Chapter 4: Working with Azure Data Lake
A data lake is a central storage system that stores data in its raw format. It is used to collect huge amounts of data that are yet to be analyzed by analysts and data scientists or for regulatory purposes. As the amount of information and the variety of data that a company operates with increases, it gets increasingly difficult to preprocess and store it in a traditional data warehouse. By design, data lakes are built to handle unstructured and semi-structured data with no pre-defined schema.
On-premise data lakes are difficult to scale and require thorough requirements and cost estimations. Cloud data lakes are often considered an easier-to-use and -scale alternative. In this chapter, we will go through a set of recipes that will help you to launch a data lake, load data from external storage, and build ETL/ELT pipelines around it.
Azure Data Lake Gen2 can store both structured and unstructured data. In this chapter, we will load and manage our datasets in Azure Data Lake Gen2. These datasets will then be used for analytics in the next chapter.
In this chapter, we are going to cover the following recipes:
- Setting up Azure Data Lake Storage Gen2
- Connecting Azure Data Lake to Azure Data Factory and loading data
- Creating big data pipelines using Azure Data Lake and Azure Data Factory
Technical requirements
You need to have access to Microsoft Azure. An Azure free account is sufficient for all recipes in this chapter. To create an account use the following link: https://azure.microsoft.com/free/.
Setting up Azure Data Lake Storage Gen2
Azure Data Lake Storage Gen2 is a versatile solution that can be used as a single storage platform.
It is Hadoop compatible, so you can use it with HDInsights and Databricks, which we will cover in the next chapter.
Setting up properly configured storage is a critical operation for developers and data engineers. In this section, we will set up and configure a scalable Azure data lake to be used with Azure Data Factory.
Getting ready
To get started with your recipe, log in to your Microsoft Azure account.
How to do it...
Azure Data Lake Gen2 uses hierarchical namespaces. Unless you already have a storage account with hierarchical namespaces, you will have to create a new one.
Now that we have set up the resource group, let's create a storage account:
- Search for Storage accounts in the Azure search bar and click on it.
- To add a new storage account, click + Add.
- Select Azure Subscription and Resource Group.
- Add a Storage account name. This needs to be globally unique. See https://docs.microsoft.com/en-us/azure/azure-resource-manager/management/resource-name-rules, and set a data center location as shown in the following screenshot. In order to minimize latency, pick a region close to the location of your servers:

Figure 4.1 – Creating a storage account
- Pick Standard or Premium performance. Use the Standard option for cheaper and slower hard drive-based storage.
- Select StorageV2 (general purpose v2) for Account kind.
Important note
Note that StorageV1 (general purpose v1) is deprecated. BlobStorage is a specialized type that stores only blobs and can also be considered outdated.
- Select Replication of Locally-redundant storage (LRS).
- Set Access tier(default) to Cool and click Next: Networking.
- Let's configure network connectivity for our new storage account. You can connect to your storage account either publicly or privately. Select Public endpoint (all networks) and Microsoft network routing (default) as shown in the following screenshot:

Figure 4.2 – Configure network connectivity
- Click Next: Data protection. On this tab, we have to set up policies for soft delete and blob versioning, which can help us recover files after overwrites and file share data. We are not going to track changes, so we will keep the default settings:

Figure 4.3 – Setting up data protection
- Let's set everything to disabled and click Next: Advanced to move to the next tab, shown in the following screenshot:
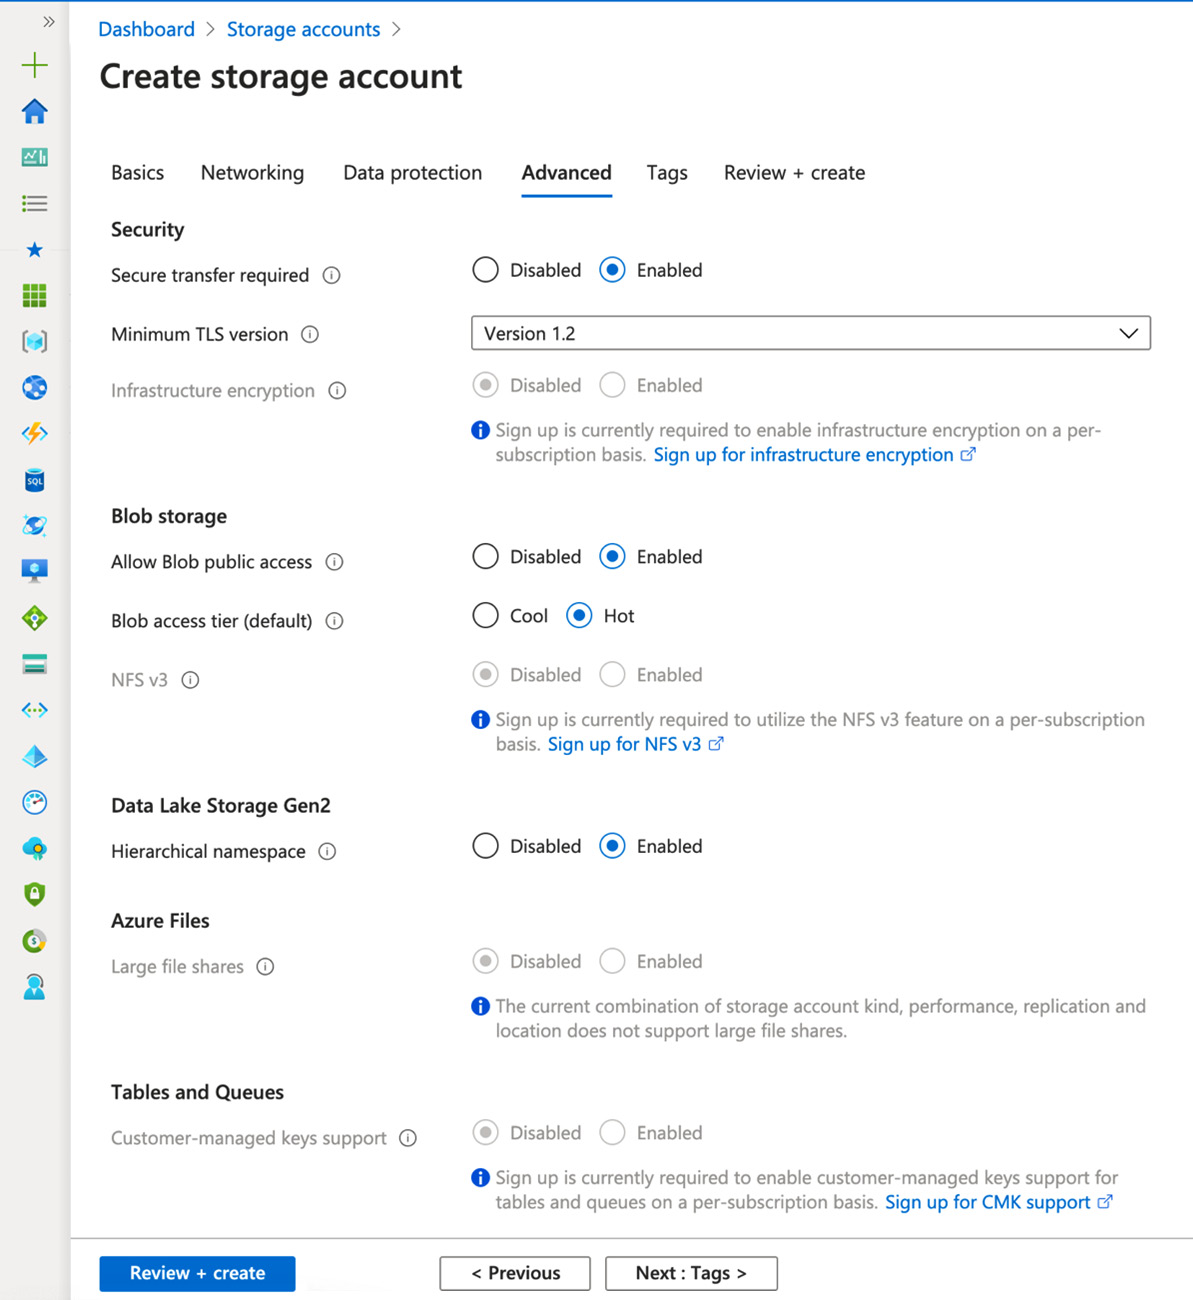
Figure 4.4 – Setting advanced features
- Set up the following parameters on the Advanced tab:
(a) Set Secure transfer required to Enabled.
(b) Set an appropriate Minimum TLS version. (The default version is fine for this recipe and most cases of production usage.)
(c) Leave Infrastructure encryption as Disabled.
(d) Set Allow Blob public access to Enabled.
(e) Set Blob access tier (default) to Hot.
(f) Leave NFS v3 as Disabled.
(g) Set Hierarchical namespace to Enabled. Please note that Hierarchical namespace is a feature of Data Lake Storage Gen2 and has to be enabled.
(h) Leave Large file shares as Disabled. If you are planning to use files bigger than 5 TiB, then you will need to reconfigure storage options.
(j) Leave Customer-managed keys support as Disabled.
- Proceed to the Tags tab. Fill tags and add appropriate tags as per your requirements.
- After checking all inputs on the Review + create tab, click Create.
- After a short wait, we will have our storage account created and ready for use with Azure Data Factory. Don't forget to delete unused storage accounts.
Connecting Azure Data Lake to Azure Data Factory and loading data
Moving data is one of the typical tasks done by data engineers. In this recipe, we will be connecting Azure Data Factory to external storage (Azure Blob Storage) and moving the Chicago Safety Data dataset to Azure Data Lake Gen2 that we set up in the previous recipe.
Getting ready
Make sure you have set up Azure Data Lake Gen2 in the Setting up Azure Data Lake Storage Gen 2 recipe.
The dataset that we are going to use in this recipe, Chicago Safety Data, is stored here: https://azure.microsoft.com/en-us/services/open-datasets/catalog/chicago-safety-data/. This dataset is published as a part of Azure Open Datasets, which is built to distribute data.
How to do it...
To transfer the dataset from Azure Blob storage to Azure Data Lake Gen2 with Data Factory, first, let's go to the Azure Data Factory UI:
- Click + and select Copy Data tool as shown in the following screenshot:
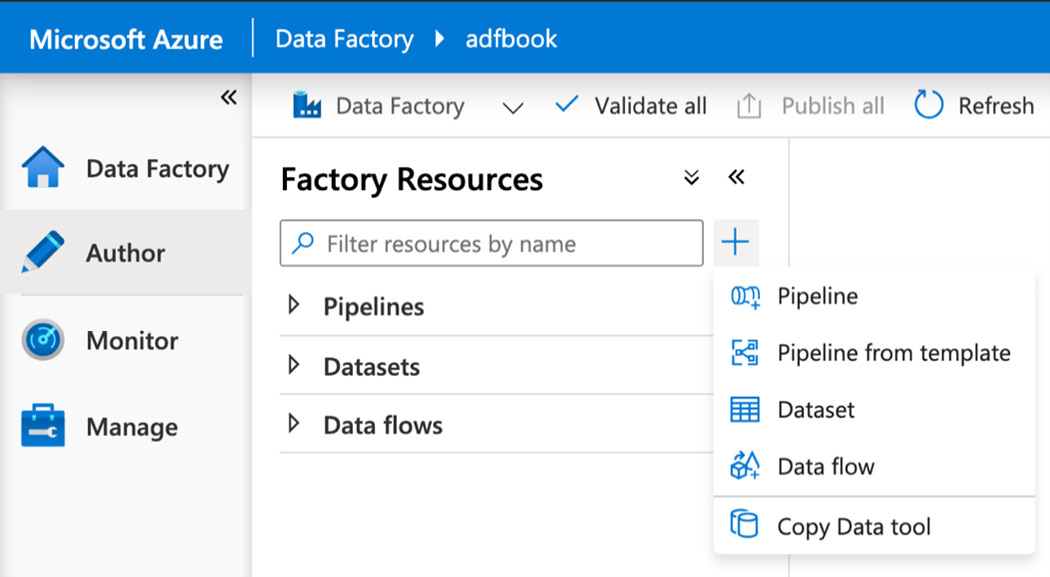
Figure 4.5 – Set up the copy data tool
Data Factory will open a wizard window that looks as follows:
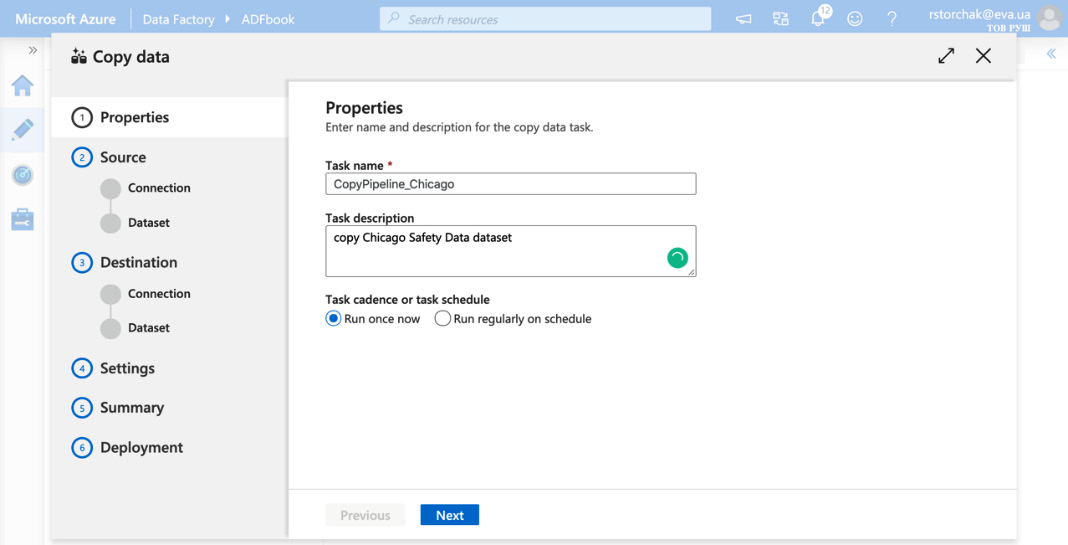
Figure 4.6 – Creating a Data Factory activity
- Fill in Task name and Task description and select the appropriate task schedule. In our case, we will download the whole dataset once.
- To connect to the Azure Blob storage where our dataset is stored, select the Azure tab, click + Create new connection and Azure Blob Storage. Click Continue.
- Create or select a linked service. You can treat a linked service as a connection string that contains addresses and credentials for external resources. (See Chapter 2, Orchestration and Control Flow.):

Figure 4.7 – Creating a linked service
- Name the new linked service and add an appropriate description.
- Select an integration runtime. In this case, the default AutoResolveIntegrationRuntime will be the right option.
- Select an SAS URI authentication method and paste in the SAS URL, https://azureopendatastorage.blob.core.windows.net/citydatacontainer/Safety/Release/city=Chicago?"", which contains the address of our dataset of interest and an empty password string.
- Test the connection by clicking Test connection. If Connection successful is displayed, click the Create button as shown in the following screenshot:

Figure 4.8 – Setting up a new linked service
- Go back to the Source data store page, select our newly created linked service, and click Next.
- Choose an input folder. In our case, it is citydatacontainer/Safety/Release/city=Chicago as shown in Figure 4.12.
- Fill in the appropriate fields according to whether you need a binary or recursive copy. We don't know the structure of the input folder, so a Recursive copy is more appropriate.
- Filter by the last modified field. In our case, we will copy the whole dataset.
- Click Next:
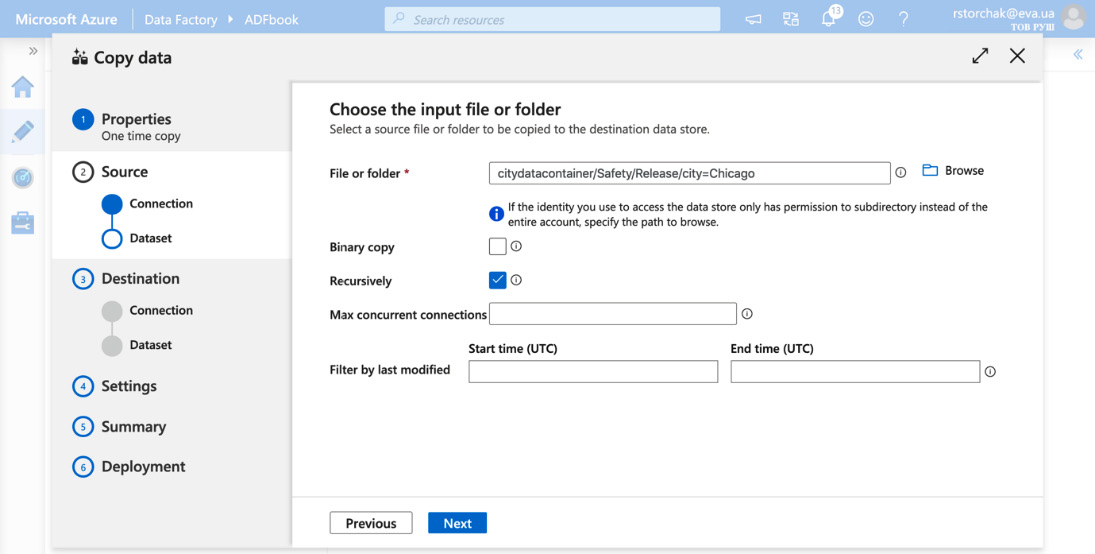
Figure 4.9 – Choosing the input folder
- Select an appropriate file format. In this case, it is Parquet format and the snappy compression type. You will see a valid Preview of the data and Schema. If the preview is unreadable or absent, pick an appropriate file format and compression type, as shown in the following figure:
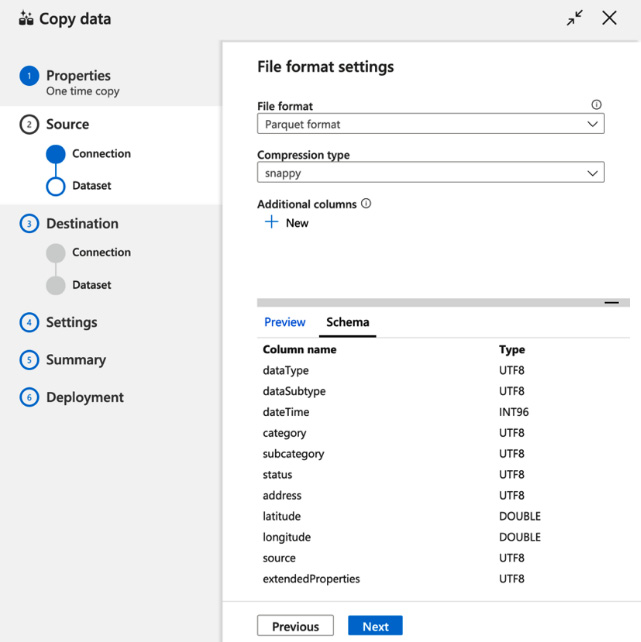
Figure 4.10 – Setting the file format
Now that we have set up the properties of the Copy data activity and Source, we have to set an output destination:
- Create or select a linked service for Azure Data Lake Storage Gen2 (Figure 4.11).
- Add a Name and Description.
- Select an integration runtime. Since we are working on a fully managed cloud solution, AutoResolveIntegrationRuntime is a good choice.
- Set Authentication method to Account key and select an Account selection method. The From Azure subscription selection should be your choice, but you can use the manual method too.
- Click Test connection and if the test is successful, click Apply:
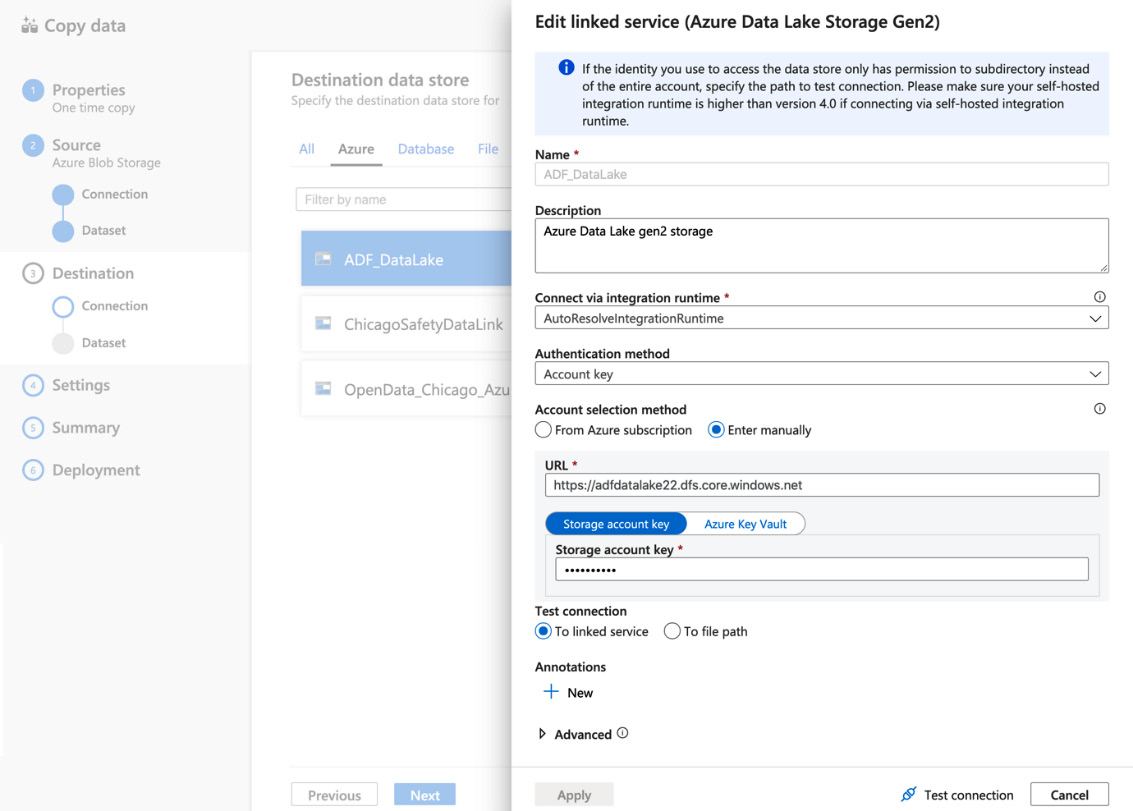
Figure 4.11 – Creating a linked service
- Choose the output folder as shown in the following figure:

Figure 4.12 – Setting up a destination
Important note
You can't create a new folder from Azure Data Factory. If you want to create a new folder, you can create it from the Azure Data Lake UI.
- In this recipe, we can leave Block size (MB) and Max concurrent connections as the default.
- Click Next.
- Set File format and Compression type. We are copying this dataset, so let's leave the same format as the original dataset, as shown in the following screenshot:

Figure 4.13 – Setting the file format and compression type
- Let's check the final settings. Set Fault tolerance to Skip incompatible rows. Add a Folder path for logging and enable or disable staging. For this recipe, staging should be disabled, as shown in the following screenshot:
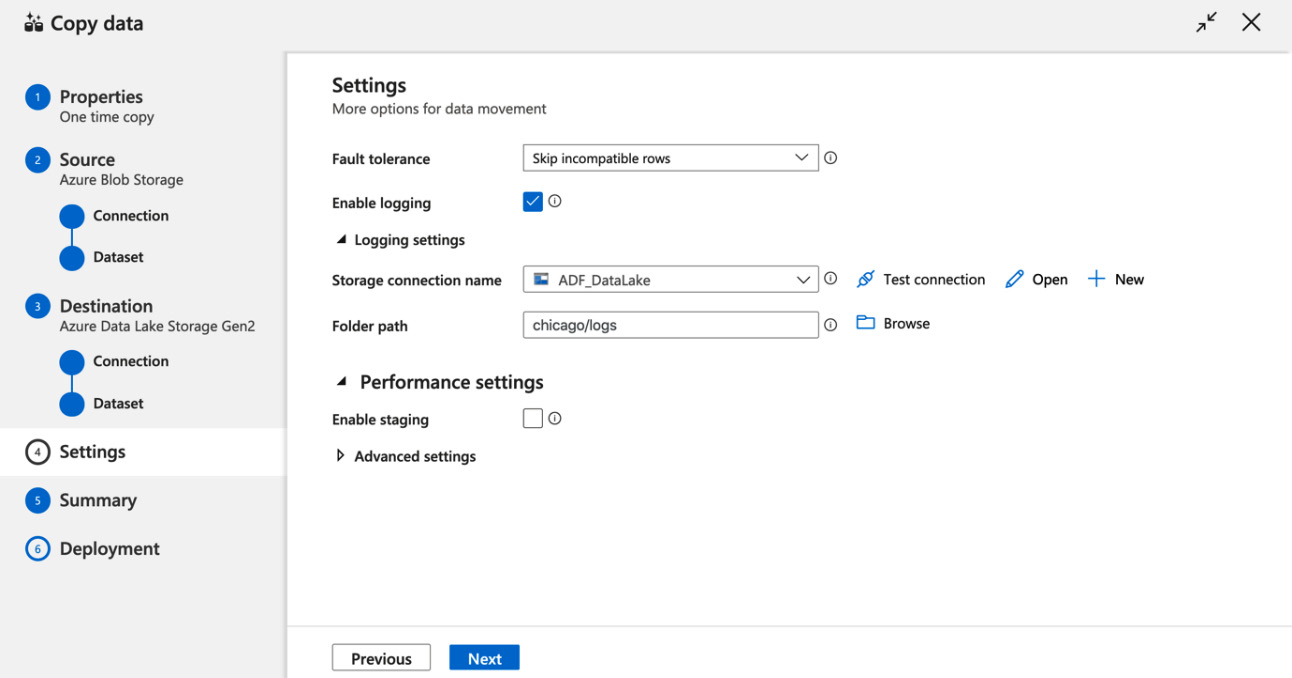
Figure 4.14 – Setting the properties of the Copy data activity
- As a final step, check all the settings in Summary and click Next if everything seems right:
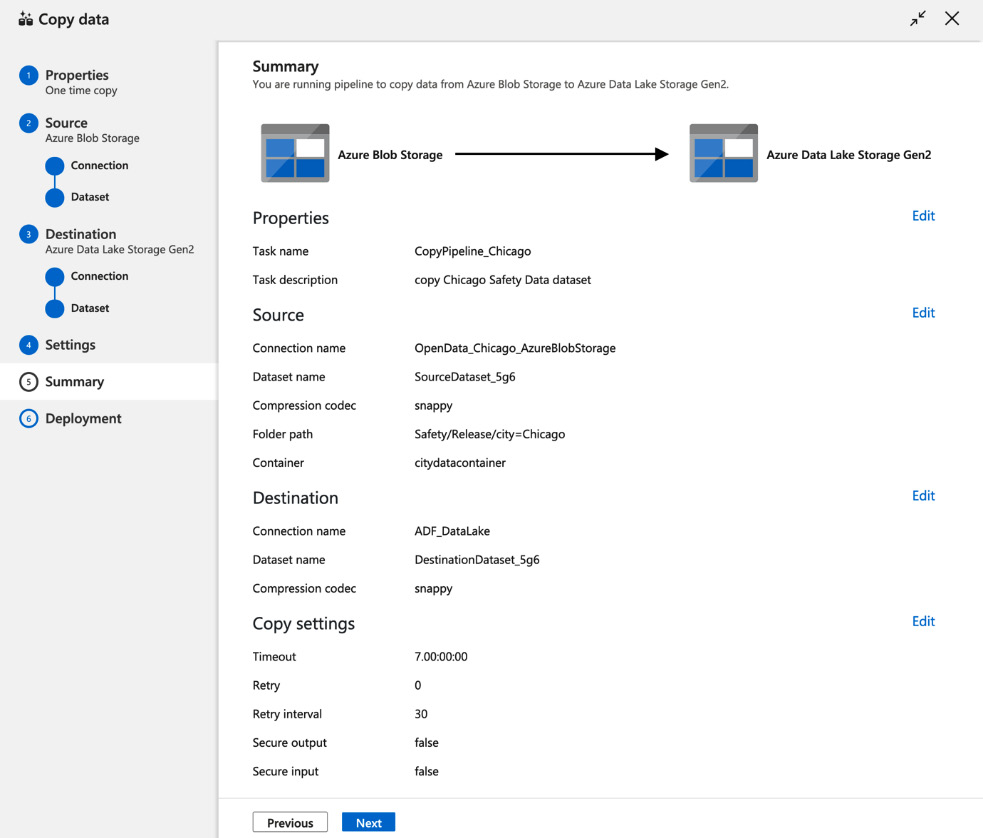
Figure 4.15 – Verifying the copy activity
The pipeline will be deployed immediately. After a short delay, you will see a Deployment complete message as shown in the following screenshot:

Figure 4.16 – Successful deployment
Congratulations, we have copied our dataset to Azure Data Lake.
How it works...
An Azure Data Factory instance was created to execute and orchestrate ETL/ELT activities. Copying data is one of the most frequent activities that Azure Data Factory executes. In order to get access to the data, Azure Data Factory needs linked services, which govern the connections to various services.
A linked service to Azure Blob storage allows us to connect to the Azure Open Datasets service, which stores the dataset. Another linked service (to Azure Data Lake Gen2) is used to write the dataset of interest in our data lake.
While setting up this activity, we have to specify the parameters of the source and destination, and a copy activity itself.
Creating big data pipelines using Azure Data Lake and Azure Data Factory
Running big data pipelines is an essential feature of Azure Data Factory. They allow you to ingest and preprocess data at any scale. You can program and test any ELT/ETL processes out of the web UI. This is one of the core tasks of the data engineer in your company.
Getting ready
Let's load and preprocess the MovieLens dataset (F. Maxwell Harper and Joseph A. Konstan. 2015. The MovieLens Datasets: History and Context. ACM Transactions on Interactive Intelligent Systems (TiiS) 5, 4: 19:1–19:19. https://doi.org/10.1145/2827872). It contains ratings and free-text tagging activity from a movie recommendation service.
The MovieLens dataset exists in a few sizes, which have the same structure. The smallest one has 100,000 ratings, 600 users, and 9,000 movies. The biggest one can be as big as 1.2 billion reviews, 2.2 million users, and 855,000 items.
MovieLens is distributed as a set of .csv files. Go to https://grouplens.org/datasets/movielens/ and download a dataset that seems to be appropriate for your practice and Azure budget.
Make sure you have set up Azure Data Lake Gen2. You can use the Setting up Azure Data Lake Storage Gen 2 recipe:
- Log in to your Azure Data Lake Storage account and create a new container and name it movielens as shown in the following screenshot:

Figure 4.17 – Uploading the dataset
- Upload files to the movielens container via the Azure Data Lake UI. See the following screenshot:

Figure 4.18 – Verifying the dataset
How to do it...
To create your first Data Factory pipeline, go to the Data Factory UI and create a dataset:
- Select Azure Data Lake Storage Gen2 and click Next.
- Set the Format type of the data to DelimitedText(csv).
- Enter the dataset name and select a linked service. Use the linked service that we created in the second recipe of this chapter.
- Set up the proper file path and check First row as a header.
- Lucky us – row and column delimiters, encoding, the escape character, quote character, and so on are set up correctly even by default. If you need to change them, you can click on the dataset name in Datasets and modify parameters on the Connections tab:
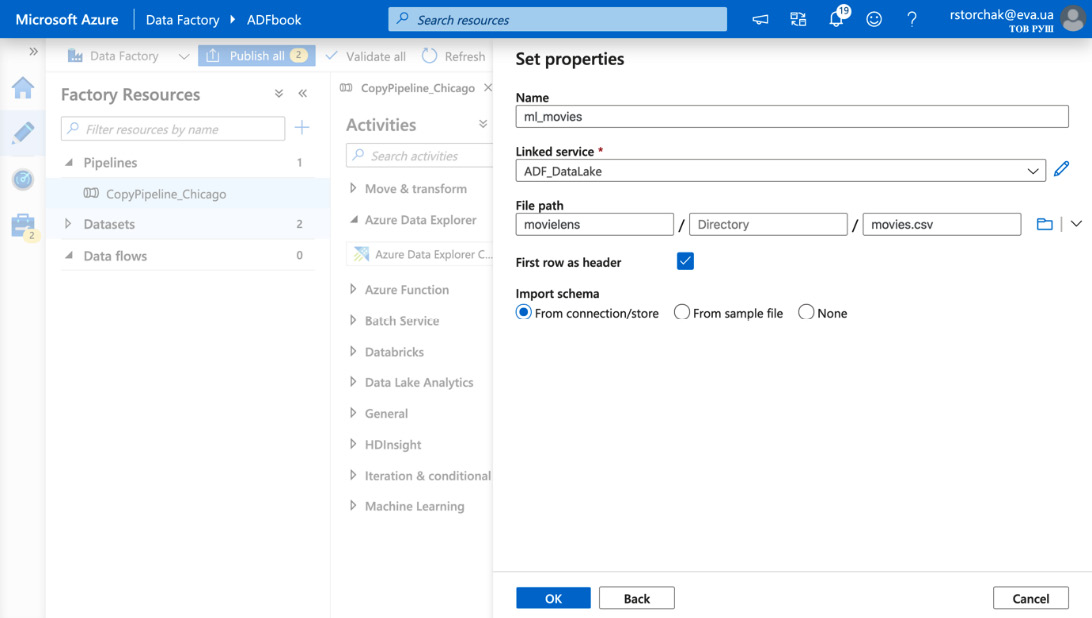
Figure 4.19 – Connecting datasets
- Repeat Step 3 for each file, and click Publish All.
Now we have all the datasets required to process Movie Rankings data. Let's build a 'data flow' that preprocesses data from the MovieLens dataset:
- Click + and Pipeline.
- Go to Move & Transform and drag Data Flow into your workspace.
- Select Create new data flow and click on Data Flow and OK.
- Name your data flow. In the production environment, write a description of your data flow.
- Click Add Source, which you can find in the top-left corner of your workspace.
- Fill in Output stream name and Source type. Select a dataset from the drop-down menu or add a new one. In our case, we have already prepared our datasets. So, select the ml_ratings dataset, as shown in the following figure:

Figure 4.20 – Creating a data flow
- Classical ETL/ELT patterns often fail when the schema of input data changes. Azure Data Factory can handle schema drift. So, your process can handle changes in upstream data source changes.
- Set up Infer drifted column types and Validate schema according to the expectations of the behavior of your ETL/ELT procedure.
- When working with massive datasets, enable Sampling and select an appropriate Rows limit. Usually, it falls between 100 and 1,000 rows. For this recipe, let's enable Sampling.
- If your dataset consists of multiple files, fill in the Source options tab. In this case, we don't need to fill in anything.
- Keep in mind that the contents of Data preview and Projection have to be fetched from the dataset. Hence, you have to launch Data flow debug. Select AutoResolveIntegrationRuntime. Be aware that starting Data flow debug requires some time to start a compute instance or cluster and start billing (Figure 4.24).
- Go to the Projection tab and check if the column names and data types are correct. If not, fix it by clicking Import projection or do it manually. Please note that Azure Data Factory does not automatically parse timestamps in UNIX or POSIX time format. So, we should set Type to integer and we will fix it during preprocessing:

Figure 4.21 – Setting up the projection of the source
- Go to the Optimize tab. Setting the Optimal partition option is critical for performance. If the whole dataset fits one worker, use Single partition. You can use custom partitioning logic by selecting Set Partitioning.
- Check the column types on the Inspect tab and check data on the Data preview tab.
- Repeat steps 11-20 for the ml_movies dataset. Make sure that the movieId column has the same type as the movieId column from the mlratings dataset.
- Let's transform a timestamp column from the mlratings output stream. Click + and select Derived Column as shown in the following figure:
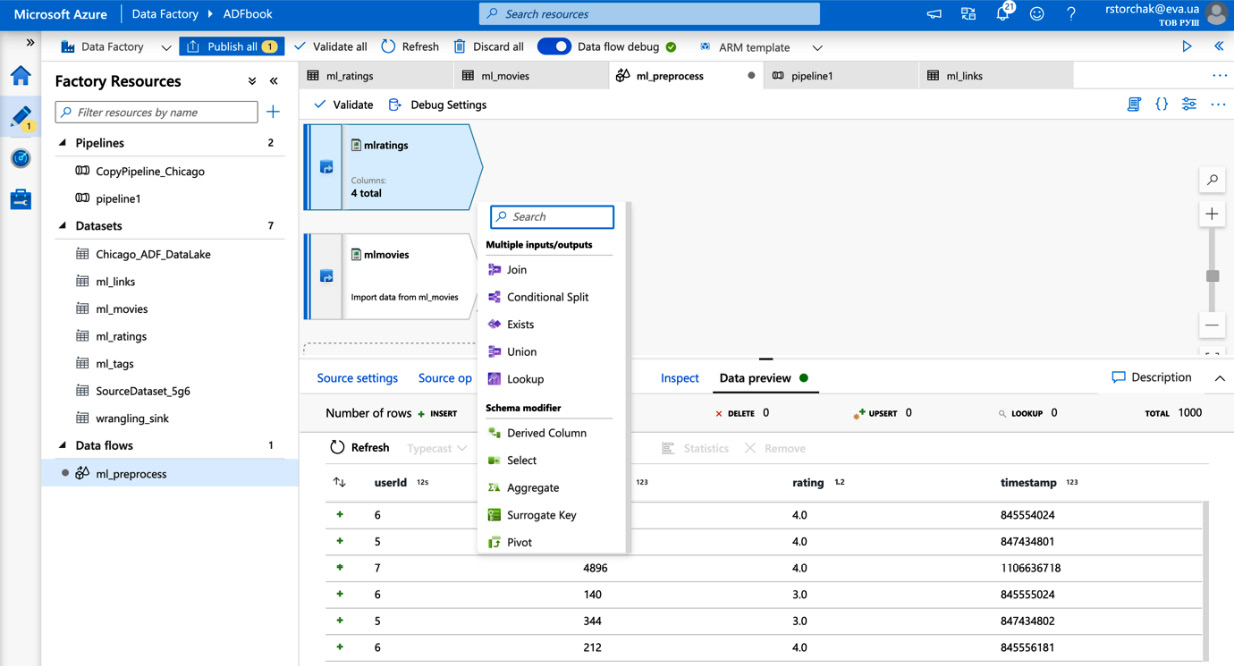
Figure 4.22 – Adding derived columns
- Fill in the derived column's name. We will name it Date. Check if the incoming stream is right, and add transformation logic in Columns. In this case, we have to add toDate(seconds(timestamp), 'yyyy-MM-dd') in a pop-up window.
- Store the dataset by selecting Sink for the next step.
- Let's add the average ranking and count of rankings to each movie in the mlmovies stream.
(a) First, we have to group ml_ratings by movieID and add aggregation logic: Count() and mean(raring), shown in the following figure:

Figure 4.23 – Aggergating data
(b) Then join the ratingstats output stream with mlmovies. Click + and Join. Select Left stream and Right Stream, then Join type. Select columns and join logic in Join conditions. During this exercise, we will use Left outer join and the movieId column (Figure 4.23).
(c) Go to the Optimize tab and set the Broadcast option to Auto and Partition option. As usual, select a single partition if your dataset is small. Otherwise, choose another option. You can check for the details here: https://docs.microsoft.com/azure/data-factory/concepts-data-flow-performance.
(d) Inspect the column names and check out Data preview.
(e) We can drop redundant columns by clicking Remove and Confirm on the Data preview tab. It will automatically generate the next step and the appropriate output stream.
(f) Add the appropriate name of the step. You can modify the column mapping manually.
(g) Add the sink dataset, where we will store our preprocessed data. Please note that a dataset can be created in Azure Data Factory.
(h) If you need to store your dataset in a separate folder, you have to go to the Azure Data Lake admin page and create it. Then, specify the desired path for the sink dataset:

Figure 4.24 – Joins in the data flow
- To save your data flow, click Publish all.
- Close your Data flow tab and switch to the pipeline that we created in Step 1 of this recipe.
- Rename your mapping data flow. The default properties on the General tab are fine for our task, as shown in the following figure:
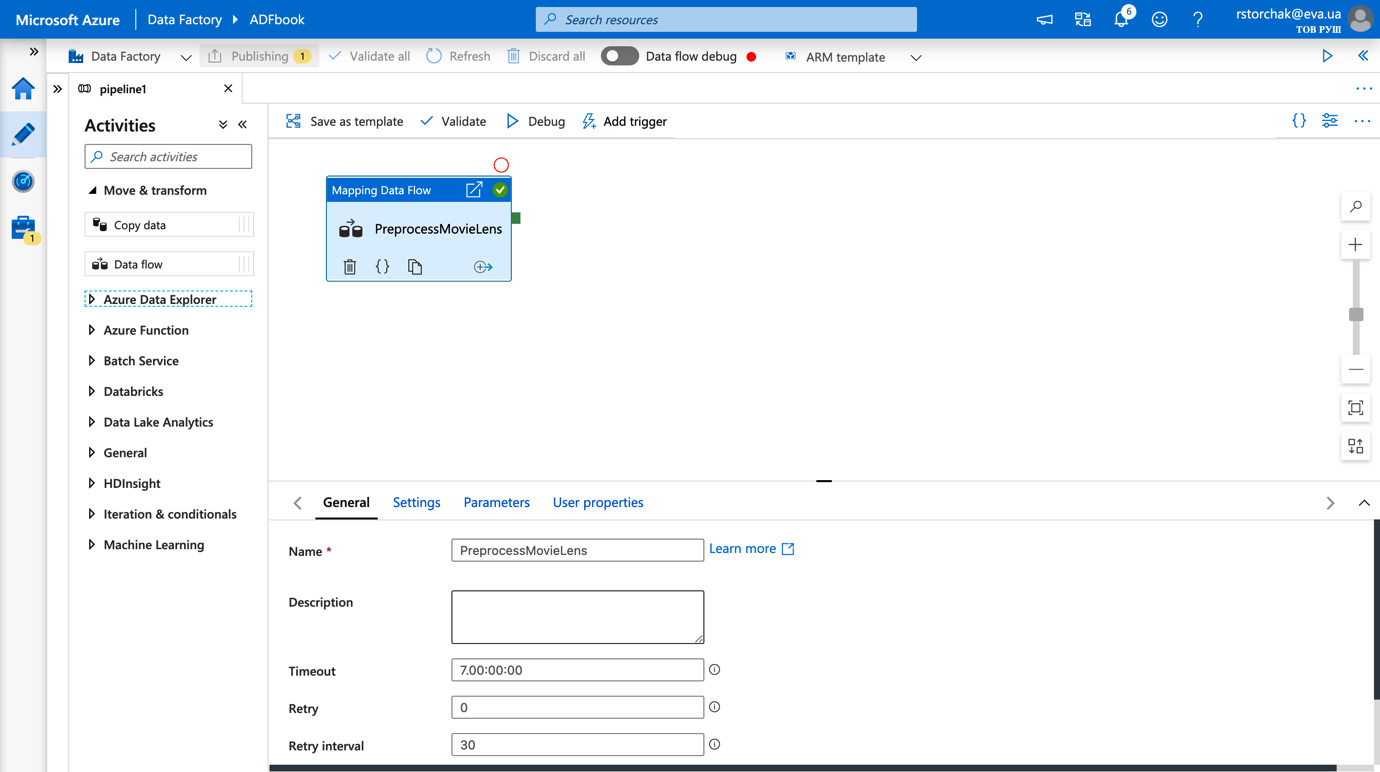
Figure 4.25 – Cleaning up your data flow
- Go to the Settings tab. Check the Data flow name and integration runtime and select properties of the instances that will execute your data flow. Compute type and Core count have to be selected based on your dataset size and preprocessing in the pipeline, as shown in the following figure:
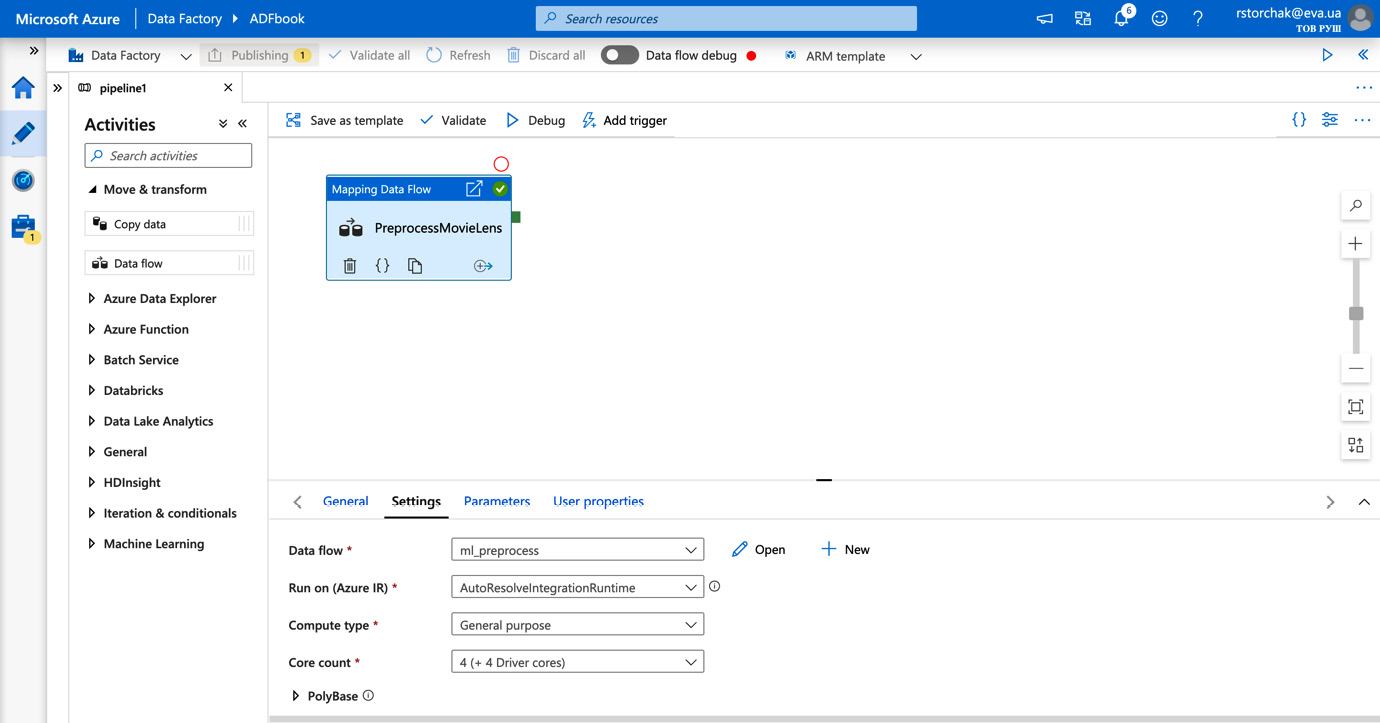
Figure 4.26 – Setting up data flow properties
- Click Debug to run a pipeline.
- In a few minutes, you can check the outcome of the pipeline execution. Please note that we have used sampling in the Add source steps for mlmovies and mlratings:
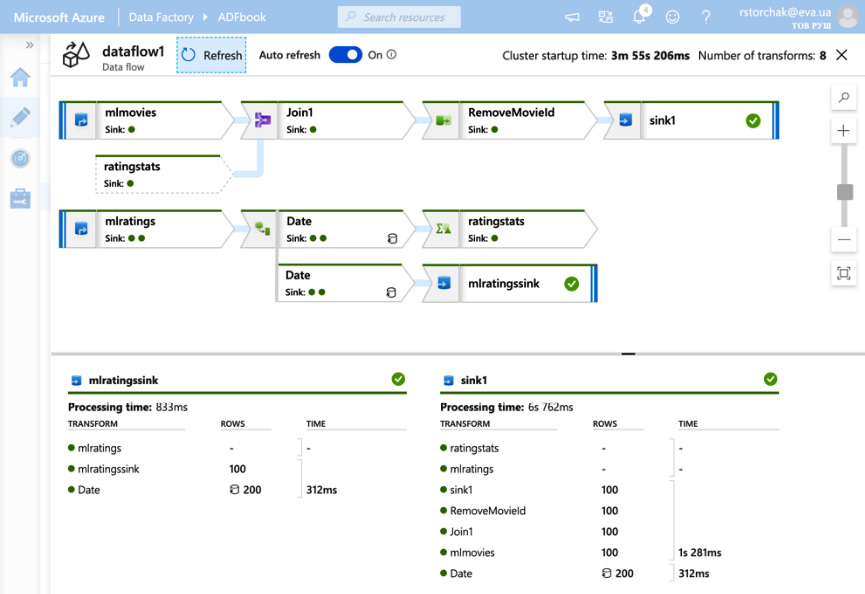
Figure 4.27 – Data flow debug
- Remove sampling in each source and rerun the data flow.
Congratulations, you have built and debugged a code-free big data pipeline that processes the MovieLens dataset.
How it works
Data flows are one of the core features of Azure Data Factory. You can ingest data, process it, and sink it to a predefined location.
Specifically, a data flow connects to one or more source datasets using linked services. Then, data is put through processing, which you coded via the Azure Data Factory web GUI. Processing is scalable and is implemented with Spark. Consequently, you can work with billions of records in your data flows without noticing.
Processed data can be stored in one of a few storage options available for Azure Data Factory.