A major responsibility of the data engineer is the development and management of extract, transform, and load (ETL) and other data integration workloads. Real-time integration workloads process data as it is generated – for example, a transaction being recorded at a point-of-sale terminal or a sensor measuring the temperature in a data center. In contrast, batch integration workloads run at intervals, usually processing data produced since the previous batch run.
Azure Data Factory (ADF) is Microsoft’s cloud-native service for managing batch data integration workloads. ADF is an example of a serverless cloud service – you use it to create your own ETL applications, but you don’t have to worry about infrastructure like operating systems or servers or how to manage changes in demand. Access to the service is achieved by means of a data factory instance (often simply called “a data factory”). The majority of this book is concerned with the authoring and management of ADF pipelines – data integration workload units written and executed in an ADF instance.
In order to create pipelines, you need first to have access to an ADF instance. In this chapter, you will create a new ADF instance, ready to start building pipelines in Chapter 2. To get started, you will need nothing more than an Internet connection and either the Microsoft Edge or Google Chrome web browser.
You may be using variations on ETL like extract, load, and transform (ELT) or extract, load, transform, and load (ELTL). ADF can be used in any of these data integration scenarios, and I use the term ETL loosely to include any of them.
Get Started in Azure
To access cloud services in Microsoft Azure, you need an Azure subscription. My goal is to get you up and running at zero cost – in the following sections, I step through the creation of a free Azure trial subscription that you will be able to use throughout this book, then introduce the Azure portal to interact with it.
Create a Free Azure Account
- 1.
In your web browser, go to https://azure.microsoft.com and sign in. If you don’t already have a Microsoft online account, you will need first to create one. The Azure Data Factory User Experience (introduced later in the chapter) is only supported in Microsoft Edge or Google Chrome, so you will need to use one of those two web browsers.
- 2.
Click the Free account link in the top right, and on the following page, click Start free.
- 3.
Follow the four-step process to set up your account. During the account setup, you will be required to provide billing information, but your credit card will not be charged unless you upgrade to a paying subscription.
After successful account creation, a Go to the portal button is displayed – click it. If you don’t see the button, you can browse to the portal directly using its URL: https://portal.azure.com.
Explore the Azure Portal
- 1.
If you are using a capped subscription, a notification about your remaining credit pops up briefly when you first open the portal. The remaining credit is displayed in your account’s local currency. The free credit included with your Azure trial subscription is time-limited to 30 days.
- 2.
On the home page, you will find a Create a resource button (plus icon). This option is also available from the portal menu, accessed using the button in the top left.
- 3.
In the top right, the email address you used to sign in is displayed.
- 4.
Immediately below your email address is your current directory. If you are using a free trial subscription, this will say DEFAULT DIRECTORY.

Azure portal home page
Your directory, commonly called a tenant, is an instance of Azure Active Directory (AAD). “Default Directory” is the default name of a new tenant. If you are already using Azure in your job, you will probably be using a tenant that represents your company or organization – often, all of an organization’s Azure resources and users are defined in the one same tenant.
A tenant contains one or more subscriptions. A subscription identifies a means of payment for Azure services – the cost of using any Azure resource is billed to the subscription with which it is associated. An Azure trial subscription includes an amount of time-limited free credit, and if you want to spend more, you can do so by upgrading to a paying subscription. Your organization might have multiple subscriptions, perhaps identifying separate budget holders responsible for paying for different resources.
An Azure tenant
Your Azure user account, with administrator-level AAD permissions inside the tenant
An Azure subscription in the tenant with some time-limited free credit for you to use
Create a Resource Group
Instances of Azure services are referred to generally as resources. An instance of Azure Data Factory is an example of a resource. Resources belonging to a subscription are organized further into resource groups. A resource group is a logical container used to collect together related resources – for example, all the resources that belong to a data warehousing or analytics platform.
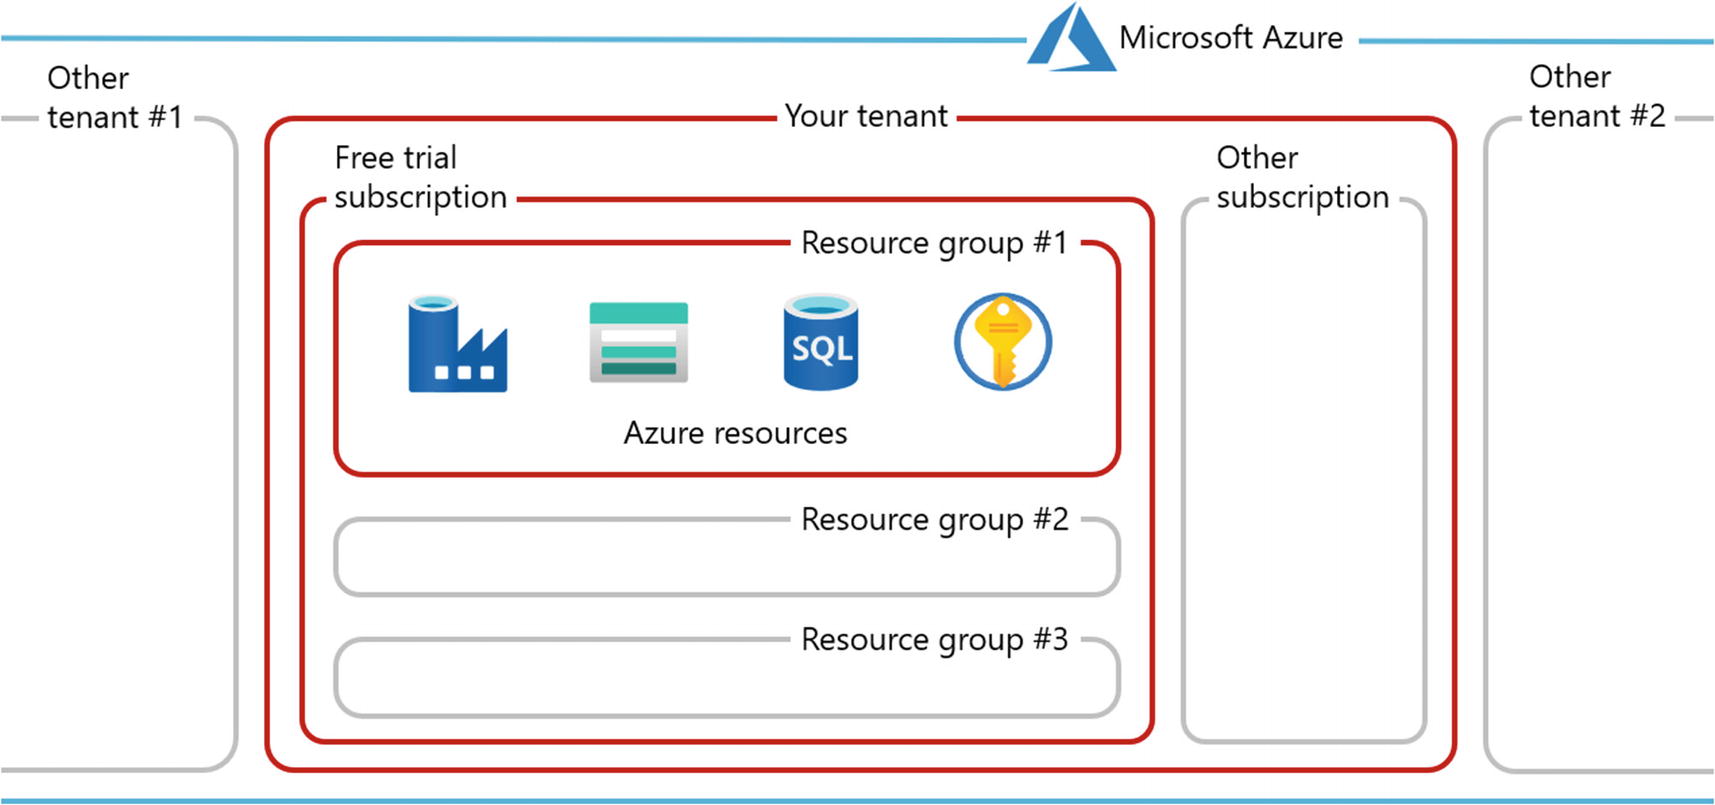
Logical resource grouping in Azure
- 1.
Click Create a resource, using either the button on the portal home page or the menu button in the top left.
- 2.
Pages in the Azure portal are referred to as blades – the new resource blade is shown in Figure 1-3. You can browse available services using the Azure Marketplace or Popular menus, or you can use the Search the Marketplace function. In the search box, start typing “resource group” (without the quotes). As you type, a filtered dropdown menu will appear. When you see the “Resource group” menu item, click it. This takes you to the resource group overview blade.

New resource blade
- 3.
The resource group overview blade provides a description of resource groups and a Create button. Click the button to start creating a new resource group.
- 4.Complete the fields on the Create a resource group blade, shown in Figure 1-4. Ensure that your trial subscription is selected in the Subscription field, and provide a name for the new resource group. I use resource group names ending in “-rg” to make it easy to see what kind of Azure resource this is. Choose a Region geographically close to you – mine is “(Europe) UK South,” but yours may differ. When you are ready, click Review + create.
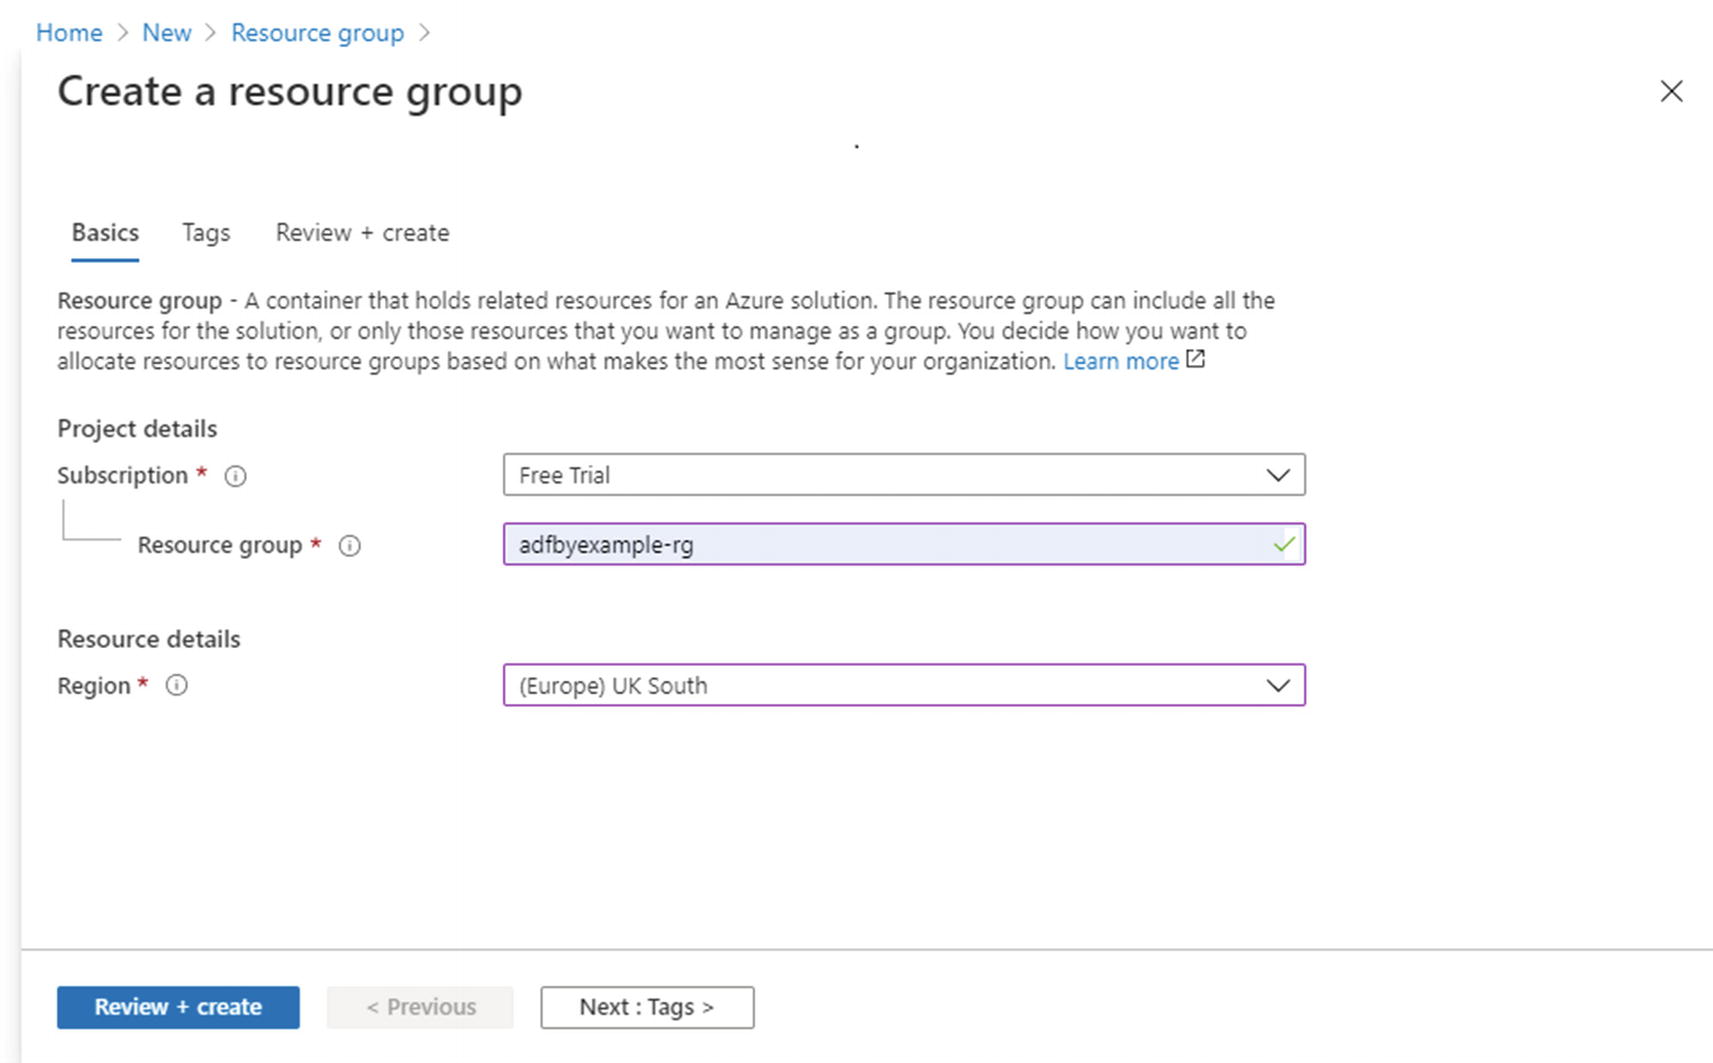 Figure 1-4
Create a resource group blade
- 5.
On the Review + create tab which follows, check the details you have entered, then click Create.
You will notice that I have skipped the Tags tab. In an enterprise environment, tags are useful for labeling resources in different ways – for example, allocating resources to cost centers within a subscription or flagging development-only resources to enable them to be stopped automatically overnight and at weekends. I won’t be using tags in this book, but your company may use a resource tagging policy to meet requirements like these.
Create an Azure Data Factory
- 1.
Go back to the Azure portal home page and click Create a resource, in the same way you did when creating your resource group.
- 2.
In the Search the Marketplace box on the new resource blade, enter “data factory”. When “Data Factory” appears as an item in the dropdown menu, select it, then on the data factory overview blade, click Create.
- 3.
The Basics tab of the Create Data Factory blade is displayed, as shown in Figure 1-5. Select the Subscription and Resource group you created earlier, then choose the Region that is geographically closest to you.
- 4.
Choose a Name for your ADF instance. Data factory names can only contain alphanumeric characters and hyphens and must be globally unique – your choice of name will not be available if someone else is already using it. I use data factory names ending in “-adf” to make it easy to see what kind of Azure resource this is.
- 5.Set Version to “V2.” (This book is concerned exclusively with Azure Data Factory V2 – ADF V1 remains available solely to support legacy implementations).
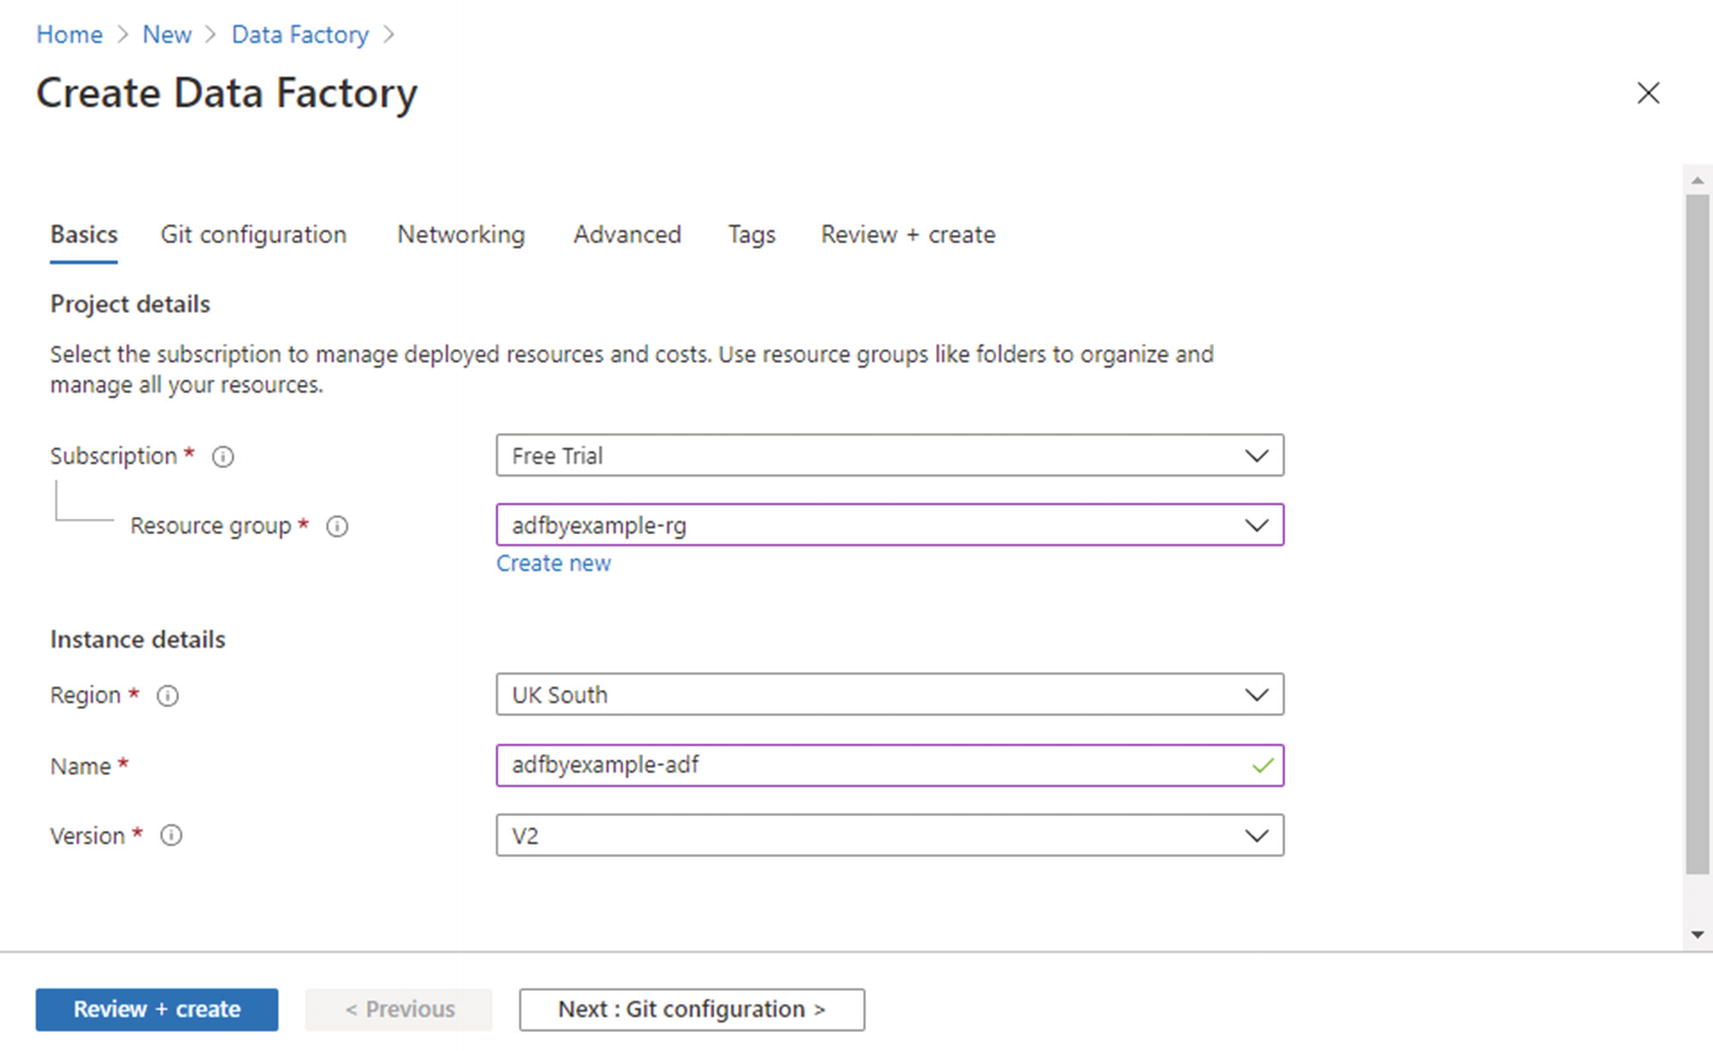 Figure 1-5
Create Data Factory blade
- 6.
Click the Next: Git configuration button, then on the Git configuration tab, tick the Configure Git later checkbox.
- 7.
Finally, click Review + create, check the factory settings you provided in steps 3 to 6, then click Create to start deployment. (I am purposely bypassing the three remaining tabs – Networking, Advanced, and Tags – and accepting their default values.)
When deployment starts, a new blade containing the message Deployment is in progress is displayed. The creation of a new ADF instance usually takes no more than 30 seconds, after which the message Your deployment is complete will be displayed. Click Go to resource to inspect your new data factory.
The portal blade displayed when you click Go to resource provides an overview of your data factory instance. It contains access controls and other standard Azure resource tools, along with monitoring information and basic details about the factory – for example, its subscription, resource group, and location. The portal does not provide tools for working inside ADF.
Beneath the factory’s basic details, you will find two tiles: Documentation and Author & Monitor. Click the Author & Monitor tile to launch the Azure Data Factory User Experience. This is where you will spend most of your time when working with ADF.
Explore the Azure Data Factory User Experience
The Azure Data Factory User Experience (ADF UX) provides a code-free integrated development environment (IDE) for authoring ADF pipelines, publishing them, then scheduling and monitoring their execution. You’ll use the ADF UX frequently, so it’s a good idea to bookmark this page.

ADF UX Data Factory overview page
A navigation header bar
An expandable navigation sidebar
A content pane, currently displaying the Data Factory overview.
The navigation header bar and sidebar are visible at all times, wherever you are in the ADF UX. The content pane displays different things, depending on which part of the UX you are using.
Navigation Header Bar
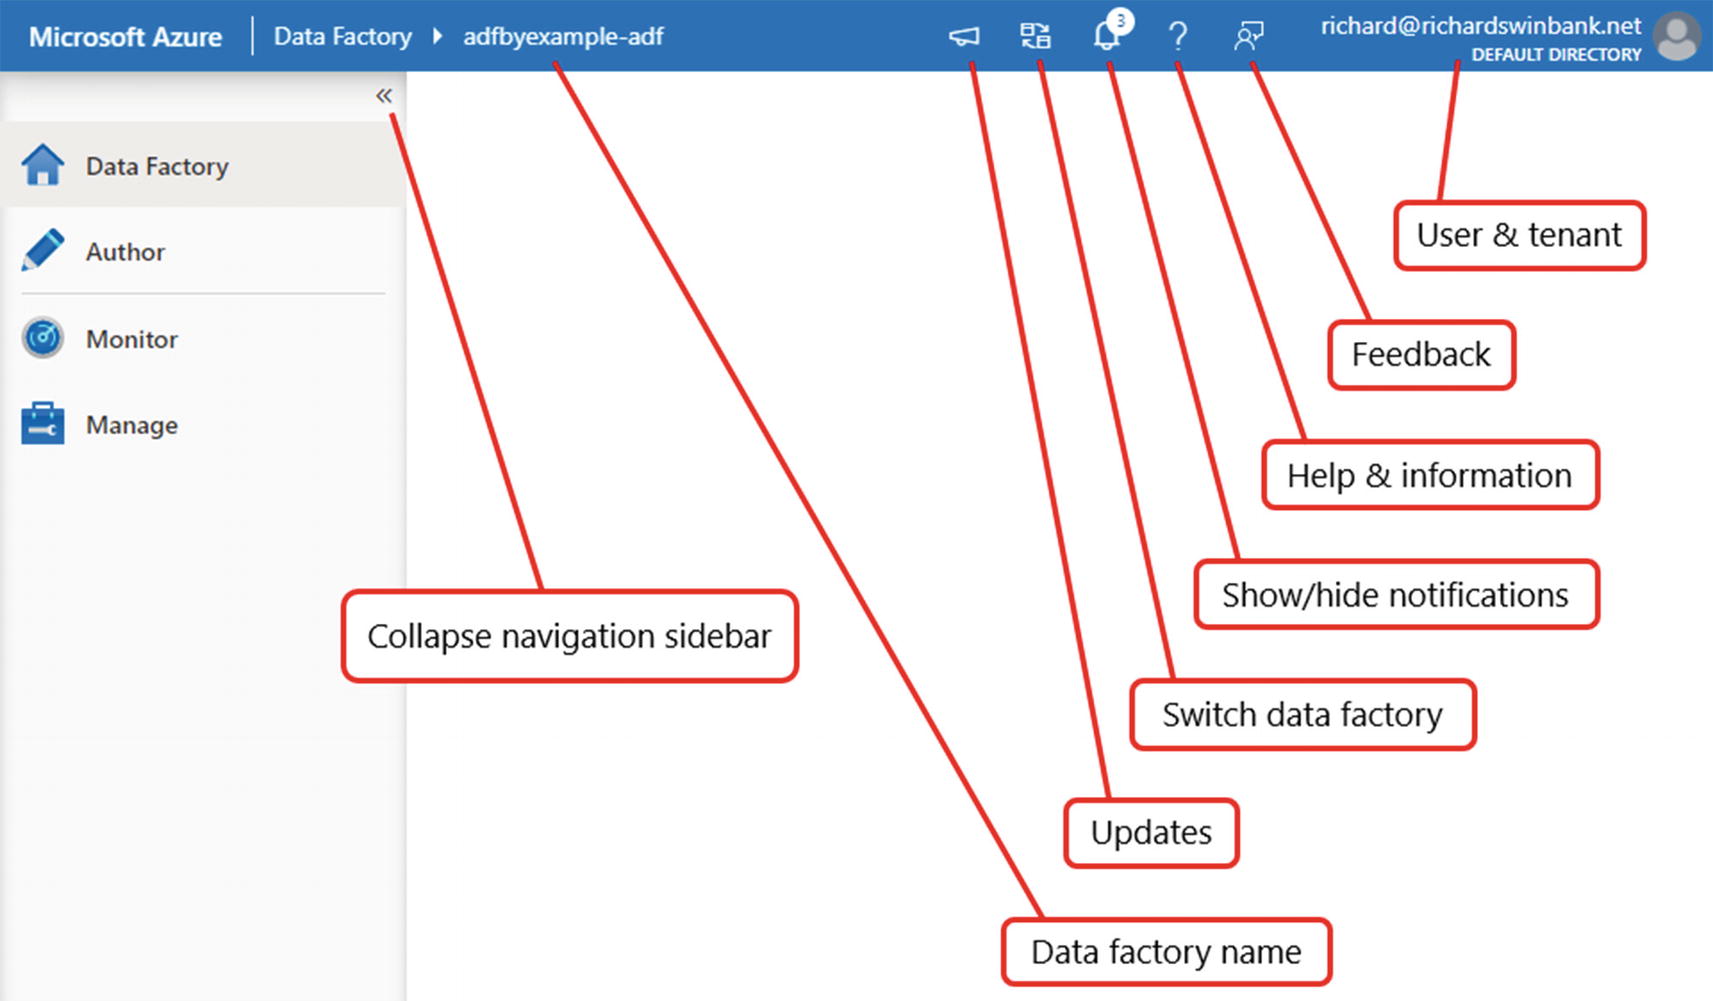
Labeled ADF UX navigation header bar
Updates: Displays recent updates to the Azure Data Factory service. ADF is in constant development and evolution – announcements about changes to the service are made here as they happen.
Switch Data Factory: Enables you to disconnect from the current ADF instance and connect to a different one.
When you opened the ADF UX from the Azure portal data factory blade, it connected automatically to the new factory. In fact, the ADF UX is always connected to an ADF instance. If you access it directly (using the URL https://adf.azure.com/), you are required to select a data factory before the ADF UX opens.
Show notifications: The ADF UX automatically notifies you of events that occur during your session – this button toggles display of those notifications. The circled “3” in the screenshot indicates that there are currently three unread notifications.
Help/information: Provides links to additional ADF support and information.
Feedback: If you wish to provide Microsoft with feedback about your experience of Azure Data Factory, you can do so here.
Navigation Sidebar
The Data Factory overview button (home icon) returns you to the overview page. This page contains quick links to a number of tools to support common ADF tasks, along with links to videos, tutorials, and other learning resources. You will use one of the tools here in Chapter 2.
The Author button (pencil icon) loads the ADF authoring workspace. The authoring workspace provides a visual editor for building ADF pipelines. As this book is primarily about authoring pipelines, you will be spending a lot of time here.
The Monitor button (gauge icon) provides access to visual monitoring tools. Here, you are able to see ADF pipeline runs executed in the factory instance and to drill down into execution details. Chapter 12 looks at the monitoring experience in more detail.
The Manage button (toolbox icon) loads the ADF management hub. This includes a variety of features such as connections to external data storage and compute resources, along with the ADF instance’s Git configuration, introduced in the next section. You will return to the management hub at various times throughout this book.
Link to a Git Repository
A data factory instance can be brought under source control by linking it to a cloud-based Git repository. While it is possible to undertake development work in ADF without linking your data factory to a Git repository, there are many disadvantages of doing so – without a linked repository, even saving work in progress is difficult. Before beginning work in your new ADF instance, you will link it to a Git repository.
It is easier to configure a data factory’s Git repository from the ADF UX than from the Azure portal – this is why you chose the Configure Git later option when you created your data factory.
Create a Git Repository in Azure Repos
- 1.
Browse to https://microsoft.com/devops and sign in, using the same account you used to create your Azure tenant. Click Start free.
- 2.The Get started with Azure DevOps page is displayed, as shown in Figure 1-8. Near the top of the dialog is displayed the email address you signed in with and a Switch directory link (indicated in the figure). This indicates the Azure directory (tenant) your new Azure DevOps organization will be connected to. Use the Switch directory link to verify that the selected tenant is the one containing your data factory, then click Continue.
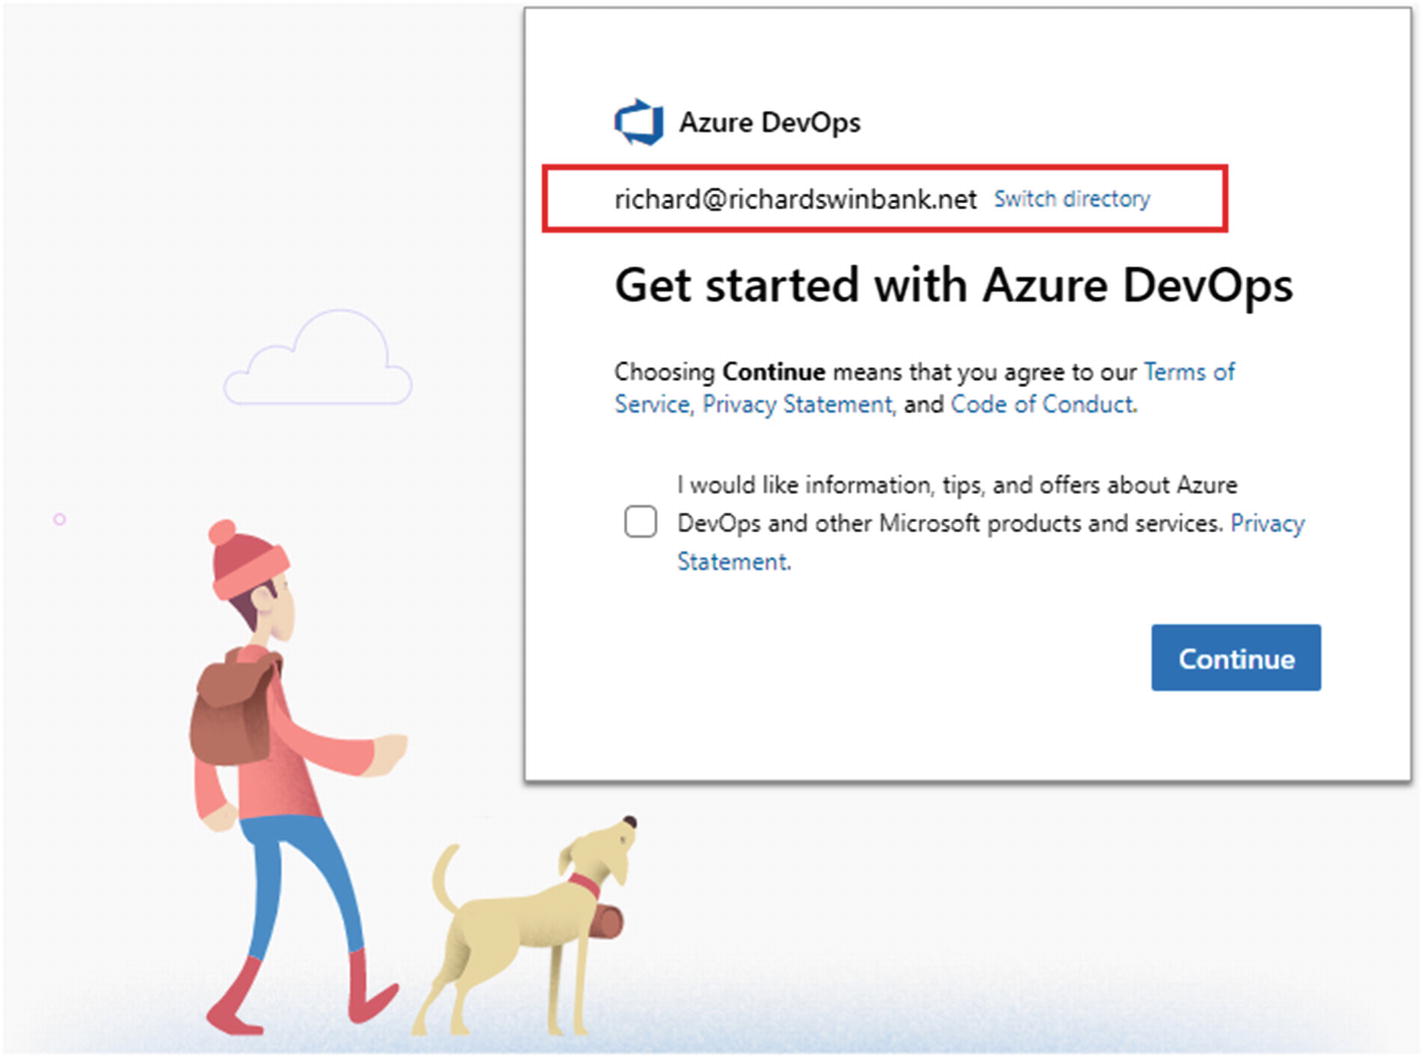 Figure 1-8
Get started dialog indicating the Azure tenant to be linked
Tip Creating your ADF instance and Git repository in the same tenant is not essential, but doing so simplifies integration between them.
- 3.
Azure DevOps creates a new organization for you – if prompted, supply a name for it – and then displays the Create a project to get started pane. Choose a name for your project and enter it into the Project name field. Set the project’s Visibility to “Private,” then click + Create project.
- 4.The new project’s welcome page is displayed, as shown in Figure 1-9. Choose to start with the Azure Repos service, either by clicking the welcome page’s Repos button or by selecting Repos (red button with branch icon) from the navigation sidebar.
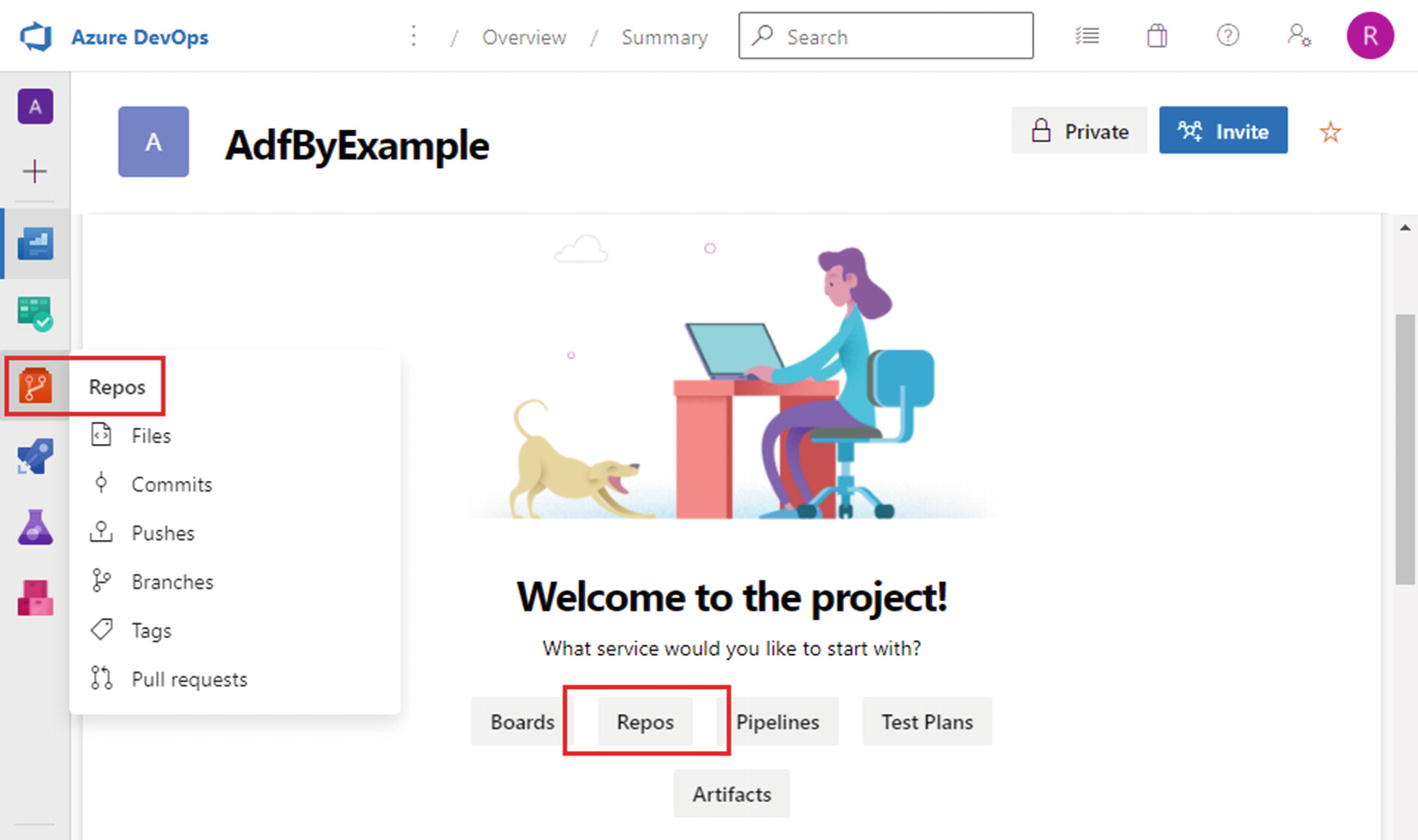 Figure 1-9
Azure DevOps project welcome page
- 5.
Because no repositories exist yet, Azure DevOps prompts that your project is empty. Scroll down to the heading Initialize main branch with a README or gitignore, then click Initialize to create a new repository with the same name as your project.
You can choose to link a data factory to a Git repository provided either by Azure Repos or by GitHub. I have chosen an Azure Repos repository because doing so makes integration with other Microsoft services slightly simpler and because you will be using another service provided by Azure DevOps later in the book.
Link the Data Factory to the Git Repository
- 1.
Return to the ADF UX and open the management hub by clicking Manage (toolbox icon) in the navigation sidebar.
- 2.
In the Source control section of the management hub menu, click Git configuration.
- 3.
The content pane indicates that no repository is configured, as shown in Figure 1-10. Click the central Configure button to connect the factory instance to your Git repository.
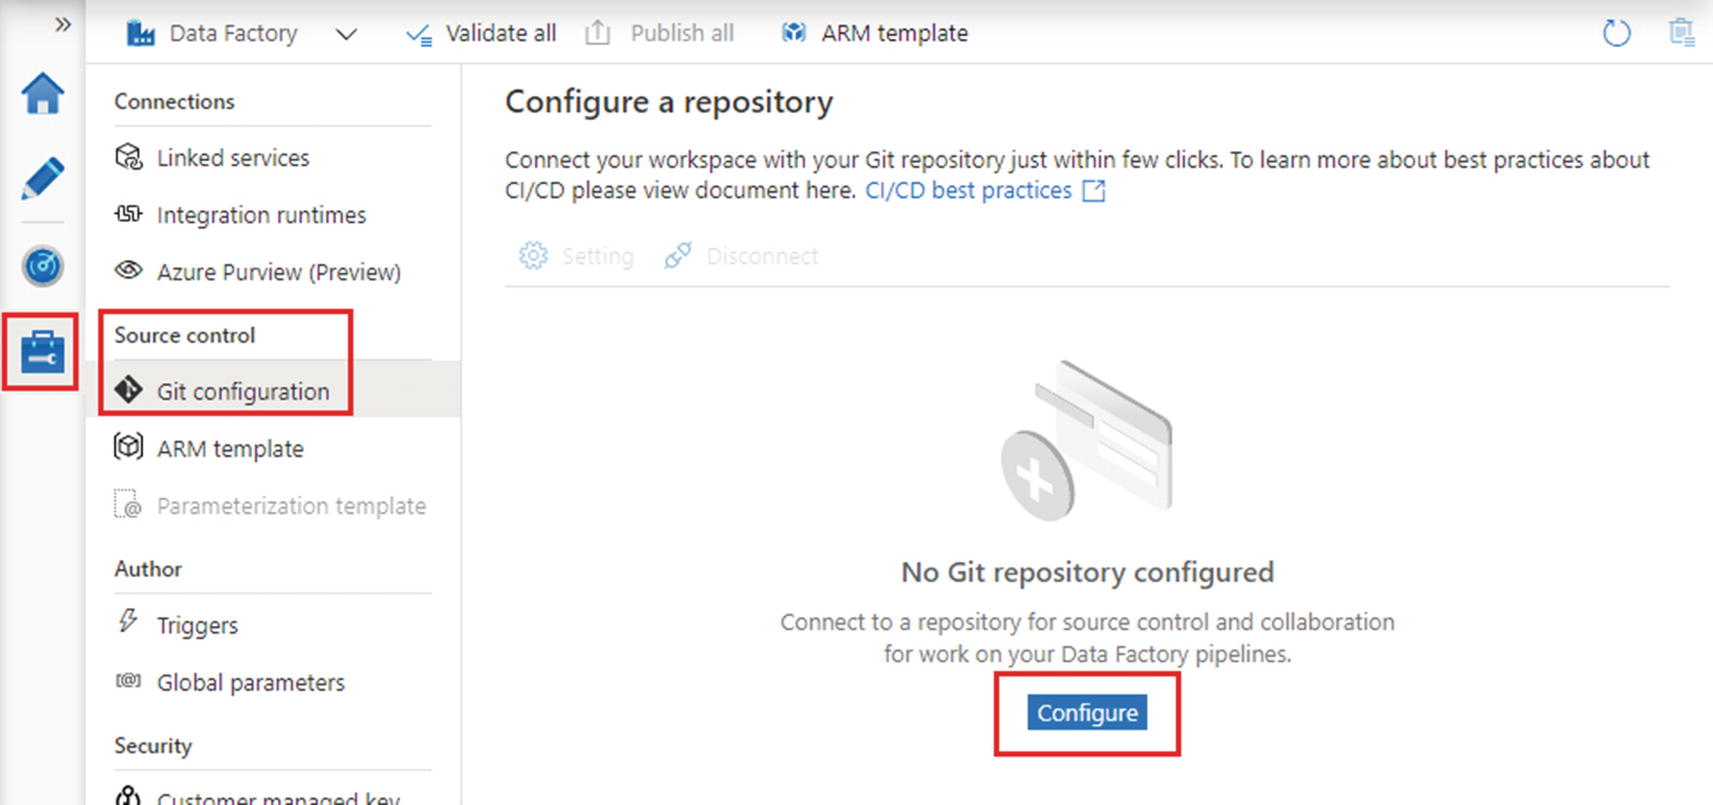
Configure a Git repository in the ADF UX management hub
- 4.
The Configure a repository blade opens. Choose “Azure DevOps Git” from the Repository type dropdown. As you do so, more dropdown lists appear – select your Azure tenant from the Azure Active Directory list, then choose the Azure DevOps organization you created in the previous section from the Azure DevOps Account dropdown.
- 5.
As more options appear, select the Azure DevOps project you created in the previous section from the Project name dropdown, then under Repository name, select “Use existing.” Choose your newly created repository from the dropdown list.
- 6.
Set the factory’s Collaboration branch to “main” and accept the default value of “adf_publish” for Publish branch. Set the value of Root folder to “/data-factory-resources”. It is good practice to store your factory resources in a repository subfolder (rather than in the repository’s own root), because it enables you to segregate files managed by ADF from any other files stored in the same Git repository.
- 7.
The correctly completed form, including default values for the remaining settings, is shown in Figure 1-11. Click Apply to link the data factory to the Git repository.

Linking an Azure DevOps Git repository to a data factory
When an ADF instance is linked to a Git repository, the “Data Factory” logo and label in the top left of the ADF UX (visible in Figure 1-11) are replaced by the logo of the selected Git repository service. Immediately to its right, the name of your working branch is displayed, defaulting to the repository’s collaboration branch.
The ADF UX as a Web-Based IDE
If you have experience with almost any other kind of development work, then the relationship between a data factory instance, Git, and the ADF UX may seem strange. In a “traditional” development model, you might use a locally installed tool like Visual Studio to author developments on your own computer. Visual Studio enables you to debug your work using the local compute power of your own machine and stores Git repository settings locally to support source control.

High-level components in a “traditional” development model
This arrangement of components will be familiar to users of SQL Server Integration Services (SSIS). Typically, SSIS packages are authored in Visual Studio SSIS projects and committed to source control using an installed plugin. When ready, SSIS projects are published to an SSIS catalog, where reporting tools provided by SQL Server Management Studio (SSMS) enable you to monitor package behavior and performance.
When developing for Azure Data Factory, a significant difference is that its IDE – the ADF UX – is web-based. This means that the development environment has no local compute of its own. To be able to debug pipelines, the ADF UX must be attached to cloud-based compute, which is why the ADF UX is always connected to a data factory instance. The ADF UX also has no storage of its own – all of its configuration information comes from the connected data factory – so the connected instance is the only place available to store Git repository settings. Although it is the data factory instance that is linked to a Git repository, the underlying objective is actually to link the ADF UX development environment to source control via the connected factory instance.
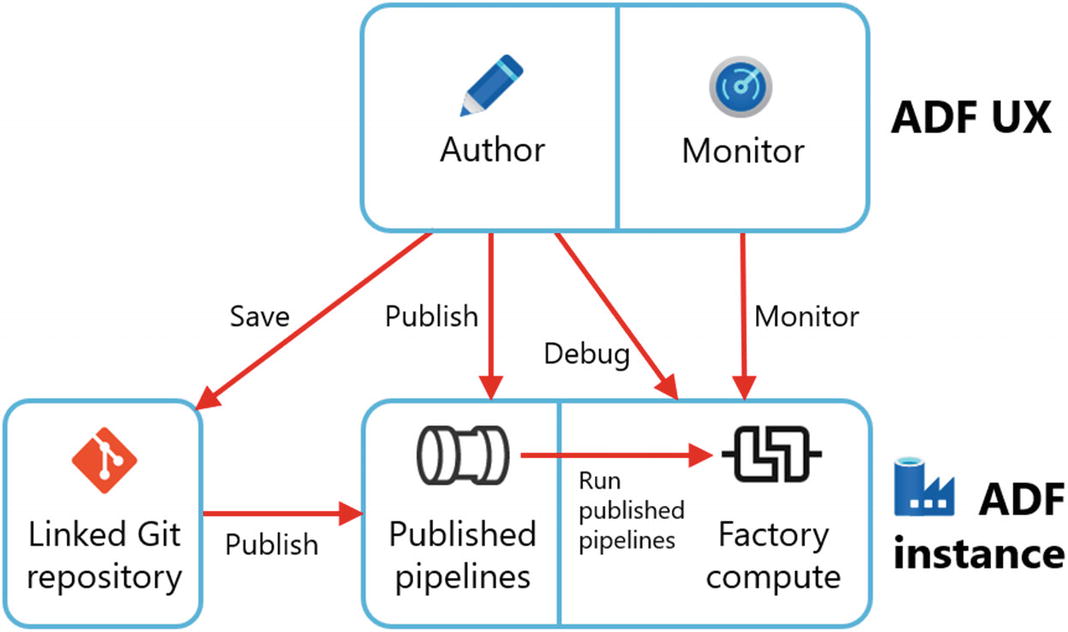
High-level components in the ADF development model
Chapter Review
In this chapter, you created an Azure subscription and a resource group inside it. You then created a Git-enabled instance of Azure Data Factory, using a repository hosted by Azure DevOps Repos. In the next chapter, you will start to use your new data factory by creating your first ADF pipeline.
Key Concepts
Azure tenant: A tenant (or directory) is an instance of Azure Active Directory (AAD). It identifies Azure users and enables them to gain access to Azure services.
Resource: An instance of an Azure service, enabling the service to be accessed by a tenant’s users.
Subscription: Specifies a means of payment for Azure services. A tenant may contain one or more subscriptions. Every Azure resource is associated with a subscription to which consumption charges can be billed.
Resource group: A logical subgrouping of Azure resources inside a subscription.
Azure portal: Browser-based console for creating, monitoring, and managing Azure resources.
Blade: Pages in the web-based Azure portal are referred to as blades.
Software as a service (SaaS): Delivery model in which end-user applications are delivered as cloud services. Microsoft Office 365 applications are examples of SaaS services.
Platform as a service (PaaS): Delivery model in which application services and developer tools are delivered as cloud services. Database management systems which do not require you to manage the underlying server infrastructure – for example, Azure SQL Database – are examples of PaaS services.
Serverless service: Like PaaS, serverless cloud services provide applications typically not used directly except by IT specialists, but with additional automated management features – for example, the ability to auto-scale in response to changes in demand. Azure Data Factory is an example of a serverless service.
Infrastructure as a service (IaaS): Cloud service delivery model in which computing infrastructure components – for example, virtual servers and networks – are provided without requiring you to manage the physical hardware involved. Virtual machines give you the freedom to choose your own operating system and application software, but at the cost of managing installation and updates yourself.
Azure Data Factory (ADF): Microsoft’s cloud-native, serverless service for managing batch ETL and other data integration workloads.
Data factory instance: An instance of the Azure Data Factory service, often referred to simply as “a data factory.” An ADF instance is an example of an Azure resource.
ADF V2: Version 2 of the ADF service is the latest and preferred choice for Azure Data Factory instances. ADF Version 1 only remains available to support legacy implementations.
Integrated development environment (IDE): Application used for software development that includes supporting features such as editing, debugging, and breakpoint capabilities. Visual Studio is an example of an IDE that can be used with many Microsoft technologies.
Azure Data Factory User Experience (ADF UX): Code-free IDE enabling visual authoring, debugging, and publishing of ADF pipelines. Additionally, the ADF UX includes tools for scheduling published pipelines and monitoring their execution.
Authoring workspace: Visual editor in the ADF UX where you create, modify, and debug ADF pipelines. Use the Author button (pencil icon) in the navigation sidebar to access the workspace.
Monitoring experience: ADF UX feature allowing you to inspect pipeline execution history. Use the Monitor button (gauge icon) in the navigation sidebar to access this tool.
Management hub: Area of the ADF UX used to manage various factory features. In this chapter, you used the management hub to edit the ADF instance’s Git configuration, and you will return to it in later chapters. Use the Manage button (toolbox icon) in the navigation sidebar to open the management hub.
Git-enabled: An ADF instance linked to a Git repository is said to be “Git-enabled.” Linking a data factory to a Git repository allows you to commit development work from the ADF UX into source control.
Collaboration branch: Git branch, usually the repository’s default branch, where changes intended for publishing to ADF are made.
Publish branch: Reserved branch used by ADF to support pipeline publishing processes. Publishing to ADF is the subject of Chapter 10.
Root folder: Path in a Git repository where a linked ADF instance saves its files. Choosing an ADF root folder below the level of the repository root is good practice, because it enables other data platform resources to be managed in the same Git repository.
Published environment: Refers to the environment into which ADF pipelines are published after development; the environment in which real data integration work is done.
Debugging environment: Refers to the use of factory resources by the ADF UX to run pipelines in development for debugging purposes.
For SSIS Developers
The authoring workspace provides a visual IDE for pipeline development, equivalent to using Visual Studio to develop an SSIS project.
The monitoring experience enables you to inspect the outcome of published ADF pipelines, in a similar way to using SSIS catalog reports in SSMS to view package execution history.
Using the ADF UX is like editing an SSIS project paired permanently with a single Integration Services server. Connecting the ADF UX to a data factory is necessary because the web-based ADF UX has no compute power or storage of its own.