ETL workloads are implemented in Azure Data Factory in units called pipelines. Using the data factory instance you created in Chapter 1, in this chapter, you will create a pipeline using the Copy Data tool – a pipeline creation wizard that steps through creating the various components that make up a pipeline. Afterward, you’ll be able to examine the pipeline in detail to gain an understanding of how it is constructed.
The Copy Data tool guides you through building pipelines with the purpose of copying data from one place to another. Before you can do that, you need some data to copy. In the first section of this chapter, you will create an Azure Storage account and upload some sample data to work with.
Work with Azure Storage
Azure Storage is Microsoft’s managed cloud storage platform. Data stored using Azure Storage services is encrypted, replicated, and can be accessed securely from anywhere in the world. The scalability of the service’s capacity and speed makes it a good choice for many data storage and processing scenarios.
Create an Azure Storage Account
- 1.
In the Azure portal, create a new resource of type Storage account. You will notice that the Search the Marketplace dropdown is limited to five entries – many Azure service names contain the word “storage,” so you may have to enter more text before you see the storage account option.
- 2.Complete the Basics tab of the Create a storage account form (Figure 2-1). Under Project details, select the Subscription and Resource group you used to create your data factory in Chapter 1.
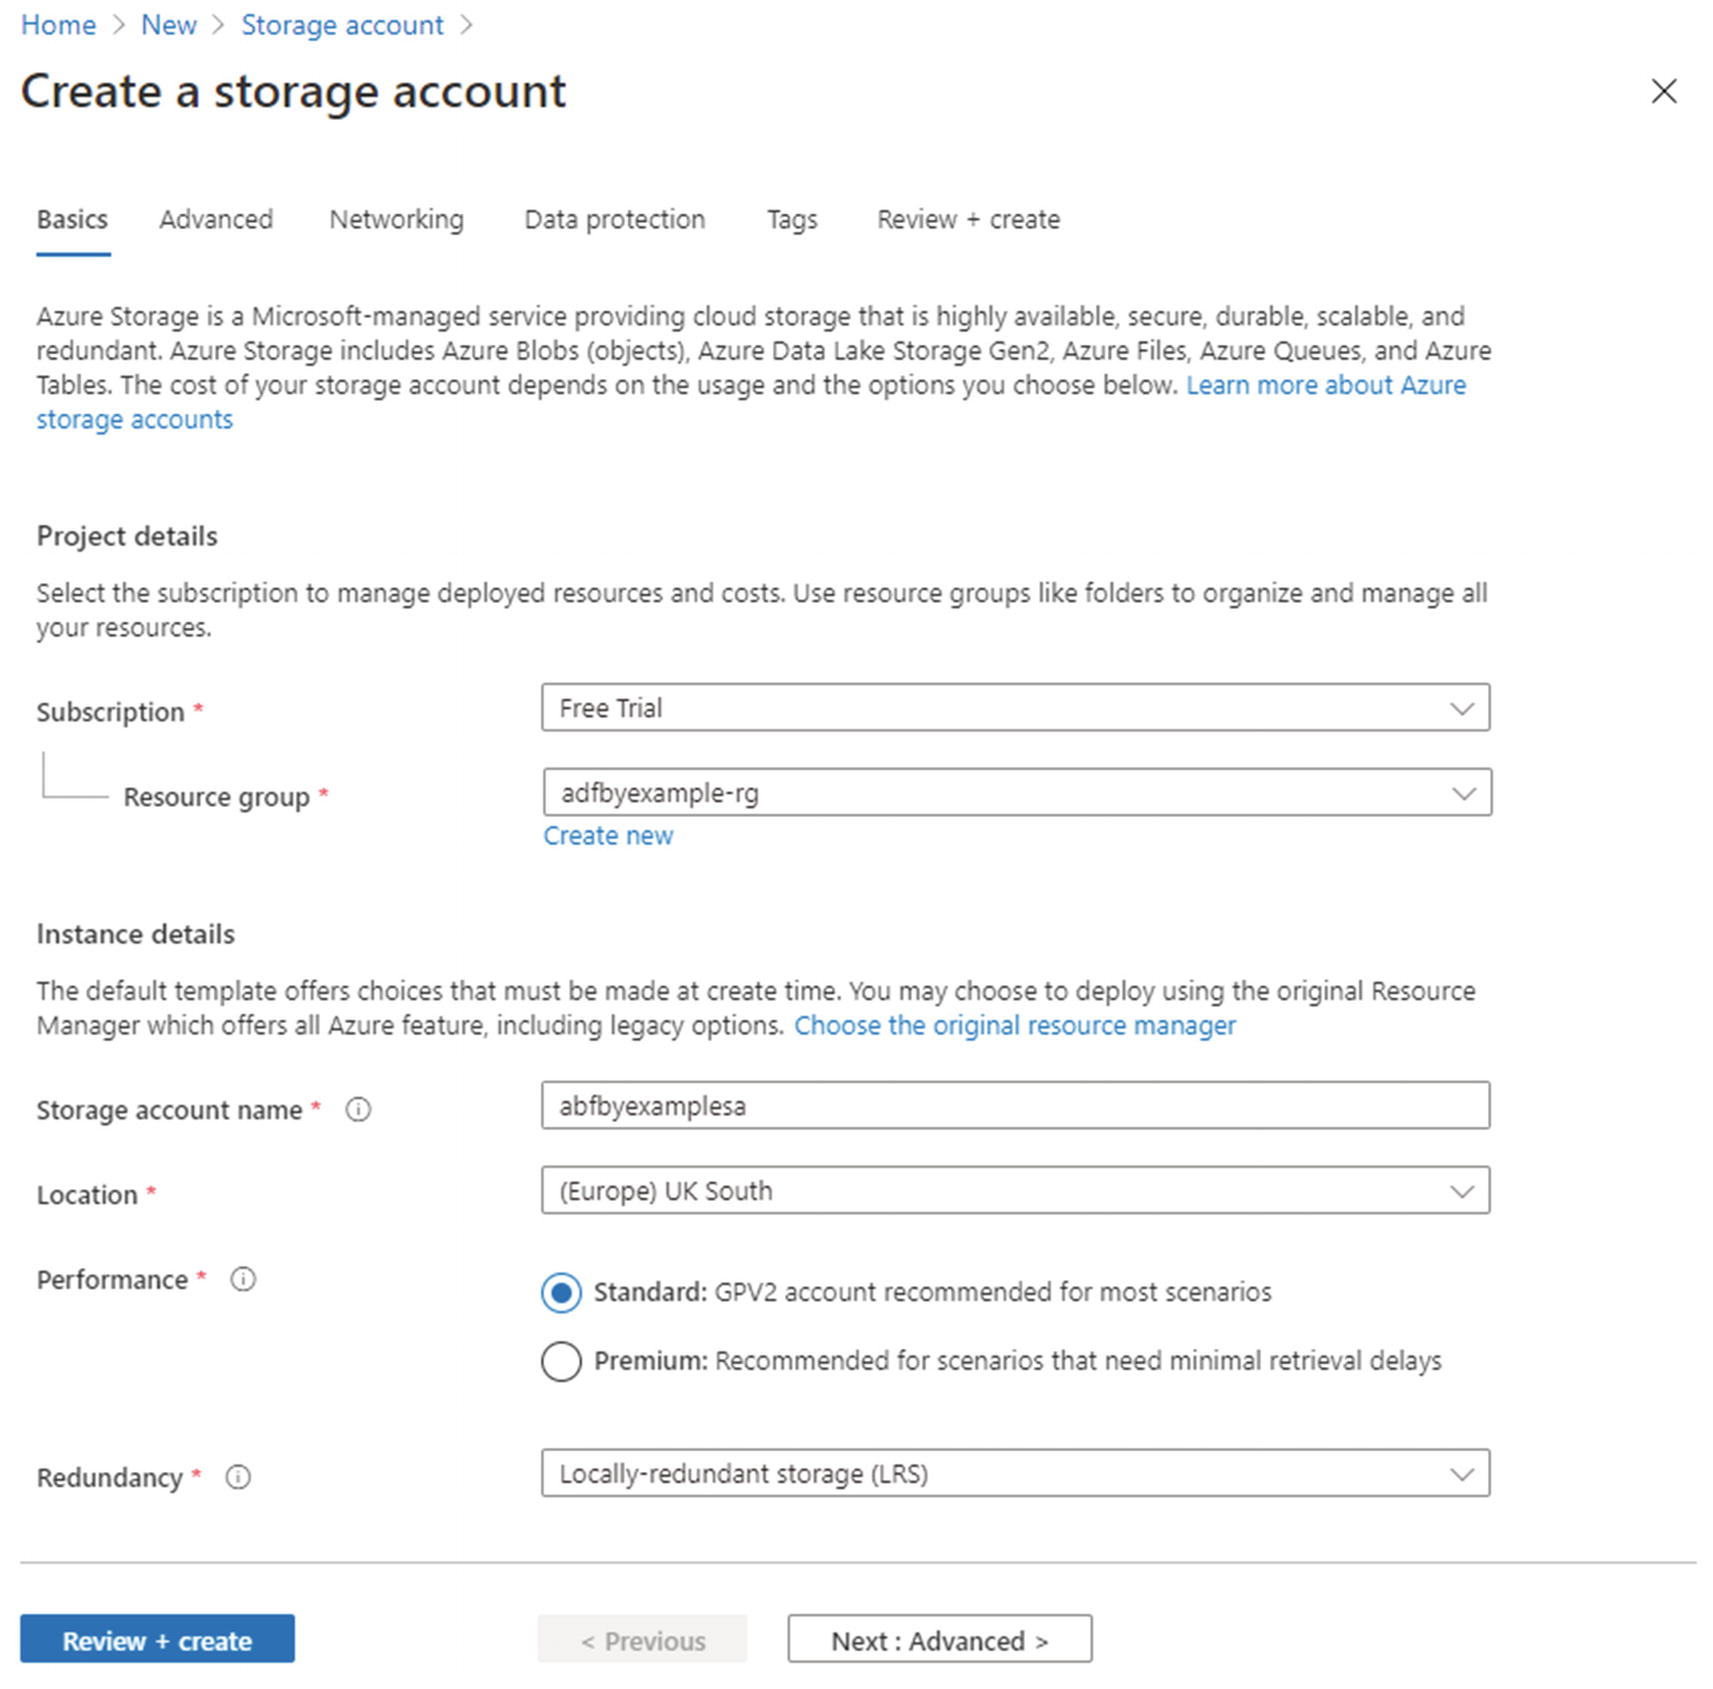 Figure 2-1
Basics tab of the Create a storage account blade
Note I suggest you use the same resource group because it will help you keep track of resources you create while using this book. It definitely isn’t a requirement for Azure Data Factory – your ADF instance can connect to resources pretty much anywhere! These might be resources in other resource groups, subscriptions, or Azure tenants; resources in competitor cloud platforms like Amazon Web Services (AWS) or Google Cloud Platform (GCP); or even your own on-premises systems.
- 3.
Specify a globally unique Storage account name. I use names ending in “sa” (storage account names may only contain lowercase alphanumeric characters).
- 4.
Choose the Location closest to you geographically – the one where you created your data factory.
Tip Choosing a location close to you reduces data retrieval latency. Choosing the same location as your data factory reduces cost, because moving data out of one Azure region and into another incurs a bandwidth charge (sometimes referred to as an egress charge).
- 5.
For Performance, select “Standard.” Performance tiers for storage are linked to the underlying hardware type. Premium storage uses solid-state disks and is more expensive.
- 6.
Select the Redundancy option “Locally-redundant storage (LRS).” This is the cheapest of the available options because data is only replicated within the same data center. LRS protects you against hardware failure but not against data center outage or loss – this is sufficient for learning or development purposes, but in production environments, a higher level of resilience is likely to be required.
- 7.
The final step on the Basics tab is to click Review + create, then after validation click Create. (I am purposely bypassing the four remaining tabs – Advanced, Networking, Data protection, and Tags – and accepting their default values.)
- 8.A notification message is displayed when deployment is complete, including a Go to resource button. Click it to open the portal’s storage account blade (shown in Figure 2-2).
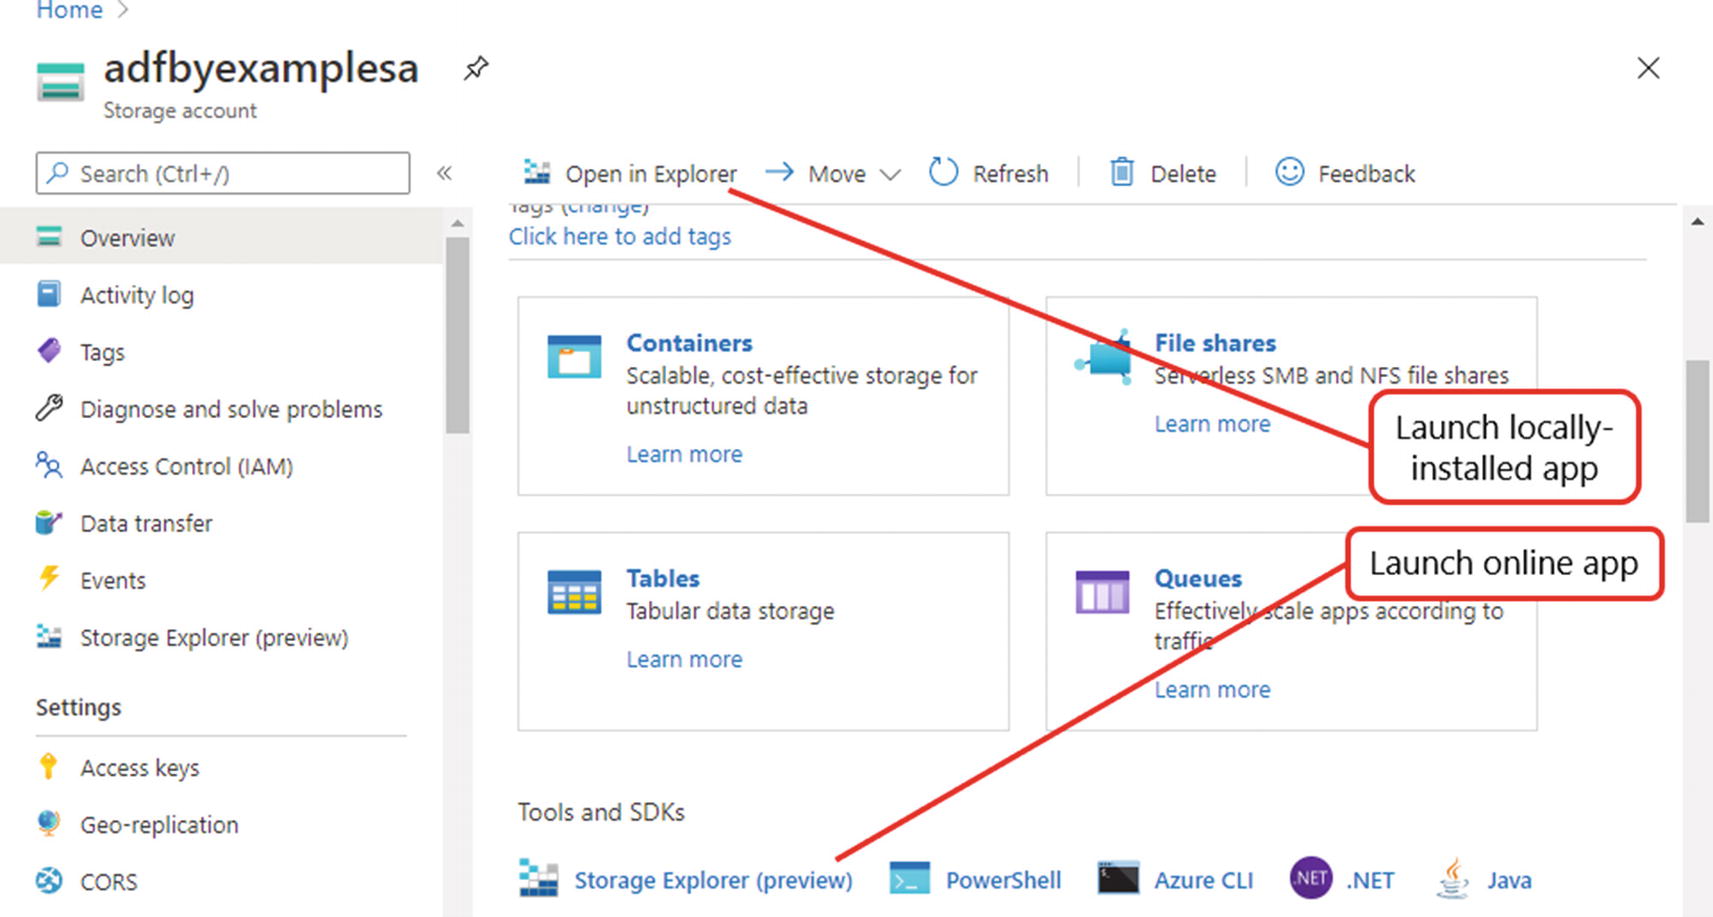 Figure 2-2
Azure portal storage account blade
You can navigate to any resource from the portal menu (top left) or home page. Use the Resource groups option to display all your resource groups, then select one from the list to explore the resources it contains.
Explore Azure Storage
A variety of tools are available for interaction with storage accounts. One easy-to-use option is Azure Storage Explorer, available as a downloadable app (available for Windows and other operating systems) or online, hosted inside the portal. You can launch both the online app and its locally installed equivalent directly from the portal – to launch the online app, scroll down and click Storage Explorer (preview) in the portal’s storage account blade (Figure 2-2).
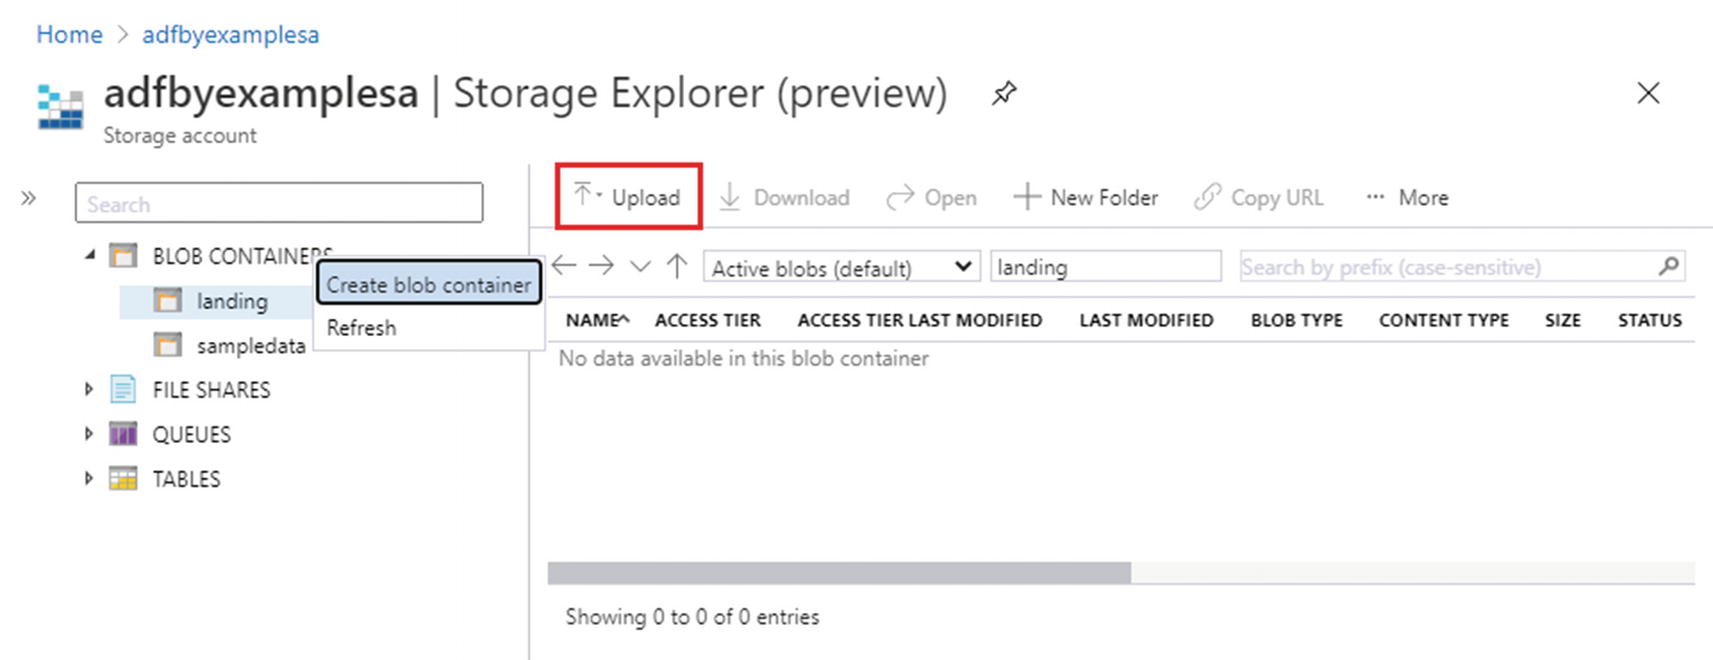
Figure 2-3 shows the online Storage Explorer app with the portal navigation sidebar collapsed. The explorer sidebar shows the four types of storage supported by the storage account: blob containers (blob storage), file shares, queues, and tables. In the next section, you will add files to blob storage.
The term blob is used to refer to a file without considering its internal data structure. This doesn’t imply that files described as blobs have no structure – it simply means that the structure isn’t important for the task at hand. The name “blob storage” reflects the fact that the service provides a general-purpose file store, with no restrictions on the types of file it can contain.
Azure Storage Explorer (online version)
Upload Sample Data
- 1.
Download the repository as a zip file, so that you can transfer sample data into your storage account. This option is available from the green Code menu button on the repository home page.
- 2.
Select the “landing” container in the online Azure Storage Explorer and click Upload on the toolbar above the container contents list (indicated in Figure 2-3).
- 3.
The Upload blob blade is displayed. In the Files field, click Select a file, then find and select azure-data-factory-by-example-main.zip, the zip file you downloaded.
- 4.
Back in the Upload blob blade, click Upload, then close the blade.
- 5.
An entry for the zip file now appears in the “landing” container contents list. (If you don’t see it, try selecting Refresh from the More menu items collection on the ribbon.)
The sample data files contain sales data for products made by a fictional multinational confectionery manufacturer, Acme Boxed Confectionery (ABC). The manufacturer does not sell directly to consumers, but to a variety of retailers which report monthly sales activity back to ABC. Sales reports are typically produced using retailers’ own data management systems and are supplied in a wide variety of file formats. Handling these formats will expose you to many of ADF’s data transformation features in the coming chapters.
Use the Copy Data Tool
Azure Data Factory’s Copy Data tool provides a wizard-style experience for creating a pipeline with a specific purpose: copying data from one place to another. In this section, you will use the Copy Data tool to create a pipeline that copies the zip file from the “landing” container in your Azure storage account, unzips it, then writes its contents into the “sampledata” container. This is purposely a very simple data movement task – implementing a simple task allows you to focus on the detail of the ADF pipeline setup.
The Copy Data tool is found on the ADF UX Data Factory overview page, accessed by clicking the home icon in the navigation sidebar. Under the heading Let’s get started are a number of bubbles – click the Copy data bubble to begin.

First step of the Copy Data tool
If the process shown in Figure 2-4 fails to launch, click the pencil icon to access the authoring workspace, then find the search field below the Factory Resources explorer title. Click the plus symbol button to the right of the search box, then select Copy Data tool from the popup menu.
- 1.
On the Properties page, set Task name to “ImportSampleData” – this will be the name of your pipeline – and provide a Task description. Descriptions are searchable, so adding one to every new pipeline makes it easier to manage a large data factory. Click Next.
- 2.
On the Source data store page, click + Create new connection. Choose the linked service type Azure Blob Storage and click Continue.
- 3.Use the New linked service (Azure Blob Storage) blade (Figure 2-5) to create a connection to your Azure Storage account. Provide a name and description – I have reused the name of the underlying storage account – then under Account selection method, ensure that “From Azure subscription” is selected. Choose the relevant subscription and storage account you created earlier. At the bottom of the blade, click Test connection to check that it’s working, then click Create.
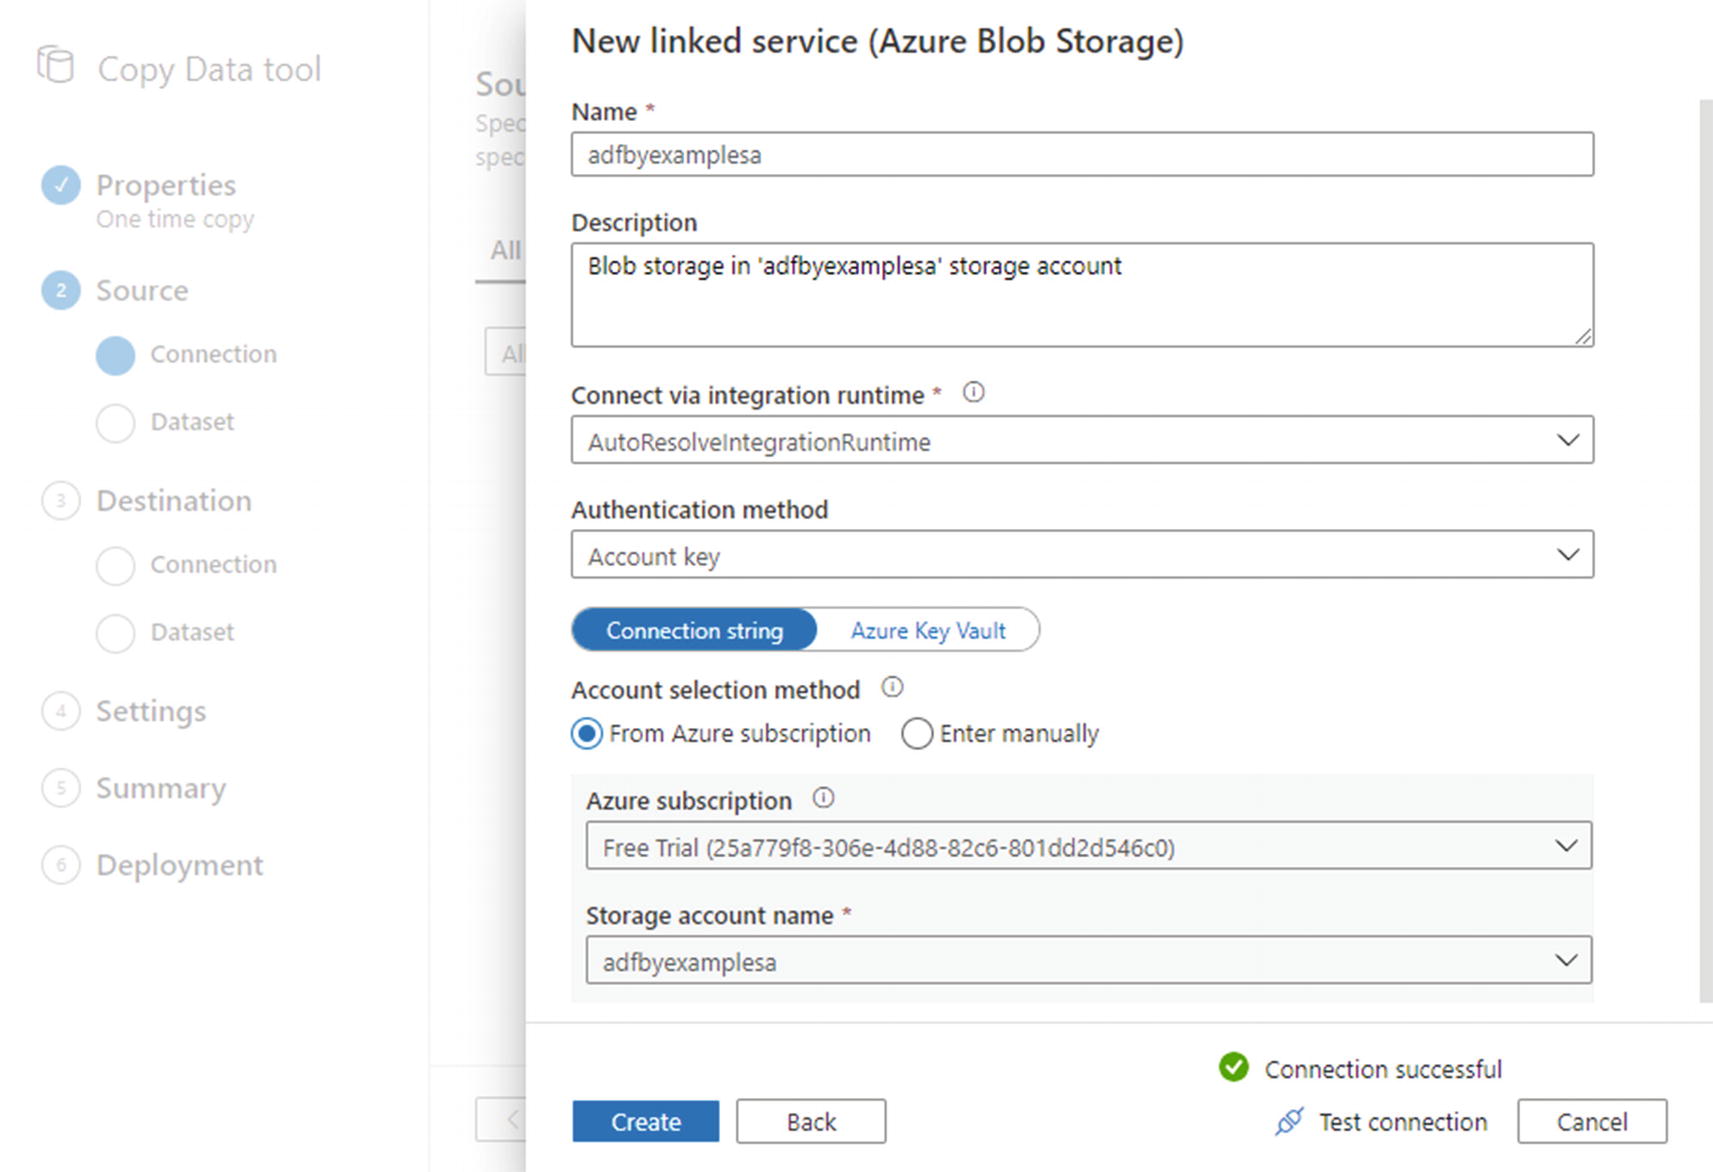 Figure 2-5
New linked service (Azure Blob Storage) dialog
Note The ADF UX uses a storage key (part of your storage account’s configuration) to authorize connection to your storage account. The reason you don’t need to specify a key explicitly is that the UX uses your logged-in identity to retrieve its value.
- 4.
Back on the Source data store page, you will see a tile for your new linked service – ensure it is selected, then click Next.
- 5.
On the Choose the input file or folder page, click the Browse icon to the right of the File or folder text box. Browse into the “landing” container, select the uploaded zip file, and click Choose.
- 6.
Tick the Binary copy checkbox, select Compression type “ZipDeflate,” and uncheck Preserve zip file name as folder. Click Next.
- 7.
You will find the linked server you created in step 3 displayed in a tile on the Destination data store page. Select it and click Next.
- 8.
On the Choose the output file or folder page, click the Browse icon, select the “sampledata” container, and click Choose. Leave the other settings unchanged and click Next.
- 9.
Click Next again on the Settings page, then inspect the details you have provided on the Summary page. When you are ready, click Next to start pipeline creation.
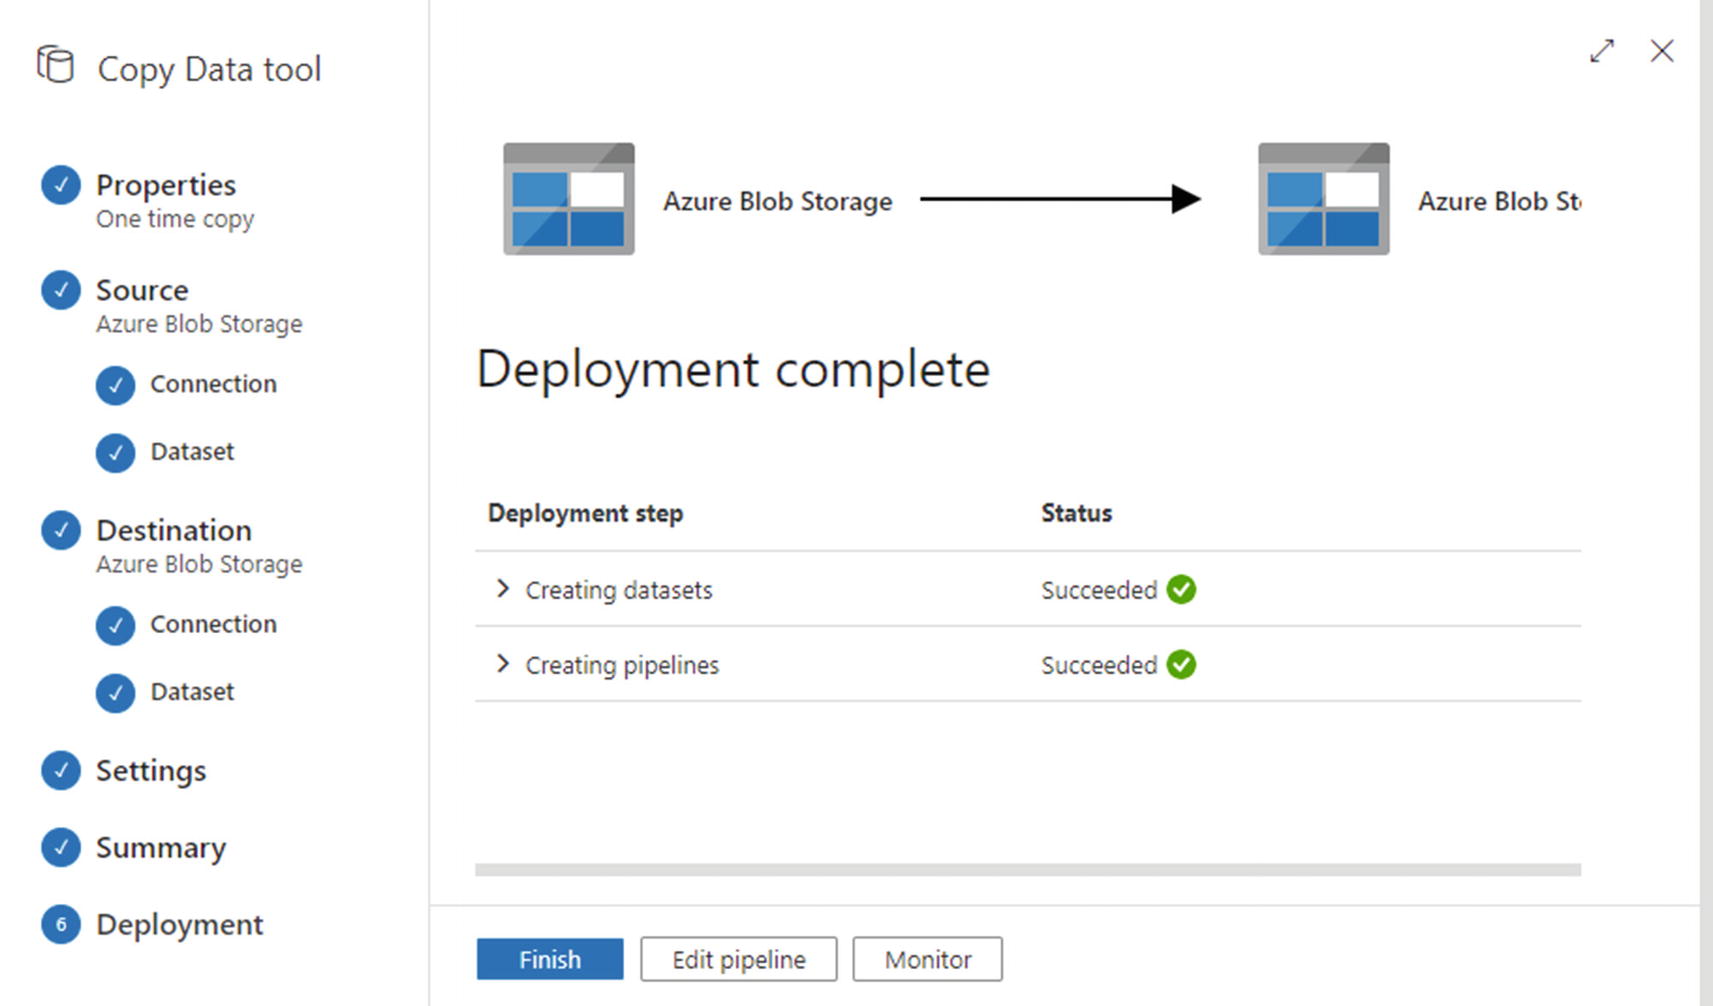
Copy Data tool’s Deployment page
Explore Your Pipeline
Created a linked service connection to your storage account
Published the linked service connection
Created datasets representing the inputs and outputs of the copy process
Created an ADF pipeline to perform the copy process
Committed and pushed the linked service, datasets, and pipeline to your Git repository
To prevent exposure, the storage key used to authorize ADF’s connection to your storage account is not committed to Git. Instead, the key is saved directly to ADF by publishing the linked service connection immediately.
In this section, you will examine the various resources created by the Copy Data tool.
Linked Services
Storage refers to the holding of data, without any additional processing or movement being performed (except, e.g., movement occurring within the storage system for storage replication).
Compute describes computational power used to move stored data around, to transform it, and to analyze it.
The separation of storage and compute services in cloud platforms like Azure is very common. It adds flexibility by allowing the two to be scaled up and down independently of one another as demand rises and falls.
Azure Data Factory has no storage resources of its own, but factory instances can access and use external storage and compute resources via linked services. A linked service may provide a connection to a storage system – for example, an Azure storage account or a database – or may enable access to external compute resources like an Azure Function App or a Databricks cluster.

Linked services in the ADF UX management hub
Datasets
A linked service storage connection provides information necessary to connect to an external data store, but nothing more. For a database system, this might consist of a database connection string, including server, database, and credential details, but with no information about database tables. Similarly, the linked service you created in the previous section contains metadata to locate the relevant Azure Blob Storage account, but has no information about files stored there. Azure Data Factory stores metadata to represent objects inside external storage systems as datasets.
A factory header bar (beneath the main navigation header bar), containing various controls and indicating that the factory is linked to an Azure DevOps Git repository
The Factory Resources explorer, listing pipelines, datasets, and other factory resources
A tabbed authoring canvas, displaying details of selected factory resources
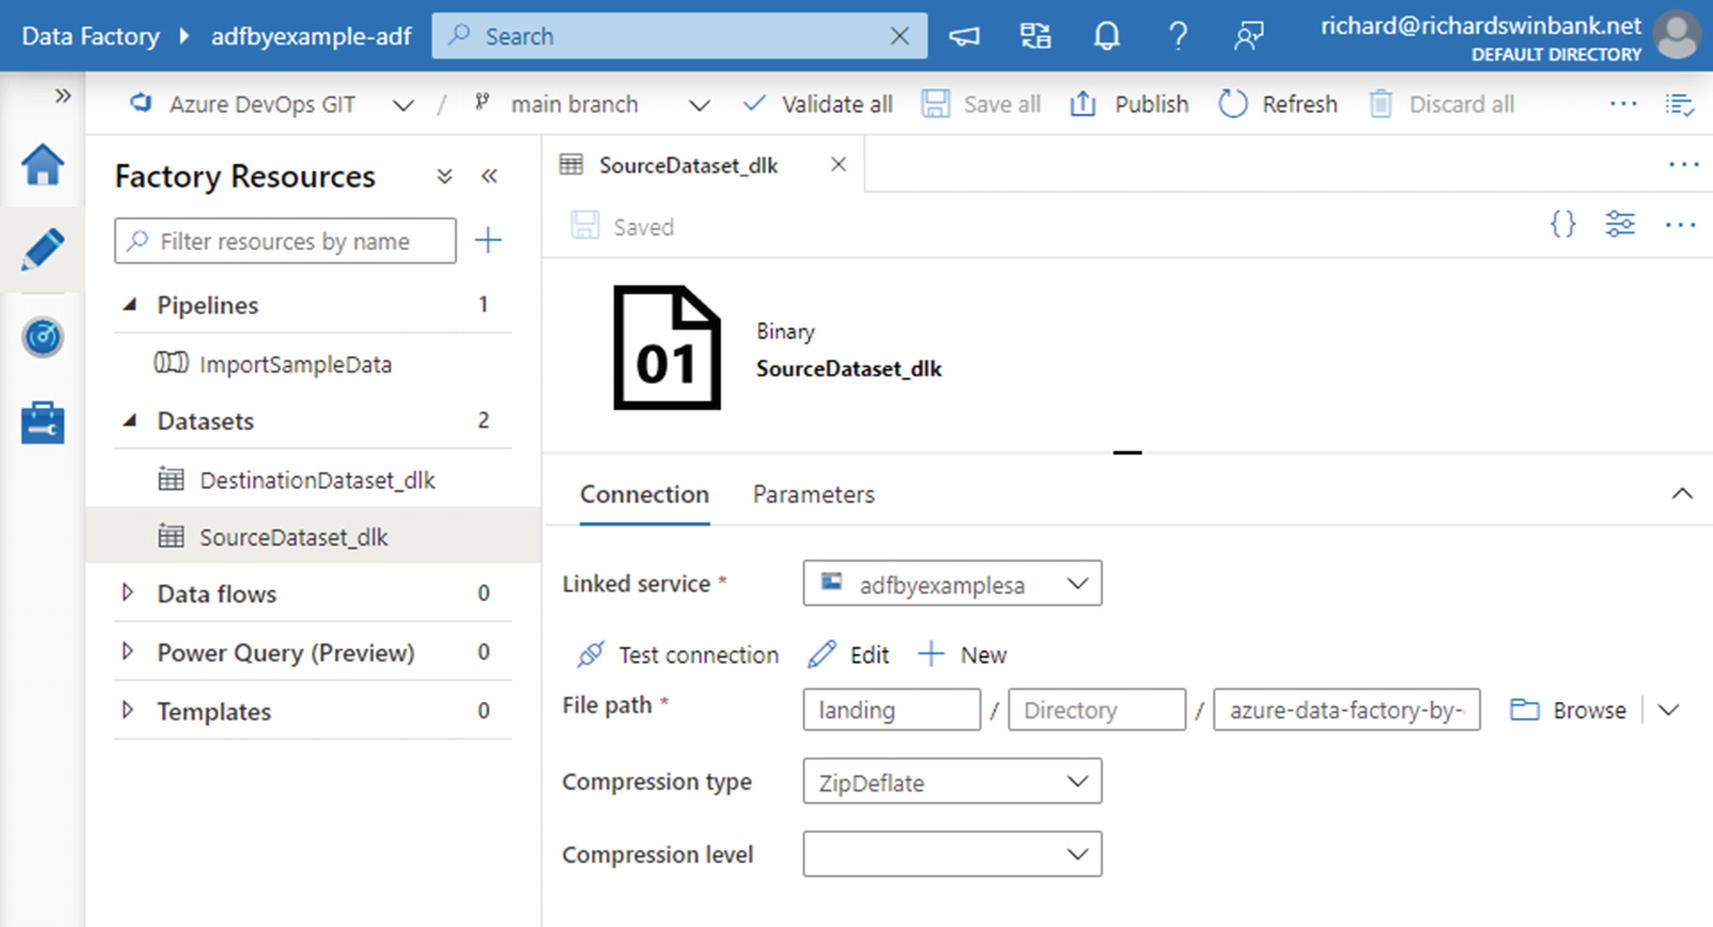
Dataset configuration in the ADF UX authoring workspace
The term resource is used in the Azure portal to describe different instances of Azure services (e.g., a storage account or a data factory) and is used within ADF to describe various factory components such as pipelines and datasets. The reuse of terminology can be confusing, but it should be clear from the context whether I’m referring to Azure resources or ADF resources.
Notice also that, in the authoring workspace, the navigation header bar features a Search box. This allows you to search factory resource definitions, including text descriptions like the one you created for the “ImportSampleData” pipeline.
The authoring canvas in Figure 2-8 shows the source dataset “SourceDataset_dlk”. (The dataset name was generated automatically by the Copy Data tool). The Connection tab on the tabbed configuration pane in the lower half of the screen displays details of the selected file path: the “landing” container, file “azure-data-factory-by-example-main.zip,” and compression type “ZipDeflate.”
Linked services behave in a similar way to project-scoped connection managers in SSIS, but unlike some connection managers (such as flat file), they do not contain schema metadata. Schema metadata can be defined separately in an ADF dataset, although it may not always be required (as in the case of the schemaless file copy you performed using the Copy Data tool).
Pipelines
Pipelines are at the very heart of Azure Data Factory. A pipeline is a collection of data movement and transformation activities, grouped together to achieve a higher-level data integration task. Figure 2-9 shows the ADF UX authoring workspace with the “ImportSampleData” pipeline displayed. When authoring pipelines, the workspace additionally contains an Activities toolbox, a menu of available pipeline activities. Activities can be dragged from the Activities toolbox and dropped onto the authoring canvas.
On the authoring canvas in Figure 2-9, you can see that the pipeline contains a single Copy data activity, named “Copy_dlk”. (The activity name was also generated automatically by the Copy Data tool.)
A data factory pipeline is equivalent to an SSIS package, and the authoring canvas shown in Figure 2-9 provides functionality comparable to the SSIS control flow surface. This simple pipeline is like an SSIS package which contains a single File System Task to copy files from one location to another – but with the additional ability to unzip files on the fly.
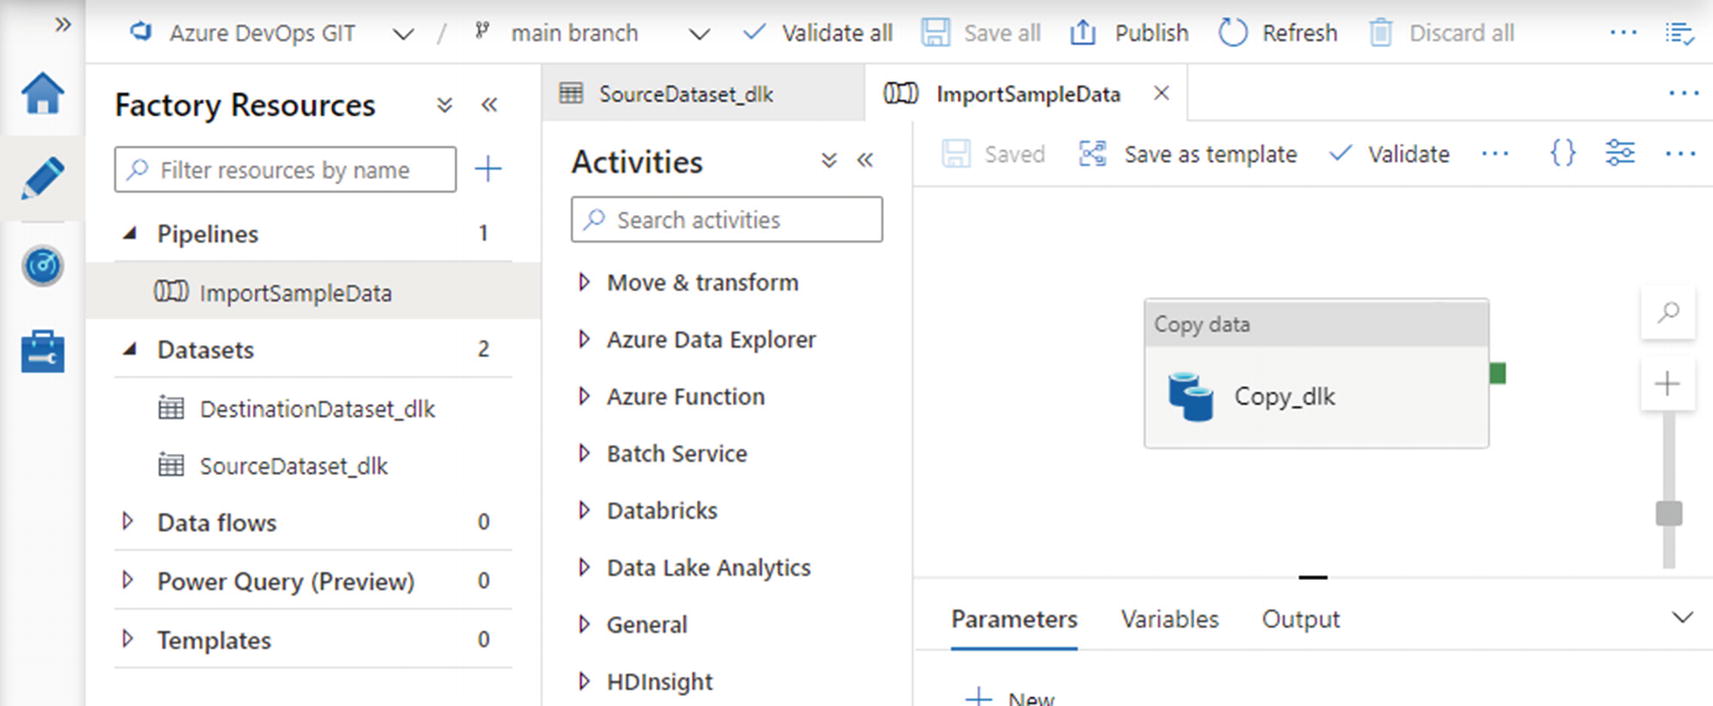
Pipeline configuration on the ADF UX authoring canvas
Activities
The Activities toolbox provides a variety of activity types available for use in an ADF pipeline. Activities are available for the native movement and transformation of data inside ADF, as well as to orchestrate work performed by external resources such as Azure Databricks and Machine Learning services.
This simple pipeline contains only one activity, but in Chapter 4 you will start to see how multiple activities can be linked together inside a pipeline to orchestrate progressively more complex ETL workflows. ADF defines a library of over 30 activity types, including the ability to write your own custom activities, making the scope of tasks that a pipeline can accomplish virtually limitless.
Integration Runtimes
Externally, by creating a linked service connection to a separate compute service like Azure Databricks or HDInsight
Internally, using an ADF-managed compute service called an integration runtime
Native data transformations and movements – such as the Copy data activity – use compute resources provided by an integration runtime. This is what I described in Chapter 1 as “factory compute.”
Integration runtimes are listed in the ADF UX’s management hub, immediately below Linked services on the hub menu. Every ADF instance automatically includes one integration runtime, called the AutoResolveIntegrationRuntime. This provides access to Azure compute resources in a geographic location that is chosen automatically, depending on the task being performed. Under certain circumstances, you may wish to create integration runtimes of your own – Chapter 8 returns to this question in greater detail.
The compute required for your pipeline’s Copy data activity is provided by the AutoResolveIntegrationRuntime. This is not specified as part of the activity itself, but as part of the storage account linked service(s) it uses. If you review Figure 2-5, you will notice that the option Connect via integration runtime has the value “AutoResolveIntegrationRuntime.”
The closest parallel to an integration runtime in SSIS is the Integration Services Windows service – it provides access to server compute resources for data movement and transformation. The concept is less visible in SSIS, simply because there is only one runtime, used by all tasks in all packages.
Figure 2-10 illustrates the relationship between linked services, datasets, activities, integration runtimes, and your pipeline. The arrows indicate the direction of data flow from the “landing” to the “sampledata” container.
The dataset “SourceDataset_dlk” uses the “adfbyexamplesa” linked service to connect to the “landing” container in the storage account of the same name.
The dataset “DestinationDataset_dlk” uses the “adfbyexamplesa” linked service to connect to the “sampledata” container in the same storage account.
The “ImportSampleData” pipeline contains a single Copy data activity, “Copy_dlk”, which uses the AutoResolveIntegrationRuntime to copy data from “SourceDataset_dlk” to “DestinationDataset_dlk”.

Relationship between Azure Data Factory resources
Access to identified data in external storage is provided by a dataset via a linked service connection.
Pipeline activities use an ADF integration runtime to move and transform data between datasets.
Factory Resources in Git
Linked services, datasets, and pipelines are all examples of factory resources. In addition to creating resource definitions in the ADF UX, the Copy Data tool also saved them, by committing and pushing them to the collaboration branch of your Git repository.
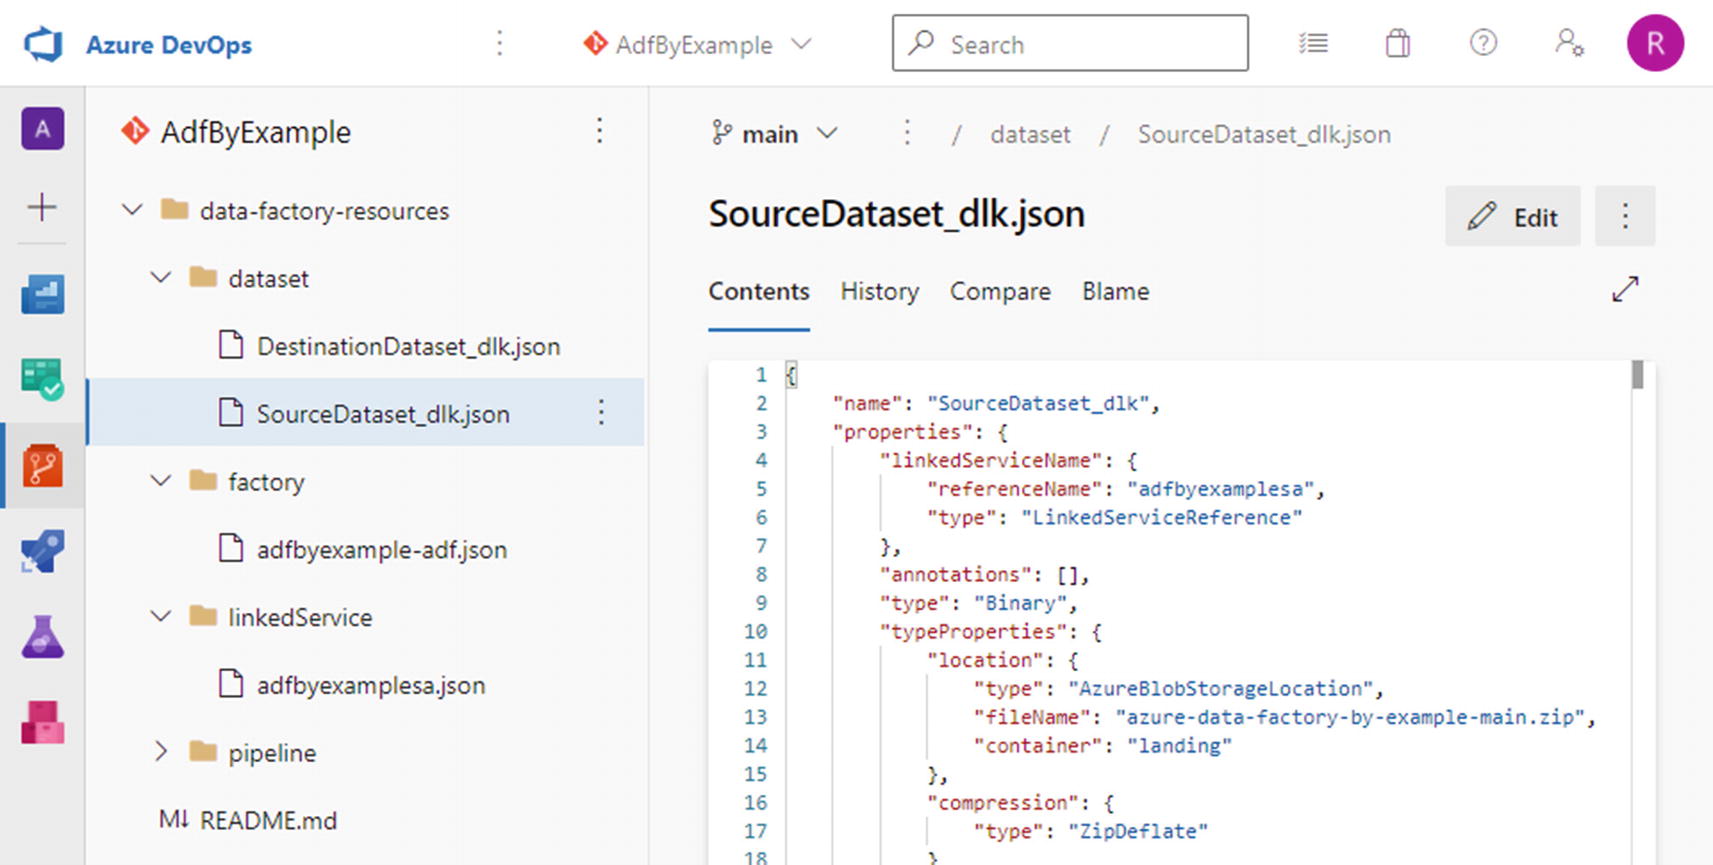
Git repository contents after creating factory resources
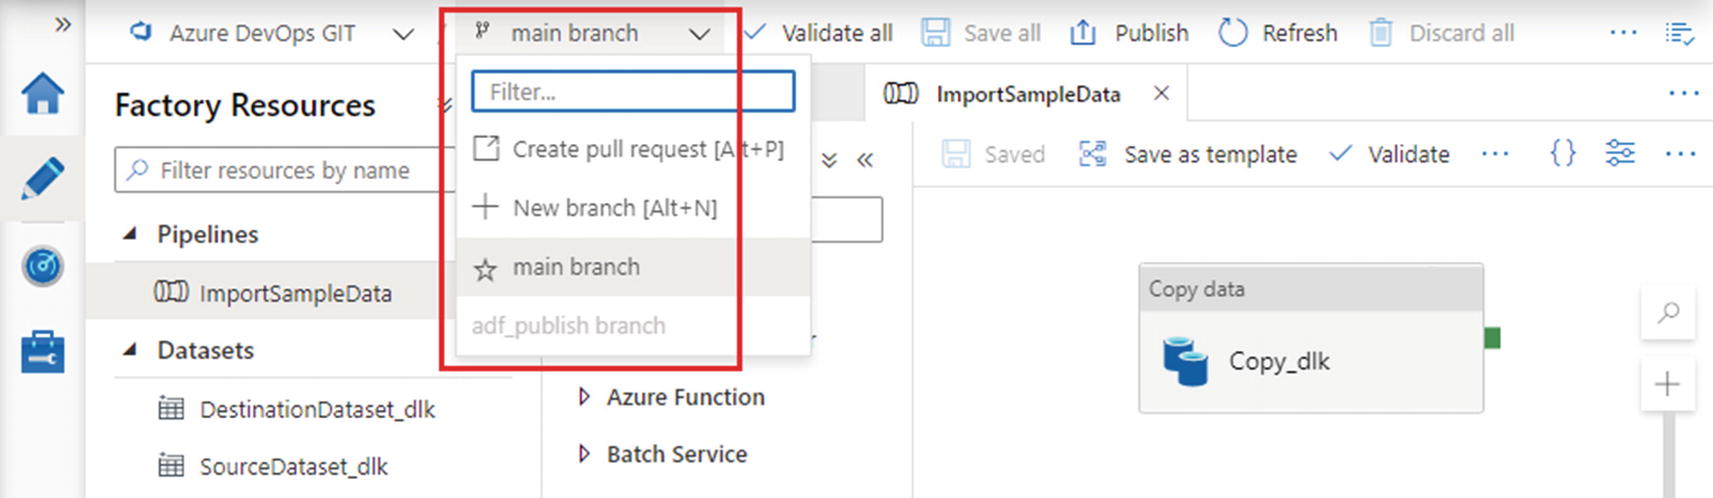
Git branch selection dropdown
Debug Your Pipeline
Your Git repository contains saved linked service, dataset, and pipeline definitions.
Those definitions are loaded into your ADF UX session, where you can edit them.
The ADF published environment contains the linked service definition (because the Copy Data tool published it in order to save the storage account key securely).
To run the pipeline in the published environment, you would need first to publish all its related resources. Publishing factory resources is the subject of Chapter 10. Until then, you will be running pipelines interactively in the ADF UX, using its Debug mode – whenever I say “run the pipeline” from now on, I mean “Click Debug to run the pipeline.” (You may have found the Trigger now option on the Add trigger menu above the authoring canvas – this executes published pipelines and will also be examined in Chapter 10.)
“Debug” means simply “run the pipeline definition in my ADF UX session, without publishing it.” A pipeline debug run accesses and modifies external resources in exactly the same way as a published pipeline.
Run the Pipeline in Debug Mode
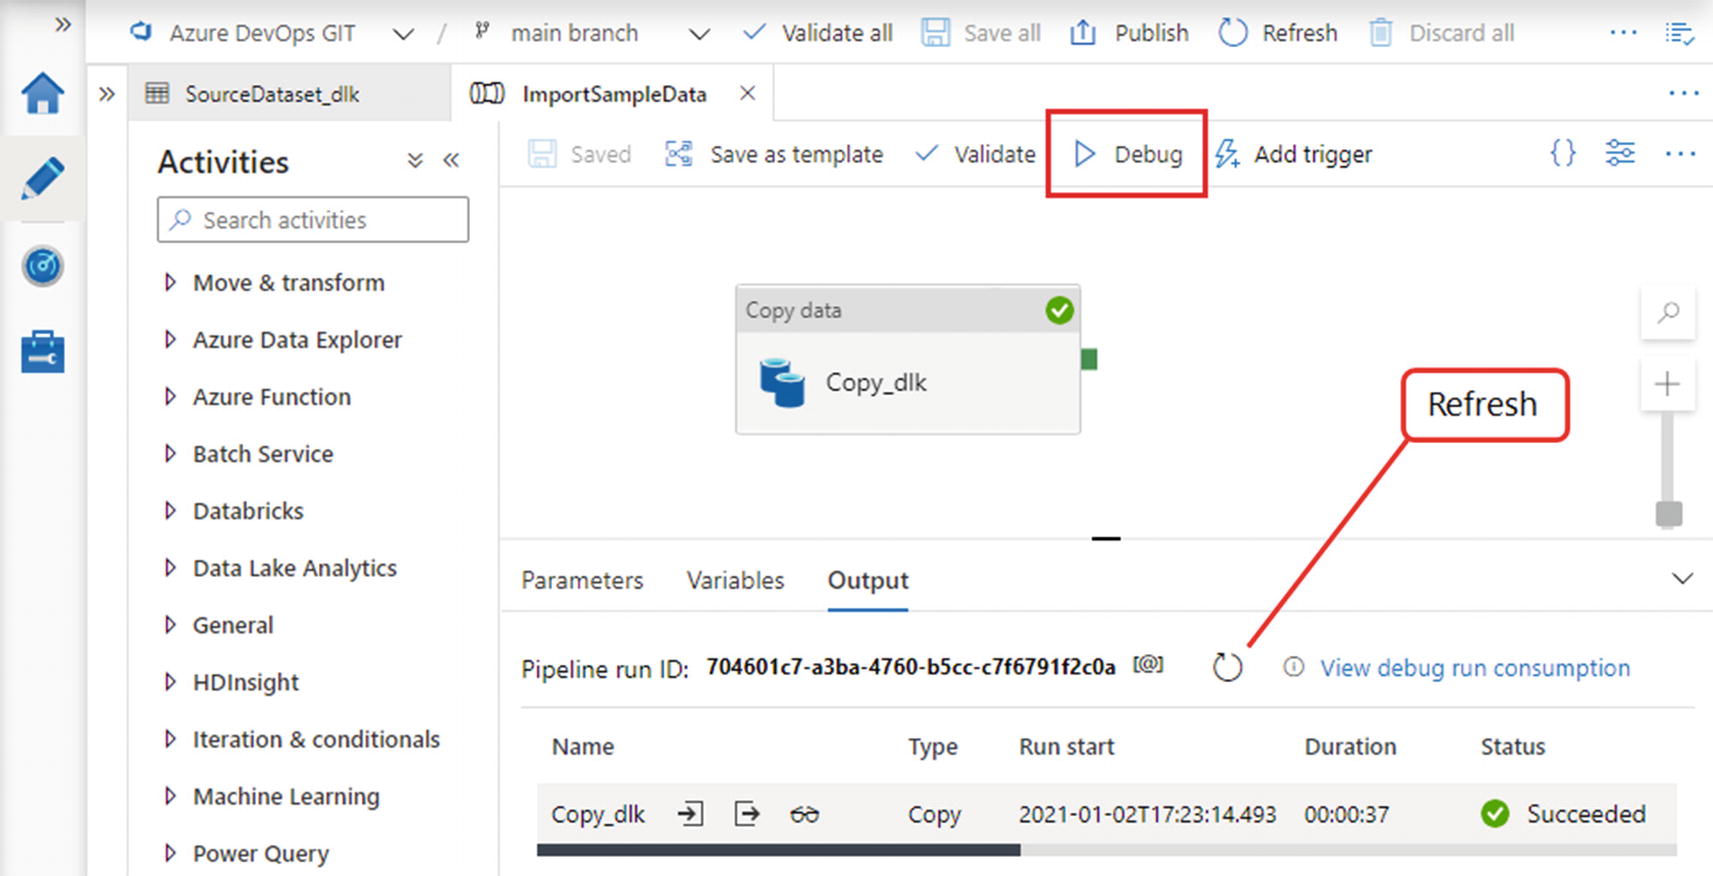
Debug controls on the authoring canvas
As soon as you click Debug, the tabbed configuration pane below the canvas automatically expands, with the Output tab selected. Figure 2-13 shows the tab after the debug run has completed successfully – while the pipeline is still running, you can click the Refresh button to update the tab with the latest status information.
At the bottom of the tab is a list of activity runs performed during the pipeline’s execution. In this case, there is only one – the Copy data activity. You can use the icons to the right of an activity’s name to view its inputs, outputs, and performance information. You can view consumption information for the pipeline run as a whole by clicking View debug run consumption.
Inspect Execution Results
An unpublished pipeline is still connected to all the same external resources as its published equivalent, and running the pipeline accesses and modifies those same resources. Running your pipeline in debug mode has performed a real data copy from the “landing” container to the “sampledata” container.
Return to Azure Storage Explorer to inspect the “sampledata” container and verify that it now contains a nested folder structure, extracted from the zip file in the “landing” container. You will make use of the data unzipped to this container in the following chapters.
Chapter Review
In this chapter, you created an Azure Storage account and used an ADF pipeline to unzip and copy files from one container into another.
The Copy data activity used by the pipeline is the workhorse of data movement in ADF. In your pipeline, the activity treats files as unstructured blobs, but in Chapter 3 you will explore its handling of structured and semi-structured text file formats, along with other structured datasets.
Key Concepts
Pipeline: A data integration workload unit in Azure Data Factory. A logical grouping of activities assembled to execute a particular data integration process.
Activity: Performs a task inside a pipeline, for example, copying data from one place to another.
Dataset: Contains metadata describing a specific set of data held in an external storage system. Pipeline activities use datasets to interact with external data.
Linked service: Represents a connection to an external storage system or external compute resource.
Integration runtime: Provides access to internal compute resource inside Azure Data Factory. ADF has no internal storage resources.
Debug: You can run a pipeline interactively from the ADF UX using “Debug” mode. This means that the pipeline definition from the ADF UX session is executed – it does not need to be published to the connected factory instance. During a debugging run, a pipeline treats external resources in exactly the same way as in published pipeline runs.
Copy Data tool: A wizard-style experience in the ADF UX that creates a pipeline to copy data from one place to another. I have presented it in this chapter as a quick way to start exploring the pipeline structure, but in practice you are unlikely to use the tool very often.
Azure Storage: Microsoft’s cloud-based managed storage platform.
Storage account: A storage account is created in order to use Azure Storage services.
Storage key: Storage keys are tokens used to authorize access to a storage account. You can manage an account’s keys in the Azure portal.
Blob storage: General-purpose file (blob) storage, one of the types of storage offered by Azure Storage. Other supported storage types (not described here) include file shares, queues, and tables.
Container: Files in blob storage are stored in containers, subdivisions of a storage account’s blob storage. Blob storage is divided into containers at the root level only – they cannot be nested.
Azure Storage Explorer: An app used to manage Azure Storage accounts, available online and as a desktop application.
Bandwidth: A term used by Microsoft to describe the movement of data into and out of Azure data centers. Outbound data movements incur a fee, sometimes referred to as an egress charge.
For SSIS Developers
ADF Concept | Equivalent in SSIS |
|---|---|
Pipeline | Package |
Activity | Task (on control flow surface) |
Copy data activity | Used in this chapter like a File System Task. In Chapter 3, you will explore more advanced behavior where it acts like a basic Data Flow Task |
Linked service | Project-scoped connection manager (with no schema metadata) |
Dataset | Schema metadata, stored in various different places (such as a flat file connection manager or OLE DB data flow source) |
Integration runtime | SSIS Windows service |
Set of pipelines in ADF UX | SSIS project open in Visual Studio |
Set of pipelines published to an ADF instance | SSIS project deployed to SSIS catalog |