Lighting Concepts in Practice |
In Chapters 1–8 we discussed the science of light and its properties—quality, intensity, color temperature, direction, and balance. The following chapters explore the art, craft, and practice of motion picture and television lighting. Since the emphasis here is on practice, you will find no self-study questions in Chapters 9, 10, and 11. These chapters have been augmented with more projects, which you will find interspersed throughout each chapter.
The projects you will encounter in this chapter are all basic lighting setups that may be used for a variety of situations. They are meant to be created in any medium-size room with a minimum of instruments. Because schools and production units vary widely in terms of available lighting equipment, these setups have been kept very elementary. Many effective lighting plans can be derived from these models; however, these and other lighting plans in this book are not meant to be formulas. Try these setups a few times as designed and then vary them; change the combinations and configurations for the best effect. Then forget them and experiment on your own. The best approach to film and video lighting, as with all art, is to go with your own intuition.
The narrative, dramatic, and informative traditions of motion pictures and television owe much to literature, theater, and radio. The conventions of film and video lighting, however, derive from the visual arts, primarily from discoveries made long ago by the old masters of traditional oil painting. Thus, all lighting for film and video draws from one of three distinct styles taken from representational painting—high-key lighting, low-key lighting, and modulated value lighting.
A high-key scene is one that appears predominantly bright overall. High-key lighting can be seen in the paintings of Franz Hals and Hans Holbein, and in most musicals and comedies produced before the 1970s. Most multicamera television programs taped before a live audience also use high-key lighting. This kind of lighting, which may be created with directional or diffused sources, features strong, even illumination on both subject and background, bright highlights, and relatively few shadows.
Other painters, notably Caravaggio and Rembrandt, developed a style that enhanced the three-dimensional qualities of their subjects by using contrasting tones of highlight and shadow. Their subjects were often illuminated in sharp relief against dark backgrounds. This type of painting, called chiaroscuro (pronounced key-AR-oh-skur-oh), literally light-dark, uses directional lighting that emphasizes deep shadows and extreme contrasts; it is the antecedent to film and television low-key lighting. Detective movies, mysteries, and horror films customarily use low-key lighting to great effect, as does the entire genre known as film noir (literally, black film). Since the 1960s, low-key lighting techniques have crept into other genres as well, including comedies, love stories, and action films.
Much natural interior lighting is neither high- nor low-key, but instead reflects a continuum of modulated medium values. Modulated value lighting is often diffused or diffused directional lighting. Daytime window light is a good source of modulated value lighting; an excellent example of this is seen in the interior scenes painted by the Dutch painter Vermeer van Delft. In these paintings, the lighting is soft, but directional, and is nearly always clearly justified or motivated by the light emanating from an open window; few values are extremely dark or bright.
Often, in narrative films, interior lighting appears motivated by sunlight that shines directly through windows to form hard, rhomboid patterns on adjoining walls. This kind of lighting appears frequently in paintings by the American artist Edward Hopper. In the real world, this lighting occurs only for brief periods during the very early morning and very late afternoon (if there are no buildings or trees outside to block it). Most of the day, the sun is so high overhead that its direct rays reach only small areas of floor. Despite this fact, most contemporary films and television shows nearly always depict interior daylight scenes illuminated by steeply raking crosslight, because it is evocative and tends to look the most realistic.
![]() PROJECT 9.1: THREE STYLES FOR MOTIVATED INTERIOR WINDOW LIGHTING
PROJECT 9.1: THREE STYLES FOR MOTIVATED INTERIOR WINDOW LIGHTING
Purpose:
To create modulated value, high-key, and low-key window lighting in a single environment.
Materials Needed:
a medium-size room with one window
model
assistant
video camcorder or camera and VCR
tripod
incident meter for determining light ratios
one 1000-watt or 650-watt focusable fixture (a Fresnel such as a baby is ideal) with barndoors and stand
one softlight or one broad fixture (a Tota-light will do)
one shiny board (or equivalent) with stand
one C-stand
one flag
one scrim or net
one diffusion sheet, such as tracing paper, a sheet, or a plastic shower curtain liner, to cover the window
one blue gel to filter the spotlight
two sandbags
one grounded, AC extension cable
one 30 × 40-inch foam core sheet or show card
black wrap
cukaloris (optional)
accessories as needed (gaffer tape, gels, clothespins, etc.)
Procedure:
In this project, the emphasis is on natural, motivated window lighting. You will create three different effects using the same interior and motivation direction.
1. Vermeer Lighting (diffused, directional, modulated value lighting)—In the mid-daylight hours (10:00 AM–3:00 PM), pose a figure standing by an open window. Incoming daylight should be diffused and should define the model in crosslight. If the sun is shining in directly, cover the window with tracing paper or Roscoscrim. Fasten the paper or scrim with gaffer tape to the exterior window frame to ensure that the light will be diffused. Your setup should look like the one depicted in Figure 9.1. If the contrast is high, fill in some of the shadows with a reflector card mounted on a C-stand.
2. Edward Hopper Lighting (direct, high-key window sunlight)—In Hopper’s paintings, direct sunlight often cuts through tall windows to define figures in sharp relief for a high-key effect. Pose the model as in step #1. In this exercise, you will want to illuminate the model in hard sunlight. Since it is difficult, if not impossible, to wait until the sun is just right, you will be cheating the effect.
Arcs, HMIs, and PAR-FAY clusters are the only artificial sources that can begin to compete with the intensity of daylight. A shiny board, however, will give you the power of the sun itself. Set up a reflector board outside the window to catch the sun’s rays and reflect them through the window (see Figure 9.2). Have an assistant aim the board to keep the sun reflecting through the window. Dim the strong light somewhat by using a slip-on reflector net and fill in the high-contrast light on the model by using a card or even a softlight.
3. Caravaggio Lighting (low-key chiaroscuro lighting)—This kind of lighting emphasizes high contrast and shadow for effect. The motivation is the full moon or perhaps an outdoor streetlight. Use the same model blocking as in steps #2 and #3, and set up this shot after the sun goes down. Set up a fixture outside the window and angle the fixture in to imitate the steep lighting of the full moon (in this case, clip a blue gel to the barndoors) or street lamp (see Figure 9–3).
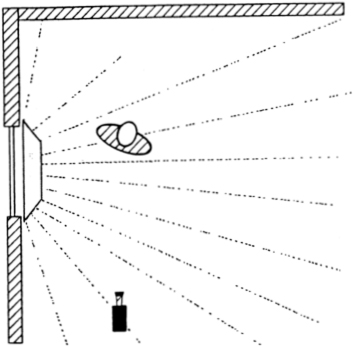
FIGURE 9.1 Vermeer lighting.
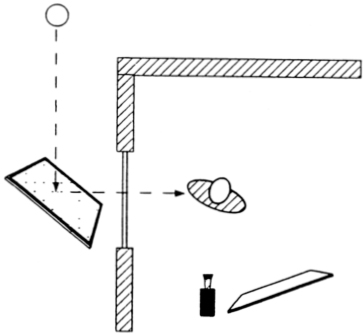
FIGURE 9.2 High-key sunlight.
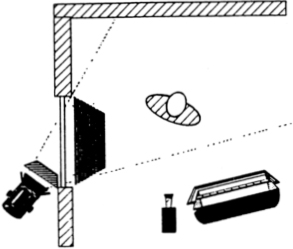
FIGURE 9.3 Low-key night lighting.
If you have to shoot this step during the day for any reason, block out all ambient daylight by covering the window with heavy black plastic garbage bags or duvatyne. Then cut a hole in the plastic that is just big enough for the light to pass through. Set a 1K or 650-watt fixture outside the window to shine through the hole.
If the window is equipped with blinds, produce a convincing film noir effect by pulling the blinds down to break up the light into the familiar bar pattern. If blinds are unavailable, set up a cookie outside the window to imitate the mottled pattern of light filtering through foilage. You may wish to introduce some fill to decrease the lighting ratio. Experimentation will yield the most pleasing effect.
In many interior lighting situations, motivated window lighting is augmented with artificial illumination because window light falloff is generally steep. PAR-FAYs and HMIs are ideal, as they match the color temperature of daylight. If tungsten sources are used, fit the window with CTO or #85 gel, available in 55-in. × 100-ft rolls. The best method is to cut the gel to the window size and tape it to the exterior perimeter of the window frame with gaffer tape where it will not appear in the shot. As an alternative, gelling the tungsten sources to match daylight is less desirable, as it cuts intensity by about 75%.
Lighting plans vary considerably based on the room, the number of subjects, the available equipment, and the effect desired by the director. There are, however, a number of elemental lighting schemes that can be adapted and expanded to cover a wide variety of situations. The basic setups include lighting for one shots (three-point lighting), two-shots (cross-key lighting), and semicontrolled action (360° lighting).
The three-point lighting scheme is the most often taught lighting configuration and the most useful as a starting point for shooting a single subject in a controlled situation, as a close-up, medium shot, or as a documentary-style interview, such as a controlled interview.
Controlled interviews are the staple of informational programs and documentaries. In fact, the “talking head” interview technique works not only for nonnarrative programming, but also for dramatic, nonfiction and fiction feature films (e.g., the entire film The Thin Blue Line [Errol Morris, 1988] and parts of When Harry Met Sally … [Rob Reiner, The three-point lighting scheme is the most often taught 1989]).
![]() PROJECT 9.2: LIGHTING AN INTERVIEW
PROJECT 9.2: LIGHTING AN INTERVIEW
Purpose:
To illuminate a single, seated subject.
Materials Needed:
subject
video camcorder or camera and VCR
incident light meter
tripod
three Lowel Tota-lights
one open-faced 650-watt compact fixture (a Lowel Pro-light, Omni-light, or Mole-Richardson teenie will do nicely)
six light stands
four sandbags
four grounded, AC extension cables
three 30 × 40-inch foam core sheets or 48 × 60-inch show cards
black wrap (optional)
cukaloris (optional)
accessories as needed (gaffer tape, diffusion, clothespins, etc.)
camera log and pen
Procedure:
This setup provides three-point, diffused lighting that is quite versatile for interviewing subjects in a controlled environment (see Figure 9.4). Since documentary production seldom allows the space, budget, and power requirements of grids, C-stands, and Fresnel fixtures, this setup has been designed for a minimum of equipment. In this case, our shooting situation includes an interviewer, a camera operator, and a sound person. The interviewer sits immediately to the right and just in front of the camera. Seen through the camera viewfinder, the subject will be speaking to the interviewer and looking camera-right. The key will also be placed on the right side of the camera.
1. Clamp a 30 × 40-inch card onto a C-stand and set up a Tota-light to bounce off its reflective white surface. If you require more light, use a double pin accessory to mount two Tota-lights on the same stand.
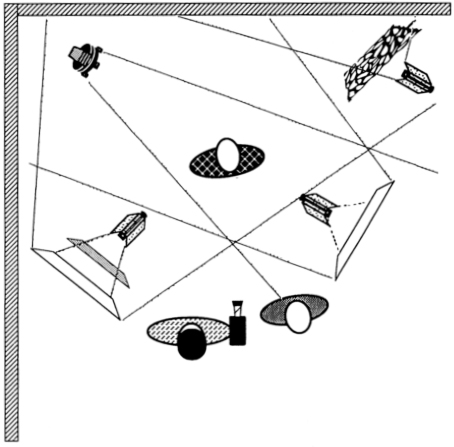
FIGURE 9.4 A lighting plan for controlled interviews.
2. If spill light from the key creates a camera lens flare or otherwise creates problems, flag off the light by positioning another show card between the camera and the fixture. You can also fasten black wrap to the barndoors of the Tota-light using clothespins or fasten the black wrap to the stand itself, using spring clamps, to eliminate the spill.
3. Now you have a diffused, directional key light, which also makes a very nice eye light as well. But since this, alone, usually creates too extreme a lighting ratio for video interviews, you need to set a fill. Do this by setting up a second Tota-light a bit further back from the subject. If the room is not large enough for this, then use one or two layers of ND filter between the lamp and the card to bring down the fill. Spill light from the fill on the ceiling may add some good overall base light.
4. Set the compact fixture high on a stand and aim it to rake across the top of the subject’s head and shoulders. You may want to narrow the beam by affixing a snoot made of black wrap. If the source is too bright, scrim it. In this instance, hair light is best kept to a minimum; use just enough to separate the subject from the background.
5. You may decide to highlight the background with another compact. Use a cukaloris to give an interesting mottled effect to an otherwise lifeless back wall.
The three-point model is a good starting point for lighting a single subject that will remain stationary, as in an interview. It is often difficult, however, to hold to this kind of approach in real lighting situations that involve more than one subject. A scene that includes two subjects who are conversing often calls for a cross-key lighting approach. In this configuration, two keys are used, one for each subject. Each light is set so that it keys one subject and backlights the other.
![]() PROJECT 9.3: CROSS-KEY LIGHTING
PROJECT 9.3: CROSS-KEY LIGHTING
Purpose:
To light a two-shot with a minimum of equipment.
Materials Needed:
a medium-size room
two subjects
video camcorder or camera and VCR
tripod
incident meter for determining light ratios
three teenies with stands
three C-stands
three flags
three full scrims or nets
three half scrims
sandbags for stands
three grounded, AC extension cables
one 30 × 40-inch foam core sheet or show card
black wrap
accessories as needed (gaffer tape, gels, clothespins, etc.)
Procedure:
The two-shot master scene is an essential element of most narrative films. While separate, close-up and reaction one shots offer more lighting control, the two-shot is nearly always necessary to establish a sense of connection between the two actors. Cross-keying is an effective method of lighting this kind of shot. Motivation for most cross-key plans is the practical lights on ceilings or high walls (or streetlamps in outdoor situations).
1. Block the actors positions as in Figure 9.5, so that they face each other in conversation.

FIGURE 9.5 A simple, cross-key lighting plan.
2. Rig the teenies high behind each subject and angle them to key light one figure, while backlighting the other.
3. Set up a white card on a C-stand near the camera facing the action. Bounce the third teenie off the card to fill in strong shadows left by the high key lights.
4. At this point, you may wish to gel the lights to get more separation. Red gels on the keys and a blue on the fill might suggest a nightclub atmosphere; blue over the keys and amber on the fill would give a warmer, more subtle night look.
Lighting style depends on the content of the film—that is, the way the film is to be acted and how shots are framed and constructed. Strict adherence to Rembrandt lighting or chiaroscuro techniques is often difficult to maintain with animated subjects. Low-key lighting means pooling light in specific areas and requires actors to limit their movements or else lose the lighting that has been so carefully arranged for them. Documentary-style takes and dramatic sequence shots dictate that subjects and often the camera be allowed to move freely throughout a set. This requires a looser lighting approach designed to give a general high-key illumination over a wide area, including several moving subjects.
Purpose:
To light a semicontrolled action situation.
Materials Needed:
a medium-size room
three or more subjects
video monitor or camera and VCR
tripod
incident meter for determining light ratios
three broad fixtures (Nooklights, Tota-lights, etc.) or softlights with stands
toughspun or similar diffusion material
sandbags for stands
three grounded, AC extension cables
black wrap
accessories as needed (gaffer tape, gels, clothespins, etc.)
Procedure:
Tightly focused spots are not particularly useful when the action is not controlled. In this case, a broad, overall diffused light is best to provide maximum coverage.
1. Mount three broad fixtures high and angle them down. Aim them into the action area in a roughly 10–2–6 o’clock configuration (see Figure 9.6).
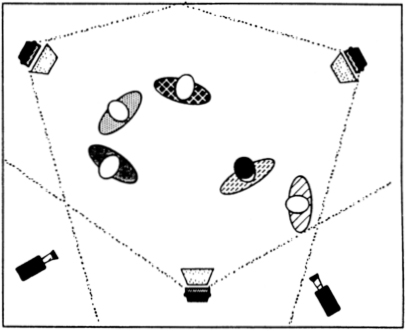
FIGURE 9.6 Lighting for semicontrolled action situations. This configuration allows for several camera angles without the bother of resetting lights.
2. Clip diffusion material to the barndoors to soften the light further. Try to mount the fixtures on top of doors, rafters, or other high mounts to avoid cluttering the floor and field of view with light stands.
This lighting configuration is useful when the videographer has little time to set lights before the shoot and is quite workable for documentary and nonnarrative situations.
