Lighting on Location |
Location shoots (known as remote production in video) have been an important part of production since early in this century when independent film companies left the eastern United States for the year-round, sunny climate of southern California. Location production, which includes all shooting that does not take place in a studio, can yield more realistic and convincing footage. Location production does not, however, give the cinematographer the control of the studio. Thus, careful planning is critical.
LOCATION SCOUTING AND PLANNING
Go to the location well before the shoot and note the physical features of the location, including the size and shape of the room, the height of the ceiling, the availability of power, and the configuration of the circuits. Make sure that power and ventilation are not shut off during the time scheduled for the shoot. Decide on the number and type of instruments required for the shoot and the method of mounting them. The director who fails to review the location before the day production begins risks embarrassing surprises when the crew arrives.
Some important steps for previewing a location are:
1. Note the dimensions of the area or room.
2. Sketch out lighting positions, camera angles, and blocking of the actors.
3. Determine your power requirements and available amperage at the location.
4. Decide what special lighting requirements are necessary.
The French Impressionist painter Claude Monet demonstrated the effects of continually changing sunlight in a series of canvases depicting the cathedral at Rouen during different times of the day. These paintings demonstrated how harsh midday light contrasted dramatically with late afternoon rays that raked across the cathedral’s facade, defining its myriad details and textures.
The cinematographer will also learn much about a desired location by observing and photographing the location at various times of day. A Polaroid or standard 35mm camera is handy for taking snapshots as visual records of the site. A hand-held compass helps to judge and predict sunlight positions for different hours of the day. Determine which side of a street will receive full sun, partial shade, or full shadow at any given time—you will have an accurate picture of the conditions at the time of the shooting.
Block scenes so that the shadows are consistent with shot continuity. If the master scene is shot during the morning hours and the close-ups shot later in the afternoon, be sure to cheat the actors’ positions so that shadow directions and backgrounds in the scenes match. This is particularly crucial if pickups (shoots deemed necessary to preserve continuity, often shot several days or weeks after principal photography) are needed later.
The aim of most exterior lighting is to reduce the harsh contrast of sunlight, which exceeds the contrast range of film and video. Direct sunlight is often filtered by means of a butterfly or an overhead. In many cases, the sun becomes a backlight or kicker, with supplemental fill light provided by carbon arcs, HMIs, PAR-FAY clusters, or reflectors.
When windy locations or enclosed areas make lighting with reflectors impractical, artificial sources must be used. The problem is that any artificial source must be of sufficient intensity in order to fill in the deep shadows cast by the sun. Therefore, conventional tungsten sources (which must be filtered with blue gels to match daylight) are not particularly useful under these circumstances. Only high-intensity, daylight-balanced sources, such as carbon arcs, HMIs, and PAR-FAYs, are practical for use in daylight. Such high-intensity lamps draw a great deal of current (as much as 225 amps for brutes) and require the use of a high-power generator.
![]() PROJECT 11.1: LIGHTING A DAYLIGHT EXTERIOR
PROJECT 11.1: LIGHTING A DAYLIGHT EXTERIOR
Purpose:
To use reflectors and diffusion materials to reduce contrast in an outdoor one shot.
Materials Needed:
model
partly shaded courtyard or similar location
camera and tripod
two C-stands
shiny board and stand
4 × 4-foot butterfly
two 20 × 30-inch foam core sheets, 48 × 60-inch showcards, or stretched Griffolyn sheets
sandbags
When shooting a medium one shot or two-shot on a sunny day, you have the option of placing the subject in either a sunlit or shady area. Direct sun has the disadvantage of high contrast—harsh highlights and dark shadows. The sun’s continuous movement also causes problems of changing light direction that can be quite drastic through the course of several takes. Selecting a shady area is not without its problems as well, as background area may be unacceptably bright, ambient reflected light from pavement or foliage may be difficult to control, and the subject itself may appear to be quite flat.
An effective alternative is to use shade augmented with extra light. The most controllable method of adding daylight-balanced light is with HMI or FAY lights, which have the high intensity needed to fill in sun-cast shadows. Since the cost and power requirements of such fixtures are beyond the budget of all but big production companies, the next best choice involves using filtered sunlight filled in with reflectors.
Procedure:
1. Place the subject at the edge of a shaded area in a courtyard with the camera and tripod set up approximately 8 feet away. At this point, at midmorning, the key light cast by the sun on the short side of the subject’s face is overly bright and harsh; meanwhile, the dark foliage and shrubbery in the background appears too dark. Therefore, shape the existing light to create an aesthetically pleasing shot (see Figure 11.1).
2. Mount a 4 × 4-foot silk or lavender butterfly on a high roller stand and adjust it to take the edge off specular sunlight on the subject.
3. With the key light brought down to a manageable level, bring up the lighting ratio through the use of reflectors.
4. Now bring up the background foliage by setting up a high riser stand and reflector board to the camera’s left. Focus the soft side of the board on the greenery to bring out the overall detail. The soft side will provide a larger illuminated surface than the highly specular hard side, which may create a hot spot on the foliage. If necessary, dim the reflector board with a slip-on net.
5. Lighten the shaded broad side of the subject’s face with a white reflector, such as a foam core panel of a Griffolyn sheet stretched on a frame. Mount the white reflector on a C-stand 4 feet from the subject and just off the left border of the frame. The reflected light from a white sheet falls off dramatically as its distance from the subject becomes greater, so it is easy to change the fill level dramatically simply by moving the reflector. Since some cameras take in slightly more picture area than their viewfinders indicate, it is wise to keep all reflectors and lights well out of frame.
With a minimum of equipment, this lighting setup takes little time, keeps the subject comfortable, and produces high-quality results. Though all situations present different requirements, most problems encountered with this or a similar setup may be overcome by experimenting with different types of nets, scrims, diffusions, reflectors, and reflective surfaces.
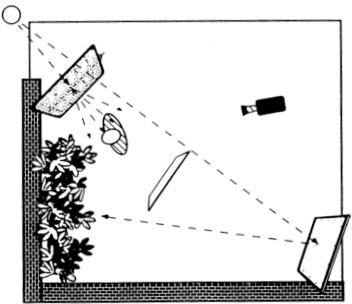
FIGURE 11.1 Lighting a daylight exterior.
Night shoots present special problems for the cinematographer. At night, it is one thing to light a city street scene or a suburban house exterior, and quite another when the shoot is to take place in the great outdoors away from towns, buildings, and motivating light sources such as streetlights. The cinematographer has a choice of shooting night with available light, shooting at night with studio lights, or shooting day-for-night.
Day-for-night, which entails faking a night look in a scene while shooting during daylight hours, has fallen out of favor as film and television audiences have become more visually aware. There are few viable alternatives, however, when budgets are low or when the shoot must take place in remote, natural surroundings. Day-for-night, therefore, remains one of the most effective ways to capture a night effect in the open country.
Compared with actual night shooting, day-for-night is a relatively simple procedure. The primary objective is to impart a convincing moonlit appearance. Thus, it is best to shoot in the early morning or late afternoon when the sun achieves its greatest angle and shadows cast by the sun are long. Shadows can be further enhanced by blocking action so that light comes from a kicker position, about 130° off the camera axis.
An ND.6 filter will allow for a wider aperture and will decrease the depth of field; a polarizer or graduate will darken the sky for static camera setups. Even so, it is wise to include as little sky as possible, as any clouds will give away the day-for-night effect. A “midnight cast” may be added by using a blue filter or by leaving off the #85 B (or replacing it with a #81 EF), if shooting tungsten film. A #23 red filter for sky darkening, combined with a #56 green to ensure good flesh tones, is a traditional combination for black-and-white cinematography.
Day-for-night is often most effective when shot during the “magic hour”—the period of dusk just after the sun sets. The major problem with this approach is the short time available for shooting, magic hour usually lasts no more than 20 minutes. Day-for-night scenes are even more realistic when nighttime lights, including automobile headlamps, streetlights, and lighted windows, are illuminated to appear in the shot. For a breathtaking example of a film shot entirely on location, much of it using available light during magic hour, see Days of Heaven (Malick, 1977), which won DPs Nestor Almendros and Haskell Wexler an Academy Award for cinematography.
The most convincing night photography is indeed shot at night. This is particularly true when scenes take place in urban or suburban areas where ambient illumination emanates from streetlights, building lamps, signs, and automobile headlights.
The cinematographer will sometimes need to shoot a night scene using practical sources alone. It is frequently impossible to access electrical power or take the time required to rig lights in outdoor locations. It is then necessary to use ambient light as a primary source, providing the filmmaker is willing to accept some compromises in picture contrast, shadow detail, and resolution.
Streetlights alone are too high off the ground to cast much light on a subject. Illuminated signs may be effective depending on the amount of the light they give off, their color, and how close they are to the subject. Building lights (such as porch lights) are useful, as are banks and bulbs, such as those lighting storefronts and movie marquees. The most important factor is always the intensity of the light source.
The more practicals available on a given location, the better for ambient light photography. If possible, replace existing standard tungsten lamps with the highest watt photoflood lamps that the socket can handle. (Many sockets have labels that warn against using anything higher than a 100-watt lamp to avoid overloads.) If practicals cannot be replaced, other methods may be necessary to use them as keys.
Night-for-night shooting often requires particular light sources that must be specially constructed or rigged. A practical such as a hanging porch fixture, for example, may be augmented by concealing a small, bare, 250- or 500-watt tungsten-halogen lamp (or peanut) in or behind the practical. Thus, the light emitted by the peanut should appear to be emanating from the practical itself. The simplest way to hide a peanut is to hide it inside the shade behind the actual practical lamp, wrapping the wiring of the peanut around the cord of the existing fixture. The peanut must not touch anything surrounding the fixture; it should also have sufficient ventilation.
As we saw in Chapter Five, varying color temperatures in practical sources present real problems to the cinematographer. A continuing trend toward greater realism in night cinematography has made the odd-colored glow of industrial lamps more acceptable as practicals on the periphery of the scene. The presence of orange incandescents, green fluorescents, greenish blue mercury vapors, and amber and pink sodiums make color balancing a challenging experience.
High-contrast lighting, to be avoided in many exterior daylight situations, enhances the authenticity of exterior night scenes. Contrast, which serves to separate subjects from the background, is enhanced further by strong side lighting. Side light from streetlights provides the motivation for the lighting in the following project.
![]() PROJECT 11.2: NIGHT EXTERIOR-SIDEWALK ON A RESIDENTIAL STREET
PROJECT 11.2: NIGHT EXTERIOR-SIDEWALK ON A RESIDENTIAL STREET
Purpose:
To simulate ambient light in a typical night exterior.
Materials Needed:
two subjects
video camcorder or camera and VCR
tripod
incident meter for determining light ratios
two or more 1K Fresnel spots, mickeys, or PAR cans
one 2K Fresnel
generator or other 110-volt AC source
blue, amber, and yellow gels
three full scrims or nets
three half scrims
at least two sandbags per light stand
at least six 50-foot grounded, AC extension cables
black wrap
accessories as needed (gaffer tape, gels, clothespins, etc.)
Procedure:
1. This scene includes a couple walking down a quiet, suburban sidewalk at night. Take your motivation cues from street lamps or other regularly spaced fixtures that occur naturally in the area, such as building lights. Set a 1K spot at 10-15-feet intervals; you may want to gel the spots with amber or yellow to imitate the odd light of sodium or mercury vapor lamps (see Figure 11.2).
2. If the shot takes place in a more urban environment, take your cue from the closest ambient sources—neon lights or the fluorescents in storefront windows (in the case of the latter, large-area sources like softlights may better simulate the supposed window light).
3. Mount a blue-gelled 2K or larger spot on a high riser to give a moonlight or streetlight kick. Remember to use one sandbag for every riser column you extend.
4. If you can plug into the power of a nearby house, do so; if the source is too far away, however, you will suffer a drop in voltage (which means dimmer and yellower light). Use 10- or 12-gauge cables of 100 feet or less. If AC power is unavailable or you are using HMIs, you will have to have a generator that can produce at least 40 amps.
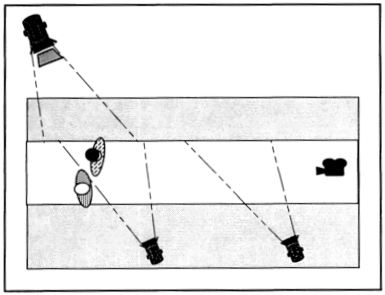
FIGURE 11.2 Night exterior—a sidewalk stroll.
Location daytime interiors are generally illuminated by window light and may be lit using variations on the basic motivated, window lighting plans found in Chapter Nine. The problem with window light on sunny days is that light constantly changes throughout the course of the day. What we barely perceive becomes quite apparent as scenes with windows are filmed over several hours. The continuity problems posed by sunny windows can be very distracting, as shadows and hot spots change radically from full shot to medium shot. The best course of action is to avoid sunny windows as much as possible and shoot them when they are in shade. If a sunlight effect is essential, a shady window lit by an HMI or arc lamp just outside the window can provide such an effect.
Most modern offices and other places of business are lit primarily with banks of overhead fluorescent light and many of these same settings are also replete with large windows. The most convincing approach for shooting in such a situation is to go with the dominant motivating source—usually the fluorescents if the windows are heavily tinted. The following project is one solution to lighting the daytime office problem.
![]() PROJECT 11.3: BALANCING SOURCES IN A DAYTIME OFFICE
PROJECT 11.3: BALANCING SOURCES IN A DAYTIME OFFICE
Purpose:
To light a daytime location interior with augmented available light.
a medium-to-large-size room
fluorescent and window light
desk
chairs
one subject
video camcorder or camera and VCR
tripod
incident meter for determining light ratios
one teenie
one scissor clamp
two 1K Nooklights or broads
one softlight
three full scrims or nets
three half scrims
two sandbags
at least four 25-foot grounded, AC extension cables
a large roll of Tough Plusgreen/Windowgreen
Tough Plusgreen 50 for fixtures
black wrap
accessories as needed (gaffer tape, clothespins, etc.)
Procedure:
Figure 11.3 represents a typical modern office, replete with large, tinted windows and overhead fluorescent lighting. If you augment this available light with tungsten instruments, you will be faced with three different color temperatures.
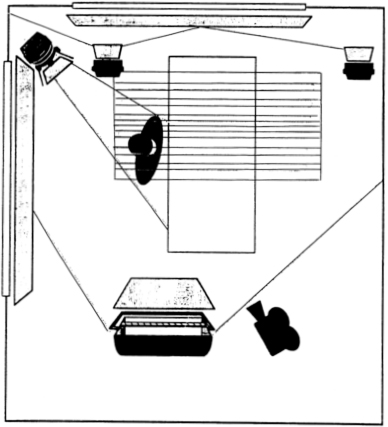
FIGURE 11.3. A daytime office location lit with gelled window light, overhead fluorescents, and gelled tungsten.
1. Determine the dominant light source. During the day, most interiors with large windows are lit primarily by sun and skylight. In many modern office buildings, however, the large windows are heavily tinted, making the fluorescents the primary source. Hence, for shooting convincing realistic office scenes, it is best to use the ambient fluorescents as a main source and filter your other sources to match it. This means gelling windows with Tough Plusgreen/Windowgreen and gelling tungsten sources with Tough Plusgreen 50.
2. Attach the large sheet gels to the windows by taping the gel perimeter to the window frame. Make sure that any seams are not noticeable on camera.
3. White balance the video camera for the prevailing fluorescent green light. If you are using film, use a daylight-balanced emulsion and filter the lens with a CCM30 lens filter as well. If you are using many tungsten sources and few fluorescents, leave the tungsten unfiltered and filter the fluorescents with fluorofilter sheets; use CTO gel on any windows.
4. After gelling the windows, hang a teenie or pepper as a backlight high behind the seated subject by means of a scissor clamp rigged to the dropped ceiling. If the background walls need bringing up, hide a nook or small broad in the corners—be careful, however, not to make walls unnaturally hot.
5. Set a softlight near the camera to fill in the harsh fluorescent light.
Prerigging means rigging your lights before the shooting day or at least well before the rest of the crew arrives. Determine the amperage of circuits and note how they are distributed throughout the building you will be using. Lay and tape down enough AC cable to power all lights needed to illuminate the sets. By all means, try to mount the instruments above the set with as few floor stands as possible. Light stands clutter the set, intrude on the action, and invite accidents. Often, lightweight instruments can be clamped to rafters, moldings, or doors and doorway lintels. In rooms with dropped ceilings, it is possible to use special scissor clamps to hang light fixtures from the T-bar, dropped ceiling frame. Since many actual locations do not offer overhead mounting possibilities, however, it is usually necessary to rig some kind of overhead grid.
The small rooms and cramped spaces common to many location interiors often prohibit the use of light stands. Light stands also intrude on camera framing, particularly with moving camera shots. A grid is indispensible in this instance. A grid is simply a pipe or several pipes fastened together and suspended from the ceiling above a set to support lighting fixtures. The grid can be as modest as a single furniture clamp, similar to a woodworking bar clamp, which is used to span doorways, rafters, and ceiling vaults. Instruments may be attached quickly with C-clamps. A fixture may also be affixed directly to walls or ceilings with a baby plate, a plate with a 5/8-inch pin for mounting lightweight lighting instruments that can be nailed or taped to a surface. Pole cats, spring-loaded telescoping poles that are mounted vertically in out-of-the-way areas, are another convenient way to mount lights in a limited space. A more elaborate grid may be constructed from aluminum conduit or from 2 × 3-foot fir studs in 8-foot lengths suspended near the ceiling. With the grid in place, fixtures may be rigged high enough to allow complete freedom of both actor and camera movement.
Everyone is familiar with Leonardo da Vinci’s painting, The Last Supper, which depicts Christ and his apostles seated along one side of a long table. The power of this fresco is the frankly theatrical composition, which reveals the expressions of all 13 apostles at the moment Christ tells of his eventual betrayal by one of them. Bold as it is, this blocking would not work in a realistic scene, because people almost never all sit on one side of a table. Lighting a number of seated figures facing one another in a natural manner is a problem that calls for a somewhat different approach than Leonardo’s bas-relief style. The following project is one solution to lighting a group gathered around a table.
![]() PROJECT 11.4: LIGHTING A CONTROLLED GROUP (TABLE)
PROJECT 11.4: LIGHTING A CONTROLLED GROUP (TABLE)
Purpose:
To light a seated group with a minimum of equipment.
a medium-size room
table and chairs
three to five subjects
video camcorder or camera and VCR
tripod
incident meter for determining light ratios
two 1K mickeys or 650W teenies
two 1K Nooklights or broads
three 200W peppers
two softlights
three full scrims or nets
three half scrims
three 1/4 scrims, if available
two sandbags
at least eight 25-foot grounded, AC extension cables
black wrap
accessories as needed (gaffer tape, gels, clothespins, etc.)
Procedure:
1. This project involves a discussion scene with four or five actors seated around a dinner table. Block the actors around the table as shown in Figure 11.4. Most tables are illuminated by an overhead fixture, so this will provide the motivation for this lighting plan.
2. An overhead source alone can create unwanted facial shadows and harsh hot light on the tops of heads, so use the grid to hand additional instruments to create key, back, and fill light. A scene such as this will be more pleasing if the walls are painted a medium-dark color, rather than white.

FIGURE 11.4 Lighting grid plan for a group seated around a table.
3. Rig a grid using telescoping wall spreaders that are secured high above the table. Make sure they span the room’s shorter dimension.
4. Be sure not to overload any one circuit; run extension cords to various circuits throughout the house and tape down cables to keep them out of the way.
5. Hang a large softlight directly over the table.
6. Rig a 1K mickey or 650W teenie as a key on either side of the table, high and behind each row of diners.
7. Use a half or quarter scrim in each to eliminate hot spots on the table.
8. Hang two broads to illuminate the back wall. You may wish to use a half or quarter scrim on each to even out the distribution of the light.
9. Add separation with three high, small spots (peppers, inkies, or tweenies) and perhaps amber or blue gel to add effect. You might decide to add an extra softlight in front of the scene, if a flatter light is desired.
As you try these setups, you will undoubtedly find that lighting for film and video is a time-intensive business. Now is the time to experiment; try different approaches to orthodox lighting situations; learn rules and then break them. The great cinematographers have all parted with tradition to advance the art. Vilmos Zsigmond pushed and flashed film beyond some industry people’s belief on Robert Altman’s pictures, Vittorio Storaro gelled his lights to screaming primary hue saturation levels in One from the Heart, Nestor Almendros eschewed the use of Fresnels entirely on more than one motion picture, and Gordon Willis deliberately lit the Godfather films to leave actors’ eyes in deep shadow. By all means, break rules—but learn them first.
In the real world of production, time is money and much pressure is put on the photography unit to proceed as swiftly as possible. It may become difficult to be creative and maintain high lighting standards if the production unit is under the gun to shoot 7–10 pages of script a day. Nonetheless, everyone from the director to the lowliest group will agree that a carefully lit film is well worth the pains taken to create it. The satisfaction of doing one’s very best and seeing the result of the contribution is the greatest payoff of all.