
Now that you have your basic motor controller functionality up and running, you need to connect both motor controllers to the BeagleBone Black. This task will cover this, and then show you how to control your entire platform programmatically.
Now you'll hook up both motor controllers to the battery power supply and motors. Let's start with the motor controllers. The screw-type connectors on your motor controllers make this easy and help you avoid any soldering.
First, run the battery connectors to the VIN and GND connections on one of the motor controllers. Then, take one of the two small lengths of the jumper wire and place that in the VIN connector, and then do the same with the second jumper wire and the GND connector, as shown in the following image:
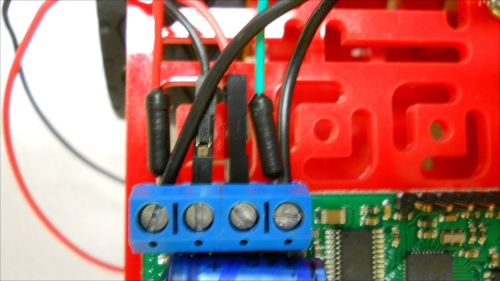
Now screw the connection tight. Do this on both the VIN and GND connectors. Now, take the other end of these two jumper wires and place them in the VIN and GND connections on the other motor controller and screw them tight. Now, you have power connections to both of your motor controllers.
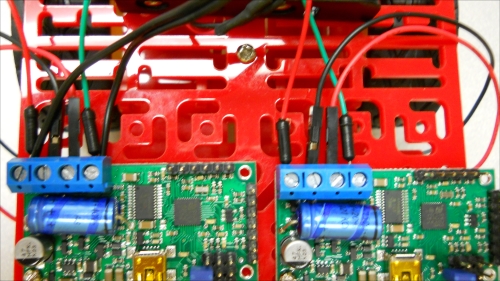
The next step is to connect each of the motors to one of the motor controllers, using the same technique that you used in the last task. Take the red and black wire connections from the motor and place them in the OUTA and OUTB connections, the red in the OUTA connection and the black in the OUTB connection, as shown in the following image:
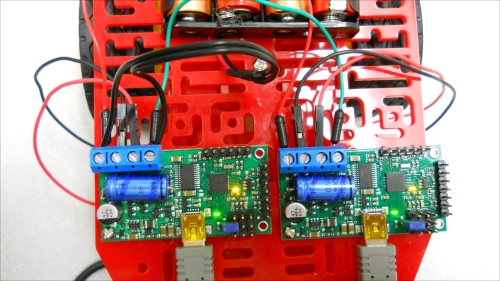
Now, you need to connect the BeagleBone Black and its USB hub to the motor controllers. First, connect the USB to the motor controllers using the USB cables. Then, connect the USB hub to the BeagleBone Black using its USB cable. These connections are shown in the following image:
Once you've made these connections, you can configure all of the HW on top of the mobile platform, perhaps as shown in the following image:
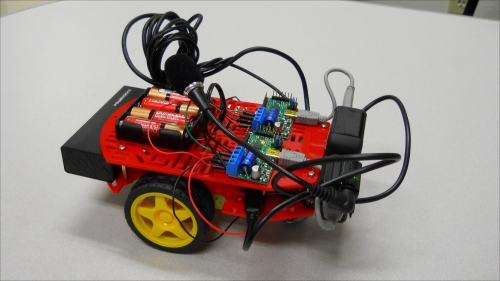
I tend to use lots of cable ties, but if you'd like it to look even more polished, feel free to use more metal nuts and bolts.
I suggest you use Python in your initial attempts to control the motor. It is very straightforward to code, run, and debug your code in Python. I am going to include the directions in this task for Python; you can also go to the Pololu's website at www.pololu.com/ and find instructions for how to access the capabilities using C.
The first Python program you are going to create is shown in the following screenshot:
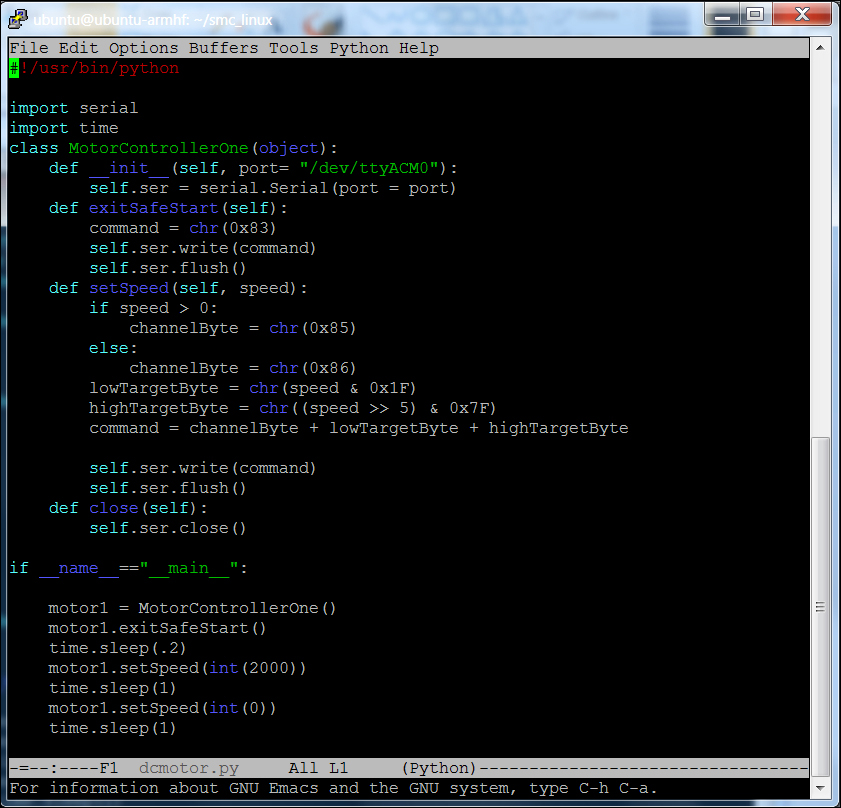
To create this program, go to your smc_linux directory and type emacs dcmotor.py (if you are using a different editor, open a new file with the name dcmotor.py). Now enter the program. Let's go through the program step by step:
- The first line allows your program to run outside of the Python environment. You'll use it later when you want to execute your code using voice commands.
- The next line imports the serial library. You need this to talk to our motor controllers.
- The
MotorControllerOneclass holds four functions. The__init__function associates your motor controller with the specific serial port, in this casettyACM0. TheexitSafeStartfunction tells your motor that you want to actually run it now and removes the safe start setting that comes as default. ThesetSpeedfunction takes yourspeedsetting and turns it into a serial command that the unit can understand, and then sends the command. Theclosefunction closes the port when you leave your program. - The
if __name__=="__main__"section is the main part of your program. The first line here initializes your motor controller; the second line tells your motor controller to exit the safe start default. The third line is 200 milliseconds wait, then the fourth line tells your motor to turn at a speed of2000. The fourth line in this section waits one second then the fifth line tells your motor to go back to the0speed. The final line is a one second wait. - In order to run this program, you'll need the serial library. Install it by typing
sudo apt-get install Python-serialat the prompt. You'll then need to add yourself to the dialout group; do this by typingsudo adduser ubuntu dialout. Then, do asudo rebootto enable all these changes. - With this installed, you can run your program. To do this, type
Python dcmotor.py. Your motor should run for one second then stop. You can now control the motor through Python! Additionally, you'll want to make this program available to run from the command line. Type:chmod +x dcmotor.py. If you now do anll(list programs), you'll see that your program is now green, which means you can execute it directly. Now, you can type./dcmotor.py. - The final step is to create a second controller for the second motor. Do this, by adding a
MotorControllerTwoclass that is a copy of theMotorControllerOneclass except that the port it points to isttyACM1. This code will look as shown in the following screenshot:
You will also copy the statements in the main section, so that both motor1 and motor2 do the same things. You don't need to copy the time.sleep statements. They are just fixed delays. Now when you run your program, both motors should turn. One important note; Linux is not a real-time platform, so your motors cannot be guaranteed to turn at exactly the same time. However, they are normally going to move within a few milliseconds of each other, which is good enough in this application. My platform turned out to be a bit finicky, I found I had to do a sudo reboot and re-log in using Putty to reset the USB, so that I could run the program more than once. Also, you may need to issue the ./SmcCmd --resume command to reset the motor controllers. A bit painful, but it works.
Now that you know the basics of commanding your mobile platform, feel free to add even more setSpeed commands to make your mobile platform move. Setting both the motors to a positive speed will move the mobile platform forward. Setting them to a negative value will make the platform go in reverse. Running just one motor will make the platform turn, as will running both the motors in opposite directions.
The platforms you've looked at up until now had two DC motors. It would be easy to add even more motors. There are several platforms that provide DC motors for all four wheels. In this case, you'd just add two more motor controllers, and then update the code for four classes of MotorContoller.