
Self-Publishing 101
Once you have built your app and are happy with the contents and quality, it’s time to publish your work on the Google Play Store. The Play Store is Google’s official distribution network for Android developers. It’s worth noting that it’s not the only option but it is definitely the easiest and most visible option for distributing all types of apps on Android.
Distributing apps via the Play Store is not free; like any retailer, Google makes money from every app sold. Google’s fee is 30% of the sales price after tax. It’s worth bearing this in mind whenever you are doing any calculations with regards to working out how much to charge for your app.
Getting ready to sell your app is an exciting time but it can also be daunting. There are many tasks which need to be completed before your app can show up in the Play Store. The purpose of this chapter is to take a look at what those are.
The Google Play Developer Console
Before you can get your app on the Google Play Store you must register as a developer. Google charges a one-time fee of $25 to register as a developer and obtain a Google Play Developer Console account. The page to sign up can be found here: https://support.google.com/googleplay/android-developer/answer/113468.
The Google Play Developer Console is a full-featured web app to control the distribution of your app. This is where you will upload your app, upload updates, set pricing, upload marketing material, and see your number of downloads and revenue.
Before we can upload any apps to the Developer Console we must create secure, signed versions of our app.
Keys, Keystore, and Digital Signatures
The Play Store uses digital signatures to verify the authenticity of apps which are uploaded via the Google Play Developer Console. The basis of the signature process lies in the public-private key system which is also used in some forms of encryption.
Keys used for these purposes come in pairs: the public key and the private key. The private key is a file which you must keep secure. Private keys allow you to create encrypted messages or signatures which you can then share with others. The public key is a file which you can share with others to allow them to unecrypt this data. In the Android ecosystem, the APKs themselves are simple zip files which can be opened by any capable program. These are not encrypted but the application will have a digital signature included. This signature includes data which is encrypted with the private key you create and includes the public key so that others can read the signature. This two-step process allows the Android OS on a device to validate that an app is legitimate. If the signature cannot be read using the supplied public key, or if the data it contains cannot be recreated from the data contained within the APK, the OS can be sure that the app is not legitimate. The exact process which Google uses to create signatures for Android APKs is not available to the public; this in itself is an added layer of security.
Keystores are the files used to provide public-private key signatures for use with your APKs. A keystore may contain multiple aliases; each alias represents a public-private key pair. The entire keystore is also password encrypted. This configuration allows you to create different public-private key pairs for each app which you plan to release and to easily manage these keys by storing them within a single keystore.
At this point, you may be wondering why the applications need to be signed in this way. Essentially it is a method for securing your identity. By signing the applications with your private key, of which you have the only unique copy, Google can trust that any applications uploaded using this key are new versions of the same application and safe to upload to users. This prevents others from being able to hijack your applications and upload compromised APKs to the store.
Keys used to encrypt data being transmitted via the Internet are generally issued by an authorized certificate authority. Certificate authorities are organizations which provide third-party verification of public keys. Web browsers contain built-in lists of certificate authorities who are on trusted lists and are contacted by the program to verify that a key is legitimate and should to be used. Android does not require that APKs be signed by keys provided by a certificate authority. It is acceptable to create your own keys which you generate using the tools supplied with the Android SDK. You can only be sure that your APKs are safe, however, if you properly secure your own keys. Make sure that you keep them in a safe location and never share your keystore or your passwords.
Signing an APK for the Play Store
When you create an app for the Play Store, you must package it into an Android application package file (APK), which is Google’s distribution format. This format is Google’s proprietary format but is essentially a zip file and can be opened using a utility such as 7-Zip.
Every time you have built an app during the process of reading through this book, the ADT plug-in for Eclipse has been automatically creating APKs and transferring them to your device. All Android apps must be signed, the ADT plug-in signs these debug APKs with a debug key. The Google Play Developer Console will show an error if you try to upload an APK signed with a debug key to the Play Store.
- To be able to upload an app to the Play Store, we must create a version which is signed with a unique key . The Android SDK contains methods for achieving this and the ADT plugin provides an easy-to-use wizard to aid in this process. The following instructions will walk you through the process of creating an APK signed with a unique key which you can use to upload to the Google Play Store. Run Eclipse and open your project in the Project Explorer window.
- Right-click your project folder and select the Export Signed Application Package
… option under the Android Tools menu. The menu option is shown in Figure 11-1. Selecting this option will cause the Export wizard to begin to create your signed APK.
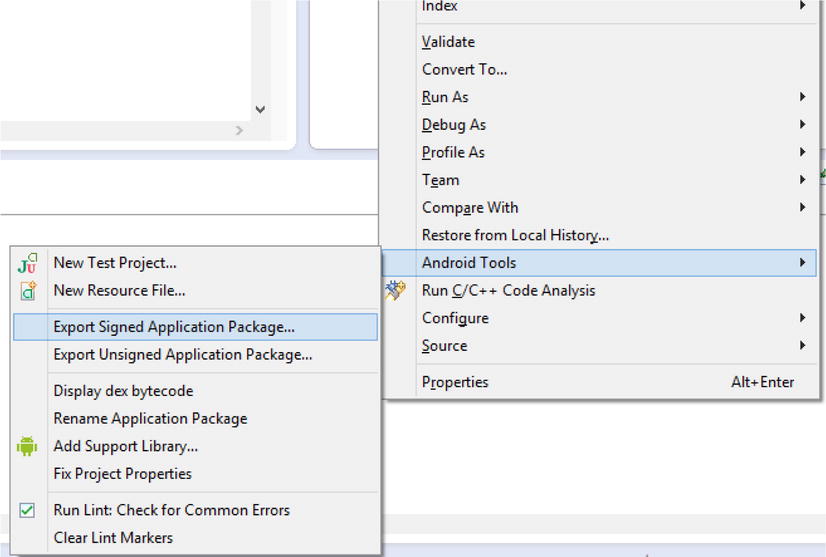
Figure 11-1. The Export Signed Application Package option
- In the wizard, select the project which you are going to use to export the APK. If you right-clicked the project you would like to export, the name should already be entered. Figure 11-2 shows the Export Android Application window
.

Figure 11-2. The Export Android Application window
- Click Next; you will be taken to the Keystore Selection window. Figure 11-3 shows this dialog.

Figure 11-3. The Keystore Selection window
- Select the radio button for “Create new keystore” if this is the first time you have exported an Android application. Otherwise, you will want to select “Use existing keystore.”
Figure 11-4 shows the Key Creation window. This window is used to enter the information used to identify the owner of the key.

Figure 11-4. The Key Creation window
The Key Creation window requires that you supply some detailed information about the owner of the keystore.
The alias is most likely to be the name of the company or organization which is releasing the game.
A password is also required for the alias.
Keys expire; therefore, selecting a long-validity period is essential to ensure that your keystore’s validity does not expire while you are likely to still be using it. Google recommends a minimum validity period of 25 years in its documentation, which can be found at http://developer.android.com/tools/publishing/app-signing.html. An expired key does not prevent your app from being used on user’s devices but it does prevent you from issuing updates to your app. If your key were to expire, you would need to register a new app to issue updates.
Then, the personal details for an employee or company director should be entered. The candidate for this is an easy selection in a one-person operation.
Figure 11-5 shows the last step of the export process , which is to select an output location for your exported APK.
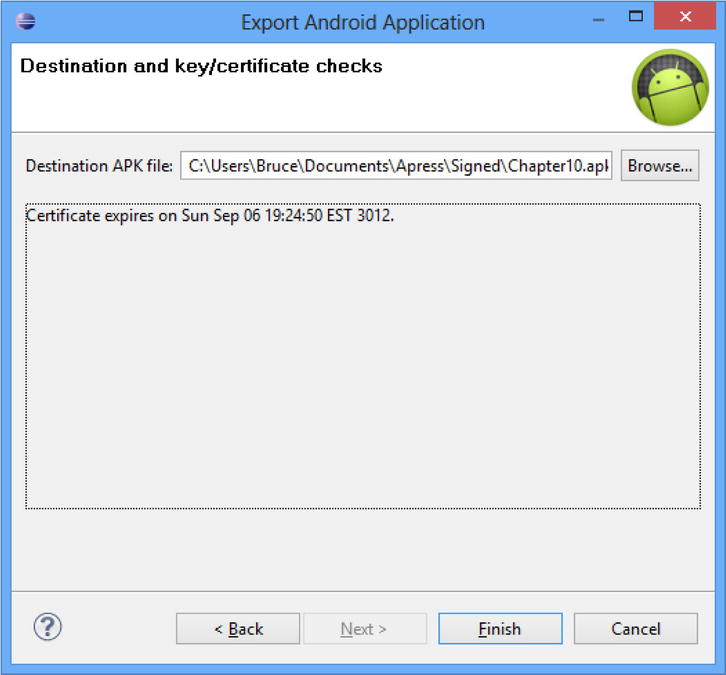
Figure 11-5. The Perform Checks window
This last window performs some last-minute error checking on your keystore and will list any errors which are found. More often than not, there will be no errors, as in Figure 11-5.
Once you click Finish, your APK will be written to your selected location and will be ready for upload to the Play Store Developer Console.
Uploading to the Google Play Developer Center
The Google Play Developer Console is your portal to the Play Store. This web app is provided by Google to allow developers easy access to their distribution channel without needing to form complicated publishing agreements. This is ideal for small developers, as it allows self-publishing without needing an external relationship with a publishing partner.
The first step in having your game appear on the Play Store is to create a new application in the Developer Console. The Developer Console can be found at the following URL: http://play.google.com/apps/publish.
When you first log in, your console will be empty and appear as it does in Figure 11-6.
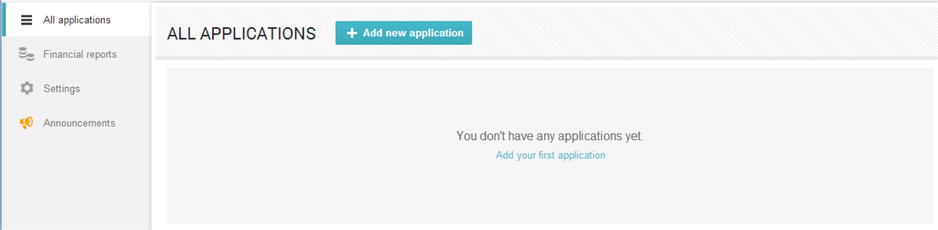
Figure 11-6. Google Play Developer console All Applications
At this point, we must create a new application.
- We do this by clicking the Add New Application button. Doing this presents us with the Add New Application dialog, shown in Figure 11-7.
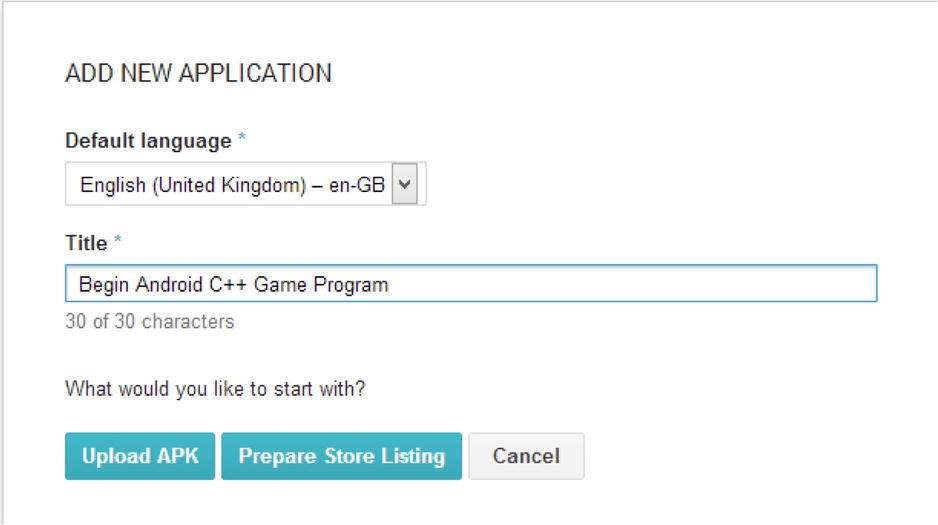
Figure 11-7. The Add New Application dialog
- This dialog allows us to select the default language for our application and the app’s title. There are two options which we can now take: Upload APK and Prepare Store Listing. Figure 11-8 shows the screen which appears after selecting Upload APK. This screen now consists of the title for our app and screens which allow us to control our Store Listing, Pricing and Distribution, In-app products, and Services and APIs.
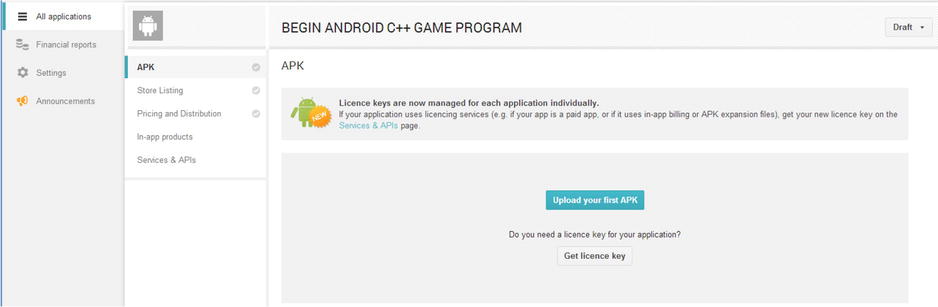
Figure 11-8. The APK screen
- When you select Upload, the web application will present a dialog where you can drag and drop your APK file. Once you have done this, you will see the progress bar shown in Figure 11-9.

Figure 11-9. Upload APK progress bar
Once the APK has finished uploading, your app will be in the draft state. This means that it has been set up and configured on the Play Store but not yet “live.”
Before you can make your app appear in the Play Store listings on users’ devices, you must finishing configuring the details needed to list the app in the store. The Developer Console provides a list of this information in the Why Can’t I Publish dialog box. We look at this list in Figure 11-10.

Figure 11-10. The Why Can’t I Publish dialog
As you can see, there are quite a few steps which must still be completed before you can push your app into the live Play Store environment.
The icon and screenshots are essential to your listing. These attract customers and should be created with a purpose of showing your game in its best light. You should take a look at some of the listings of the most popular apps and games and try to determine if there are any particular trends which may be contributing to their success. It’s also important to select the appropriate category for your app and a description which entices people to play your game.
These details are supplied via the Store Listing screen. The title of your app can be changed here and can consist of up to 30 characters. It’s also possible to provide translations for different languages.
Your description can be up to 4,000 characters long. It’s important to provide an enticing introduction to your app in the description. The description will convey the type of gameplay and experience the player can expect to have when downloading your app. It’s also possible to provide a list of the latest updates which are included in your app if this is not the first release in the recent changes section.
The graphic assets are vitally important to the success of your app. While not all players will read the lengthy description of your app, almost all users will look at the screenshots which you provide. It’s important to provide screenshots which show the graphics of your game in their best light and also some screenshots which show the gameplay of your app. Google has also provided a link to a Youtube video for your game. If you have created a trailer for the app, it would be a very good idea to upload this to Youtube and include the link with your store listing. The Google Play Store app will automatically embed the Youtube video you supply into your store listing. Providing all of the requested assets at any given time is important if you wish to be featured in the Play Store. It’s important to periodically check the required assets, as Google is known to change and update these to suit different types of devices and resolutions. If the Play Store app or website changes, then you will be less likely to be featured if you have not provided the assets Google needs to show your app off on their new layout.
Selecting the appropriate category is important for your game. This category determines where in the Play Store your app will be listed. Selecting an accurate category will help people find your game when they are looking for apps of that type. You can expect your game to be more successful due to the category properly targeting your users.
It’s likely that you will have a website to promote your company or your app. Google requires that you provide a URL to your privacy policy, so it’s a good idea to think about what you would like this important declaration to contain. Sites such as http://www.docracy.com/mobileprivacy/ can be used as a good starting point, but it’s important that your privacy policy covers all of the ways in which you may be using your users data.
The Developer Console is also the place where you will set up the monetization strategy for your app. The traditional business model where apps are sold for a price is available, and you can set the price for your app in the Pricing and Distribution section of the Google Play Developer Console.
When setting a price, you initially set the default price for your application in your own local currency. This is the price for your app excluding local sales tax. You then have the choice to automatically convert the price of the app to all of the foreign markets which you choose to support. The Google Play Developer Console currently supports distribution in 135 different countries. It is also possible for you to set specific prices for some of these countries in their local currencies. Certain countries also support limiting distribution to specific mobile network operators.
Caution It’s also entirely possible to set your app to be free. Make sure that this is something which you wish to do before finalizing the setting; changing your app’s price to free cannot be reversed.
Another option for making money with your app is to support in-app purchases. There are two types of in-app purchases, permanent purchases and consumables. Downloadable content packs, which include levels, weapons, characters, or cars, can be considered as permanent purchases. With this type of purchase, a player pays once for the content and it permanently belongs to them. The other type of purchase is consumables. An example of this may be health potions. A user may buy a potion but once it is used they would be required to buy another. Getting the balance of cost and benefits of in-app purchases is a delicate and complicated topic but is one which can reap rewards for a developer who gets it right. The decisions you eventually make with regards to how much to charge will include factors such as the cost of development, your expected return, and also how much you believe customers will be willing to spend for the product you have produced. There are no easy methods to determine how you should make these decisions; however, an excellent starting point on the theory of pricing can be found at http://book.personalmba.com/pricing-uncertainty-principle/ .
Last but not least are subscriptions. Google now offers subscription services and billing via the Play Store. This could allow developers to create massively multiplayer online (MMO)–type experiences on mobile platforms. If you believe your game could sustain players for a considerable period of time, then this may be a viable option.
Once you have released your game and begin having users make purchases, data will begin to appear in the Financial Reports sections of the Play Store. This allows you to track the revenue which your app is making. You can use this section to determine if new features, updates, or publicity is making any impact on the revenue generated by your app.
The Google Play Developer Console is also able to provide you with crash data from your application, data on App Not Responding notifications to users, and other recommendations for optimizing your store listing.
It’s important to take any suggestions made by the Developer Console seriously. These recommendations and notices help indicate areas where your application may not meet the standards of other applications, thus reducing the rating of your app. High ratings and high quality listings are key to gaining traction among users and possibly even being featured in the Play Store. Being featured by Google in the Play Store will make a massive difference to the earning potential of your game.
The quality of your applications can be improved over time in a number of ways, and this can tie into an overall strategy for increasing your user base and revenues. In the past, it was common for game developers to develop every part of a game title before launch. This was especially true for cartridge-based games and disc-based games, which were distributed on physical media.
Today, the Internet has opened brand-new methods of game development for developers. The Internet has allowed developers to create games gradually by building minimum viable versions of their games and releasing them to the public. Feedback is then received from people who play the games and developers can follow paths of development which their users have found interesting.
A perfect current example of this is Minecraft . Minecraft was developed as a very minimal product in the initial stages. Each new release has added more and more content and gameplay elements to build the product up into something which is a modern phenomenon and a massively successful title. While it won’t be possible for every game to reach the levels of success which Minecraft has achieved, it is a business model and development practice which smaller, independent studios should be looking to emulate as opposed to developing full titles with large budgets and lots of risk.
To support this type of development, I recommend using a three-part game versioning system which categorizes builds using the major, minor, and maintenance method. An example of such a version number would be 1.0.1.
The major version of the preceding build is 1.0 should be used for prerelease builds such as alpha and beta builds which are given to internal or external testers. Build 1 should be the first public release of a title.
The minor version here is 0. Minor versions are generally useful for updates which include new content. The mechanics and structure of the game are likely the same between minor versions, but new content has been added which denotes that the game is a reasonable update over the previous minor revision.
The maintenance number should be used to indicate versions which contain only bug fixes. It is common for titles to ship with bugs. Some of these bugs will be serious and some will be minor, but it is good for developers to issue updates to resolve bugs which are frustrating users. Players have taken to using the Google Play 5-star rating system to encourage developers to fix bugs in their games. If you take a look at the reviews for any top title in the Play Store, it won’t be long before you come across some comments from users letting the developer know that they would score the game with a higher score if a certain bug which frustrates them could be fixed.
The last point is especially important to game developers. Google will feature apps which are popular, are of high quality, and receive good reviews. Any developer who would like to have their game featured in the Play Store by Google should absolutely be responding to the feedback supplied by Google in the Developer Console and to the reviews of users who may be unhappy with a certain aspect of your game.
Summary
This chapter has covered the final step of taking an app from development to distribution. We have looked at the process of signing an APK for distribution and creating a keystore to uploading to the Developer Console. Lastly, we looked at the options available to developers to monetize their game products.
Shipping a product is not the end of the journey for a game title. For independent, small developers finishing the game code and putting the app on sale is just the end of the first stage of the game business cycle. At this point it’s important to begin to learn what players of the game think and feel about the product and make changes and updates to the app on a regular basis to maintain interest and create a dedicated following.
Some of the biggest games on the Android platform do not follow the old style of game development, where the game is finished up front then put out for sale. It’s more common now for successful games to ship and then grow to a large committed user base.
It’s an exciting time to be an independent developer. Services such as the Play Store allow anyone with the skill and determination to create commercially successful games without necessarily having a large budget or team.