It’s time to put together all you’ve learned about OpenGL ES to create a game. As discussed in Chapter 3, there are several very popular genres from which to choose when developing a game in the mobile space. For our next game, we decided to stick to the casual genre. We’ll implement a jump-’em-up game similar to Abduction or Doodle Jump. As with Mr. Nom, we’ll start by defining our game mechanics.
Core Game Mechanics
If you aren’t familiar with Abduction, we suggest that you install it on your Android device and give it a try (a free download on Google Play) or at least watch a video of the game on the Web. Using Abduction as an example, we can condense the core game mechanics of our game, which will be called Super Jumper, into the following:
The protagonist is constantly jumping upward, moving from platform to platform. The game world spans multiple screens vertically.
Horizontal movement can be controlled by tilting the phone to the left or the right.
When the protagonist leaves one of the horizontal screen boundaries, he reenters the screen on the opposite side.
Platforms can be static or moving horizontally.
Some platforms will be pulverized randomly when the protagonist hits them.
Along the way up, the protagonist can collect items to score points.
Besides coins, there are also springs on some platforms that will make the protagonist jump higher.
Evil forces populate the game world, moving horizontally. When our protagonist hits one of them, he dies and the game is over.
When our protagonist falls below the bottom edge of the screen, the game is over.
At the top of the level is some sort of goal. When the protagonist hits that goal, a new level begins.
While the list is longer than the one we created for Mr. Nom, it doesn’t seem a lot more complex. Figure 9-1 shows an initial mock-up of the core principles. This time we went straight to Paint.NET for creating the mock-up. Let’s come up with a backstory.
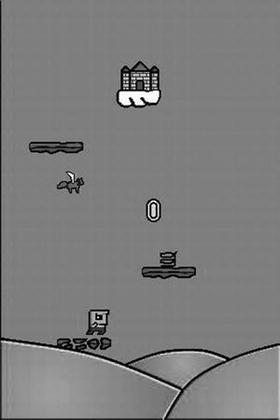
Figure 9-1. Our initial game mechanics mock-up, showing the protagonist, platforms, a spring, a coin, an evil force, and a goal at the top of the level
Developing a Backstory and Choosing an Art Style
We are going to be totally creative here and develop the following unique story for our game.
Bob, our protagonist, suffers from chronic jumperitis. He is doomed to jump every time he touches the ground. Even worse, his beloved princess, who shall remain nameless, was kidnapped by an evil army of flying killer squirrels and placed in a castle in the sky. Bob’s condition proves beneficial after all, and he begins the hunt for his loved one, battling the evil squirrel forces.
This classic video game story lends itself well to the 8-bit graphics style, which can be found in games such as the original Super Mario Brothers on the NES. The mock-up in Figure 9-1 shows the final game graphics for all the elements of our game. Bob, coins, flying squirrels, and pulverized platforms are, of course, animated. We’ll also use music and sound effects that fit our visual style.
Defining Screens and Transitions
We are now able to define our screens and transitions. Following the same formula we used in Mr. Nom, we’ll include the following elements:
A main screen with a logo; PLAY, HIGHSCORES, and HELP menu items; and a button to disable and enable sound.
A game screen that asks the player to get ready and handles running, paused, game-over, and next-level states gracefully. The only new addition to what we used in Mr. Nom will be the next-level state of the screen, which will be triggered once Bob hits the castle. In that case, a new level will be generated, and Bob will start at the bottom of the world again, keeping his score.
A high-scores screen that shows the top five scores the player has achieved so far.
Help screens that present the game mechanics and goals to the player. We’ll be sneaky and leave out a description of how to control the player. Kids these days should be able to handle the complexity we faced back in the ’80s and early ’90s, when games didn’t provide any instructions.
That is more or less the same setup as in Mr. Nom. Figure 9-2 shows all screens and transitions. Note that we don’t have any buttons on the game screen or its subscreens, except for the pause button. Users will intuitively touch the screen when asked if they are ready.
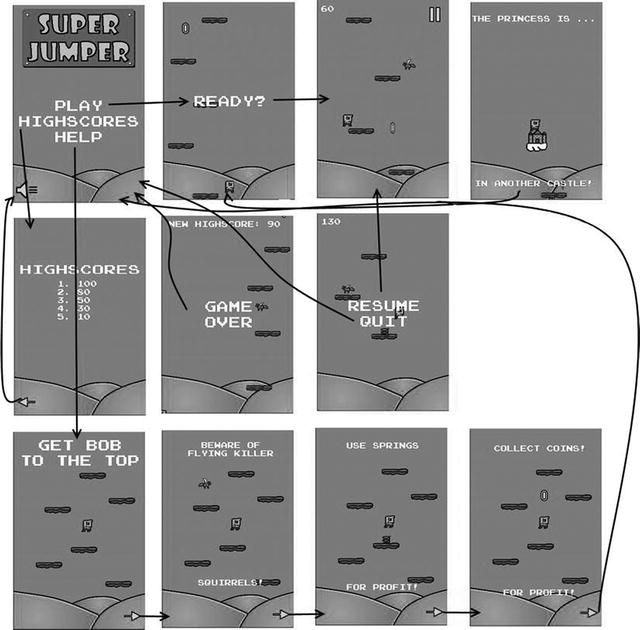
Figure 9-2. All the screens and transitions of Super Jumper
With our screens and transitions defined, we can now think about our world’s size and units, as well as how those sizes and units relate to the graphical assets.
Defining the Game World
The classic chicken-and-egg problem haunts us again. As you learned in Chapter 8, we have a correspondence between world units (for example, meters) and pixels. Our objects are defined physically in world space. Bounding shapes and positions are given in meters; velocities are given in meters per second. The graphical representations of our objects are defined in pixels, though, so we have to have some sort of mapping. We overcome this problem by first defining a target resolution for our graphical assets. As with Mr. Nom, we will use a target resolution of 320×480 pixels (aspect ratio of 1.5). We’re using this target because it’s the lowest practical resolution; if you’re targeting tablets specifically, you may want to use a resolution such as 800×1280, or perhaps something in between, such as 480×800 (a typical Android handset). Regardless of your target resolution, the principals remain the same.
The next thing we have to do is establish a correspondence between pixels and meters in our world. The mock-up in Figure 9-1 gives us a sense of how much screen space the different objects use, as well as their proportions relative to each other. We recommend choosing a mapping of 32 pixels to 1 meter for 2D games. So, let’s overlay our mock-up, which is 320×380 pixels in size, with a grid where each cell is 32×32 pixels. In our world space, this would map to 1×1-meter cells. Figure 9-3 shows our mock-up and the grid.
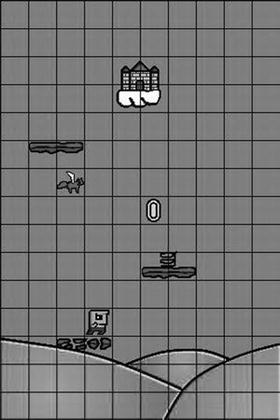
Figure 9-3. The mock-up overlaid with a grid. Each cell is 32×32 pixels and corresponds to a 1×1-meter area in the game world.
We cheated a bit in Figure 9-3. We arranged the graphics in such a way that they line up nicely with the grid cells. In the real game, we’ll place the objects at noninteger positions.
So, what can we make of Figure 9-3? First of all, we can directly estimate the width and height of each object in our world in meters. Here are the values we’ll use for the bounding rectangles of our objects:
Bob is 0.8×0.8 meters; he does not entirely span a complete cell.
A platform is 2×0.5 meters, taking up two cells horizontally and half a cell vertically.
A coin is 0.8×0.5 meters. It nearly spans a cell vertically and takes up roughly half a cell horizontally.
A spring is 0.5×0.5 meters, talking up half a cell in each direction. The spring is actually a little bit taller than it is wide. We make its bounding shape square so that the collision testing is a bit more forgiving.
A squirrel is 1×0.8 meters.
A castle is 1.8×1.8 meters.
With these sizes, we also have the sizes of the bounding rectangles of our objects for collision detection. We can adjust them if they turn out to be a little too big or small, depending on how the game plays out with these values.
Another thing we can derive from Figure 9-3 is the size of our view frustum. It will show us 10×15 meters of our world.
The only things left to define are the velocities and accelerations we have in the game. These are highly dependent on how we want our game to feel. Usually, you’d have to do some experimentation to get these values right. Here’s what we came up with after a few iterations of tuning:
The gravity acceleration vector is (0,–13) m/s2, slightly more than what we have here on Earth and what we used in our cannon example in Chapter 8.
Bob’s initial jump velocity vector is (0,11) m/s. Note that the jump velocity affects the movement only on the y axis. The horizontal movement will be defined by the current accelerometer readings.
Bob’s jump velocity vector will be 1.5 times his normal jump velocity when he hits a spring. That’s equivalent to (0,16.5) m/s. Again, this value is derived purely from experimentation.
Bob’s horizontal movement speed is 20 m/s. Note that that’s a directionless speed, not a vector. We’ll explain in a minute how that works together with the accelerometer.
The squirrels will patrol from the left to the right and back continuously. They’ll have a constant movement speed of 3 m/s. Expressed as a vector, that’s either (–3,0) m/s if the squirrel moves to the left or (3,0) m/s if the squirrel moves to the right.
So, how will Bob’s horizontal movement work? The movement speed we previously defined is actually Bob’s maximum horizontal speed. Depending on how much the player tilts his or her phone, Bob’s horizontal movement speed will be between 0 (no tilt) and 20 m/s (fully tilted to one side).
We’ll use the value of the accelerometer’s x axis because our game will run in portrait mode. When the phone is not tilted, the axis will report an acceleration of 0 m/s2. When fully tilted to the left so that the phone is in landscape orientation, the axis will report an acceleration of roughly –10 m/s2. When fully tilted to the right, the axis will report an acceleration of roughly 10 m/s2. All we need to do is normalize the accelerometer reading by dividing it by the maximum absolute value (10) and then multiplying Bob’s maximum horizontal speed by that. Bob will thus travel 20 m/s to the left or right when the phone is fully tilted to one side and less if the phone is tilted less. Bob can move around the screen twice per second when the phone is fully tilted.
We’ll update this horizontal movement velocity each frame based on the current accelerometer value on the x axis and combine it with Bob’s vertical velocity, which is derived from the gravity acceleration and his current vertical velocity, as we did for the cannonball in the Chapter 8 examples.
One essential aspect of the world is the portion we see of it. Since Bob will die when he leaves the screen on the bottom edge, our camera also plays a role in the game mechanics. While we’ll use a camera for rendering and move it upward when Bob jumps, we won’t use it in our world simulation classes. Instead, we record Bob’s highest y coordinate so far. If he’s below that value minus half the view frustum height, we know he has left the screen. Thus, we don’t have a completely clean separation between the model (our world simulation classes) and the view, since we need to know the view frustum’s height to determine whether Bob is dead. We can live with this.
Let’s have a look at the assets we need.
Creating the Assets
Our new game has two types of graphical assets: UI elements and actual game, or world, elements. Let’s start with the UI elements.
The UI Elements
The first thing to notice is that the user interface (UI) elements (buttons, logos, and so forth) do not depend on our pixel-to-world unit mapping. As in Mr. Nom, we design them to fit a target resolution—in our case, 320×480 pixels. Looking at Figure 9-2, we can determine which UI elements we have.
The first UI elements we create are the buttons we need for the different screens. Figure 9-4 shows all the buttons of our game.
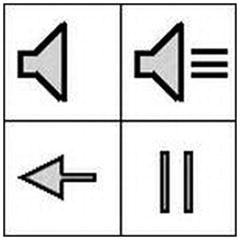
Figure 9-4. Various buttons, each 64×64 pixels in size
We prefer to create all graphical assets in a grid with cells having sizes of 32×32 or 64×64 pixels. The buttons in Figure 9-4 are laid out in a grid with each cell having 64×64 pixels. The buttons in the top row are used on the main menu screen to signal whether sound is enabled or not. The arrow at the bottom left is used in a couple of screens to navigate to the next screen. The button in the bottom right is used on the game screen when the game is running to allow the user to pause the game.
You might wonder why there’s no arrow pointing to the right. Remember from Chapter 8 that, with our fancy sprite batcher, we can easily flip things we draw by specifying negative width and/or height values. We’ll use that trick for a couple of graphical assets to save some memory.
Next up are the elements we need on the main menu screen: a logo, the menu entries, and the background image. Figure 9-5 shows all of these elements.
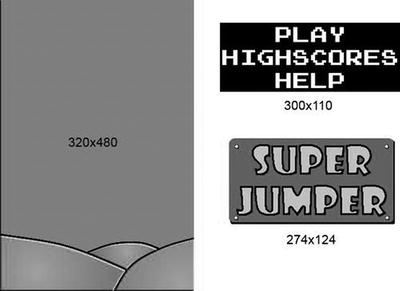
Figure 9-5. The background image, the main menu entries, and the logo
The background image is used not only on the main menu screen, but also on all screens. It is the same size as our target resolution, 320×480 pixels. The main menu entries make up 300×110 pixels. The main menu’s black background is used because white on white wouldn’t look good. In the actual image, the main menu’s background is made up of transparent pixels, of course. The logo is 274×142 pixels with some transparent pixels at the corners.
Next up are the help-screen images. Instead of compositing each of them with a couple of elements, we lazily made them all full-screen images of size 320×480. That will reduce the size of our drawing code a little while not adding a lot to our program’s size. You can see all of the help screens in Figure 9-2. The only thing we’ll composite these images with is the arrow button.
For the high-scores screen, we’ll reuse the portion of the main menu image that says HIGHSCORES. The actual scores are rendered with a special technique we’ll look into later in this chapter. The rest of that screen is again composed of the background image and a button.
The game screen has a few more textual UI elements, namely the READY? label, the menu entries for the paused state (RESUME and QUIT), and the GAME OVER label. Figure 9-6 shows them in all their glory.

Figure 9-6. The READY?, RESUME, QUIT, and GAME OVER labels
Handling Text with Bitmap Fonts
So, how do we render the other textual elements on the game screen? We use the same technique we used in Mr. Nom to render the scores. Instead of just having numbers, we also have characters now. We use an image atlas, where each subimage represents one character (for example, 0 or a). This image atlas is called a bitmap font. Figure 9-7 shows the bitmap font we’ll use.
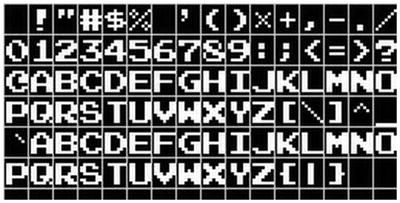
Figure 9-7. A bitmap font
The black background and the grid in Figure 9-7 are not, of course, part of the actual image. Using bitmap fonts is a very old technique for rendering text on the screen in a game. Bitmap fonts usually contain images for a range of ASCII characters. One such character image is referred to as a glyph. ASCII is one of the predecessors of Unicode. There are 128 characters in the ASCII character set, as shown in Figure 9-8.
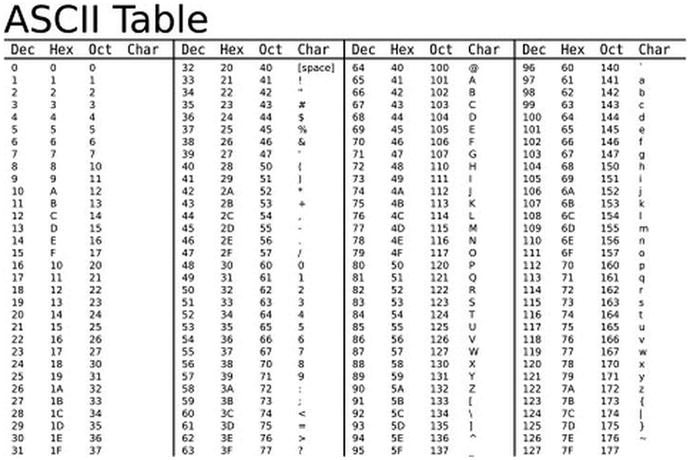
Figure 9-8. ASCII characters and their decimal, hexadecimal, and octal values
Out of these 128 characters, 95 are printable (characters 32 to 126). Our bitmap font contains only printable characters. The first row in the bitmap font contains the characters 32 to 47, the next row contains the characters 48 to 63, and so on. ASCII is only useful if you want to store and display text that uses the standard Latin alphabet. There’s an extended ASCII format that uses the values 128 to 255 to encode other common characters of Western languages, such as ö and é. More expressive character sets (for example, for Chinese or Arabic) are represented via Unicode and can’t be encoded via ASCII. For our game, the standard ASCII character set suffices.
So, how do we render text with a bitmap font ? That turns out to be really easy. First, we create 96 texture regions, each mapping to a glyph in the bitmap font. We can store those texture regions in an array as follows:
TextureRegion[] glyphs = new TextureRegion[96];Java strings are encoded in 16-bit Unicode. Luckily for us, the ASCII characters we have in our bitmap font have the same values in ASCII and Unicode. To fetch the region for a character in a Java string, we just need to do this:
int index = string.charAt(i) – 32;This gives us a direct index into the texture-region array. We just subtract the value for the space character (32) from the current character in the string. If the index is less than 0 or greater than 95, we have a Unicode character that is not in our bitmap font. Usually, we just ignore such a character.
To render multiple characters in a line, we need to know how much space there should be between characters. The bitmap font in Figure 9-7 is a fixed-width font, meaning that each glyph has the same width. Our bitmap font glyphs have a size of 16×20 pixels each. When we advance our rendering position from character to character in a string, we just need to add 20 pixels. The number of pixels by which we move the drawing position from character to character is called the advance. For our bitmap font, it is fixed; however, it is generally variable depending on the character we draw. A more complex form of advance is calculated by considering both the current character we are about to draw and the next character. This technique is called kerning, if you want to look it up on the Web. We’ll use only fixed-width bitmap fonts, as they make our lives considerably easier.
So, how did we generate that ASCII bitmap font ? We used one of the many tools available on the Web for generating bitmap fonts. The one we used is called Codehead’s Bitmap Font Generator (CBFG) , and it is freely available at www.codehead.co.uk/cbfg/ . You can select a font file on your hard drive and specify the height of the font, and the generator will produce an image from it for the ASCII character set. The tool has many options that are beyond the scope of our discussion here. We recommend that you download CBFG and play around with it a little.
We’ll draw all the remaining strings in our game with this technique. Later, you’ll see a concrete implementation of a bitmap font class. For now, let’s get back to creating our assets.
With the bitmap font, we now have assets for all our graphical UI elements. We will render them via a sprite batcher using a camera that sets up a view frustum that directly maps to our target resolution. This way, we can specify all the coordinates in pixel coordinates.
The Game Elements
The actual game objects are dependent on our pixel-to-world unit mappings, as discussed earlier. To make the creation of the game elements as easy as possible, we used a little trick: we started each drawing with a grid of 32×32 pixels per cell. All the objects are centered in one or more such cells so that they correspond easily with the physical sizes they have in our world. Let’s start with Bob, depicted in Figure 9-9.

Figure 9-9. Bob and his five animation frames
Figure 9-9 shows two frames for jumping, two frames for falling, and one frame for being dead. Each image is 160×32 pixels in size, and each animation frame is 32×32 pixels in size. The background pixels are transparent.
Bob can be in one of three states: jumping, falling, or dead. We have animation frames for each of these states. Granted, the difference between the two jumping frames and the two falling frames is minor—only his forelock is wiggling. We’ll create an Animation instance for each of the three animations of Bob, and we’ll use them for rendering according to his current state. We also don’t have duplicate frames for Bob heading left. As with the arrow button (shown earlier, in Figure 9-4), we’ll just specify a negative width with the SpriteBatcher.drawSprite() call to flip Bob’s image horizontally.
Figure 9-10 depicts the evil flying squirrel. We have two animation frames again, so the squirrel appears to be flapping its evil wings.
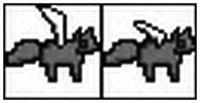
Figure 9-10. An evil flying squirrel and its two animation frames
The image in Figure 9-10 is 64×32 pixels, and each frame is 32×32 pixels.
The coin animation shown in Figure 9-11 is special. Our keyframe sequence will not be 1, 2, 3, 1, but 1, 2, 3, 2, 1. Otherwise, the coin would go from its collapsed state in frame 3 to its fully extended state in frame 1. We can conserve a little space by reusing the second frame.
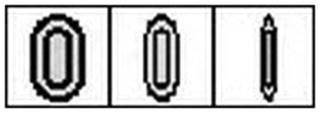
Figure 9-11. The coin and its animation frames
The image in Figure 9-11 is 96×32 pixels, and each frame is 32×32 pixels.
Not a lot has to be said about the spring image in Figure 9-12. The spring just sits there happily in the center of the image. The image is 32×32 pixels.

Figure 9-12. The spring
The castle in Figure 9-13 is also not animated. It is bigger than the other objects (64×64 pixels).

Figure 9-13. The castle
The platform in Figure 9-14 (64x64 pixels) has four animation frames. According to our game mechanics, some platforms will be pulverized when Bob hits them. We’ll play back the full animation of the platform once in that case. For static platforms, we’ll just use the first frame.
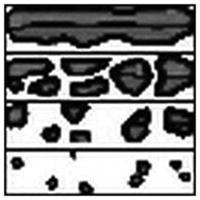
Figure 9-14. The platform and its animation frames
Texture Atlas to the Rescue
Now that we’ve identified all the graphical assets in our game, we need to discuss their textures. We already talked about how textures need to have power-of-two widths and heights. Our background image and all the help screens have a size of 320×480 pixels. We’ll store those in 512×512-pixel images so that we can load them as textures. That’s already six textures.
Do we create separate textures for all the other images as well? No. We create a single texture atlas. It turns out that everything else fits nicely in a single 512×512 pixel atlas, which we can load as a single texture—something that will make the GPU really happy, since we only need to bind one texture for all game elements, except the background and help screen images. Figure 9-15 shows the atlas.

Figure 9-15. The mighty texture atlas
The image in Figure 9-15 is 512×512 pixels in size. The grids and red outlines are not part of the image, and the background pixels are transparent. This is also true for the black background pixels of the UI labels and the bitmap font. The grid cells are 32×32 pixels in size. The cool thing about using a texture atlas like this is that if you want to support higher-resolution screens, you don’t need to change anything but the size of this texture atlas. You can scale it up to 1024×1024 pixels with higher-fidelity graphics and, even though your target was 320×480, OpenGL ES gives you the better graphics with no game changes!
We placed all the images in the atlas at corners with coordinates that are multiples of 32. This makes creating texture regions easier.
Music and Sound
We also need sound effects and music. Since our game is an 8-bit retro-style game, it’s fitting to use chip tunes, sound effects and music generated by a synthesizer. The most famous chip tunes were generated by Nintendo’s NES, SNES, and Game Boy. For the sound effects, we used a tool called as3sfxr (Tom Vian’s Flash version of sfxr, created by Tomas Pettersson). It can be found at www.superflashbros.net/as3sfxr . Figure 9-16 shows its user interface.
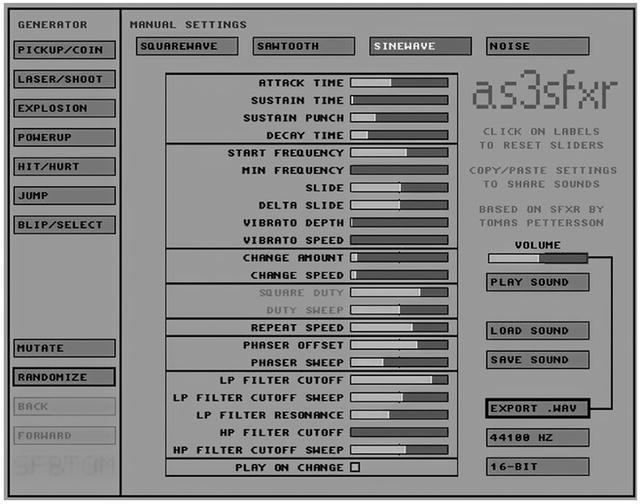
Figure 9-16. as3sfxr, a Flash port of sfxr
We created sound effects for jumping, hitting a spring, hitting a coin, and hitting a squirrel. We also created a sound effect for clicking UI elements. All we did was mash the buttons on the left in as3sfxr for each category until we found a fitting sound effect.
Music for games is usually a little bit harder to come by. There are a few sites on the Web that feature 8-bit chip tunes that are fitting for a game like Super Jumper. We’ll use a single song called “New Song,” by Geir Tjelta. The song can be found at the Free Music Archive ( www.freemusicarchive.org ). It’s licensed under the Creative Commons Attribution-NonCommercial-ShareAlike 3.0 United States license ( https://creativecommons.org/licenses/by-nc-sa/3.0/us/ ). This means we can use it in noncommercial projects, such as our open source Super Jumper game, as long as we give attribution to Geir and don’t modify the original piece. When you scout the Web for music to be used in your games, always make sure that you adhere to the license. People put a lot of work into their songs. If the license doesn’t fit your project (that is, if your game is a commercial one), then you can’t use it.
Implementing Super Jumper
Implementing Super Jumper will be pretty easy. We can reuse our complete framework from Chapter 8 and follow the architecture of Mr. Nom on a high level. This means we’ll have a class for each screen, and each of these classes will implement the logic and presentation expected from that screen. Besides that, we’ll also have our standard project setup with a proper manifest file, all our assets in the assets/ folder, an icon for our application, and so on. Let’s start with our main Assets class. Just set up the project as you did before, copy over all the framework classes, and you are ready to code this marvelous game.
The Assets Class
In Mr. Nom, we already had an Assets class that consisted only of a metric ton of pixmap and sound references held in static member variables. We’ll do the same in Super Jumper. This time, we’ll add a little loading logic, though. Listing 9-1 shows the code, with comments mixed in.
Listing 9-1. Assets.java, which holds all our assets except for the help-screen textures
package com.badlogic.androidgames.jumper;import com.badlogic.androidgames.framework.Music;import com.badlogic.androidgames.framework.Sound;import com.badlogic.androidgames.framework.gl.Animation;import com.badlogic.androidgames.framework.gl.Font;import com.badlogic.androidgames.framework.gl.Texture;import com.badlogic.androidgames.framework.gl.TextureRegion;import com.badlogic.androidgames.framework.impl.GLGame;public class Assets {public static Texture background;public static TextureRegion backgroundRegion;public static Texture items;public static TextureRegion mainMenu;public static TextureRegion pauseMenu;public static TextureRegion ready;public static TextureRegion gameOver;public static TextureRegion highScoresRegion;public static TextureRegion logo;public static TextureRegion soundOn;public static TextureRegion soundOff;public static TextureRegion arrow;public static TextureRegion pause;public static TextureRegion spring;public static TextureRegion castle;public static Animation coinAnim;public static Animation bobJump;public static Animation bobFall;public static TextureRegion bobHit;public static Animation squirrelFly;public static TextureRegion platform;public static Animation brakingPlatform;public static Font font;public static Music music;public static Sound jumpSound;public static Sound highJumpSound;public static Sound hitSound;public static Sound coinSound;public static Sound clickSound;
The class holds references to all the Texture, TextureRegion, Animation, Music, and Sound instances we need throughout our game. The only thing we don’t load here are the images for the help screens.
public static void load(GLGame game) {background = new Texture(game, "background.png");backgroundRegion = new TextureRegion(background, 0, 0, 320, 480);items = new Texture(game, "items.png");mainMenu = new TextureRegion(items, 0, 224, 300, 110);pauseMenu = new TextureRegion(items, 224, 128, 192, 96);ready = new TextureRegion(items, 320, 224, 192, 32);gameOver = new TextureRegion(items, 352, 256, 160, 96);highScoresRegion = new TextureRegion(Assets.items, 0, 257, 300, 110 / 3);logo = new TextureRegion(items, 0, 352, 274, 142);soundOff = new TextureRegion(items, 0, 0, 64, 64);soundOn = new TextureRegion(items, 64, 0, 64, 64);arrow = new TextureRegion(items, 0, 64, 64, 64);pause = new TextureRegion(items, 64, 64, 64, 64);spring = new TextureRegion(items, 128, 0, 32, 32);castle = new TextureRegion(items, 128, 64, 64, 64);coinAnim = new Animation(0.2f,new TextureRegion(items, 128, 32, 32, 32),new TextureRegion(items, 160, 32, 32, 32),new TextureRegion(items, 192, 32, 32, 32),new TextureRegion(items, 160, 32, 32, 32));bobJump = new Animation(0.2f,new TextureRegion(items, 0, 128, 32, 32),new TextureRegion(items, 32, 128, 32, 32));bobFall = new Animation(0.2f,new TextureRegion(items, 64, 128, 32, 32),new TextureRegion(items, 96, 128, 32, 32));bobHit = new TextureRegion(items, 128, 128, 32, 32);squirrelFly = new Animation(0.2f,new TextureRegion(items, 0, 160, 32, 32),new TextureRegion(items, 32, 160, 32, 32));platform = new TextureRegion(items, 64, 160, 64, 16);brakingPlatform = new Animation(0.2f,new TextureRegion(items, 64, 160, 64, 16),new TextureRegion(items, 64, 176, 64, 16),new TextureRegion(items, 64, 192, 64, 16),new TextureRegion(items, 64, 208, 64, 16));font = new Font(items, 224, 0, 16, 16, 20);music = game.getAudio().newMusic("music.mp3");music.setLooping(true);music.setVolume(0.5f);if(Settings.soundEnabled)music.play();jumpSound = game.getAudio().newSound("jump.ogg");highJumpSound = game.getAudio().newSound("highjump.ogg");hitSound = game.getAudio().newSound("hit.ogg");coinSound = game.getAudio().newSound("coin.ogg");clickSound = game.getAudio().newSound("click.ogg");}
The load() method , which will be called once at the start of our game, is responsible for populating all the static members of the class. It loads the background image and creates a corresponding TextureRegion for it. Next, it loads the texture atlas and creates all the necessary texture regions and animations. Compare the code to what’s shown in Figure 9-15 and the other figures in the previous section. The only noteworthy thing about the code for loading graphical assets is the creation of the coin Animation instance. As discussed, we reuse the second frame at the end of the animation frame sequence. All the animations use a frame time of 0.2 seconds.
We also create an instance of the Font class, which we have not yet discussed. It will implement the logic to render text with the bitmap font embedded in the atlas. The constructor takes the Texture, which contains the bitmap font glyphs, the pixel coordinates of the top-left corner of the area that contains the glyphs, the number of glyphs per row, and the size of each glyph in pixels.
We also load all the Music and Sound instances in that method. As you can see, we work with our old friend the Settings class again. We can reuse it from the Mr. Nom project pretty much as is, with one slight modification, as you’ll see in a minute. Note that we set the Music instance to be looping and its volume to 0.5, so it is a little quieter than the sound effects. The music will start playing only if the user hasn’t previously disabled the sound, which is stored in the Settings class, as in Mr. Nom.
public static void reload() {background.reload();items.reload();if(Settings.soundEnabled)music.play();}
Next, we have a mysterious method called reload(). Remember that the OpenGL ES context will get lost when our application is paused. We have to reload the textures when the application is resumed, and that’s exactly what this method does. We also resume the music playback in case sound is enabled.
public static void playSound(Sound sound) {if(Settings.soundEnabled)sound.play(1);}}
The final method of this class, playSound(), is a helper method we’ll use in the rest of the code to play back audio. Instead of having to check whether sound is enabled everywhere, we encapsulate that check in this method.
Let’s have a look at the modified Settings class.
The Settings Class
Not a lot has changed in the Settings class . Listing 9-2 shows the code of our slightly modified Settings class.
Listing 9-2. Settings.java, our slightly modified settings class, borrowed from Mr. Nom
package com.badlogic.androidgames.jumper;import java.io.BufferedReader;import java.io.BufferedWriter;import java.io.IOException;import java.io.InputStreamReader;import java.io.OutputStreamWriter;import com.badlogic.androidgames.framework.FileIO;public class Settings {public static boolean soundEnabled = true;public final static int[] highscores = new int[] { 100, 80, 50, 30, 10 };public final static String file = ".superjumper";public static void load(FileIO files) {BufferedReader in = null;try {in = new BufferedReader(new InputStreamReader(files.readFile(file)));soundEnabled = Boolean.parseBoolean(in.readLine());for(int i = 0; i < 5; i++) {highscores[i] = Integer.parseInt(in.readLine());}} catch (IOException e) {// :( It's ok we have defaults} catch (NumberFormatException e) {// :/ It's ok, defaults save our day} finally {try {if (in != null)in.close();} catch (IOException e) {}}}public static void save(FileIO files) {BufferedWriter out = null;try {out = new BufferedWriter(new OutputStreamWriter(files.writeFile(file)));out.write(Boolean.toString(soundEnabled));out.write(" ");for(int i = 0; i < 5; i++) {out.write(Integer.toString(highscores[i]));out.write(" ");}} catch (IOException e) {} finally {try {if (out != null)out.close();} catch (IOException e) {}}}public static void addScore(int score) {for(int i=0; i < 5; i++) {if(highscores[i] < score) {for(int j= 4; j > i; j--)highscores[j] = highscores[j-1];highscores[i] = score;break;}}}}
The only difference from the Mr. Nom version of this class is the file from and to which we read and write the settings. Instead of .mrnom, we now use the file .superjumper.
The Main Activity
We need an Activity class as the main entry point of our game. We’ll call it SuperJumper. Listing 9-3 shows its code.
Listing 9-3. SuperJumper.java, the main entry point class
package com.badlogic.androidgames.jumper;import javax.microedition.khronos.egl.EGLConfig;import javax.microedition.khronos.opengles.GL10;import com.badlogic.androidgames.framework.Screen;import com.badlogic.androidgames.framework.impl.GLGame;public class SuperJumper extends GLGame {boolean firstTimeCreate = true;public Screen getStartScreen() {return new MainMenuScreen(this);}@Overridepublic void onSurfaceCreated(GL10 gl, EGLConfig config) {super.onSurfaceCreated(gl,config);if(firstTimeCreate) {Settings.load(getFileIO());Assets.load(this);firstTimeCreate = false;} else {Assets.reload();}}@Overridepublic void onPause() {super.onPause();if(Settings.soundEnabled)Assets.music.pause();}}
We derive from GLGame and implement the getStartScreen() method, which returns a MainMenuScreen instance. The other two methods are a little less obvious.
We override onSurfaceCreate(), which is called each time the OpenGL ES context is re-created (compare with the code of GLGame in Chapter 7). If the method is called for the first time, we use the Assets.load() method to load all assets and also load the settings from the settings file on the SD card, if available. Otherwise, all we need to do is reload the textures and start playback of the music via the Assets.reload() method. We also override the onPause() method to pause the music if it is playing. We do both of these things so that we don’t have to repeat them in the resume() and pause() methods of our screens.
Before we dive into the screen implementations, let’s have a look at our new Font class.
The Font Class
We are going to use bitmap fonts to render arbitrary (ASCII) text. We already discussed how this works on a high level, so let’s look at the code in Listing 9-4.
Listing 9-4. Font.java: A bitmap font–rendering class
package com.badlogic.androidgames.framework.gl;public class Font {public final Texture texture;public final int glyphWidth;public final int glyphHeight;public final TextureRegion[] glyphs = new TextureRegion[96];
The class stores the texture containing the font’s glyph, the width and height of a single glyph, and an array of TextureRegion instances—one for each glyph. The first element in the array holds the region for the space glyph, the next one holds the region for the exclamation mark glyph, and so on. In other words, the first element corresponds to the ASCII character with the code 32, and the last element corresponds to the ASCII character with the code 126.
public Font(Texture texture,int offsetX, int offsetY,int glyphsPerRow, int glyphWidth, int glyphHeight) {this.texture = texture;this.glyphWidth = glyphWidth;this.glyphHeight = glyphHeight;int x = offsetX;int y = offsetY;for(int i = 0; i < 96; i++) {glyphs[i] = new TextureRegion(texture, x, y, glyphWidth, glyphHeight);x += glyphWidth;if(x == offsetX + glyphsPerRow * glyphWidth) {x = offsetX;y += glyphHeight;}}}
In the constructor, we store the configuration of the bitmap font and generate the glyph regions. The offsetX and offsetY parameters specify the top-left corner of the bitmap font area in the texture. In our texture atlas, that’s the pixel at (224,0). The parameter glyphsPerRow tells us how many glyphs there are per row, and the parameters glyphWidth and glyphHeight specify the size of a single glyph. Since we use a fixed-width bitmap font, that size is the same for all glyphs. The glyphWidth is also the value by which we will advance when rendering multiple glyphs.
public void drawText(SpriteBatcher batcher, String text, float x, float y) {int len = text.length();for(int i = 0; i < len; i++) {int c = text.charAt(i) - ' ';if(c < 0 || c > glyphs.length - 1)continue;TextureRegion glyph = glyphs[c];batcher.drawSprite(x, y, glyphWidth, glyphHeight, glyph);x += glyphWidth;}}}
The drawText() method takes a SpriteBatcher instance, a line of text, and the x and y positions at which to start drawing the text. The x and y coordinates specify the center of the first glyph. All we do is get the index for each character in the string, check whether we have a glyph for it, and, if so, render it via the SpriteBatcher. We then increment the x coordinate by the glyphWidth so that we can start rendering the next character in the string.
You might wonder why we don’t need to bind the texture containing the glyphs. We assume that this is done before a call to drawText(). The reason is that the text rendering might be part of a batch, in which case the texture must already be bound. Why unnecessarily bind it again in the drawText() method? Remember, OpenGL ES loves nothing more than minimal state changes.
Of course, we can only handle fixed-width fonts with this class. If we want to support more general fonts, we also need to have information about the advance of each character. One solution would be to use kerning, as described in the earlier “Handling Text with Bitmap Fonts” section. We are happy with our simple solution though.
The GLScreen Class
In the examples in the previous two chapters, we always got the reference to GLGraphics by casting. Let’s fix this with a little helper class called GLScreen, which will do the dirty work for us and store the reference to GLGraphics in a member. Listing 9-5 shows the code.
Listing 9-5. GLScreen.java: A little helper class
package com.badlogic.androidgames.framework.impl;import com.badlogic.androidgames.framework.Game;import com.badlogic.androidgames.framework.Screen;public abstract class GLScreen extends Screen {protected final GLGraphics glGraphics;protected final GLGame glGame;public GLScreen(Game game) {super(game);glGame = (GLGame)game;glGraphics = glGame.getGLGraphics();}}
We store the GLGraphics and GLGame instances in the GLScreen class. Of course, this will crash if the Game instance passed as a parameter to the constructor is not a GLGame, but we’ll make sure it is. All the screens of Super Jumper will derive from this class.
The Main Menu Screen
The main menu screen is the screen that is returned by SuperJumper.getStartScreen(), so it’s the first screen the player will see. It renders the background and UI elements and simply waits there for the player to touch any of the UI elements. Based on the element that was touched, the game either changes the configuration (sound enabled/disabled) or transitions to a new screen. Listing 9-6 shows the code.
Listing 9-6. MainMenuScreen.java: The main menu screen
package com.badlogic.androidgames.jumper;import java.util.List;import javax.microedition.khronos.opengles.GL10;import com.badlogic.androidgames.framework.Game;import com.badlogic.androidgames.framework.Input.TouchEvent;import com.badlogic.androidgames.framework.gl.Camera2D;import com.badlogic.androidgames.framework.gl.SpriteBatcher;import com.badlogic.androidgames.framework.impl.GLScreen;import com.badlogic.androidgames.framework.math.OverlapTester;import com.badlogic.androidgames.framework.math.Rectangle;import com.badlogic.androidgames.framework.math.Vector2;public class MainMenuScreen extends GLScreen {Camera2D guiCam;SpriteBatcher batcher;Rectangle soundBounds;Rectangle playBounds;Rectangle highscoresBounds;Rectangle helpBounds;Vector2 touchPoint;
The class derives from GLScreen, so we can access the GLGraphics instance more easily.
There are a couple of members in this class. The first one is a Camera2D instance called guiCam. We also need a SpriteBatcher to render our background and UI elements. We’ll use rectangles to determine if the user touched a UI element. Since we use a Camera2D, we also need a Vector2 instance to transform the touch coordinates to world coordinates.
public MainMenuScreen(Game game) {super(game);guiCam = new Camera2D(glGraphics, 320, 480);batcher = new SpriteBatcher(glGraphics, 100);soundBounds = new Rectangle(0, 0, 64, 64);playBounds = new Rectangle(160 - 150, 200 + 18, 300, 36);highscoresBounds = new Rectangle(160 - 150, 200 - 18, 300, 36);helpBounds = new Rectangle(160 - 150, 200 - 18 - 36, 300, 36);touchPoint = new Vector2();}
In the constructor, we simply set up all the members. And there’s a surprise. The Camera2D instance will allow us to work in our target resolution of 320×480 pixels. All we need to do is set the view frustum width and height to the proper values. The rest is done by OpenGL ES on the fly. Note, however, that the origin is still in the bottom-left corner and the y axis is pointing upward. We’ll use such a GUI camera in all screens that have UI elements so that we can lay them out in pixels instead of world coordinates. Of course, we cheat a little on screens that are not 320×480 pixels wide, but we already did that in Mr. Nom, so we don’t need to feel bad about it. The rectangles we set up for each UI element are thus given in pixel coordinates.
@Overridepublic void update(float deltaTime) {List<TouchEvent> touchEvents = game.getInput().getTouchEvents();game.getInput().getKeyEvents();int len = touchEvents.size();for(int i = 0; i < len; i++) {TouchEvent event = touchEvents.get(i);if(event.type == TouchEvent.TOUCH_UP) {touchPoint.set(event.x, event.y);guiCam.touchToWorld(touchPoint);if(OverlapTester.pointInRectangle(playBounds, touchPoint)) {Assets.playSound(Assets.clickSound);game.setScreen(new GameScreen(game));return;}if(OverlapTester.pointInRectangle(highscoresBounds, touchPoint)) {Assets.playSound(Assets.clickSound);game.setScreen(new HighscoreScreen(game));return;}if(OverlapTester.pointInRectangle(helpBounds, touchPoint)) {Assets.playSound(Assets.clickSound);game.setScreen(new HelpScreen(game));return;}if(OverlapTester.pointInRectangle(soundBounds, touchPoint)) {Assets.playSound(Assets.clickSound);Settings.soundEnabled = !Settings.soundEnabled;if(Settings.soundEnabled)Assets.music.play();elseAssets.music.pause();}}}}
Next is the update() method. We loop through the TouchEvents returned by our Input instance and check for touch events. If we have such an event, we first translate the touch coordinates to world coordinates. Since the camera is set up in such a way that we work in our target resolution, this transformation boils down simply to flipping the y coordinate on a 320×480-pixel screen. On larger or smaller screens, we just transform the touch coordinates to the target resolution. Once we have our world touch point, we can check it against the rectangles of the UI elements. If PLAY, HIGHSCORES, or HELP were touched, we transition to the respective screen. If the sound button was pressed, we change the setting and either resume or pause the music. Also note that we play the click sound if a UI element is pressed via the Assets.playSound() method.
@Overridepublic void present(float deltaTime) {GL10 gl = glGraphics.getGL();gl.glClear(GL10.GL_COLOR_BUFFER_BIT);guiCam.setViewportAndMatrices();gl.glEnable(GL10.GL_TEXTURE_2D);batcher.beginBatch(Assets.background);batcher.drawSprite(160, 240, 320, 480, Assets.backgroundRegion);batcher.endBatch();gl.glEnable(GL10.GL_BLEND);gl.glBlendFunc(GL10.GL_SRC_ALPHA, GL10.GL_ONE_MINUS_SRC_ALPHA);batcher.beginBatch(Assets.items);batcher.drawSprite(160, 480 - 10 - 71, 274, 142, Assets.logo);batcher.drawSprite(160, 200, 300, 110, Assets.mainMenu);batcher.drawSprite(32, 32, 64, 64, Settings.soundEnabled?Assets.soundOn:Assets.soundOff);batcher.endBatch();gl.glDisable(GL10.GL_BLEND);}
The present() method shouldn’t really need any explanation at this point, we’ve done all this before. We clear the screen, set up the projection matrices via the camera, and render the background and UI elements. Since the UI elements have transparent backgrounds, we enable blending temporarily to render them. The background does not need blending, so we don’t use it in order to conserve some GPU cycles. Again, note that the UI elements are rendered in a coordinate system with the origin in the lower left of the screen and the y axis pointing upward.
@Overridepublic void pause() {Settings.save(game.getFileIO());}@Overridepublic void resume() {}@Overridepublic void dispose() {}}
The last method that actually does something is the pause() method. Here, we make sure that the settings are saved to the SD card since the user can change the sound settings on this screen.
The Help Screens
We have a total of five help screens, all of which work the same way: load the help-screen image, render it along with the arrow button, and wait for a touch of the arrow button to move to the next screen. The screens differ only in the image that each loads and the screen to which each transitions. For this reason, we’ll look at the code of the first help screen only, as shown in Listing 9-7, which transitions to the second help screen. The image files for the help screens are named help1.png, help2.png, and so on, up to help5.png. The respective screen classes are called HelpScreen, Help2Screen, and so on. The last screen, Help5Screen, transitions to the MainMenuScreen again.
Listing 9-7. HelpScreen.java: The first help screen
package com.badlogic.androidgames.jumper;import java.util.List;import javax.microedition.khronos.opengles.GL10;import com.badlogic.androidgames.framework.Game;import com.badlogic.androidgames.framework.Input.TouchEvent;import com.badlogic.androidgames.framework.gl.Camera2D;import com.badlogic.androidgames.framework.gl.SpriteBatcher;import com.badlogic.androidgames.framework.gl.Texture;import com.badlogic.androidgames.framework.gl.TextureRegion;import com.badlogic.androidgames.framework.impl.GLScreen;import com.badlogic.androidgames.framework.math.OverlapTester;import com.badlogic.androidgames.framework.math.Rectangle;import com.badlogic.androidgames.framework.math.Vector2;public class HelpScreen extends GLScreen {Camera2D guiCam;SpriteBatcher batcher;Rectangle nextBounds;Vector2 touchPoint;Texture helpImage;TextureRegion helpRegion;
We have a couple of members again holding a camera, a SpriteBatcher, the rectangle for the arrow button, a vector for the touch point, and a Texture and a TextureRegion for the help image.
public HelpScreen(Game game) {super(game);guiCam = new Camera2D(glGraphics, 320, 480);nextBounds = new Rectangle(320 - 64, 0, 64, 64);touchPoint = new Vector2();batcher = new SpriteBatcher(glGraphics, 1);}
In the constructor, we set up all members in pretty much the same way as we did in the MainMenuScreen.
@Overridepublic void resume() {helpImage = new Texture(glGame, "help1.png" );helpRegion = new TextureRegion(helpImage, 0, 0, 320, 480);}@Overridepublic void pause() {helpImage.dispose();}
In the resume() method, we load the actual help-screen texture and create a corresponding TextureRegion for rendering with the SpriteBatcher. We do the loading in this method, as the OpenGL ES context might be lost. The textures for the background and the UI elements are handled by the Assets and SuperJumper classes, as discussed before. We don’t need to deal with them in any of our screens. Additionally, we dispose of the help-image texture in the pause() method again to clean up memory.
@Overridepublic void update(float deltaTime) {List<TouchEvent> touchEvents = game.getInput().getTouchEvents();game.getInput().getKeyEvents();int len = touchEvents.size();for(int i = 0; i < len; i++) {TouchEvent event = touchEvents.get(i);touchPoint.set(event.x, event.y);guiCam.touchToWorld(touchPoint);if(event.type == TouchEvent.TOUCH_UP) {if(OverlapTester.pointInRectangle(nextBounds, touchPoint)) {Assets.playSound(Assets.clickSound);game.setScreen(new HelpScreen2(game));return;}}}}
Next up is the update() method, which simply checks whether the arrow button was pressed. If it was pressed, we transition to the next help screen. We also play the click sound.
@Overridepublic void present(float deltaTime) {GL10 gl = glGraphics.getGL();gl.glClear(GL10.GL_COLOR_BUFFER_BIT);guiCam.setViewportAndMatrices();gl.glEnable(GL10.GL_TEXTURE_2D);batcher.beginBatch(helpImage);batcher.drawSprite(160, 240, 320, 480, helpRegion);batcher.endBatch();gl.glEnable(GL10.GL_BLEND);gl.glBlendFunc(GL10.GL_SRC_ALPHA, GL10.GL_ONE_MINUS_SRC_ALPHA);batcher.beginBatch(Assets.items);batcher.drawSprite(320 - 32, 32, -64, 64, Assets.arrow);batcher.endBatch();gl.glDisable(GL10.GL_BLEND);}@Overridepublic void dispose() {}}
In the present() method, we clear the screen, set up the matrices, and render the help image in one batch, and then render the arrow button. Of course, we don’t need to render the background image here, as the help image already contains that.
The other help screens are analogous, as previously outlined.
The High-Scores Screen
Next on our list is the high-scores screen. Here, we’ll use part of the main menu UI labels (the HIGHSCORES portion) and render the high scores stored in Settings via the Font instance we store in the Assets class. Of course, we have an arrow button so that the player can get back to the main menu. Listing 9-8 shows the code.
Listing 9-8. HighscoresScreen.java: The high-scores screen
package com.badlogic.androidgames.jumper;import java.util.List;import javax.microedition.khronos.opengles.GL10;import com.badlogic.androidgames.framework.Game;import com.badlogic.androidgames.framework.Input.TouchEvent;import com.badlogic.androidgames.framework.gl.Camera2D;import com.badlogic.androidgames.framework.gl.SpriteBatcher;import com.badlogic.androidgames.framework.impl.GLScreen;import com.badlogic.androidgames.framework.math.OverlapTester;import com.badlogic.androidgames.framework.math.Rectangle;import com.badlogic.androidgames.framework.math.Vector2;public class HighscoreScreen extends GLScreen {Camera2D guiCam;SpriteBatcher batcher;Rectangle backBounds;Vector2 touchPoint;String[] highScores;float xOffset = 0;
As always, we have a couple of members for the camera, the SpriteBatcher, bounds for the arrow button, and so on. In the highScores array, we store the formatted strings for each high score we present to the player. The xOffset member is a value we compute to offset the rendering of each line so that the lines are centered horizontally.
public HighscoreScreen(Game game) {super(game);guiCam = new Camera2D(glGraphics, 320, 480);backBounds = new Rectangle(0, 0, 64, 64);touchPoint = new Vector2();batcher = new SpriteBatcher(glGraphics, 100);highScores = new String[5];for(int i = 0; i < 5; i++) {highScores[i] = (i + 1) + ". " + Settings.highscores[i];xOffset = Math.max(highScores[i].length() * Assets.font.glyphWidth, xOffset);}xOffset = 160 - xOffset / 2;}
In the constructor, we set up all members as usual and compute that xOffset value. We do so by evaluating the size of the longest string out of the five strings we create for the five high scores. Since our bitmap font is fixed-width, we can easily calculate the number of pixels needed for a single line of text by multiplying the number of characters by the glyph width. This will, of course, not account for nonprintable characters or characters outside of the ASCII character set. Since we know that we won’t be using those, we can get away with this simple calculation. The last line in the constructor then subtracts half of the longest line width from 160 (the horizontal center of our target screen of 320×480 pixels) and adjusts it further by subtracting half of the glyph width. This is needed since the Font.drawText() method uses the glyph centers instead of one of the corner points.
@Overridepublic void update(float deltaTime) {List<TouchEvent> touchEvents = game.getInput().getTouchEvents();game.getInput().getKeyEvents();int len = touchEvents.size();for(int i = 0; i < len; i++) {TouchEvent event = touchEvents.get(i);touchPoint.set(event.x, event.y);guiCam.touchToWorld(touchPoint);if(event.type == TouchEvent.TOUCH_UP) {if(OverlapTester.pointInRectangle(backBounds, touchPoint)) {game.setScreen(new MainMenuScreen(game));return;}}}}
The update() method just checks whether the arrow button was pressed. If it was, it plays the click sound and transitions back to the main menu screen.
@Overridepublic void present(float deltaTime) {GL10 gl = glGraphics.getGL();gl.glClear(GL10.GL_COLOR_BUFFER_BIT);guiCam.setViewportAndMatrices();gl.glEnable(GL10.GL_TEXTURE_2D);batcher.beginBatch(Assets.background);batcher.drawSprite(160, 240, 320, 480, Assets.backgroundRegion);batcher.endBatch();gl.glEnable(GL10.GL_BLEND);gl.glBlendFunc(GL10.GL_SRC_ALPHA, GL10.GL_ONE_MINUS_SRC_ALPHA);batcher.beginBatch(Assets.items);batcher.drawSprite(160, 360, 300, 33, Assets.highScoresRegion);float y = 240;for(int i = 4; i >= 0; i--) {Assets.font.drawText(batcher, highScores[i], xOffset, y);y += Assets.font.glyphHeight;}batcher.drawSprite(32, 32, 64, 64, Assets.arrow);batcher.endBatch();gl.glDisable(GL10.GL_BLEND);}@Overridepublic void resume() {}@Overridepublic void pause() {}@Overridepublic void dispose() {}}
The present() method is again very straightforward. We clear the screen, set the matrices, render the background, render the “HIGHSCORES” portion of the main menu labels, and then render the five high-score lines using the xOffset we calculated in the constructor. Now we can see why the Font does not do any texture binding: we can batch the five calls to Font.drawText(). Of course, we have to make sure that the SpriteBatcher instance can batch as many sprites (or glyphs, in this case) as are needed for rendering our text. We made sure it could when creating it in the constructor with a maximum batch size of 100 sprites (glyphs).
Now it’s time to look at the classes of our simulation.
The Simulation Classes
Before we can dive into the game screen, we need to create our simulation classes. We’ll follow the same pattern as in Mr. Nom, with a class for each game object and an all-knowing superclass called World that ties together the loose ends and makes our game world tick. We’ll need classes for the following:
Bob
Squirrels
Springs
Coins
Platforms
Bob, squirrels, and platforms can move, so we’ll base their classes on the DynamicGameObject class we created in Chapter 8. Springs and coins are static, so those will derive from the GameObject class. The tasks of each of our simulation classes are as follows:
Store the position, velocity, and bounding shape of the object.
Store the state and length of time that the object has been in that state (state time), if needed.
Provide an update() method that will advance the object, if needed, according to its behavior.
Provide methods to change an object’s state (for example, tell Bob he’s dead or has hit a spring).
The World class will then keep track of multiple instances of these objects, update them each frame, check collisions between objects and Bob, and carry out the collision responses (that is, let Bob die, collect a coin, and so forth). We will go through each class next, from simplest to most complex.
The Spring Class
Let’s start with the Spring class , presented in Listing 9-9.
Listing 9-9. Spring.java: The Spring class
package com.badlogic.androidgames.jumper;import com.badlogic.androidgames.framework.GameObject;public class Spring extends GameObject {public static float SPRING_WIDTH = 0.3f;public static float SPRING_HEIGHT = 0.3f;public Spring(float x, float y) {super(x, y, SPRING_WIDTH, SPRING_HEIGHT);}}
The Spring class derives from the GameObject class that we created in Chapter 8. We only need a position and a bounding shape since a spring does not move.
Next, we define two constants that are publicly accessible: the spring width and the spring height, in meters. We estimated those values previously, and we just reuse them here.
The final piece is the constructor, which takes the x and y coordinates of the spring’s center. With this, we call the constructor of the superclass GameObject, which takes the position as well as the width and height of the object from which to construct a bounding shape (a rectangle centered around the given position). With this information, our Spring class is fully defined, having a position and bounding shape against which to collide.
The Coin Class
Next up is the class for coins, shown in Listing 9-10.
Listing 9-10. Coin.java: The Coin class
package com.badlogic.androidgames.jumper;import com.badlogic.androidgames.framework.GameObject;public class Coin extends GameObject {public static final float COIN_WIDTH = 0.5f;public static final float COIN_HEIGHT = 0.8f;public static final int COIN_SCORE = 10;float stateTime;public Coin(float x, float y) {super(x, y, COIN_WIDTH, COIN_HEIGHT);stateTime = 0;}public void update(float deltaTime) {stateTime += deltaTime;}}
The Coin class is pretty much the same as the Spring class, with only one difference: we keep track of the duration the coin has been alive already. This information is needed when we want to render the coin later on using an Animation. We did the same thing for our cavemen in the final example of Chapter 8. It is a technique we’ll use for all our simulation classes. Given a state and a state time, we can select an Animation, as well as the keyframe of that Animation, to use for rendering. The coin only has a single state, so we only need to keep track of the state time. For that we have the update() method, which will increase the state time by the delta time passed to it.
The constants defined at the top of the class specify a coin’s width and height, as previously defined, as well as the number of points Bob earns if he hits a coin.
The Castle Class
Next up, we have a class for the castle at the top of our world. Listing 9-11 shows the code.
Listing 9-11. Castle.java: The Castle class
package com.badlogic.androidgames.jumper;import com.badlogic.androidgames.framework.GameObject;public class Castle extends GameObject {public static float CASTLE_WIDTH = 1.7f;public static float CASTLE_HEIGHT = 1.7f;public Castle(float x, float y) {super(x, y, CASTLE_WIDTH, CASTLE_HEIGHT);}}
Not too complex. All we need to store is the position and bounds of the castle. The size of a castle is defined by the constants CASTLE_WIDTH and CASTLE_HEIGHT, using the values we discussed earlier.
The Squirrel Class
Next is the Squirrel class , shown in Listing 9-12.
Listing 9-12. Squirrel.java: The Squirrel class
package com.badlogic.androidgames.jumper;import com.badlogic.androidgames.framework.DynamicGameObject;public class Squirrel extends DynamicGameObject {public static final float SQUIRREL_WIDTH = 1;public static final float SQUIRREL_HEIGHT = 0.6f;public static final float SQUIRREL_VELOCITY = 3f;float stateTime = 0;public Squirrel(float x, float y) {super(x, y, SQUIRREL_WIDTH, SQUIRREL_HEIGHT);velocity.set(SQUIRREL_VELOCITY, 0);}public void update(float deltaTime) {position.add(velocity.x * deltaTime, velocity.y * deltaTime);bounds.lowerLeft.set(position).sub(SQUIRREL_WIDTH / 2, SQUIRREL_HEIGHT / 2);if(position.x < SQUIRREL_WIDTH / 2 ) {position.x = SQUIRREL_WIDTH / 2;velocity.x = SQUIRREL_VELOCITY;}if(position.x > World.WORLD_WIDTH - SQUIRREL_WIDTH / 2) {position.x = World.WORLD_WIDTH - SQUIRREL_WIDTH / 2;velocity.x = -SQUIRREL_VELOCITY;}stateTime += deltaTime;}}
Squirrels are moving objects, so we let the class derive from DynamicGameObject, which gives us a velocity vector and an acceleration vector as well. The first thing we do is define a squirrel’s size, as well as its velocity. Since a squirrel is animated, we also keep track of its state time. A squirrel has a single state, like a coin: moving horizontally. Whether it moves to the left or right can be decided based on the velocity vector’s x component, so we don’t need to store a separate state member for that.
In the constructor, we call the superclass’s constructor with the initial position and size of the squirrel. We also set the velocity vector to (SQUIRREL_VELOCITY,0). All squirrels will thus move to the right in the beginning.
The update() method updates the position and bounding shape of the squirrel based on the velocity and delta time. It’s our standard Euler integration step, which we talked about and used a lot in Chapter 8. We also check whether the squirrel hit the left or right edge of the world. If that’s the case, we simply invert its velocity vector so that it starts moving in the opposite direction. Our world’s width is fixed at a value of 10 meters, as discussed earlier. The last thing we do is update the state time based on the delta time so that we can decide which of the two animation frames we need to use for rendering that squirrel later on.
The Platform Class
The Platform class is shown in Listing 9-13.
Listing 9-13. Platform.java: The Platform class
package com.badlogic.androidgames.jumper;import com.badlogic.androidgames.framework.DynamicGameObject;public class Platform extends DynamicGameObject {public static final float PLATFORM_WIDTH = 2;public static final float PLATFORM_HEIGHT = 0.5f;public static final int PLATFORM_TYPE_STATIC = 0;public static final int PLATFORM_TYPE_MOVING = 1;public static final int PLATFORM_STATE_NORMAL = 0;public static final int PLATFORM_STATE_PULVERIZING = 1;public static final float PLATFORM_PULVERIZE_TIME = 0.2f * 4;public static final float PLATFORM_VELOCITY = 2;
Platforms are a little bit more complex, of course. Let’s go over the constants defined in the class. The first two constants define the width and height of a platform, as discussed earlier. A platform has a type; it can be either a static platform or a moving platform. We denote this via the constants PLATFORM_TYPE_STATIC and PLATFORM_TYPE_MOVING. A platform can also be in one of two states: it can be in a normal state—that is, either sitting there statically or moving—or it can be pulverized. The state is encoded via one of the constants PLATFORM_STATE_NORMAL or PLATFORM_STATE_PULVERIZING. Pulverization is, of course, a process limited in time. We therefore define the time it takes for a platform to be completely pulverized, which is 0.8 seconds. This value is simply derived from the number of frames in the Animation of the platform and the duration of each frame—one of the little quirks we have to accept while trying to follow the MVC pattern. Finally, we define the speed of moving platforms to be 2 m/s, as discussed earlier. A moving platform will behave exactly like a squirrel in that it just travels in one direction until it hits the world’s horizontal boundaries, in which case it just inverts its direction.
int type;int state;float stateTime;public Platform(int type, float x, float y) {super(x, y, PLATFORM_WIDTH, PLATFORM_HEIGHT);this.type = type;this.state = PLATFORM_STATE_NORMAL;this.stateTime = 0;if(type == PLATFORM_TYPE_MOVING) {velocity.x = PLATFORM_VELOCITY;}}
To store the type, the state, and the state time of the Platform instance, we need three members. These get initialized in the constructor based on the type of the Platform, which is a parameter of the constructor, along with the platform center’s position.
public void update(float deltaTime) {if(type == PLATFORM_TYPE_MOVING) {position.add(velocity.x * deltaTime, 0);bounds.lowerLeft.set(position).sub(PLATFORM_WIDTH / 2, PLATFORM_HEIGHT / 2);if(position.x < PLATFORM_WIDTH / 2) {velocity.x = -velocity.x;position.x = PLATFORM_WIDTH / 2;}if(position.x > World.WORLD_WIDTH - PLATFORM_WIDTH / 2) {velocity.x = -velocity.x;position.x = World.WORLD_WIDTH - PLATFORM_WIDTH / 2;}}stateTime += deltaTime;}
The update() method will move the platform and check for the out-of-world condition, acting accordingly by inverting the velocity vector. This is exactly the same thing we did in the Squirrel.update() method. We also update the state time at the end of the method.
public void pulverize() {state = PLATFORM_STATE_PULVERIZING;stateTime = 0;velocity.x = 0;}}
The final method of this class is called pulverize(). It switches the state from PLATFORM_STATE_NORMAL to PLATFORM_STATE_PULVERIZING and resets the state time and velocity. This means that moving platforms will stop moving. The method will be called if the World class detects a collision between Bob and the Platform, and it decides to pulverize the Platform based on a random number. We’ll talk about that in a bit. First, we need to talk about Bob.
The Bob Class
The Bob class is shown in Listing 9-14.
Listing 9-14. Bob.java
package com.badlogic.androidgames.jumper;import com.badlogic.androidgames.framework.DynamicGameObject;public class Bob extends DynamicGameObject{public static final int BOB_STATE_JUMP = 0;public static final int BOB_STATE_FALL = 1;public static final int BOB_STATE_HIT = 2;public static final float BOB_JUMP_VELOCITY = 11;public static final float BOB_MOVE_VELOCITY = 20;public static final float BOB_WIDTH = 0.8f;public static final float BOB_HEIGHT = 0.8f;
We start with a couple of constants again. Bob can be in one of three states: jumping upward, falling downward, or being hit. He also has a vertical jump velocity, which is only applied on the y axis, and a horizontal move velocity, which is only applied on the x axis. The final two constants define Bob’s width and height in the world. Of course, we also have to store Bob’s state and state time.
int state;float stateTime;public Bob(float x, float y) {super(x, y, BOB_WIDTH, BOB_HEIGHT);state = BOB_STATE_FALL;stateTime = 0;}
The constructor just calls the superclass’s constructor so that Bob’s center position and bounding shape are initialized correctly, and then initializes the state and stateTime member variables.
public void update(float deltaTime) {velocity.add(World.gravity.x * deltaTime, World.gravity.y * deltaTime);position.add(velocity.x * deltaTime, velocity.y * deltaTime);bounds.lowerLeft.set(position).sub(bounds.width / 2, bounds.height / 2);if(velocity.y > 0 && state != BOB_STATE_HIT) {if(state != BOB_STATE_JUMP) {state = BOB_STATE_JUMP;stateTime = 0;}}if(velocity.y < 0 && state != BOB_STATE_HIT) {if(state != BOB_STATE_FALL) {state = BOB_STATE_FALL;stateTime = 0;}}if(position.x < 0)position.x = World.WORLD_WIDTH;if(position.x > World.WORLD_WIDTH)position.x = 0;stateTime += deltaTime;}
The update() method starts off by updating Bob’s position and bounding shape based on gravity and his current velocity. Note that the velocity is a composite of the gravity and Bob’s own movement due to jumping and moving horizontally. The next two big conditional blocks set Bob’s state to either BOB_STATE_JUMPING or BOB_STATE_FALLING and then reinitialize his state time depending on the y component of his velocity. If it is greater than zero, Bob is jumping; if it is smaller than zero, Bob is falling. We only do this if Bob hasn’t been hit and if he isn’t already in the correct state. Otherwise, we’d always reset the state time to zero, which wouldn’t play nicely with Bob’s animation later on. We also wrap Bob from one edge of the world to the other if he leaves the world to the left or right. Finally, we update the stateTime member again.
Where does Bob get his velocity from apart from gravity? That’s where the other methods come in.
public void hitSquirrel() {velocity.set(0,0);state = BOB_STATE_HIT;stateTime = 0;}public void hitPlatform() {velocity.y = BOB_JUMP_VELOCITY;state = BOB_STATE_JUMP;stateTime = 0;}public void hitSpring() {velocity.y = BOB_JUMP_VELOCITY * 1.5f;state = BOB_STATE_JUMP;stateTime = 0;}}
The method hitSquirrel()is called by the World class if Bob hits a squirrel. If that’s the case, Bob stops moving by himself and enters the BOB_STATE_HIT state. Only gravity will apply to Bob from this point on; the player can’t control him anymore, and he doesn’t interact with platforms any longer. That’s similar to the behavior Super Mario exhibits when he gets hit by an enemy. He just falls down.
The hitPlatform() method is also called by the World class. It will be invoked when Bob hits a platform while falling downward. If that’s the case, then we set his y velocity to BOB_JUMP_VELOCITY, and we also set his state and state time accordingly. From this point on, Bob will move upward until gravity wins again, making Bob fall down.
The last method, hitSpring(), is invoked by the World class if Bob hits a spring. It does the same thing as the hitPlatform() method, with one exception; that is, the initial upward velocity is set to 1.5 times BOB_JUMP_VELOCITY. This means that Bob will jump a little higher when hitting a spring than when hitting a platform.
The World Class
The last class we have to discuss is the World class. It’s a little longer, so we’ll split it up. Listing 9-15 shows the first part of the code.
Listing 9-15. Excerpt from World.java: Constants, members, and initialization
package com.badlogic.androidgames.jumper;import java.util.ArrayList;import java.util.List;import java.util.Random;import com.badlogic.androidgames.framework.math.OverlapTester;import com.badlogic.androidgames.framework.math.Vector2;public class World {public interface WorldListener {void jump();void highJump();void hit();void coin();}
The first thing we define is an interface called WorldListener. What does it do? We need it to solve a little MVC problem: when do we play sound effects? We could just add invocations of Assets.playSound() to the respective simulation classes, but that’s not very clean. Instead, we’ll let a user of the World class register a WorldListener, which will be called when Bob jumps from a platform, jumps from a spring, gets hit by a squirrel, or collects a coin. We will later register a listener that plays back the proper sound effects for each of those events, keeping the simulation classes clean from any direct dependencies on rendering and audio playback.
public static final float WORLD_WIDTH = 10;public static final float WORLD_HEIGHT = 15 * 20;public static final int WORLD_STATE_RUNNING = 0;public static final int WORLD_STATE_NEXT_LEVEL = 1;public static final int WORLD_STATE_GAME_OVER = 2;public static final Vector2 gravity = new Vector2(0, -12);
Next, we define a couple of constants. WORLD_WIDTH and WORLD_HEIGHT specify the extents of our world horizontally and vertically. Remember that our view frustum will show a region of 10×15 meters of our world. Given the constants defined here, our world will span 20 view frustums or screens vertically. Again, that’s a value we came up with by tuning. We’ll get back to it when we discuss how we generate a level. The world can also be in one of three states: running, waiting for the next level to start, or the game-over state—when Bob falls too far (outside of the view frustum). We also define our gravity acceleration vector as a constant here.
public final Bob bob;public final List<Platform> platforms;public final List<Spring> springs;public final List<Squirrel> squirrels;public final List<Coin> coins;public Castle castle;public final WorldListener listener;public final Random rand;public float heightSoFar;public int score;public int state;
Next up are all the members of the World class. It keeps track of Bob; all the platforms, springs, squirrels, and coins; and the castle. Additionally, it has a reference to a WorldListener and an instance of Random, which we’ll use to generate random numbers for various purposes. The last three members keep track of the highest height Bob has reached so far, as well as the world’s state and the score achieved.
public World(WorldListener listener) {this.bob = new Bob(5, 1);this.platforms = new ArrayList<Platform>();this.springs = new ArrayList<Spring>();this.squirrels = new ArrayList<Squirrel>();this.coins = new ArrayList<Coin>();this.listener = listener;rand = new Random();generateLevel();this.heightSoFar = 0;this.score = 0;this.state = WORLD_STATE_RUNNING;}
The constructor initializes all members and also stores the WorldListener passed as a parameter. Bob is placed in the middle of the world horizontally and a little bit above the ground at (5,1). The rest is pretty much self-explanatory, with one exception: the generateLevel() method .
Generating the World
You might have wondered already how we actually create and place the objects in our world. We use a method called procedural generation . We came up with a simple algorithm that will generate a random level for us. Listing 9-16 shows the code.
Listing 9-16. Excerpt from World.java: The generateLevel() method
private void generateLevel() {float y = Platform.PLATFORM_HEIGHT / 2;float maxJumpHeight = Bob.BOB_JUMP_VELOCITY * Bob.BOB_JUMP_VELOCITY/ (2 * -gravity.y);while (y < WORLD_HEIGHT - WORLD_WIDTH / 2) {int type = rand.nextFloat() > 0.8f ? Platform.PLATFORM_TYPE_MOVING: Platform.PLATFORM_TYPE_STATIC;float x = rand.nextFloat()* (WORLD_WIDTH - Platform.PLATFORM_WIDTH)+ Platform.PLATFORM_WIDTH / 2;Platform platform = new Platform(type, x, y);platforms.add(platform);if (rand.nextFloat() > 0.9f&& type != Platform.PLATFORM_TYPE_MOVING) {Spring spring = new Spring(platform.position.x,platform.position.y + Platform.PLATFORM_HEIGHT / 2+ Spring.SPRING_HEIGHT / 2);springs.add(spring);}if (y > WORLD_HEIGHT / 3 && rand.nextFloat() > 0.8f) {Squirrel squirrel = new Squirrel(platform.position.x+ rand.nextFloat(), platform.position.y+ Squirrel.SQUIRREL_HEIGHT + rand.nextFloat() * 2);squirrels.add(squirrel);}if (rand.nextFloat() > 0.6f) {Coin coin = new Coin(platform.position.x + rand.nextFloat(),platform.position.y + Coin.COIN_HEIGHT+ rand.nextFloat() * 3);coins.add(coin);}y += (maxJumpHeight - 0.5f);y -= rand.nextFloat() * (maxJumpHeight / 3);}castle = new Castle(WORLD_WIDTH / 2, y);}
Let’s outline the general idea of the algorithm in plain words:
Start at the bottom of the world at y = 0.
As long as we haven’t reached the top of the world yet, do the following:
Create a platform, either moving or stationary, at the current y position with a random x position.
Fetch a random number between 0 and 1 and, if it is greater than 0.9 and if the platform is not moving, create a spring on top of the platform.
If we are above the first third of the level, fetch a random number and, if it is above 0.8, create a squirrel offset randomly from the platform’s position.
Fetch a random number and, if it is greater than 0.6, create a coin offset randomly from the platform’s position.
Increase y by the maximum normal jump height of Bob, decrease it a tiny bit randomly—but only so far that it doesn’t fall below the last y value—and go to the beginning of step 2.
Place the castle at the last y position, centered horizontally.
The big secret of this procedure is how we increase the y position for the next platform in step 2e. We have to make sure that each subsequent platform is reachable by Bob by jumping from the current platform. Bob can only jump as high as gravity allows, given his initial jump velocity of 11 m/s vertically. How can we calculate how high Bob will jump? We can do this with the following formula:
height = velocity × velocity / (2 × gravity) = 11 × 11 / (2 × 13) ∼= 4.6m
This means that we should have a distance of 4.6 meters vertically between each platform so that Bob can still reach it. To make sure that all platforms are reachable, we use a value that’s a little bit less than the maximum jump height. This guarantees that Bob will always be able to jump from one platform to the next. The horizontal placement of platforms is again random. Given Bob’s horizontal movement speed of 20 m/s, we can be more than sure that he will be able to reach a platform not only vertically but also horizontally.
The other objects are created based on chance. The method Random.nextFloat()returns a random number between 0 and 1 on each invocation, where each number has the same probability of occurring. Squirrels are only generated when the random number we fetch from Random is greater than 0.8. This means that we’ll generate a squirrel with a probability of 20 percent (1 – 0.8). The same is true for all other randomly created objects. By tuning these values, we can have more or fewer objects in our world.
Updating the World
Once we have generated our world, we can update all objects in it and check for collisions. Listing 9-17 shows the update methods of the World class, with comments.
Listing 9-17. Excerpt from World.java: The update methods
public void update(float deltaTime, float accelX) {updateBob(deltaTime, accelX);updatePlatforms(deltaTime);updateSquirrels(deltaTime);updateCoins(deltaTime);if (bob.state != Bob.BOB_STATE_HIT)checkCollisions();checkGameOver();}
The method update()is the one called by our game screen later on. It receives the delta time and acceleration on the x axis of the accelerometer as an argument. It is responsible for calling the other update methods, as well as performing the collision checks and game-over check. We have an update method for each object type in our world.
private void updateBob(float deltaTime, float accelX) {if (bob.state != Bob.BOB_STATE_HIT && bob.position.y <= 0.5f)bob.hitPlatform();if (bob.state != Bob.BOB_STATE_HIT)bob.velocity.x = -accelX / 10 * Bob.BOB_MOVE_VELOCITY;bob.update(deltaTime);heightSoFar = Math.max(bob.position.y, heightSoFar);}
The updateBob() method is responsible for updating Bob’s state. The first thing it does is check whether Bob is hitting the bottom of the world, in which case Bob is instructed to jump. This means that, at the start of each level, Bob is allowed to jump off the ground of our world. As soon as the ground is out of sight, this won’t work anymore, of course. Next, we update Bob’s horizontal velocity, which is based on the value of the x axis of the accelerometer we get as an argument. As discussed, we normalize this value from a range of –10 to 10 to a range of –1 to 1 (full left tilt to full right tilt) and then multiply it by Bob’s standard movement velocity. Next, we tell Bob to update himself by calling the Bob.update() method. The last thing we do is keep track of the highest y position Bob has reached so far. We need this to determine whether Bob has fallen too far later on.
private void updatePlatforms(float deltaTime) {int len = platforms.size();for (int i = 0; i < len; i++) {Platform platform = platforms.get(i);platform.update(deltaTime);if (platform.state == Platform.PLATFORM_STATE_PULVERIZING&& platform.stateTime > Platform.PLATFORM_PULVERIZE_TIME) {platforms.remove(platform);len = platforms.size();}}}
Next, we update all the platforms in updatePlatforms(). We loop through the list of platforms and call each platform’s update() method with the current delta time. If the platform is in the process of pulverization, we check for how long that has been going on. If the platform is in the PLATFORM_STATE_PULVERIZING state for more than PLATFORM_PULVERIZE_TIME, we simply remove the platform from our list of platforms.
private void updateSquirrels(float deltaTime) {int len = squirrels.size();for (int i = 0; i < len; i++) {Squirrel squirrel = squirrels.get(i);squirrel.update(deltaTime);}}private void updateCoins(float deltaTime) {int len = coins.size();for (int i = 0; i < len; i++) {Coin coin = coins.get(i);coin.update(deltaTime);}}
In the updateSquirrels() method , we update each Squirrel instance via its update() method, passing in the current delta time. We do the same for each Coin instance in the updateCoins() method.
Collision Detection and Response
Looking back at our original World.update() method , we can see that the next thing we do is check for collisions between Bob and all the other objects with which he can collide in the world. We do this only if Bob is in a state not equal to BOB_STATE_HIT, because in that state he just continues to fall down due to gravity. Let’s have a look at those collision-checking methods in Listing 9-18.
Listing 9-18. Excerpt from World.java: The collision-checking methods
private void checkCollisions() {checkPlatformCollisions();checkSquirrelCollisions();checkItemCollisions();checkCastleCollisions();}
The checkCollisions() method is more or less another master method, which simply invokes all the other collision-checking methods. Bob can collide with a couple of things in the world: platforms, squirrels, coins, springs, and the castle. For each of these object types, we have a separate collision-checking method. Remember that we invoke this method and the slave methods after we have updated the positions and bounding shapes of all objects in our world. Think of it as a snapshot of the state of our world at a given point in time. All we do is observe this still image and see whether anything overlaps. We can then take action and make sure that the objects that collide react to those overlaps or collisions in the next frame by manipulating their states, positions, velocities, and so on.
private void checkPlatformCollisions() {if (bob.velocity.y > 0)return;int len = platforms.size();for (int i = 0; i < len; i++) {Platform platform = platforms.get(i);if (bob.position.y > platform.position.y) {if (OverlapTester.overlapRectangles(bob.bounds, platform.bounds)) {bob.hitPlatform();listener.jump();if (rand.nextFloat() > 0.5f) {platform.pulverize();}break;}}}}
In the checkPlatformCollisions() method , we test for overlap between Bob and any of the platforms in our world. We break out of that method early in case Bob is currently on his way up. That enables Bob to pass through platforms from below. For Super Jumper, that’s good behavior; in a game like Super Mario Brothers, we’d probably want Bob to fall down if he hits a block from below.
Next, we loop through all platforms and check whether Bob is above the current platform. If he is, we test whether his bounding rectangle overlaps the bounding rectangle of the platform. If it does, we tell Bob that he hit a platform via a call to Bob.hitPlatform(). Looking back at that method, we see that it will trigger a jump and set Bob’s states accordingly. Next, we call the WorldListener.jump() method to inform the listener that Bob has just started to jump again. We’ll use this later on to play back a corresponding sound effect in the listener. The last thing we do is fetch a random number and, if it is above 0.5, tell the platform to pulverize itself. It will be alive for another PLATFORM_PULVERIZE_TIME seconds (0.8) and will then be removed in the updatePlatforms() method shown earlier. When we render that platform, we’ll use its state time to determine which of the platform animation keyframes to play back.
private void checkSquirrelCollisions() {int len = squirrels.size();for (int i = 0; i < len; i++) {Squirrel squirrel = squirrels.get(i);if (OverlapTester.overlapRectangles(squirrel.bounds, bob.bounds)) {bob.hitSquirrel();listener.hit();}}}
The method checkSquirrelCollisions()tests Bob’s bounding rectangle against the bounding rectangle of each squirrel. If Bob hits a squirrel, we tell him to enter the BOB_STATE_HIT state, which will make him fall down without the player being able to control him any further. We also tell the WorldListener about it so that Bob can play back a sound effect, for example.
private void checkItemCollisions() {int len = coins.size();for (int i = 0; i < len; i++) {Coin coin = coins.get(i);if (OverlapTester.overlapRectangles(bob.bounds, coin.bounds)) {coins.remove(coin);len = coins.size();listener.coin();score += Coin.COIN_SCORE;}}if (bob.velocity.y > 0)return;len = springs.size();for (int i = 0; i < len; i++) {Spring spring = springs.get(i);if (bob.position.y > spring.position.y) {if (OverlapTester.overlapRectangles(bob.bounds, spring.bounds)) {bob.hitSpring();listener.highJump();}}}}
The checkItemCollisions() method checks Bob against all coins in the world and against all springs. If Bob hits a coin, we remove the coin from our world, tell the listener that a coin was collected, and increase the current score by COIN_SCORE. If Bob is falling downward, we also check Bob against all springs in the world. If he hits one, we tell him about it so that he’ll perform a higher jump than usual. We also inform the listener of this event.
private void checkCastleCollisions() {if (OverlapTester.overlapRectangles(castle.bounds, bob.bounds)) {state = WORLD_STATE_NEXT_LEVEL;}}
The final method checks Bob against the castle. If Bob hits it, we set the world’s state to WORLD_STATE_NEXT_LEVEL, signaling any outside entity (such as our game screen) that we should transition to the next level, which will again be a randomly generated instance of World.
Game Over, Buddy!
The last method in the World class, which is invoked in the last line of the World.update() method, is shown in Listing 9-19.
Listing 9-19. The Rest of World.java: The game over–checking method
private void checkGameOver() {if (heightSoFar - 7.5f > bob.position.y) {state = WORLD_STATE_GAME_OVER;}}}
Remember how we defined the game-over state: Bob must leave the bottom of the view frustum. The view frustum is, of course, governed by a Camera2D instance, which has a position. The y coordinate of that position is always equal to the biggest y coordinate Bob has had so far, so the camera will somewhat follow Bob on his way upward. Since we want to keep the rendering and simulation code separate, though, we don’t have a reference to the camera in our world. We thus keep track of Bob’s highest y coordinate in updateBob() and store that value in heightSoFar. We know that our view frustum will have a height of 15 meters. Thus, we also know that if Bob’s y coordinate is below heightSoFar – 7.5, then he has left the view frustum on the bottom edge. That’s when Bob is declared to be dead. Of course, this is a tiny bit hackish, as it is based on the assumption that the view frustum’s height will always be 15 meters and that the camera will always be at the highest y coordinate Bob has been able to reach so far. If we had allowed zooming or used a different camera-following method, this would no longer hold true. Instead of overcomplicating things, we’ll just leave it as is. You will often face such decisions in game development, as it is hard at times to keep everything clean from a software engineering point of view (as evidenced by our overuse of public or package private members).
You may be wondering why we don’t use the SpatialHashGrid class we developed in Chapter 8. We’ll show you the reason in a minute. Let’s get our game done by implementing the GameScreen class first.
The Game Screen
We are nearing the completion of Super Jumper. The last thing we need to implement is the game screen, which will present the actual game world to the player and allow the player to interact with it. The game screen consists of five subscreens, as shown in Figure 9-2 earlier in the chapter. We have the ready screen, the normal running screen, the next-level screen, the game-over screen, and the pause screen. The game screen in Mr. Nom was similar to this; it only lacked a next-level screen, as there was only one level. We will use the same approach as in Mr. Nom: we’ll have separate update and present methods for all subscreens that update and render the game world, as well as the UI elements that are part of the subscreens. Since the game screen code is a little longer, we’ll split it up into multiple listings here. Listing 9-20 shows the first part of the game screen.
Listing 9-20. Excerpt from GameScreen.java: Members and constructor
package com.badlogic.androidgames.jumper;import java.util.List;import javax.microedition.khronos.opengles.GL10;import com.badlogic.androidgames.framework.Game;import com.badlogic.androidgames.framework.Input.TouchEvent;import com.badlogic.androidgames.framework.gl.Camera2D;import com.badlogic.androidgames.framework.gl.SpriteBatcher;import com.badlogic.androidgames.framework.impl.GLScreen;import com.badlogic.androidgames.framework.math.OverlapTester;import com.badlogic.androidgames.framework.math.Rectangle;import com.badlogic.androidgames.framework.math.Vector2;import com.badlogic.androidgames.jumper.World.WorldListener;public class GameScreen extends GLScreen {static final int GAME_READY = 0;static final int GAME_RUNNING = 1;static final int GAME_PAUSED = 2;static final int GAME_LEVEL_END = 3;static final int GAME_OVER = 4;int state;Camera2D guiCam;Vector2 touchPoint;SpriteBatcher batcher;World world;WorldListener worldListener;WorldRenderer renderer;Rectangle pauseBounds;Rectangle resumeBounds;Rectangle quitBounds;int lastScore;String scoreString;
The class starts off with constants defining the five states of the screen. Next, we have the members. We have a camera for rendering the UI elements, as well as a vector so that we can transform touch coordinates to world coordinates (as in the other screens, to a view frustum of 320×480 units, our target resolution). Next, we have a SpriteBatcher, a World instance, and a WorldListener. The WorldRenderer class is something we’ll look into in a minute. It basically just takes a World instance and renders it. Note that it also takes a reference to the SpriteBatcher as a parameter of its constructor. This means that we'll use the same SpriteBatcher to render the UI elements of the screen and to render the game world. The rest of the members are Rectangles for different UI elements (such as the RESUME and QUIT menu entries on the paused subscreen) and two members for keeping track of the current score. We want to avoid creating a new string every frame when rendering the score so that we make the garbage collector happy.
public GameScreen(Game game) {super(game);state = GAME_READY;guiCam = new Camera2D(glGraphics, 320, 480);touchPoint = new Vector2();batcher = new SpriteBatcher(glGraphics, 1000);worldListener = new WorldListener() {public void jump() {Assets.playSound(Assets.jumpSound);}public void highJump() {Assets.playSound(Assets.highJumpSound);}public void hit() {Assets.playSound(Assets.hitSound);}public void coin() {Assets.playSound(Assets.coinSound);}};world = new World(worldListener);renderer = new WorldRenderer(glGraphics, batcher, world);pauseBounds = new Rectangle(320- 64, 480- 64, 64, 64);resumeBounds = new Rectangle(160 - 96, 240, 192, 36);quitBounds = new Rectangle(160 - 96, 240 - 36, 192, 36);lastScore = 0;scoreString = "score: 0";}
In the constructor, we initialize all the member variables. The only interesting thing here is the WorldListener we implement as an anonymous inner class. It’s registered with the World instance and will play back sound effects according to the event that gets reported to it.
Updating the GameScreen
Next, we have the update methods, which will make sure any user input is processed correctly and will also update the World instance if necessary. Listing 9-21 shows the code.
Listing 9-21. Excerpt from GameScreen.java: The update methods
@Overridepublic void update(float deltaTime) {if(deltaTime > 0.1f)deltaTime = 0.1f;switch(state) {case GAME_READY:updateReady();break;case GAME_RUNNING:updateRunning(deltaTime);break;case GAME_PAUSED:updatePaused();break;case GAME_LEVEL_END:updateLevelEnd();break;case GAME_OVER:updateGameOver();break;}}
We have the GLScreen.update() method as the master method again, which calls one of the other update methods depending on the current state of the screen. Note that we limit the delta time to 0.1 seconds. Why do we do that? In Chapter 7, we talked about a bug in the direct byte buffers in Android version 1.5 that generates garbage. We will have that problem in Super Jumper as well on Android 1.5 devices. Every now and then, our game will be interrupted for a few hundred milliseconds by the garbage collector. This would be reflected in a delta time of a few hundred milliseconds, which would make Bob sort of teleport from one place to another instead of smoothly moving there. That’s annoying for the player, and it also has an effect on our collision detection. Bob could tunnel through a platform without ever overlapping with it, due to his moving a large distance in a single frame. By limiting the delta time to a sensible maximum value of 0.1 seconds, we can compensate for those effects.
private void updateReady() {if(game.getInput().getTouchEvents().size() > 0) {state = GAME_RUNNING;}}
The updateReady() method is invoked in the paused subscreen. All it does is wait for a touch event, in which case it will change the state of the game screen to the GAME_RUNNING state.
private void updateRunning(float deltaTime) {List<TouchEvent> touchEvents = game.getInput().getTouchEvents();int len = touchEvents.size();for(int i = 0; i < len; i++) {TouchEvent event = touchEvents.get(i);if(event.type != TouchEvent.TOUCH_UP)continue;touchPoint.set(event.x, event.y);guiCam.touchToWorld(touchPoint);if(OverlapTester.pointInRectangle(pauseBounds, touchPoint)) {Assets.playSound(Assets.clickSound);state = GAME_PAUSED;return;}}world.update(deltaTime, game.getInput().getAccelX());if(world.score != lastScore) {lastScore = world.score;scoreString = "" + lastScore;}if(world.state == World.WORLD_STATE_NEXT_LEVEL) {state = GAME_LEVEL_END;}if(world.state == World.WORLD_STATE_GAME_OVER) {state = GAME_OVER;if(lastScore >= Settings.highscores[4])scoreString = "new highscore: " + lastScore;elsescoreString = "score: " + lastScore;Settings.addScore(lastScore);Settings.save(game.getFileIO());}}
In the updateRunning() method , we first check whether the user touched the pause button in the upper-right corner. If that’s the case, then the game is put into the GAME_PAUSED state. Otherwise, we update the World instance with the current delta time and the x-axis value of the accelerometer, which are responsible for moving Bob horizontally. After the world is updated, we check whether our score string needs updating. We also check whether Bob has reached the castle; if he has, we enter the GAME_NEXT_LEVEL state, which shows the message in the top-left screen in Figure 9-2 and waits for a touch event to generate the next level. In case the game is over, we set the score string to either score: #score or new highscore: #score, depending on whether the score achieved is a new high score. We then add the score to the Settings class and tell it to save all the settings to the SD card. Additionally, we set the game screen to the GAME_OVER state.
private void updatePaused() {List<TouchEvent> touchEvents = game.getInput().getTouchEvents();int len = touchEvents.size();for(int i = 0; i < len; i++) {TouchEvent event = touchEvents.get(i);if(event.type != TouchEvent.TOUCH_UP)continue;touchPoint.set(event.x, event.y);guiCam.touchToWorld(touchPoint);if(OverlapTester.pointInRectangle(resumeBounds, touchPoint)) {Assets.playSound(Assets.clickSound);state = GAME_RUNNING;return;}if(OverlapTester.pointInRectangle(quitBounds, touchPoint)) {Assets.playSound(Assets.clickSound);game.setScreen(new MainMenuScreen(game));return;}}}
In the updatePaused() method , we check whether the user has touched the RESUME element or the QUIT UI element and react accordingly.
private void updateLevelEnd() {List<TouchEvent> touchEvents = game.getInput().getTouchEvents();int len = touchEvents.size();for(int i = 0; i < len; i++) {TouchEvent event = touchEvents.get(i);if(event.type != TouchEvent.TOUCH_UP)continue;world = new World(worldListener);renderer = new WorldRenderer(glGraphics, batcher, world);world.score = lastScore;state = GAME_READY;}}
In the updateLevelEnd() method , we check for a touch event; if there has been one, we create new World and WorldRenderer instances. We also tell the World to use the score achieved so far and to set the game screen to the GAME_READY state, which will again wait for a touch event.
private void updateGameOver() {List<TouchEvent> touchEvents = game.getInput().getTouchEvents();int len = touchEvents.size();for(int i = 0; i < len; i++) {TouchEvent event = touchEvents.get(i);if(event.type != TouchEvent.TOUCH_UP)continue;game.setScreen(new MainMenuScreen(game));}}
In the updateGameOver() method , we again just check for a touch event, in which case we simply transition back to the main menu, as indicated in Figure 9-2.
Rendering the GameScreen
After all those updates, the game screen will be asked to render itself via a call to GameScreen.present(). Let’s have a look at that method in Listing 9-22.
Listing 9-22. Excerpt from GameScreen.java: The rendering methods
@Overridepublic void present(float deltaTime) {GL10 gl = glGraphics.getGL();gl.glClear(GL10.GL_COLOR_BUFFER_BIT);gl.glEnable(GL10.GL_TEXTURE_2D);renderer.render();guiCam.setViewportAndMatrices();gl.glEnable(GL10.GL_BLEND);gl.glBlendFunc(GL10.GL_SRC_ALPHA, GL10.GL_ONE_MINUS_SRC_ALPHA);batcher.beginBatch(Assets.items);switch(state) {case GAME_READY:presentReady();break;case GAME_RUNNING:presentRunning();break;case GAME_PAUSED:presentPaused();break;case GAME_LEVEL_END:presentLevelEnd();break;case GAME_OVER:presentGameOver();break;}batcher.endBatch();gl.glDisable(GL10.GL_BLEND);}
The rendering of the game screen is done in two steps. We first render the actual game world via the WorldRenderer class, and then we render all the UI elements on top of the game world depending on the current state of the game screen. The render() method does just that. As with our update methods, we again have a separate rendering method for all the subscreens.
private void presentReady() {batcher.drawSprite(160, 240, 192, 32, Assets.ready);}
The presentRunning() method just displays the pause button in the top-right corner and the score string in the top-left corner.
private void presentRunning() {batcher.drawSprite(320 - 32, 480 - 32, 64, 64, Assets.pause);Assets.font.drawText(batcher, scoreString, 16, 480-20);}
In the presentRunning() method, we simply render the pause button and the current score string.
private void presentPaused() {batcher.drawSprite(160, 240, 192, 96, Assets.pauseMenu);Assets.font.drawText(batcher, scoreString, 16, 480-20);}
The presentPaused() method displays the pause menu UI elements and the score again.
private void presentLevelEnd() {String topText = "the princess is ...";String bottomText = "in another castle!";float topWidth = Assets.font.glyphWidth * topText.length();float bottomWidth = Assets.font.glyphWidth * bottomText.length();Assets.font.drawText(batcher, topText, 160 - topWidth / 2, 480 - 40);Assets.font.drawText(batcher, bottomText, 160 - bottomWidth / 2, 40);}
The presentLevelEnd() method renders the string THE PRINCESS IS … at the top of the screen and the string IN ANOTHER CASTLE! at the bottom of the screen, as shown in Figure 9-2. We perform some calculations to center those strings horizontally.
private void presentGameOver() {batcher.drawSprite(160, 240, 160, 96, Assets.gameOver);float scoreWidth = Assets.font.glyphWidth * scoreString.length();Assets.font.drawText(batcher, scoreString, 160 - scoreWidth / 2, 480-20);}
The presentGameOver() method displays the game-over UI element as well the score string. Remember that the score screen is set in the updateRunning() method to either score: #score or new highscore: #value.
Finishing Touches
That’s basically our GameScreen class. The rest of its code is given in Listing 9-23.
Listing 9-23. The Rest of GameScreen.java: The pause(), resume(), and dispose() methods
@Overridepublic void pause() {if(state == GAME_RUNNING)state = GAME_PAUSED;}@Overridepublic void resume() {}@Overridepublic void dispose() {}}
We just make sure our game screen is paused when the user decides to pause the application.
The last thing we have to implement is the WorldRenderer class.
The WorldRenderer Class
This class should be no surprise. It simply uses the SpriteBatcher we pass to it in the constructor and renders the world accordingly. Listing 9-24 shows the beginning of the code.
Listing 9-24. Excerpt from WorldRenderer.java: Constants, members, and constructor
package com.badlogic.androidgames.jumper;import javax.microedition.khronos.opengles.GL10;import com.badlogic.androidgames.framework.gl.Animation;import com.badlogic.androidgames.framework.gl.Camera2D;import com.badlogic.androidgames.framework.gl.SpriteBatcher;import com.badlogic.androidgames.framework.gl.TextureRegion;import com.badlogic.androidgames.framework.impl.GLGraphics;public class WorldRenderer {static final float FRUSTUM_WIDTH = 10;static final float FRUSTUM_HEIGHT = 15;GLGraphics glGraphics;World world;Camera2D cam;SpriteBatcher batcher;public WorldRenderer(GLGraphics glGraphics, SpriteBatcher batcher, World world) {this.glGraphics = glGraphics;this.world = world;this.cam = new Camera2D(glGraphics, FRUSTUM_WIDTH, FRUSTUM_HEIGHT);this.batcher = batcher;}
As always, we start off by defining some constants. In this case, we define the view frustum’s width and height as 10 and 15 meters, respectively. We also have a couple of members—namely, a GLGraphics instance and the SpriteBatcher reference we get from the game screen.
The constructor takes a GLGraphics instance, a SpriteBatcher, and the World the WorldRenderer should draw as parameters. We set up all members accordingly. Listing 9-25 shows the actual rendering code.
Listing 9-25. The rest of WorldRenderer.java: The actual rendering code
public void render() {if(world.bob.position.y > cam.position.y )cam.position.y = world.bob.position.y;cam.setViewportAndMatrices();renderBackground();renderObjects();}
The render() method splits up rendering into two batches: one for the background image and another one for all the objects in the world. It also updates the camera position based on Bob’s current y coordinate. If he’s above the camera’s y coordinate, the camera position is adjusted accordingly. Note that we use a camera that works in world units here. We only set up the matrices once for both the background and the objects.
public void renderBackground() {batcher.beginBatch(Assets.background);batcher.drawSprite(0, 0,FRUSTUM_WIDTH, FRUSTUM_HEIGHT,Assets.backgroundRegion);batcher.endBatch();}
The renderBackground() method simply renders the background so that it follows the camera. It does not scroll but instead is always rendered so that it fills the complete screen. We also don’t use any blending for rendering the background, so that we can squeeze out a little bit more performance.
public void renderObjects() {GL10 gl = glGraphics.getGL();gl.glEnable(GL10.GL_BLEND);gl.glBlendFunc(GL10.GL_SRC_ALPHA, GL10.GL_ONE_MINUS_SRC_ALPHA);batcher.beginBatch(Assets.items);renderBob();renderPlatforms();renderItems();renderSquirrels();renderCastle();batcher.endBatch();gl.glDisable(GL10.GL_BLEND);}
The renderObjects() method is responsible for rendering the second batch. This time we use blending, as all our objects have transparent background pixels. All the objects are rendered in a single batch. Looking back at the constructor of GameScreen, we see that the SpriteBatcher we use can cope with 1,000 sprites in a single batch—more than enough for our world. For each object type, we have a separate rendering method.
private void renderBob() {TextureRegion keyFrame;switch(world.bob.state) {case Bob.BOB_STATE_FALL:keyFrame = Assets.bobFall.getKeyFrame(world.bob.stateTime, Animation.ANIMATION_LOOPING);break;case Bob.BOB_STATE_JUMP:keyFrame = Assets.bobJump.getKeyFrame(world.bob.stateTime, Animation.ANIMATION_LOOPING);break;case Bob.BOB_STATE_HIT:default:keyFrame = Assets.bobHit;}float side = world.bob.velocity.x < 0? -1: 1;batcher.drawSprite(world.bob.position.x, world.bob.position.y, side * 1, 1, keyFrame);}
The method renderBob()is responsible for rendering Bob. Based on Bob’s state and state time, we select a keyframe out of the total of five keyframes we have for Bob (see Figure 9-9 earlier in this chapter). Based on Bob’s velocity’s x component, we also determine which way Bob is facing. Based on that, we multiply by either 1 or –1 to flip the texture region accordingly. Remember, we only have keyframes for a Bob looking to the right. Note also that we don’t use BOB_WIDTH or BOB_HEIGHT to specify the size of the rectangle we draw for Bob. Those sizes are the sizes of the bounding shapes, which are not necessarily the sizes of the rectangles we render. Instead, we use our 1×1-meter-to-32×32-pixel mapping. That’s something we’ll do for all sprite rendering; we’ll either use a 1×1 rectangle (Bob, coins, squirrels, springs), a 2×0.5 rectangle (platforms), or a 2×2 rectangle (castle).
private void renderPlatforms() {int len = world.platforms.size();for(int i = 0; i < len; i++) {Platform platform = world.platforms.get(i);TextureRegion keyFrame = Assets.platform;if(platform.state == Platform.PLATFORM_STATE_PULVERIZING) {keyFrame = Assets.brakingPlatform.getKeyFrame(platform.stateTime, Animation.ANIMATION_NONLOOPING);}batcher.drawSprite(platform.position.x, platform.position.y,2, 0.5f, keyFrame);}}
The method renderPlatforms()loops through all the platforms in the world and selects a TextureRegion based on the platform’s state. A platform can be either pulverized or not pulverized. In the latter case, we simply use the first keyframe; in the former case, we fetch a keyframe from the pulverization animation based on the platform’s state time.
private void renderItems() {int len = world.springs.size();for(int i = 0; i < len; i++) {Spring spring = world.springs.get(i);batcher.drawSprite(spring.position.x, spring.position.y, 1, 1, Assets.spring);}len = world.coins.size();for(int i = 0; i < len; i++) {Coin coin = world.coins.get(i);TextureRegion keyFrame = Assets.coinAnim.getKeyFrame(coin.stateTime, Animation.ANIMATION_LOOPING);batcher.drawSprite(coin.position.x, coin.position.y, 1, 1, keyFrame);}}
The method renderItems()renders springs and coins. For springs, we just use the one TextureRegion we defined in Assets, and for coins we again select a keyframe from the animation based on a coin’s state time.
private void renderSquirrels() {int len = world.squirrels.size();for(int i = 0; i < len; i++) {Squirrel squirrel = world.squirrels.get(i);TextureRegion keyFrame = Assets.squirrelFly.getKeyFrame(squirrel.stateTime, Animation.ANIMATION_LOOPING);float side = squirrel.velocity.x < 0?-1:1;batcher.drawSprite(squirrel.position.x, squirrel.position.y, side * 1, 1, keyFrame);}}
The method renderSquirrels()renders squirrels. We again fetch a keyframe based on the squirrel’s state time, figure out which direction it faces, and manipulate the width accordingly when rendering it with the SpriteBatcher. This is necessary since we only have a left-facing version of the squirrel in the texture atlas.
private void renderCastle() {Castle castle = world.castle;batcher.drawSprite(castle.position.x, castle.position.y, 2, 2, Assets.castle);}}
The last method, renderCastle(), simply draws the castle with the TextureRegion we defined in the Assets class.
That was pretty simple, wasn’t it? We only have two batches to render: one for the background and one for the objects. Taking a step back, we see that we render a third batch for all the UI elements of the game screen as well. That’s three texture changes and three times uploading new vertices to the GPU. We could theoretically merge the UI and object batches, but that would be cumbersome and would introduce some hacks into our code.
We are finally done. Our second game, Super Jumper, is now ready to be played. According to our optimization guidelines from Chapter 7, we should have lightning-fast rendering. Let’s see whether that’s true.
Summary
We’ve created our second game with the power of OpenGL ES. As a result of our nice framework, it was actually a breeze to implement. The use of a texture atlas and the SpriteBatcher made for some very good performance. We also discussed how to render fixed-width ASCII bitmap fonts. Good initial design of our game mechanics and a clear definition of the relationship between world units and pixel units make developing a game a lot easier. Imagine the nightmare we’d have if we tried to do everything in pixels. All our calculations would be riddled with divisions—something the CPUs of less-powerful Android devices don’t like all that much. We also took great care to separate our logic from the presentation. All in all, Super Jumper is a success.
Now it’s time to turn the knobs to 11. Let’s get our feet wet with some 3D graphics programming.