
In Chapter 3, we churned out a full design for Mr. Nom consisting of the game mechanics, a simple background story, handcrafted graphical assets, and definitions for all the screens based on some paper cutouts. In Chapter 5, we developed a full-fledged game development framework that allows us to transfer our design screens easily to code. But enough talking; let’s start writing our first game!
Creating the Assets
We have two types of assets in Mr. Nom: audio assets and graphical assets. We recorded the audio assets via a nice, open source application called Audacity and a bad netbook microphone. We created a sound effect to be played when a button is pressed or a menu item is chosen, one for when Mr. Nom eats an ink stain, and one for when he eats himself. We saved them as OGGs to the assets/ folder under the names click.ogg, eat.ogg, and bitten.ogg, respectively. You can either be creative and create those files yourself using Audacity and a microphone, or fetch them from the SVN repository at http://code.google.com/p/beginnginandroidgames2/ . See the front matter where we describe how to get the source code if you are unfamiliar with SVN.
Earlier, we mentioned that we’d want to reuse those paper cutouts from the design phase as our real game graphics. To do this, we first have to make them fit with our target resolution.
We chose a fixed target resolution of 320×480 (portrait mode, Android mdpi resolution), for which we’ll design all our graphic assets. This might seem small, but it made it very quick and easy for us to develop the game and graphics, and, after all, the point here is that you get to see the entire Android game development process.
For your production game, consider all of the resolutions and use higher-resolution graphics so that your game looks good even on tablet-sized screens, perhaps targeting 1440×2560 as a baseline. We scanned in all the paper cutouts and resized them a bit. We saved most of the assets in separate files and merged some of them into a single file. All images are saved in a PNG format . The background is the only image that is RGB888; all others are ARGB8888. Figure 6-1 shows you what we ended up with.
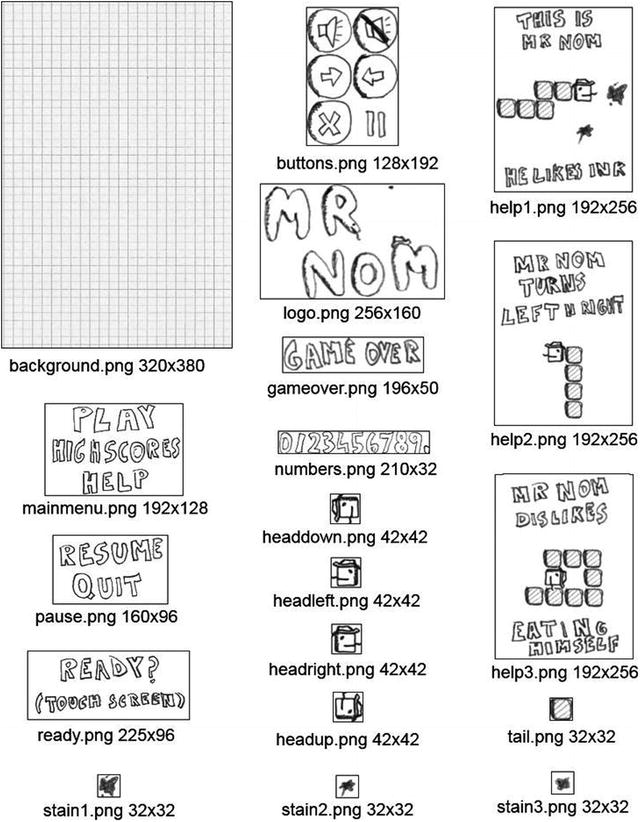
Figure 6-1. All the graphic assets of Mr. Nom with their respective filenames and sizes in pixels
Let’s break down those images a little:
background.png: This is our background image, which will be the first thing we’ll draw to the framebuffer. It is the same size as our target resolution for obvious reasons.
buttons.png: This contains all the buttons we’ll need in our game. We put them into a single file, as we can easily draw them via the Graphics.drawPixmap() method, which allows for drawing portions of an image. We’ll use that technique more often when we start drawing with OpenGL ES, so we better get used to it now. Merging several images into a single image is often called atlasing, and the image itself is called an image atlas (or texture atlas, or sprite sheet). Each button has a size of 64×64 pixels, which will come in handy when we have to decide whether a touch event has pressed a button on the screen.
help1.png, help2.png, and help3.png: These are the images we’ll display on the three help screens of Mr. Nom. They are all the same size, which makes placing them on the screen easier.
logo.png: This is the logo we’ll display on the main menu screen.
mainmenu.png: This contains the three options that we’ll present to the player on the main menu. Selecting one of these will trigger a transition to the respective screen. Each option has a height of roughly 42 pixels, something we can use to easily detect which option was touched.
ready.png, pause.png, and gameover.png: We’ll draw these when the game is about to be started, when it is paused, and when it is over.
numbers.png: This holds all the digits we’ll need in order to render our high scores later on. What to remember about this image is that each digit has the same width and height, 20×32 pixels, except for the dot at the end, which is 10×32 pixels. We can use this to render any number that is thrown at us.
tail.png: This is the tail of Mr. Nom, or rather one part of his tail. It’s 32×32 pixels in size.
headdown.png, headleft.png, headright.png, and headup.png: These images are for the head of Mr. Nom; there’s one for each direction in which he can move. Because of his hat, we have to make these images a little bigger than the tail image. Each head image is 42×42 pixels in size.
stain1.png, stain2.png, and stain3.png: These are the three types of stains that we can render. Having three types will make the game screen a little more diverse. They are 32×32 pixels in size, just like the tail image.
Great, now let’s start implementing the screens!
Setting Up the Project
As mentioned in Chapter 5, we will merge the code for Mr. Nom with our framework code. All the classes related to Mr. Nom will be placed in the package com.badlogic.androidgames.mrnom. Additionally, we have to modify the manifest file, as outlined in Chapter 4. Our default activity will be called MrNomGame. Just follow the eight steps outlined in the section “Android Game Project Setup in Six Easy Steps” in Chapter 4 to set the <activity> attributes properly (that is, so that the game is fixed in portrait mode and configuration changes are handled by the application) and to give our application the proper permissions (writing to external storage, using a wake lock, and so forth).
All the assets from the previous sections are located in the assets/ folder of the project. Additionally, we have to put ic_launcher.png files into the res/mipmap-mdpi, res/mipmap-hdpi, res/mipmap-xdpi, res/mipmap-xxdpi, and res/mipmap-xxxdpi folders. We just take the headright.png of Mr. Nom, rename it ic_launcher.png, and put a properly resized version of it in each of the folders.
All that’s left is to put our game code into the com.badlogic.androidgames.mrnom package of the Android Studio project!
MrNomGame: The Main Activity
Our application needs a main entry point, known as the default activity on Android. We will call this default activity MrNomGame and let it derive from AndroidGame, the class we implemented in Chapter 5 to run our game. It will be responsible for creating and running our first screen later on. Listing 6-1 shows our MrNomGame class.
Listing 6-1. MrNomGame.java: Our main activity/game hybrid
package com.badlogic.androidgames.mrnom;import com.badlogic.androidgames.framework.Screen;import com.badlogic.androidgames.framework.impl.AndroidGame;public class MrNomGame extends AndroidGame {public Screen getStartScreen() {return new LoadingScreen(this);}}
All we need to do is derive from AndroidGame and implement the getStartScreen() method, which will return an instance of the LoadingScreen class (which we’ll implement in a minute). Remember, this will get us started with all the things we need for our game, from setting up the different modules for audio, graphics, input, and file I/O to starting the main loop thread. Pretty easy, huh?
Assets: A Convenient Asset Store
The loading screen will load all the assets of our game. But where do we store them? To store them, we’ll do something that is not seen very often in Java land: we’ll create a class that has a ton of public static members that hold all the pixmaps and sounds that we’ve loaded from the assets. Listing 6-2 shows that class.
Listing 6-2. Assets.java: Holding all of our pixmaps and sounds for easy access
package com.badlogic.androidgames.mrnom;import com.badlogic.androidgames.framework.Pixmap;import com.badlogic.androidgames.framework.Sound;public class Assets {public static Pixmap background;public static Pixmap logo;public static Pixmap mainMenu;public static Pixmap buttons;public static Pixmap help1;public static Pixmap help2;public static Pixmap help3;public static Pixmap numbers;public static Pixmap ready;public static Pixmap pause;public static Pixmap gameOver;public static Pixmap headUp;public static Pixmap headLeft;public static Pixmap headDown;public static Pixmap headRight;public static Pixmap tail;public static Pixmap stain1;public static Pixmap stain2;public static Pixmap stain3;public static Sound click;public static Sound eat;public static Sound bitten;}
We have a static member for every image and sound we load from the assets. If we want to use one of these assets, we can do something like this:
game.getGraphics().drawPixmap(Assets.background, 0, 0);or something like this:
Assets.click.play(1);Now, that’s convenient. However, note that nothing is keeping us from overwriting those static members, as they are not final. But as long as we don’t overwrite them, we are safe. These public, non-final members actually make this “design pattern” an anti-pattern. For our game, it’s OK to be a little lazy, though. A cleaner solution would hide the assets behind setters and getters in a so-called singleton class. We’ll stick to our poor-man’s asset manager.
Settings: Keeping Track of User Choices and High Scores
There are two other things that we need to load in the loading screen: the user settings and the high scores. If you look back at the main menu and high-scores screens in Chapter 3, you’ll see that we allow the user to toggle the sounds and that we store the top five high scores. We’ll save these settings to the external storage so that we can reload them the next time the game starts. For this, we’ll implement another simple class, called Settings, as shown in Listing 6-3. The listing is split up, with comments interspersed.
Listing 6-3. Settings.java: Stores our settings and loads/saves them
package com.badlogic.androidgames.mrnom;import java.io.BufferedReader;import java.io.BufferedWriter;import java.io.IOException;import java.io.InputStreamReader;import java.io.OutputStreamWriter;import com.badlogic.androidgames.framework.FileIO;public class Settings {public static boolean soundEnabled = true;public static int[] highscores = new int[] { 100, 80, 50, 30, 10 };
Whether sound effects are played back is determined by a public static Boolean called soundEnabled. The high scores are stored in a five-element integer array, sorted from highest to lowest. We define sensible defaults for both settings. We can access these two members the same way we accessed the members of the Assets class.
public static void load(FileIO files) {BufferedReader in = null;try {in = new BufferedReader(new InputStreamReader(files.readFile(".mrnom")));soundEnabled = Boolean.parseBoolean(in.readLine());for (int i = 0; i < 5; i++) {highscores[i] = Integer.parseInt(in.readLine());}} catch (IOException e) {// :( It's ok we have defaults} catch (NumberFormatException e) {// :/ It's ok, defaults save our day} finally {try {if (in != null)in.close();} catch (IOException e) {}}}
The static load() method tries to load the settings from a file called .mrnom from the external storage. It needs a FileIO instance for that, which we pass to the method. It assumes that the sound setting and each high-score entry is stored on a separate line and simply reads them in. If anything goes wrong (for example, if the external storage is not available or there is no settings file yet), we simply fall back to our defaults and ignore the failure.
public static void save(FileIO files) {BufferedWriter out = null;try {out = new BufferedWriter(new OutputStreamWriter(files.writeFile(".mrnom")));out.write(Boolean.toString(soundEnabled));for (int i = 0; i < 5; i++) {out.write(Integer.toString(highscores[i]));}} catch (IOException e) {} finally {try {if (out != null)out.close();} catch (IOException e) {}}}
Next up is a method called save(). It takes the current settings and serializes them to the .mrnom file on the external storage (that is, /sdcard/.mrnom). The sound setting and each high-score entry is stored as a separate line in that file, as expected by the load() method. If something goes wrong, we just ignore the failure and use the default values defined earlier. In a AAA title, you might want to inform the user about this loading error.
public static void addScore(int score) {for (int i = 0; i < 5; i++) {if (highscores[i] < score) {for (int j = 4; j > i; j--)highscores[j] = highscores[j - 1];highscores[i] = score;break;}}}}
The final method, addScore(), is a convenience method. We will use it to add a new score to the high scores, automatically re-sorting them depending on the value we want to insert.
LoadingScreen : Fetching the Assets from Disk
With those classes at hand, we can now easily implement the loading screen. Listing 6-4 shows the code.
Listing 6-4. LoadingScreen.java: Loads all assets and the settings
package com.badlogic.androidgames.mrnom;import com.badlogic.androidgames.framework.Game;import com.badlogic.androidgames.framework.Graphics;import com.badlogic.androidgames.framework.Screen;import com.badlogic.androidgames.framework.Graphics.PixmapFormat;public class LoadingScreen extends Screen {public LoadingScreen(Game game) {super(game);}
We let the LoadingScreen class derive from the Screen class we defined in Chapter 3. This requires that we implement a constructor that takes a Game instance, which we hand to the superclass constructor. Note that this constructor will be called in the MrNomGame.getStartScreen() method we defined earlier.
public void update(float deltaTime) {Graphics g = game.getGraphics();Assets.background = g.newPixmap("background.png", PixmapFormat.RGB565);Assets.logo = g.newPixmap("logo.png", PixmapFormat.ARGB4444);Assets.mainMenu = g.newPixmap("mainmenu.png", PixmapFormat.ARGB4444);Assets.buttons = g.newPixmap("buttons.png", PixmapFormat.ARGB4444);Assets.help1 = g.newPixmap("help1.png", PixmapFormat.ARGB4444);Assets.help2 = g.newPixmap("help2.png", PixmapFormat.ARGB4444);Assets.help3 = g.newPixmap("help3.png", PixmapFormat.ARGB4444);Assets.numbers = g.newPixmap("numbers.png", PixmapFormat.ARGB4444);Assets.ready = g.newPixmap("ready.png", PixmapFormat.ARGB4444);Assets.pause = g.newPixmap("pausemenu.png", PixmapFormat.ARGB4444);Assets.gameOver = g.newPixmap("gameover.png", PixmapFormat.ARGB4444);Assets.headUp = g.newPixmap("headup.png", PixmapFormat.ARGB4444);Assets.headLeft = g.newPixmap("headleft.png", PixmapFormat.ARGB4444);Assets.headDown = g.newPixmap("headdown.png", PixmapFormat.ARGB4444);Assets.headRight = g.newPixmap("headright.png", PixmapFormat.ARGB4444);Assets.tail = g.newPixmap("tail.png", PixmapFormat.ARGB4444);Assets.stain1 = g.newPixmap("stain1.png", PixmapFormat.ARGB4444);Assets.stain2 = g.newPixmap("stain2.png", PixmapFormat.ARGB4444);Assets.stain3 = g.newPixmap("stain3.png", PixmapFormat.ARGB4444);Assets.click = game.getAudio().newSound("click.ogg");Assets.eat = game.getAudio().newSound("eat.ogg");Assets.bitten = game.getAudio().newSound("bitten.ogg");Settings.load(game.getFileIO());game.setScreen(new MainMenuScreen(game));}
Next up is our implementation of the update() method, where we load the assets and settings. For the image assets, we simply create new pixmaps via the Graphics.newPixmap() method. Note that we specify which color format the pixmaps should have. The background has an RGB565 format, and all other images have an ARGB4444 format (if the BitmapFactory respects our hint). We do this to conserve memory and increase our rendering speed a little later on. Our original images are stored in RGB888 and ARGB8888 formats as PNGs. We also load in the three sound effects and store them in the respective members of the Assets class. Next, we load the settings from the external storage via the Settings.load() method. Finally, we initiate a screen transition to a Screen called MainMenuScreen, which will take over execution from that point on.
public void present(float deltaTime) {}public void pause() {}public void resume() {}public void dispose() {}}
The other methods are just stubs and do not perform any actions. Since the update() method will immediately trigger a screen transition after all assets are loaded, there’s nothing more to do on this screen.
The Main Menu Screen
The main menu screen is pretty dumb. It just renders the logo, the main menu options, and the sound setting in the form of a toggle button. All it does is react to touches on either the main menu options or the sound setting toggle button. To implement this behavior, we need to know two things: where on the screen we render the images, and what the touch areas are that will either trigger a screen transition or toggle the sound setting. Figure 6-2 shows where we’ll render the different images on the screen. From that we can directly derive the touch areas.
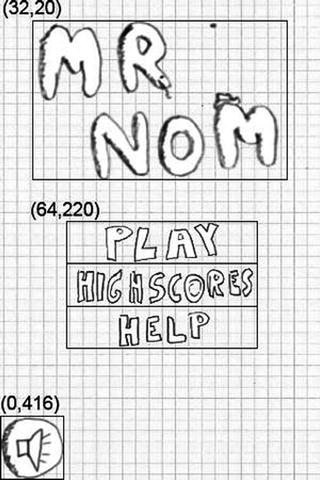
Figure 6-2. The main menu screen. The coordinates specify where we’ll render the different images, and the outlines show the touch areas.
The x coordinates of the logo and main menu option images are calculated so that they are centered on the x axis.
Next, let’s implement the Screen. Listing 6-5 shows the code.
Listing 6-5. MainMenuScreen.java: The main menu screen
package com.badlogic.androidgames.mrnom;import java.util.List;import com.badlogic.androidgames.framework.Game;import com.badlogic.androidgames.framework.Graphics;import com.badlogic.androidgames.framework.Input.TouchEvent;import com.badlogic.androidgames.framework.Screen;public class MainMenuScreen extends Screen {public MainMenuScreen(Game game) {super(game);}
We let the class derive from Screen again and implement an adequate constructor for it.
public void update(float deltaTime) {Graphics g = game.getGraphics();List<TouchEvent> touchEvents = game.getInput().getTouchEvents();game.getInput().getKeyEvents();int len = touchEvents.size();for(int i = 0; i < len; i++) {TouchEvent event = touchEvents.get(i);if(event.type == TouchEvent.TOUCH_UP) {if(inBounds(event, 0, g.getHeight() - 64, 64, 64)) {Settings.soundEnabled = !Settings.soundEnabled;if(Settings.soundEnabled)Assets.click.play(1);}if(inBounds(event, 64, 220, 192, 42) ) {game.setScreen(new GameScreen(game));if(Settings.soundEnabled)Assets.click.play(1);return;}if(inBounds(event, 64, 220 + 42, 192, 42) ) {game.setScreen(new HighscoreScreen(game));if(Settings.soundEnabled)Assets.click.play(1);return;}if(inBounds(event, 64, 220 + 84, 192, 42) ) {game.setScreen(new HelpScreen(game));if(Settings.soundEnabled)Assets.click.play(1);return;}}}}
Next, we have the update() method, in which we’ll do all our touch-event checking. We first fetch the TouchEvent and KeyEvent instances from the Input instance the Game instance provides us. Note that we do not use the KeyEvent instances, but we fetch them anyway in order to clear the internal buffer (yes, that’s a tad bit nasty, but let’s make it a habit). We then loop over all the TouchEvent instances until we find one with the type TouchEvent.TOUCH_UP. (We could alternatively look for TouchEvent.TOUCH_DOWN events, but in most UIs the up event is used to indicate that a UI component was pressed.)
Once we have a fitting event, we check whether it pressed either the sound toggle button or one of the menu entries. To make that code a little cleaner, we wrote a method called inBounds(), which takes a touch event, x and y coordinates, and a width and height. The method checks whether the touch event is inside the rectangle defined by those parameters, and it returns either true or false.
If the sound toggle button is pressed, we simply invert the Settings.soundEnabled Boolean value. In case any of the main menu entries are pressed, we transition to the appropriate screen by instancing it and setting it via Game.setScreen(). We can immediately return in that case, as the MainMenuScreen doesn’t have anything to do anymore. We also play the click sounds if either the toggle button or a main menu entry is pressed and sound is enabled.
Remember that all the touch events will be reported relative to our target resolution of 320×480 pixels, thanks to the scaling magic we performed in the touch event handlers discussed in Chapter 5.
private boolean inBounds(TouchEvent event, int x, int y, int width, int height) {if(event.x > x && event.x < x + width - 1 &&event.y > y && event.y < y + height - 1)return true;elsereturn false;}
The inBounds() method works as previously discussed: put in a touch event and a rectangle, and it tells you whether the touch event’s coordinates are inside that rectangle.
public void present(float deltaTime) {Graphics g = game.getGraphics();g.drawPixmap(Assets.background, 0, 0);g.drawPixmap(Assets.logo, 32, 20);g.drawPixmap(Assets.mainMenu, 64, 220);if(Settings.soundEnabled)g.drawPixmap(Assets.buttons, 0, 416, 0, 0, 64, 64);elseg.drawPixmap(Assets.buttons, 0, 416, 64, 0, 64, 64);}
The present() method is probably the one you’ve been waiting for most, but it isn’t all that exciting. Our little game framework makes it really simple to render our main menu screen. All we do is render the background at (0,0), which will basically erase our framebuffer, so no call to Graphics.clear() is needed. Next, we draw the logo and main menu entries at the coordinates shown in Figure 6-2. We end that method by drawing the sound toggle button based on the current setting. As you can see, we use the same pixmap, but only draw the appropriate portion of it (the sound toggle button; see Figure 6-1). Now, that was easy.
public void pause() {Settings.save(game.getFileIO());}
The final piece we need to discuss is the pause() method. Since we can change one of the settings on that screen, we have to make sure that it gets persisted to the external storage. With our Settings class, that’s pretty easy too!
public void resume() {}public void dispose() {}}
The resume() and dispose() methods don’t have anything to do in this screen.
The HelpScreen Classes
Next, let’s implement the HelpScreen, HighscoreScreen, and GameScreen classes we used previously in the update() method.
We defined three help screens in Chapter 3, each more or less explaining one aspect of the game play. We now directly translate those to Screen implementations called HelpScreen, HelpScreen2, and HelpScreen3. They all have a single button that will initiate a screen transition. The HelpScreen3 screen will transition back to the main menu screen. Figure 6-3 shows the three help screens with the drawing coordinates and touch areas.
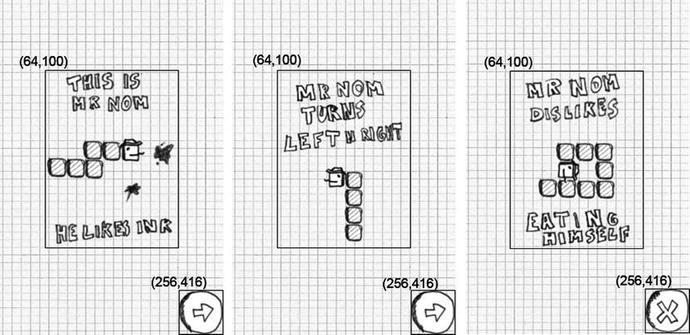
Figure 6-3. The three help screens, drawing coordinates, and touch areas
Now, that seems simple enough to implement. Let’s start with the HelpScreen class, shown in Listing 6-6.
Listing 6-6. HelpScreen.java: The first help screen
package com.badlogic.androidgames.mrnom;import java.util.List;import com.badlogic.androidgames.framework.Game;import com.badlogic.androidgames.framework.Graphics;import com.badlogic.androidgames.framework.Input.TouchEvent;import com.badlogic.androidgames.framework.Screen;public class HelpScreen extends Screen {public HelpScreen(Game game) {super(game);}@Overridepublic void update(float deltaTime) {List<TouchEvent> touchEvents = game.getInput().getTouchEvents();game.getInput().getKeyEvents();int len = touchEvents.size();for(int i = 0; i < len; i++) {TouchEvent event = touchEvents.get(i);if(event.type == TouchEvent.TOUCH_UP) {if(event.x > 256 && event.y > 416 ) {game.setScreen(new HelpScreen2(game));if(Settings.soundEnabled)Assets.click.play(1);return;}}}}@Overridepublic void present(float deltaTime) {Graphics g = game.getGraphics();g.drawPixmap(Assets.background, 0, 0);g.drawPixmap(Assets.help1, 64, 100);g.drawPixmap(Assets.buttons, 256, 416, 0, 64, 64, 64);}@Overridepublic void pause() {}@Overridepublic void resume() {}@Overridepublic void dispose() {}}
Again, very simple. We derive from Screen and implement a proper constructor. Next, we have our familiar update() method, which simply checks if the button at the bottom was pressed. If that’s the case, we play the click sound and transition to HelpScreen2.
The present() method just renders the background again, followed by the help image and the button.
The HelpScreen2 and HelpScreen3 classes look the same; the only difference is the help image they draw and the screen to which they transition. We can agree that we don’t have to look at their code. On to the high-scores screen!
The High-Scores Screen
The high-scores screen simply draws the top five high scores we store in the Settings class, plus a fancy header telling the player that he or she is on the high-scores screen, and a button at the bottom left that will transition back to the main menu when pressed. The interesting part is how we render the high scores. Let’s first have a look at where we render the images , which is shown in Figure 6-4.
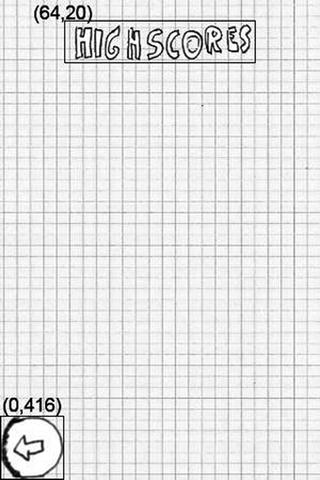
Figure 6-4. The high-scores screen, without high scores
That looks as easy as the other screens we have implemented. But how can we draw the dynamic scores?
Rendering Numbers : An Excursion
We have an asset image called numbers.png that contains all digits from 0 to 9 plus a dot. Each digit is 20×32 pixels, and the dot is 10×32 pixels. The digits are arranged from left to right in ascending order. The high-scores screen should display five lines, each line showing one of the five high scores. One such line would start with the high score’s position (for example, “1.” or “5.”), followed by a space, and then by the actual score. How can we do that?
We have two things at our disposal: the numbers.png image and the Graphics.drawPixmap() method, which allows us to draw portions of an image to the screen. Say we want the first line of the default high scores (with the string “1. 100”) to be rendered at (20,100), so that the top-left corner of the digit 1 coincides with those coordinates. We call Graphics.drawPixmap() like this:
game.getGraphics().drawPixmap(Assets.numbers, 20, 100, 20, 0, 20, 32); We know that the digit 1 has a width of 20 pixels. The next character of our string would have to be rendered at (20+20,100). In the case of the string “1. 100,” this character is the dot, which has a width of 10 pixels in the numbers.png image:
game.getGraphics().drawPixmap(Assets.numbers, 40, 100, 200, 0, 10, 32);The next character in the string needs to be rendered at (20+20+10,100). That character is a space, which we don’t need to draw. All we need to do is advance on the x axis by 20 pixels again, as we assume that’s the width of the space character. The next character, 1, would therefore be rendered at (20+20+10+20,100). See a pattern here?
Given the coordinates of the upper-left corner of our first character in the string, we can loop through each character of the string, draw it, and increment the x coordinate for the next character to be drawn by either 20 or 10 pixels, depending on the character we just drew.
We also need to figure out which portion of the numbers.png image we should draw, given the current character. For that, we need the x and y coordinates of the upper-left corner of that portion, as well as its width and height. The y coordinate will always be 0, which should be obvious when looking at Figure 6-1. The height is also a constant—32 in our case. The width is either 20 pixels (if the character of the string is a digit) or 10 pixels (if it is a dot). The only thing that we need to calculate is the x coordinate of the portion in the numbers.png image. We can do that by using the following neat little trick.
The characters in a string can be interpreted as Unicode characters or as 16-bit integers. This means that we can actually do calculations with those character codes. By a lucky coincidence, the characters 0 to 9 have ascending integer representations. We can use this to calculate the x coordinate of the portion of the number.png image for a digit like this:
char character = string.charAt(index);int x = (character – '0') * 20;
That will give us 0 for the character 0, 3 × 20 = 60 for the character 3, and so on. That’s exactly the x coordinate of the portion of each digit. Of course, this won’t work for the dot character, so we need to treat that specially. Let’s summarize this in a method that can render one of our high-score lines, given the string of the line and the x and y coordinates where the rendering should start:
public void drawText(Graphics g, String line, int x, int y) {int len = line.length();for (int i = 0; i < len; i++) {char character = line.charAt(i);if (character == ' ') {x += 20;continue;}int srcX;int srcWidth;if (character == '.') {srcX = 200;srcWidth = 10;} else {srcX = (character - '0') * 20;srcWidth = 20;}g.drawPixmap(Assets.numbers, x, y, srcX, 0, srcWidth, 32);x += srcWidth;}}
We iterate over each character of the string. If the current character is a space, we just advance the x coordinate by 20 pixels. Otherwise, we calculate the x coordinate and width of the current character’s region in the numbers.png image. The character is either a digit or a dot. We then render the current character and advance the rendering x coordinate by the width of the character we’ve just drawn. This method will of course blow up if our string contains anything other than spaces, digits, and dots. Can you think of a way to make it work with any string?
Implementing the Screen
Equipped with this new knowledge, we can now easily implement the HighscoreScreen class, as shown in Listing 6-7.
Listing 6-7. HighscoreScreen.java: Showing us our best achievements so far
package com.badlogic.androidgames.mrnom;import java.util.List;import com.badlogic.androidgames.framework.Game;import com.badlogic.androidgames.framework.Graphics;import com.badlogic.androidgames.framework.Screen;import com.badlogic.androidgames.framework.Input.TouchEvent;public class HighscoreScreen extends Screen {String lines[] = new String[5];public HighscoreScreen(Game game) {super(game);for (int i = 0; i < 5; i++) {lines[i] = "" + (i + 1) + ". " + Settings.highscores[i];}}
As we want to stay friends with the garbage collector, we store the strings of the five high-score lines in a string array member. We construct the strings based on the Settings.highscores array in the constructor.
@Overridepublic void update(float deltaTime) {List<TouchEvent> touchEvents = game.getInput().getTouchEvents();game.getInput().getKeyEvents();int len = touchEvents.size();for (int i = 0; i < len; i++) {TouchEvent event = touchEvents.get(i);if (event.type == TouchEvent.TOUCH_UP) {if (event.x < 64 && event.y > 416) {if(Settings.soundEnabled)Assets.click.play(1);game.setScreen(new MainMenuScreen(game));return;}}}}
Next, we define the update() method, which is unsurprisingly boring. All we do is check for whether a touch-up event pressed the button in the bottom-left corner. If that’s the case, we play the click sound and transition back to the main menu screen.
@Overridepublic void present(float deltaTime) {Graphics g = game.getGraphics();g.drawPixmap(Assets.background, 0, 0);g.drawPixmap(Assets.mainMenu, 64, 20, 0, 42, 196, 42);int y = 100;for (int i = 0; i < 5; i++) {drawText(g, lines[i], 20, y);y += 50;}g.drawPixmap(Assets.buttons, 0, 416, 64, 64, 64, 64);}
The present() method is pretty simple with the help of the mighty drawText() method we previously defined. We render the background image first, as usual, followed by the “HIGHSCORES” portion of the Assets.mainmenu image. We could have stored this in a separate file, but we reuse it to free up more memory.
Next, we loop through the five strings for each high-score line we created in the constructor. We draw each line with the drawText() method. The first line starts at (20,100), the next line is rendered at (20,150), and so on. We just increase the y coordinate for text rendering by 50 pixels for each line so that we have a nice vertical spacing between the lines. We finish the method off by drawing our button.
public void drawText(Graphics g, String line, int x, int y) {int len = line.length();for (int i = 0; i < len; i++) {char character = line.charAt(i);if (character == ' ') {x += 20;continue;}int srcX = 0;int srcWidth = 0;if (character == '.') {srcX = 200;srcWidth = 10;} else {srcX = (character - '0') * 20;srcWidth = 20;}g.drawPixmap(Assets.numbers, x, y, srcX, 0, srcWidth, 32);x += srcWidth;}}@Overridepublic void pause() {}@Overridepublic void resume() {}@Overridepublic void dispose() {}}
The remaining methods should be self-explanatory. Let’s get to the last missing piece of our Mr. Nom game: the game screen.
Abstracting the World of Mr. Nom: Model, View, Controller
So far, we’ve only implemented boring UI stuff and some housekeeping code for our assets and settings. We’ll now abstract the world of Mr. Nom and all the objects in it. We’ll also free Mr. Nom from the screen resolution and let him live in his own little world with his own little coordinate system.
If you are a long-time coder, you’ve probably heard about design patterns. They are, more or less, strategies to design your code, given a scenario. Some of them are academic, and some have uses in the real world. For game development, we can borrow some ideas from the Model-View-Controller (MVC)design pattern. It’s often used by the database and web community to separate the data model from the presentation layer and the data-manipulation layer. We won’t strictly follow this design pattern, but rather will adapt it in a simpler form.
So, what does this mean for Mr. Nom? First of all, we need an abstract representation of our world that is independent of any bitmaps, sounds, framebuffers, or input events. Instead, we’ll model Mr. Nom’s world with a few simple classes in an object-oriented manner. We’ll have a class for the stains in the world, and a class for Mr. Nom himself. Mr. Nom is composed of a head and tail parts, which we’ll also represent by separate classes. To tie everything together, we’ll have an all-knowing class representing the complete world of Mr. Nom, including the stains and Mr. Nom himself. All of this represents the model part of MVC.
The view in MVC will be the code that is responsible for rendering the world of Mr. Nom. We’ll have a class or a method that takes the class for the world, reads its current state, and renders it to the screen. How it is rendered does not concern the model classes, which is the most important lesson to take away from MVC. The model classes are independent of everything, but the view classes and methods depend on the model classes.
Finally, we have the controller in MVC . It tells the model classes to change their state based on things like user input or the time ticking away. The model classes provide methods to the controller (for example, with instructions like “turn Mr. Nom to the left”), which the controller can then use to modify the state of the model. We don’t have any code in the model classes that directly accesses things like the touchscreen or the accelerometer. This way, we can keep the model classes clear of any external dependencies.
This may sound complicated, and you may be wondering why we do things this way. However, there are a lot of benefits to this approach. We can implement all of our game logic without having to know about graphics, audio, or input devices. We can modify the rendering of the game world without having to change the model classes themselves. We could even go so far as to exchange a 2D world renderer with a 3D world renderer. We can easily add support for new input devices by using a controller. All it does is translate input events to method calls of the model classes. Want to turn Mr. Nom via the accelerometer ? No problem—read the accelerometer values in the controller and translate them to a “turn Mr. Nom left” or a “turn Mr. Nom right” method call on the model of Mr. Nom. Want to add support for the Zeemote? No problem, just do the same as in the case of the accelerometer! The best thing about using controllers is that we don’t have to touch a single line of Mr. Nom’s code to make all of this happen.
Let’s start by defining Mr. Nom’s world. To do this, we’ll break away from the strict MVC pattern a little and use our graphic assets to illustrate the basic ideas. This will also help us to implement the view component later on (rendering Mr. Nom’s abstract world in pixels).
Figure 6-5 shows the game screen upon which the world of Mr. Nom is superimposed, in the form of a grid.

Figure 6-5. Mr. Nom’s world superimposed onto our game screen
Notice that Mr. Nom’s world is confined to a grid of 10×13 cells. We address cells in a coordinate system , with the origin in the upper-left corner at (0,0) and spanning to the bottom-right corner at (9,12). Any part of Mr. Nom must be in one of these cells and, thus, have integer x and y coordinates within this world. The same is true for the stains in this world. Each part of Mr. Nom fits into exactly one cell of 1×1 units. Note that the type of units doesn’t matter—this is our own fantasy world free from the shackles of the SI system or pixels!
Mr. Nom can’t travel outside this small world. If he passes an edge, he’ll just come out the other end, and all his parts will follow. (We have the same problem here on Earth by the way—go in any direction for long enough and you’ll come back to your starting point.) Mr. Nom can also only advance cell by cell. All his parts will always be at integer coordinates . He’ll never, for example, occupy two and a half cells.
Note
As stated earlier, what we use here is not a strict MVC pattern . If you are interested in the real definition of an MVC pattern, we suggest you read Design Patterns: Elements of Reusable Object-Oriented Software by Erich Gamm, Richard Helm, Ralph Johnson, and John M. Vlissides (a.k.a. the Gang of Four) (Addison-Wesley, 1994). In their book, the MVC pattern is known as the Observer pattern.
The Stain Class
The simplest object in Mr. Nom’s world is a stain. It just sits in a cell of the world, waiting to be eaten. When we designed Mr. Nom, we created three different visual representations of a stain. The type of a stain does not make a difference in Mr. Nom’s world, but we’ll include it in our Stain class anyway. Listing 6-8 shows the Stain class.
Listing 6-8. Stain.java
package com.badlogic.androidgames.mrnom;public class Stain {public static final int TYPE_1 = 0;public static final int TYPE_2 = 1;public static final int TYPE_3 = 2;public int x, y;public int type;public Stain(int x, int y, int type) {this.x = x;this.y = y;this.type = type;}}
The Stain class defines three public static constants that encode the type of a stain. Each Stain instance has three members: x and y coordinates in Mr. Nom’s world and a type, which is one of the constants that were defined previously. To make our code simple, we don’t include getters and setters, as is common practice. We finish the class off with a nice constructor that allows us to instantiate a Stain instance easily.
One thing to notice is the lack of any connection to graphics, sound, or other classes. The Stain class stands on its own, proudly encoding the attributes of a stain in Mr. Nom’s world.
The Snake and SnakePart Classes
Mr. Nom is like a moving chain, composed of interconnected parts that will move along when we pick one part and drag it somewhere. Each part occupies a single cell in Mr. Nom’s world, much like a stain. In our model, we do not distinguish between the head and tail parts, so we can have a single class that represents both types of parts of Mr. Nom. Listing 6-9 shows the SnakePart class, which is used to define both parts of Mr. Nom.
Listing 6-9. SnakePart.java
package com.badlogic.androidgames.mrnom;public class SnakePart {public int x, y;public SnakePart(int x, int y) {this.x = x;this.y = y;}}
This is essentially the same as the Stain class—we just removed the type member. The first really interesting class of our model of Mr. Nom’s world is the Snake class. Let’s think about what it has to be able to do:
It must store the head and tail parts.
It must know which way Mr. Nom is currently heading.
It must be able to grow a new tail part when Mr. Nom eats a stain.
It must be able to move by one cell in the current direction.
The first and second items are easy. We just need a list of SnakePart instances—the first part in that list being the head and the other parts making up the tail. Mr. Nom can move up, down, left, and right. We can encode that with some constants and store his current direction in a member of the Snake class.
The third item isn’t all that complicated either. We just add another SnakePart to the list of parts we already have. The question is, at what position should we add that part? It may sound surprising, but we give it the same position as the last part in the list. The reason for this becomes clearer when we look at how we can implement the last item on the preceding list: moving Mr. Nom.
Figure 6-6 shows Mr. Nom in his initial configuration . He is composed of three parts: the head, at (5,6), and two tail parts, at (5,7) and (5,8).
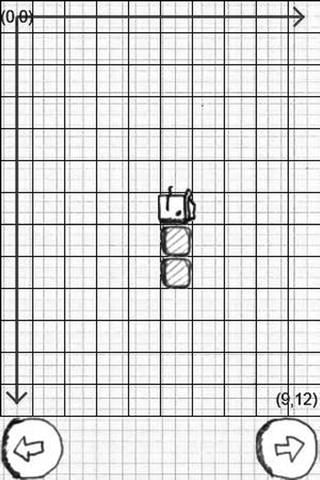
Figure 6-6. Mr. Nom in his initial configuration
The parts in the list are ordered, beginning with the head and ending at the last tail part. When Mr. Nom advances by one cell, all the parts behind his head have to follow. However, Mr. Nom’s parts might not be laid out in a straight line, as in Figure 6-6, so simply shifting all the parts in the direction Mr. Nom advances is not enough. We have to do something a little more sophisticated.
We need to start at the last part in the list, as counterintuitive as that may sound. We move it to the position of the part before it, and we repeat this for all other parts in the list, except for the head, as there’s no part before it. In the case of the head, we check which direction Mr. Nom is currently heading and modify the head’s position accordingly. Figure 6-7 illustrates this with a bit more complicated configuration of Mr. Nom.

Figure 6-7. Mr. Nom advancing and taking his tail with him
This movement strategy works well with our eating strategy. When we add a new part to Mr. Nom, it will stay at the same position as the part before it the next time Mr. Nom moves. Also, note that this will allow us to implement wrapping Mr. Nom easily to the other side of the world if he passes one of the edges. We just set the head’s position accordingly, and the rest is done automatically.
With all this information, we can now implement the Snake class representing Mr. Nom. Listing 6-10 shows the code.
Listing 6-10. Snake.java: Mr. Nom in code
package com.badlogic.androidgames.mrnom;import java.util.ArrayList;import java.util.List;public class Snake {public static final int UP = 0;public static final int LEFT = 1;public static final int DOWN = 2;public static final int RIGHT = 3;public List<SnakePart> parts = new ArrayList<SnakePart>();public int direction;
We start off by defining a couple of constants that encode the direction of Mr. Nom. Remember that Mr. Nom can only turn left and right, so the way we define the constants’ values is critical. It will later allow us to rotate the direction easily by plus and minus 90 degrees, just by incrementing and decrementing the current direction of the constant by one.
Next, we define a list called parts that holds all the parts of Mr. Nom. The first item in that list is the head, and the other items are the tail parts. The second member of the Snake class holds the direction in which Mr. Nom is currently heading.
public Snake() {direction = UP;parts.add(new SnakePart(5, 6));parts.add(new SnakePart(5, 7));parts.add(new SnakePart(5, 8));}
In the constructor, we set up Mr. Nom to be composed of his head and two additional tail parts , positioned more or less in the middle of the world, as shown previously in Figure 6-6. We also set the direction to Snake.UP so that Mr. Nom will advance upward by one cell the next time he’s asked to advance.
public void turnLeft() {direction += 1;if(direction > RIGHT)direction = UP;}public void turnRight() {direction -= 1;if(direction < UP)direction = RIGHT;}
The methods turnLeft() and turnRight()just modify the direction member of the Snake class. For a turn left, we increment it by one, and for a turn right, we decrement it by one. We also have to make sure that we wrap Mr. Nom around if the direction value gets outside the range of the constants we defined earlier.
public void eat() {SnakePart end = parts.get(parts.size()-1);parts.add(new SnakePart(end.x, end.y));}
Next up is the eat() method . All it does is add a new SnakePart to the end of the list. This new part will have the same position as the current end part. The next time Mr. Nom advances, those two overlapping parts will move apart, as discussed earlier.
public void advance() {SnakePart head = parts.get(0);int len = parts.size() - 1;for(int i = len; i > 0; i--) {SnakePart before = parts.get(i-1);SnakePart part = parts.get(i);part.x = before.x;part.y = before.y;}if(direction == UP)head.y -= 1;if(direction == LEFT)head.x -= 1;if(direction == DOWN)head.y += 1;if(direction == RIGHT)head.x += 1;if(head.x < 0)head.x = 9;if(head.x > 9)head.x = 0;if(head.y < 0)head.y = 12;if(head.y > 12)head.y = 0;}
The next method, advance(), implements the logic illustrated in Figure 6-7. First, we move each part to the position of the part before it, starting with the last part. We exclude the head from this mechanism. Then, we move the head according to Mr. Nom’s current direction. Finally, we perform some checks to make sure Mr. Nom doesn’t go outside his world. If that’s the case, we just wrap him around so that he comes out at the other side of the world.
public boolean checkBitten() {int len = parts.size();SnakePart head = parts.get(0);for(int i = 1; i < len; i++) {SnakePart part = parts.get(i);if(part.x == head.x && part.y == head.y)return true;}return false;}}
The final method, checkBitten(), is a little helper method that checks if Mr. Nom has bitten his tail. All it does is check that no tail part is at the same position as the head. If that’s the case, Mr. Nom will die and the game will end.
The World Class
The last of our model classes is called World. The World class has several tasks to fulfill:
Keeping track of Mr. Nom (in the form of a Snake instance) as well as the Stain instance that dropped on the world. There will only ever be a single stain in our world at one time.
Providing a method that will update Mr. Nom in a time-based manner (for example, he should advance by one cell every 0.5 seconds). This method will also check whether Mr. Nom has eaten a stain or has bitten himself.
Keeping track of the score; this is basically just the number of stains eaten so far times 10.
Increasing the speed of Mr. Nom after every ten stains he’s eaten. That will make the game a little more challenging.
Keeping track of whether Mr. Nom is still alive. We’ll use this to determine whether the game is over later on.
Creating a new stain after Mr. Nom eats the current one (a subtle but important and surprisingly complex task).
There are only two items on this task list that we haven’t discussed yet: updating the world in a time-based manner and placing a new stain.
Time-Based Movement of Mr. Nom
In Chapter 3, we talked about time-based movement. This basically means that we define velocities of all of our game objects, measure the time that has passed since the last update (a.k.a. the delta time), and advance the objects by multiplying their velocity by the delta time. In the example given in Chapter 3, we used floating-point values to achieve this. Mr. Nom’s parts have integer positions, though, so we need to figure out how to advance the objects in this scenario.
Let’s first define the velocity of Mr. Nom. The world of Mr. Nom has time, and we measure it in seconds. Initially, Mr. Nom should advance by one cell every 0.5 seconds. All we need to do is keep track of how much time has passed since we last advanced Mr. Nom. If that accumulated time goes over our 0.5-second threshold, we call the Snake.advance() method and reset our time accumulator. Where do we get those delta times from? Remember the Screen.update() method? It gets the frame delta time. We just pass that on to the update() method of our World class, which will do the accumulation. To make the game more challenging, we will decrease that threshold by 0.05 seconds each time Mr. Nom eats another ten stains. We have to make sure, of course, that we don’t reach a threshold of 0, or else Mr. Nom would travel at infinite speed—something Einstein wouldn’t take kindly to.
Placing Stains
The second issue we have to solve is how to place a new stain when Mr. Nom has eaten the current one. It should appear in a random cell of the world. So, we could just instantiate a new Stain with a random position, right? Sadly, it’s not that easy.
Imagine Mr. Nom taking up a considerable number of cells. There is a reasonable probability that the stain would be placed in a cell that was already occupied by Mr. Nom, and that probability would increase the bigger Mr. Nom got. Thus, we have to find a cell that is currently not occupied by Mr. Nom. Easy again, right? Just iterate over all cells and use the first one that is not occupied by Mr. Nom.
Again, that’s a little suboptimal. If we started our search at the same position, the stain wouldn’t be placed randomly. Instead, we’ll start at a random position in the world, scan all cells until we reach the end of the world, and then scan all cells above the start position, if we haven’t found a free cell yet.
How do we check whether a cell is free? The naïve solution would be to go over all cells, take each cell’s x and y coordinates, and check all the parts of Mr. Nom against those coordinates. We have 10 × 13 = 130 cells, and Mr. Nom can take up 55 cells. That would be 130 × 55 = 7,150 checks! Granted, most devices could handle that, but we can do better.
We’ll create a two-dimensional array of Booleans, where each array element represents a cell in the world. When we have to place a new stain, we first go through all parts of Mr. Nom and set those elements that are occupied by a part in the array to true. We then simply choose a random position from which we start scanning until we find a free cell in which we can place the new stain. With Mr. Nom being composed of 55 parts, it would take 130 + 55 = 185 checks. That’s a lot better!
Determining When the Game Is Over
There’s one last thing we have to think about: What if all of the cells are taken up by Mr. Nom? In that case, the game would be over, as Mr. Nom would officially become the whole world. Given that we add 10 to the score each time Mr. Nom eats a stain, the maximally achievable score is ((10 × 13) – 3) × 10 = 1,270 points (remember, Mr. Nom starts off with three parts already).
Implementing the World Class
Phew, we have a lot of stuff to implement, so let’s get going. Listing 6-11 shows the code of the World class.
Listing 6-11. World.java
package com.badlogic.androidgames.mrnom;import java.util.Random;public class World {static final int WORLD_WIDTH = 10;static final int WORLD_HEIGHT = 13;static final int SCORE_INCREMENT = 10;static final float TICK_INITIAL = 0.5f;static final float TICK_DECREMENT = 0.05f;public Snake snake;public Stain stain;public boolean gameOver = false;;public int score = 0;boolean fields[][] = new boolean[WORLD_WIDTH][WORLD_HEIGHT];Random random = new Random();float tickTime = 0;float tick = TICK_INITIAL;
As always, we start off by defining a few constants—in this case, the world’s width and height in cells, the value that we use to increment the score each time Mr. Nom eats a stain, the initial time interval used to advance Mr. Nom (called a tick), and the value we decrement the tick by each time Mr. Nom has eaten ten stains in order to speed up things a little.
Next, we have some public members that hold a Snake instance, a Stain instance, a Boolean that stores whether the game is over, and the current score.
We define another four package private members: the 2D array we’ll use to place a new stain; an instance of the Random class, through which we’ll produce random numbers to place the stain and generate its type; the time accumulator variable, tickTime, to which we’ll add the frame delta time; and the current duration of a tick, which defines how often we advance Mr. Nom.
public World() {snake = new Snake();placeStain();}
In the constructor, we create an instance of the Snake class, which will have the initial configuration shown in Figure 6-6. We also place the first random stain via the placeStain() method.
private void placeStain() {for (int x = 0; x < WORLD_WIDTH; x++) {for (int y = 0; y < WORLD_HEIGHT; y++) {fields[x][y] = false;}}int len = snake.parts.size();for (int i = 0; i < len; i++) {SnakePart part = snake.parts.get(i);fields[part.x][part.y] = true;}int stainX = random.nextInt(WORLD_WIDTH);int stainY = random.nextInt(WORLD_HEIGHT);while (true) {if (fields[stainX][stainY] == false)break;stainX += 1;if (stainX >= WORLD_WIDTH) {stainX = 0;stainY += 1;if (stainY >= WORLD_HEIGHT) {stainY = 0;}}}stain = new Stain(stainX, stainY, random.nextInt(3));}
The placeStain() method implements the placement strategy discussed previously. We start off by clearing the cell array. Next, we set all the cells occupied by parts of the snake to true. Finally, we scan the array for a free cell starting at a random position. Once we have found a free cell, we create a Stain instance with a random type. Note that if all cells are occupied by Mr. Nom, then the loop will never terminate. We’ll make sure that will never happen in the next method.
public void update(float deltaTime) {if (gameOver)return;tickTime += deltaTime;while (tickTime > tick) {tickTime -= tick;snake.advance();if (snake.checkBitten()) {gameOver = true;return;}SnakePart head = snake.parts.get(0);if (head.x == stain.x && head.y == stain.y) {score += SCORE_INCREMENT;snake.eat();if (snake.parts.size() == WORLD_WIDTH * WORLD_HEIGHT) {gameOver = true;return;} else {placeStain();}if (score % 100 == 0 && tick - TICK_DECREMENT > 0) {tick -= TICK_DECREMENT;}}}}}
The update() method is responsible for updating the world and all the objects in it based on the delta time we pass to it. This method will call each frame in the game screen so that the world is updated constantly. We start off by checking whether the game is over. If that’s the case, then we don’t need to update anything. Next, we add the delta time to our accumulator. The while loop will use up as many ticks that have been accumulated (for example, when tickTime is 1.2 and one tick should take 0.5 seconds, we can update the world twice, leaving 0.2 seconds in the accumulator). This is called a fixed-time-step simulation.
In each iteration, we first subtract the tick interval from the accumulator. Next, we tell Mr. Nom to advance. We check if he has bitten himself and set the game-over flag if that’s the case. Finally, we check whether Mr. Nom’s head is in the same cell as the stain. If that’s the case, we increment the score and tell Mr. Nom to grow. Next, we check if Mr. Nom is composed of as many parts as there are cells in the world. If that’s the case, the game is over and we return from the function. Otherwise, we place a new stain with the placeStain() method. The last thing we do is check whether Mr. Nom has just eaten ten more stains. If that’s the case, and our threshold is above zero, we decrease it by 0.05 seconds. The tick will be shorter and thus will make Mr. Nom move faster.
This completes our set of model classes. The last thing we need to implement is the game screen!
The GameScreen Class
There’s only one more screen to implement. Let’s see what that screen does:
As defined in Mr. Nom’s design in Chapter 3, the game screen can be in one of four states: waiting for the user to confirm that he or she is ready, running the game, waiting in a paused state, or waiting for the user to click a button in the game-over state.
In the ready state, we simply ask the user to touch the screen to start the game.
In the running state, we update the world, render it, and also tell Mr. Nom to turn left and right when the player presses one of the buttons at the bottom of the screen.
In the paused state, we simply show two options: one to resume the game and one to quit it.
In the game-over state, we tell the user that the game is over and provide a button to touch so that he or she can get back to the main menu.
For each state, we have different update() and present() methods to implement, as each state does different things and shows a different UI.
Once the game is over, we have to make sure that we store the score if it is a high score.
That’s quite a bit of responsibility, which translates into more code than usual. Therefore, we’ll split up the source listing of this class. Before we dive into the code, let’s lay out how we arrange the different UI elements in each state. Figure 6-8 shows the four different states.
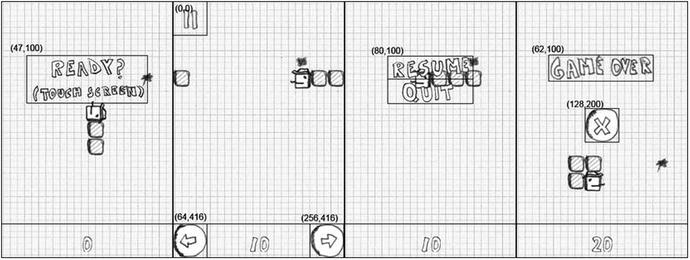
Figure 6-8. The game screen in its four states: ready, running, paused, and game over
Note that we also render the score at the bottom of the screen, along with a line that separates Mr. Nom’s world from the buttons at the bottom. The score is rendered with the same routine that we used in the HighscoreScreen. Additionally, we center it horizontally, based on the score’s string width.
The last missing bit of information is how to render Mr. Nom’s world based on its model. That’s actually pretty easy. Take a look at Figure 6-1 and Figure 6-5 again. Each cell is exactly 32×32 pixels in size. The stain images are also 32×32 pixels in size, and so are the tail parts of Mr. Nom. The head images of Mr. Nom for all directions are 42×42 pixels, so they don’t fit entirely into a single cell. That’s not a problem, though. All we need to do to render Mr. Nom’s world is take each stain and snake part and multiply its world coordinates by 32 to arrive at the object’s center in pixels on the screen—for example, a stain at (3,2) in world coordinates would have its center at 96×64 on the screen. Based on these centers, all that’s left to do is to take the appropriate asset and render it centered around those coordinates. Let’s get coding. Listing 6-12 shows the GameScreen class.
Listing 6-12. GameScreen.java
package com.badlogic.androidgames.mrnom;import java.util.List;import android.graphics.Color;import com.badlogic.androidgames.framework.Game;import com.badlogic.androidgames.framework.Graphics;import com.badlogic.androidgames.framework.Input.TouchEvent;import com.badlogic.androidgames.framework.Pixmap;import com.badlogic.androidgames.framework.Screen;public class GameScreen extends Screen {enum GameState {Ready,Running,Paused,GameOver}GameState state = GameState.Ready;World world;int oldScore = 0;String score = "0";
We start off by defining an enumeration called GameStatethat encodes our four states (ready, running, paused, and game over). Next, we define one member that holds the current state of the screen, another member that holds the World instance, and two more members that hold the currently displayed score in the forms of an integer and a string. The reason we have the last two members is that we don’t want to create new strings constantly from the World.score member each time we draw the score. Instead, we’ll cache the string and only create a new one when the score changes. That way, we play nice with the garbage collector .
public GameScreen(Game game) {super(game);world = new World();}
The constructor calls the superclass constructor and creates a new World instance. The game screen will be in the ready state after the constructor returns to the caller.
@Overridepublic void update(float deltaTime) {List<TouchEvent> touchEvents = game.getInput().getTouchEvents();game.getInput().getKeyEvents();if(state == GameState.Ready)updateReady(touchEvents);if(state == GameState.Running)updateRunning(touchEvents, deltaTime);if(state == GameState.Paused)updatePaused(touchEvents);if(state == GameState.GameOver)updateGameOver(touchEvents);}
Next comes the screen’s update() method . All it does is fetch the TouchEvents and KeyEvents from the input module and then delegate the update to one of the four update methods that we implement based on the current state.
private void updateReady(List<TouchEvent> touchEvents) {if(touchEvents.size() > 0)state = GameState.Running;}
The next method is called updateReady(). It will be called when the screen is in the ready state. All it does is check if the screen was touched. If that’s the case, it changes the state to running.
private void updateRunning(List<TouchEvent> touchEvents, float deltaTime) {int len = touchEvents.size();for(int i = 0; i < len; i++) {TouchEvent event = touchEvents.get(i);if(event.type == TouchEvent.TOUCH_UP) {if(event.x < 64 && event.y < 64) {if(Settings.soundEnabled)Assets.click.play(1);state = GameState.Paused;return;}}if(event.type == TouchEvent.TOUCH_DOWN) {if(event.x < 64 && event.y > 416) {world.snake.turnLeft();}if(event.x > 256 && event.y > 416) {world.snake.turnRight();}}}world.update(deltaTime);if(world.gameOver) {if(Settings.soundEnabled)Assets.bitten.play(1);state = GameState.GameOver;}if(oldScore != world.score) {oldScore = world.score;score = "" + oldScore;if(Settings.soundEnabled)Assets.eat.play(1);}}
The updateRunning()method first checks whether the Pause button in the top-left corner of the screen was pressed. If that’s the case, it sets the state to paused. It then checks whether one of the controller buttons at the bottom of the screen was pressed. Note that we don’t check for touch-up events here, but rather for touch-down events. If either of the buttons was pressed, we tell the Snake instance of the world to turn left or right. That’s right—the updateRunning() method contains the controller code of our MVC schema! After all the touch events have been checked, we tell the world to update itself with the given delta time. If the world signals that the game is over, we change the state accordingly and also play the bitten.ogg sound. Next, we check if the old score we have cached is different from the score that the world stores. If it is, then we know two things: Mr. Nom has eaten a stain, and the score string must be changed. In that case, we play the eat.ogg sound. And that’s all there is to the running-state update.
private void updatePaused(List<TouchEvent> touchEvents) {int len = touchEvents.size();for(int i = 0; i < len; i++) {TouchEvent event = touchEvents.get(i);if(event.type == TouchEvent.TOUCH_UP) {if(event.x > 80 && event.x <= 240) {if(event.y > 100 && event.y <= 148) {if(Settings.soundEnabled)Assets.click.play(1);state = GameState.Running;return;}if(event.y > 148 && event.y < 196) {if(Settings.soundEnabled)Assets.click.play(1);game.setScreen(new MainMenuScreen(game));return;}}}}}
The updatePaused()method just checks whether one of the menu options was touched and changes the state accordingly.
private void updateGameOver(List<TouchEvent> touchEvents) {int len = touchEvents.size();for(int i = 0; i < len; i++) {TouchEvent event = touchEvents.get(i);if(event.type == TouchEvent.TOUCH_UP) {if(event.x >= 128 && event.x <= 192 &&event.y >= 200 && event.y <= 264) {if(Settings.soundEnabled)Assets.click.play(1);game.setScreen(new MainMenuScreen(game));return;}}}}
The updateGameOver()method also checks if the button in the middle of the screen was pressed. If it has been pressed, then we initiate a screen transition back to the main menu screen.
@Overridepublic void present(float deltaTime) {Graphics g = game.getGraphics();g.drawPixmap(Assets.background, 0, 0);drawWorld(world);if(state == GameState.Ready)drawReadyUI();if(state == GameState.Running)drawRunningUI();if(state == GameState.Paused)drawPausedUI();if(state == GameState.GameOver)drawGameOverUI();drawText(g, score, g.getWidth() / 2 - score.length()*20 / 2, g.getHeight() - 42);}
Next up are the rendering methods . The present()method first draws the background image, as that is needed in all states. Next, it calls the respective drawing method for the state we are in. Finally, it renders Mr. Nom’s world and draws the score at the bottom-center of the screen.
private void drawWorld(World world) {Graphics g = game.getGraphics();Snake snake = world.snake;SnakePart head = snake.parts.get(0);Stain stain = world.stain;Pixmap stainPixmap = null;if(stain.type == Stain.TYPE_1)stainPixmap = Assets.stain1;if(stain.type == Stain.TYPE_2)stainPixmap = Assets.stain2;if(stain.type == Stain.TYPE_3)stainPixmap = Assets.stain3;int x = stain.x * 32;int y = stain.y * 32;g.drawPixmap(stainPixmap, x, y);int len = snake.parts.size();for(int i = 1; i < len; i++) {SnakePart part = snake.parts.get(i);x = part.x * 32;y = part.y * 32;g.drawPixmap(Assets.tail, x, y);}Pixmap headPixmap = null;if(snake.direction == Snake.UP)headPixmap = Assets.headUp;if(snake.direction == Snake.LEFT)headPixmap = Assets.headLeft;if(snake.direction == Snake.DOWN)headPixmap = Assets.headDown;if(snake.direction == Snake.RIGHT)headPixmap = Assets.headRight;x = head.x * 32 + 16;y = head.y * 32 + 16;g.drawPixmap(headPixmap, x - headPixmap.getWidth() / 2, y - headPixmap.getHeight() / 2);}
The drawWorld()method draws the world, as we just discussed. It starts off by choosing the pixmap to use for rendering the stain, and then it draws it and centers it horizontally at its screen position. Next, we render all the tail parts of Mr. Nom, which is pretty simple. Finally, we choose which pixmap of the head to use, based on Mr. Nom’s direction, and draw that pixmap at the position of the head in the screen coordinates. As with the other objects, we also center the image around that position. And that’s the code of the view in MVC.
private void drawReadyUI() {Graphics g = game.getGraphics();g.drawPixmap(Assets.ready, 47, 100);g.drawLine(0, 416, 480, 416, Color.BLACK);}private void drawRunningUI() {Graphics g = game.getGraphics();g.drawPixmap(Assets.buttons, 0, 0, 64, 128, 64, 64);g.drawLine(0, 416, 480, 416, Color.BLACK);g.drawPixmap(Assets.buttons, 0, 416, 64, 64, 64, 64);g.drawPixmap(Assets.buttons, 256, 416, 0, 64, 64, 64);}private void drawPausedUI() {Graphics g = game.getGraphics();g.drawPixmap(Assets.pause, 80, 100);g.drawLine(0, 416, 480, 416, Color.BLACK);}private void drawGameOverUI() {Graphics g = game.getGraphics();g.drawPixmap(Assets.gameOver, 62, 100);g.drawPixmap(Assets.buttons, 128, 200, 0, 128, 64, 64);g.drawLine(0, 416, 480, 416, Color.BLACK);}public void drawText(Graphics g, String line, int x, int y) {int len = line.length();for (int i = 0; i < len; i++) {char character = line.charAt(i);if (character == ' ') {x += 20;continue;}int srcX = 0;int srcWidth = 0;if (character == '.') {srcX = 200;srcWidth = 10;} else {srcX = (character - '0') * 20;srcWidth = 20;}g.drawPixmap(Assets.numbers, x, y, srcX, 0, srcWidth, 32);x += srcWidth;}}
The methods drawReadUI(), drawRunningUI(), drawPausedUI(), and drawGameOverUI()are nothing new. They perform the same old UI rendering as always based on the coordinates shown in Figure 6-8. The drawText()method is the same as the one in HighscoreScreen, so we won’t discuss that one either.
@Overridepublic void pause() {if(state == GameState.Running)state = GameState.Paused;if(world.gameOver) {Settings.addScore(world.score);Settings.save(game.getFileIO());}}@Overridepublic void resume() {}@Overridepublic void dispose() {}}
Finally, there’s one last vital method, pause(), which gets called when the activity is paused or the game screen is replaced by another screen. That’s the perfect place to save our settings. First, we set the state of the game to paused. If the paused()method gets called because of the activity being paused, this will guarantee that the user will be asked to resume the game when he or she returns to it. That’s good behavior, as it would be stressful to pick up immediately from where one left the game. Next, we check whether the game screen is in a game-over state. If that’s the case, we add the score the player achieved to the high scores (or not, depending on its value) and save all the settings to the external storage.
And that’s it. We’ve written a full-fledged game for Android from scratch! You can be proud of yourself, as you’ve conquered all the necessary topics to create almost any game you like. From here on in, it’s mostly just cosmetics.
Summary
In this chapter, we implemented a complete game on top of our framework with all the bells and whistles (minus music). You learned why it makes sense to separate the model from the view and the controller, and you learned that you don’t need to define your game world in terms of pixels. We could take this code and replace the rendering portions with OpenGL ES, making Mr. Nom go 3D. We could also spice up the current renderer by adding animations to Mr. Nom, adding in some color, adding new game mechanics, and so on. We have just scratched the surface of the possibilities, however.
Before continuing with the book, we suggest taking the game code and playing around with it. Add some new game modes, power-ups, and enemies—anything you can think of.
Once you come back, in the next chapter, you’ll beef up your knowledge of graphics programming to make your games look a bit fancier, and you’ll also take your first steps into the third dimension!