
Google has made it relatively easy to publish your Android application so that it can be quickly distributed to end users. The steps to publishing your Android application generally involve the following:
1. Export your application as an APK (Android Package) file.
2. Generate your own self-signed certificate and digitally sign your application with it.
3. Deploy the signed application.
4. Use the Android Market for hosting and selling your application.
In the following sections, you will learn how to prepare your application for signing, and then learn about the various ways to deploy your applications.
This chapter uses the LBS project created in Chapter 4 to demonstrate how to deploy an Android application.
Versioning
Beginning with version 1.0 of the Android SDK, the AndroidManifest.xml file of every Android application includes the android:versionCode and android:versionName attributes:
<?xml version="1.0" encoding="utf-8"?>
<manifest xmlns:android="http://schemas.android.com/apk/res/android"
      package="net.learn2develop.LBS"
      android:versionCode="1"
      android:versionName="1.0">
    <application android:icon="@drawable/icon" android:label="@string/app_name">
    <uses-library android:name="com.google.android.maps" />
        <activity android:name=".MainActivity"
                  android:label="@string/app_name">
            <intent-filter>
               <action android:name="android.intent.action.MAIN" />
               <category android:name="android.intent.category.LAUNCHER" />
            </intent-filter>
        </activity>
    </application>
    <uses-sdk android:minSdkVersion="11" />
    <uses-permission android:name="android.permission.INTERNET" />
<uses-permission android:name="android.permission.ACCESS_FINE_LOCATION" />
<uses-permission android:name="android.permission.ACCESS_COARSE_LOCATION" />
</manifest>
The android:versionCode attribute represents the version number of your application. For every revision you make to the application, you should increment this value by 1 so that you can programmatically differentiate the newest version from the previous one. This value is never used by the Android system, but it is useful for developers as a means to obtain the version number of an application. However, the android:versionCode attribute is used by Android Market to determine if a newer version of your application is available.
You can programmatically retrieve the value of the android:versionCode attribute by using the getPackageInfo() method from the PackageManager class, like this:
        PackageManager pm = getPackageManager();
        try {
            //---get the package info---
            PackageInfo pi =
                pm.getPackageInfo("net.learn2develop.LBS", 0);
            //---display the versioncode---
            Toast.makeText(getBaseContext(),
                "VersionCode: " +Integer.toString(pi.versionCode),
                Toast.LENGTH_SHORT).show();
        } catch (NameNotFoundException e) {
            // TODO Auto-generated catch block
            e.printStackTrace();
        }
The android:versionName attribute contains versioning information that is visible to the users. It should contain values in the format: <major>.<minor>.<point>. If your application undergoes a major upgrade, you should increase the <major> by 1. For small incremental updates, you can increase either the <minor> or <point> by 1. For example, a new application may have a version name of “1.0.0.” For a small incremental update, you might change it to “1.1.0” or “1.0.1.” For the next major update, you might change it to “2.0.0.”
If you are planning to publish your application on the Android Market (www.android.com/market/), the AndroidManifest.xml file must have the following attributes:
- android:versionCode (within the <manifest> element)
- android:versionName (within the <manifest> element)
- android:icon (within the <application> element)
- android:label (within the <application> element)
The android:label attribute specifies the name of your application. This name is displayed in the Settings ⇒ Applications ⇒ Manage Applications section of your Android device. For the LBS project, give the application the name “Where Am I”:
<?xml version="1.0" encoding="utf-8"?>
<manifest xmlns:android="http://schemas.android.com/apk/res/android"
      package="net.learn2develop.LBS"
      android:versionCode="1"
      android:versionName="1.0">
    <application android:icon="@drawable/icon" android:label="Where Am I">
    <uses-library android:name="com.google.android.maps" />
        <activity android:name=".MainActivity"
                  android:label="@string/app_name">
            <intent-filter>
               <action android:name="android.intent.action.MAIN" />
               <category android:name="android.intent.category.LAUNCHER" />
            </intent-filter>
        </activity>
    </application>
    <uses-sdk android:minSdkVersion="11" />
    <uses-permission android:name="android.permission.INTERNET" />
<uses-permission android:name="android.permission.ACCESS_FINE_LOCATION" />
<uses-permission android:name="android.permission.ACCESS_COARSE_LOCATION" />
</manifest>
In addition, if your application needs a minimum version of the SDK, you can specify it in the AndroidManifest.xml file using the <uses-sdk> element:
<?xml version="1.0" encoding="utf-8"?>
<manifest xmlns:android="http://schemas.android.com/apk/res/android"
      package="net.learn2develop.LBS"
      android:versionCode="1"
      android:versionName="1.0">
    <application android:icon="@drawable/icon" android:label="Where Am I">
    <uses-library android:name="com.google.android.maps" />

        <activity android:name=".MainActivity"
                  android:label="@string/app_name">
            <intent-filter>
                <action android:name="android.intent.action.MAIN" />
                <category android:name="android.intent.category.LAUNCHER" />
            </intent-filter>
        </activity>
    </application>
    <uses-sdk android:minSdkVersion="11" />
    <uses-permission android:name="android.permission.INTERNET" />
    <uses-permission android:name="android.permission.ACCESS_FINE_LOCATION" />
    <uses-permission android:name="android.permission.ACCESS_COARSE_LOCATION" />
</manifest>
In the preceding example, the application requires a minimum of SDK version 11, which is Android 3.0. In general, it is always good to set this version number to the lowest one that your application can support. This ensures that a wider range of users will be able to run your application.
Digitally Signing Your Android Applications
All Android applications must be digitally signed before they are allowed to be deployed onto a device (or emulator). Unlike some mobile platforms, you need not purchase digital certificates from a certificate authority (CA) to sign your applications. Instead, you can generate your own self-signed certificate and use it to sign your Android applications.
When you use Eclipse to develop your Android application and then press F11 to deploy it to an emulator, Eclipse automatically signs it for you. You can verify this by going to Windows ⇒ Preferences in Eclipse, expanding the Android item, and selecting Build (see Figure 6-1). Eclipse uses a default debug keystore (appropriately named “debug.keystore”) to sign your application. A keystore is commonly known as a digital certificate.

If you are publishing an Android application, you must sign it with your own certificate. Applications signed with the debug certificate cannot be published. While you can manually generate your own certificates using the keytool.exe utility provided by the Java SDK, Eclipse has made it easy for you by including a wizard that walks you through the steps to generate a certificate. It will also sign your application with the generated certificate (which you can also sign manually using the jarsigner.exe tool from the Java SDK).
The following Try It Out demonstrates how to use Eclipse to export an Android application and sign it with a newly generated certificate.
TRY IT OUT: Exporting and Signing an Android Application
1. Using Eclipse, open the LBS projected created in Chapter 4.
2. Select the LBS project in Eclipse and then select File ⇒ Export. . . .
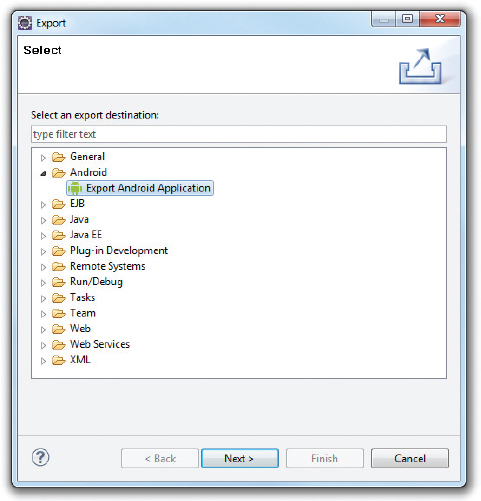
3. In the Export dialog, expand the Android item and select Export Android Application (see Figure 6-2). Click Next.
4. The LBS project should now be displayed (see Figure 6-3). Click Next.

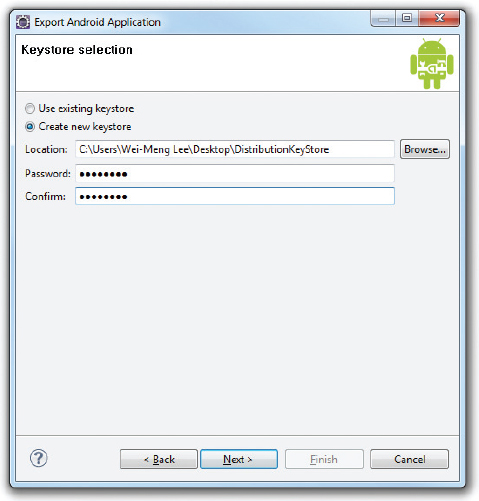
5. Select the “Create new keystore” option to create a new certificate (keystore) for signing your application (see Figure 6-4). Enter a path to save your new keystore and then enter a password to protect the keystore. For this example, enter password as the password. Click Next.
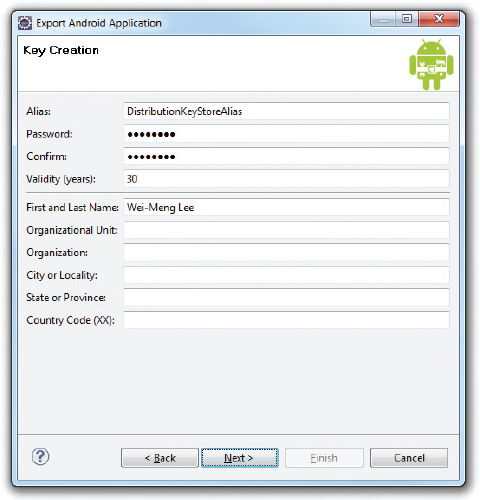
6. Provide an alias for the private key (name it DistributionKeyStoreAlias; see Figure 6-5) and enter a password to protect the private key. For this example, enter password as the password. You also need to enter a validity period for the key. According to Google, your application must be signed with a cryptographic private key whose validity period ends after 22 October 2033. Hence, enter a number that is greater than 2033 minus the current year. Click Next.
7. Enter a path to store the destination APK file (see Figure 6-6). Click Finish. The APK file will now be generated.

8. Recall from Chapter 4 that the LBS application requires the use of the Google Maps API key, which you applied by using your debug.keystore’s MD5 fingerprint. This means that the Google Maps API key is essentially tied to the debug.keystore used to sign your application. Because you are now generating your new keystore to sign your application for deployment, you need to apply for the Google Maps API key again, using the new keystore’s MD5 fingerprint. To do so, go to the command prompt and enter the following command (the location of your keytool.exe utility might differ slightly, in which case you would need to replace the path of the keystore with the path you selected earlier in step 5; see also Figure 6-7):
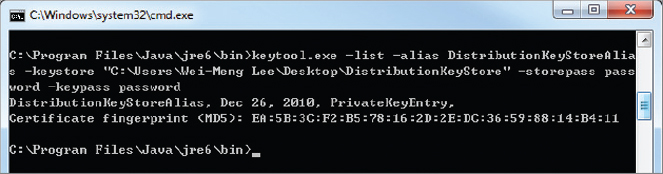
C:Program FilesJavajre6in>keytool.exe -list -alias DistributionKeyStoreAlias
-keystore "C:UsersWei-Meng LeeDesktopDistributionKeyStore" -storepass password -keypass password
9. Using the MD5 fingerprint obtained from the previous step, go to http://code.google.com/android/add-ons/google-apis/maps-api-signup.html and sign up for a new Maps API key.
10. Enter the new Maps API key in the main.xml file:
<?xml version="1.0" encoding="utf-8"?>
<LinearLayout xmlns:android="http://schemas.android.com/apk/res/android"
    android:orientation="vertical"
    android:layout_width="fill_parent"
    android:layout_height="fill_parent"
    >
<com.google.android.maps.MapView
    android:id="@+id/mapView"
    android:layout_width="fill_parent"
    android:layout_height="fill_parent"
    android:enabled="true"
    android:clickable="true"
    android:apiKey="<Your Key Here>" />
</LinearLayout>
11. With the new Maps API key entered in the main.xml file, you now need to export the application once more and resign it. Repeat steps 2 through 4. When you are asked to select a keystore, select the “Use existing keystore” option (see Figure 6-8) and enter the password you used earlier to protect your keystore (in this case, “password”). Click Next.

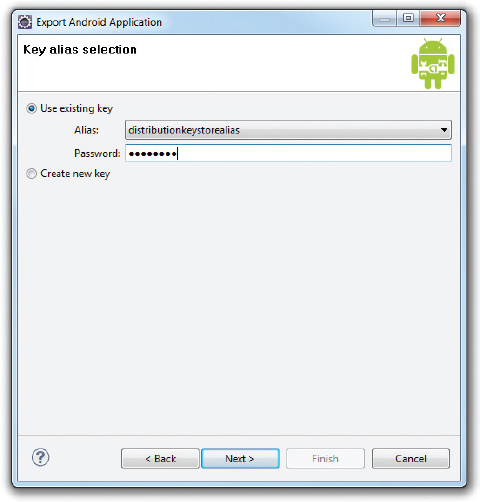
12. Select the “Use existing key” option (see Figure 6-9) and enter the password you set earlier to secure the private key (enter “password”). Click Next.
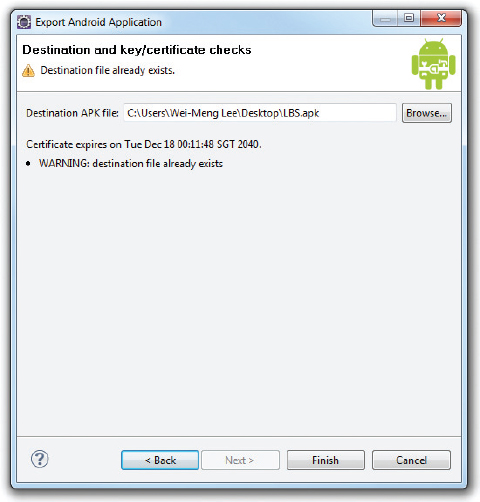
13. Click Finish (see Figure 6-10) to generate the APK file again.
That’s it! The APK is now generated and it contains the new Map API key that is tied to the new keystore.
How It Works
Eclipse provides the Export Android Application option, which helps you to both export your Android application as an APK file and generate a new keystore to sign the APK file. For applications that use the Maps API key, note that the Maps API key must be associated with the new keystore that you use to sign your APK file.