
ANATOMY OF AN ANDROID APPLICATION
Now that you have created your first Hello World Android application, it is time to dissect the innards of the Android project and examine all the parts that make everything work.
First, note the various files that make up an Android project in the Package Explorer in Eclipse (see Figure 1-29).
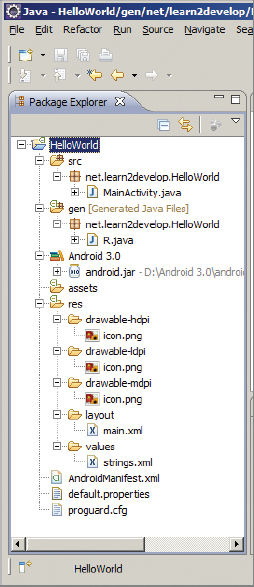
The various folders and their files are as follows:
- src — Contains the .java source files for your project. In this example, there is one file, MainActivity.java. The MainActivity.java file is the source file for your activity. You will write the code for your application in this file.
- Android 3.0 library — This item contains one file, android.jar, which contains all the class libraries needed for an Android application.
- gen — Contains the R.java file, a compiler-generated file that references all the resources found in your project. You should not modify this file.
- assets — This folder contains all the assets used by your application, such as HTML, text files, databases, etc.
- res — This folder contains all the resources used in your application. It also contains a few other subfolders: drawable-<resolution>, layout, and values.
- AndroidManifest.xml — This is the manifest file for your Android application. Here you specify the permissions needed by your application, as well as other features (such as intent-filters, receivers, etc.).
The main.xml file defines the user interface for your activity. Observe the following in bold:
<TextView
     android:layout_width="fill_parent"
     android:layout_height="wrap_content"
     android:text="@string/hello" />
The @string in this case refers to the strings.xml file located in the res/values folder. Hence, @string/hello refers to the hello string defined in the strings.xml file, which is “Hello World, MainActivity!”:
<?xml version="1.0" encoding="utf-8"?>
<resources>
     <string name="hello">Hello World, MainActivity!</string>
     <string name="app_name">HelloWorld</string>
</resources>
It is recommended that you store all the string constants in your application in this strings.xml file and reference these strings using the @string identifier. That way, if you ever need to localize your application to another language, all you need to do is replace the strings stored in the strings.xml file with the targeted language and recompile your application.
Observe the content of the AndroidManifest.xml file:
<?xml version="1.0" encoding="utf-8"?>
<manifest xmlns:android="http://schemas.android.com/apk/res/android"
      package="net.learn2develop.HelloWorld"
      android:versionCode="1"
      android:versionName="1.0">
    <uses-sdk android:minSdkVersion="11" />
    <application android:icon="@drawable/icon"
             android:label="@string/app_name">
        <activity android:name=".MainActivity"
                  android:label="@string/app_name">
            <intent-filter>
               <action android:name="android.intent.action.MAIN" />
               <category android:name="android.intent.category.LAUNCHER" />
            </intent-filter>
        </activity>
    </application>
</manifest>
The AndroidManifest.xml file contains detailed information about the application:
- It defines the package name of the application as net.learn2develop.HelloWorld.
- The version code of the application is 1. This value is used to identify the version number of your application. It can be used to programmatically determine whether an application needs to be upgraded.
- The version name of the application is 1.0. This string value is mainly used for display to the user. You should use the format: <major>.<minor>.<point> for this value.
- The application uses the image named icon.png located in the drawable folder.
- The name of this application is the string named app_name defined in the strings.xml file.
- There is one activity in the application, represented by the MainActivity.java file. The label displayed for this activity is the same as the application name.
- Within the definition for this activity, there is an element named <intent-filter>:
- The action for the intent filter is named android.intent.action.MAIN to indicate that this activity serves as the entry point for the application.
- The category for the intent filter is named android.intent.category.LAUNCHER to indicate that the application can be launched from the device’s Launcher icon. Chapter 2 discusses intents in more details.
- Finally, the android:minSdkVersion attribute of the <uses-sdk> element specifies the minimum version of the OS on which the application will run.
As you add more files and folders to your project, Eclipse automatically generates the content of R.java, which at the moment contains the following:
package net.learn2develop.HelloWorld;

public final class R {
    public static final class attr {
    }
    public static final class drawable {
        public static final int icon=0x7f020000;
    }
    public static final class layout {
        public static final int main=0x7f030000;
    }
    public static final class string {
        public static final int app_name=0x7f040001;
        public static final int hello=0x7f040000;
    }
}
You are not supposed to modify the content of the R.java file; Eclipse automatically generates the content for you when you modify your project.
NOTE If you delete R.java manually, Eclipse regenerates it for you immediately. Note that in order for Eclipse to generate the R.java file for you, the project must not contain any errors. If you realize that Eclipse has not regenerated R.java after you have deleted it, check your project again. The code may contain syntax errors, or your XML files (such as AndroidManifest.xml, main.xml, etc.) may not be well formed.
Finally, the code that connects the activity to the UI (main.xml) is the setContentView() method, which is in the MainActivity.java file:
package net.learn2develop.HelloWorld;

import android.app.Activity;
import android.os.Bundle;

public class MainActivity extends Activity {
    /** Called when the activity is first created. */
    @Override
    public void onCreate(Bundle savedInstanceState) {
        super.onCreate(savedInstanceState);
        setContentView(R.layout.main);
    }
}
Here, R.layout.main refers to the main.xml file located in the res/layout folder. As you add additional XML files to the res/layout folder, the filenames are automatically generated in the R.java file. The onCreate() method is one of many methods that are fired when an activity is loaded. Chapter 2 discusses the life cycle of an activity in more detail.