
Now you know a bit more about how we will be making these games, it is time to set up a development environment so we can get coding.
The games that we make can be built to run on Windows, Mac and Linux! The code we use will be identical for each. However, each version does need to be compiled and linked on the platform for which it is intended and Visual Studio will not be able to help us with Mac and Linux.
It would be unfair to say that this book is entirely suited for Mac and Linux users, especially complete beginners. Although, I guess, if you are an enthusiastic Mac or Linux user, and you are comfortable with your operating system, the vast majority of the extra challenges you will encounter will be in the initial setup of the development environment, SFML, and the first project.
To this end, I can highly recommend the following tutorials which will hopefully replace the next 10 pages (approximately), up to the section Planning Timber!!!, when this book should again become relevant to all operating systems.
For Linux, read this for an overview: http://www.sfml-dev.org/tutorials/2.0/start-linux.php .
For Linux, read this for step-by-step guidance: http://en.sfml-dev.org/forums/index.php?topic=9808.0 .
On Mac, read this tutorial as well as the linked out articles: http://www.edparrish.net/common/sfml-.osx.html .
Installing Visual Studio can be almost as simple as downloading a file and clicking a few buttons. It will help us, however, if we carefully run through exactly how we do this. For this reason, I will walk through the installation process a step at a time.
The Microsoft Visual Studio site says that you need 5 GB of hard disk space. From experience, however, I would suggest you need at least 10 GB of free space. In addition, these figures are slightly ambiguous. If you are planning to install it on a secondary hard drive, you will still need at least 5 GB on the primary hard drive because no matter where you choose to install Visual Studio, it will need this space too.
Note
To summarize this ambiguous situation: It is essential to have a full 10 GB space on the primary hard disk, if you intend to install Visual Studio to that primary hard disk. On the other hand, make sure you have 5 GB on the primary hard disk as well as 10 GB on the secondary, if you intend to install to a secondary hard disk. Yep, stupid, I know!
- The first thing you need is a Microsoft account and the login details. If you have a Hotmail or MSN email address then you already have one. If not, you can sign up for a free one here: https://login.live.com/.
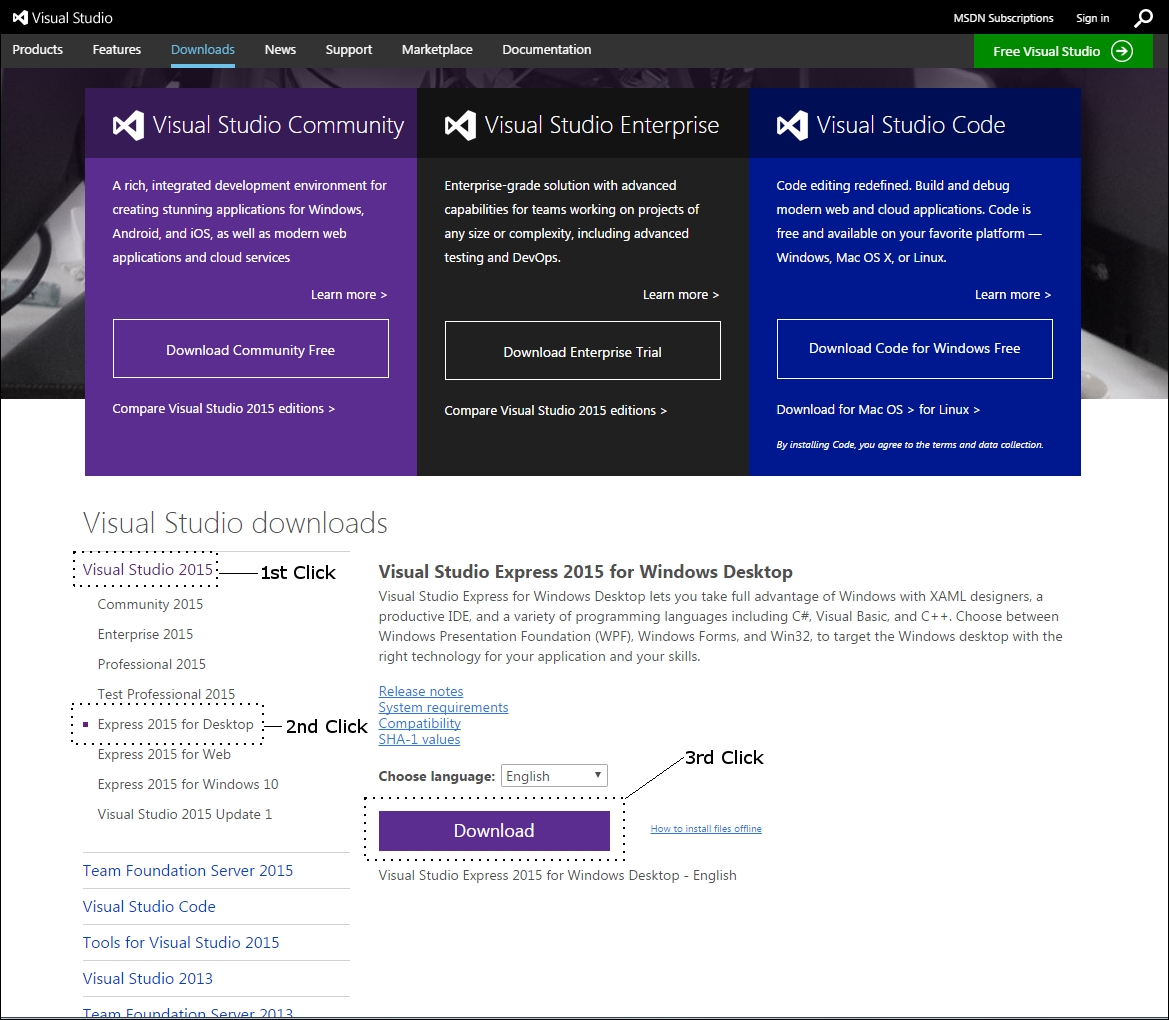
- Visit this link: https://www.visualstudio.com/en-us/downloads/download-visual-studio-vs.aspx. Click on Visual Studio 2015, then Express 2015 for desktop then the Downloads button. The next screenshot shows the three places to click:
- Wait for the short download to complete and then run the downloaded file. Now you just need to follow the on-screen instructions. However, make a note of the folder where you choose to install Visual Studio. If you want to do things exactly the same as me, then create a new folder called
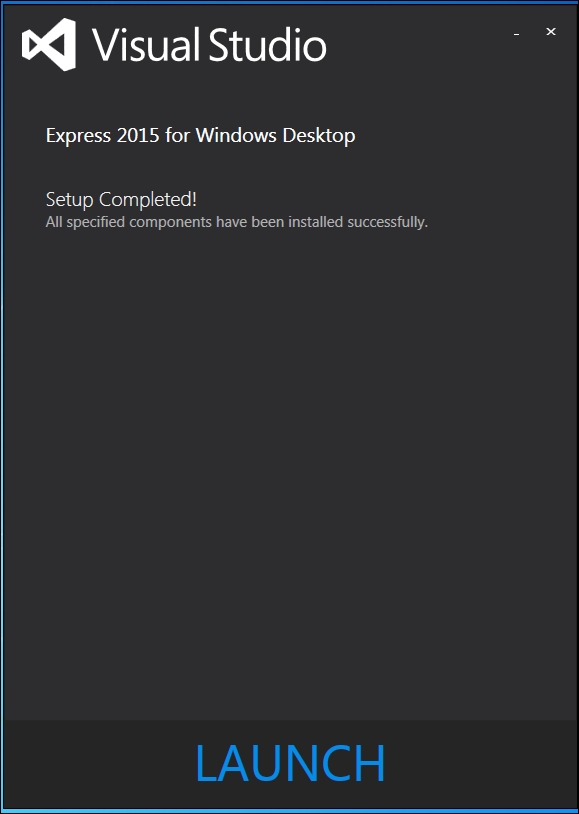
Visual Studio 2015on your preferred hard disk and install to this folder. This whole process could take a while depending on the speed of your Internet connection. - When you see the next screen, click on Launch and enter your Microsoft account login details.
Now we can turn to SFML.
This short tutorial will take you through downloading the SFML files that allow us to include the functionality contained in the library. In addition, we will see how to use the SFML DLL files that will enable our compiled object code to run alongside SFML:
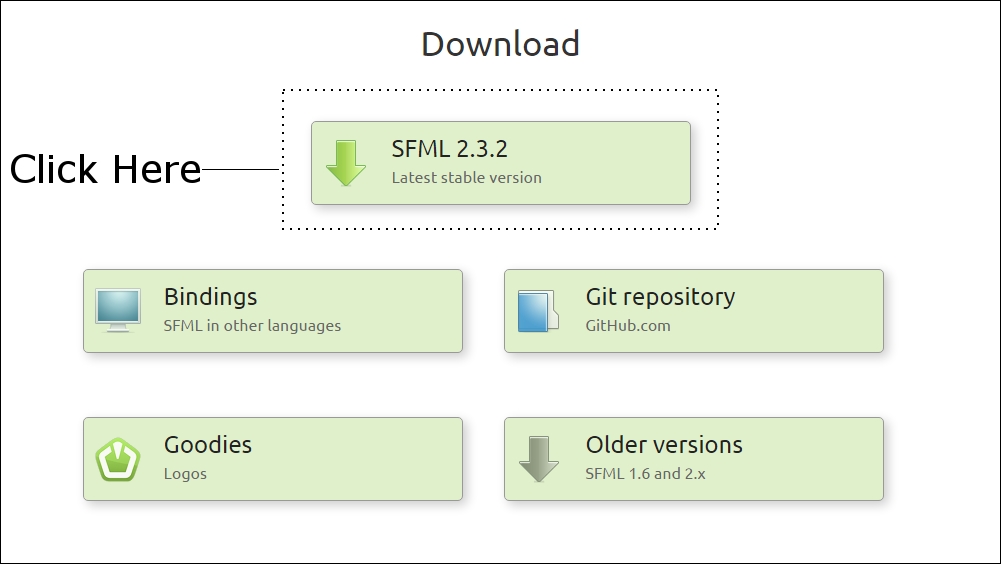
- Visit this link on the SFML website: http://www.sfml-dev.org/download.php. Click on the button that says Latest stable version as shown next.
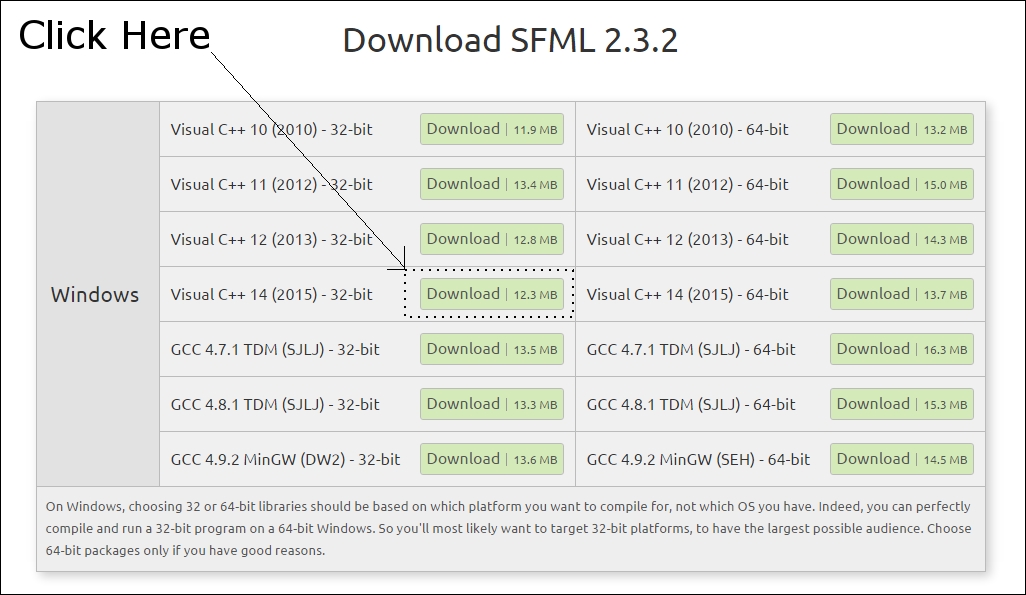
- By the time you read this guide, the latest version will almost certainly have changed. That doesn't matter as long as you do the next step correctly. We want to download the 32-bit version for Visual C++ 2014. This might sound counter-intuitive because we have just installed Visual Studio 2015 and you probably (most commonly) have a 64-bit PC. The reason we choose this download is because Visual C++ 2014 is part of Visual Studio 2015 (Visual Studio offers more than just C++) and we will be building games in 32-bit so that they run on both 32- and 64- bit machines. To be clear, click the following download:
- When the download completes, create a folder at the root of the same drive where you installed Visual Studio and name it
SFML. Also create another folder at the root of the drive where you installed Visual Studio and call itVisual Studio Stuff. We will store all kinds of Visual Studio-related things here soVisual Studio Stuffseems like a good name. Just to be clear, here is what my hard drive looks like after this step: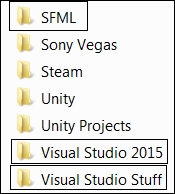
- Obviously, the folders you have in between the highlighted three folders in the screenshot will probably be totally different to mine. Now we are ready for all the projects we will soon be making, create a new folder inside
Visual Studio Stuff. Name the new folderProjects. - Finally, unzip the SFML download. Do this on your desktop. When unzipping is complete you can delete the
zipfolder. You will be left with a single folder on your desktop. Its name will reflect the version of SFML that you downloaded. Mine is calledSFML-2.3.2-windows-vc14-32-bit. Your file name will likely reflect a more recent version. Double-click this folder to see the contents, then double-click again into the next folder (mine is calledSFML-2.3.2). The following screenshot shows what mySFML-2.3.2folder's contents looks like, when the entire contents have been selected. Yours should look the same.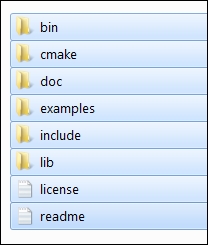
- Copy the entire contents of this folder, as seen in the previous screenshot, and paste/drag all the contents into the
SFMLfolder you created in Step 3. For the rest of the book I will refer to this folder simply as your SFML folder.
Now we are ready to start using C++ and SFML in Visual Studio.
As setting up a project is a fairly fiddly process, we will create a project and then save it as a Visual Studio template. This will save us quite a significant amount of work each time we start a new game. So, if you find the next tutorial a little tedious, rest assured that you will never need to do this again:
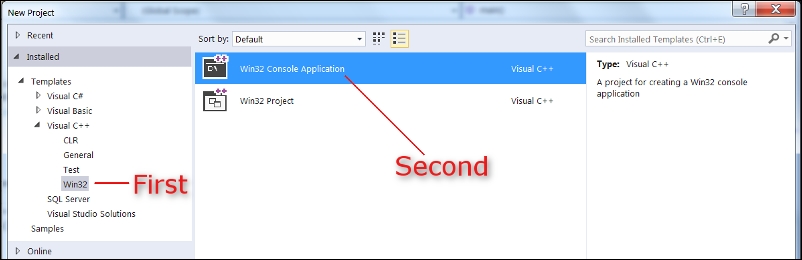
- Start Visual Studio and, in the New Project window, click the little drop-down arrow next to Visual C++ to reveal more options, then click Win32, and click Win32 Console Application. You can see all these selections in the next screenshot.
- Now, at the bottom of the New Project window, type
HelloSFMLin the Name: field. - Next, browse to the
Visual Studio StuffProjectsfolder that we created in the previous tutorial. This will be the location where all our project files will be kept. All templates are based on an actual project. So, we will have a project calledHelloSFMLbut the only thing we will do with it is make a template from it.
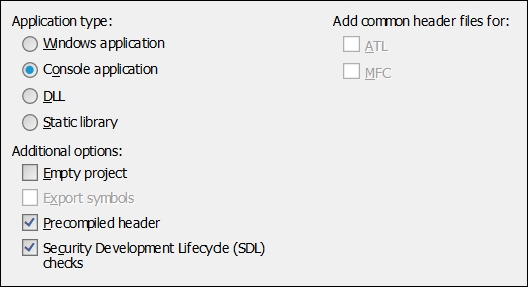
- When you have completed the steps above, click OK. The next screenshot shows the Application Settings window. Check the box for Console application, and leave the other options as shown below.
- Click Finish and Visual Studio will create the new project.
- Next, we will add some fairly intricate and important project settings. This is the laborious part but, as we will create a template, we will only need to do this once. What we need to do is tell Visual Studio, or more specifically the code compiler that is part of Visual Studio, where to find a special type of code file from SFML. The special type of file I am referring to is a header file. Header files are the files that define the format of the SFML code. So when we use the SFML code, the compiler knows how to handle it. Note that the header files are distinct from the main source code files and they are contained in files with the
.hppfile extension. (All this will become clearer when we eventually start adding our own header files in the second project). In addition, we need to tell Visual Studio where it can find the SFML library files. From the Visual Studio main menu select Project | HelloSFML properties. - In the resulting HelloSFML Property Pages window, perform the following steps, flagged in the next screenshot.
- Select All Configurations from the Configuration: drop-down.
- Select C/C++ then General from the left-hand menu.
- Locate the Additional Include Directories edit box and type the drive letter where your SFML folder is located, followed by
SFMLinclude. The full path to type, if you located yourSFMLfolder on your D drive, is as shown in the screenshot:D:SFMLinclude. Vary your path if you installed SFML to a different drive.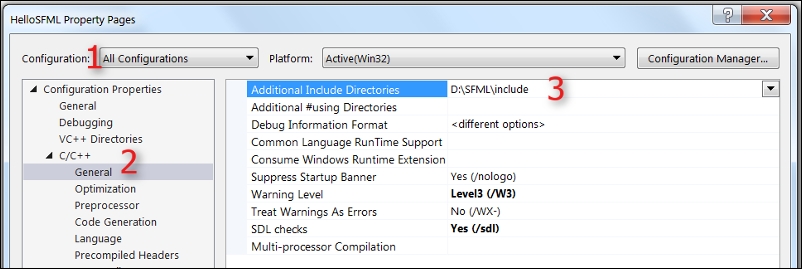
- Click Apply to save your configurations so far.
- Now, still in the same window, perform these next steps, again flagged in the next screenshot. Select Linker then General.
- Find the Additional Library Directories edit box and type the drive letter where your
SFMLfolder is, followed bySFMLlib. So the full path to type if you located yourSFMLfolder on your D drive is, as shown in the screenshot,D:SFMLlib. Vary your path if you installed SFML to a different drive.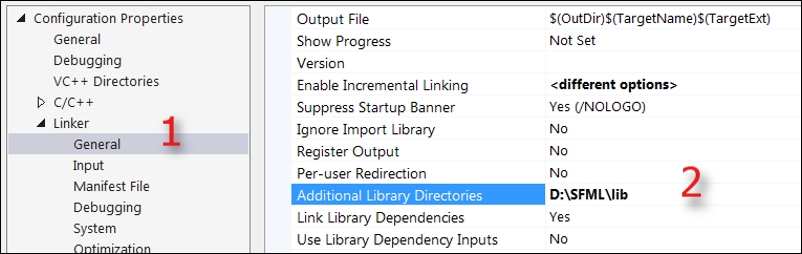
- Click Apply to save your configurations so far.
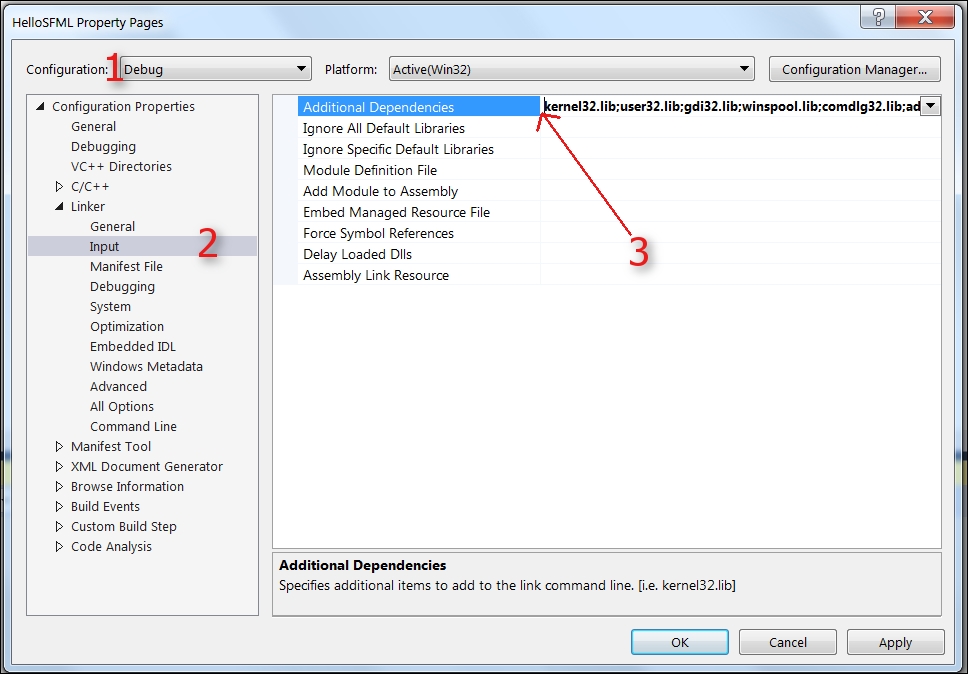
- Finally for this stage, still in the same window, perform these steps, which again refer to the next screenshot. Switch the Configuration: drop-down(1) to Debug as we will be running and testing our games in Debug mode.
- Select Linker then Input (2).
- Find the Additional Dependencies edit box (3) and click into it on the far left-hand side. Now copy and paste/type the following:
sfml-graphics-d.lib;sfml-window-d.lib;sfml-system-d.lib;sfml-network-d.lib;sfml-audio-d.lib;at the indicated place. Again, be really careful to place the cursor precisely, and dont overwrite any of the text that is already there. - Click OK.
- Let's make a template from our
HelloSFMLproject so we never have to do this slightly mind-numbing task again. Creating a reusable project template is really easy. In Visual Studio select File | Export Template.... Then, in the Export Template Wizard window, make sure the Project template option is selected, and then select HelloSFML project for the From which project do you want to create a template option. - Click Next and then Finish.
Phew, that's it! Next time we create a project, I'll show you how to do it from this template. Now let's build Timber!!!