B.C. Forbes once said that it's better to be occasionally cheated than perpetually suspicious. This was certainly intended to be tongue-in-cheek, and it's obvious that he said it long before the invention of the Internet. While things might go fine for a long while, a single "occasional" breach of security on your site is a terrible thing. Even a single successful attack can bring your site down to its knees and destroy everything that you've worked for. It's a sad truth, but as web developers, "perpetual suspicion" is the state of mind that we must re-affirm as part of our critical thought process when designing the architecture of an application.
While there's no such thing as a 100% secure web application (and don't let anyone tell you otherwise, no matter what they're trying to sell you), there are certainly measures you can take to greatly minimize the level of risk to you, your we bsite, and your business. In this chapter, we're going to examine some of the more common security concerns on the web, what the issues are, and the steps you can take to lower the risks associated with putting a Django web application up live on the Internet.
In an ideal world, your business would be run by one person: you. In theory, this is the best structure for a company because the person with a stake in the business's success, and the person running the show, are one and the same. When this is the case, that one person (you) is going to make sure that all the work they do for the business will be of the highest quality, that they use all of their resources efficiently without wasting them, and that you provide excellent customer service. Everything will be done in the best interest of the business, because as a sole proprietor, you know that how much you stand to profit from the business is directly correlated with how good of a job you choose to do.
Back in the real world, this is a tricky thing to pull off as a real business. Sure, there are sole proprietorships that manage to earn their owners a comfortable living, but those are the exception and not the rule. Most businesses require more than one person to be at the helm running things. Another problem is that they don't scale very well. As a company grows, you need to start leveraging the advantages of division of labor by dividing up tasks between employees.
It may seem counterintuitive, but we're going to start by looking at how we can secure the site from our own staff. Sooner or later, your site is going to grow and you're going to need to bring in outside people to help you. When this happens, you want to make sure you have mechanisms in place so that if any of these employees ever becomes an ex-employee or, due to circumstances, you end up losing trust in them, the amount of damage that they can do is minimized.
I'm not saying that you hire people who are untrustworthy...not at all. What I'm saying is that the security of your web application, when it comes to the human element, is largely beyond your control. You might hire your own nephew to help you fulfill the orders, so you've got to give him access to the backend that has the order information in it. Naturally, you trust him, since it was only a short 20 years ago that you were helping his mother change his diapers. He's family, so there's nothing to fear.
Except that when you give him a login to your backend, let's say that he writes the username and password down on a sticky note that he puts on the monitor of the workstation you've assigned him to. And later, when you're not there, he brings in a friend to show them this little e-commerce business that he started, and that he's been running, and as he's showing his friend how things are running, the friend notices the username and password. All of the sudden, some outsider to your business has a login. And if, for some distant reason, they decide that they don't like your nephew anymore because they have some grand falling out, they might take it upon themselves to log in to that admin interface and delete every order in there.
Don't take too much stock in my little story, because it's just a contrived example. However, the message is very important. Once you're little e-commerce application grows, and your organization grows with it, sooner or later, things are going to grow beyond you. Right now, with a small, single site to maintain, you can easily grasp the scope of the project in your head, all at once, and foresee most of the problems that might arise. When that changes, you need to be ready. Security needs to be done up front, because when the site does start to grow, you're going to need to be worrying about other things, like whether to partner up with FedEx or UPS as your main "logistics solutions provider" or whether you should incorporate your business in Nevada or Delaware. There probably won't be time later. You need to think about it now, and plan for it.
When you design the security architecture of your application, you might do so with certain base assumptions in mind. Like, for example, that you'll always hire people you can trust no matter what. This is, of course, almost impossible to do in reality. Good security architecture takes into account that people are not perfect, that the code that people write is never perfect, and that you should expect the unexpected. No matter how you intend people to use your web application, they're going to find other ways of using it that you never even thought of. While not all of them will be strictly malicious, some of them are bound to be attacks designed to compromise your data.
In this section, we're going to look at Django permissions that you can apply to users in order to restrict what your administrative users can do with your data.
Up until this point in the book, you've probably been using the single user login that we created when you first ran manage.py syncdb, when the application prompted you to create a superuser account login. This has worked great so far, since you're probably a single developer doing everything. However, giving everyone a superuser account that has access to everything is far from ideal for a real site.
Django comes equipped with the ability to assign users different permissions levels. By default, user accounts have three Boolean fields that allow you to control their access permissions to your site:
is_superuser: The user will have access to everything on the site and the admin interface, with all permissions, regardless of other settings.
is_staff: The user is allowed to log in and access the admin interface (as well as the public site), but you can manually adjust their permissions.
is_active: If this is set to False, the user cannot access any part of the site. This is useful for removing a user while still preserving their login name and password if there's a chance you'll ever want to re-enable access.
You can set each of these on a per-user basis using the Django admin interface.
So once you get your first employee and you need to set them up with an account that will let them access the admin interface of your site, the first thing you need to do is add the user account to the system. You can do this directly in the admin interface; under the "Auth" section, just click the "Users" link and then the "Add User" button, just like you've been doing with every other model so far. This will take you to a simple form, where you can have the employee enter their desired username and password. If you'd like, you can just assign them a password, give it to them, and encourage them to change it after they've first logged in.
Once you have their user account created, you just need to determine what kinds of access permissions that user needs to have. What do they need to be able to see, edit, or create in the admin interface? As one example, if they're order fulfillment, then they'll certainly need to be able to edit orders.
In order to give a user staff status, you must edit their user account in the admin interface. On the "Edit User" page, there should be three checkboxes corresponding to the three Boolean fields discussed earlier. You just need to check "Staff Status" in order to give them access.
Below this, there should be two select boxes labeled "User Permissions," where you can assign the user permissions. As you can see, each model has three permissions: add, edit, and delete. What each of these actions does is fairly self-explanatory. You just need to figure out what level of access you need to give them to your data.
Of course, after you apply permissions to a few users, you might find that you're repeating yourself quite a bit, setting up the same permissions for different employees. To make this process easier, Django allows you to create groups to which you can assign permissions, and then you can assign users to these groups. Any permission that you've applied to a group will be applied to all users that belong to that group. For organizations that are larger than three people and a dog, and for any organization that plans on growing over time, this is probably the easiest way of distributing permissions to users.
In the ASP.NET web framework, a very similar security mechanism exists, but instead of groups, they are referred to as roles. This is actually a much better term when trying to grasp the concept of what you're trying to set up. Think about the role that each individual plays in your organization, and what they are required to be able to do. You can give your groups names that make sense given the different departments in your organization.
For Modern Musician, I defined six different groups and gave them all different permissions based on what the employees in that group are required to do, as shown in Figure 12-1.

When designing your web application for security, the overall message you should pound into your brain with some kind of sledgehammer is this: never trust any input from your users. This is especially true when your application is a public-facing Internet web site. You need to thoroughly examine each form on your site, and make sure that you don't blindly trust anything. Your customers are trying to give you their money by shopping on your site, yes, but that doesn't mean that they're angels.
Along the same lines, retail stores use security cameras, Electronic Article Surveillance, and other means of making sure that you don't walk off with their precious inventory. Some of them have even employed people to stand at the exit doors, armed with highlighters to check customer receipts before they leave, and God help you if one of those Bic-wielding clerks catches you trying to walk out with something in your cart that isn't listed on the receipt.
While the effectiveness of the methods they use to prevent people from stealing things might be debatable, the reason that they do it is crystal clear. Retail establishments, if they are smart, don't trust their customers. Even though 99% of them will shop honestly and leave without any funny business, a small portion of customers will try to get away with petty theft. I don't know much about shoplifters, but most of them are probably stealing just for the thrill of getting away with something.
However, the profiles of the kinds of people that will attack your site are much different. They are technologically adept, they will try to steal more than just a few small pieces of merchandise, and the motivation driving them probably stems from more than a mere act of rebellion. More often than not, the person attacking your site is trying to extract valuable information from your site. Credit cards fetch a fair per-card price in black markets on the Internet. You need to be extremely vigilant in the design of your site, and make sure that you don't leave any gaping security holes that invite these kinds of attacks.
This might go without saying for most, but it does bear repeating because it's very important: when your site has been deployed into production, make sure that DEBUG is set to False in your settings.py file. If you don't, then any error your web application trips up on will display a traceback with source code to the end user, as well as several configuration variables about your web server, what database you're using, or payment gateway login credentials. Even just revealing that your web site is powered by the Django web framework might be enough information to get potential attackers to start formulating ideas about how to crack your site.
Often times, it's much easier to base the True or False value of DEBUG on some aspect of the development environment. For example, if you're developing on a local machine, you can set a PATH variable with a unique name and a value of True that will only ever exist on your development machine (or the machines of your fellow developers.) Then, inside settings.py, you can automate the setting of the DEBUG value like so:
import os
DEBUG = True if os.environ.get('LOCAL_DEBUG','') else False
That way, the only time DEBUG will resolve to True is when you're running the site on your local machine, and the LOCAL_DEBUG variable is found. Then, you don't have to concern yourself with switching it manually every time you update your site and want to test. Also notice the order we're assuming here: we default to production settings (e.g., DEBUG = False) unless our environment explicitly states otherwise. For security, the default assumption should be for a production environment, since it's much better to accidentally run DEBUG = False on a development machine instead of the other way around. Secure is the rule, with insecure being the exception on which we place the burden of proof.
Chances are good that the larger your site is, the greater number of differences there are between your development environment and your production environment. As your site grows, so will the gap between these two. In order to facilitate the greatest ease of migrating your project between the two, you need a way to set configuration variables with a little more ease than just checking for a single environment variable every time you want to conditionalize each setting.
One excellent technique is to create a separate file that contains configuration variables that are intended only for use in local development. To try this out, add the following four lines of code to the very bottom of your settings.py file:
try:
    from settings_local import *
except ImportError:
    pass
Now, create a new file in the root of your project called settings_local.py. Any configuration variables you define in this file will be imported into your project via the code we just added to settings.py. Even better, anything that you add to the settings_local.py file will override the variables you've defined in settings.py, which means that you can optionally add variable settings that are specific to your development environment in settings_local.py. If you exclude the settings_local.py file from your version control and don't deploy it into production, then you can use these local settings in development and the main settings.py file will be used when after you deploy your code.
A good example of when you might consider using this is the setting where you specify the network location of your cache backend server. (We'll look at setting up a cache server later in this chapter.) As your site grows, your cache server will likely reside on its own machine available to the production machine running your Django project over the network. However, on development machines, you won't want to refer to this cache server, as the cache server is unlikely to be available to development machines and, even if it is, you don't want to fill the cache server with development data.
However, if you specify your production cache server in a local_settings.py on your production application server, and your local development cache in settings_local.py on your development machine, you can safely run your code in both environments without clobbering the data in the production cache.
Even better, however, are the cases where you want to store passwords that you don't want to end up leaking out. If you have sensitive data stored inside settings.py, such as payment gateway passwords, and you suspect that you might one day release your source into the wild for others to use (and as an open source developer, I heartily encourage that), putting these sensitive variables into a local settings file that isn't part of your base source code is a good measure to ensure that the values aren't inadvertently distributed along with your released code.
Back in Chapter 6, we hooked into the built-in Django authentication app to handle registration and login functionality. While this will work for you without any technical problems, there is an issue with the customer registration regarding the restrictions on passwords. Namely, there are no restrictions. There is no minimum password length required, meaning that a user could register with a password that is no more than a single letter "a" and successfully create an account. In addition to this, there are no constraints on password strength in the registration form. Some applications force users to create "stronger" passwords, in that they are required to contain one or more of: a combination of both uppercase and lowercase letters, at least one number, or at least one non-alphanumeric character.
In Django, this lack of enforcement is by design. The developers of the framework decided that it would be better not to have these restrictions in place by default and to let those who required them add them, instead of including them by default and forcing people to disable the ones they didn't require. I don't entirely agree with this decision, because that means that over time, more and more Django applications are going to be deployed by companies that don't take security into consideration, and then users will start registering new accounts in these applications. Without any restrictions in place, these customers could be using very weak passwords to authenticate themselves, which is a concern.
The reason for this is simple: you don't want people to be able to easily determine a customer's password and get access to their account information. Attempts to hack web sites can succeed merely by selecting a username known by the attacker to be valid, and then attempting to log in to that account using every single word in a dictionary as a password, in the hopes that the successful password will be discovered by chance and will authenticate the attacker.
This is known as a dictionary attack. The large micro-blogging site Twitter was compromised in January of 2009 by an attacker who executed a dictionary attack using the known username "Crystal," eventually managing to authenticate himself when the password "happiness" was used. As it turned out, the user "Crystal" was actually a Twitter administrator, so the attacker found himself in a position to access every single Twitter account, including the account of Barack Obama. Twitter was very lucky that the attacker didn't cause a lot more damage than he did.
There's a very simple change you can make to minimize the risk of this: let's make a couple of quick tweaks to the registration form. First, we can give the two password fields a minimum required length. Exactly what length you decide upon for your own site depends on how secure you want your site to be. I'm going to set our password requirements to at least six characters in length, and require that passwords contain at least one character that isn't a letter or a number. We can do this by simply subclassing the Django's default UserCreationForm and overriding the fields that we want to customize. As long as we're doing this, let's take this opportunity to add an e-mail field to the registration form as well, so that as soon as the customer has signed up for an account, we'll have a valid e-mail address that we can use later, if we ever decide do any e-mail marketing.
Inside your projects accounts app, add the following to forms.py:
from django.contrib.auth.forms import UserCreationForm

class RegistrationForm(UserCreationForm):
    password1 = forms.RegexField(label="Password", regex=r'^(?=.*W+).*$',
                                 help_text='Password must be six characters long ?
                                 and contain at least one non-alphanumeric character.',
                                 widget=forms.PasswordInput, min_length=6,
                                 render_value=False)
    password2 = forms.RegexField(label="Password confirmation", regex=r'^(?=.*W+).*$',
                                 widget=forms.PasswordInput, min_length=6,
                                 render_value=False)
    email = forms.EmailField(max_length="50")
Here we're taking advantage of the RegexField that you can use on Django form classes in order to ensure that the password entered contains at least one character that isn't a letter or a number. We're also putting a minimum length constraint on both the password fields so that they must be at least six characters long. In order to help facilitate a minimum of erroneous registration submissions, we've added some help text to the first password field to let the user know about our requirements.
Of course, enforcing a minimum password length and requiring that the user add at least one non-alphanumeric character might turn some of your customers away, even if you do use the help text argument to let them know in advance. Chances are good a lot of them won't read the help text you provide, and may become frustrated that they need to come up with a password that isn't merely a word in the dictionary.
One common alternative to forcing password strength is to have a bit of JavaScript on the registration page, tied to the onkeyup event of the first password textbox. As the user types, the JavaScript will analyze the strength of the password based on the type and number of characters it contains. After each keyup event, it will update an element on the page that lets the user know how strong their password is. Passwords could be rated one of three ways: "Weak." "Moderate," and "Strong." Using colors when displaying these values to the user is also immensely helpful; use red, yellow, and green for the aforementioned ratings, respectively. In this way, you encourage your customers to create a stronger password by making a "game" of it. Visually, present them with information that makes them really want to create a strong password. Make them want that "Strong" message to appear in green, and the "Weak" message in red vanish.
Like most things, good security when it comes to your customers involves carefully balancing tradeoffs between conflicting issues. On the one hand, you would like it if everyone entered a password that was 15 characters in length, and was very strong, full of ampersands and percentage signs. However, most people will choose some silly, easy-to-guess word as their password, because it's convenient for them to remember. Exactly how strong you choose to enforce the passwords in your system is a decision that will depend on you and your own specific business requirements.
One other addition to the form is the render_value argument we're passing into both of the password fields. If set to False, then the form field is not repopulated with the data from the last POST that was made to the page. So, if the user enters two passwords that don't match and the form redisplays with the error message, we don't enter the two non-matching passwords back into the inputs. Instead, we'll just force the user to completely re-enter their password and confirmation password again. It's a little extra step, but it's less error-prone and convenient for the user this way.
Next, update your view function for the registration page so that it uses this subclassed form instead of the Django default:
from ecomstore.accounts.forms import UserProfileForm, RegistrationFormdef register(request, template_name="registration/register.html"): if request.method == 'POST': postdata = request.POST.copy()form = RegistrationForm(postdata)if form.is_valid():user = form.save(commit=False)user.email = postdata.get('email','')user.save()un = postdata.get('username','') pw = postdata.get('password1','') from django.contrib.auth import login, authenticate new_user = authenticate(username=un, password=pw) if new_user and new_user.is_active: login(request, new_user) url = urlresolvers.reverse('my_account') return HttpResponseRedirect(url) else:form = RegistrationForm()page_title = 'User Registration' return render_to_response(template_name, locals(), context_instance=RequestContext(request))
The only real addition here is the import and use of the new registration form class, and the fact that we're storing the e-mail address provided along with the user account.
Cross-site scripting attacks (or XSS attacks) are different from most of the attacks a web application needs to worry about, in that the attacker is not necessarily attacking your site and your servers, but is instead trying to attack the other customers on your site. It involves the use of JavaScript <script></script> tags that can contain potentially malicious JavaScript.
The attack is carried out by finding places in a web application where input from a user is potentially rendered back as part of a page. On our site, we accept user input and render it back to the user (or other users) in the search functionality, product reviews, and product tags. That means that each of these areas is a potential security hole where the site might be vulnerable to this kind of attack.
The reason that these attacks are possible is because web browsers are literal. They receive a page full of HTML from the server and render this output to the user who requested it. If a user submits some malicious HTML to our site, we store it in the database, and later include this HTML in a page on our site, the browser cannot distinguish between this HTML from the user and the legitimate HTML that we, the site developers, put into our template files. So, not knowing any better, the browser simply renders all HTML and any JavaScript that's included in this output, regardless of its source, is executed blindly.
Testing for this problem is very simple: try submitting some JavaScript to a form on your site. For simplicity, let's start with the search functionality. After a user has entered search text and clicks the button, they are taken to a results page that reads "Search Results for [search text]". Whatever the user has entered is displayed right there at the top of the page. Enter the following bit of JavaScript into the search box:
<script>alert('Hello XSS!'),</script>If this page were vulnerable, then this JavaScript would be executed when the page was loaded and an alert box containing "Hello XSS!" would pop up as the page was loading. However, instead, you should have seen the text you typed, angled brackets and all, merely displayed on the page, without any alert box. By default, Django escapes any HTML tags that it finds in template variables before it displays them on the page.
Warning
If you're using a version of Django earlier than 1.0, the auto-escaping behavior is not included. You need to explicitly use the escape template filter anywhere on your site where you display user input in a template variable.
Generally, developers are not terribly concerned when you show them that you can coerce a web site into popping up an alert box just by submitting some JavaScript as part of a form. Who really cares about some stupid little alert box? The problem is not with the alert box; the issue is that it's an indication that the site permits the user to inject JavaScript into the page, which will then be executed. JavaScript is generally used for harmless client-side functionality, such as form validation or rollover effects. However, it can also be used to steal users' cookies and craft phishing exploits to steal sensitive user information.
Maybe there's a place on your site where you want to render HTML that your users can input. You might be wondering if you could just strip <script> and </script> text blocks from your template variables before you display them to the user and that this would solve the problem. The problem with trying to take matters into your own hands is that attackers will be testing your site to see if there is a way around the safeguards you have in place. You might be able to do a simple search and replace on the string <script>, but what if an attacker submits a value containing <scr<script>ipt>? The middle of that text will be stripped out, but the parser will miss the outer four characters on either side, resulting in an opening <script> tag sneaking onto the page. Also, while today the vulnerability involves the use of script tags, tomorrow it may be another tag used to attack your site. In most cases involving security, you'll want to stick to the tried and true methods that the framework provides.
Often times, in a dynamic web site, you will use the URL and its contents to handle the fetching of records from the database. The perfect example is the product page: the product slug field is used to generate hyperlinks on your site to the product page, and when the page is requested, your application retrieves the product record that has the corresponding slug field. As long as each slug field contains a string of descriptive and unique text, you're unlikely to run into a security problem.
The issue arises in instances where you are looking up records based on the primary key field of a database table. More often than not, the primary key field will be an auto-incrementing integer value that's assigned to new records automatically. We use this field to look up order information in the "Order Details" page under the "My Account" section of the site, where customers can view details and products included in their past orders.
We're looking up each order by the use of its primary key, which we've been referring to as the Order Number. So, in order for a user to get the details about Order #445, they would just navigate to the following URL:
http://www.yoursite.com/order_details/445/
The problem is that any astute user will notice that the Order Number field is in the URL, and the curious ones might try changing the order number to see if they could load pages for other customer orders. The solution to this problem is simple enough: since this page requires that a customer is logged in and user information is stored along with each order, you can just add the user field to the filter() method call on the Order model manager. If you look back at the code we wrote in Chapter 6 for these pages, you'll notice that the view includes this:
order = get_object_or_404(Order, id=order_id, user=request.user)
That way, any request for an order that isn't associated with the current user will return a 404 response, instead of the page with details about that order. In this case, it might not be that big of an issue because we're not displaying any sensitive information on the Order Details page. However, in the future, this may not be the case. Later on, we might choose to include some basic credit card information, in which case you'll be much better off restricting to whom you choose to display this information. It's good to get in the habit of restricting database lookups for user information to ensure that they only ever return records that belong to that particular customer by adding the extra user field to the filter.
Back in the days before cell phones, before everyone had caller ID right in the palm of their hand, teenagers were much more inclined to make prank calls to random phone numbers. You could pick up the phone, call someone with some kind of crazy story, and try to hook them into what you were saying. Or you ask a simple question that sounds legitimate and, when you get the answer you expect, drop some terribly witty punch line on them and hang up. Here is a classic gem that most people have heard:
Prank Caller: Hello, this is the electric company. Is your refrigerator running?
Victim: Hang on. [pause to check] Yes, it's running.
Prank Caller: Well, you better go catch it! [cue for laughter]
If you were ever the victim of such a prank, you might have found yourself angry when the facade was revealed and the comedy bombshell was dropped. The caller exploited your trust in the people who call you on the phone, and you got roped into the conversation because you believed that the person on the other end was who they claimed to be, when in fact it was a stranger spoofing their own identity. A Cross-Site Request Forgery (CSRF) attack is much like this. A CSRF attack takes advantage of the fact that a web server, without enough information, doesn't have the ability to distinguish between a legitimate request and a bogus one coming from somewhere else.
For example, imagine that the process of adding products to the shopping cart is handled via GET requests to a specific URL. The cart form, when we want to add an item to the shopping cart, makes a request to the following URL: /cart/add/?product=some-product. This in turn calls the view function, which passes the request on down the chain, and ends up creating a new record in the database in the CartItem table. The problem arises when someone places some HTML on a web page that looks like this:
<img src="http://www.yoursite.com/cart/add/?product=some-product" />
Remember, when the browser sends a request for a page to the server, the first reply we get is the HTML for that page. Then, once the browser has the HTML, it goes through the document and makes a subsequent HTTP request for each script, style sheet, or image tag that it finds. When the browser encounters the image tag here, it will initiate a new request to the URL. The user that loaded the web page with this HTML would inadvertently have the product with the "some-product" slug value added to their shopping cart. In this case, much like with XSS attacks, it's a computer that doesn't know any better. The server is "dumb." It has no way of differentiating HTTP requests that came in from form submissions and those that were made because they were embedded in HTML tags. While this example is harmless, it does illustrate the nature of the vulnerability, and how more serious attacks could be carried out, such as placing orders.
This problem is solved on our site, because we're encoding our HTML so that users cannot post HTML that might execute a CSRF Attack. However, other sites on the Internet may not be as secure. If a customer were logged in to our site, and then clicked away to a forum page on another site, where a user had posted a reply to a thread that contains the HTML image tag shown earlier, the request would be made to our site and the item would be added to the cart. The easiest solution to this problem is to ensure that no GET requests to our site manipulate any data. So, such actions as adding products to the shopping cart, placing orders, updating user profile information, or anything else that changes data in the database should only occur via POST requests. That way, arbitrary links elsewhere on the Internet cannot alter our data in any way.
Of course, while this is good practice and eliminates most of the "tire-kicking" that attackers will do against your site, that doesn't make it impossible to carry out these kinds of attacks with POST requests. It's still possible to post HTML on a web page that contains a form with the POST values that will trigger the action on our site. Right now, it would be all-too-easy for an attacker to "clone" the HTML of the form on any given product page on our site and include some JavaScript that automatically submits the form when that web page is loaded. So there's still no guarantee that the request came from our site, even given the correct POST values.
The best solution is to "sign" each form with a hidden input field that contains a unique value. When the form is submitted, you can check the value of this hidden field to verify that the form POST came from a page on our site. This might sound like a lot of work, and it probably would be some effort if we had to create a solution from scratch. Fortunately, Django includes a solution: a middleware package that you can use to generate a form validation input for all forms on your site, and this couldn't be any easier to use. All you need to do is put the following line into your project's MIDDLEWARE_CLASSES section:
'django.contrib.auth.middleware.AuthenticationMiddleware',
'django.contrib.csrf.middleware.CsrfMiddleware',
'django.contrib.flatpages.middleware.FlatpageFallbackMiddleware',
This middleware does two things: first, it adds a hidden input field with a validation token value to any form that makes a POST request on your site. The validation token is a hash function calculated from the user's session and the SECRET_KEY value in your project's settings.py file. Second, whenever a POST request is submitted from a form on your site, the middleware checks to make sure that the values in the post contain the hidden input field with a valid hash value. If the POST request is made without that hidden input, or without a valid hash value, we can assume that the request did not come from our site and is bogus. The CSRF middleware responds to such bogus requests with a HTTP 403 Forbidden error page.
In the course of opening the file in every chapter of this book, you may have noticed the SECRET_KEY value in your settings.py file. This value is used by your Django project for secret key hashing algorithms, for security purposes throughout the site. It was generated for you by Django when you first started the project, but you're free to change it to any random string of characters. You can generate the value using either of the methods we used to generate Cart IDs or Tracking IDs elsewhere in the book, using the random or urandom modules. According to the Django documentation, the longer the better. Naturally, too much might be overkill. If your SECRET_KEY is dozens of lines long, that will significantly slow things down unnecessarily, but a value between 50 and 100 characters cannot hurt you. Of course, if you find that the value is an empty string, you should certainly put something in there!
For any database-driven web site, the real value of your site lies in the data. Consequently, this is what many attackers will attempt to do right from the start: try to steal, manipulate, or delete large quantities of your data. Of course, attackers won't have direct access to your database, since they won't have the database credentials required to connect directly to your MySQL server. Instead, this is done with an attack known as a SQL injection attack, which is an attempt by a user to pass their own SQL into your database server through the interface of your application, to manipulate your database contents in some way.
On the surface, this might seem like a difficult thing to do, but web sites with poor security measures in place fall victim to this kind of attack all the time. The problem lies in SQL queries that are constructed ad-hoc inside a web application based on user-submitted data. If user-supplied parameters that are passed to the database in WHERE clauses that are not properly escaped, an attacker can trick the database behind a web application into executing SQL that they've submitted as part of a form.
For illustrative purposes, take a hypothetical web application (not our own) that makes the following SQL call for the search page:
SELECT * FROM products WHERE name LIKE '%guitar%';
In this example, the user entered the word "guitar" and this was the SQL that was constructed and sent to the database. Imagine that the user entered this as the search term: a%'; DROP TABLE products;. In a situation where the site was vulnerable, this would produce the following SQL being sent to the database:
SELECT * FROM products WHERE name LIKE '%a'; DROP TABLE products;%
In this case, the SQL sent to the database retrieves all products containing the letter "a." This certainly massive result set of this query is the swan song of our product data, as the next statement deletes the product table altogether. If this were to be executed against a production database successfully, the site would almost entirely go down and return nothing but 500 Server Errors for almost every page, as the application would suddenly be trying to query from a database that no longer exists. In this case, you just have to hope that you're doing regular backups of your database, and that you can restore your data before too long.
The example here is dependent on a few assumptions. First, the attacker needed to know that our product database table was named products in order to attempt this query. In addition, the attacker would have to determine that we were using MySQL in order to know the syntax for some database commands, but DROP TABLE and the semi-colon as a delimiter between statements is actually common to a lot of the more popular RDBMS options out there.
As it happens, this problem is unlikely to come up in the course of building a Django site because most of the queries that you're going to make are done using the Django ORM. Queries made through the ORM use bind variables, which have their parameters automatically escaped, so that any attempts to end the SQL statement early by using a single quote don't get passed through. If someone performed this search on our site, Django would send the following:
SELECT * FROM products WHERE name LIKE '%a'; DROP TABLE products';%
This just performs a search for products whose name contains that weird string of text that our would-be attacker entered. Thanks to Django, no harm done.
Django does allow you to write raw SQL queries and pass them to the database, both with a cursor or using the ORM extra() method. In order to eliminate any SQL injection vulnerabilities, you should use the following syntax when generating the SQL:
from django.db import connection

def raw_sql_query(product_name):
    sql = "SELECT description FROM products WHERE name = %s;"
    cr = connection.cursor()
    cr.execute(sql, [product_name])
In the normal course of things, you shouldn't ever have to do this. However, you should be mindful of the potential security hole and use the correct technique if you ever need to.
By default, the Django admin interface is located at the path /admin/ in your application. However, since this is the default for all Django applications, it's very easy for the average developer to figure this out and try accessing your admin login at this path on your site. To avoid inviting any mischief to your admin login page, you might consider moving it to another path, like /sitename-admin/ or something that cannot be guessed as easily.
Naturally, just making this simple change doesn't actually do anything to secure your site. It's a form of what is known in the security community as "security through obscurity," whereby you make it a little more difficult for attackers to gather information about your site by eliminating the most obvious weak points. It's useful to apply in some cases, such as the location of the admin interface, but you want to shoot for a different principle in securing your application: "security by design." Using the latter approach, your web application is designed with security in mind from the ground up. When applied correctly, security by design is much more effective.
So far, we have several layers of security protecting the information contained in our database. By the time you have deployed your site, there should be network security in place to prevent crackers from compromising your machines, and passwords restricting access to the database server. Even though this is the case, you still shouldn't be storing sensitive information just as human-readable plain text.
In the course of running an e-commerce application, you'll no doubt encounter a situation where you need to store some kind of sensitive data that you don't want to leave sitting in the database in plain text. Passwords are an excellent example of this. There's no reason for you to leave customer passwords sitting in the database as plain text, because if your database were ever compromised, the attacker would have all of your customer's passwords and would have absolutely no trouble logging in to the site as one of your many customers. Even worse, a lot of people re-use the same username and password combinations across multiple sites, so if your site is ever compromised, it's entirely possible that an attacker might be able to use their credentials to log in to other sites as well.
For this reason, you'll want to use some kind of cryptographic algorithm to encrypt sensitive data. Unfortunately, there's no way that I can do the subject of cryptography any justice in this short chapter. However, in this section, I'm going to talk about some extremely basic concepts, look at how Django uses encryption to store passwords, and then take a look at how to securely encrypt and store customer credit card data using the Python Cryptographic Toolkit and the Google Keyczar library.
Storing customer passwords is something that just about every web application is required to do in this day and age, since most applications require that users authenticate themselves before adding or manipulating any data on the site. Naturally, because information stored with customer accounts is intended to be confidential and only accessible to that user, we should take care to store the password in a secure fashion, so that each customer's password can't be easily obtained and used by anyone else. For this reason, when storing passwords, you shouldn't store them as plain text, but instead should encrypt the characters of the password for each customer so that the values are difficult to obtain for anybody who isn't that particular customer.
Passwords are a somewhat unique case, because once we encrypt them, we don't actually need to ever decrypt them. If you have a consistent means of encrypting passwords—that is, if you can use an encryption function that will produce identical encrypted values for the identical password values—then you never need to reverse the encryption. When a customer first registers for their new account and enters their password, you compute and store the encrypted text in the database along with their username. Later, when they come back and log in a second time, you can take the password they enter at login, apply the same encryption function as you did when they initially registered, and compare the resulting text with what you have stored in the database.
If the two encrypted strings match, then the user has entered the same password stored in the database, so we can safely assume they are who they claim to be. If they don't match, then the user has entered the wrong password, either because of a typo or because the person attempting to log in isn't really the customer who registered that account.
Because customer account passwords only need to be encrypted without decryption, we can use a very strong encryption means known as a one-way hash function. Hash functions take a string of character values, such as a password, and generate a unique hash value based on the characters. Hash functions are deterministic, in that the hash value computed for any given string of text will be the same, no matter how many times the value is computed.
In order to store passwords, Django uses a cryptographic hash function known as SHA-1 (SHA stands for Secure Hash Algorithm) to compute hash values for passwords. We can see this in action by dropping into a Python shell and seeing this for ourselves. The following bit of code computes the SHA-1 hash value of "password":
>>> import hashlib
>>> hashlib.sha1('password').hexdigest()
'5baa61e4c9b93f3f0682250b6cf8331b7ee68fd8'
Because SHA-1 is a one-way hash function, and isn't intended to need decryption, the actual encryption is extremely strong. That is, it would be immensely difficult for anyone to determine that the original value of the large hash value here is "password."
The results that you see are consistent when done multiple times:
>>> my_password = 'password'
>>> hash1 = hashlib.sha1(my_password).hexdigest()
>>> hash2 = hashlib.sha1(my_password).hexdigest()
>>> hash1 == hash2
True
A well-design hash algorithm ensures that the output is unique for any given string of text, so that two different passwords will never have the same hash value. Therefore, an incorrect password should never match the stored hash value. The hashed text is also case-sensitive, so "Password" would generate a different result than "password."
Django actually goes one step further than this and uses a hash salt when computing the hash value. This is a small, randomly generated string of characters that is tacked on to the beginning of the password before the hash value is computed. The salt values are stored along with the hash value of the password when the user first registers on your site. Then, when they return to log in to your site a second time, the authentication process follows these steps:
Retrieve from the database the salt, the password hash value, and the algorithm that was used to compute the hash text.
Append the salt onto the front of the password the user has just provided at login.
Compute the hash value of the salt/password combination using the same algorithm as before.
Compare the computed hash value with the stored value. If the two values match, the passwords match, and the user is authenticated.
Django stores these three values together in a single field on the User model, delimited by a dollar sign ($) character. For example, here is the password stored for a username with the password "blah":
sha1$d4e4a$a725b60c877ee448c9a66515ea5672be118f2f0a
The first value before the first dollar sign is the algorithm used, followed by the salt used to compute the password hash value. This means that the following code will produce the same output as what you see stored after the last dollar sign in the preceding code:
>>> hashlib.sha1('d4e4ablah').hexdigest()
'a725b60c877ee448c9a66515ea5672be118f2f0a'
Using a salt to compute hash values has the added bonus of making it so that any attacker that gains access to all of your customer passwords cannot identify two different users that happen to have the same password. For example, two different customers might both use the same password of "jamesbond." If a salt isn't used, it's very easy to scan a list of password hashes and find those that are the same. If the password of one account is known, then the attacker knows that other accounts with identical hash values share that same password. Applying a salt makes trying to crack the stored hash values much more computationally expensive, and therefore much more infeasible to anyone trying to crack them.
One disadvantage of this approach is that you cannot retrieve a user password if the customer forgets it. Many sites offer to send users their password by e-mail if they've forgotten it. Since a hash is one-way, you cannot do this for your customers. The only recourse you have if a customer forgets their password is to set up a mechanism to reset their password to some arbitrary bunch of text, and e-mail that new password to the customer instead. For most sites, the added security of using hashes to store passwords far outweighs the convenience of password recovery.
Cryptography is one of those areas of computer programming that keeps me humble. As a web developer, it's all too easy to develop an ego and start thinking that you're capable of anything. I remember the first time I created an HTML page and opened it up in a browser. The results were astonishing... wow, did I do that? Then I added in some CSS to make the colors and fonts all pretty. And it worked! Then I set up a basic database and managed to hook my web pages into them, displaying dynamic data like magic. Hallelujah, it's working! I must be brilliant.
Of course, real programming problems are never that simple to solve. I'm just lucky that most really tough low-level problems have already been solved by people that have come before me. The mechanisms behind cryptographic algorithms are the archetype example of a computer programming problem that is beyond most of us, and reserved strictly for those few gifted souls who are mathematically inclined. Most of us simply cannot grasp how these kinds of algorithms work, let alone implement our own custom solution.
For this reason, if you're going to store data and you have to encrypt it, then you must go with a tried and true solution that has been adopted by those in the security community. Period. While there are quite a few "hand-rolled" solutions floating around out there that claim to be more secure because they're "new" and based on some company's proprietary secret code doesn't make them secure. In fact, usually the opposite is true. Bear in mind that just because the mathematical mechanism behind all major algorithms is public and available to anyone, what makes them secure is not the specific details behind their protocols, but how hard they are to crack once they are in use.
In short, if it's good enough for the U.S. government, then it's definitely good enough for us. The last thing we want to do is start thinking we can do any better on our own.
That being said, the decision to store credit card data for your customers, anywhere on your system, is not necessarily a good idea no matter what security measures you put into place. We skipped over storing credit card information earlier, in the chapter on checkout, simply because for most small- to medium-sized e-commerce sites, storing financial information is more than likely an unnecessary risk. You may feel the urge to store it simply as a convenience to your customers, so they don't need to key in their information each and every time they come back to your site to place another order.
I disagree with this last point. If anything, making a conscious decision not to store credit card data can be touted as a feature of your site, not a weakness. Tell your customers right on your site that you're not going to store their information because you're thinking of them and their own personal security. For a smaller site where most of your customers are placing one-time e-commerce transactions (as opposed to a site that requires recurring monthly billing), most of them will probably not have any problem with this. Some of them will probably be relieved that you're not storing this information.
For smaller sites, this is also a good decision because the future is uncertain. Sure, today you may have a development server and a single production server, both of which run out of your company's office. Today, you have physical control over the hardware that's running your site. However, in a world where virtualization is increasing, you can't be sure where your business is going to be a year after you launch. In the Amazon's Elastic Cloud Compute, the physical hardware is an abstraction; you just deploy machine instances into the cloud and you lack the same physical control over the hardware that you did when your servers were in-house. It's a tricky prospect to consider, particularly very early on in the development process.
If you do decide to store credit card data, I'd strongly recommend that you read and comply with the PCI Security Standard in your web application. Make sure the systems on which you store the credit card information are secured by a firewall, and that any data you store is strongly encrypted and not merely stored as plaintext. Don't store the card verification value (CVV) anywhere. If you decide to ask customers for their CVV when they place orders, make sure that it doesn't end up in the session or log files, and definitely don't store it along with the rest of the credit card information. If you can, store the encrypted credit card information in a database that's separate from the database containing the rest of your application data, so that if a cracker compromises your credit card data, it will be devoid of any personally identifiable information, such as customer name or address.
On your site, some customer information may need to be stored securely, but you won't be able to use a one-way hash function to encrypt it because you'll later need to decrypt it. If you were to hash credit card data, for example, then the best you could do is ask the customer to enter it again the next time they come back and verify that it matches the credit card data you have stored. And if you're going to make them re-enter it, you might as well just avoid any liability and not store it in the first place.
Symmetric cryptography is the kind of cryptography with which most people are intuitively familiar. There are two parties involved: one that's composing a message intended to be sent and read by the other. While in transport, the person sending the message would like it to be encrypted so that no one besides the intended recipient will be able to read its contents.
The original text of the message, which is human-readable, is known as the plaintext. The plaintext is converted into ciphertext using a cryptographic algorithm (also known as a cipher) and a key, which is an encrypted representation of the data that obscures the original message and renders it unreadable. The ciphertext is transmitted to the recipient, who uses the same cryptographic algorithm and the key to decrypt the ciphertext, converting it back into the original plaintext of the message. Both parties use a single key both in the encryption and decryption, which must be agreed upon by each party and not transmitted with the ciphertext message, as this would remove any security.

The best library available for handling cryptography inside Python is the Python Cryptographic Toolkit. It's not part of the standard library, and it's not even written in Python. The actual parts of the library that perform low-level cryptographic functions are written in C, mostly for performance reasons. Cryptography requires some very heavy computation, and this is much faster if it's handled by a compiled language like C instead of an interpreted language like Python. The library itself provides a nice interface that lets you perform the functions inside Python.
While I'm not going to cover the mechanisms behind cryptography in this book, you might have a keen interest in learning more for yourself. The authoritative introduction to the field of cryptography is Applied Cryptography: Protocols, Algorithms, and Source Code in C, Second Edition by Bruce Schneier (Wiley, 1996). While it's somewhat dated at this point, and it doesn't cover the specific cryptographic algorithm we're going to implement in the next section, it's an excellent book on the subject.
As it turns out, you don't even need to understand exactly how to implement an encryption scheme using the Python Cryptographic Toolkit.[55] Google has provided a library of its own algorithm implementations, using this Toolkit, to help developers take full advantage of the encryption algorithms it offers. The mission statement behind Google Keyczar[56] is very insightful, and describes the reason that Google decided to create it for developers. From the Keyczar web site:
"Cryptography is easy to get wrong. Developers can often choose the wrong cipher mode, use obsolete algorithms, compose primitives in an unsafe manner, or fail to anticipate the need for key rotation. Keyczar abstracts some of these details by choosing safe defaults, automatically tagging outputs with key version information, and providing a simple interface."
Let's say that you've decided that you want to store some sensitive information, such as credit card data, and you decide that you need to use symmetric cryptography so that you can encrypt the data, and then decrypt it later, using a single key. You might poke around and come across information about the Data Encryption Standard (or DES). Eventually, after you dig a little deeper, you'll find that DES was replaced by the Advanced Encryption Standard (or AES), which was certified as an encryption standard in 2002 and adopted for use by the United States Government. So, since it's good enough for the NSA, you decide to use it yourself, but when you start looking into the specifics of how to implement AES for encrypting your data, you'll encounter more questions than answers. What block size should you use? What block cipher mode is most secure for your purposes? How do you generate a random and secure key, and where do you put it? You could spend hours looking for answers to all of these questions but, again, the math behind these processes is beyond most of us lowly developers, so you'll likely get exhausted while trying to find the correct answer.
Or, you could use Google Keyczar for your cryptography needs, and defer to the choices they've made in implementing AES for you.
Now, I don't intend to make Google Keyczar sound like a silver bullet that completely eliminates any work that you might need to do. There are still some very important decisions you need to make regarding the security of your system. For instance, where will the key used for encryption and decryption reside on your system? It needs to be accessible to your project, but you don't want just anyone to be able to get at it.
Google Keyczar is not an encryption library by itself. Rather, it strives to use existing libraries and just provides developers a simple interface for performing encryption that abstracts away all of the lower-level details. There is a version of Google Keyczar that is written to work with the Python Cryptographic Toolkit.
Keyczar also has a couple of dependencies you'll need to install before it will work. Because it relies on the Python Cryptographic Toolkit, you'll need to download and install that before trying to use Keyczar. A Debian installation is available via apt-get install python-crypto.
If you're using a version of Python earlier than 2.6, you will also need to download and install the simplejson module.[57] Django comes with a version of this module built-in, but Keyczar requires that you have the Python module installed. You'll also need to get your hands on a copy of the Python Abstraction Notation One library.[58]
Make sure that you download the Python version of the library. After extracting the .tar file, find the src/keyczar subdirectory inside the download. The keyczar directory is the one you want. Place a copy of, or create a symbolic link to, this folder somewhere on your system's PYTHONPATH, such as in your site-packages directory. To test that you've installed the library correctly, drop into a python shell and try the following import:
>>> import keyczar
If you don't get any errors, then you've successfully put Google Keyczar onto your PYTHONPATH and can now use it in your project. The utility that we're going to use inside of this directory is the keyczart.py module, which we'll use for creating our keys. Optionally, you can put this module on your PYTHONPATH as well.
Once you have it configured, you first need to generate a key that you can use for the encryption process. This is simple enough. For simplicity, we're going to generate and store the keys for encryption directly inside our project, but keep in mind that this is less than ideal. For security reasons, you probably want to store the keys in some other directory on your system that doesn't reside within your project. However, for our simple example, this is secure enough.
From inside your system's shell, in the root of your project directory, create a new subdirectory to hold your encryption keys:
$ mkdir keys
$ python /path/to/keyczar/keyczart.py create --location='keys' ?
     --purpose=crypt --name='ecomstore'
$ python keyczart.py addkey --location='keys' --status=primary
$ cd keys
$ pwd
'/path/to/project/keys/'
Here, we create a new directory to hold our key information. Then, we use the keyczart module to create a new keyset, which means that our directory can contain more than one key for cryptographic functions. However, notice that when we create the first (and only) key for our keyset that we set its status as primary. At any given time, only one key in our keyset can be primary. Others can be created with their status set to active or inactive. Later, you can "promote" one of these other keys to primary if you want to rotate out the old key and replace it with a new one. For now, it's enough to create a single key with a primary status that we'll use for encryption.
Make note of the present working directory that we echoed in the last line, because we're going to use it in just a second. Now, we're going to take the new code for a quick trial run inside our project's Python shell. Drop into it using the manage.py shell command and enter the following commands. Remember to replace the path in the Read() function with your own path.
>>> import keyczar
>>> crypter = keyczar.Crypter.Read('/path/to/project/keys/')
>>> encrypted = crypter.Encrypt('some secret info goes here')
>>> decrypted = crypter.Decrypt(encrypted)
Go ahead and look at the contents of the encrypted and decrypted variables. The encrypted should be a bunch of incomprehensible junk that is our ciphertext, and the decrypted variable should contain the same text that you passed into the Encrypt() function.
Note
If you've installed Google Keyczar using the easy_install utility, you may need to amend the first import statement in the preceding code to read from keyczar import keyczar, in order to ensure that your code is referencing the correct module that contains the Crypter module.
Even though we cannot use hash algorithms such as SHA-1 to encrypt our data, since hash functions are only one-way, it's possible to use them to "sign" encrypted data. That is, after encrypting some plaintext, generate an SHA-1 hash value from the plaintext and store this with the encrypted ciphertext. Later, when we decrypt the stored ciphertext, we compute the SHA-1 hash value from the newly retrieved plaintext and compare this value with the stored hash value. If the two hash values do not match, this means that the encrypted data we had stored was tampered with between the time it was originally encrypted and the time we decrypted it.
One of the nice things about the way Keyczar implements the AES encryption algorithm is that underneath the hood, our generated ciphertext contains an SHA-1 hash that is verified upon decrypting the data. Therefore, if anyone tampers with the encrypted data in the database, the Decrypt() function will raise an InvalidSignatureError exception. You can test this by manipulating a few of the characters toward the end of the encrypted text and trying to decrypt it:
>>> corrupted = encrypted.replace('mL','hh')
>>> crypter.Decrypt(corrupted)
InvalidSignatureError: Invalid ciphertext signature
There are a few exceptions that the Keyczar library might raise if the Decrypt() function receives invalid ciphertext, which we'll catch in our code.
Remember that the security of your encrypted data is based entirely on the security of your key. If the key ever gets out or is leaked, then none of your data is really secure. That is the crux of symmetric key cryptography. So remember that you should never transmit the key across an open public network (such as the Internet) without doing so securely. We've put the keys we're using in this example right into our project, so if you're using source control, make sure that you explicitly exclude any keys you intended to use in production. Also, make sure that wherever you put it after you deploy your site into production is only accessible by a few people in your organization, and that the machine you have it on is secured as well.
Let's put this new encryption functionality to work for us and take it for a test drive. In this section, we're going to create a simple model to store credit card information and a simple form class for capturing the data from customers. The following code for this demonstration can go anywhere you'd like in your project. I'm going to create a new app to house this code, called billing. Create this new app in your shell and add it to your project's INSTALLED_APPS section.
Inside the new app, add the following model definition to the models.py file:
from django.db import models
from django.contrib.auth.models import User

class Card(models.Model):
    data = models.CharField(max_length=500)
    user = models.ForeignKey(User)
    num = models.CharField(max_length=4)
@property
def display_number(self):
return u'xxxx-xxxx-xxxx-' + unicode(self.num)
def __unicode__(self):
return unicode(self.user.username) + ' - ' + self.display_numberAs you can see, we've defined a very slim model that will hold all of the encrypted credit card data in a single field. We've also created a very small string field that will hold the last four digits of the credit card number for use in display on the interface. For example, on the order details page in order history, we might show that the credit card "xxxx-xxxx-xxxx-1234" was used, instead of having to display the whole number. We've also defined a model method to return this value as a property of each model instance.
Next, we need to create a form that will actually capture all fields of a credit card as inputs from the user. Create a file named forms.py in your new billing app and add the following form class definition to it:
from ecomstore.billing.models import Card
from django import forms
from datetime import datetime

month_choice = [ ]
# month_choice.append(('','- Month -'))
for i in range(1,13):
    if len(str(i)) == 1:
        numeric = '0' + str(i)
    else:
        numeric = str(i)
    month_choice.append((numeric, datetime(2009, i, 1).strftime('%B')))
MONTHS = tuple(month_choice)


calendar_years = [ ]
# calendar_years.append(('','- Year -'))
for i in range(datetime.now().year, datetime.now().year+10):
    calendar_years.append((i,i))
YEARS = tuple(calendar_years)

class CardForm(forms.ModelForm):
    CARD_TYPES = (('Visa', 'Visa'),
                ('Amex', 'Amex'),
                ('Discover', 'Discover'),
                ('Mastercard', 'Mastercard'),)
    class Meta:
        model = Card
        exclude = ('data','num', 'user')

    cardholder_name = forms.CharField(max_length=100)
    card_number = forms.CharField(max_length=20)
    card_type = forms.ChoiceField(choices=CARD_TYPES)
    card_expire_month = forms.ChoiceField(choices=MONTHS)
    card_expire_year = forms.ChoiceField(choices=YEARS)
A lot of the logic you see in this form should look much like the code we wrote for the checkout form in Chapter 5. If need be, this stand-alone form can be integrated into the checkout form, in accordance with your own needs.
Next, we're going to create a module inside this new app to actually interface with the Keyczar library and perform the actual calls to the encryption and decryption methods. Create a new file called passkey.py and add the follow little bit of code:
from ecomstore.settings import CURRENT_PATH
from keyczar import keyczar
import os

KEY_PATH = os.path.join(CURRENT_PATH, 'keys')

def encrypt(plaintext):
    crypter = _get_crypter()
    return crypter.Encrypt(plaintext)

def decrypt(ciphertext):
    crypter = _get_crypter()
    return crypter.Decrypt(ciphertext)

def _get_crypter():
    return keyczar.Crypter.Read(KEY_PATH)
Make sure that your own KEY_PATH variable contains the actual path to the keyset you created in the last section.
Now, we just need a view function and a template file we can use to take this new code for a test drive. Inside views.py, create this single view function:
from django.shortcuts import render_to_response
from django.core import serializers
from django.utils import simplejson
from django.template import RequestContext
from django.contrib.auth.decorators import login_required

from ecomstore.billing.forms import CardForm
from ecomstore.billing import passkey

@login_required
def add_card(request):
    if request.method == 'POST':
        post_data = request.POST.copy()
        # convert the POST variables into JSON format
        post_data.__delitem__('csrfmiddlewaretoken')
        json_data = simplejson.dumps(post_data)
        # encrypt the JSON
        encrypted_json = passkey.encrypt(json_data)
        # retrieve the encrypted JSON
        decrypted_json = passkey.decrypt(encrypted_json)
        # convert the decrypted JSON into a dictionary
        decrypted_data = simplejson.loads(decrypted_json)

        # store the newly encrypted data as a Card instance
        form = CardForm(post_data)
card = form.save(commit=False)
card.user = request.user
card.num = post_data.get('card_number')[−4:]
card.data = encrypted_json
card.save()
else:
form = CardForm()
return render_to_response("billing/add_card.html", locals(), context_instance=RequestContext(request))Lastly, inside your project's templates directory, create a new subdirectory called billing and add a template file called add_card.html. Add this template code, which contains the form and variables to check the progress each step of the way:
{% extends "catalog.html" %}
{% block content %}
<h1>Add Card</h1>
<form method="post" action="{{ request.path }}">
<table>
{{ form.as_table }}
</table>
<input type="submit" value="Submit" />
</form>
<br /><br />
Original Post Data: {{ post_data }}
<br /><br />
Data as JSON: {{ json_data }}
<br /><br />
Encrypted JSON: {{ encrypted_json }}
<br /><br />
Decrypted JSON: {{ decrypted_json }}
<br /><br />
Decrypted Python Dictionary: {{ decrypted_data }}
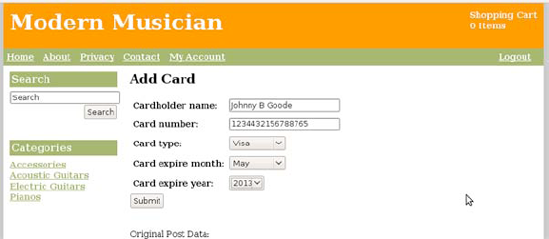
{% endblock %}In order to do this test, you'll need to create a URL entry for this view function somewhere in your project. Once you've gotten that set up, navigate to that URL on your site and you should see the credit card form as it appears in Figure 12-3.
The view function itself just takes the data directly from the POST request made to the page and converts it into JSON format. Then, we pass this JSON object into the encrypt() function we created in the passkey.py file, getting back the encrypted JSON that we'll later store. Then, to ensure that everything goes smoothly with retrieval, we perform decryption on the encrypted data and convert the JSON data back into a Python dictionary.
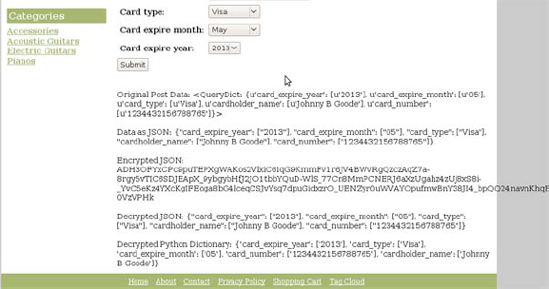
You might wonder why we convert the data to JSON format, instead of just storing the QuerySet itself. One very good reason to make the extra effort and convert the POST data to JSON before storing it is portability; later, if the application is ever ported over to Ruby on Rails, or some other up-and-coming web framework, you don't want a bunch of arbitrary Django QuerySet data in your database, requiring you to decrypt everything and then convert it to some other programming language. Most major web frameworks have a means of dealing with JSON-formatted data, so you'll have an easy time dealing with the information once it's decrypted, no matter what platform you're on. Optionally, you could have chosen to store all of the data in XML format instead of JSON, using the XML document creation techniques we discussed in Chapter 5.
I also opted not to hook this particular credit card model into the admin interface. None of our employees really need access to the encrypted blobs of text data stored in our database. The only thing you might consider doing is adding the card's display number to the Order model admin page as an inline model.
How to integrate this new form and model that we've just created into the checkout process or My Account customer pages is an exercise left up to the reader.
The security battles between people who are trying to attack web sites and the developers responsible for securing those sites is an ever-escalating arms race. Keeping a site secure is not only a tricky thing to do for any site, but it's also not just one step you need to take while developing the site; it's an ongoing process. The types of attacks that crackers will use to try and compromise your site are sure to change, and you need to keep current and remain vigilant as long as your site is deployed, to ensure that your site doesn't succumb to any of these new attacks.
Security is a very diverse and extremely important topic. In this chapter, we covered a few of the basic security measures you can take when getting ready to deploy a Django site into production. We did not cover network security or how to harden the web server hosting your site, and this is certainly something you'll want to look into before actually deploying a site. If you're interested in learning more about the topics covered in this chapter, as well as other important programming security concepts, I'd recommend you take a look at Foundations of Security: What Every Developer Needs To Know by Neil Daswani, Christoph Kern, and Anita Kesevan (Apress, 2007).
Now that we've got that under our belt, we're going to turn our attention to another critical aspect of any highly trafficked web site: performance. In the next chapter, we're going to talk about caching and indexes, and how we can greatly reduce the query load on our database server.