Anyone who's ever done any shopping, either on the Internet or off, understands the concept of a shopping cart. It allows customers browsing your products to aggregate some products from your catalog and then, once they've gotten everything they want to buy, go through the checkout process with all the items in their shopping cart.
In this chapter, we're going to create a shopping cart on our site, to which users can add the products in our catalog. We're going to create the shopping cart page, where they can review their selections, adjust any purchase quantities, or remove any items before beginning the checkout process. In doing so, we'll take a much closer look at the Django templating system and what you can do to extend Django's templating system with your own custom template filters and template tags.
Before we get to coding up our shopping cart models and creating our templates, let's write a quick spec outlining the basics of our cart requirements, and talk a little bit about the purpose of sessions.
I'm going to do a quick write-up to serve as an overview of the functionality that our shopping cart requires. Feel free to do your own and remember, yours might end up looking a whole lot different than mine for lots of different reasons. The only piece of advice I'm going to give you is to call your shopping cart just that... a "shopping cart." While you might think it's a good idea to come up with a different metaphor that fits into the particular theme of your site, I would strongly advise against this.
I remember shopping on an e-commerce site for a hardware store that sold tools and garden equipment, and they called their shopping cart a "wheelbarrow." Sure, that's cute and all, but most web shoppers are familiar with the shopping cart metaphor. When they are finished shopping and are ready to check out, they will scan your site looking for the cart so they can complete their purchase, but if all they see is "wheelbarrow," there's always the chance that a few of them will get confused about what they are looking for. Hardware stores don't give you a wheelbarrow to shop with, so why should we get creative with an online storefront anyway?
If you want to detract from the usual name and go with something a little more quaint, I believe that "basket" is a close second choice to "shopping cart."
In any case, here is my quick outline of our needs for the shopping cart. Just as before, in Chapter 1, my functional spec is not bound by the formalities or procedural bureaucracies of any organization, so it may sound like unorganized gibberish. However, in my defense, I'd like to point out that my spec is very human-readable gibberish:
"A link to the shopping cart must be present on every page. This link should include a quick summary about how many items are in the cart, maybe a small icon of the shopping cart? This needs to be on every page so that whenever the user gets the itch to check out, no matter what page they are on, they should be able to figure out how to do it quickly and without any confusion. Once they click on the shopping cart link, they should be taken to the cart page where they can review their items and edit quantities or remove single items as they need. A checkout link should be present only if the cart is not empty. IMPORTANT: Users, even anonymous ones that haven't registered or logged in, should be able to add items to their cart."
Very simple and direct. If your own spec gets much more complicated than this, you might consider breaking it into sections.
As I mentioned in the last chapter, it's usually in your best interest to start with your data, set up the structure and relationships of your models, and then develop the rest of the site from this foundation. Before we jump into the models, a quick bit of theory about how web sites track anonymous visitors is in order.
Do you know what sessions are and why web developers use them? You do? All right, you're off the hook, feel free to skip ahead to the next section and you shouldn't have any problems understanding what's going on. The rest of you will have to read the following story.
I live in California, which is home to about 98% of the remaining functional 1970s flower-covered Volkswagen Vans left in the entire world. Let's imagine that one day, a driver of one of them cuts me off on the highway and I take it very personally. I decide to write a letter to my governor and let him know that I think he ought to ban VW Vans from the roads and highways of California, if for no other reason than I'm bored and would like to complain.
So, I write up a letter to Governor Arnold Schwarzenegger (yes, I had to look up how to spell that) and tell him how much those pesky VW vans are annoying me and give him a piece of my mind. I write his address on an envelope and drop the letter into a mailbox, then sit on my hands and wait patiently for his reply.
A week later, a return letter from Mr. Schwarzenegger's shows up in my mailbox, and I open it eagerly. No, he has written back, he will not ban VW Vans from the 1970s, and that's the silliest thing he's ever heard. He also pleads with me to get a job so I stop worrying about what kinds of cars are on the road.
Now, I might be a little put off by his reply, and want to tell him how I feel about it. But notice that the only way for me to do this is to write him another letter. At this point, the line of communication has ended. The correspondence is complete. I've sent him a request, and he's sent back a response, and now this entire plan of mine to eliminate VW Vans is all but kaput. The only way for me to try and spark up this whole process is to initiate the whole thing from scratch, by writing another letter.
However, let's imagine that Arnold S. receives a whole ton of letters each day, to which he always sends a personal reply. After replying to each and every letter, he immediately tosses the original letter and forgets the name of the person who sent it to him. He just doesn't bother retaining any information
This is how the Internet works. The entire thing is based on a request-response system between clients and servers, kind of like me writing to Arnold in the VW story. When you type in http://www.google.com/ in the address bar of your browser and hit Enter, you are transmitting a request (as a client) to Google (who is the server), which will take your request and then return a response to you. Think of it like tossing a rubber bouncy ball at the wall: the ball is not at rest until it's back in your hand.
This shouldn't be too big of a shock, since this is what your view functions were doing in the last chapter. They accept an argument aptly named "request" and then render a "response" in return. After the response, there is no longer any open line of communication. This is in the interest of conserving server connections. Web servers tend to have a limit on the number of concurrent connections they can have open. If every site visitor was given their own dedicated connection from the web server, the server's performance would not scale as well. Also, keeping connections open only long enough to transmit information and closing them as soon as possible conserves bandwidth, which is an expensive and very finite resource on the Internet.
Contrast this to a regular desktop program that you might install and use on Windows, such as Excel. When you're using something that's installed on your local machine, and not running it in a browser, there is a direct line of communication between you and the program. You enter data into a few cells and the program accepts it right there. This is akin to me giving Arnold a call on the telephone and talking directly to him (assuming that he didn't just hang up on me right away).
The World Wide Web doesn't have these direct lines open, and instead has to rely on the request-response means of communicating. If you want to sound like a very technical and well-read person, you refer to this principle on the Internet as the statelessness of HTTP. A bunch of faceless requests come in, and the servers reply to them, but the servers don't have a means of aggregating all of the requests that originated from one particular machine.
Back to Arnold on his state of California throne. In the interest of getting re-elected, he decides to start keeping a filing system. He files away the letters that he gets by the name and address of the person who sent them, instead of carelessly throwing them away. That way, with each letter, he can check and see if the writer has ever sent him a letter in the past. This enables him to tailor his response to that person in particular.
So when I write him next month and tell him how much I hate palm trees and how I think we should get rid of all the palm trees in California, he can reply back to me and say, "Hello Jim, no, we won't be doing that either. That's an even stupider idea than getting rid of all the VW Vans you mentioned last month. Please reconsider my advice for seeking gainful employment. Sincerely, Arnold." You see? With that reply, he addressed not only the letter I had sent but the one before it as well. The response feels more personal, like he's really listening to me, and I really get the impression that he cares.
You want your customers to think, and know, that you care. Web developers have been using a technique to identify and track all of those anonymous requests that come in from web surfers for a long time now, using cookies. A cookie is a small text file that you write to each user's computer, via their browser, with some information that you can use to uniquely identify that user on that computer. We can use this for all sorts of things that will let us tailor the experience that the user has on our site specifically for them.
The beauty of this approach is that it allows customers who aren't registered or logged in to still shop on our site, adding items to their cart for eventual checkout. This is the best approach, because you want to make everything as easy as possible for your users, particularly the new ones. If you concern new users with registering before they can even start shopping on your site, you're going to annoy some of them and they're going to leave. Just because the register-first-then-shop approach works for Costco certainly doesn't mean it's a good idea for your site.
We're going to use this cookie information to help track the shopping cart data. When a user first adds an item to their cart, we're going to create a long and crazy string of random characters that will uniquely identify their cart and the items in it, and write this to a cookie in their browser. Then we'll store this long string with the associated cart items in the model. Whenever they interact with their cart, or add other items to it, we'll reference this identifier to pull the corresponding cart items from the database.
There is an important distinction to point out here, about how we're using session information. There are lots of examples floating around out on the Internet that demonstrate how to use sessions in Django, and while the examples are programmatically correct, they are architectural nightmares that, if implemented, wouldn't scale at all.
Let's say you want to restrict product reviews to one per product per customer on the site, and you decide to use the Django session framework in order to track which products a user has reviewed to prevent them from posting more than one for any given product. Now, what you don't want to do is write a cookie for each product that the user reviews and track them that way. There is a limit to how many cookies you should be writing to each user's browser, and in practice, it's somewhere between 30 and 50 cookies. (As a matter of fact, the number of cookies you actually use will likely be much smaller than that.) Since a user might write hundreds of product reviews (in theory), filling up a user's machine with hundreds of corresponding cookies is bad architecture.
Admittedly, this is a poor example, because you would more than likely track a user's reviews with an e-mail or a user account. My only point is that sessions are one tool in the Django arsenal, they can be used for tracking anonymous users, and you certainly don't want to start storing large quantities of detailed information in them. That's what your database is for.
Let's continue this chapter with a very quick review of setting up models, just like we did in the last chapter. Before we get started, I'd like to remind you that source code for this chapter can be downloaded from the Apress web site, if you want to spare your wrists some mileage at the keyboard.
First, we're going to create a new app within our project to house all of the shopping cart information. I'm going to call my app cart.
From the root of your project, run the following:
$ python manage.py startapp cart
This will create the directory with the default Django app files, and that's just so Chapter 3 that I'm not going to repeat the list again for you here.
First, let's talk about what we need for our shopping cart models. What data do you need to store? Turns out this requires a little more thought than the product data, and once again, I welcome you to sketch up a mock of what you envision your cart should look like and go from there. Here's one hint: don't store any information that's associated directly with the product (like the price) or anything that's calculated (like the extended price) in the cart models.
For my simple little cart model, I came up with four things that I need to store with each item in a user's shopping cart:
Our unique Cart ID value
Product ID
Date product was added to the cart
Quantity in the cart
This is simple. Exceedingly simple. It's so straightforward that we really only need one model for storing this information. Open up your models.py file in your new cart app and add in the following code for your cart item class:
from django.db import models
from ecomstore.catalog.models import Product

class CartItem(models.Model):
     cart_id = models.CharField(max_length=50)
     date_added = models.DateTimeField(auto_now_add=True)
     quantity = models.IntegerField(default=1)
     product = models.ForeignKey('catalog.Product', unique=False)

     class Meta:
          db_table = 'cart_items'
          ordering = ['date_added']

     def total(self):
          return self.quantity * self.product.price

     def name(self):
          return self.product.name

     def price(self):
          return self.product.price
def get_absolute_url(self):
return self.product.get_absolute_url()
def augment_quantity(self, quantity):
self.quantity = self.quantity + int(quantity)
self.save()As you can see, the CartItem class and its associated methods borrow a lot from the related Product model. When we call the name, price, and the link to the cart item, we're actually going to be calling for those items on the related product that we've set up in our model as a foreign key. Items on the cart page will be linkable, but the items will link to the product page, since they don't have their own dedicated templates. There's also one method, called total(), that returns the extended price, which is calculated from the product's price and the quantity of the cart item.
Now that we've added a new model, we need to make sure that we add the new app to our settings.py file and run manage.py syncdb to create the database table. Open up your settings.py file and add the following line to your INSTALLED_APPS section:
'ecomstore.cart',
Then, inside your system's shell, run the following command in your project:
$ python manage.py syncdb
The database table for the CartItem model class should now be created and ready to start storing shopping cart items.
Let's back up one step: why are we only using one model instead of two? In a cart with more than one item, we're going to be storing the Cart ID for that user in more than one place. In a properly normalized database, you're trying to reduce the amount of redundancy as much as possible, because you want to ensure that when the time comes to change the data, you'll only have to remember to change it in one place. Given this thought, it makes more sense to give the Cart ID its own table and link it, in a one-to-many relationship, with the items it contains.
I've chosen to merge the cart data into one table, and potentially store redundant Cart IDs across multiple records, for a couple of reasons. First, the Cart IDs are going to be a big blob of character data from the session cookie that is not going to change. The only thing that can happen is the customer clears their cookies, or switches computers or browsers, in which case we'll just assign them a new Cart ID.
But second, and much more importantly, when you pull your model information in your views to show the user, two separate tables with the cart information would do one of two things. It would either require you to do a query for the Cart ID, and then do a second query for the associated items in the cart, in which case you've performed an extra query, or you would have to perform a join on the two tables in order to get the information you need in one shot. Queries are expensive, and joins on tables to query data from more than one table are also quite expensive.[25] And after all, in our case, there isn't any additional information that a second table would contain, other than the Cart ID.
The last method, augment_quantity(), will be used by our site just in case someone adds an item to their cart and, by some weird coincidence, finds their way back to that product page and adds the exact same item to their cart a second time. Instead of adding it again, we'll just adjust the quantity.
So how long do Django cookies last? Once you identify a user and they start adding items to their cart, how long does that cart persist in their browser? The best answer I can give you to these questions is to point you directly to where the answer lies: in the Django global configuration file. We saw this file in the last chapter. It's called global_settings.py, and it resides in your Django installation folder on your development machine.
Open this file and navigate down to the section labeled SESSIONS surrounded by lots of pound (#) signs. You should see about 10 configuration settings related to cookies, which have self-describing names and comments that should help you understand the purpose of each one. In case you don't feel like opening the file yourself, here are the most important ones:
# Cookie name. This can be whatever you want.
SESSION_COOKIE_NAME = 'sessionid'
# The module to store sessions data.
SESSION_ENGINE = 'django.contrib.sessions.backends.db'
# Age of cookie, in seconds (default: 2 weeks).
SESSION_COOKIE_AGE = 60 * 60 * 24 * 7 * 2
# Whether a user's session cookie expires when the Web browser is closed
SESSION_EXPIRE_AT_BROWSER_CLOSE = False
# Whether the session cookie should be secure (https:// only).
SESSION_COOKIE_SECURE = False
As you can see, cookies last two weeks before they expire in the user's browser. At these two weeks of idle activity, if the user returns to your site, their shopping cart will appear to be empty, even if they had previously filled it up with 10 different kinds of jaw harps and banjo strings.
That last value is the most important one to examine, because it makes a very important point: cookies are not secure. Cookies are only as secure as the transmission protocol they're sent over, and plain ol' HTTP is not secure. We discussed not storing large amounts of complex information in cookies, but you certainly don't want to start storing any sensitive information in them. As a way-too-obvious example, don't store customer credit card information in cookies.
Note
Setting your SESSION_COOKIE_SECURE value to True does not in any way secure your cookies. That just means they won't work in your web project unless the user is browsing your site over SSL. (I'll discuss SSL in more detail in Chapter 5.)
Lastly, notice that, while the database is used to store session information by default, you can change this configuration to use one of the other options. Your project can use a file in your project's directory to track user session information. Because performance is superior with the database approach, we're not going to use the file approach in this book, but you do have the option, in case your project isn't using a database.
If you feel the need to change any of these default settings, my advice to you is not to edit this global settings configuration file. As a matter of fact, as far as changes go, leave the Django source code alone. Like any computer code, a change in one area of the source code might inadvertently break things in other places. This shouldn't be a problem for you, since you can override any of the settings in the global settings file by adding the same configuration setting to your project's settings.py file.
For example, if you want to set cookies so that they last 90 days instead of 2 weeks, you can add this line of code to your settings.py file:
SESSION_COOKIE_AGE = 60 * 60 * 24 * 90
Or, if you want to make it unreadable to anyone that doesn't have a calculator at hand:
SESSION_COOKIE_AGE = 7776000 # the number of seconds in 90 days
The two are functionally equivalent. However long you would like your carts to last is entirely up to you and your own needs. I'm going to set my cookie to last for 90 days, to give my users enough time to think about their buying decisions. If you want to test this setting, set it to some ridiculously low, like three seconds, add an item to your cart, and watch how quickly it disappears after you start refreshing the cart page.
The good news is that you already have sessions enabled. Back in Chapter 3, when you uncommented out this line of code in your settings.py file under the INSTALLED_APPS section:
'django.contrib.sessions',
the tables that your database needed to track sessions were created as soon as you ran the syncdb command in your shell. In addition, your project came equipped with another batch of code in the MIDDLEWARE_CLASSES section.
The request.session object is an instance of a special SessionStore class, which is similar in concept to a Python dictionary object that you can use in your Django code to store and retrieve session information with each request. So, when a user adds an item to their cart on the product page, and you want to set the value of their Cart ID, you can use the following code:
request.session['cart_id'] = 'cart_id_value_here'
Later, when you want to retrieve it, you can just as easily get at it with this:
request.session['cart_id']
The syntax is simple, but things get a little sticky when you try to access a user's Cart ID before you've set it, and you can't set the value each time it's accessed, because you'd just be overwriting the value that was already there. To solve this problem, we're going to check for the existence of the Cart ID, set it if it doesn't exist, and then return that value.
Here is the function for the Cart ID for our cart module (we haven't created the cart module yet):
def _cart_id(request):
     if  'cart_id' in request.session:
          request.session['cart_id'] = _generate_cart_id()
     return request.session['cart_id']
As you can see, we use the Python dictionary's get() method to check for the Cart ID, and if the key cart_id is not found, an empty string is returned and our _generate_cart_id() method is called to create one for us.
So what is our Cart ID going to look like? In our project, we're going to generate a random string of fifty letters, numbers, and other non-alphanumeric characters. Here is the implementation of our function to generate random Cart IDs:
import random

def _generate_cart_id():
     cart_id = ''
     characters = 'ABCDEFGHIJKLMNOPQRQSTUVWXYZabcdefghij
          klmnopqrstuvwxyz1234567890!@#$%^&*()'
     cart_id_length = 50
     for y in range(cart_id_length):
          cart_id += characters[random.randint(0, len(characters)−1)]
     return cart_id
klmnopqrstuvwxyz1234567890!@#$%^&*()'
cart_id_length = 50
for y in range(cart_id_length):
cart_id += characters[random.randint(0, len(characters)−1)]
return cart_idI should point out that the random module is not actually "random" enough for serious security purposes, but it's random enough for our purposes in trying to make sure two poor shoppers out there don't end up with the exact same Cart ID. Each of our generated Cart IDs is 50 characters in length, and with 72 possible characters for each of the 50, there are 5072 possible Cart IDs... which is really a lot of Cart IDs. This makes the likelihood of a collision extremely improbable.
Of course, we cannot say with absolute certainty that no two customers will ever end up with same Cart ID, but the chances are so remote that for practical purposes, we don't need to worry about it. You can rest easy knowing that the guy trying to buy a death metal distortion pedal doesn't end up with a harmonica in his cart, and vice versa.
When you get right down to it, web developers probably enjoy creating, designing, and testing forms for usability about as much as users enjoy clicking around them. They're clunky, awkward, and there's not a lot of room for creativity. They're a functional requirement. You're users have to be able to add items to a cart and give you their order information, or else you're not going to be able to make any money.
Django has an interesting approach for dealing with forms: create a Python class, much like you did with your models, that represents a form, instantiate one in your view code, and pass it to your template just like you would any other variable.
If that sounds a little odd, don't worry. It is a rather unique approach to creating forms, but once you get used to it, you'll be amazed at the amount of flexibility you have in using them to create forms for your user interface. The first form we're going to create will be the "Add to Cart" form on the product page. It's just a baby, with only a small handful of inputs.
I mentioned the use of cookies earlier in the chapter. One caveat is that cookies are not always enabled in the user's browser by default. It's very easy for a user to turn them off so a site cannot write cookie values to their machine.
Our site requires that customer's surfing our site must have their browsers configured in order to accept cookies. Since our site requires that cookies be enabled before anyone can add anything to the cart, we need to check to see if cookies are enabled and, if they are disabled, display a message to the customer letting them know that they need to enable cookies in their browser before they can use our site.
This may sound kind of Draconian, like "Turn on your cookies or get lost," and I understand your concern. You don't want to annoy anyone, but if I were you, I wouldn't worry too much. These days, almost everyone has their cookies enabled, and almost every site requires them. If you don't believe me, go ahead and turn your own cookies off, and try browsing the web for a while. You'll get an error message from just about every reputable site that has a login or a shopping cart.
For the most part, this shouldn't be an issue for you, but you do want to make sure that if any super-paranoid, hacker-fearing customer tries to add something to their cart, they get some feedback about why their attempt to add to the cart didn't work.
As it turns out, Django has the plumbing built right in to test whether cookies are available. You can write a test cookie to the user's browser, which you can then check for to make sure it exists, and delete it when you're done using it.
To write this dummy test cookie, we use the following line of code:
request.session.set_test_cookie()
Then, when you need to check for that cookie's existence in your code, you use the following function, which will check for the cookie and return True if it finds it:
request.session.test_cookie_worked()
Lastly, you can destroy this dummy cookie with:
request.session.delete_test_cookie()
We're going to use these three methods in our form code to check if cookies are enabled and, if they aren't, let the user know they can't buy anything from our site until they are enabled.
Go back into your catalog app directory and find the file called forms.py. Open it up and add the following class definition for our "Add To Cart" form, below the ProductAdminForm class:
from django import forms  #this import should already be at the top

class ProductAddToCartForm(forms.Form):
     quantity = forms.IntegerField(widget=forms.TextInput(attrs={'size':'2',
          'value':'1', 'class':'quantity', 'maxlength':'5'}),
           error_messages={'invalid':'Please enter a valid quantity.'},
           min_value=1)
     product_slug = forms.CharField(widget=forms.HiddenInput())

     # override the default __init__ so we can set the request
     def __init__(self, request=None, *args, **kwargs):
          self.request = request
          super(ProductAddToCartForm, self).__init__(*args, **kwargs)

     # custom validation to check for cookies
     def clean(self):
          if self.request:
               if not self.request.session.test_cookie_worked():
                    raise forms.ValidationError("Cookies must be enabled.")
          return self.cleaned_data
Each field definition in the form class is assigned a given field type, based on the type of data you are asking the user for. These fields take a "widget" argument that allows you to control exactly how the input is rendered on the page. As you can see, this is a very simple form that only takes a quantity that the user can input, and a hidden input field that represents our product slug to identify just which product is being added to the cart.
The quantity field will be rendered as a textbox input to the user, with some extra attributes like size, value, and class. We've also specified a custom error message that will be displayed to the user if they try and submit the form with an invalid value.
The hidden input will never be displayed, so we don't have to waste valuable CPU cycles in our brain determining how it should look on the page. We're just going to assign it a value in our view code, just before we pass it to our templates.
Following the field definitions are two function definitions. The first one overrides our form's default constructor with its own __init__() function definition, which enables us to pass the current request object into our form instance, so we can check to see if cookies are enabled.
The second function definition, clean(), is called on our form to actually perform the validation. If cookies are disabled in the user's browser and test_cookie_worked() returns False, then we raise a ValidationError with a quick message letting the user know they need to enable cookies to shop our site.
The HTTP protocol, the one sending web pages from servers to client machines all over the world, uses different verbs in order to process requests. There are two verbs that are in widespread use: GET and POST. These are really not so much like verbs as they are adverbs, in that they are defining how we are requesting instead of changing the action itself. The majority of the time, the GET verb is the one being used. When you click a hyperlink and load up a web page with some local news on it, you're doing just that: you're GETting something.
Now, the POST verb is used when you want to do something. It's telling the server to create or modify some resource on the server instead of just passively asking for a web page. Usually, in order to make a POST request to a page, you have to click something with your mouse, like a button that submits a web form to the server.
So what does that have to do with our "Add To Cart" form? Think about how you're going to implement the form for adding items to the cart. You might be thinking it will end up looking something like this:
<form action="/add/to/cart/product_slug/" method="post">...etc
The problem with this approach is that you've got this funky URL to which you're posting your form, which means that you'll need to set up that URL and map it to a view function, which isn't even really a view function because no one will ever see it. It's just going to process adding to cart and redirect to the cart page when it's done.
We're going to keep out this clutter by having the "Add To Cart" form on the product page post back right onto the product page itself. Just like the scarecrow in The Wizard of Oz, we're going to give our view function a brain, so that it can differentiate what it does based on whether the request coming in is a GET or a POST. Here's the general idea:
def show_product(reqest, product_slug):
     # ... more code here ...
     if request.method == 'POST':
          # someone's adding to cart...do something here.
     else:
          # just a normal GET request
     # ... etc ...
So if a POST request comes in, we assume that someone just tried to add our product to the cart, then, um... add it, and send them off to the cart page. If it's just a boring old GET, then we do just what the view does now, and display the product page. The flow of this can be tricky to get your head around because you're skipping a whole block of it the first time around, so the whole process just doesn't seem linear.
Don't worry about adding this code to your view right now. We'll get to it in a moment.
Okay, now, in order to get our "Add To Cart" form working so that you can start testing your code, we've got to jump around a lot and implement a lot of little things all at once. If you've been skimming the rest of this chapter so far, sit up in your chair and pay attention. This won't take long.
Let's take a quick moment to set up the URLs for our cart app, as well as a dummy "Cart" template that will show up after we've added something to the cart. Open up the urls.py file in the root and add the following line to your patterns tuple:
(r'^cart/', include('cart.urls')),Then create a urls.py file within your cart app and add this code to it:
from django.conf.urls.defaults import *

urlpatterns = patterns('ecomstore.cart.views',
     (r'^$', 'show_cart', { 'template_name': 'cart/cart.html' }, 'show_cart'),
)
Now, we need to create a template for this URL so that it doesn't spit up a TemplateNotFound exception like we got at the end of Chapter 2. We're passing in a variable named template_name, just like in the last chapter, to specify the template our cart page will use.
In your project's templates directory, create a cart subdirectory and a cart.html file that contains the following simple code:
{% extends "catalog.html" %}

{% block content %}
     <h1>Cart Page Here</h1>
     Cart item count: {{ cart_item_count }}
{% endblock %}
And then, finally, create the view function in views.py:
from django.shortcuts import render_to_response
from django.template import RequestContext
from ecomstore.cart import cart

def show_cart(request, template_name="cart/cart.html"):
     cart_item_count = cart.cart_item_count(request)
     page_title = 'Shopping Cart'
     return render_to_response(template_name, locals(),
context_instance=RequestContext(request))
It's far from complete, but now, when we add in the "Add To Cart" functionality, it will at least have someplace to go. Now, we're going to create all of those fun cart functions we were talking about earlier. With your project's cart app directory, create a new file, and call it cart.py. Add the following code to this file:
from ecomstore.cart.models import CartItem
from ecomstore.catalog.models import Product
from django.shortcuts import get_object_or_404
from django.http import HttpResponseRedirect
import decimal    # not needed yet but we will later
import random

CART_ID_SESSION_KEY = 'cart_id'

# get the current user's cart id, sets new one if blank
def _cart_id(request):
     if request.session.get(CART_ID_SESSION_KEY,'') == '':
            request.session[CART_ID_SESSION_KEY] = _generate_cart_id()
      return request.session[CART_ID_SESSION_KEY]

def _generate_cart_id():
     cart_id = ''
     characters = 'ABCDEFGHIJKLMNOPQRSTUVWXYZabcdefghij
          klmnopqrstuvwxyz1234567890!@#$%^&*()'
     cart_id_length = 50
      for y in range(cart_id_length):
           cart_id += characters[random.randint(0, len(characters)−1)]
      return cart_id

# return all items from the current user's cart
def get_cart_items(request):
     return CartItem.objects.filter(cart_id=_cart_id(request))

# add an item to the cart
def add_to_cart(request):
     postdata = request.POST.copy()
     # get product slug from post data, return blank if empty
     product_slug = postdata.get('product_slug','')
     # get quantity added, return 1 if empty
     quantity = postdata.get('quantity',1)
     # fetch the product or return a missing page error
     p = get_object_or_404(Product, slug=product_slug)
     #get products in cart
     cart_products = get_cart_items(request)
     product_in_cart = False
     # check to see if item is already in cart
     for cart_item in cart_products:
          if cart_item.product.id = p.id:
               # update the quantity if found
               cart_item.augment_quantity(quantity)
               product_in_cart = True
     if not product_in_cart:
          # create and save a new cart item
          ci = CartItem()
          ci.product = p
          ci.quantity = quantity
          ci.cart_id = _cart_id(request)
          ci.save()

# returns the total number of items in the user's cart
def cart_distinct_item_count(request):
     return get_cart_items(request).count()
This code is almost twice as long as it really needs to be, because I've commented the heck out of it. I'm generally very liberal with my commenting, because a week later, when I have to come back to it and change something, I don't have to decode it all. Also, it helps my co-workers when they're using my code. (At least I think it does.)
The art of commenting your code isn't terribly difficult to get the hang of. My first inclination is to say you should comment liberally, but you can go overboard. The point of commenting your code is not to document it thoroughly, but to explain to those reading your code things about your code that may not be immediately obvious from the code itself. When in doubt, comment your code when you need to explain why you're doing something, and avoid too many cases when you're merely explaining what your code is doing.
In the last chapter, I didn't use many comments in my code because there wasn't a whole lot of logic in what was happening. There were some Django models and views, and not a whole lot more. But look at the add_to_cart() function. It makes perfect sense to me because I just wrote it, but for the rest of you reading this, it's just a big hairy mess without any comments. You're welcome.
First of all, you'll notice that the name of two of our functions start with an underscore (_). If you're coming from the Java or C# camps, you might be familiar with access modifiers. These are the keywords you put before function definitions, such as public, private, protected, and so forth, which determine what code can call your functions. The private keyword, for example, ensures that the function can only be called by code within the same class.
In Python, there are no such access modifiers, but in practice, if you preface a function name with an underscore, you're telling other developers that the function is only intended to be used within the same module. So, these two functions, while they can be called from other files, are only intended to be accessed from other code in your cart.py file.
Now, back to the add_to_cart() method. You see that we create a copy of the data that came in our request object via the POST. We request the product (returning a 404 if the requested one can't be found) and request all of the products in the user's cart. We loop through the cart contents to see if the product is already in the cart. If it is, we just add the quantity to the existing quantity. If not, we create a new cart item, and save it. Next, we need to tweak the views.py file in your catalog app directory so that it can handle this sudden barrage of POST requests we're hoping that it receives from shoppers eagerly filling up their carts. Open that file, and add the following import statements and extra lines to your product page view function. Comment as liberally as you see fit.
# this stuff goes at the top of the file, below other imports
from django.core import urlresolvers
from ecomstore.cart import cart
from django.http import HttpResponseRedirect
from ecomstore.cart.forms import ProductAddToCartForm

# new product view, with POST vs GET detection
def show_product(request, product_slug, template_name="catalog/product.html"):
     p = get_object_or_404(Product, slug=product_slug)
     categories = p.categories.all()
     page_title = p.name
     meta_keywords = p.meta_keywords
     meta_description = p.meta_description
     # need to evaluate the HTTP method
     if request.method == 'POST':
          # add to cart...create the bound form
          postdata = request.POST.copy()
          form = ProductAddToCartForm(request, postdata)
          #check if posted data is valid
          if form.is_valid():
               #add to cart and redirect to cart page
cart.add_to_cart(request)
# if test cookie worked, get rid of it
if request.session.test_cookie_worked():
request.session.delete_test_cookie()
url = urlresolvers.reverse('show_cart')
return HttpResponseRedirect(url)
else:
# it's a GET, create the unbound form. Note request as a kwarg
form = ProductAddToCartForm(request=request, label_suffix=':')
# assign the hidden input the product slug
form.fields['product_slug'].widget.attrs['value'] = product_slug
# set the test cookie on our first GET request
request.session.set_test_cookie()
return render_to_response("catalog/product.html", locals(),
context_instance=RequestContext(request))Here, we put the new product page form we coded earlier into action. You'll notice that we create a new variable, simply called form. If this request is coming from a POST request, we pass the accompanying post data into the creation of the form variable, which binds the values the user submitted to the form. An unbound form will have a value of "1" (we specified that when we wrote the code for the form class earlier in the chapter), but a bound form will display the value that the user submitted. So, if they enter "5" and submit the form, the value of "5" will be retained instead of being reset to "1." In this particular case, this will only matter when there's a validation error and the page is redisplayed to the user.
Then, we ask Django to validate the form via the form.is_valid() method call. If the user entered any value that isn't a number, or if the user has cookies disabled, then our form class will raise an "invalid" error and display our custom error message.
However, if the form is valid, we delete the test cookie, add the item to the cart, and then redirect the user to the cart page. We do this using a built-in Django function:
url = urlresolvers.reverse('show_cart')This reverse() method looks through your project's list of URLs and returns the matching one. The show_cart value corresponds to the fourth parameter in your URL, the one that comes after the dictionary. In this case, the name of our view function is also show_cart... but the reverse() method is looking at the fourth parameter in your urls.py module.
And finally, whether or not the HTTP request verb is GET or POST, we set the hidden input in our form to match the product slug.
form.fields['product_slug'].widget.attrs['value'] = product_slug
So now you can rest easy knowing that you can access, and manipulate, the values of your forms programmatically.
Okay, we're almost done here. The last step is to add the form variable to your product template. Open the product.html file inside of your templates/catalog directory and find the line reading [add to cart button]. Replace that code with the following:
<form method="post" action="." class="cart">
     {{ form.as_p }}
     <br />
     <input type="submit" value="Add To Cart" name="submit" alt="Add To Cart" />
</form>
<div class="cb"></div>
And that's all you need. Notice that the entire form isn't built for us... we still need to create the opening and closing form elements, and the input still needs to be added by hand. But as for the other inputs, you just call the as_p() method on your form variable (notice that the parentheses are omitted when you call methods on variables in templates) and it renders the inputs in your form class in the way that you specified your "widget" arguments.
Have a closer look here. Go ahead and fire up a product page in a browser. Not much has changed, but you should see something that looks like Figure 4-1.
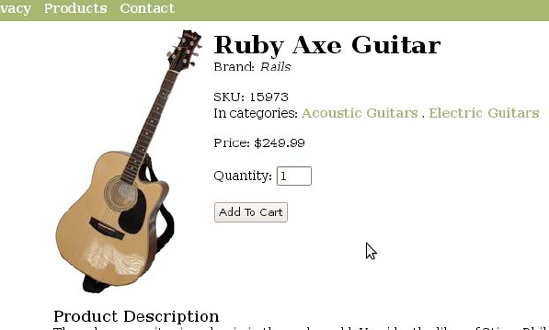
Okay, now, I think this is really cool: have a look at the source of the "Add to Cart" form, and look at the two inputs that were generated by the as_p() method. You'll notice that these were created and wrapped in a set of <p></p> elements. If you want more control over how these inputs are displayed, you can also call the as_table() or as_ul() methods if you want them to be rendered differently.
The neat thing here is that, as far accessibility goes, Django has done exactly the right thing. People who use screen readers and other assistive technologies may have trouble with the following HTML input on a form:
<p>Quantity: <input type="text" value="1" /></p>
The problem with this HTML is that a screen reader has absolutely no way of figuring out that the input textbox next to the text "Quantity:" is the input for the quantity. Sure, users can guess at it, but they really have no way of being certain. And this doesn't even take into account situations where there are dozens of input fields on a single page, all mashed into some messy HTML table, and the screen reader is reading all of this garbage to the poor user, who has to really work to figure out which input is which.
The solution is to use the following syntax:
<label for="quantity">Quantity</label><input type="text" id="quantity" value="1" />
In this example, the for attribute of the label and the id attribute of the input are matched up so that screen readers can clearly communicate to the user exactly which input they're using. And, as you can see in your product page's source, Django has constructed the quantity form input using just this syntax. Yay!
So, go ahead and add one of your products to the cart. You should be taken to the cart page and see that you have one item in the cart. You can go back and test adding as many as you like. Just remember that if you keep adding the same product, this count won't augment, as it's counting product types in the cart, and individual items.
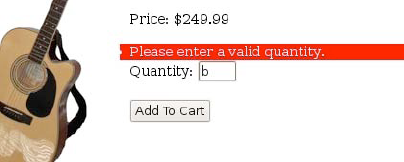
Make sure you also try and enter an invalid number, or disable cookies in your browser, and then click the "Add To Cart" button. You should see the product page redisplayed, with the error message telling you to enter a valid quantity. The problem here is that the message doesn't really reveal itself, since it's just black text on white. It looks like the rest of the product page.
If you look at the source of this error message, you should see:
<ul class="errorlist">
     <li>Please enter a valid quantity.</li>
</ul>
Well, we can solve that problem by styling it. Open up your project's CSS file and add the following line of CSS code:
/* style for Django error messages */
ul.errorlist{
     background-color:Red;color:White;
}
Now, your error message should really jump at the user, as it appears in Figure 4-2. The new styles will make them realize that there's an error that they need to fix.
Okay, so we just jumped all around and added code to a bunch of different places. I wouldn't be at all surprised if you were completely lost about what's happening. Sure, maybe your code is working, but maybe you're not entirely sure how. Or maybe it isn't working, and you don't have the slightest clue how to start debugging it.
Let's quickly walk through the steps of the user experience:
The user navigates to a product page from somewhere else, via a GET request. An unbound form is created and passed to the template, and shown to the user with a default value of 1. At this point, we also write the dummy test cookie to the browser.
The user, because they were dropped on their head several times as a child, enters "B" into the quantity box and tries adding to the cart. Our product view detects the POST, but the form is invalid, because "B" is not a valid value for an IntegerField in the form. The error message is displayed.
The user fixes their mistakes and adds a quantity of "2" quantity and resubmits. The product view detects the POST, validates the form, and then calls the
add_to_cart()function in ourcart.pymodule, passing in our product slug."Add To Cart" requests the current user's Cart ID. Because it doesn't exist, a new one is generated and set in the session. It returns this to the adding-to-cart operation in progress.
After the item is added to the cart, the user is redirected to the cart page. Right now, they only see the number of products in their cart.
If you're getting any kind of error, try and trace through the flow of the code and find where the error is occurring. Try commenting out a block around the area where you think the error is happening and see if you can get it to throw a different error, which might provide an additional clue about what's wrong.
Otherwise, let's move right along and code up the view for the shopping cart page.
For the most part, our shopping cart will be little more than just a single HTML table that we're going to use to display the list of items in our cart. While HTML tables were long ago phased out for site layout in the interest of simplicity, maintainability, and (most importantly) accessibility, HTML tables are still the best option when you need to display a grid of information on a single web page.
Even though a single HTML table is still pretty straightforward, we are going to add a few things to the markup of our table that you might have never seen before, in the interest of making the cart page as accessible as possible to everyone. The HTML of our shopping cart table will have six columns, and look something like this:
<table summary="Your Shopping Cart" id="shopping_cart">
     <caption>Your Shopping Cart</caption>
     <thead>
          <!-- header info here -->
          <th scope="col">Product</th>
          <!-- ...etc... -->
      </thead>
      <tfoot>
         <!-- footer info here -->
      </tfoot>
      <tbody>
     <! - - loop through cart items here -->
      </tbody>
</table>
We're making use of three things here. First, we're creating a caption element within our table so that it's officially labeled. This is akin to the <label for=""></label> markup for each form input. It helps people using assistive technologies identify the contents of the table as their shopping cart.
Also, each th element in the table will have its scope attribute set to col. This way, when screen readers are reading out the contents of the table, they will preface the contents of each cell with the header information. So, as it reads through the cart items, it will sound like: "Product. Ruby Axe Guitar. Price. $249.99." It's one very tiny addition to our table that helps make our cart page much more usable.
Lastly, we're using the thead, tfoot, and tbody elements so that the header, footer, and content information of the table are explicitly identified in the markup.
In the last chapter, we already got a look at both of these template tags in action, and as a programmer, you're probably already intuitively familiar with how these work. It's very possible that the designer touching your template files will have no programming background. If this is the case, the bare minimum is that the graphic designer/CSS guru who's designing the markup code for your site at least needs to understand the Django template syntax, and what the {% if %} and {% for %} tags do.
Django {% if %} tags allow your templates to handle conditional logic. This is most commonly used when you want to check for the existence of a variable and, if it exists, display it on the page. On our shopping cart page, we're going to use the {% if %} statement tags in a couple of places. First, we're going to check and see if there are any items in the user's shopping cart. If there are, we're going to list them. If not, we'll instead display a friendly "Hi, your cart is empty" message letting them know they haven't added anything yet.
Also, if you refer back to the functional spec that I coughed up at the beginning of this chapter, you'll notice that we want to display a link to the checkout page only if there are items in the cart. Again, the {% if %} tag will come to the rescue here as well. There is also a corresponding {% else %} tag that you can use inside of a block of {% if %} tags.
The Django {% for %} tag is used to iterate through sets of items. Our list of shopping cart items is just such a group of items that we want to run through, one at a time, and roll them out as rows inside of our table.
There's not much more to it than that. In a moment, we'll see both of these in action inside the Django template/HTML code for our cart page.
Django template filters are a powerful way for us to control the appearance of our output directly inside our template code. There are a ton of template filters that come with Django by default, and it's well worth your trouble to have a look at the Django documentation so that you know which ones are available for your use. Among the more important ones are those for encoding or stripping HTML (to prevent cross-site scripting attacks), converting text to all upper- or lowercase, taking operations on sets or groups, or formatting strings. We already used one of these in the last chapter, the pluralize filter that customizes the display of a word based on a numeric value (for example, "category" versus "categories" on the product page).
If any of the default filters don't do what you want, you are free to create your own. Since we're creating an e-commerce site, I already feel myself putting dollar signs ($) all over the site, which might be fine for the moment, but will pose a problem for us when we want to start selling stuff in other countries. To make sure that our site propagates as needed, we're going to create a custom "currency" filter for displaying price information.
In order to create a custom template filter, we just need to create a Python function definition that takes a value as an argument, and returns a string to display in our template. This function just needs to be in a directory called templatetags inside one of our project's installed apps. Go ahead and create this folder inside your project's catalog app, and add two files to it: __init__.py, and catalog_filters.py. The first, of course, is the obligatory empty file that merely identifies your directory as a Python package. The second will contain our code. Add the following to catalog_filters.py:
from django import template
import locale

register = template.Library()

@register.filter(name='currency')
def currency(value):
     try:
          locale.setlocale(locale.LC_ALL,'en_US.UTF-8')
     except:
          locale.setlocale(locale.LC_ALL,'')
     loc = locale.localeconv()
     return locale.currency(value, loc['currency_symbol'], grouping=True)
I'm using a very useful part of the standard Python distribution, called locale, which is used for formatting and displaying currency values based on the locale that is set by our code. The preceding function definition will use a comma to separate dollar values by the thousands, and use a dollar sign for the currency symbol. We use decorators to register our filter with the template system using the Python decorator syntax and name it currency.
I have to admit that before I found the locale module in Python, I spent about a half-hour trying to design my own custom solution to this problem. Never underestimate the resourcefulness of the Python community. Keep in mind that if you dig deep enough, you can probably find a solution to your problem somewhere on the Internet.
Note
The locale module is dependent upon the locales that have been configured with your operating system. If you run into problems with the preceding code, you may need to take explicit steps to set these up on your system. On Unix systems, you may trying running the following as root locale-gen en_US.UTF-8 to configure the locale.
In order to use the filter in our template, we just need to load it inside our template file, with the following line of code at the top of the file (but make sure it's below the extends directive. That must always come first!):
{% load catalog_filters %}The load directive is the Django template equivalent of the Python import statements at the top of your Python files. It scans through all of the templatetags subdirectories that it finds in your project's list of installed apps, and loads in any custom template tags or filters that it finds.
After you're finished with the cart page, go back into your product page template file and add your new currency filter. You just need to add the {% load %} directive and add the filter to any price you're displaying on the page.
Open up your CSS file and add the following style definitions for your shopping cart table:
/* styles for shopping cart page */
table#shopping_cart{
width:100%;
border-collapse:collapse;
color:#616161;
}
h1,caption{
text-align:left;
font-size:x-large;
margin-bottom:15px;
color:Black;
}
th,td{
text-align:left;
padding:3px;
}
thead th{
color:White;
background-color:#616161;
}
tfoot th{
height:40px;
}
table#shopping_cart th.right, td.right{
text-align:right;
}
a.cart{
color:DarkOrange;
}Then, open up your cart template that you created earlier and replace what's in there with the following markup:
{% extends "catalog.html" %}

{% load catalog_filters %}

{% block content %}
<table summary="Your Shopping Cart" id="shopping_cart">
     <caption>Your Shopping Cart</caption>
      <thead>
      <tr>
          <th scope="col">Product</th>
          <th scope="col">Price</th>
          <th></th>
          <th></th>
          <th></th>
          <th scope="col" class="right">Total</th>
     </tr>
     </thead>
      <tfoot>
      <tr>
          <th class="right" colspan="5">
          Cart Subtotal:
</th>
<th class="right">
{{ cart_subtotal|currency }}
</th>
</tr>
{% if cart_items %}
<tr>
<th class="right" colspan="6">
<a href="/url/to/checkout/">Checkout Now</a>
</th>
</tr>
{% endif %}
</tfoot>
<tbody>
{% if cart_items %}
{% for item in cart_items %}
<tr>
<td>
<a href="{{ item.get_absolute_url }}" class="cart">
{{ item.name }}
</a>
</td>
<td>{{ item.price|currency }}</td>
<td class="right">
<form method="post" action="." class="cart">
<label for="quantity">Quantity:</label>
<input type="text" name="quantity" value="{{ item.quantity }}" id="quantity"
size="2" class="quantity" maxlength="5" />
<input type="hidden" name="item_id" value="{{ item.id }}" />
</td>
<td>
<input type="submit" name="submit" value="Update" />
</form>
</td>
<td>
<form method="post" action="." class="cart">
<input type="hidden" name="item_id" value="{{ item.id }}" />
<input type="submit" name="submit" value="Remove"/>
</form>
</td>
<td class="right">{{ item.total|currency }}</td>
</tr>
{% endfor %}
{% else %}
<tr>
<td colspan="6" style="height:30px;">
Your cart is empty.
</td>
</tr>
{% endif %}
</tbody>
</table>
{% endblock %}The indentation in this code is somewhat mashed, for the sake of preserving space. You can see that we're using our new currency filter function definition for all of our prices. Before you start trying to type that in, have a look at Figure 4-3, so you have so idea of what it's supposed to look like.
Notice that we've got two forms for each line item that have a POST method that post back to the cart page. That means that we're going to handle these processing requests in our view function, right? Exactly.

With the template and corresponding styles in place, we can now turn our attention on the last bit of code we need to write, which is our view code and the corresponding functions in our cart.py module. Open up your views.py file and change the show_cart() view function so that it looks like this:
def show_cart(request, template_name="cart/cart.html"):
     if request.method == 'POST':
           postdata = request.POST.copy()
           if postdata['submit'] == 'Remove':
               cart.remove_from_cart(request)
           if postdata['submit'] == 'Update':
                cart.update_cart(request)
     cart_items = cart.get_cart_items(request)
     page_title = 'Shopping Cart'     cart_subtotal = cart.cart_subtotal(request)
     return render_to_response(template_name, locals(),
          context_instance=RequestContext(request))
And lastly, add the following four function definitions to the cart.py module, so that our view code actually has some corresponding code to call:
def get_single_item(request, item_id):
     return get_object_or_404(CartItem, id=item_id, cart_id=_cart_id(request))

# update quantity for single item
def update_cart(request):
     postdata = request.POST.copy()
     item_id = postdata['item_id']
     quantity = postdata['quantity']
     cart_item = get_single_item(request, item_id)
     if cart_item:
if int(quantity) > 0:
cart_item.quantity = int(quantity)
cart_item.save()
else:
remove_from_cart(request)
# remove a single item from cart
def remove_from_cart(request):
postdata = request.POST.copy()
item_id = postdata['item_id']
cart_item = get_single_item(request, item_id)
if cart_item:
cart_item.delete()
# gets the total cost for the current cart
def cart_subtotal(request):
cart_total = decimal.Decimal('0.00')
cart_products = get_cart_items(request)
for cart_item in cart_products:
cart_total += cart_item.product.price * cart_item.quantity
return cart_totalYou should be starting to get the hang of the flow at work here, and hopefully, the preceding code is making some sense to you. Most of the code in our cart.py module is stuff that would have been put in the would-be "cart" model, if we had chosen to create two separate models. For example, one of the preceding methods, cart_subtotal(), is returning the subtotal of the user's cart for display on the page. Logically, this would have gone in the cart model if we had created one, and we would call this method on the instance of our user's cart.
Have a look at the forms that are on the cart page. Here, I've opted to build them from scratch instead of coding up Django form classes to create them for us. One of them takes one quantity input, very similar to our product page, and updates the quantity in the cart. If the quantity is zero on an update submission, than we simply delete the item from the cart. The other form contains a Remove input that removes the item from the cart.
One last thing that we need to add is a link somewhere at the top of the page that links to the cart, so our browsing users are free to check out whenever they would like. We're going to create a custom Django template tag to contain our "Link to Cart" box. We'll have this information display at the top right in the banner, inside an absolutely positioned div element. Create a new include template file called cart_box.html inside your project's template/tags directory. Add the following markup to it:
{% with cart_item_count as cart_count %}
      <a href="{% url show_cart %}">
            Shopping Cart
            <br />
            {{ cart_count }} Item{{ cart_count|pluralize }}
      </a>
{% endwith %}
Remember when we used the built-in urlresolvers.reverse() method to fetch the URL location of the cart page? Turns out, you can use a Django template {% url %} tag to achieve the same thing in your templates. We pass it the string show_cart and it finds the corresponding URL definition in our urls.py modules. Pretty slick, eh?
We're also using a new Django tag: {% with %}. The Django {% with %} tag allows you to give a variable an alias and cache it in the template, so that your database isn't hit with the query to get the number of items in the cart each time a new page is loaded. Here, we're assigning the value of cart_item_count to a variable called cart_count, and using that variable in our actual template code.
Lastly on the template side of things, we need to load our new templates and insert the tag in the appropriate spot. Add the following line of code near the top of your template:
{% load catalog_tags %}And then add this to your catalog.html, inside the cart_box div:
<div class="cart_box">
     {% cart_box request %}
</div>
Here, we're calling on our new cart_box template tag and passing in the current request object as a variable. Now we get to the real Django magic. Inside your catalog app's templatetags directory, right alongside your catalog_filters.py module, create a new module called catalog_tags.py. This file will contain the functions for our template tags. Open up catalog_tags.py and add in the following lines of Django code:
from django import template
from ecomstore.cart import cart

register = template.Library()

@register.inclusion_tag("tags/cart_box.html")
def cart_box(request):
     cart_item_count = cart.cart_distinct_item_count(request)
     return {'cart_item_count': cart_item_count }
In the inclusion_tag() function call, you pass in the name of the template file you want to use, which in our case is the cart_box.html file we just created. Our template function tags the request object as a parameter (which we passed in our use of the tag in the template) and then returns a Python dictionary of variables that our template will be able to use. You can see that this is how our template is getting the cart_item_count variable we aliased and used in our actual template file.
With these simple changes, we now have a link to our Shopping Cart page on every page of our site, which also tells the user how many distinct products are in their cart. We're also making good use of the Django pluralize template filter and the excellent {% with %} tag.

Keep that new catalog_tags.py file open, because we're not done with it quite yet. We can apply this same template tag logic to the list of categories that we're using in the sidebar of each page, and, at the same time, make a couple of improvements. First, we can use this new {% with %} tag to cache our list of categories and save a hit to the database on each one. On top of that, we'll set up some logic so that if the user is currently on a category page, we'll deactivate the link to give the user a small visual cue about where they are.
As long you've got it open, add the following code to your catalog_tags.py file:
from ecomstore.catalog.models import Category

@register.inclusion_tag("tags/category_list.html")
def category_list(request_path):
     active_categories = Category.objects.filter(is_active=True)
     return {
          'active_categories': active_categories,
          'request_path': request_path
     }
Now, open up the category_list.html file you created back in Chapter 3 and change its contents to the following:
<h3>Categories</h3>
<ul id="categories">
{% with active_categories as cats %}
     {% for c in cats %}
     <li>
     {% ifequal c.get_absolute_url request_path %}
          {{ c.name }}<br />
     {% else %}
          <a href="{{ c.get_absolute_url }}" class="category">{{ c.name }}</a><br />
     {% endifequal %}
     </li>
{% endfor %}
{% endwith %}
</ul>Here, on top of the {% with %} tag again, we're also using a new template tag, the {% ifequal %} tag, which takes two parameters, compares them, and returns True if they have the same value. As you can see, the function takes the current request.path (in a variable called request_path) and compares it with the get_absolute_url() returned by our category. If the two are equal, that means the user is on that particular category page, and we deactivate the link to just be plain text.
There are some CSS styles that go along with this. Add these to your CSS file:
h3{
     background-color:#98AC5E;
     color:White;
     padding:3px;
     margin-bottom:6px;
}

ul#categories{
     list-style:none;
}
ul#categories li{
     font-weight:bold;
     color:#616161;
}
ul#categories li a{
     text-decoration:underline;
}

div#footer a{
     color:White;
     font-size:small;
     text-decoration:underline;
     font-weight:normal;
     margin-right:10px;
}
And finally, we just need to tweak the catalog.html file so that our site uses our new template tag instead of the include tag we created before. Find this line:
{% include 'tags/category_list.html' %}and change it to this:
{% category_list request.path %}You're all set. Your category link list at the side of the site now has its data call and functionality neatly wrapped up in one template file and one template function. At this point, you can go back to your context_processors.py file in your catalog app and remove the variable active_categories from your return dictionary, as you don't need this to be called here anymore.
In the next chapter, we're going to create the site checkout and order processing system, and before we do that, we need to set up a bunch of pages with static HTML content on them. Customers who shop online, particularly at small sites, will be interested in your organization's privacy policy. People want to be reassured that you're not going to hand out their e-mail and phone number to every spammer on the planet, who will then try to contact them at every possible opportunity to buy a renewal on the warranty on their vehicle which is about to expire, and what have you.
There are lots of other pages you might want to create, such as a "Contact" or "About" page, for which we set up placeholders in Chapter 2 in our navigation.html file. You might also need to create a "Return Policy" page so that your customers can be reassured that they'll be taken care of in the event that their product ends up being broken on arrival, or any of the other things that can go wrong during shipping.
The need for these static pages, that will only contain a header and some basic text as content, is a very wide one. Since it's such a common requirement for most sites, Django comes equipped with an app called flatpages that is designed to help you create simple static pages.
Hooking up the flatpages app is just as simple as adding the app to your project. Open your settings.py file and add the following line to your INSTALLED_APPS tuple:
'django.contrib.flatpages',
Then, add this line to your MIDDLEWARE_CLASSES section:
'django.contrib.flatpages.middleware.FlatpageFallbackMiddleware',
Finally, run the manage.py syncdb utility in order to set up your database tables for the models:
$ python manage.py syncdb
If that runs successfully, you can now add static pages to your admin interface. Go ahead and fire up http://localhost:8000/admin/ in a browser window, log in, and notice that there's now a section of your admin interface named "Flat pages."
Before we jump into that, notice that there's also another section called "Sites" that we've ignored so far. Go ahead and click on this, and you should see one site listed as example.com. Let's go ahead and change that information to match our own site. Click that domain name and you'll be taken to an edit screen where you can change the domain name and the display name of your site. Go ahead and put in your information, as I have in Figure 4-5.

Now, click back to the admin interface homepage and go into the "Flatpages" section. Click the "Add Flat Page" button at the top right and you'll be taken to a form that asks you for four things: a url where the site should reside, a title, content, and the choice of a site in a select box, which should now contain your own domain information.
Enter in some values for a test page. I'm going to put in my site's contact page information, as shown in Figure 4-6.

When you're choosing URLs for your flatpages, you'll want to be careful to avoid entering URLs that are used by other pages. Also, make sure you select the site in the select box or else you'll get an error when you try to click "Save." Under the "Advanced Options" tab, you can specify the exact name of the template that will be used to render the page, but in our case, we're just going to fall back on the default template.
Save this page, and you should be taken back to a page that lists your flatpages, of which there is just one. Feel free to create a bunch more pages for your project.
After you're done adding pages, go back to your project files. In your project's templates directory, create a subdirectory called flatpages and create a single file called default.html. This is the file that the flatpage module will use in rendering each page. Put the following code into the flatpages/default.html file:
{% extends "catalog.html" %}

{% block title %}
     {{ flatpage.title }} - {{ site_name }}
{% endblock %}

{% block content %}
     <h1>{{ flatpage.title }}</h1>
     {{ flatpage.content }}
{% endblock %}
As you can see, we're overriding the site title block with our own content, where we inject the page title manually. The content is little more than just a header with the title, and contains the content for this page below it.
While we're at all of this, let's create an inclusion tag for our footer, which will be a list of links that includes all of our new flatpages. Inside your project's templates/tags directory, create a file called footer.html and enter the following template code:
<a href="{% url catalog_home %}">Home</a>
{% with flatpage_list as pages %}
     {% for page in pages %}
          <a href="{{ page.url }}">{{ page.title }}</a>
     {% endfor %}
{% endwith %}
<a href="{% url show_cart %}">Shopping Cart</a>
This contains a link to the homepage, the shopping cart page, and between them, lists all of your flatpages. Then, inside your catalog_tags.py, enter the following code:
from django.contrib.flatpages.models import FlatPage

@register.inclusion_tag("tags/footer.html")
def footer_links():
     flatpage_list = FlatPage.objects.all()
     return {'flatpage_list': flatpage_list }
Lastly, inside your catalog.html template, change the placeholder line of text:
[footer here]
to this custom tag:
{% footer_links %}Now we have a footer with actual navigable content that includes any flatpage we might end up adding in the future.
For the navigation at the top, I'm not going to go crazy and create another Django inclusion tag. Truth be told, we're probably going to want to be able to control the list and ordering of the navigation at the top manually. Since we'll want this level of control, let's merely edit the existing navigation.html file in the tags directory, and edit our list of links:
<ul>
     <li><a href="{% url catalog_home %}">Home</a></li>
     <li><a href="/about/">About</a></li>
     <li><a href="/privacy-policy/">Privacy</a></li>
     <li><a href="/contact/">Contact</a></li>
</ul>
<div class="cb"></div>
You may have to change this list a little bit to match your own flatpages. With this in place, fire up a browser and see how the site looks now. My contact page looks like Figure 4-7, which, with the exception of the search box placeholder text, is looking just about complete.

The site is coming together very nicely. We now have a functional catalog with a working shopping cart! The rest of the site certainly looks like it's ready to be deployed pretty soon (save for, perhaps, my choice of the orange and green color scheme).
If you've been following along at home, and making your own customizations to the code as you go, now would be the perfect time for the first round of usability testing. Go grab someone you know, in your home or at work, sit them down, and ask them to shop your site. Tell them to find some products they like, add them to the cart, and then update or remove them on the cart page. Go on, do it. You might find something terribly wrong with the design of my UI. I don't care if you're out alone reading and working on this at Starbucks on your laptop... go ask that barista you think is really cute, that you just haven't had the guts to ask out, if they can take five minutes out of their busy drink-making day to help you out with this little project you've been working on. See if there's anything about our site so far that they're unable to figure out how to make work. Then consider fixing it. For larger sites, such informal usability testing this early on in the process might not be sufficient...but getting some feedback at this point couldn't hurt matters.
In the next chapter, we're going to go the extra mile and create an order creation system for our site, so customers can check out with their shopping carts. Then, we'll integrate our little site with payment processing gateways so customers can actually start paying for the items that they order.
[25] With the proper use of indexes in your database tables, however, joins might be less expensive than tables with several columns. See Chapter 13 for more about indexes.