In mid-2008, Google finally opened up Google App Engine for use by the public. Google App Engine is a cloud infrastructure onto which developers can deploy Java- or Python-based web applications. This is an exciting prospect; Google has finally created a cloud into which we can deploy web sites. Much like Amazon's own Elastic Cloud Compute service, it's an option that abstracts away the hardware from developers and system administrators into a series of web service calls over the Internet. The hardware architecture of the App Engine cloud is maintained by Google's engineers, so all you need to do is concern yourself with deploying your Django project and managing the data properly.
It's important to point out, very early on, that the Google App Engine and Django are not the same thing. Google App Engine is a cloud infrastructure for web hosting that's capable of hosting Django-based applications. The App Engine is actually able to host a site created using any framework that uses Python and supports the Web Server Gateway Interface (WSGI) standard interface. App Engine actually has its own framework that developers are allowed to use, known as the webapp framework. I'm not going to cover webapp in this book, but a good deal of its syntax and structure is borrowed from Django. In webapp, variables in templates are enclosed by double curly braces, for example.
This chapter will not be a comprehensive introduction to Google App Engine. Instead, we're going to look at what it takes to get a basic shopping cart application up and running using the Django web framework deployed onto the Google App Engine. We're going to be duplicating the work that we've done in the rest of this book in a lot of ways. Some of you might have skipped right to this chapter in the book, in the hopes that I would shed some light on exactly how you deploy a Django application onto the Google App Engine. I will make an effort to touch upon the basic concepts. Unfortunately, I won't be able to touch upon all the subjects covered in the rest of this book, go into topics with as much depth, or create an application of comparable complexity in just a single short chapter. For the rest of you that have already read the other chapters in this book, try to think of this chapter as a brief review of Django examples from the other chapters in this book, using App Engine–specific data storage techniques.
Note
In Django terms, an "app" refers to a subset of your overall project; projects are comprised of several apps that break up parts of the project's functionality. In the Google App Engine documentation and in this chapter, entire projects that you will deploy onto the App Engine are referred to as "apps." If I mention "deploying your app," then I'm referring to the whole of your Django project, which might be several Django "apps."
So the Google App Engine sounds pretty excellent as far as a hosting option goes, and it even supports Django. Does that mean that we simply dump our project files into their cloud infrastructure and start running the site from there?
Not exactly. While the App Engine does support Django, there are enough differences that deploying the project we've created in this book onto the App Engine would be far from simple. First of all, the Django model classes that we have created are different than the ones you will need to create to use App Engine's datastore. The classes are required to subclass from a different App Engine data class, and the declaration of each field requires a different set of data types. Secondly, the queries that are required to select or manipulate the data in the App Engine datastore is also very different than the Django ORM syntax we've been using.
Because of the number of these incompatibilities and the sheer depth to which they are embedded in our project, I'm going to start from scratch and create a new shopping cart application in this chapter. We'll be able to replicate some of the logic from the rest of this book. Of course, if you're really interested in a challenge, you could just upload the Django project that we've create in this book into the App Engine and work through all of the errors that you encounter one at a time. This would be painful, but it might have some value as a learning experience. If you have a masochistic personality and would like to do this, I'd encourage you to read this chapter before you attempt to do so.
In keeping consistent with the steps required for the rest of the Google tools that we've used throughout the rest of this book, the first thing we need to do before creating our applications is to sign up for the App Engine using a Google account. Unlike the rest of the Google goodies we've used, however, signing for the App Engine requires an extra step: you'll need to have a mobile phone capable of receiving SMS text messages handy in order to complete registration. You can start the registration process at: http://appengine.google.com/, as shown in Figure 16-1.

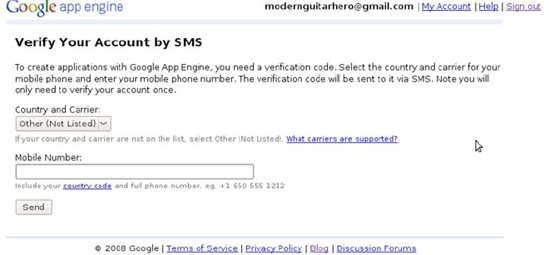
The verification process using your mobile number is shown in Figure 16-2. Once you've successfully registered, you just need to do two more things: create an application and download the SDK. When choosing a name for your app, keep in mind that it will be used in the URL of your application. If you decide to name your app mybluedjango, for example, then your app will be available at: http://mybluedjango.appspot.com/.
Next, you need to download the App Engine SDK for the Python environment. You can download the appropriate copy of this from: http://code.google.com/appengine/downloads.html. You can put the actual google_appengine directory anywhere on your system that you'd like, but you need to add this folder to your system's PATH before you'll be able to run any App Engine projects locally, using the manage.py runserver command.
In the olden days (e.g., mid-2008), it was fairly difficult to get a Django project running on the App Engine. There were a lot of extra configuration steps you needed to take just to get a basic site running, and even when you did go through all of that trouble, there were still lots of things that were missing. Support for the admin interface, for example, didn't exist. The Django authentication system wasn't compatible with the datastore. Just about all of the slick features that come with Django out of the box weren't available for use on the App Engine.
Now for the really great news: there is a project out in the wild, ripe for the taking, which is known as the Google App Engine Patch.[80] The App Engine Patch project was started and done mostly by Waldemar Kornewald in order to bridge the gap between regular Django development and the Google App Engine environment. Because of his efforts, there is support for sessions, the admin interface, and many of the default Django apps that we've been using throughout the rest of the book. It also supports the Django testing framework so that you can run all of your project tests. The project also includes a utility for integrating with Amazon's Simple Queue Service (SQS) from within your Python code, which is an immensely useful offering when you need to do intensive computing tasks but don't want your app to be bogged down.
The Django App Engine Patch actually adds a lot of other interesting capabilities as well. For example, when you go to deploy your project from your local development machine into the cloud, you would normally use a Python file provided in the App Engine SDK distribution named appcfg.py. When you're ready to deploy your project, you would run the following command:
$ python ./appcfg.py update [your_project_dir]/
The Patch project actually includes this command as part of manage.py, so that when you want to deploy your code, you just run the following from inside your project's root directory:
$ python manage.py update
As a Django developer, this should make you feel right at home. Don't worry about actually uploading your code yet. We'll get to that step in a second. First, you just need to download a copy of the App Engine Patch project. Once you've gotten the project, create a copy of the project and name the copy something similar to the name of your App Engine app that you just created after signing up. We're going to work on the copy of the project, so that if you want to start other apps on the App Engine, you can use the untouched copy of the Patch project as a starting point.
Next, we need to edit the YAML configuration file. Open the app.yaml file inside the project and have a look at its contents. First, there should be a listing of configuration variables for your project. You need to change the "application" value to match the name of the app you created after registering. So, if you named your project mybluedjango, you would enter that.
Below these, there is a section titled "handlers." This contains a list of URLs that can be mapped to files on your site, and allows you set permissions levels for directories or files, if necessary. There are three things we need to make sure are present in the handlers section. First, an entry to hook up the Remote API script included with the SDK, which will allow us to remotely add data the App Engine datastore for our project from within a local Python shell. Second, an entry to specify which directory in our project will serve static media. Lastly, we need a catchall entry to map all incoming requests that aren't handled by any other handler to the main.py file in the common/appenginepath subdirectory.
After all is said and done, here is what your app.yaml file should contain:
application: [your app name]
version: 1
runtime: python
api_version: 1

default_expiration: '3650d'

handlers:
- url: /remote_api
  script: $PYTHON_LIB/google/appengine/ext/remote_api/handler.py
  secure: optional
  login: admin

- url: /media
  static_dir: _generated_media
  secure: optional

- url: /.*
  script: common/appenginepatch/main.py
  secure: optional
The order of the items you list in the handlers section matters. You should configure them to be more restrictive and more specific, to less restrictive and more general. The first item, which hooks up the remote_api script we'll be using later, is restricted. Only an administrator of the app is allowed to access it. The next entry is telling the project to look for a directory named _generated_media at a URL path of /media for our static files. And the last entry is designed to handle any request coming into the site that doesn't match any of the other URLs. The main.py file is doing the heavy lifting for your project. It's similar to the django.wsgi file we created in the last chapter in order to interface our project with Apache and mod_wsgi.
There are a couple of other extra goodies that the App Engine Patch gives you by default, of which you should be aware before you start actively developing your site. First, there is the static media generator; if you remember back to Chapter 13, we talked about keeping your CSS and JavaScript files small and few in number, so that there is a minimum of network bandwidth required in order to view your site for the first time. The App Engine Patch comes equipped with a utility that does some very handy things. Whenever you run the manage.py update command, it automatically combines all of your JavaScript files and CSS style sheets into a single combined file. Then, it compresses the two files using the YUI Compressor, which is a Java-based tool created by Yahoo! that removes all the extraneous whitespace and comments from your static media files. It writes the output of this compression process into the _generated_media subdirectory, where your project will look for your files. The whole process makes the static media that you deploy onto the App Engine much smaller than it would have been otherwise, and will dramatically improve the overall speed of your site from a user standpoint.
If you want to make use of this utility (and I strongly suggest that you do), there are a couple of extra steps you'll need to take in order to make sure that this works the way you expect it to. First, you'll need to have Java installed and available on the PATH of your development machine so that the YUI Compressor tool can run. If you've been using Eclipse as your IDE up until this point in the book, chances are good that you've already got it on your system. Second, you need to list all of your CSS and JavaScript files in your settings.py file. Open settings.py and you'll see a section titled COMBINE_MEDIA. This is where you tell the media generator utility about each of your code files.
For sites deployed into production, you need to change the version number of the MEDIA_VERSION each time you make a change to any media files. This will change the URL path of the static media files, so that cached versions of the generated media will be replaced with updated versions. If you forget to do this, users out in the wild will still be experiencing old CSS and JavaScript until it expires in their browser's cache; this is probably not what you want!
While the compression of your static media will happen automatically whenever you run manage.py update, there is also another utility you can use to generate the media by hand. Just run the following inside your project to create the newest version of your files in _generated_media:
$ python manage.py generatemedia
App Engine Patch also comes with some basic CSS inside the blueprintcss directory that contains base styles for your HTML that's designed to cut down on your development time. While I found many of the defaults to be particularly helpful, you are free to remove it by removing the blueprintcss app from the INSTALLED_APPS of your project. Even if you don't plan to use it, keep in mind that it's present in your project. When you start creating templates for your site, you might start seeing your HTML pages behave in a strange way, with margins, padding, or other styles that you didn't create in your own CSS. If this happens, it's likely coming from this app, and you'll need to override the styles in order to change them.
Finally, if you start developing your site locally, there's one very important point to keep in mind about data: by default, if you're running the site on a development machine, the App Engine SDK writes data to a flat file in your operating system's temporary directory. Files inside this directory tend not to stick around very long; generally, they're deleted each time you restart your machine. This means that any product data, session information, or user accounts that you create on your local development machine are fleeting. Be very careful about entering new data for your site, and make sure that it's ending up in the App Engine datastore. In this chapter, when we get around to adding data, we're going to make sure that we do so on the deployed version of our app, so that important data is not wiped out.
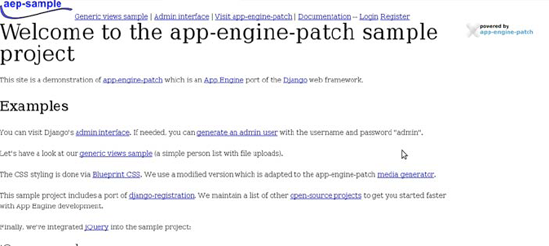
So let's take this new project for a test drive. In order to deploy your project, you just need to execute the manage.py update command that we saw in the last section. During the upload process, you should be prompted for your Google Account e-mail and password. This is just to make sure that you are an administrator of the named app and are authorized to change things; go ahead and enter them. You won't need to do this every time. After the first upload, the appcfg.py script will save a cookie on your computer so that you don't need to authenticate yourself every time after that. During the initial upload, you might also be prompted about creating a superuser account for your app. If you plan on using the admin interface to add data (which you will), then you should definitely create a superuser account now.
Provided that everything runs smoothly and the app ends up deployed without any errors, you can now view your app at the appspot.com URL. It should look something like Figure 16-3:
Since we're starting over, I'm going to scrap the Modern Musician site and create a new e-commerce store that specializes in selling coffee, tea, and other accessories that help office workers get through their often mind-numbing days.
The first thing we need to do is edit the base template files so that the look and feel of the site becomes our own. This is fairly straightforward; App Engine Patch comes equipped with a templates directory, so the first thing we need to do is create the base template files. Open the base.html template file inside this directory and have a look at its contents. There are only a couple of edits that we're going to make. We're going to replace the rest of the contents of the body section of the template with our own content block, named site_wrapper. Then, for performance reasons, we're going to move the block that contains the JavaScript includes to the bottom of the page, just before the closing body tag. Also, update the title tag to reflect the name of your own site. Here is what base.html should look like after you've finished these edits:
<!DOCTYPE html
     PUBLIC "-//W3C//DTD XHTML 1.0 Transitional//EN"
     "http://www.w3.org/TR/xhtml1/DTD/xhtml1-transitional.dtd">

<html xmlns="http://www.w3.org/1999/xhtml"
dir="{% if LANGUAGE_BIDI %}rtl{% else %}ltr{% endif %}"
xml:lang="{% firstof LANGUAGE_CODE 'en' %}"
lang="{% firstof LANGUAGE_CODE 'en' %}">
<head>
<title>{% block title %}{% endblock %} - Bleeker Street Coffee</title>
<!-- other stylesheet includes omitted here -->
{% block extra-head %}{% endblock %}
</head>
<body>
{% block site_wrapper %}{% endblock %}
{% block js %}
<script type="text/javascript" src="{{ MEDIA_URL }}combined-{{ LANGUAGE_CODE
}}.js"></script>
{% endblock %}
</body>
</html>Next, we need to create a template that will house the layout of the site, which inherits from base.html. Create a catalog.html template file and put the following template code into it:
{% extends "base.html" %}

{% load store_tags %}

{% block title %}{{ page_title }}{% endblock %}

{% block site_wrapper %}
<div id="main">
     <div id="middle">
          <div id="banner">
            <h1>
              <a href="/">
                Bleeker Street Coffee
              </a>
            </h1>
            <div id="navigation">
                <a href="/">Home</a> |
                <a href="/cart/">Cart</a>
            </div>
           </div>
           <div id="sidebar">
             {% category_list %}
             <br /><br />
             <a href="http://code.google.com/p/app-engine-patch/">
             <img src="{{ MEDIA_URL }}global/powered-by-app-engine-patch.png"
                 alt="powered by app-engine-patch" />
             </a>

           </div>
           <div id="content">
              <div id="padderIEcontent">
{% block content %}{% endblock %}
</div>
</div>
</div>
</div>
{% endblock %}You should notice a couple of things here. To start with, this example is loading a custom template tag named category_list. Obviously, because we haven't created this tag, this won't run quite yet. We're going to get to that in the next section, when we create the app to house our product catalog data. Secondly, notice that I've included a hyperlinked App Engine Patch logo as a means of tipping my hat to the developers of the App Engine Patch. If you're allowed to do this in your own project, I'd encourage you to do the same.
Before we start creating apps, have a look at the root of the App Engine Patch project. There is a simple demo Django app provided for you, named myapp. If you are having any trouble figuring out how to start adding model classes to your code, you can work off of the examples provided for you in the models.py inside this app.
Let's create the app for our catalog data. Create an app named store inside your project. The first thing we need to do is create some models that will hold catalog information in the datastore. Open the newly generated models.py inside this new app, and add the following code to it:
# -*- coding: utf-8 -*-
   from django.db.models import permalink, signals
   from google.appengine.ext import db
   from ragendja.dbutils import cleanup_relations

   class Category(db.Model):
       name = db.StringProperty()
       description = db.TextProperty()
       created_at = db.DateTimeProperty(auto_now_add=True)
       updated_at = db.DateTimeProperty(auto_now=True)
       is_active = db.BooleanProperty(default=True)

       class Meta:
           verbose_name_plural = 'Categories'1

       def __unicode__(self):
           return self.name

       @permalink
       def get_absolute_url(self):
           return ('store_category', (), { 'category_key': self.key()})

       @property
       def products(self):
           return Product.gql('WHERE category = :1', self.key())

   class Product(db.Model):
       name = db.StringProperty()
       description = db.TextProperty()
       created_at = db.DateTimeProperty(auto_now_add=True)
       updated_at = db.DateTimeProperty(auto_now=True)
       is_active = db.BooleanProperty(default=True)
is_featured = db.BooleanProperty(default=False)
price = db.FloatProperty()
category = db.ReferenceProperty(Category)
def __unicode__(self):
return self.name
@permalink
def get_absolute_url(self):
return ('store_product', (), { 'product_key': self.key()})If you've worked with Django models before, this should look fairly similar. There are only a couple of differences. First, notice that our model classes are subclasses of db.Model, which is the App Engine datastore base class. Also, the type of fields that we're declaring on the models is different, and specific to the App Engine. For example, for smaller string values, you should use db.StringProperty, much like models.CharField on Django models. Similarly, for large amounts of text that might be very long, you should use db.TextProperty, which is similar to models.TextField.
There isn't a corresponding field type in the App Engine for each of the Django model field types, but the basic ones are there and should suffice for the majority of your needs. One small adjustment we had to make is that product price is now a float field on the model instead of the Django decimal field.
More importantly, though, is the means by which we are specifying a relationship between the Category and Product models. Unfortunately, the App Engine Patch doesn't yet support many-to-many relationships between Django models using the admin interface (I'm hopeful that there will be someday soon). For now, to keep things simple, I've created a basic one-to-many relationship between categories and products; that is to say, a category can have multiple products, but each product only belongs to a single category.
Let's have a look at how this is done using the App Engine syntax. In order to understand how this works, a little bit of background on the App Engine db.Model class is in order. After each model instance is saved in App Engine's datastore, a unique key is generated for each model instance. This key is actually an instance of the google.appengine.db.Key class. Each key contains ID field of the model instance, the combined name of the app (e.g., store) and model class, and the name of your Django app (e.g., mybluedjango). Therefore, this key guaranteed to be unique across all model instances not only for your own App Engine app, but all other apps as well.
You can get the key instance of a model instance by calling the key() method on the instance. We're doing this in order to build our URLs for the pages. When used in the context of URLs and in templates, the key instance is converted into a unicode string. You might be wondering why we don't just use a slug field that has keyword-rich URLs for search engine spiders; the reason is that there is no way to apply a unique constraint on a db.Model field. Creating a StringProperty field to act as a slug field is a bad idea, as it would be possible to end up with multiple model instances with the same key.
In order to create the relationship, we create a ReferenceProperty on the Product model, which references the Category model class. On each Product instance, this will act as a foreign key field that references the key value of the associated category instance. Then, on the Category model, we create a custom method named products, which retrieves all of the products that have been assigned to that category. Note the property decorator on this function, so this method is not actually callable.
Because we want to make use of these models using the Django admin interface, we need to register these models with the admin site. To do this, create a file named admin.py inside your store app and enter the following code into it:
from django.contrib import admin
from store.models import Product, Category

class CategoryAdmin(admin.ModelAdmin):
list_display = ('name', 'description', 'created_at', 'updated_at')
     exclude = ('created_at', 'updated_at')

admin.site.register(Category, CategoryAdmin)

class ProductAdmin(admin.ModelAdmin):
    list_display = ('name', 'description', 'created_at', 'updated_at')
    exclude = ('created_at', 'updated_at')

admin.site.register(Product, ProductAdmin)
Before moving on, let's create the category list for the left-hand column on the site. Create a directory inside of store named templatetags, and inside of it, add two files: the standard __init__.py and a store_tags.py file. Inside the latter, add the following:
from django import template
from google.appengine.ext import db
from store.models import Category

register = template.Library()

@register.inclusion_tag("store_category_list.html")
def category_list():
    query = db.Query(Category)
    query.filter('is_active = ', True)
    query.order('name')
    categories = query.fetch(20)
    return {'categories': categories }
This references a template file that doesn't yet exist. Next to templatetags, there should be another directory named templates. This is where we're going to put all of the template files for the store app. In it, create a file named store_category_list.html, and add in the following code for the links:
<h3>Categories</h3>
<ul id="category_list">
{% for category in categories %}
    <li>
    <a href="{{ category.get_absolute_url }}">
        {{ category.name }}
    </a>
    </li>
{% endfor %}
</ul>
There's really nothing new here. For those of you who noticed that the templates directory we just created isn't part of the TEMPLATE_DIRS tuple for our project: that's a good observation. However, don't worry about this issue. I'll discuss this further when we get to the next section, where we create the template files for each app in our project.
For a moment, let's go back to the actual code of the category_list() function. db.Query(Category) generates an instance of google.appengine.db.Query, which represents all Category instances from which we can actually query Category instances. Similar to Django syntax, you can also use a method named filter() in order to trim down the Query object result set based on some criteria you specify. The filter method we used previously creates a Query object that will only return categories where is_active is True. You can also specify how a Query object will order its results by using the order() method and passing in a field name. Just like Django, you could reverse the order by prefacing the field name with a dash (-):
>>> query.order('-name')Once you have a Query object, you need to call one of the methods that will actually execute the query you've just constructed. Calling the get() method on this Query object, for example, will return one result: the first result that it finds. Because there is more than one category, this clearly won't do.
The fetch() method is the one you should use when you're interested in a list of results. The fetch() method requires that you pass in an integer value for the number of results that you would like returned to you. At the time I'm writing this, the maximum number of results you can query for using the fetch() method is 1,000. You cannot simply make a query for every single model instance in the datastore.
Using the fetch() method properly in your projects requires using the second optional argument you can pass in, which represents an offset. Using this, you can paginate your results across multiple pages, like we did in Chapter 8 when we built the search results pages. The offset of the first result is always zero. Therefore, to get the first 20 results, you could make the following query:
>>> query.fetch(20, 0)
The offset is zero by default, so this is the same as calling query.fetch(20). Now, if you want to get at the next 20 results, you'd use the following:
>>> query.fetch(20, 20)
This retrieves the 20 instances, starting with the 21st result. To get the third page, starting with the 41st result, you would use an offset of 40:
>>> query.fetch(20, 40)
And so forth. You can automate this with some very simple math based on the page number of records you're interested in retrieving. The offset is calculated using the following formula:
OFFSET = RESULTS_PER_PAGE * (PAGE_NUMBER - 1)
For the simple examples in this chapter, I'm going to limit my queries to the first 20 results, and I'm going to hard-code the value of 20 inside my fetch() methods. For a project of any substantial size, however, you should take the extra effort and implement a pagination system, so that the number of results isn't peppered throughout fetch() method calls all over your site.
To complete the base template files, we need to add in the CSS that will style up the base templates that we just created. Inside your project, there should be a directory named media. Open the look.css file inside there, empty the contents, and replace it with this CSS:
*{padding:0;margin:0;}
body{font-family:Verdana;font-size:0.9em;}
.bn{border:none;border:0;}
.fl{float:left;}.fr{float:right;}
.cb{clear:both;}

div#main{
    width:100%; }

div#middle{
    width:900px;
    margin: 0 auto; }
div#banner{
height:100px;
background-color:green;
position:relative; }
div#banner h1{
padding-top:25px;
padding-left:10px; }
div#banner h1 a{
color:White;
text-decoration:none;
font-size:2em; }
div#navigation{
position:absolute;
bottom:0;
right:0;
padding:5px; }
div#navigation a{
color:yellow;
font-weight:bold; }
div#sidebar{
float:left;
width:200px;
padding-top:10px;
text-align:left; }
h3{
background-color:Maroon;
color:White;
font-size:1.0em;
padding:3px;
font-weight:bold; }
div#content{
float:left;
width:700px; }
div#padderIEcontent{
padding:10px;
padding-left:30px; }
h1, summary{
font-size:1.3em;
font-weight:bold; }
ul#category_list{
list-style:None;
padding:0;
margin:0;padding-left:5px; }
ul#category_list li a{
color: Maroon;
text-decoration:None;
font-weight:bold; }
ul#category_list li a:hover{
text-decoration:underline; }We're almost at the end of a book that's about creating web sites with Django using the Python programming language and so far, there's yet to be any reference to old-time jazz musicians or John Cleese quotes. I apologize for this. As an act of contrition, I'm going to name the shopping cart app that we'll use to manage shopping cart information on the App Engine after one of my favorite jazz musicians: Dave Brubeck.
Create an app named brubeck inside your project. You certainly know the drill by now; we're going to starting by creating some model classes in models.py:
# -*- coding: utf-8 -*-
from django.db.models import permalink, signals
from google.appengine.ext import db
from ragendja.dbutils import cleanup_relations

from store.models import Product

class CartItem(db.Model):
    quantity = db.IntegerProperty()
    date_added = db.DateTimeProperty(auto_now_add=True)
    cart_id = db.StringProperty()
    product = db.ReferenceProperty(Product,
                                   collection_name='products')

    @property
    def total(self):
        return self.quantity * self.product.price

    @property
    def name(self):
        return self.product.name

    @property
    def price(self):
        return self.product.price

    def get_absolute_url(self):
        return self.product.get_absolute_url()
This is a fairly simple model class; there are really no new concepts here. We have a ReferenceProperty acting as a reference to a Product instance. There is also a field for storing cart IDs. This begs the question: how will we generate cart IDs? Create a file named cart.py inside the brubeck app and add the following code:
from google.appengine.ext import db
from brubeck.models import CartItem
from store.models import Product
from decimal import Decimal

import base64
import os

CART_ID_SESSION_KEY = 'cart_id'

def get_cart_id(request):
    cart_id = request.session.get(CART_ID_SESSION_KEY, '')
    if not cart_id:
        cart_id = _generate_cart_id()
        request.session[CART_ID_SESSION_KEY] = cart_id
    return cart_id

def _generate_cart_id():
    return base64.b64encode(os.urandom(36))

def add(request, product_key):
    postdata = request.POST.copy()
    quantity = int(postdata.get('quantity', 1))
    product = Product.get(product_key)
    item = CartItem.all().filter('product = ', product)
        .filter('cart_id = ', get_cart_id(request)).get()
    if not item:
        item = CartItem()
        item.product = product
        item.quantity = quantity
        item.cart_id = get_cart_id(request)
        item.put()
    else:
        item.quantity = item.quantity + quantity
        item.put()

class Cart(object):
    def __init__(self, request):
        cart_id = get_cart_id(request)
        query = CartItem.all().filter('cart_id = ', cart_id)
        self.items = query.fetch(20)
        self.subtotal = Decimal('0.00')
        for item in self.items:
            self.subtotal += Decimal(str(item.total))

def get(request):
    return Cart(request)

def update_item(item_key, quantity):
    key = db.Key(item_key)
item = CartItem.get(key)
if item:
if quantity <= 0:
item.delete()
else:
item.quantity = int(quantity)
item.put()
def remove_item(item_key):
key = db.Key(item_key)
item = CartItem.get(key)
if item:
item.delete()This is all very familiar. In order to track items in customers' shopping carts, we need a way of uniquely identifying each customer. We do this by generating a random string of characters for the cart ID, which we write to a cookie on the customer's browser. We store this unique value along with each item that the customer has added to their cart. When we need to get all of the items in any given customer's shopping cart, we just load the ones that have the cart ID matching that of the value stored in the cookie.
Notice that when we go to save newly generated cart items, or update existing ones, we call put() on the instance and not save().
The only major difference between this and the cart.py module we created in Chapter 4 is that we've created a custom Cart class to hold a subtotal Decimal object and a list of CartItem objects, which is a slightly more object-oriented approach to passing cart data around between the model and the view.
Now, create a file named forms.py and add this to it:
from django import forms
from brubeck.models import CartItem

class ProductAddToCartForm(forms.ModelForm):
    class Meta:
        model = CartItem
        fields = ('quantity',)

    quantity = forms.IntegerField(widget=forms.TextInput(attrs={'size':'2',

                                                                'class':'quantity'}),
                                  error_messages={'invalid':'Please enter a valid
quantity.'},
                                  min_value=1)
This is the form class that we will use on the product page template.
Now, in order for us to test that things are working the way that they're supposed to, we need to add some data to our project. This is done simply by using the Django admin interface provided for us. After your app has been deployed onto the app engine, just go to http://your-app-name.appspot.com/admin/, log in using the superuser account you created earlier, and add some categories, as well as products to go with them.
Now that we have the back end set up, we need to focus our attention on the interface. Let's start with the view functions and the URL entries that we need to create for the store app. Open the store/views.py file and add the following:
from django.shortcuts import render_to_response
from django.template import RequestContext
from google.appengine.ext import db
from django.core import urlresolvers
from django.http import HttpResponseRedirect

from store.models import Category, Product
from brubeck.forms import ProductAddToCartForm
from brubeck import cart

def index(request,
          template_name='store_index.html'):
    page_title = 'Welcome'
    query = db.Query(Product)
    query.filter("is_featured =", True)
    query.filter("is_active =", True)
    featured_products = query.fetch(20)
    return render_to_response(template_name, locals(),
        context_instance=RequestContext(request))

def show_category(request, category_key,
                  template_name="store_category.html"):
key = db.Key(category_key)
    query = Category.gql('WHERE __key__ = :1 AND is_active = True', key)
    category = query.get()
    if not category:
        raise Http404('Category not found!')
    products = category.products
    page_title = category.name
    return render_to_response(template_name, locals(),
        context_instance=RequestContext(request))

def show_product(request, product_key,
                 template_name="store_product.html",
                 form_class=ProductAddToCartForm):
    key = db.Key(product_key)
    query = Product.gql('WHERE __key__ = :1 AND is_active = True', key)
    product = query.get()
    if not product:
        raise Http404('Product not found!')     page_title = product.name
    if request.method == 'POST':
        postdata = request.POST.copy()
        form = form_class(postdata)
        if form.is_valid():
            cart.add(request, product_key)
            redirect_url = urlresolvers.reverse('show_cart')
            return HttpResponseRedirect(redirect_url)
else:
form = form_class()
return render_to_response(template_name, locals(),
context_instance=RequestContext(request))Now, create a urls.py file inside store, and add the URL entries:
from django.conf.urls.defaults import *
#from django.core.urlresolvers import reverse

from brubeck.forms import ProductAddToCartForm

urlpatterns = patterns('store.views',
    (r'^$', 'index', {'template_name':'store_index.html'},'store_home');
    (r'^category/(?P<category_key>.+)/$', 'show_category',
        {'template_name': 'store_category.html'}, 'store_category');
    (r'^product/(?P<product_key>.+)/$', 'show_product',
        {'template_name': 'store_product.html',
         'form_class': ProductAddToCartForm},
             'store_product');
)
The one thing you might notice here is that we've specified the name of the form class as a keyword argument for the show_product() view function. This way, if anyone using this app ever wants to use a different form class, they can just change the form class in the URL, and the view will automatically use the new form instead.
Switch gears for a second and go back to the brubeck shopping cart app. Inside views.py, add this single view function for the cart page:
from django.shortcuts import render_to_response
from django.template import RequestContext
from django.core import urlresolvers
from django.http import HttpResponseRedirect

from brubeck.models import CartItem
from brubeck.forms import ProductAddToCartForm
from brubeck import cart

def show_cart(request, template_name='brubeck_cart.html'):
    if request.method == 'POST':
        postdata = request.POST.copy()
        submit = postdata.get('submit','')
        item_key = postdata.get('cart_item_id')
        if postdata.get('submit','') == 'Update':
            quantity = postdata.get('quantity', 1)
            cart.update_item(item_key, quantity)
        if postdata.get('submit','') == 'Remove':
            cart.remove_item(item_key)
    shopping_cart = cart.get(request)
    page_title = u'Shopping Cart'
return render_to_response(template_name, locals(), context_instance=RequestContext(request))
Then, create a urls.py file and add the one URL entry:
from django.conf.urls.defaults import *

urlpatterns = patterns('brubeck.views',
    (r'^$', 'show_cart', {'template_name':'brubeck_cart.html'}, 'show_cart');
)
Now, we need to create our template files for each app. In the rest of the book, we created a single directory for our templates, and divided up the template files into subdirectories named after the apps the templates for which they were created. In this chapter, we're going to take a slightly different approach. Django allows you to create a subdirectory named templates inside each individual project app. When you reference the name of a template file, it will check the template directories you specified in TEMPLATE_DIRS in settings.py. If it doesn't find it there, it will then turn to the templates subdirectories that it finds inside each of your INSTALLED_APPS. This is particularly handy if you plan on distributing your apps; that way, you can include default template files with your app.
This is what we're going to do for this project. Of course, going this route, we have to be careful to avoid any naming collisions between templates. It would be all too easy for a group of people to decide that they should create an index.html to act as the home page for their given app. In this case, Django will load the first template file that it finds whenever it needs to load this template file with this name. That means that the first app with a templates/index.html will always be used when index.html is referenced, and the index.html in the apps that follow will be effectively hidden. Also, if a developer ever creates a single index.html file inside one of the listed TEMPLATE_DIRS, this one will override any other index.html provided at the app level.
To avoid this, I'd recommend giving your template files names that are prefaced by the name of the app in which they are contained. Earlier, when we created the template file for the category list of links for the left column, we called it store_category_list.html. As long as we follow the convention of prefacing the template name with the app name, the likelihood of a naming problem should be greatly reduced.
The store app requires three new template files: one for the homepage, one for the category page, and one for the product page. First, create one for the homepage called store_index.html and inside, enter this:
{% extends "catalog.html" %}

{% block content %}
    <h1>Welcome</h1>
    <br />
    {% for p in featured_products %}
        {% if forloop.first %}
            <h3>Featured Products</h3>
        {% endif %}
        <a href="{{ p.get_absolute_url }}">
            {{ p.name }}
        </a>
        <br />
    {% endfor %}
{% endblock %}
Next, create the one for category page. Create a file called store_category.html and add:
{% extends "catalog.html" %}

{% block content %}
    <h1>{{ category.name }}</h1>
    <br />
    {% for p in products %}
        <a href="{{ p.get_absolute_url }}">
            {{ p.name }}
        </a>
        <br />
    {% endfor %}
{% endblock %}
Now, to top the store app off, add a store_product.html template file and put this in it:
{% extends "catalog.html" %}

{% block content %}
    <h1>{{ product.name }}</h1>
    <br />
    Price: ${{ product.price }}
    <br />
    Description: {{ product.description }}
    <br /><br />
    <form action="." method="post">
        {{ form }}
        <br />
        <input type="submit" value="Add To Cart" />
    </form>
<br />
{% endblock %}
We're almost through with all of this mind-numbingly repetitively template code. We just need to create a template file for the cart page. Inside the brubeck app, create a templates directory and then, inside of that, create a file named brubeck_cart.html. Enter the following code into it for the cart page:
{% extends "catalog.html" %}

{% block content %}
    <table width="100%" id="shopping_cart">
        <summary>Shopping Cart</summary>
        <thead>
        <tr>
            <th>Product</th>
            <th>Quantity</th>
            <th></th>
            <th></th>
            <th>Price</th>
            <th>Total</th>
        </tr>
        </thead>
        <tfoot>
<tr>
<td colspan="6" style="text-align:right;">
Cart Subtotal: ${{ shopping_cart.subtotal }}
<br /><br />
<input type="submit" value="Checkout" />
</td>
</tr>
</tfoot>
{% if shopping_cart.items %}
{% for item in shopping_cart.items %}
<tr>
<td width="300px">
<a href="{{ item.get_absolute_url }}">
{{ item.name }}
</a>
</td>
<td>
<form action="." method="post">
<input type="text" name="quantity" value="{{ item.quantity }}" size="2" />
<input type="hidden" name="cart_item_id" value="{{ item.id }}" />
</td>
<td>
<input type="submit" name="submit" value="Update" />
</form>
</td>
<td>
<form action="." method="post">
<input type="hidden" name="cart_item_id" value="{{ item.id }}" />
<input type="submit" name="submit" value="Remove" />
</form>
</td>
<td>${{ item.price }}</td>
<td>${{ item.total }}</td>
</tr>
{% endfor %}
{% else %}
<tr>
<td colspan="6">
Your cart is empty.
</td>
</tr>
{% endif %}
</table>
{% endblock %}For the purposes of styling up the table on the cart page, and in the interest of demonstrating how to use the media generator utility that comes with the App Engine Patch, find the subdirectory inside the brubeck app called media, and add a file named brubeck.css to it. Add the following CSS bits:
table#shopping_cart th{
    background-color:Maroon;
    color:White;
}
table#shopping_cart td{
height:30px;
}Now, you just need to make sure that this code is included when the generatemedia.py script is run. Inside settings.py, find the COMBINE_MEDIA section and add the brubeck.css file to the CSS section. Note that you don't need to include the media directory in the path of the file you specify here, as the utility will scan these directories automatically.
'combined-%(LANGUAGE_DIR)s.css': (
        'global/look.css',
        'brubeck/brubeck.css',
    ),
And that's it! Make sure these two new apps are in INSTALLED_APPS, and that the URLs modules you created for each app are included in the urlpatterns in urls.py in the root of your project. After this, your app should be ready to deploy on the App Engine. Run the manage.py update utility, enter your password if need be, and your app should be available at the appspot.com URL, preceded by your app name.
When working with models for the Google datastore, you need to be aware of indexes, how they are used, and, most importantly, how they are created. When you make queries to the datastore, there needs to be an index defined for each particular query that your application will make while running in production. These queries need to be managed through the use of a file named index.yaml in the root of your project.
The index.yaml file contains a single entry, named indexes, that lists the indexes required by the queries your application will make to the datastore. The App Engine Patch comes with this YAML file, which contains a couple of indexes that have been defined for your application by default:
indexes:
- kind: django_admin_log
  properties:
  - name: content_type
  - name: object_id
  - name: action_time

- kind: django_admin_log
  properties:
  - name: user
  - name: action_time
    direction: desc
The model to which the index belongs is specified using the kind attribute, and the fields to which the index pertains are listed using the properties attribute, with a name attribute for each field you want to index.
The good news is that for most simple queries, these indexes are generated automatically for you when you run the development server on your local machine. The development server checks for any indexes that are missing on models or fields that are being used in each query and automatically adds them to this file. You also have the option of managing these indexes manually. Take a look in the index.yaml file again; below the index definitions you should see a line reading:
# AUTOGENERATED
Any indexes that are added by the development server automatically when your queries execute will be added below this line, and updated as needed by your application queries or model field changes. Any indexes that you want to add or manage manually should go above this line. You have the option of moving any auto-generated indexes from below this line to the manual area above.
The tricky part is in making sure that the indexes are up to date for your application before you deploy it into production. While this happens automatically for you, it will only happen if each datastore query in your code is executed on the development server. You can do this by firing up the development server and walking through your web application in its entirety every time you make a change, but as your project gets larger, this approach quickly becomes too large a task to handle yourself.
The lesson here is that you must always have good tests, with sufficient code coverage, if you want your code to run on the App Engine. For example, let's say that you have a block of code in your application that looks like this:
if condition1:
    # some query here.
elif condition2:
    # some other query here.
else:
    # yet another query here.
For this code, you need to create three separate test cases that handle each of these three possible conditions so that the indexes required by these three queries get updated. As mentioned in Chapter 14, you should be writing automated test cases to make sure that your application is working as expected. On the App Engine, this polite suggestion becomes almost mandatory for maintaining indexes on larger applications.
Before going too much further in developing your project, you should read the App Engine documentation[81] to learn more about indexes and how they are related to your project's queries.
Note
If you notice that the # AUTOGENERATED is there, but the indexes still aren't being added, you may be dealing with an issue[82] where the indexes won't be generated if the line endings of your file are '
'. This tends to happen when you're using an editor that appends odd line ending characters when you edit this file, such as on Windows machines. If this is happening to you, you should be able to get the indexes to generate by either deleting the file or fixing the line endings.
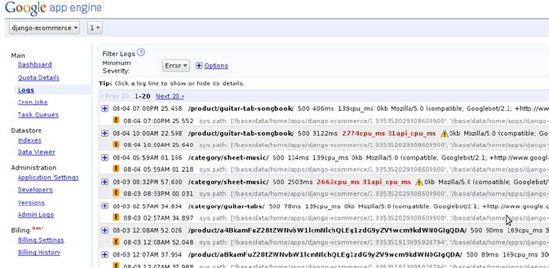
In the course of developing your Django project, you'll likely run into some server errors. Fortunately, the App Engine console keeps a log of these errors that you can use to see what exactly went wrong in your code. Go back to http://appengine.google.com/, and log in using your Google Account. You should be presented with a list of your App Engine apps. Click the one that you're working on, and you'll be taken to the dashboard for that project.
In the navigation column at the far right, you'll see one link a couple below the dashboard one titled "Logs," Click this link and you'll be taken to a page summarizing the list of most recent server errors. This provides valuable traceback information when your application hits an error.
If you're a seasoned Python developer, and you've grown accustomed to being able to manipulate large quantities of model data inside a Python shell using simple commands, you might be a little disappointed that this isn't available to you. As a matter of fact, it's as simple as using the --remote argument after the manage.py shell command:
python manage.py shell --remote
This command allows you to query for and edit model instances in the remote datastore just as if they were on your local machine.
Also, if you're interested in doing any network programming, the App Engine provides its own API for that via the urlfetch module. You would use this API if you're interested in integration with a third-party payment processor, like the examples we created for Authorize.Net or Google Checkout back in Chapter 5. Wherever you use the urllib2 or httplib modules to create connections and get responses, you would just replace it with the following urlfetch syntax:
from google.appengine.api import urlfetch

url = 'http://www.authorize.net/path/'
postdata = {'name1': 'value1', 'name2': 'value2'}
response = urlfetch.fetch(url, payload=postdata)
content = response.content
# do something with your content here.
Note that the bandwidth you consume in making network calls from within your app is billable per the terms of service agreement, once you've surpassed the free amount provided.
If this chapter was your first introduction to using Django on the Google App Engine, consider yourself very lucky. Those of us who were working with Django when the App Engine was first released back in 2008 were extremely excited at the thought of being able to host our Django projects on the App Engine. That excitement quickly degenerated into disappointment, as we realized that while the App Engine infrastructure supported Django in theory, there were enough incompatibilities to dash our hopes. Between the missing admin interface, the lack of Django sessions support, and the fact that all of the data model classes needed to be changed, it seemed that it just wasn't possible without rewriting all of our existing code almost entirely from scratch.
Django developers owe Waldemar Kornewald and the other developers of the App Engine Patch project a debt of gratitude. Thanks to them, most of the comforts of Django that we all love are very real possibilities on the App Engine. The App Engine is constantly changing, and I suspect that it will continue to do so in coming years. I invite you to read the documentation, both for the App Engine and the Django App Engine Patch project, to learn more in-depth about their capabilities. Go forth, create your own apps, and try to have as much fun as you can in the process.