Plasma is the desktop developed and distributed by KDE (the K Desktop Environment ). It is often referred to as simply the KDE desktop. Plasma includes the standard desktop features, such as a window manager and a file manager, as well as an extensive set of applications that cover most Linux tasks. The KDE Plasma version of Fedora Linux is called the Fedora KDE Plasma Desktop and is available as a separate desktop DVD from https://spins.fedoraproject.org/. The Plasma desktop is developed and distributed by the KDE Project. KDE is open source software provided under a GNU Public License and is available free of charge along with its source code. KDE Plasma development is managed by the KDE Core Team. You can install it as an alternate desktop on a GNOME system by installing plasma-desktop.
The KDE software development and distribution is organized into three projects: Plasma, Applications, and Projects. KDE Applications include numerous applications written specifically for KDE Plasma are accessible from the desktop. These include editors, photo and image applications, sound and video players, and office applications. Some applications have the letter K as part of their name, for example, KOrganizer. On a system administration level, KDE provides several tools for managing your system, such as the Discover and Apper Software Managers, and the KDE system monitor. KDE applications also feature a built-in Help application. See https://www.kde.org/applications/ for a list and descriptions of current applications.
KDE Frameworks provides support libraries designed to work with the Qt libraries that KDE plasma and applications depend on. Frameworks is designed to be cross-platform, enabling any KDE application to run on systems that support the Qt libraries. Frameworks can be used as a basis for any custom operating system, such as LXQt. KDE Framework packages have the prefix kf5, such as the kf5-filesystem that provides support for the KDE filesystem. Development for Plasma, Frameworks, and Applications proceed at different paces. The KDE Frameworks version used in Fedora 28 Plasma Desktop is 5.46.0, whereas the KDE Plasma version is 5.12.5.
Note
As as noted in Chapter 6 for GNOME, you can install the same third-party multimedia support and codecs on KDE from the RPM Fusion repository, as well as dvdcss support from the Livna repository.
KDE Websites
Website | Description |
|---|---|
KDE website | |
KDE Plasma desktop website | |
KDE Applications website | |
KDE documentation site | |
Site for the Qt company | |
KDE Plasma desktop themes | |
KDE mailing lists |
KDE, initiated by Matthias Ettrich in October 1996, is designed to run on any UNIX implementation, including Linux, Solaris, HP-UX, and FreeBSD. The official KDE website is https://www.kde.org , which provides news updates, download links, and documentation. Several KDE mailing lists are available for users and developers, including announcements, administration, and other topics. Detailed documentation for the KDE desktop and its applications is available at https://docs.kde.org . Development support can be obtained at the KDE Techbase site at https://techbase.kde.org . Most applications are available on the Fedora Linux repositories and can be installed directly from the Discover Software and Apper software managers. Various KDE websites are listed in Table 9-1. KDE uses as its library of GUI tools the Qt library, currently developed and supported by the Qt company, owned by Digia ( https://www.qt.io ). It provides the Qt libraries as open source software that is freely distributable, though a commercial license is also available.
KDE Plasma 5
The KDE Plasma 5 release is a major reworking of the KDE desktop. KDE Plasma 5.12.5 is included with the Fedora Linux 28 distribution. Check the Fedora Linux and KDE sites for detailed information on KDE 5.
https://www.kde.org/announcements/plasma5.0/
For features added with KDE Plasma 5.5, check:
https://www.kde.org/announcements/plasma-5.12.0.php
For features added with KDE Plasma 5.12.5 (current Fedora Linux KDE edition), check:
https://www.kde.org/announcements/plasma-5.12.5.php/
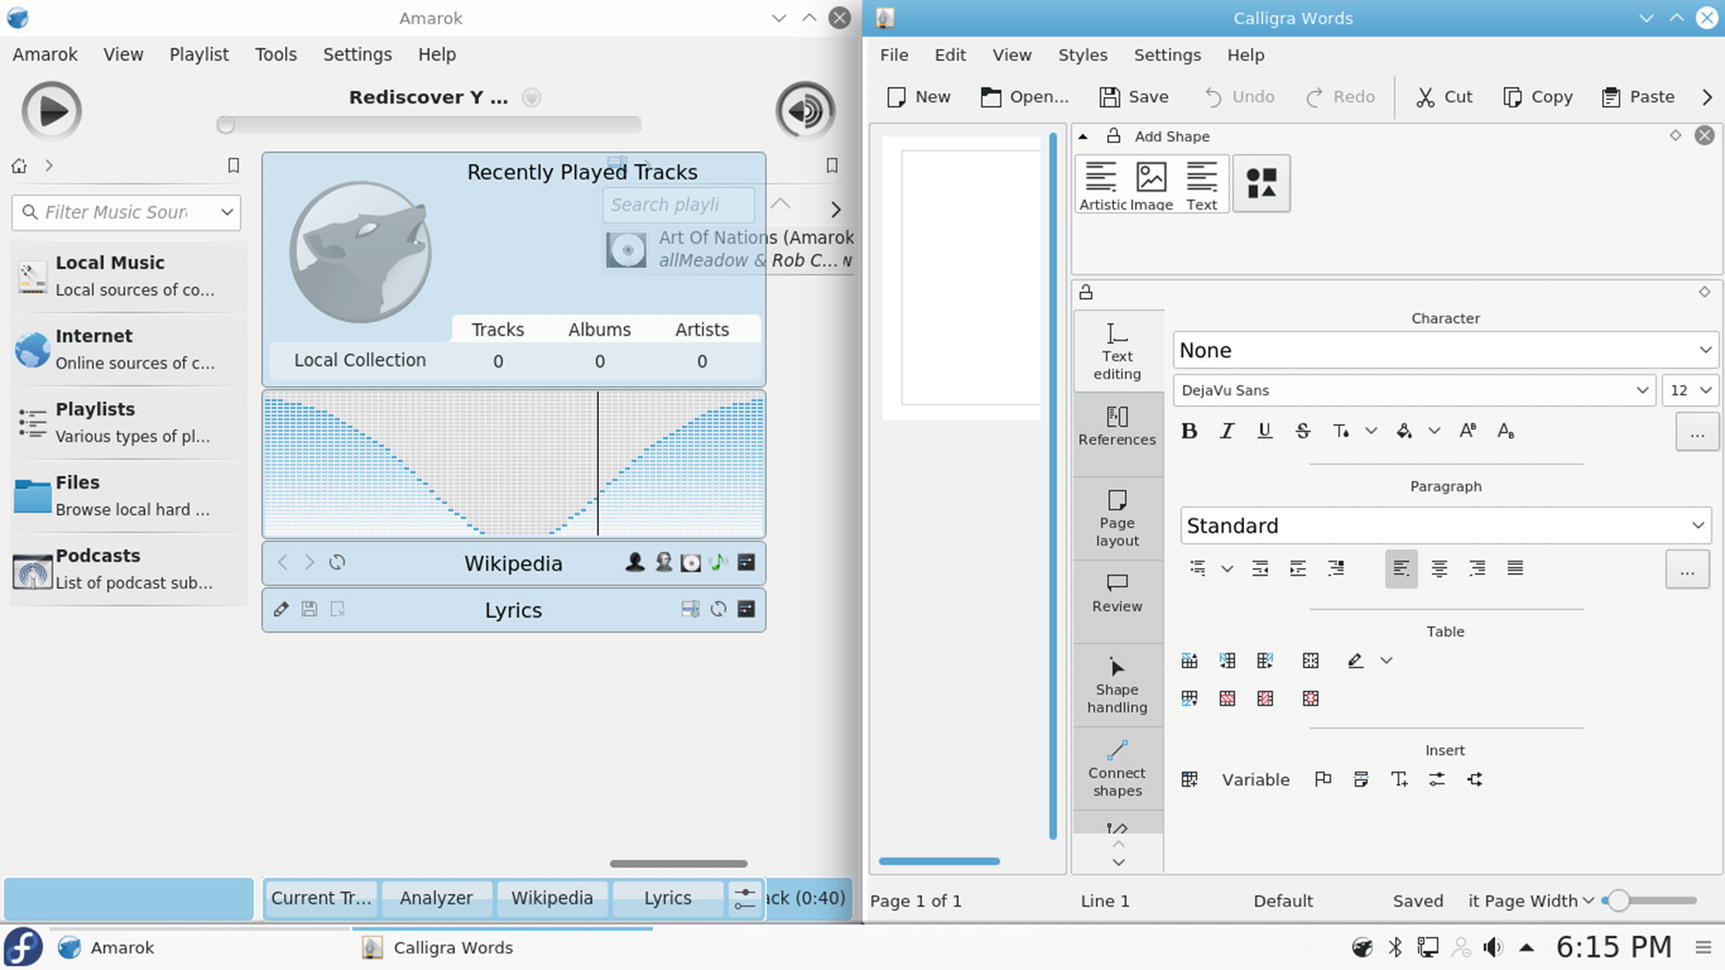
KDE development is organized into a plasma and applications releases. The plasma release covers the desktop interface (the Plasma desktop shell), and the applications release covers KDE applications. Plasma has containments and plasmoids (also called widgets). Plasmoids operate similarly to applets, small applications running on the desktop or panel. Plasmoids operate within containments. On KDE 5, there are two Plasma containments, the panel and the desktop. In this sense, the desktop and the panel are features of an underlying Plasma operation. They are not separate programs. Each has their own set of plasmoids.
Each containment has a toolbox for configuration. The desktop has a toolbox at the top left corner, and panels will have a toolbox on the right side. The panel toolbox includes configuration tools for sizing and positioning the panel. KDE also supports activities, which are multiple plasma desktop containments, each with their own set of active plasmoids (widgets) and open windows.
SDDM
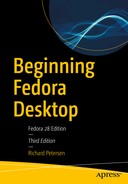
SDDM Display Manager, login screen
Upon choosing a user icon and entering the password, press Enter or click the login button at the right end of the password text box. Your KDE session then starts up.
If you have more than one desktop installed on your system, such as Cinnamon, Mate, or Xfce, then a Plasma menu item is displayed as one of the alternatives. Use this menu to choose a different desktop to log in to.
You can change the theme of the login greeter using the Login Screen (SDDM) entry in the Startup and Shutdown dialog (GNOME Settings ➤ Startup and Shutdown in the Workspace section). The theme section lists available theme. Currently, only Breeze is listed. To change the background image, click on a theme to display it in the Customize section to the right. Then click on the Background icon and choose the Load from File option from the pop-up menu. On the Advanced tab, you can choose the default user, the desktop for your session, and whether to automatically log in. You can also choose a cursor theme and an alternative desktop (session). You can also manually configure SDDM using the /etc/sddm.conf file.
The Plasma Desktop
Plasma Keyboard Shortcuts
Keys | Description |
|---|---|
Alt+F1 | Kickoff menu |
Alt+F2 | Krunner, command execution, entry can be any search string for a relevant operation, including bookmarks and contacts, not just applications |
Up/Down arrows | Move among entries in menus, including Kickoff and menus |
Left/Right arrows | Move to submenus menus, including Kickoff and Quick Access submenus menus |
Enter | Select a menu entry, including a Kickoff or QuickAccess |
PageUp, PageDown | Scroll up fast |
Alt+F4 | Close current window |
Alt+F3 | Window menu for current window |
Ctrl+Alt +F6 | Command Line Interface |
Ctrl+Alt +F8 | Return to desktop from command line interface |
Ctrl+r | Remove a selected widget |
Ctrl+s | Open a selected widget configuration's settings |
Ctrl+a | Open the Add Widgets window to add a widget to the desktop |
Ctrl+l | Lock your widgets to prevent removal, adding new ones or changing settings |
Alt+Tab | Cover Switch or Box Switch for open windows |
Ctrl+F8 | Desktop Grid |
Ctrl+F9 | Present Windows Current Desktop |
Ctrl+F10 | Present Windows All Desktops |
Ctrl+F11 | Desktop Cube for switching desktops |
To configure your desktop, you use the System Settings dialog (Computer| System Settings), which lists icons for dialogs such as Workspace Theme, Font, Icons, Applications Style Desktop Behavior, Search, Application Style, Window Management, Driver Manager, and Bluetooth. Workspace Theme lets you choose desktop, cursor, and splash themes. Desktop Behavior is where you can set desktop effects and virtual desktops. Windows Management controls window display features like window switchers, title bar actions, and screen edge actions.
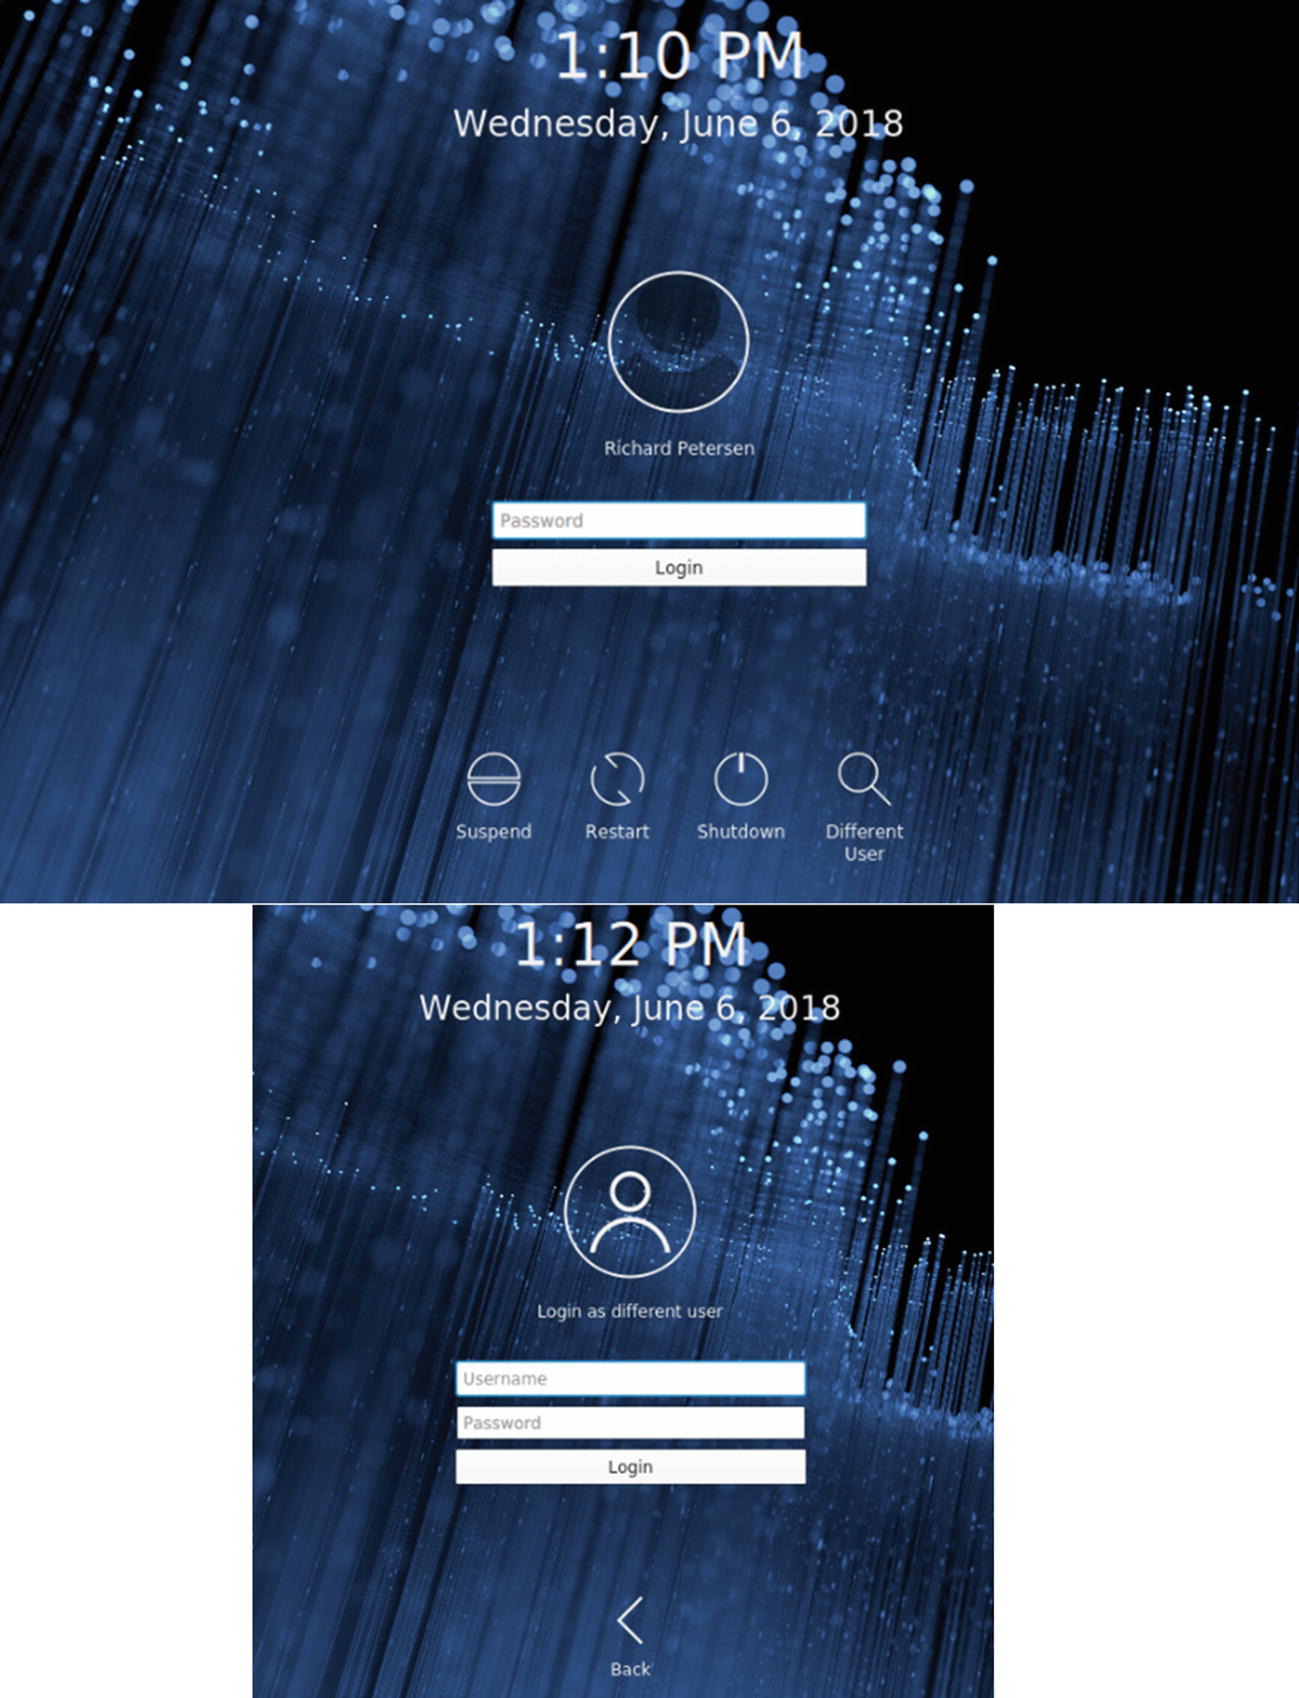
The Plasma desktop
The KDE Help Center
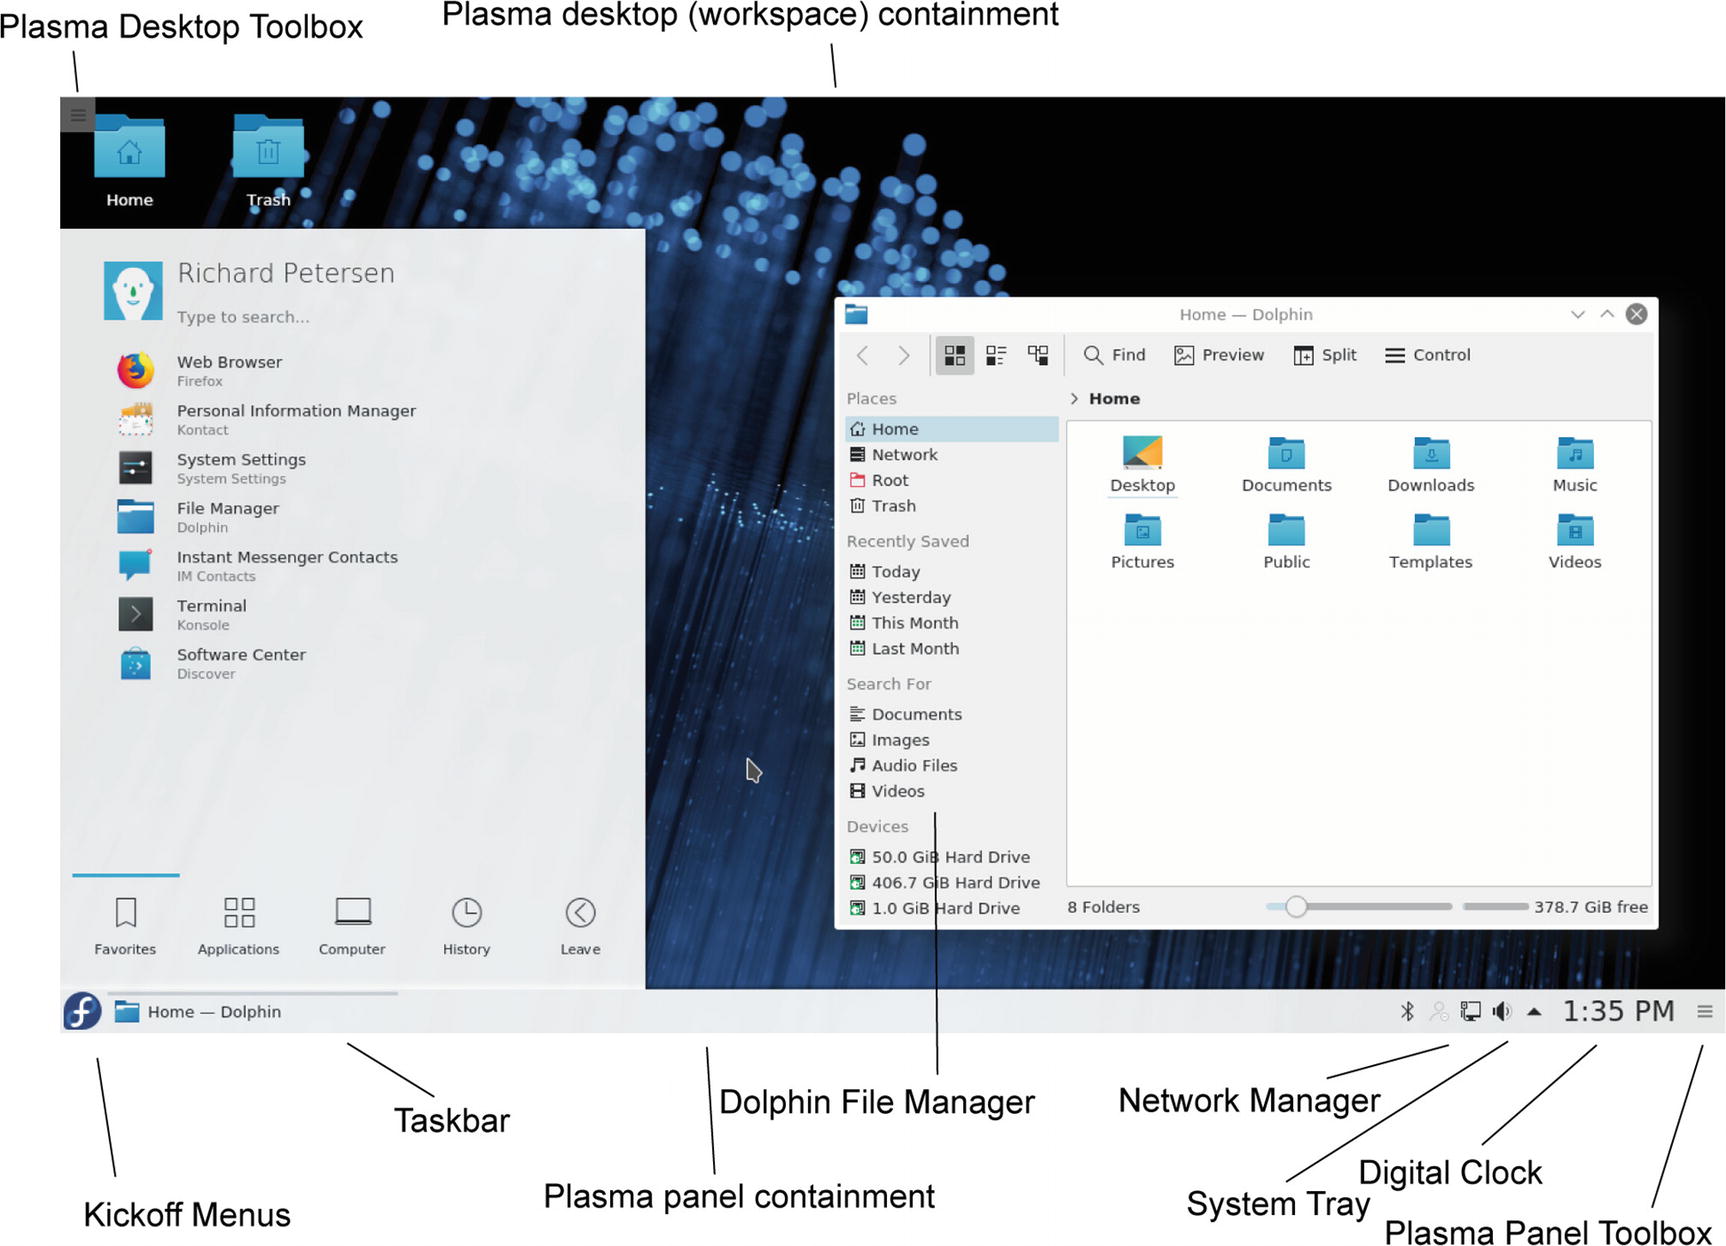
The KDE Help Center provides a browser-like interface for accessing and displaying KDE Help files and Linux Man and info files (see Figure 9-3). It may not be installed by default. Install the khelpcenter package. The same documentation is available at https://docs.kde.org . You can start the Help Center by searching for “help” in the search box of the Kickoff Applications menu. The Help window displays a sidebar that holds two tabs, one listing contents and one providing a glossary. The main pane displays currently selected document. A help tree on the contents tab in the sidebar lets you choose the kind of Help documents you want to access. Here you can choose KDE manuals, Man pages (UNIX manual pages), or info documents (Browse info Pages), or even application manuals (Application Manuals). Online Help provides links to KDE websites such as the KDE user forum and the KDE tech base sites. Click the Table of Contents button to open a listing of all KDE help documents, which you can browse through and click on to open.
KDE Help Center
Desktop Backgrounds (Wallpaper)
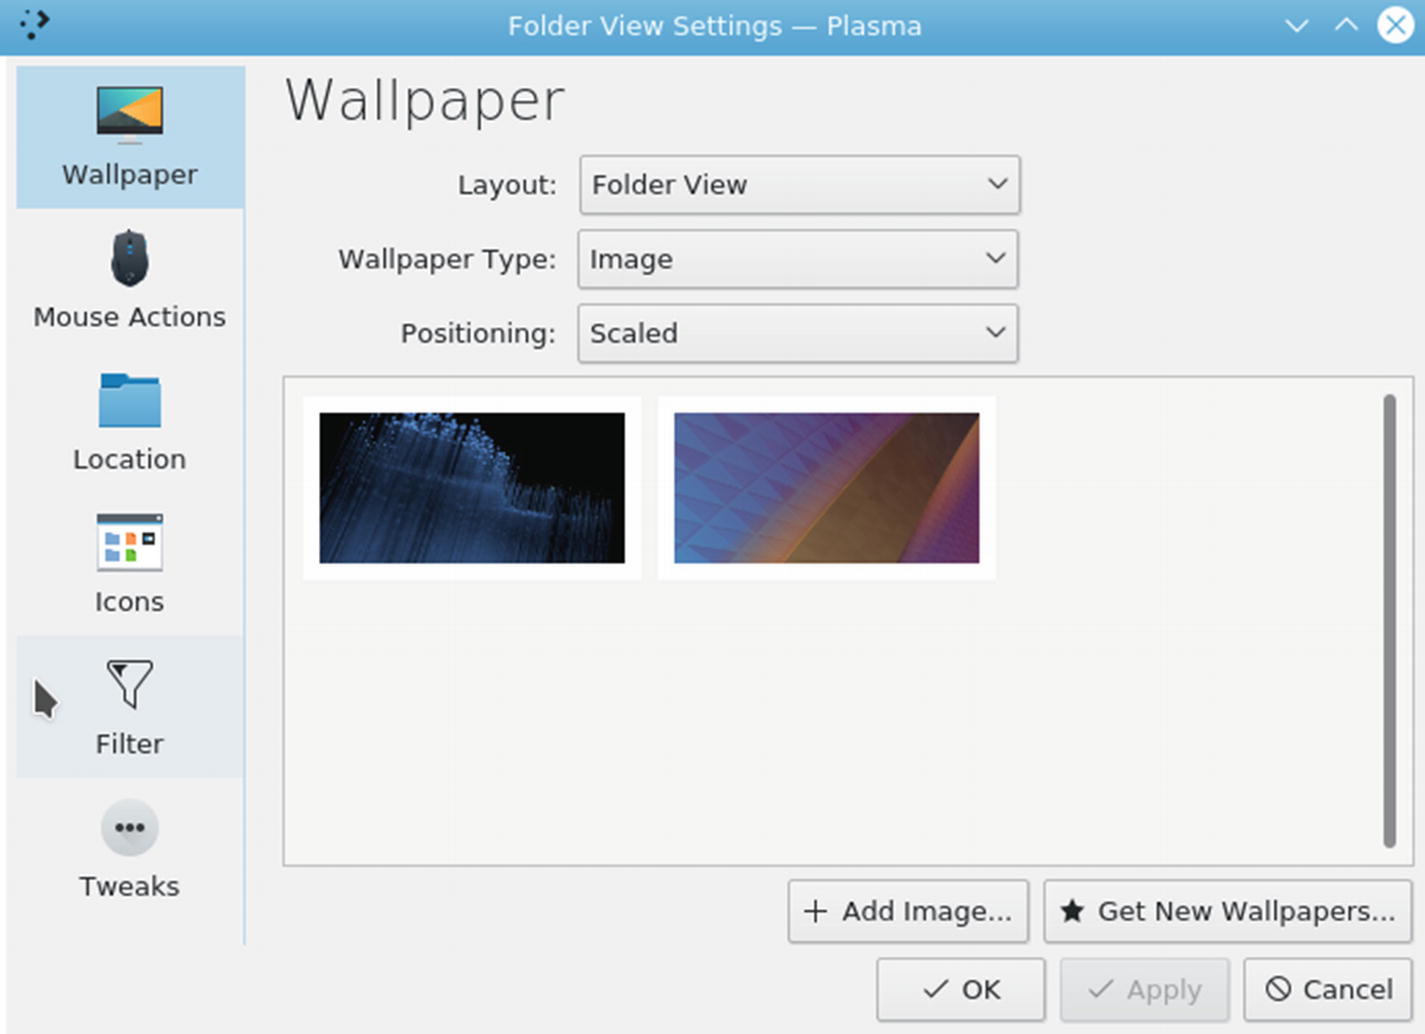
Default Desktop settings, wallpaper
You can also select Desktop Settings from the activities menu in the upper-left corner of the desktop. The background is called wallpaper in Plasma and can be changed in the Wallpaper tab. You can select other wallpapers from the wallpaper icons listed or select your own image by clicking the Open button.
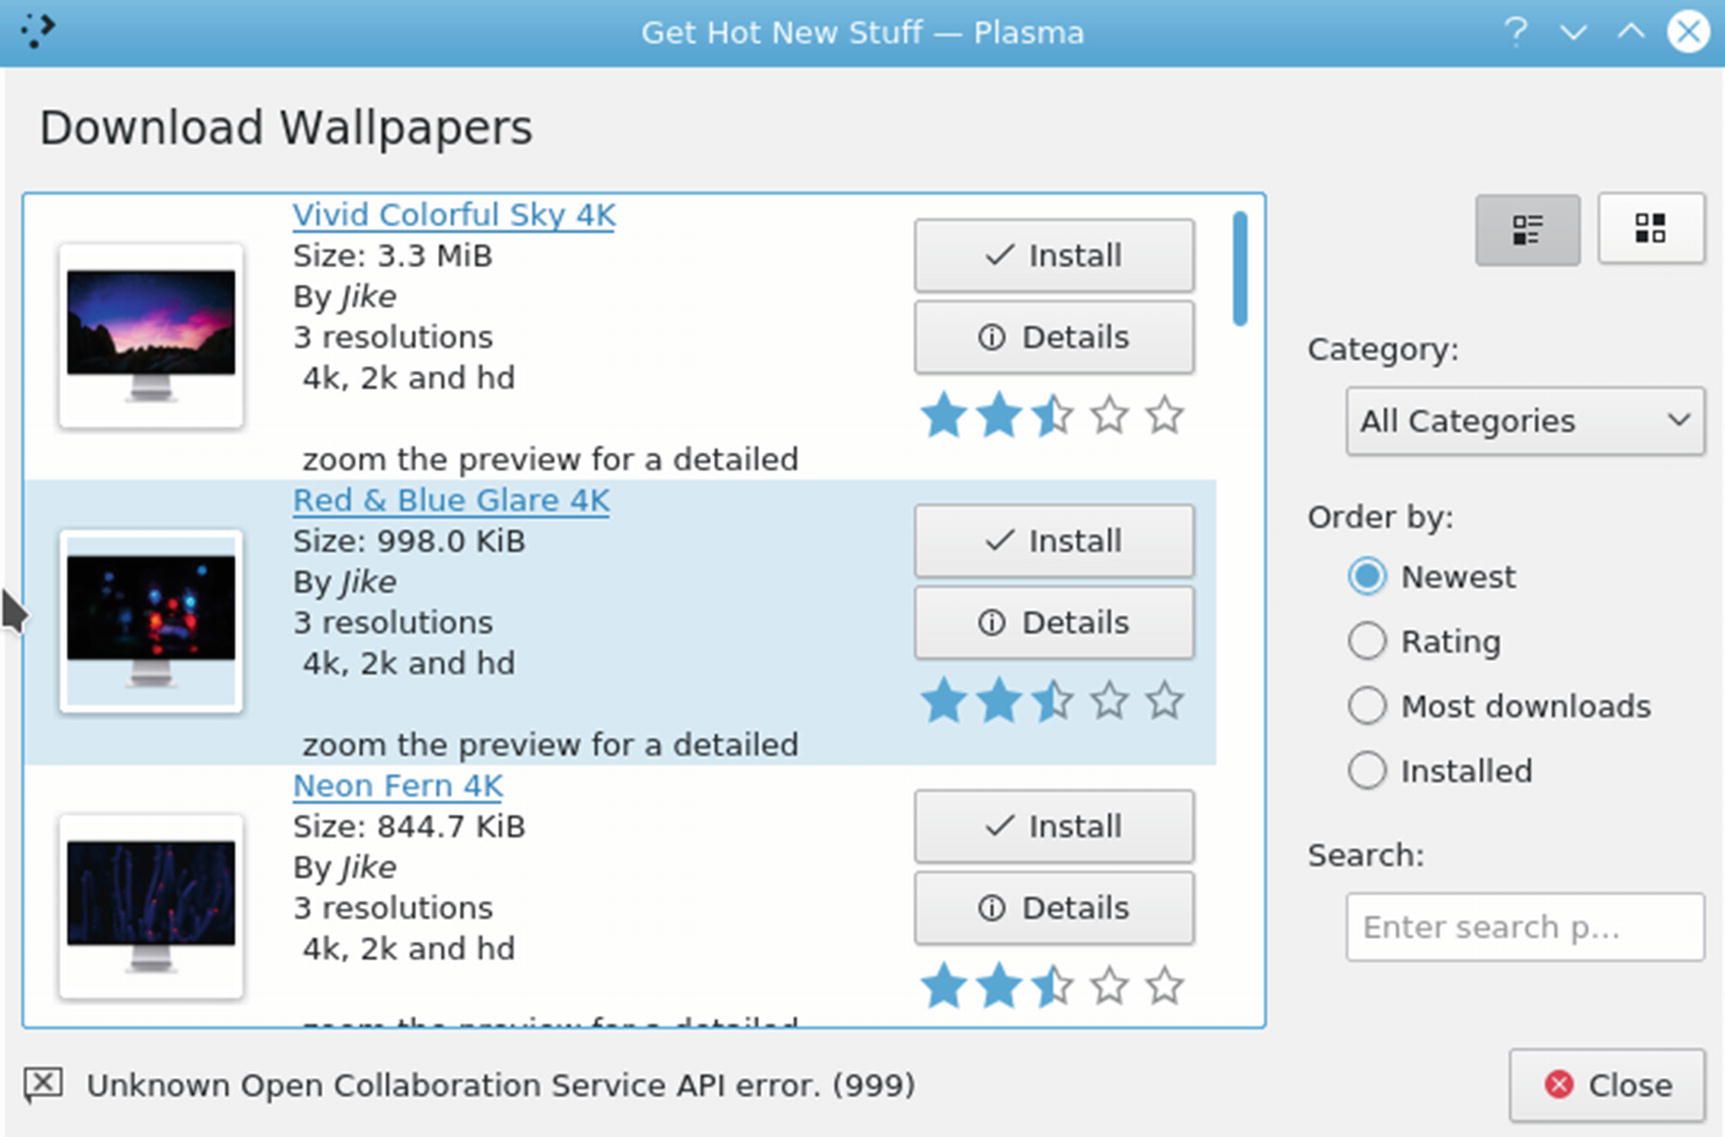
Default Desktop settings, get new wallpapers
Themes
For your desktop, you can also select a variety of different themes, icons, and window decorations. A theme changes the entire look and feel of your desktop, affecting the appearance of desktop elements, such as scroll bars, buttons, and icons. Themes and window decorations are provided for workspaces. Access the System Settings dialog from the Kickoff Computer menu or the Applications ➤ Settings menu. On the System Settings dialog, click the Workspace Theme icon in the Appearance section. The Workspace Theme dialog lets you choose overall look and feel, cursor themes, desktop themes, and a splash screen (startup) themes. The Desktop Themes tab lists installed themes, letting you choose the one you want. Click the Get New Themes button to open a Get Hot New Stuff dialog, listing desktop themes from https://store.kde.org (see Figure 9-6). Click a theme's Install button to download and install the theme.
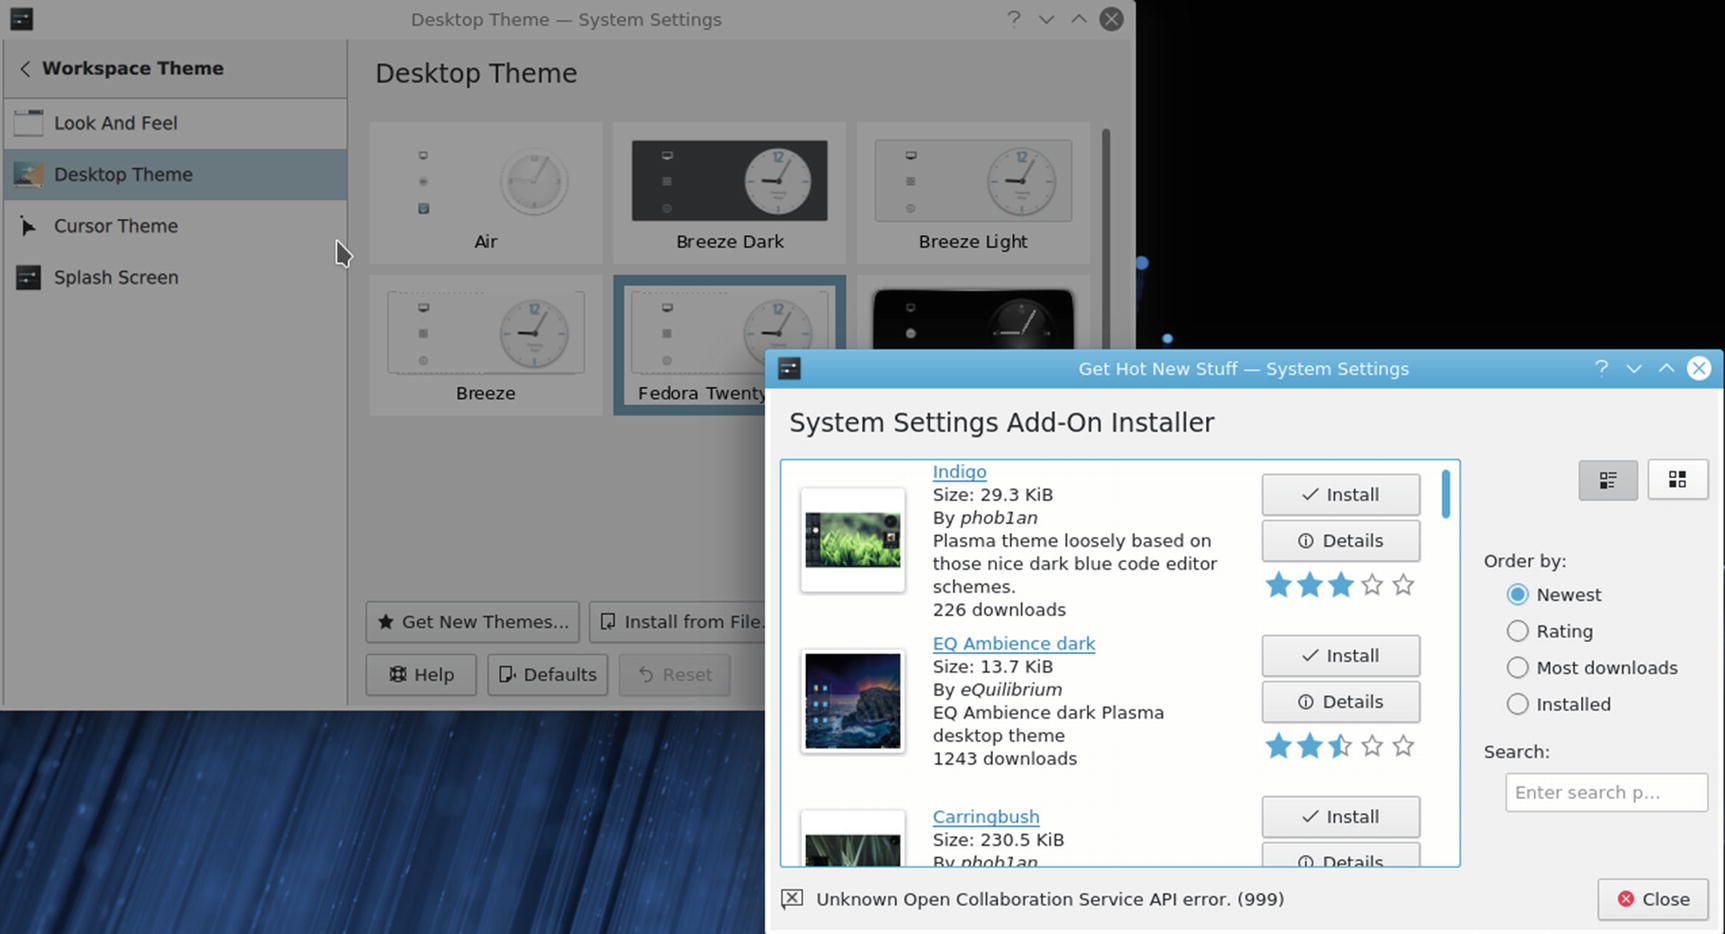
System Settings ➤ Workspace Theme ➤ Desktop Theme, Get New Themes
Leave Plasma

The Kickoff menu includes the Leave tab
The Lock and Switch User display manager (SSDM) screens display both a button for the current user and a plus button for starting a new session (Switch User shows the icon for the user you selected). The new session button displays the login screen with its list of users to log in as.
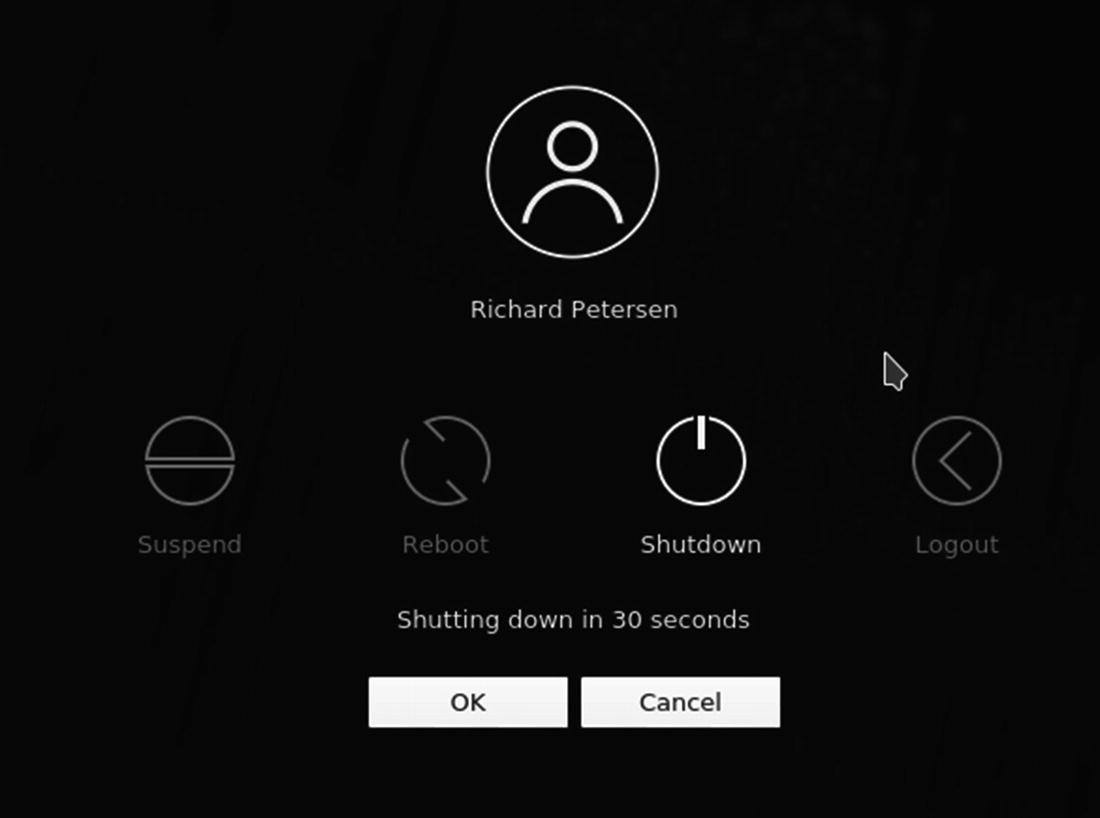
Shutdown and Logout dialog

The Application Dashboard menu, Power/Session tab
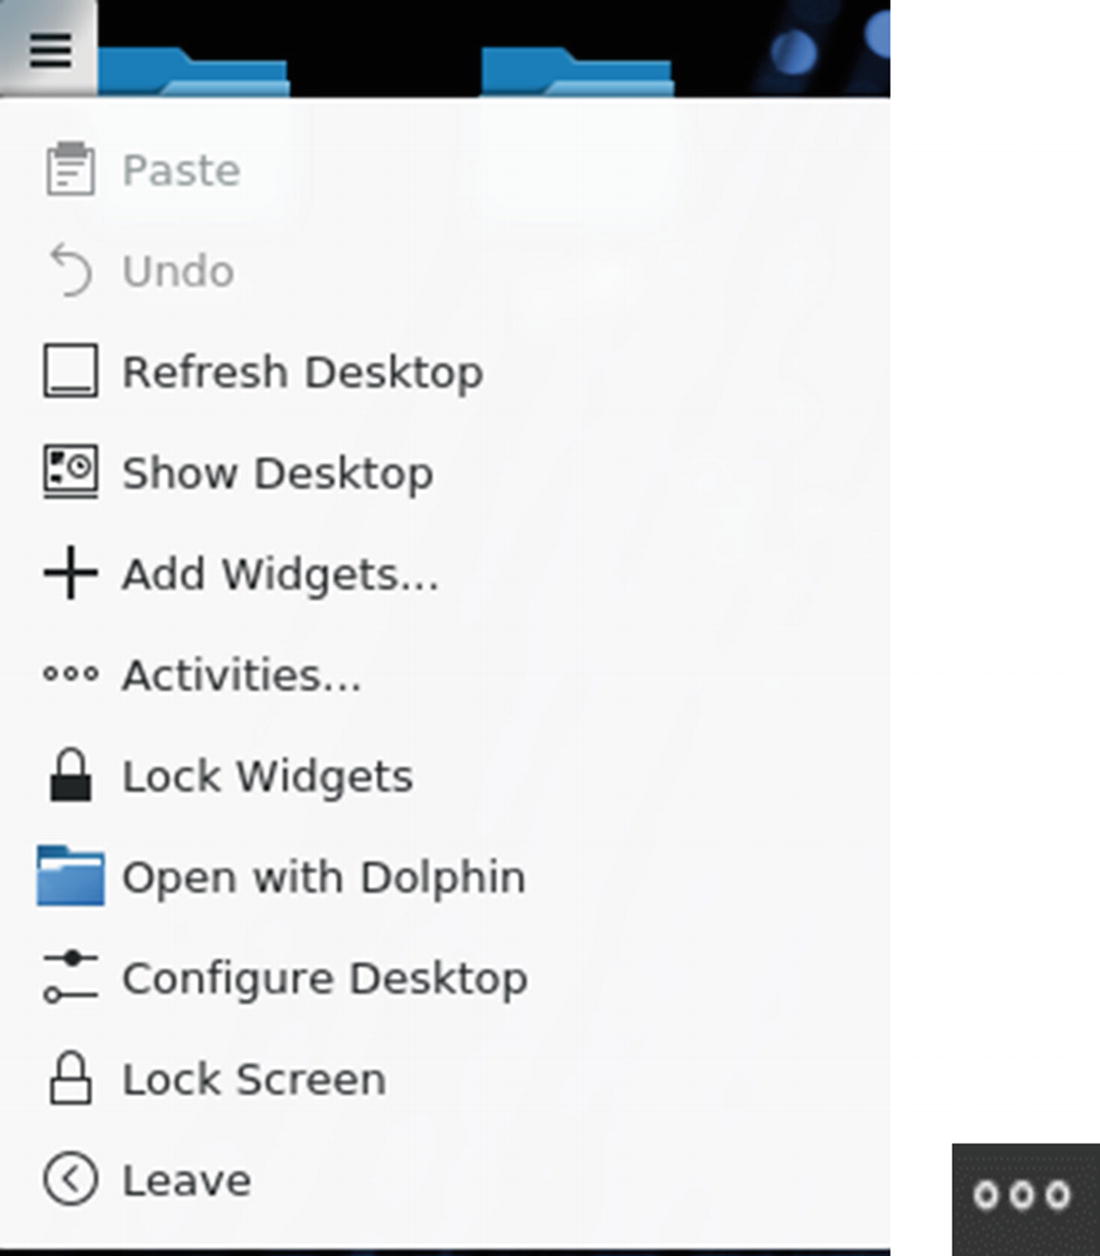
You can also press your computer's power button or right-click anywhere on the desktop and select the Leave entry from the pop-up menu, to open a leave dialog with the Logout button selected, as shown here. Buttons to the left let you choose between the suspend, reboot, and shutdown operations.
If you just want to lock your desktop , you can select the Lock Screen entry (Lock on the Kickoff and Application Dashboard menus), and your screen saver will appear. To access a locked desktop, click on the screen and a box appears prompting you for your login password. When you enter the password, your desktop reappears.
Kickoff Menus
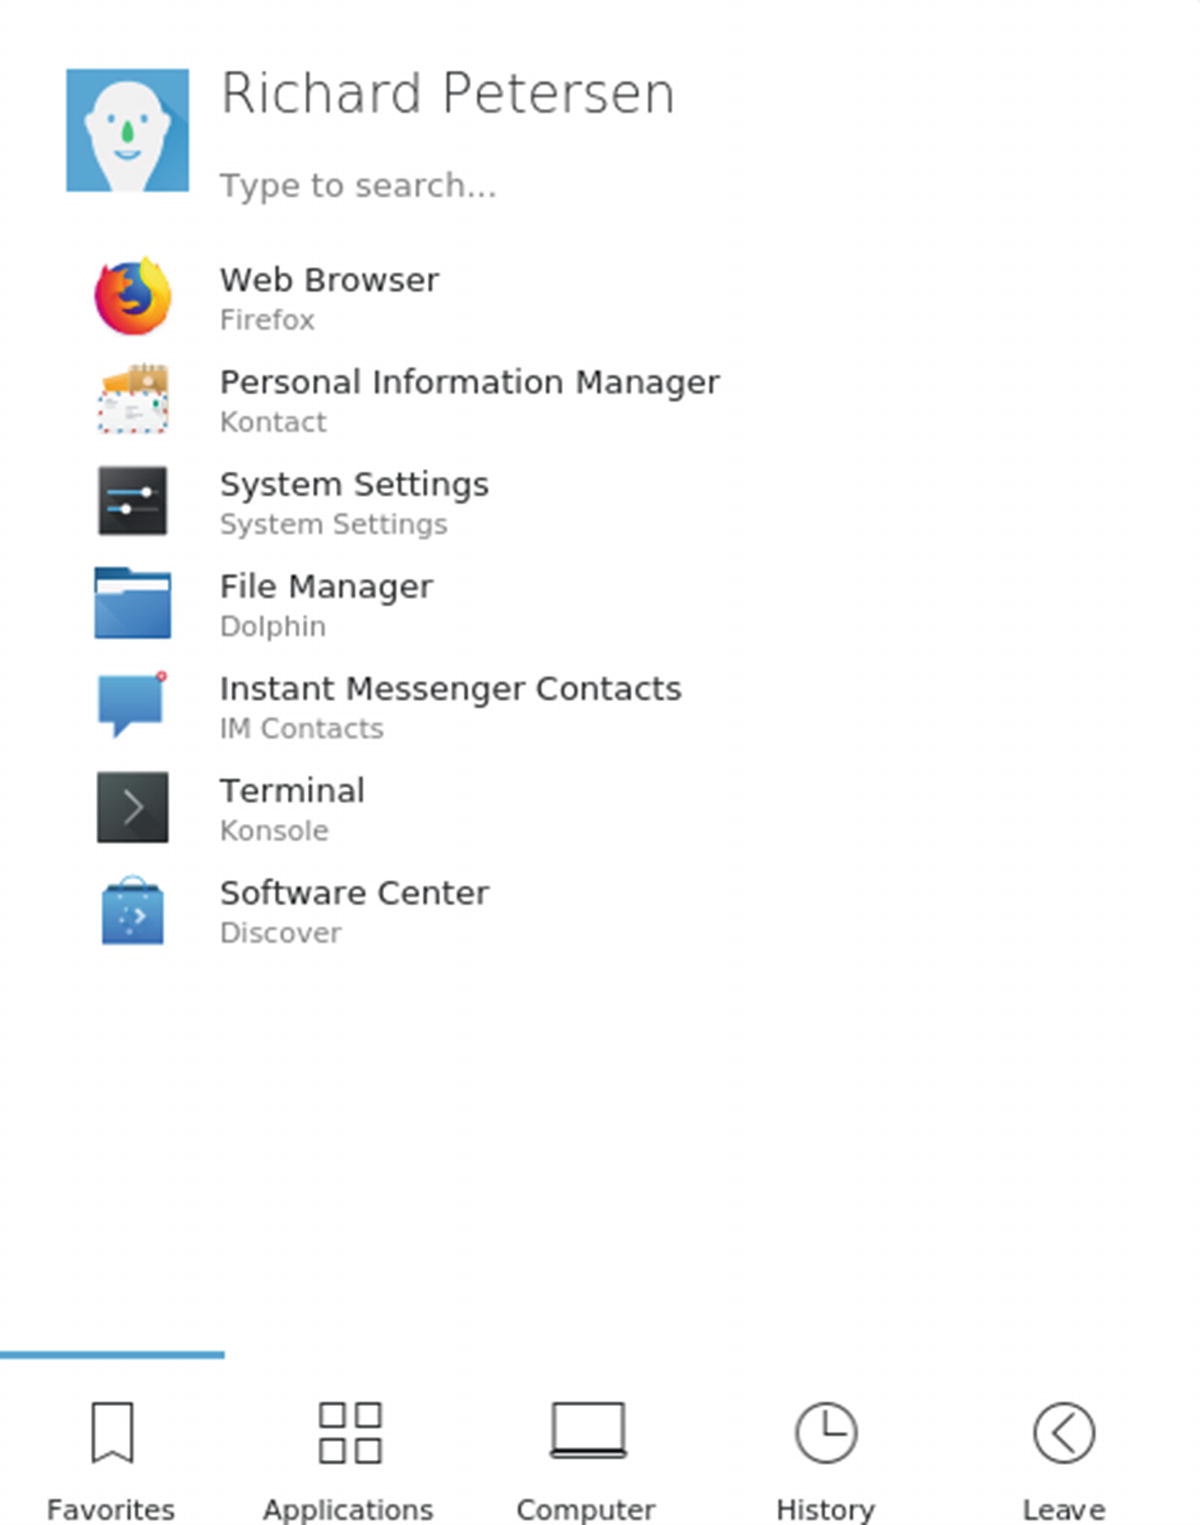
The Kickoff menu includes the Favorites tab

The Kickoff menu includes the Computer tab
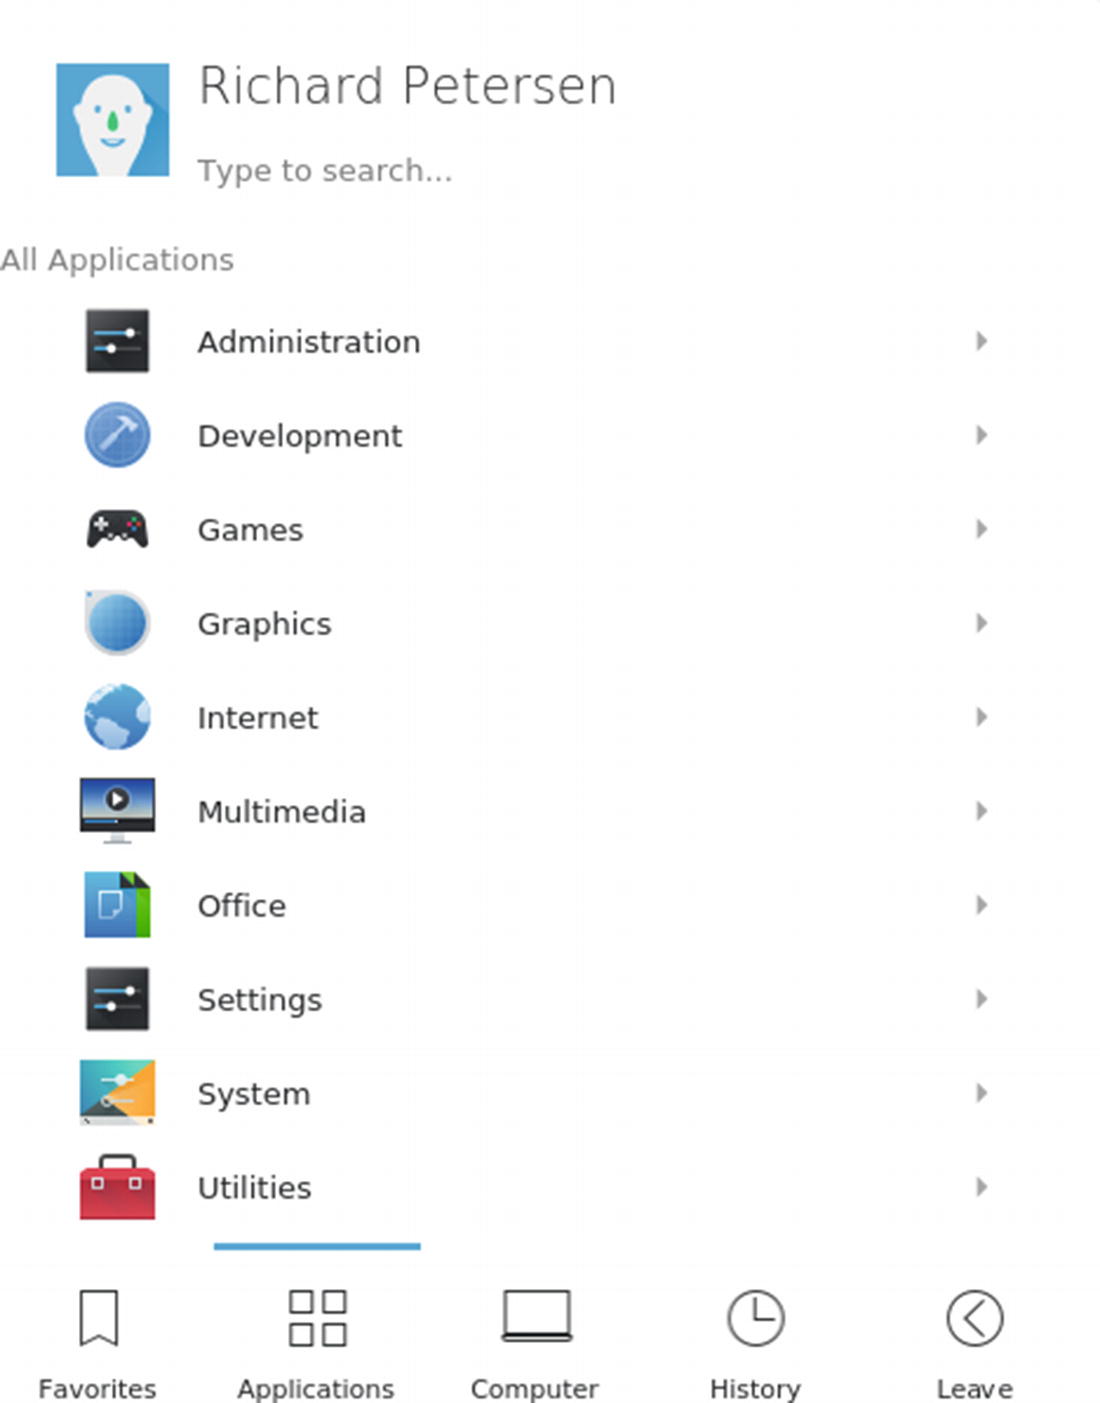
The Kickoff menu includes an Applications tab
Application Dashboard Menus
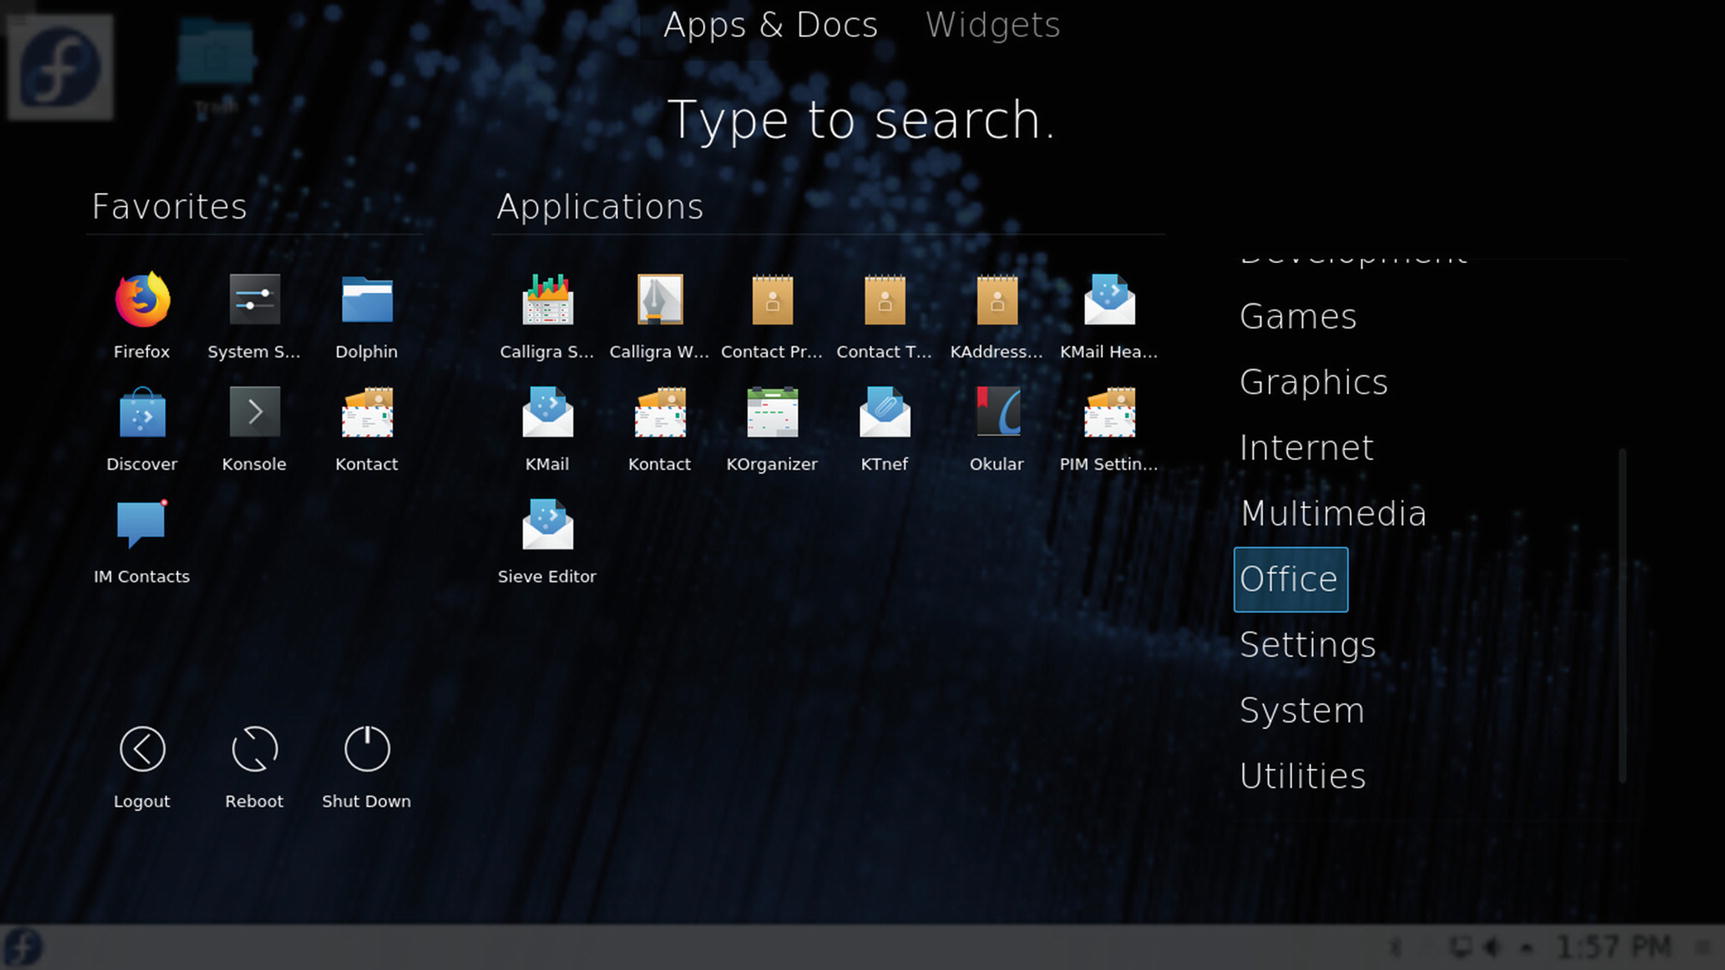
The Application Dashboard menu, Office tab
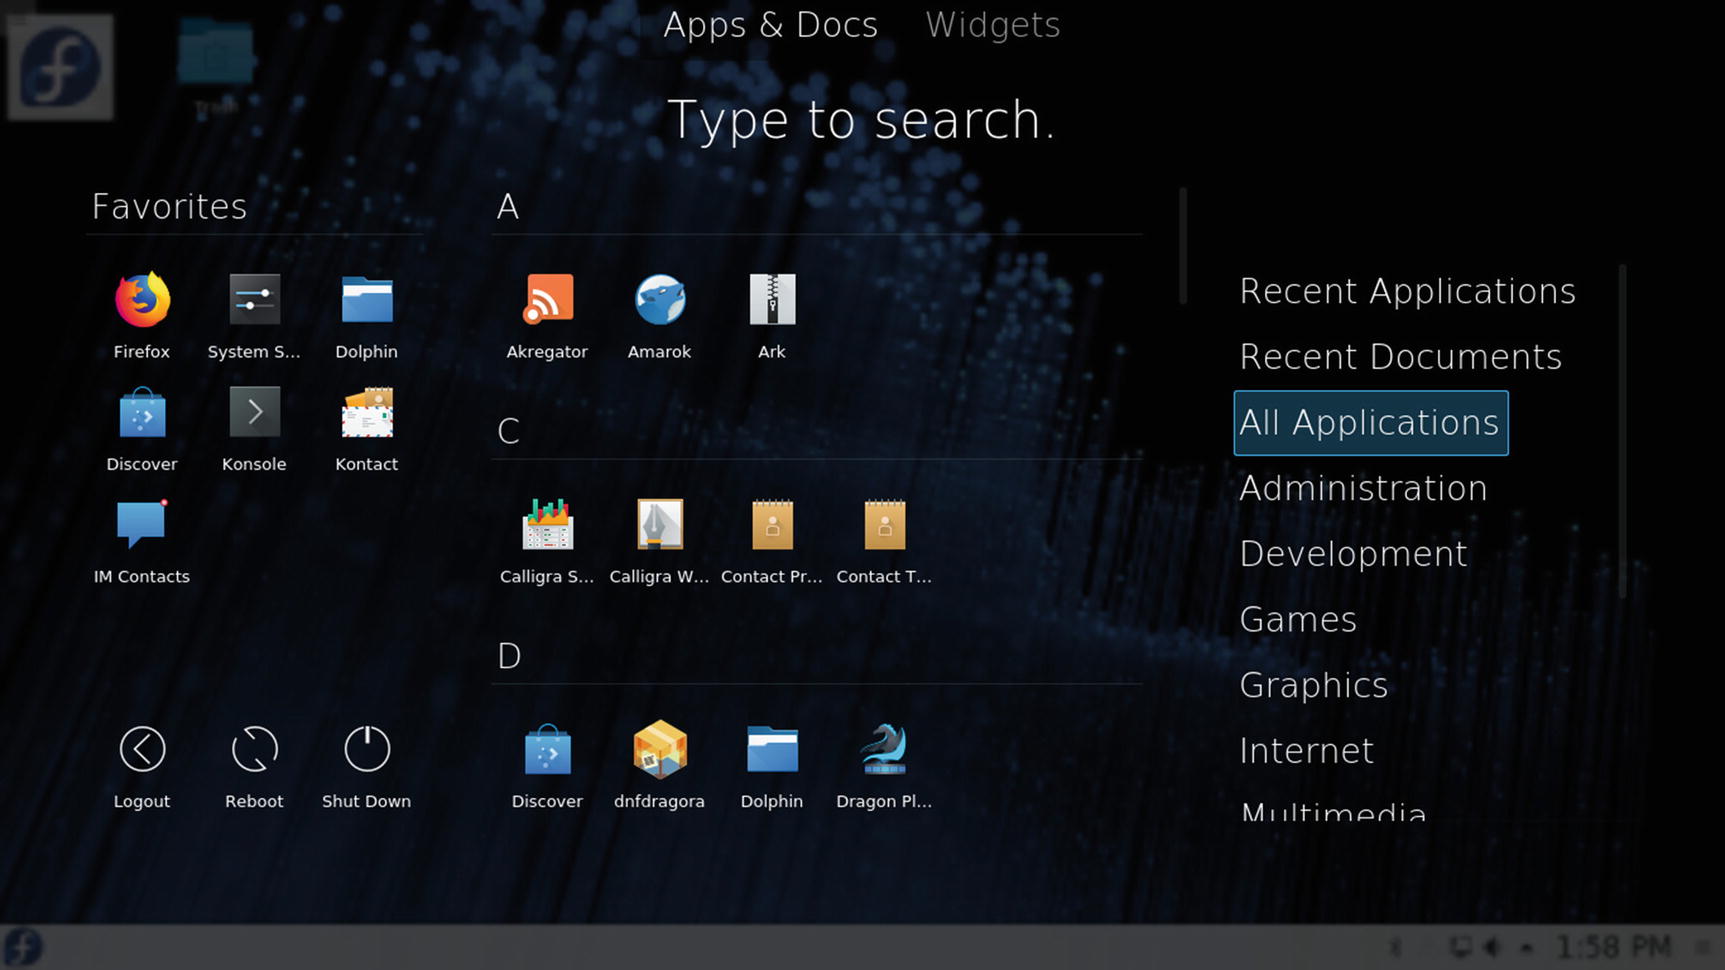
Application Dashboard menu, All Applications tab
Krunner
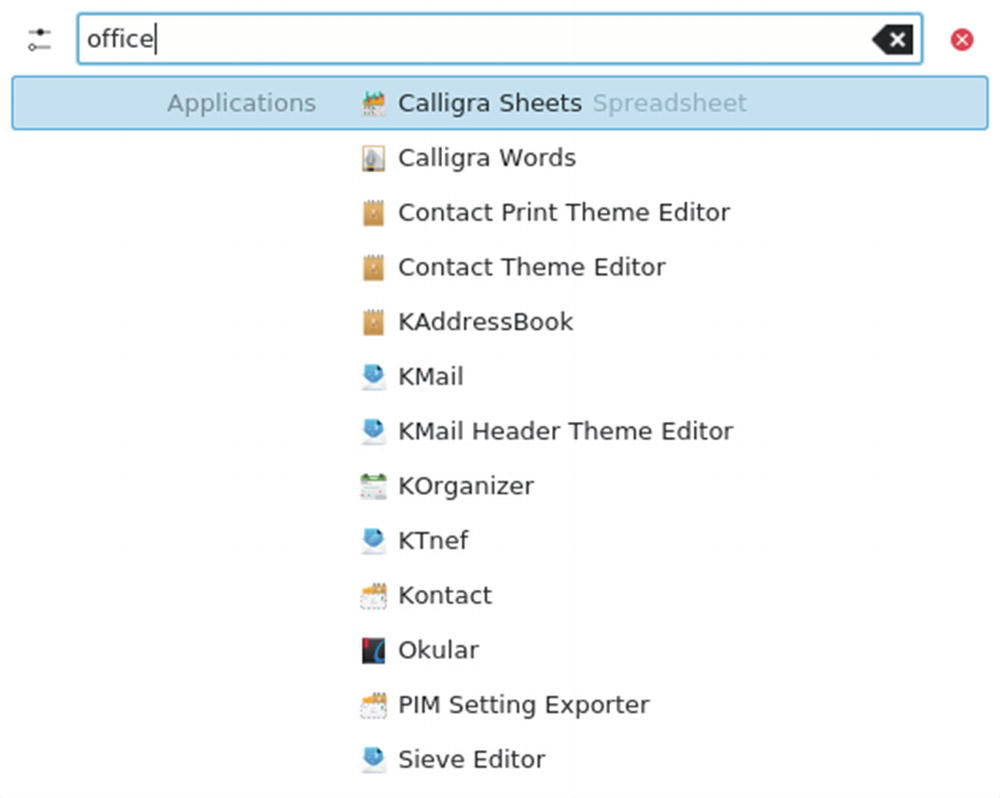
For fast access to applications, bookmarks, contacts, and other desktop items, you can use Krunner. The Krunner widget operates as a search tool for applications and other items such as bookmarks. To find an application, enter a search pattern; a listing of matching applications is displayed. Click on an application entry to start the application. You can also place an icon (application launcher) for an entry on the desktop by simply clicking and dragging its entry for the list to the desktop. For applications where you know the name, part of the name, or just its basic topic, Krunner is a very fast way to access the application. To start Krunner, press Alt+F2, Alt+space, or right-click on the desktop to display the desktop menu and select Run Command. Enter the pattern for the application you want to search for and press Enter. The pattern “software” or “package” would display an entry for Discover Software. Entering the pattern “office” displays entries for all the LibreOffice applications, as well as additional office applications you can install (see Figure 9-15).
Krunner application search
Removable Devices: Device Notifier
Installed on the system tray to the right is the Device Notifier. When you insert a removable device like a CD/DVD disc or a USB drive, the New Device Notifier briefly displays a dialog showing all your removable devices, including the new one. The Device Notifier icon is displayed on the system tray. You can click on the New Device Notifier any time to display this dialog. Figure 9-16 shows the New Device Notifier displayed on the panel and its panel icon. The New Device Notifier is displayed only if at least one removable device is attached.
Removable devices are not displayed as icons on your desktop. Instead, to open the devices, you use the New Device Notifier. Click on the Device Notifier icon in the panel to open its dialog. The device is unmounted initially with an unmount button displayed. Click on this button to mount the device. An eject button is then displayed, which you can later use to unmount and eject the device. Opening the device with an application from its menu will mount the device automatically. Clicking on the eject button for a DVD/CD disc will physically eject it. For a USB drive, the drive will be unmounted and prepared for removal. You can then safely remove the USB drive.
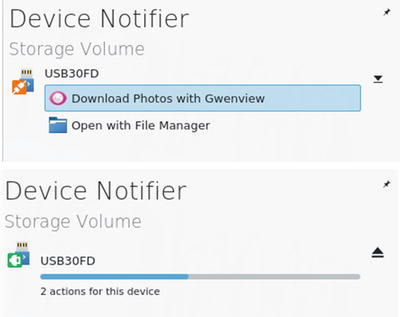
To open a device, click on its entry in the Device Notifier, like one for your DVD/CD disc or your USB drive (see Figure 9-16).
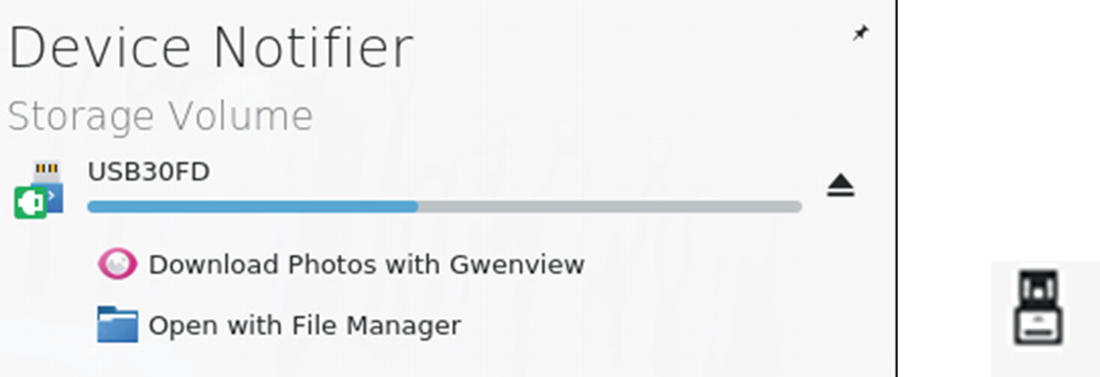
Device Notifier and its panel widget icon
Network Connections: Network Manager
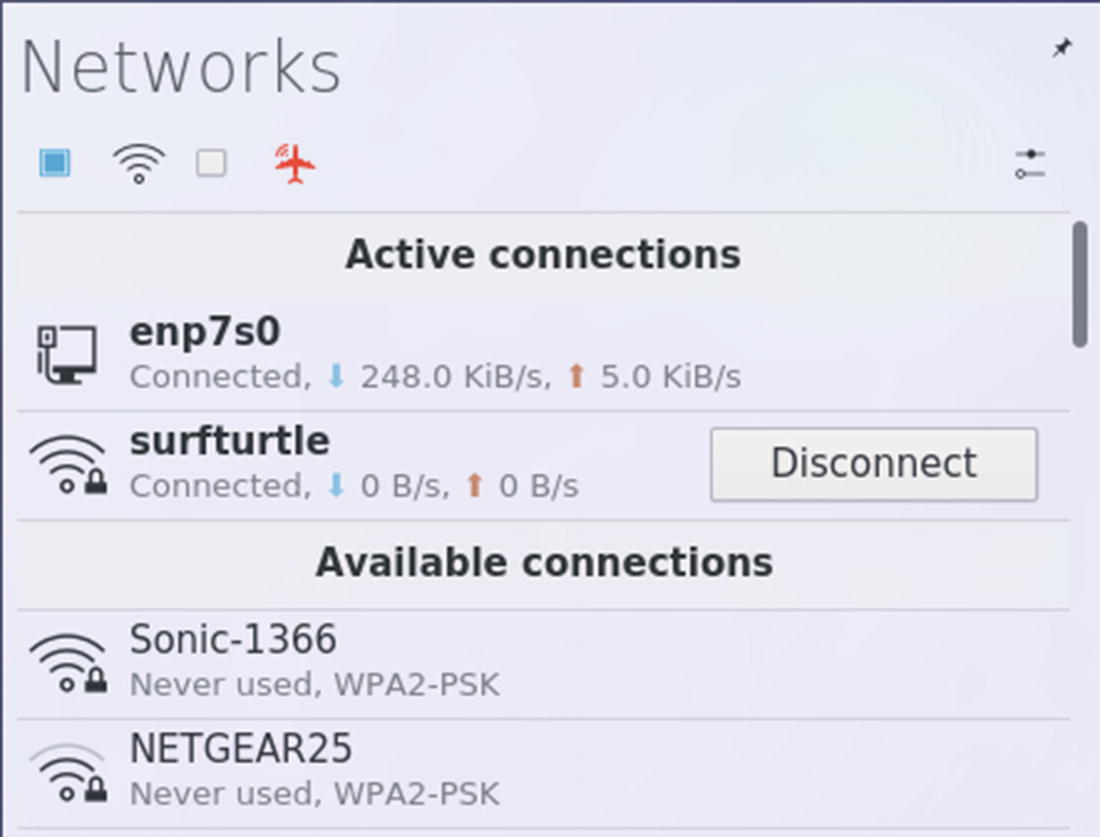
Network Manager connections and panel icons
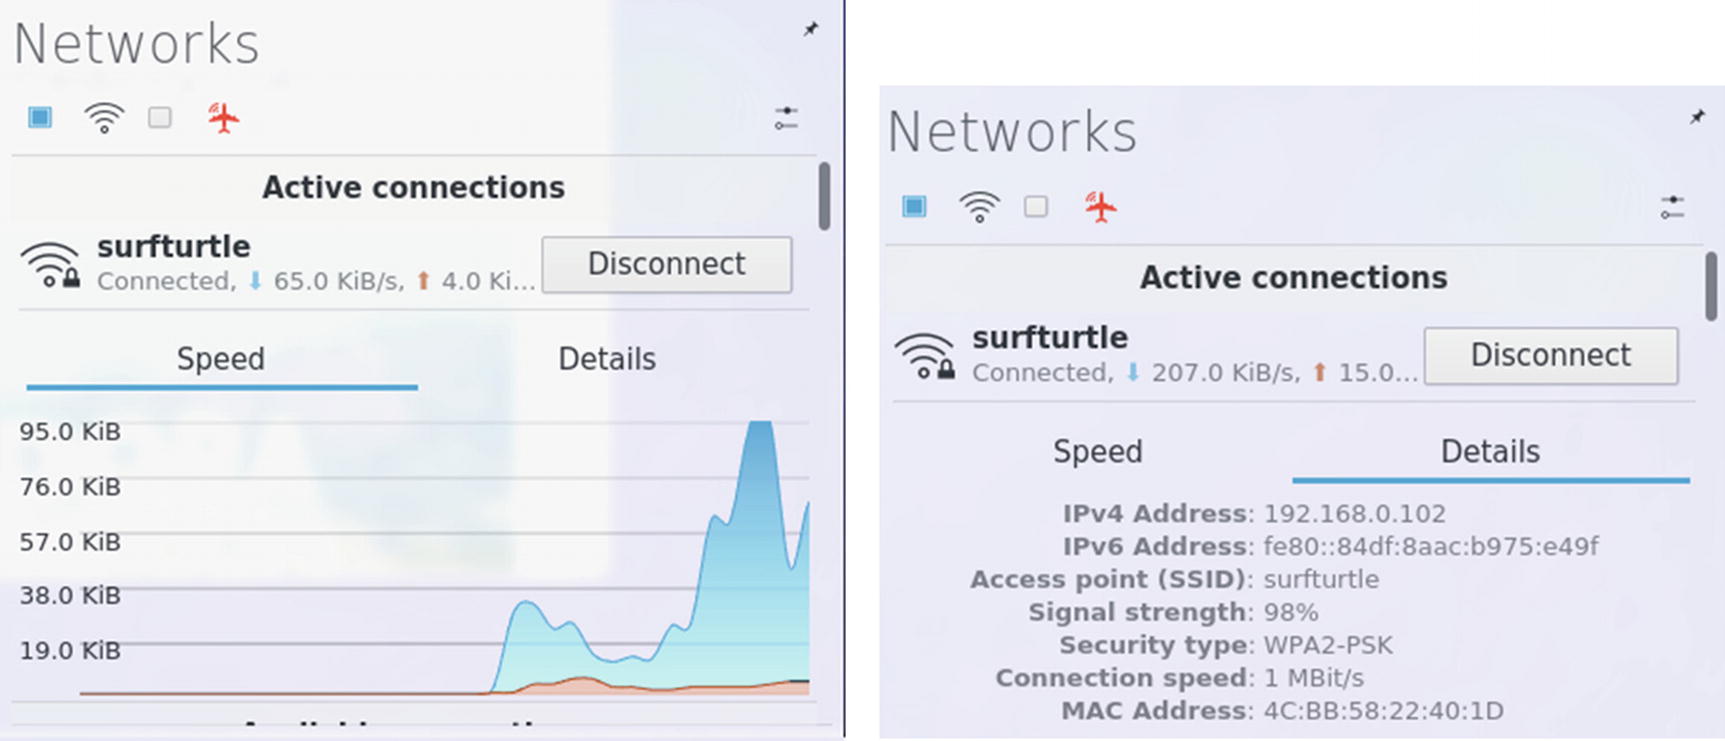
Plasma Network Manager connection information: speed and details
The toolbar at the top of the network plasma widget has buttons for wireless and airplane mode connections (shown below). Check boxes next to each connection icon show if it is enabled. Clicking on the check box for a connection will enable or disable the connection. Disabled connections have an empty check box and a red icon.


Plasma connection editor and Plasma Network Manager
Desktop Plasmoids (Widgets)
The Plasma desktop supports plasmoids. Plasmoids are integrated into the desktop on the same level as windows and icons. Just as a desktop can display windows, it can also display plasmoids. Plasmoids can take on desktop operations, running essential operations, even replacing, to a limited extent, the need for file manager windows. The name for plasmoids used on the desktop is widgets. The tools and commands on the desktop that manage plasmoids, refer to them as widgets. For that reason, they will be referred to as widgets.
Managing Desktop Widgets
When you long click (click and hold for several seconds) your mouse on a widget, its sidebar is displayed with buttons for resizing, rotating, settings, and removing the widget (see Figure 9-18). Click and drag the resize button to change the widget size. Clicking the Settings button opens that widget's settings dialog (see Figure 9-20).

Clock Widget with task sidebar and configuration dialog
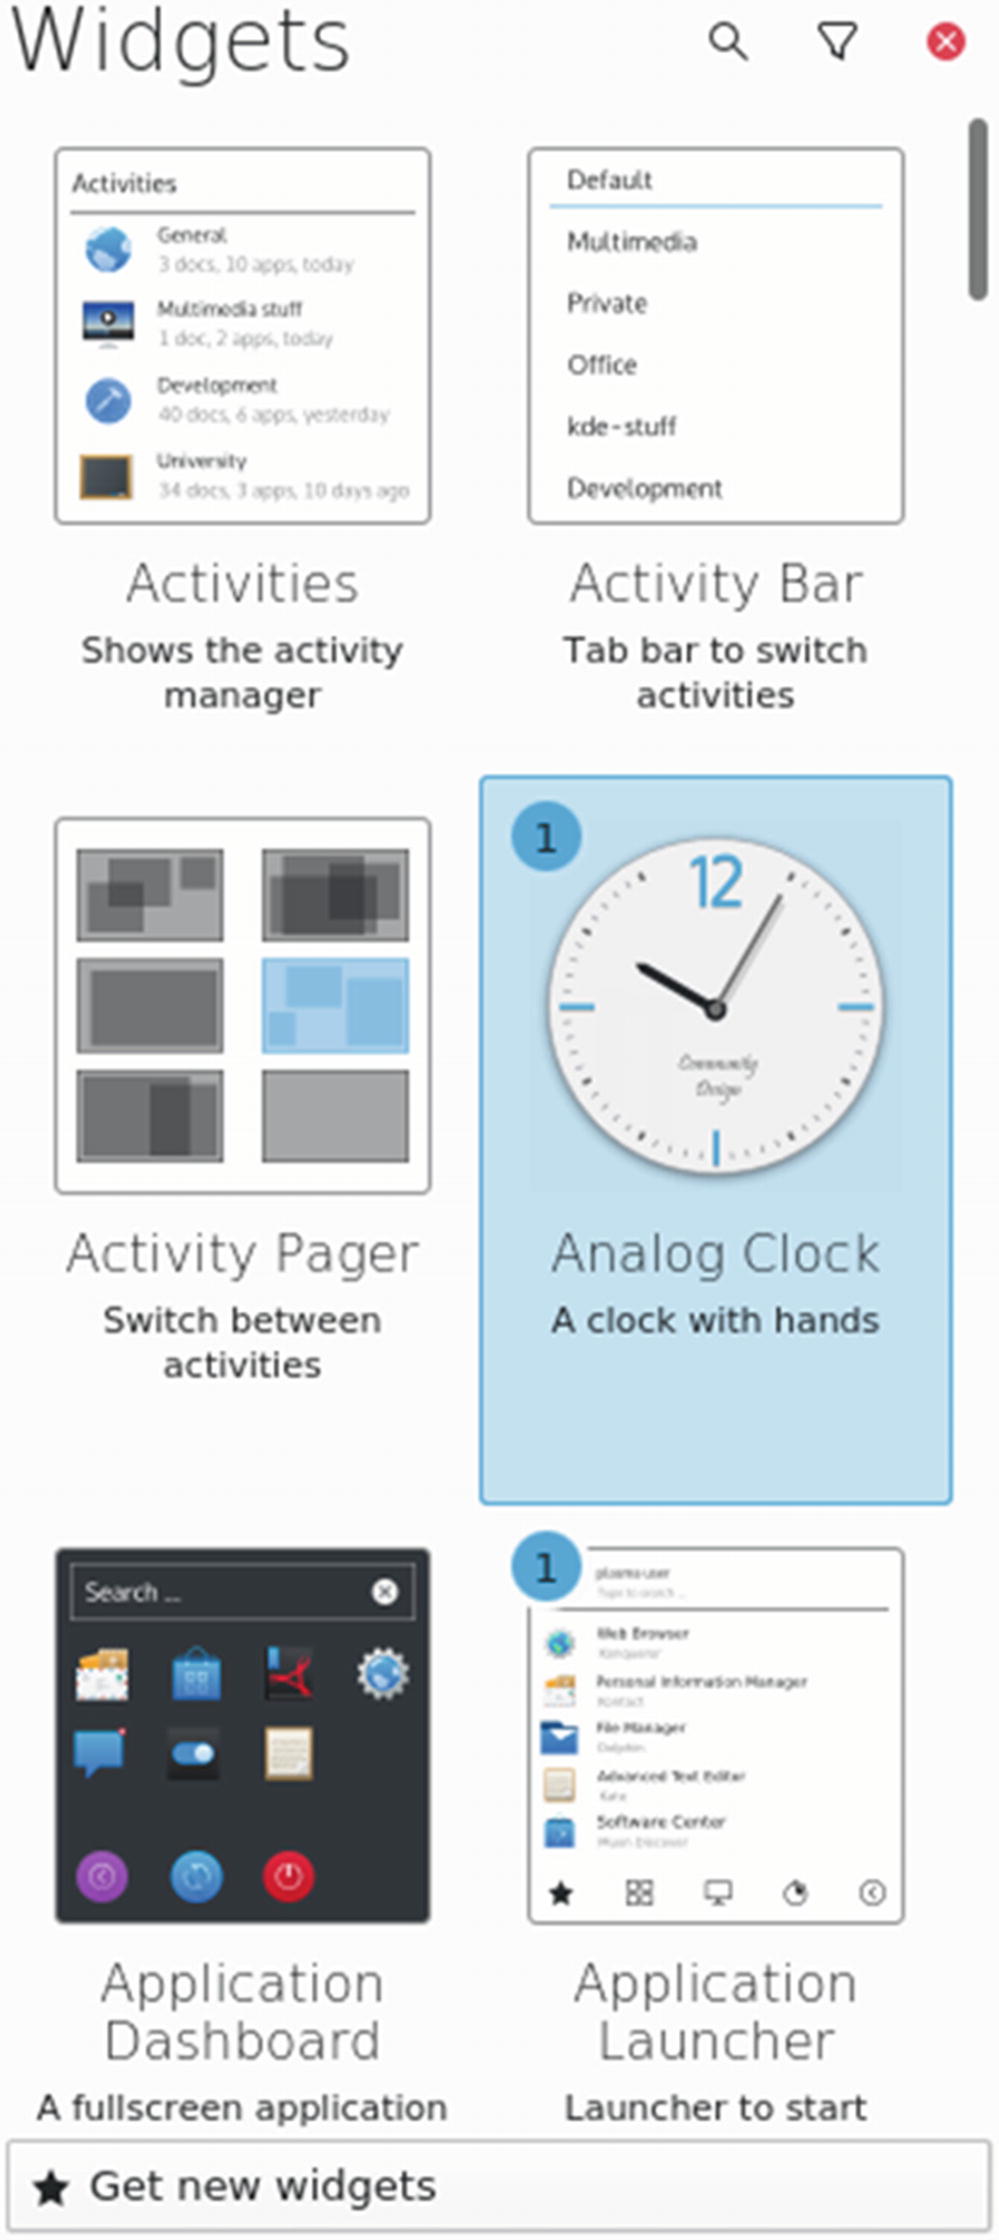
Adding a widget using the Widgets dialog
To remove a widget, long click on the widget to display its toolbar, and then click on the red Remove button at the bottom of the toolbar . When you remove a widget, a notification message is displayed with an Undo button, as shown here. Clicking on the Undo button will restore the widget.

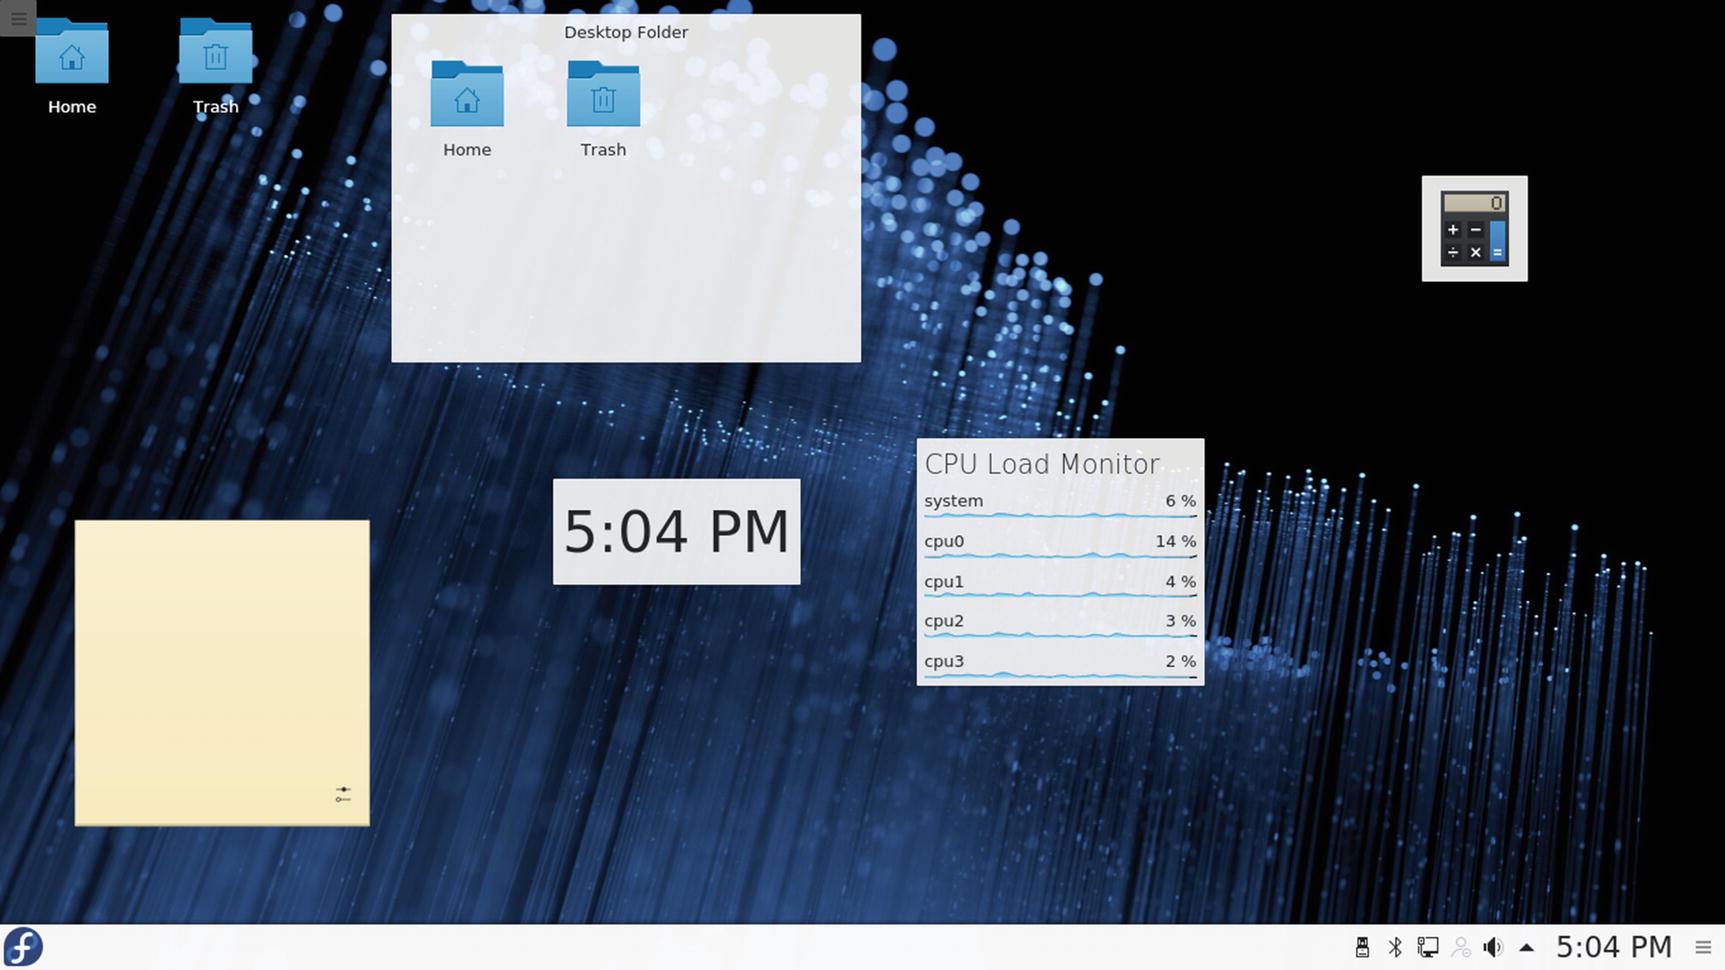
Folder, calculator, digital clock, CPU load monitor, and notes widgets
Folder and Icon Widgets
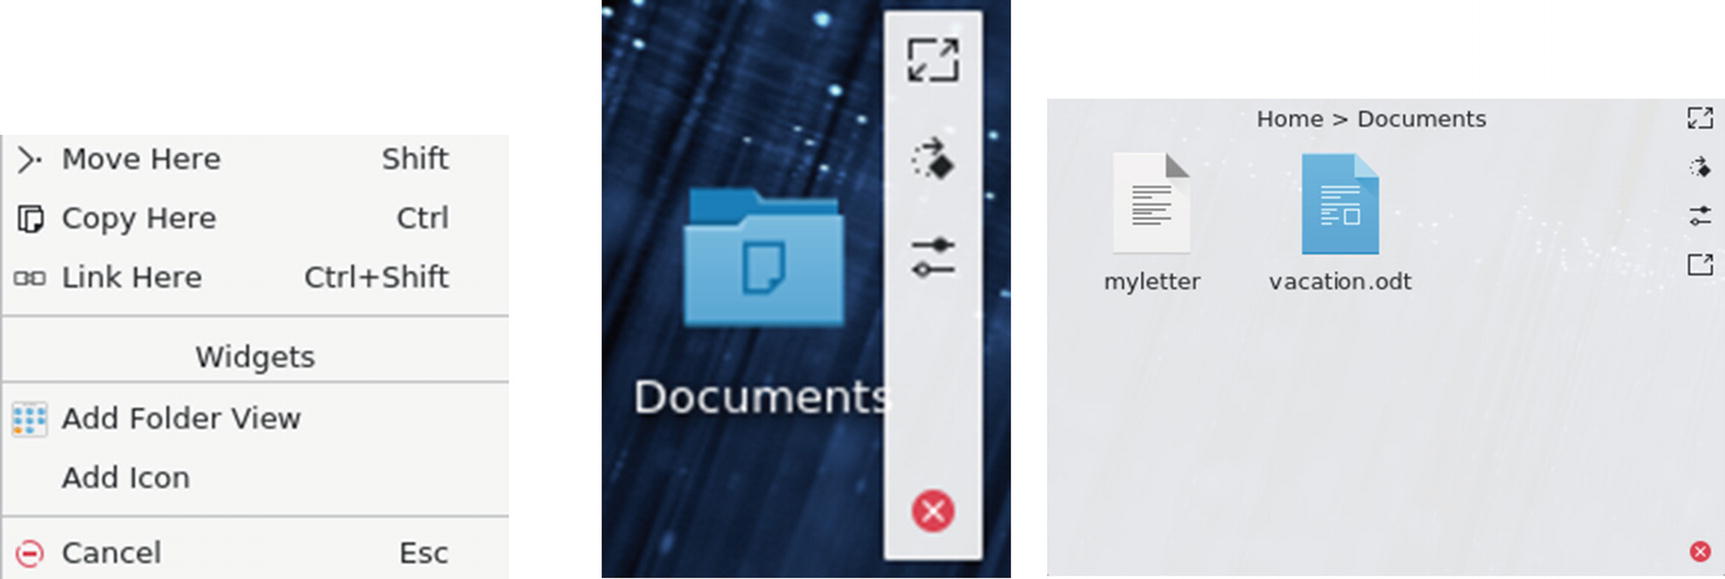
Folder and Icon widgets
For any Folder View widget, you can use that widget's settings dialog to change the folder it references. A Folder View widget has options for showing the desktop folder, a folder on your Places list, or a specific folder . You can also specify a title. You can easily create a Folder View widget for your home folder .
Activities
The Plasma desktop is designed to support multiple activities. Activities are different plasma containments, each with its set of widgets. An activity is not the same as virtual desktop. Virtual desktops affect space, displaying additional desktops. An activity has its own set of widgets (widgets) and windows, displaying a different set of widgets and windows for each activity. In effect, each activity has a different desktop and set of virtual desktops. Technically, each activity is a Plasma containment that has its own collection of widgets and windows. You can switch to a different activity (containment) and display a different collection of widgets and windows on your desktop.
An activity is often tailored for a certain task. You could have one activity for office work, another for news, and yet another for media. Each activity could have its own set of appropriate widgets, like clock, calculator, notes, and folder widgets for an office activity. A media activity might have a Media Player widget and media applications open.
Multiple activities are managed using the Activities Manager, which is accessed through the Activities entry on the desktop toolbox menu or the Activities widget, which you can install on the panel or desktop. Both are shown here.
Files and folders can be attached to an activity, displaying them only on that activity. Right-click on the folder or file icon in the File Manager and choose the Activities submenu to choose an activity. Windows are set by default to display on the activity they are opened on. The window switcher is configured to work only on the current activity. The setting is configured in the Window Management dialog (Workspace section of the System settings dialog). On the Task Switcher tab, the Filter Windows By section has Activities checked and Current Activity selected.
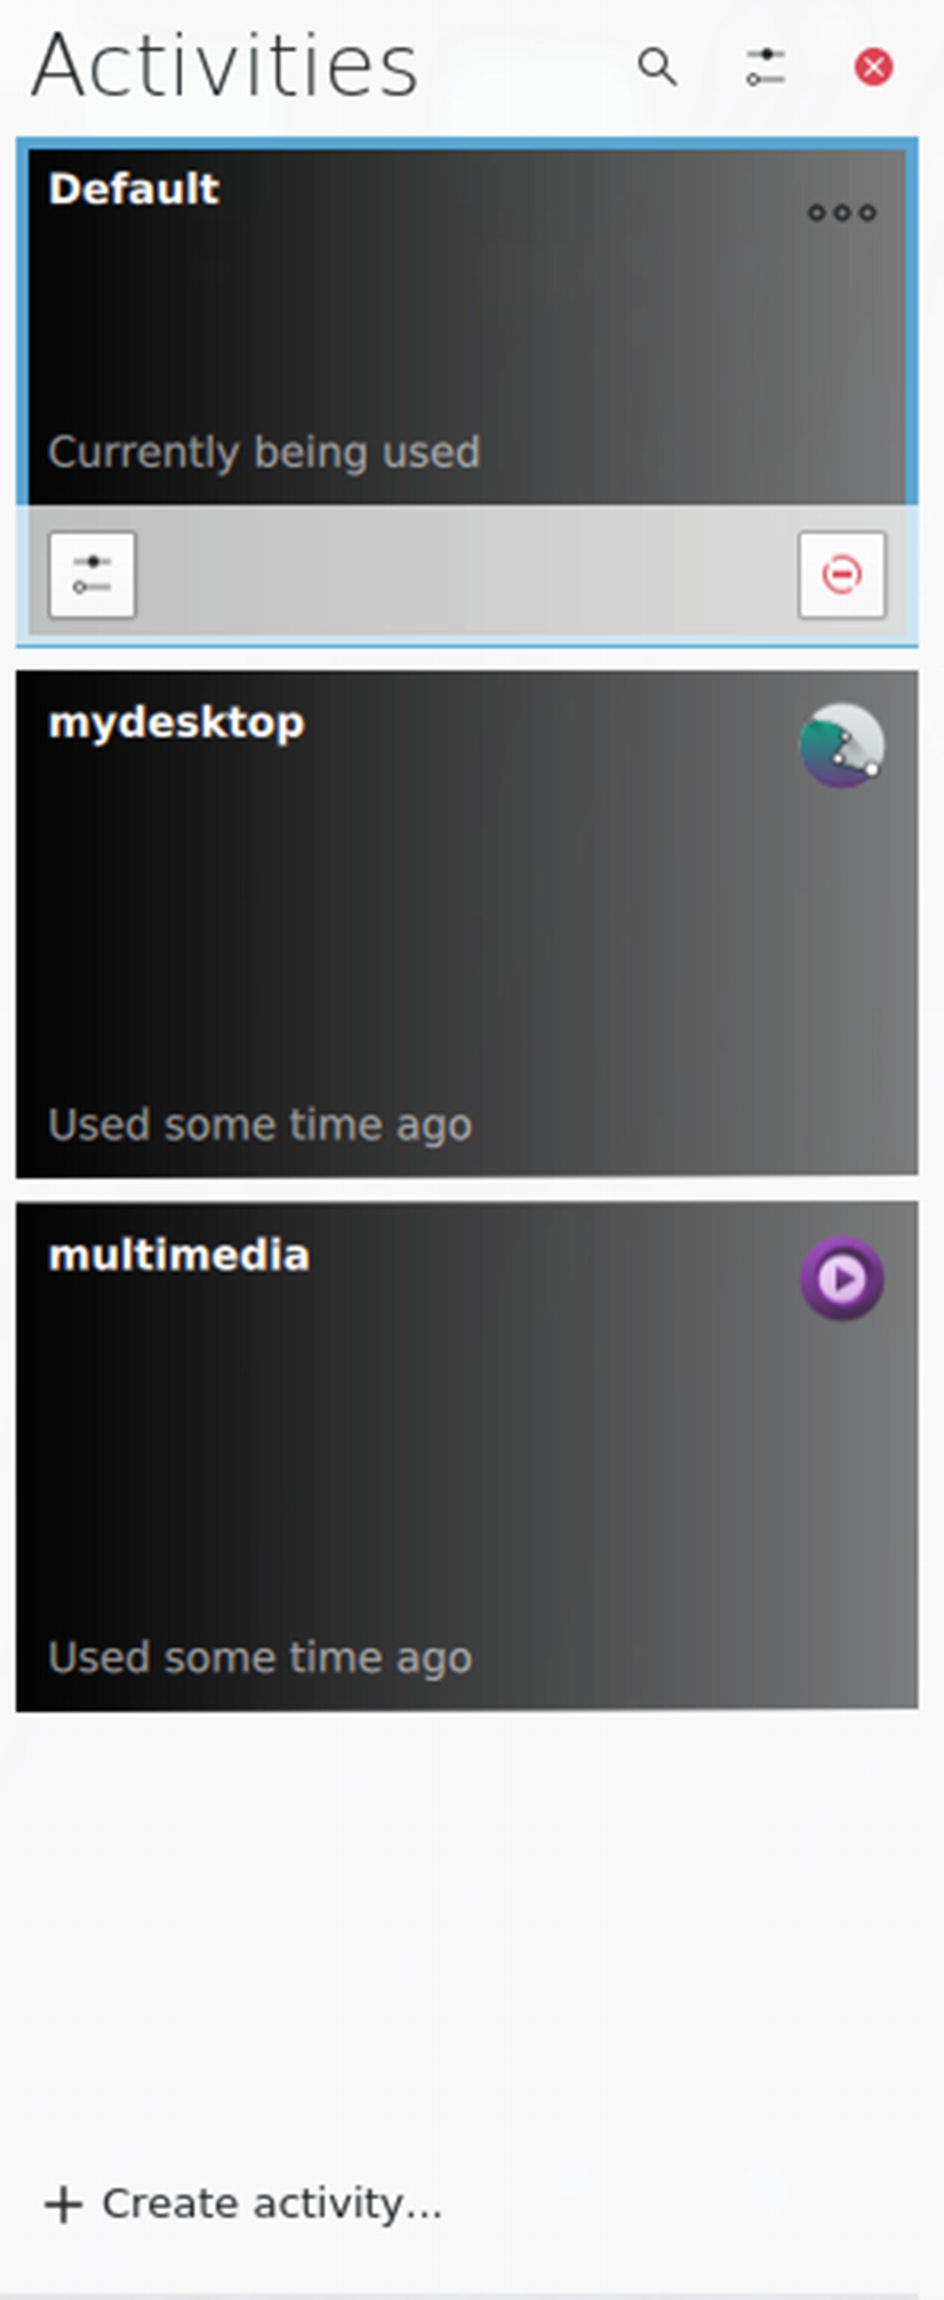
Activity toolbar and icons
Moving the mouse over an activity icon displays Configure and Stop buttons. The Configure button opens the Activity Settings dialog for that activity , which is the same as the create dialog, with Name, Description, and Icon settings. The Stop button deactivates the activity and places it at the bottom of the Activity Manager under the Stopped Activities heading. To start a stopped activity, simply click its icon in the Stopped Activities list.

Create an activity
To add widgets to an activity, first click the activity to make it the current activity, and then click the Add Widgets button to display the Widgets dialog. Widgets you add are placed in the current activity.
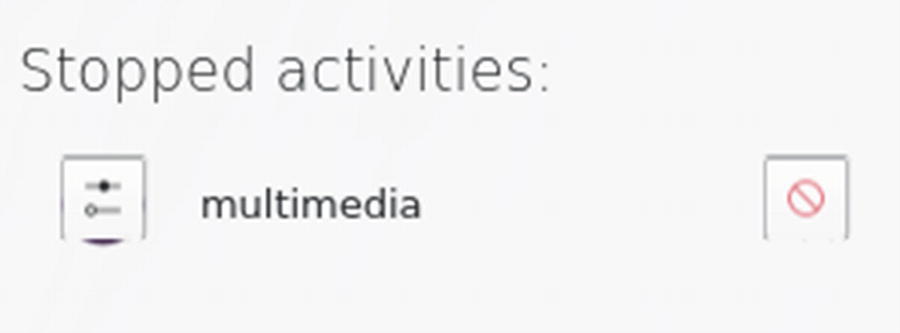
Stop Activity icons
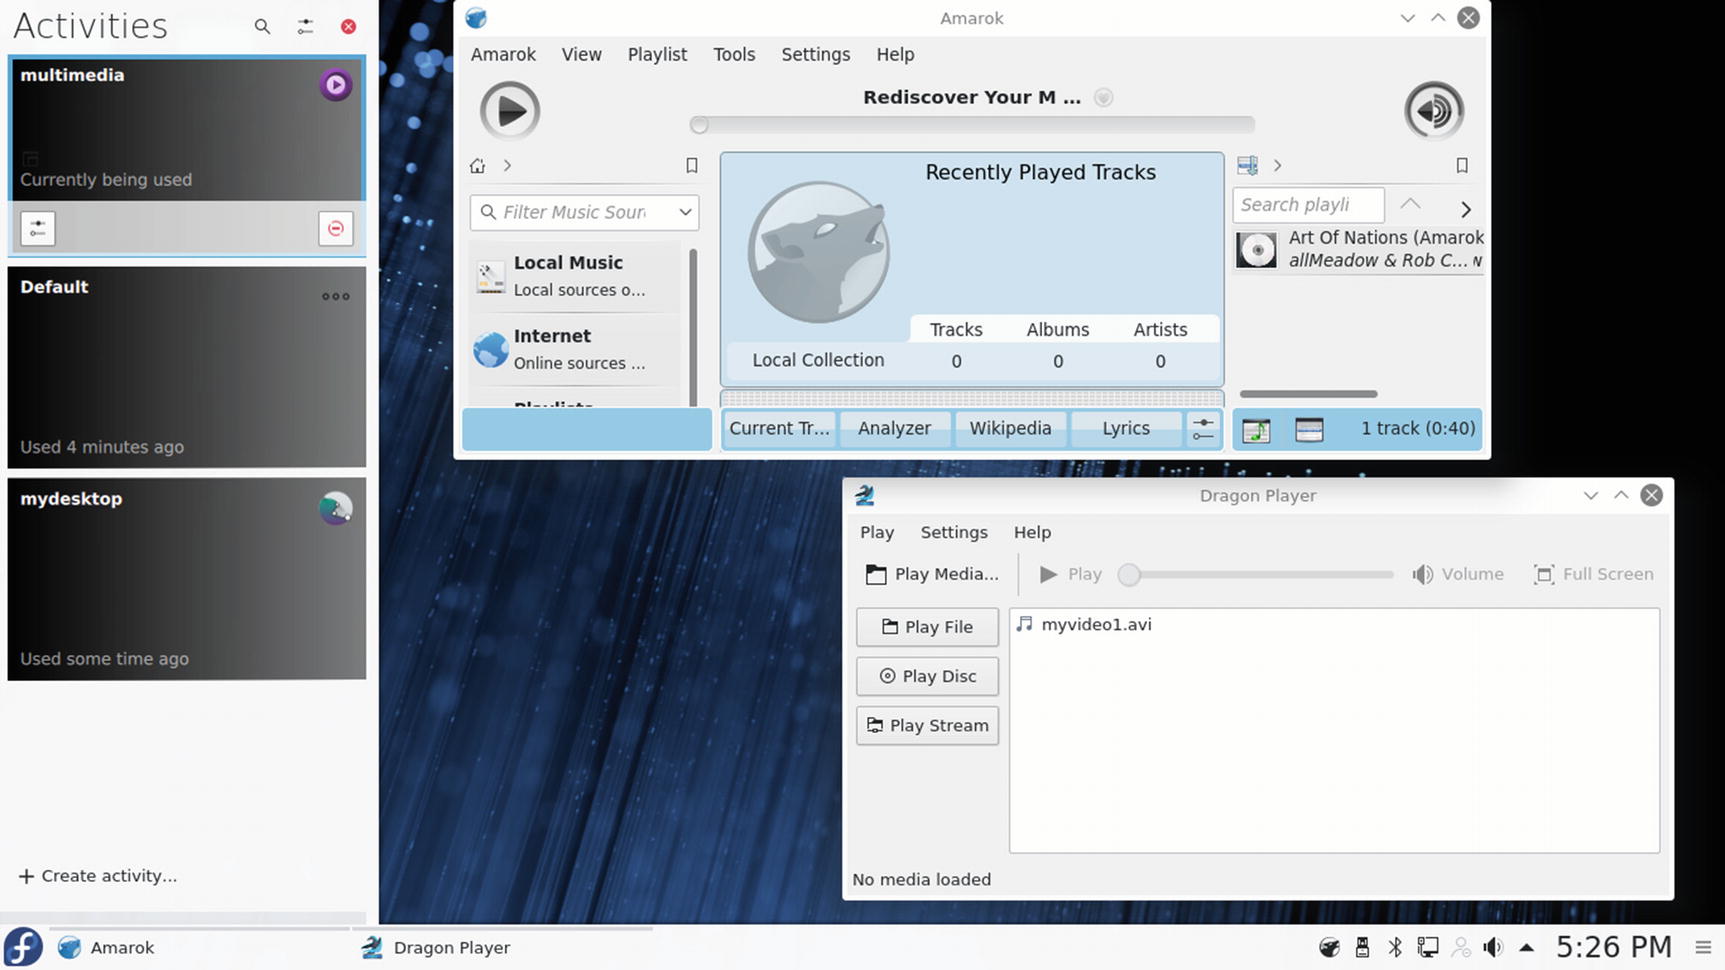
Activity Manager and screen of selected activity
To move easily between activities, you can add the Activity bar widget, either to the panel or to the desktop. On the panel, the Activity bar displays buttons for each activity. Click to move to a different activity. On the desktop , the Activity bar displays a dialog with an arrow button for moving from one activity to another.
Windows
A Plasma window has the same functionality you find in other window managers and desktops. You can resize the window by clicking and dragging any of its corners or sides. A click-and-drag operation on a side extends the window in that dimension, whereas a corner extends both height and width at the same time. The top of the window has a title bar showing the name of the window, the program name in the case of applications, and the current directory name for the file manager windows. The active window has the title bar highlighted.
To move the window, click the title bar and drag it where you want. Right-clicking the window title bar displays a pop-up menu with entries for window operations, such as minimize, maximize, and moving the window to a different desktop or activity. The More Actions submenu includes closing or resizing the window, the shade option to roll up the window to the title bar, and full screen. Menus, icons, and toolbars for the particular application are displayed in the window.
You can configure the appearance and operation of a window by selecting the Window Manager Settings from the More Actions submenu in the Window menu (right-click the title bar). Here you can set appearance (Window Decoration), button and key operations (Actions), the focus policy, such as a mouse click on the window or just passing the mouse over it (Focus), and how the window is displayed when moving it (Moving). All these features can be configured also using the System Setting's Window Behavior tool in the Workspace section.
Opened windows are shown as buttons on the Plasma taskbar located on the panel. The taskbar shows buttons for the different programs you are running or windows you have open. This is essentially a docking mechanism that lets you change to a window or application by clicking its button. When you minimize a window, it is reduced to its taskbar button. You can then restore the window by clicking its taskbar button. A live thumbnail of a window on the taskbar is displayed as your mouse passes over its taskbar button, showing its name, desktop, and image.
Taskbar buttons also function as progress bars, showing the progress of copy and download operations. Music and video players also show basic multimedia controls, such as pause, start, next, and previous.
To the right of the title bar are three small buttons for minimizing, maximizing, or closing the window (down, up, and x symbols). You can switch to a window at any time by clicking its taskbar button. You can also maximize a window by dragging it to the top edge of the screen.
From the keyboard, you can use the Alt+Tab key combination to display a list of current open windows. Holding down the Alt key and sequentially pressing Tab moves you through the list.
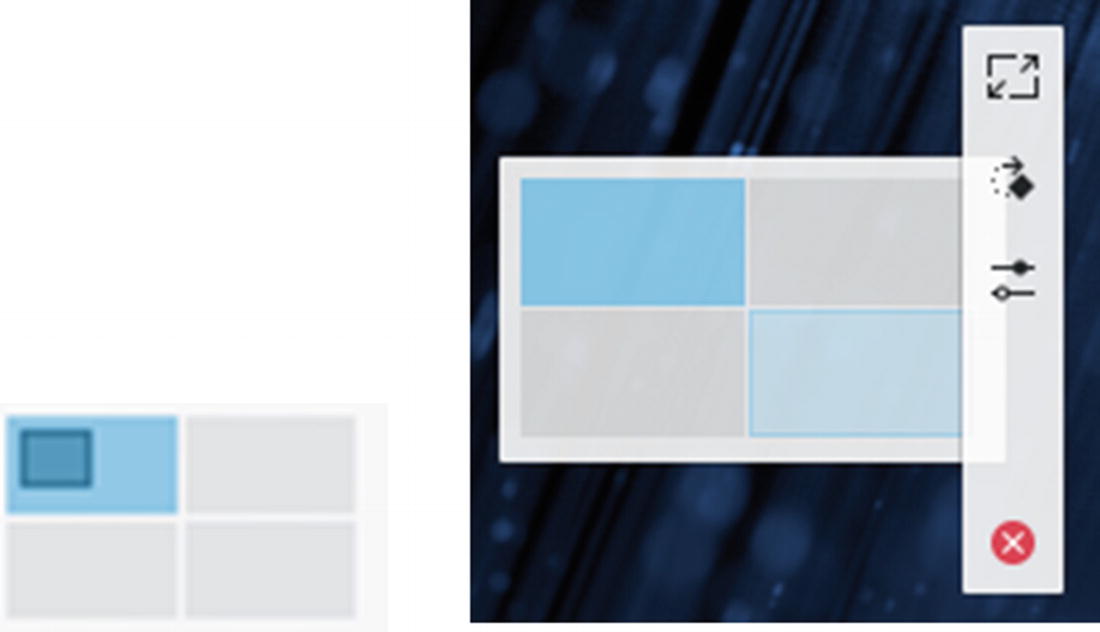
A window can be displayed as a tile on one half of the screen. Another tile can be set up for a different window on the other side of the screen, allowing you to display two windows side by side on the full screen (see Figure 9-28). You can tile a window by dragging it to the side of the screen (over the side edge to the middle of the window). A tile outline will appear. Add a second tile by moving a window to the other side edge. You can add more windows to a tile by moving them to that edge. Clicking on a window's taskbar button will display it on its tile.
Window tiles
Applications
You can start an application in Plasma in several ways. If an entry for it is in the Kickoff Applications menu or Application Dashboard, you can select that entry to start the application. You can right-click on any application entry in the Applications menu to display a pop-up menu with Add to Panel and Add to Desktop entries. Select either to add a shortcut icon for the application to the desktop or the panel. You can then start an application by single-clicking its desktop or panel icon.
An application icon on the desktop is implemented as a desktop widget. Performing a long click on the application icon on the desktop displays a sidebar with the icon for the widget settings. This opens a Settings window that allows you to specify a keyboard shortcut.
You can also run an application by right-clicking on the desktop and selecting the Run Command (or press Alt+F2 or Alt+space), which will display the Krunner tool consisting of a box to enter a single command. Previous commands can be accessed from a pop-up menu. You need only enter a pattern to search for the application. Results will be displayed in the Krunner window. Choose the one you want.
Virtual Desktops: Pager
The Plasma desktop supports virtual desktops, extending the desktop area on which you can work. You could have a web browser running on one desktop and be using a text editor in another. Plasma can support up to 16 virtual desktops. To use virtual desktops, add the Pager widget to your panel or desktop. On the panel, you can use the panel editor (toolbox, right side) to move it to the location you want on the panel. The panel and desktop pagers are shown here.
The Pager widget represents your virtual desktops as miniature screens, showing small squares for each desktop. It works much like the GNOME Workspace Switcher. To move from one desktop to another, click the square for the destination desktop. The selected desktop will be highlighted. Just passing your mouse over a desktop image on the panel will open a message displaying the desktop number along with the windows open on that desktop.
If you want to move a window to a different desktop, first open the window’s menu by right-clicking the window’s title bar. Then select the To Desktop entry, which lists the available desktops. Choose the one you want.
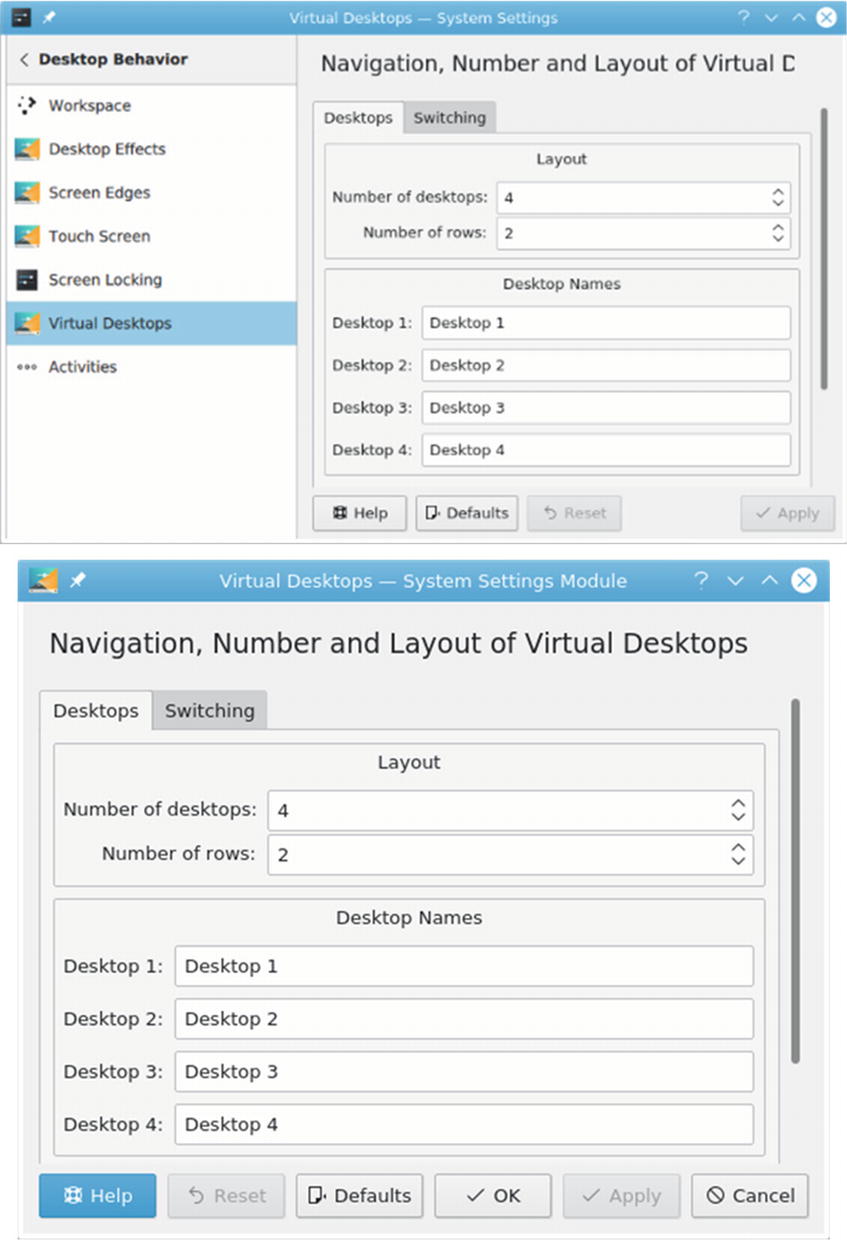
Virtual desktop configuration (desktop behavior) and Pager widget icon
To change the number of virtual desktops, right-click on the Desktop Pager widget, select the Configure Desktops entry in the pop-up menu to open the Virtual Desktops dialog, and choose the Desktops tab, which displays entries for your active desktops. You can also access the Virtual Desktops dialog from System Settings ➤ Desktop Behavior in the Workspace section (see Figure 9-29). The text box labeled Number of Desktops controls the number of active desktops. Use the arrows or enter a number to change the number of active desktops. You can change any of the desktop names by clicking an active name and entering a new one.
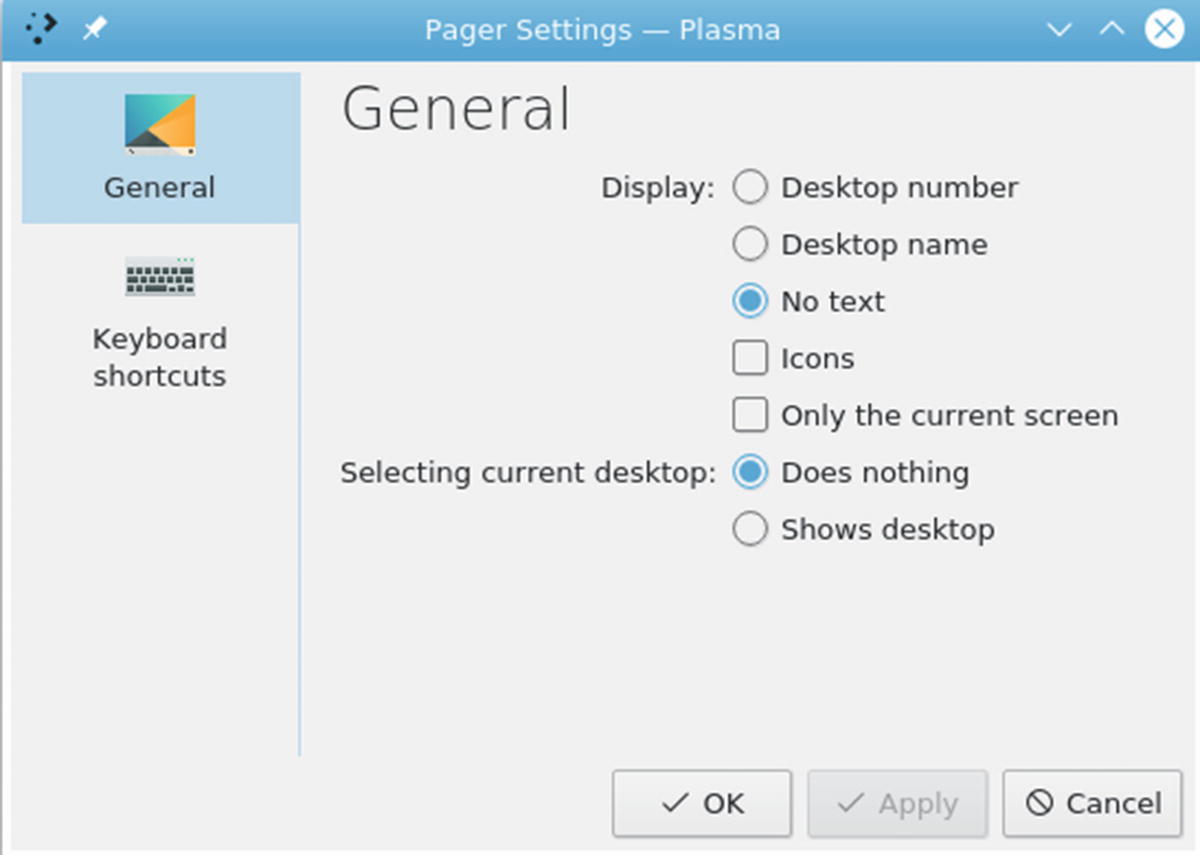
Pager Settings dialog
Tip
Use the Ctrl key in combination with a function key to switch to a specific desktop: for example, Ctrl+f1 switches to the first desktop and Ctrl+f3 to the third desktop.
Plasma Panel

The Plasma panel
To add an application to the panel, right-click on its entry in the Kickoff menu to open a pop-up menu and select Add to Panel.
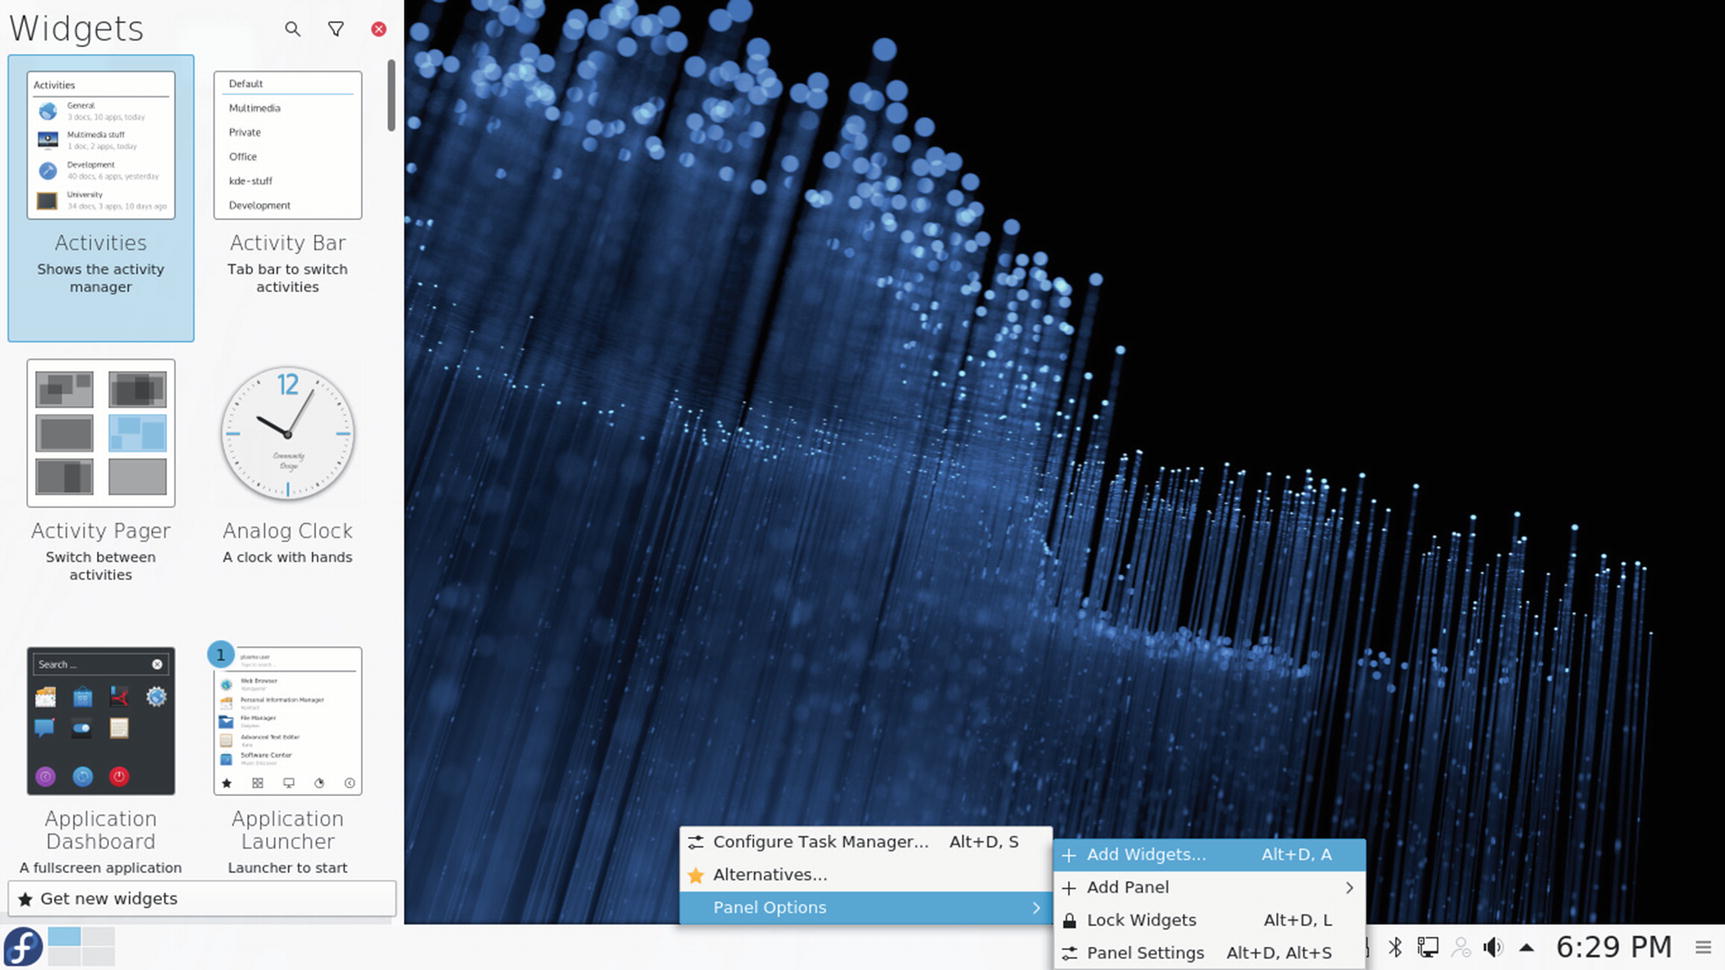
Plasma Add Widgets for panel
The Plasma panel supports several kinds of Windows and Tasks widgets, including the taskbar (Task Manager) and system tray. To the right of the system tray is the digital clock. The system tray holds widgets for desktop operations like update notifier, the clipboard, Bluetooth, device notifier, sound settings (kmix), media player (if a multimedia player is active), and network manager, as shown here.

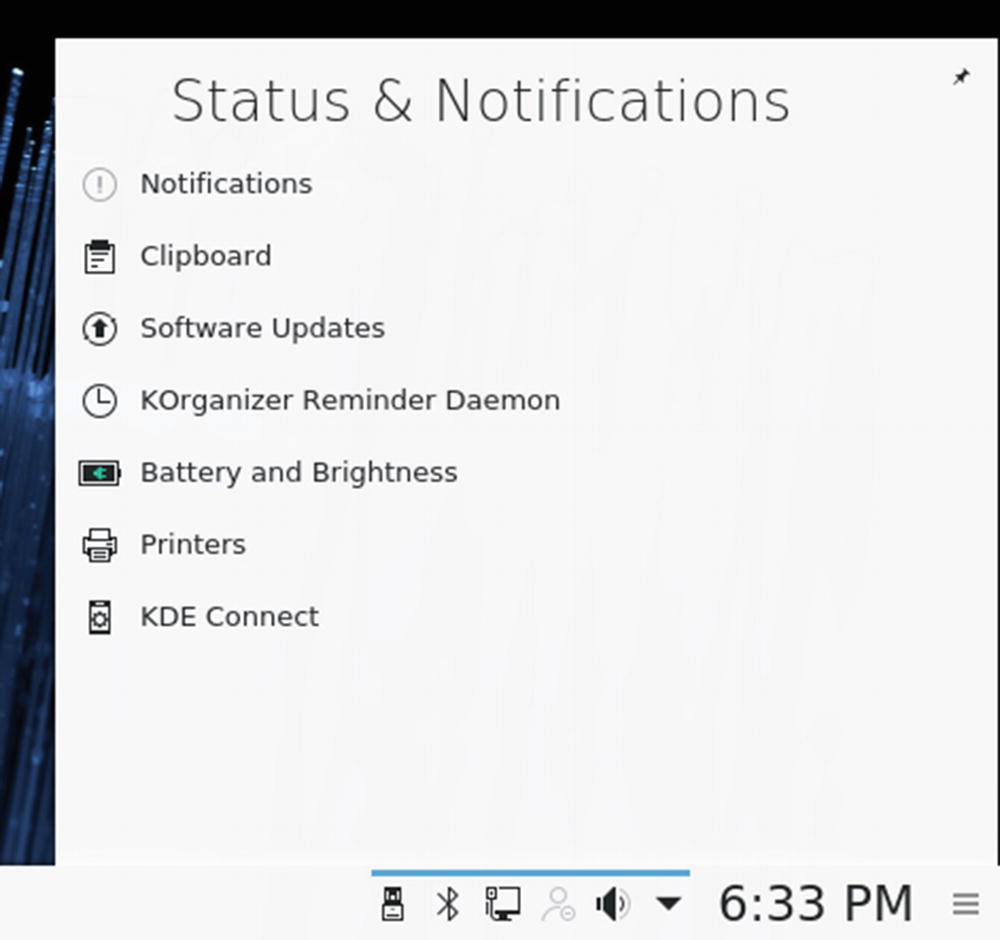
System tray

Plasma panel system tray settings
Plasma Panel Configuration

Plasma Panel Configuration
With the configuration panel activated, you can also move widgets around the panel. Clicking on a widget will overlay a movement icon , letting you then move the widget icon to a different location on the panel.
As you move your mouse over a widget in the panel, a pop-up dialog opens showing the widget's name, a settings button, and a delete button (see Figure 9-35). To remove the widget from the panel, click its delete button.
The lower part of the configuration panel is used for panel position settings. On the left side is a slider for positioning the panel on the edge of the screen. On the right side are two sliders for the minimum (bottom) and maximum (top) size of the panel.
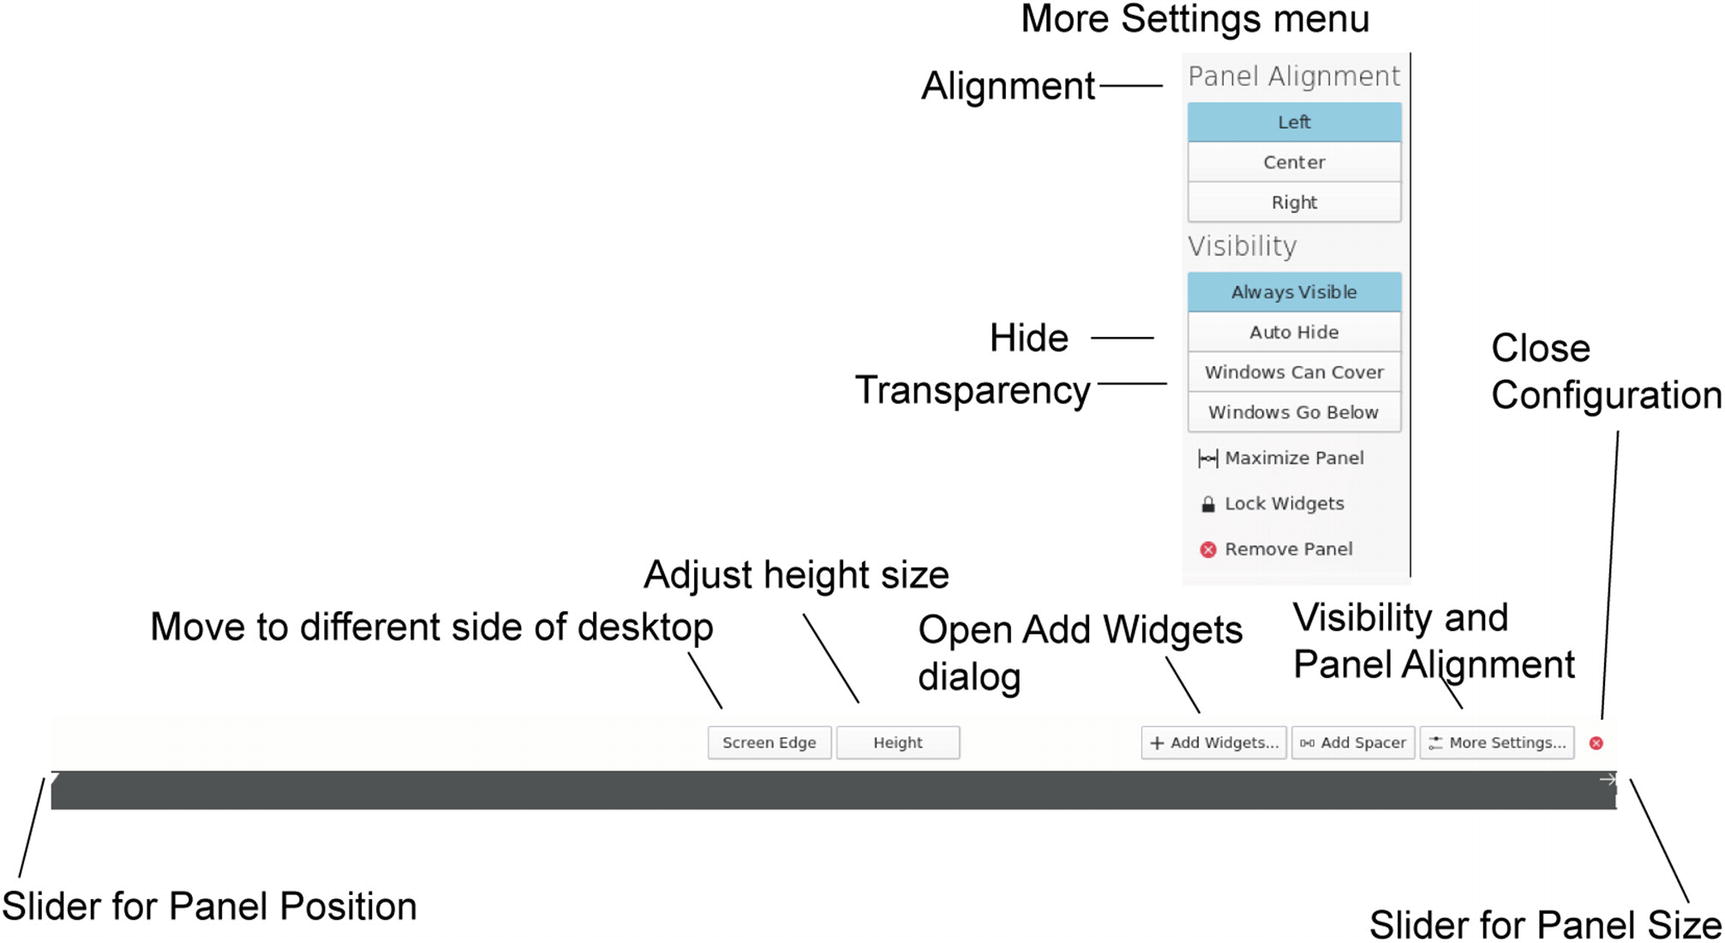
Plasma Panel Configuration details and display features
The More Setting menu lets you set Visibility and Alignment features. You can choose an AutoHide setting that will hide the panel until you move the mouse to its location. The Windows Can Cover option lets a window overlap the panel. For smaller panels, you can align to the right, left, or center of the screen edge. The More Settings menu also has an entry to remove the panel. Use this entry to delete a panel you no longer want.
When you are finished with the configuration, click the red x icon the upper-right side.
Desktop Effects
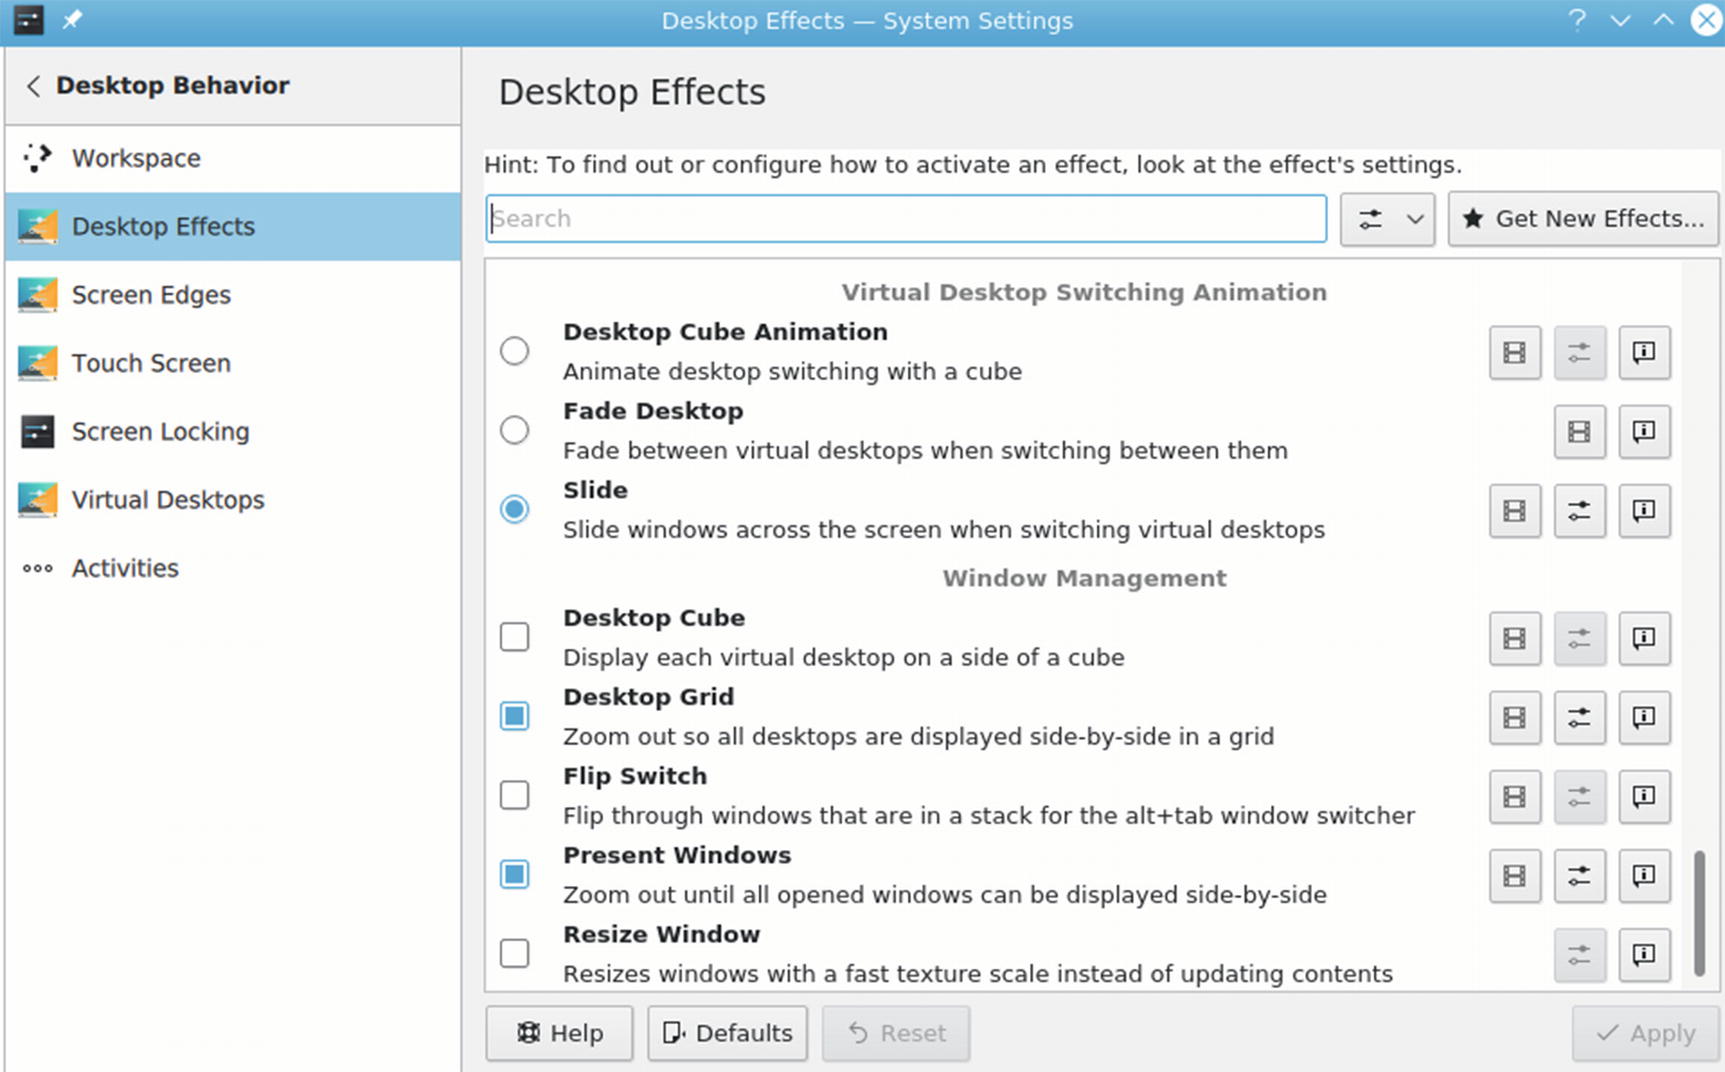
Desktop Effects selection
KWin Desktop Effects Keyboard Shortcuts
Key | Operation |
|---|---|
Alt+Tab | Cover Switch, Thumbnail, or Breeze for open windows |
Ctrl+F8 | Desktop Grid (use mouse to select a desktop) |
Ctrl+F9 | Present Windows Current Desktop |
Ctrl+F10 | Present Windows All Desktops |
Ctrl+F11 | Desktop Cube (use mouse or arrow keys to move, ESC to exit) |
Desktop Effects configuration

Thumbnail and Breeze switch: Use Alt+Tab
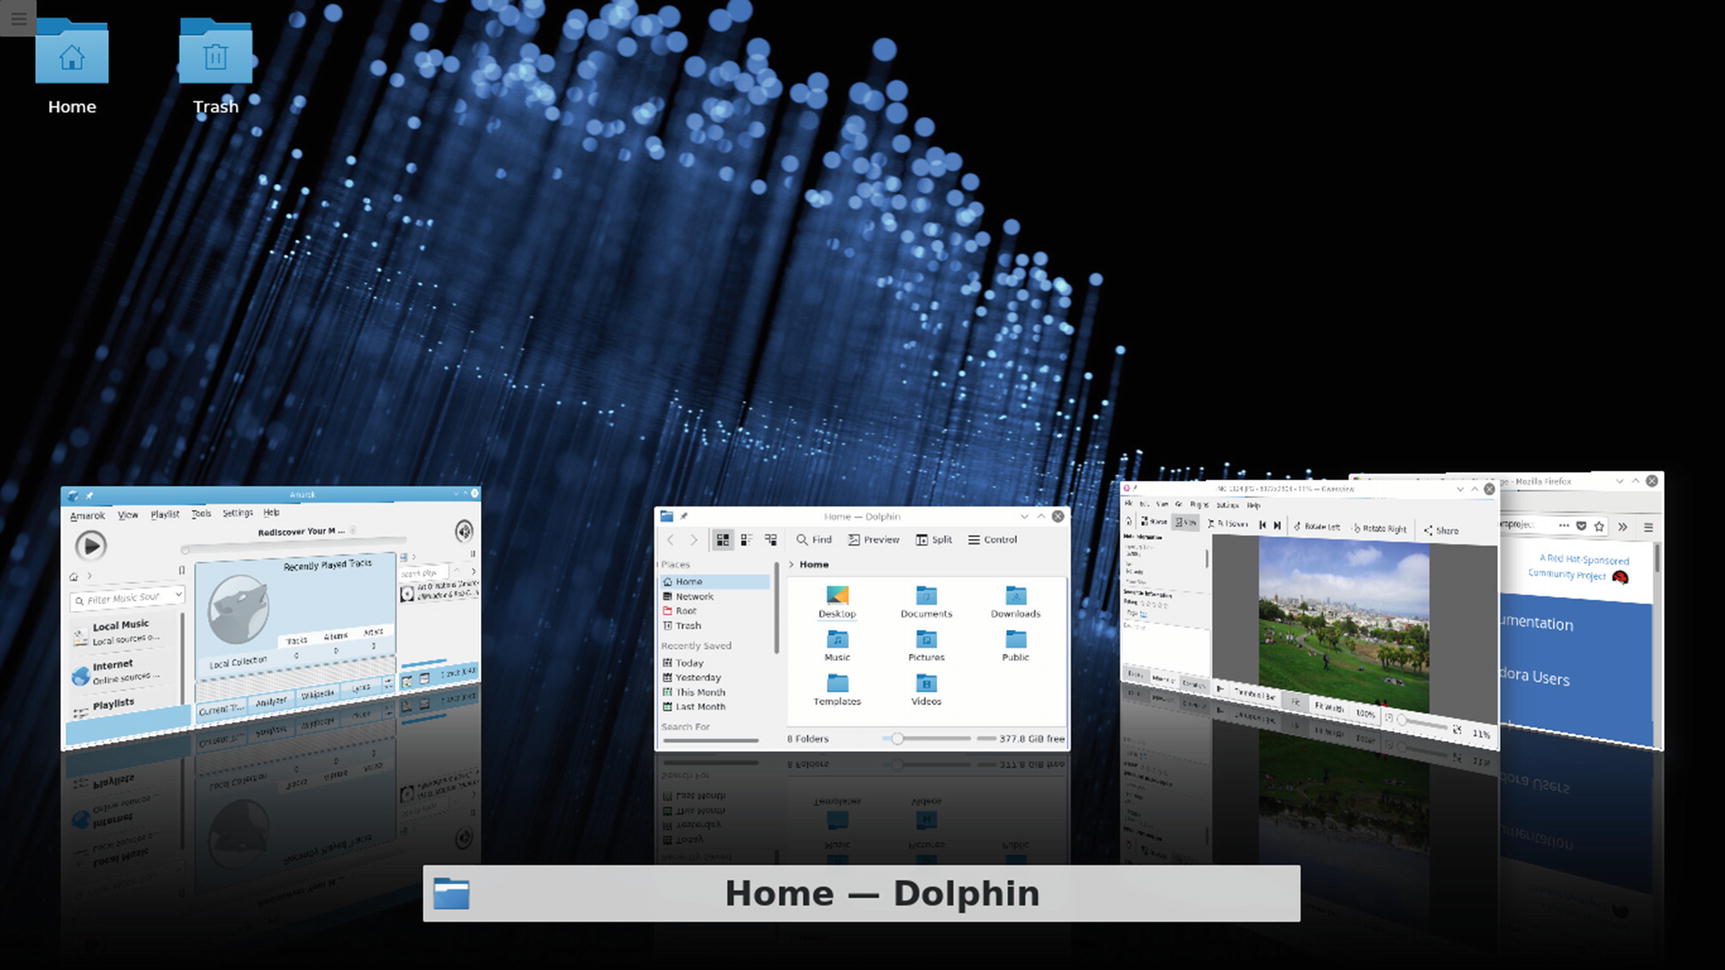
Cover Switch: Use Alt+Tab
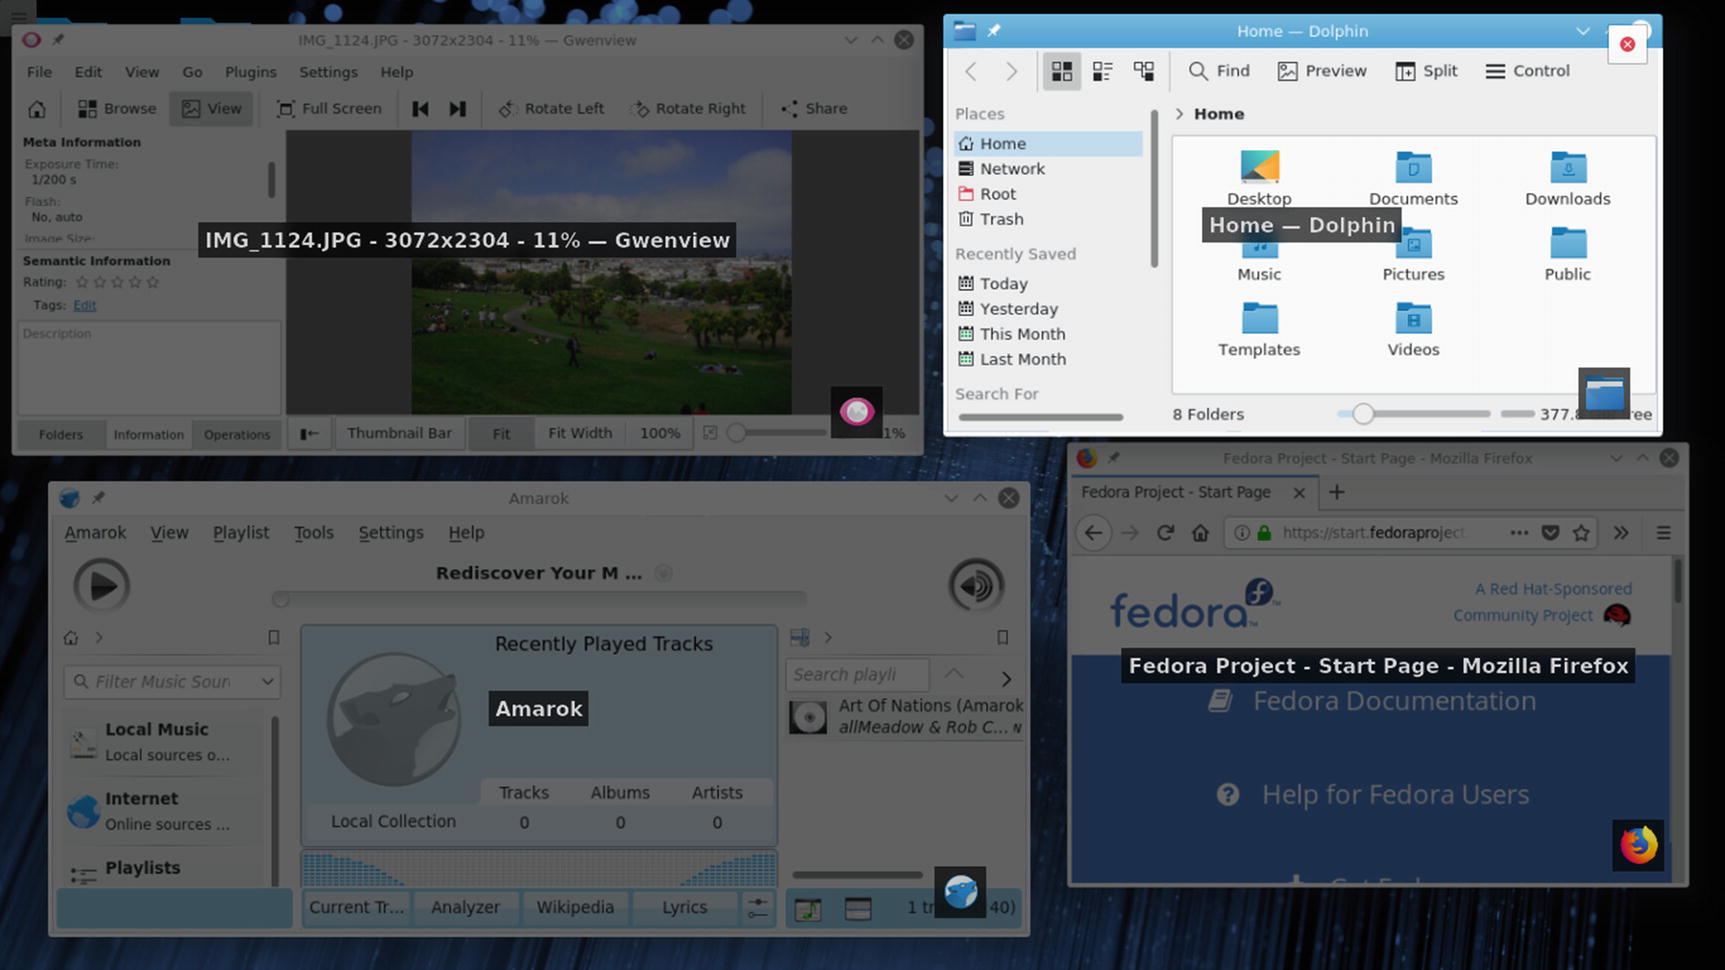
Present windows (windows effects): Use Ctrl+F9 for current desktop and Ctrl+F10 for all desktops
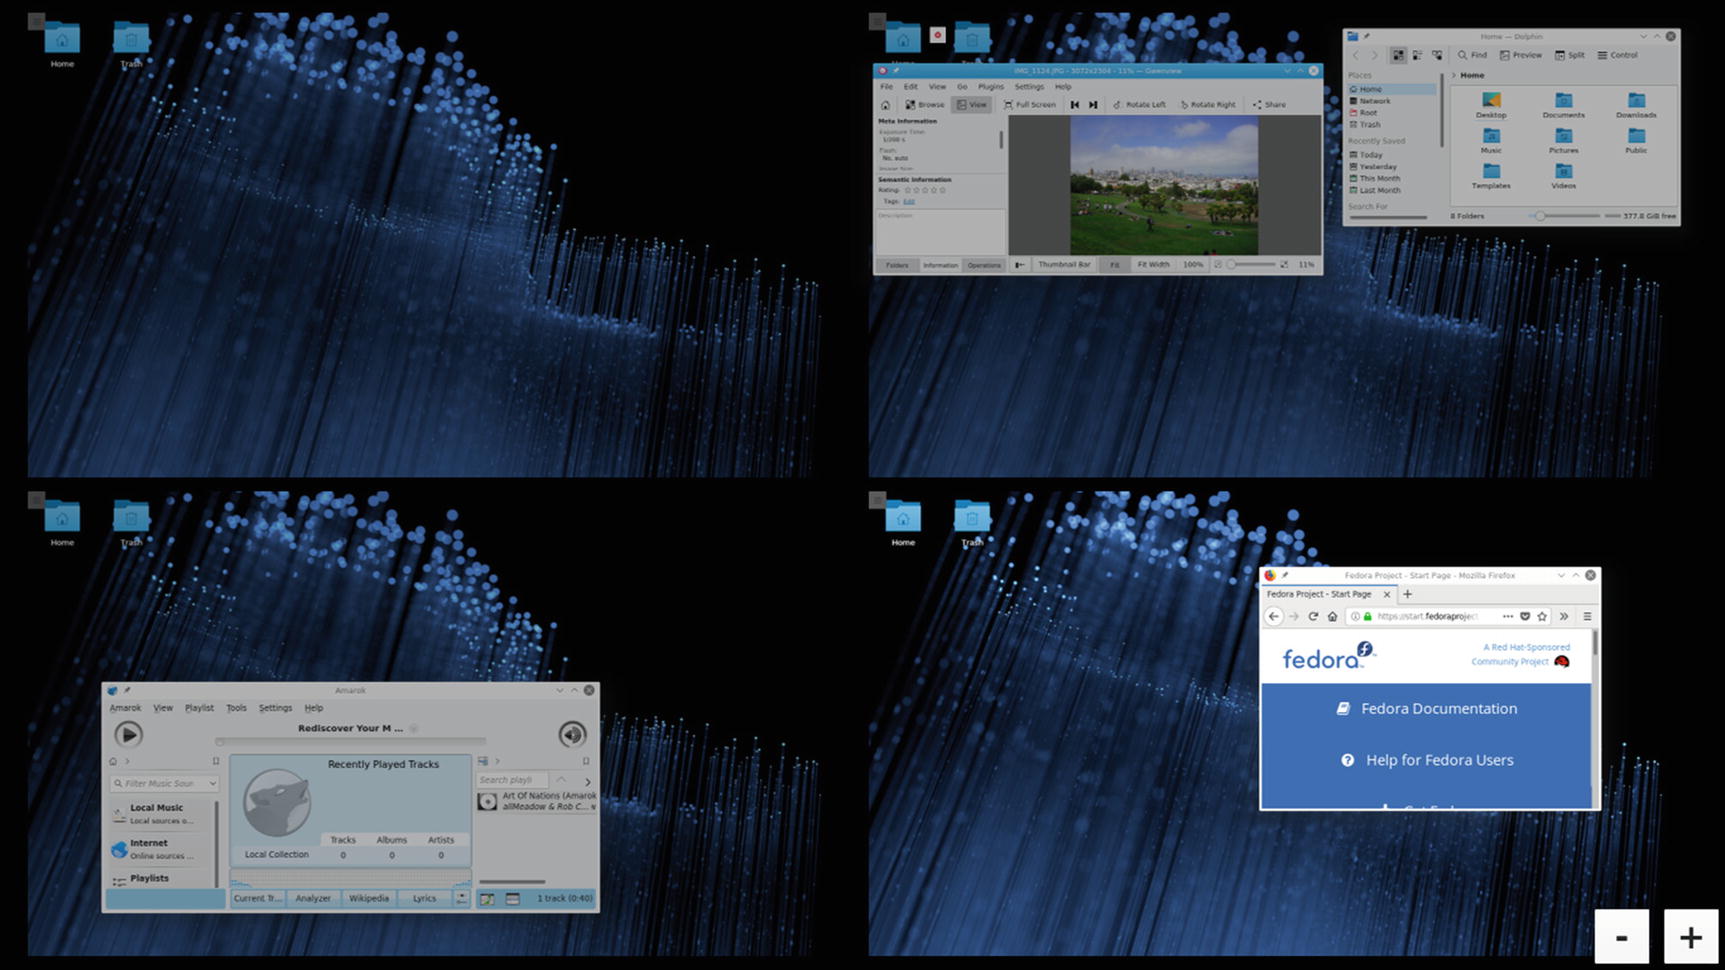
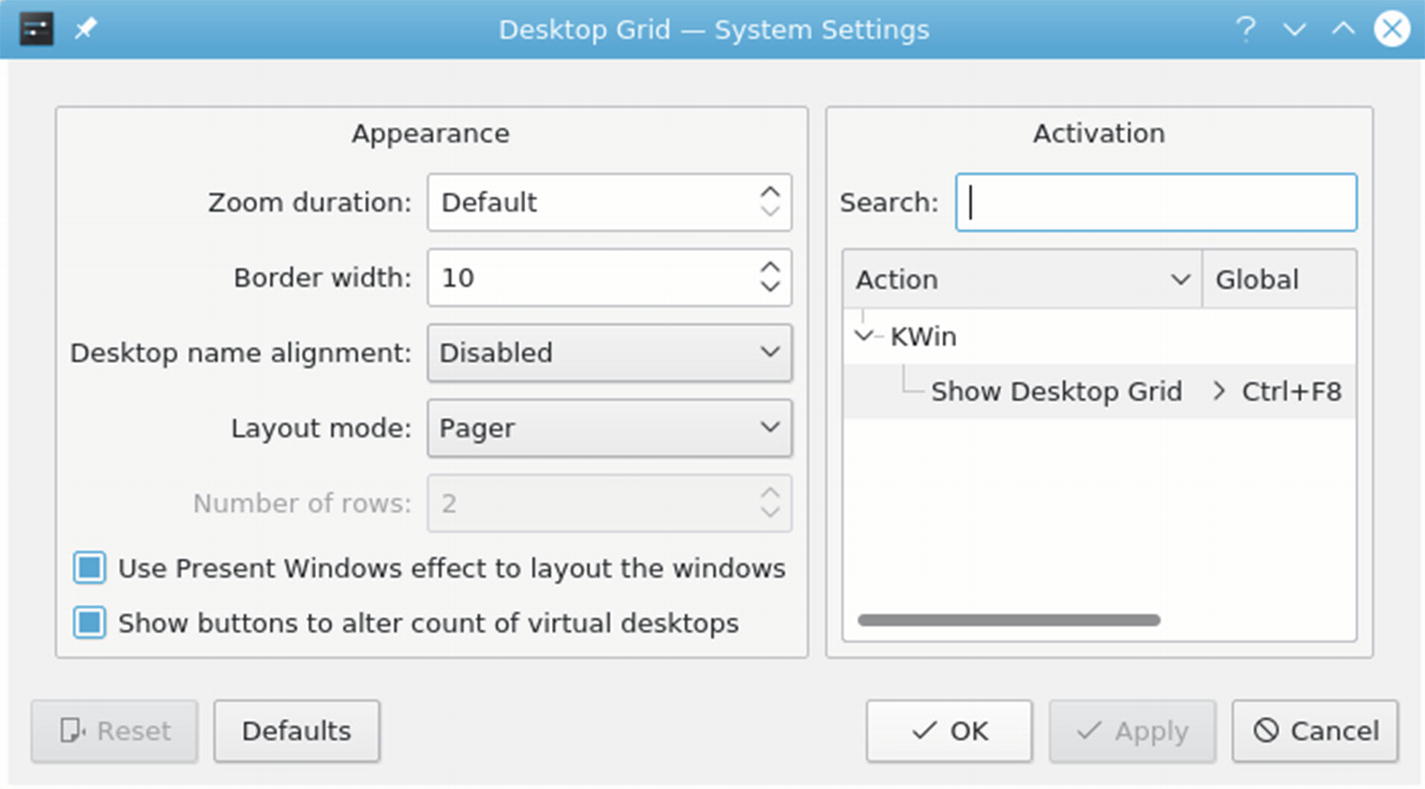
Desktop Grid: Ctrl+F8
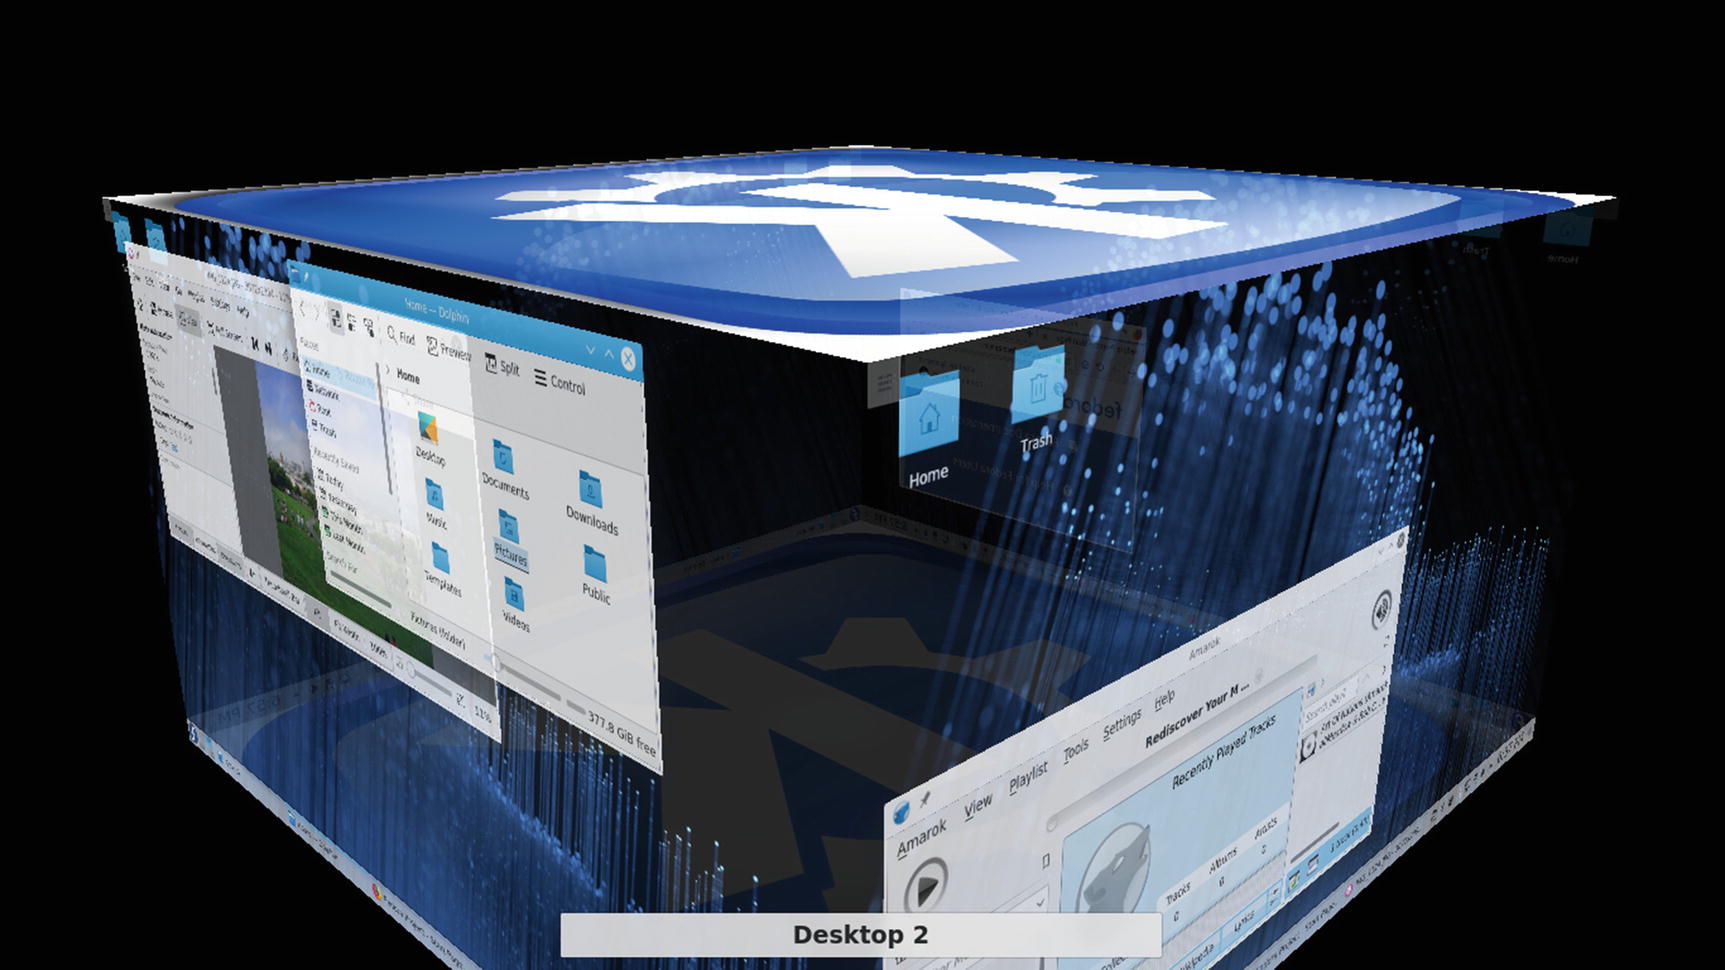
Desktop Cube : Ctrl+F11, drag-mouse, or use the right/left arrow keys (or two-finger drag on a touchpad)
Plasma File Manager: Dolphin
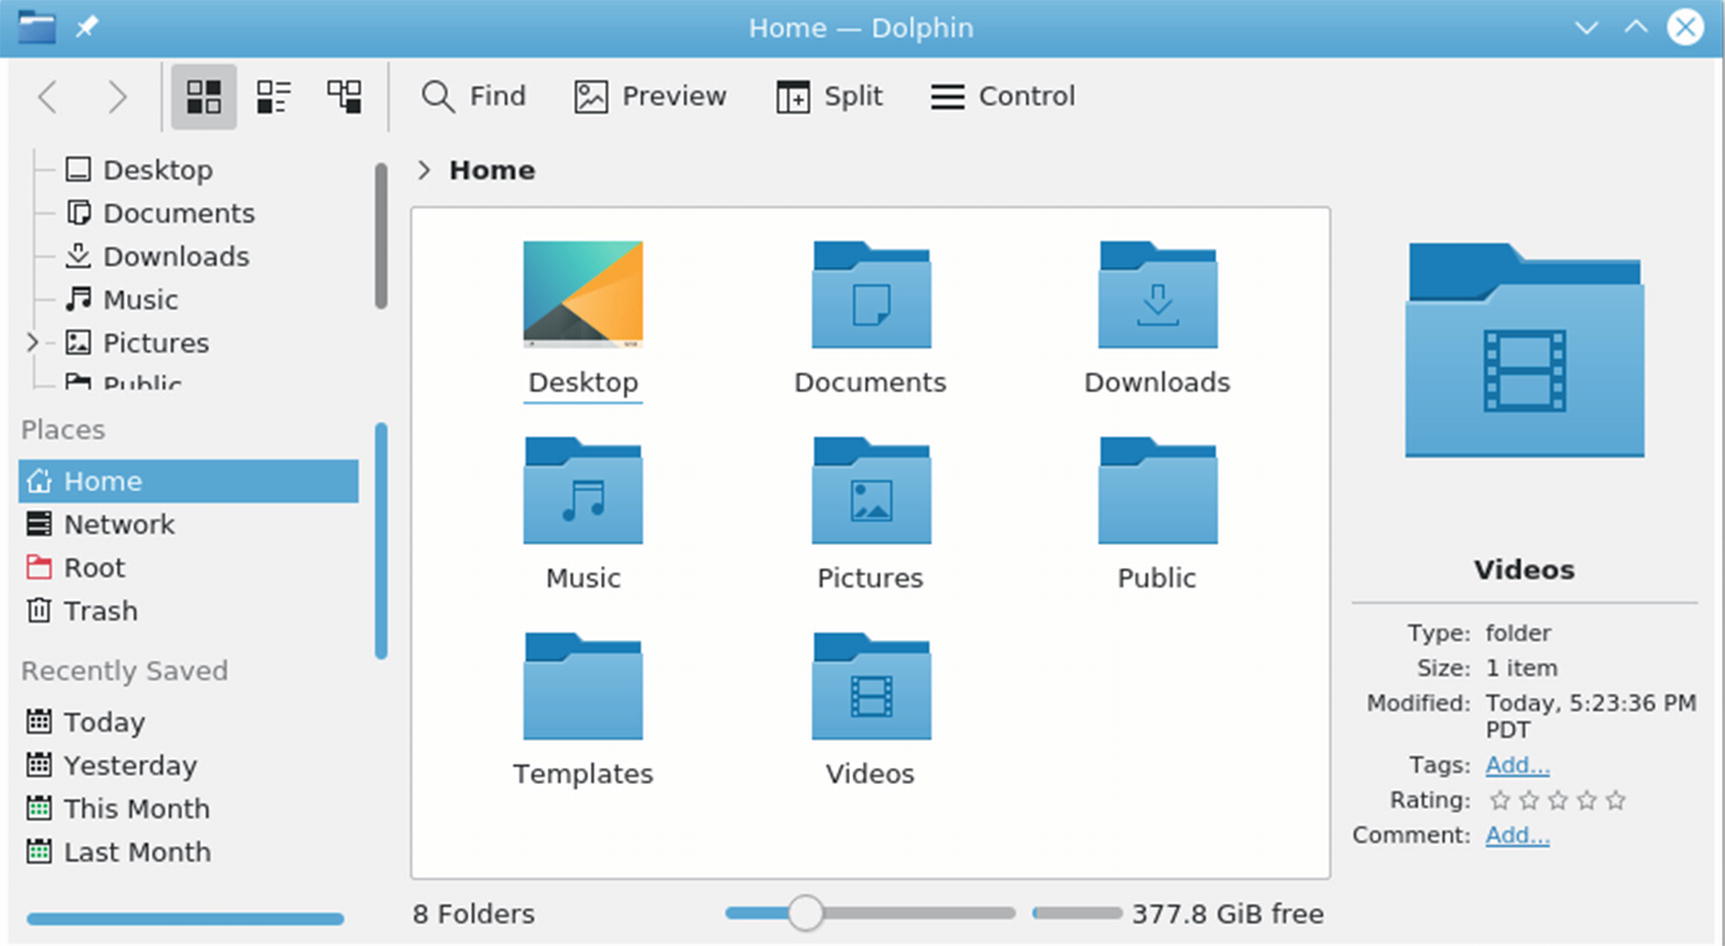
Dolphin is Plasma's dedicated file manager (see Figure 9-44). A navigation bar shows the current directory either in a browser or edit mode. In the browse mode it shows icons for the path of your current directory, and in the edit mode, it shows the path name in a text-editable box. You can use either to move to different folders and their subfolders. Use the Ctrl+l key or click to the right of the folder buttons to use the edit mode. You can also choose Control ➤ Location Bar ➤ Editable Location. Clicking on the checkmark at the end of the editable text box returns you to the browser mode.
The Dolphin menu bar has been hidden by default. The menus are displayed when clicking the Control button on the right end of the toolbar (see Figure 9-45). You can redisplay the menu bar by choosing Show Menubar from the Control (or View) menu (Ctrl+m). You can hide the menu bar again by choosing Show Menubar from the Settings menu (or pressing Ctrl+m).

The Dolphin File Manager (Plasma desktop)

The Dolphin File Manager menus
Dolphin File Manager Keyboard Shortcuts
Keys | Description |
|---|---|
Alt+left arrow, Alt+right arrow | Backward and Forward in history |
Alt+up arrow | One directory up |
Enter | Open a file/directory |
Left/Right/Up/Down arrows | Move among the icons |
Page Up, Page Down | Scroll fast |
Ctrl+c | Copy selected file to clipboard |
Ctrl+v | Paste files from clipboard to current directory |
Ctrl+s | Select files by pattern |
Ctrl+l | URI text box location bar |
Ctrl+f | Find files |
Ctrl+q | Close window |
The Dolphin File Manager with sidebars
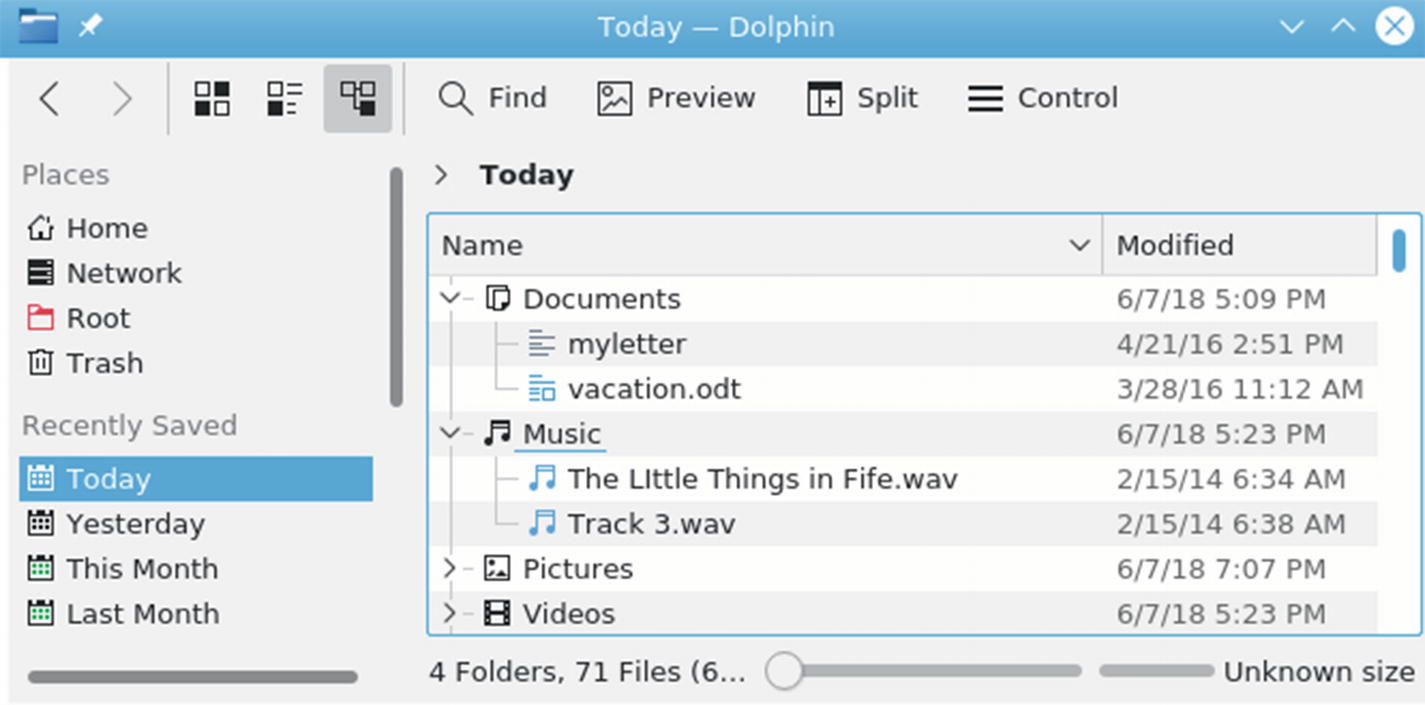
The Recently Saved panel of the Dolphin File Manager
You can display additional panels by selecting them from the Control ➤ Panels submenu. The Information panel displays detailed information about a selected file or folder, and the Folders panel displays a directory tree for the file system. The panels are detachable from the file manager window (see Figure 9-46). Be sure to choose Unlock Panels in the Panels menu to make them detachable.
The Places panel use the file metadata to provide easy access to files by category and date. The Places panel has four sections: Places, Recently Saved, Search For, and Devices. As in previous versions, the Places section holds your folders, including root, trash, and network, and the Devices section holds your attached devices, including removable devices. The Recently Saved section lets you display files you access fairly recently: today, yesterday, this month, and last month (see Figure 9-47). The Search For section lets you displays files of specified types: documents, images, audio files, and videos.
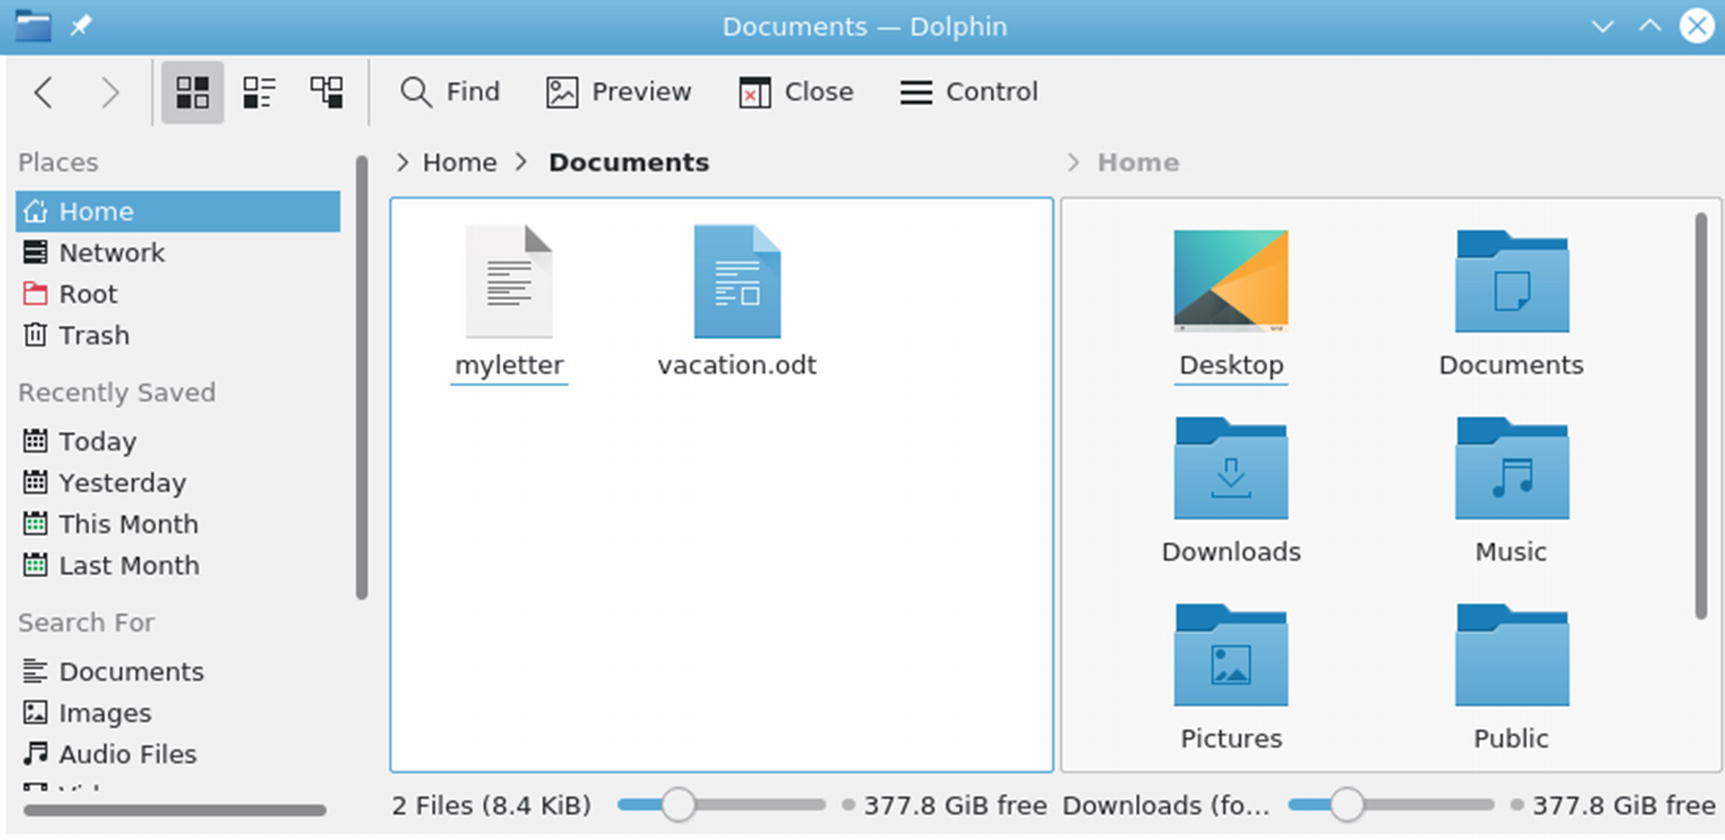
The Dolphin File Manager with split views
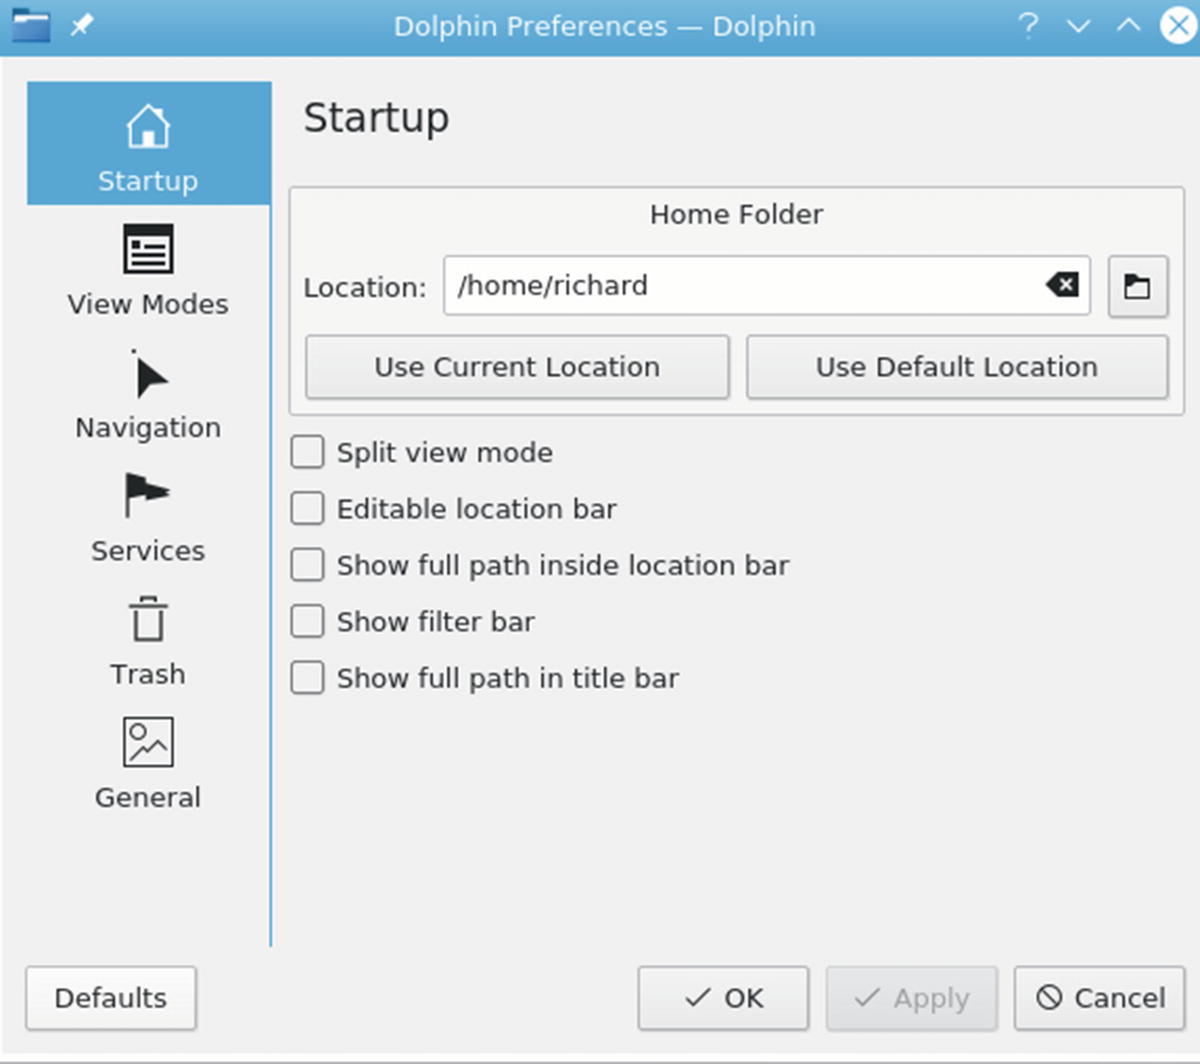
The Dolphin File Manager configuration
Navigating Directories
Within a file manager window , a single-click on a folder icon moves to that folder and displays its file and sub-folder icons. To move back up to the parent folder, you click the back arrow button located on the left end of the navigation toolbar. A single-click on a folder icon moves you down the folder tree, one folder at a time. By clicking the back arrow button, you move up the tree. The Navigation bar can display either the folder path for the current folder or an editable location box where you can enter in a pathname. For the folder path, you can click on any displayed folder name to move you quickly to an upper-level folder. To use the location box, click to the right of the folder path. The Location box is displayed. You can also select Show Full Location in the View ➤ Location Bar ➤ Editable Location menu item (or press Ctrl+L or F6). The navigation bar changes to an editable text box, where you can type a path name. To change back to the folder path, click the checkmark to the right of the text box.
Like a web browser, the file manager remembers the previous folder it has displayed. You can use the back and forward arrow buttons to move through this list of prior folders. You can also use several keyboard shortcuts to perform such operations, like Alt+back arrow to move up a folder, and the arrow keys to move to different icons.
The Copy, Move, Delete, Rename, and Link Operations
To perform an operation on a file or folder, you first have to select it by clicking the file’s icon or listing. To select more than one file, hold down the Ctrl key down while you click the files you want. You can also use the keyboard arrow keys to move from one file icon to another.
To copy and move files , you can use the standard drag-and-drop method with your mouse. To copy a file, you locate it by using the file manager. Open another file manager window to the folder to which you want the file copied. Then drag-and-drop the file icon to that window. A pop-up menu appears with selections for Move Here, Copy Here, or Link Here. Choose Copy Here. To move a file to another directory, follow the same procedure, but select Move Here from the pop-up menu. To copy or move a folder, use the same procedure as for files. All the folder’s files and subfolders are also copied or moved. Instead of having to select from a pop-up menu, you can use the corresponding keys: Ctrl for copy, Shift for move, and Ctrl+Shift for link (same as for GNOME).
To rename a file, Ctrl+click its icon and press F2, or right-click the icon and select Rename from the pop-up menu. A dialog opens where you can enter the new name for the file or folder.
You can delete a file either by selecting it and deleting it, or placing it in the Trash folder to delete later. To delete a file, select it and then choose the Delete entry in the File menu, File ➤ Delete (also Shift+Del key). To place a file in the Trash folder, drag-and-drop it to the Trash icon on the Places panel, or right-click the file and choose Move To Trash from the pop-up menu. You can later open the Trash folder and delete the files. To delete all the files in the Trash folder, right-click the Trash icon in Dolphin File Manager Places panel and select Empty Trash from the pop-up menu. To restore files in the Trash bin, open the Trash window and right-click on the file to restore and select Restore.
Each file or directory has properties associated with it that include permissions, the filename, and its directory. To display the Properties dialog for a given file, right-click the file’s icon and select the Properties entry. On the General tab, you see the name of the file displayed. To change the filename, replace the name there with a new one. Permissions are set on the Permissions tab. Here, you can set read, write, and execute permissions for user, group, or other access to the file. The Group entry enables you to change the group for a file.
Search Bar and Filter Bar
The Dolphin search tool provides a simplified search bar for files and folders. Dolphin also supports a filter bar to search files and folders in the current folder. You can also use the Filter Panel to refine searches by metadata such as type, date, ratings, and tags. For quick access to basic categories and recent use, you can use the Places panel's Recently Accessed and Search For entries, as noted previously.
Search Bar
To search for files , click the Find button on the icon bar to open the search bar, which displays a search text box. You can also choose Find from the Edit menu or press Ctrl+f. The search bar displays a search text box, where you enter the pattern of the file or folder you are searching for. Click the red x button to the left to close the find bar and use the black x button in the text box to clear the search pattern.
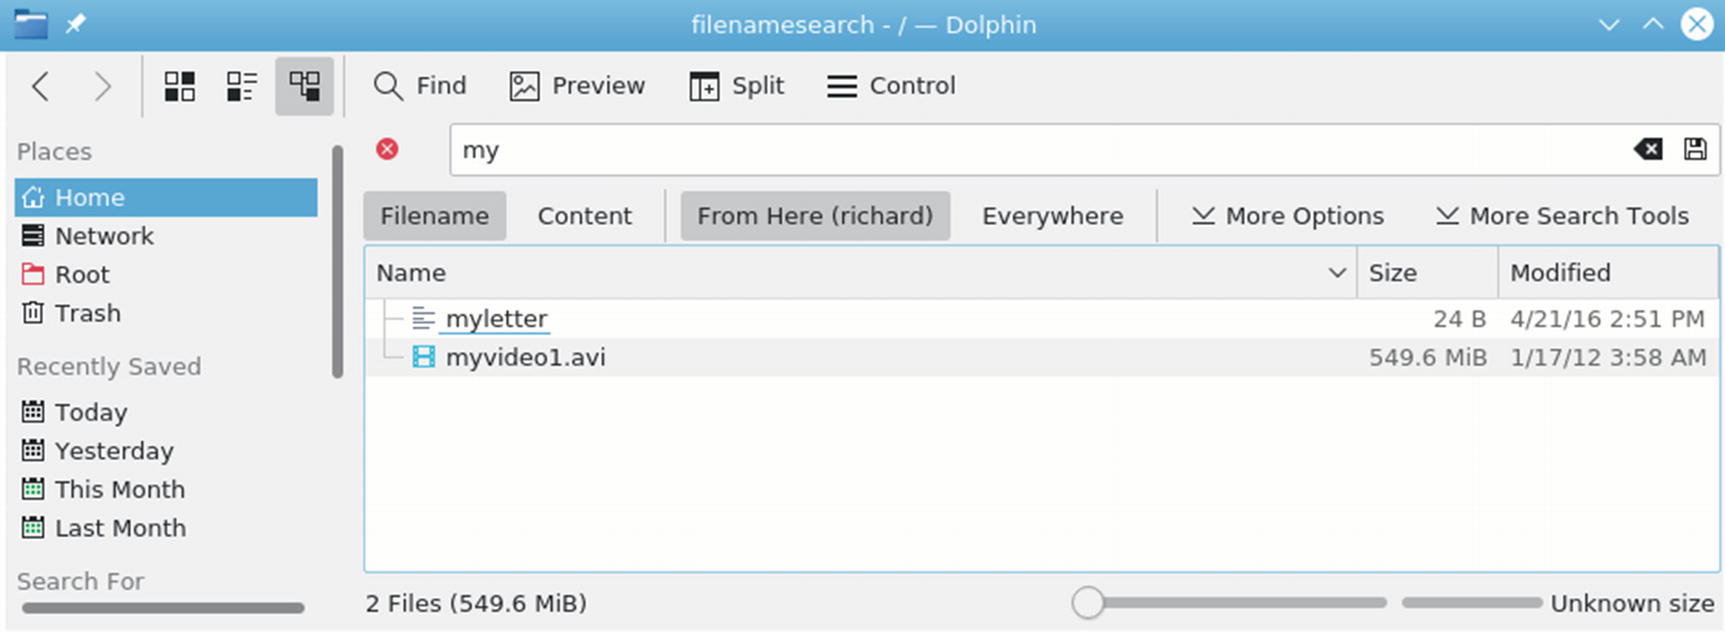
The Dolphin search bar
The search results are displayed in the main pane. You can click a file to have it open with its appropriate application. Text files are displayed by the Kate text editor, images by Gwenview, and applications are run. When you are finished searching, click the Close button.
When you pass your mouse over an icon listed in the Query Results, information about it is displayed on the information panel to the right (if the information panel is displayed). Links are shown for adding tags and comments. Right-clicking on this panel lets you open a configure dialog where you can specify what information to display.
The search operation uses the Dolphin implementation of Baloo desktop search. To configure desktop search, choose System Settings ➤ Workspace ➤ Search, File Search tab. On the File Search tab, you can enable or disable file searching and choose folders not to search.
Filter Bar
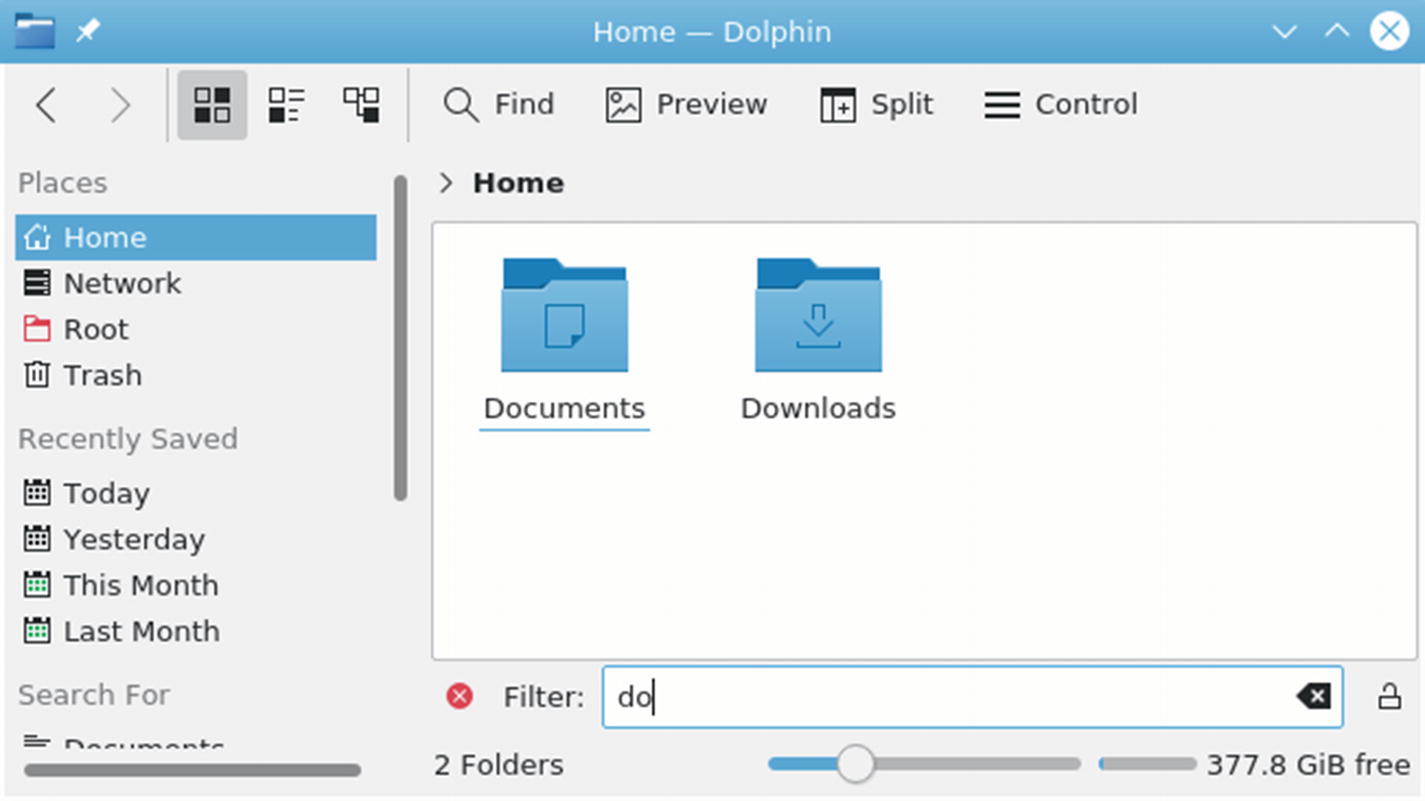
The Dolphin filter bar
Plasma Configuration: System Settings
With the Plasma configuration tools , you can configure your desktop and system, changing the way it is displayed and the features it supports. The configuration dialogs are accessed on the System Settings window (see Figure 9-52). On Plasma, you can access System Settings from the System Settings entry in the Kickoff Computer or Favorites menus, or from Applications ➤ Settings ➤ System Settings. On the Application Dashboard, you can access it in the Favorites section and in the Settings category.
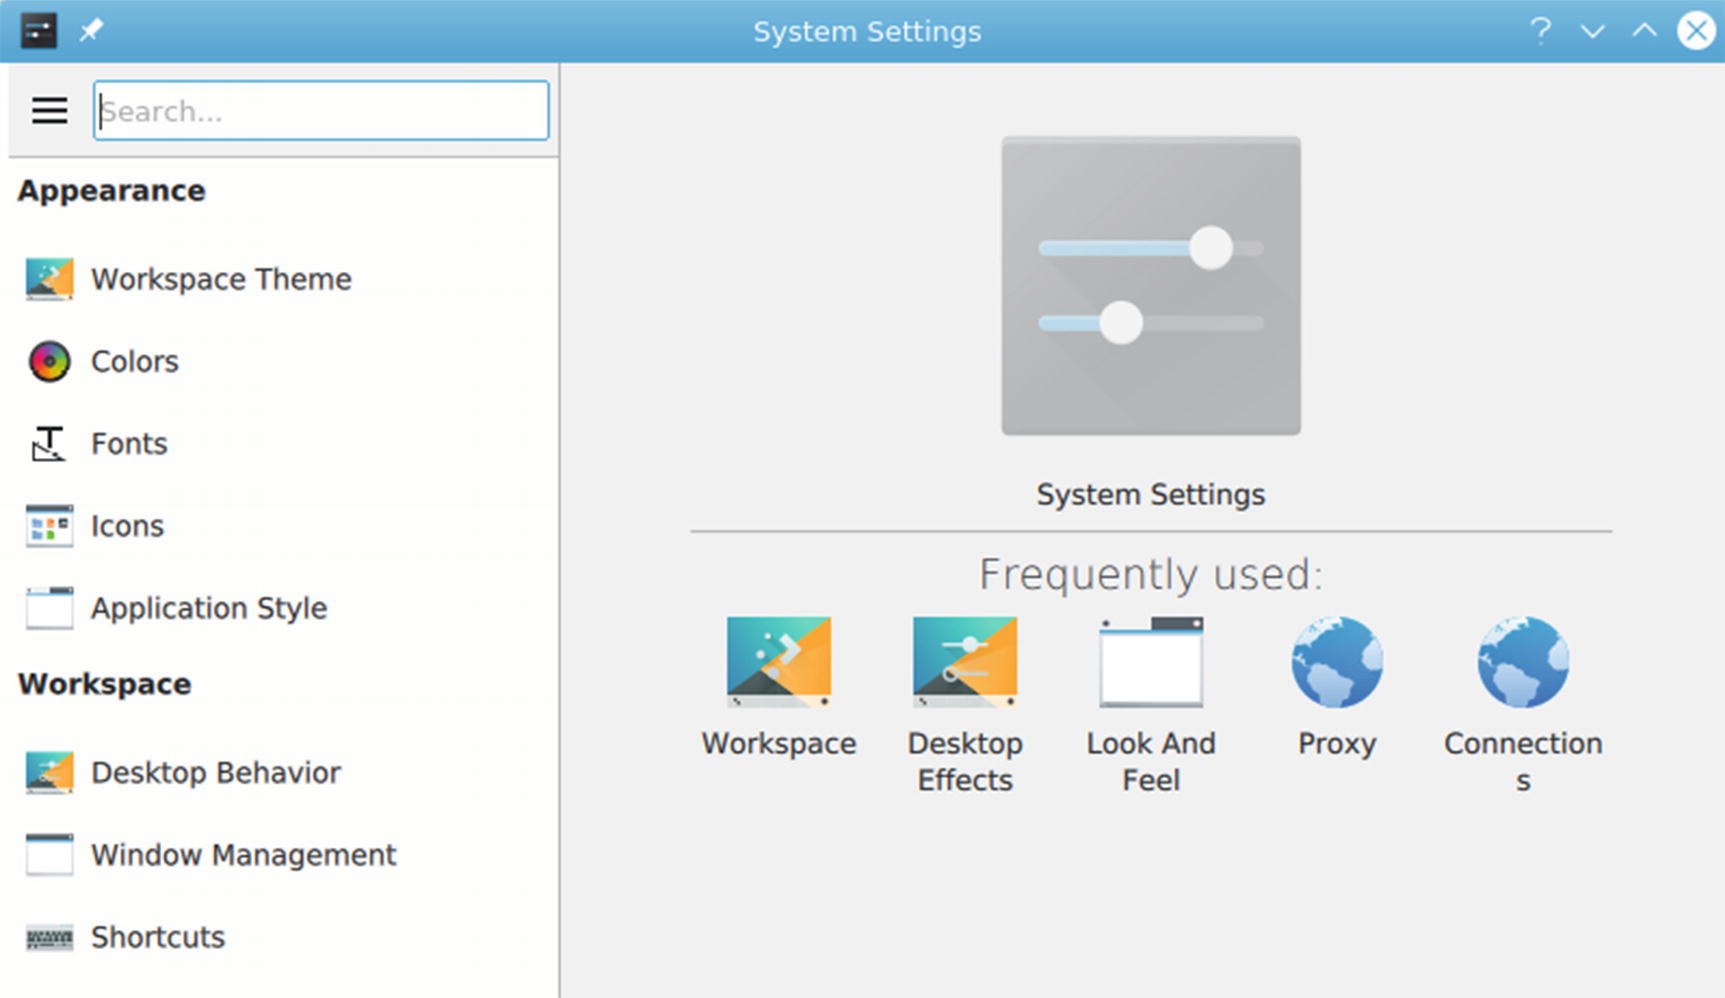
The System Settings window can be displayed three ways: tree view, icon view, and sidebar view. Use the Configure dialog ➤ General tab to choose the view you want. You can access the Configure dialog from the menu on the sidebar view (upper-left corner) or the Configure button on the icon view (top toolbar). The sidebar view is the current default (see Figure 9-52). The icon view was the default in previous releases (see Figure 9-53). With the sidebar view, System Settings shows an icon list of setting categories arranged in several sections: Appearance, Workspace, Personalization, Network, Hardware, and System Administration (see Figure 9-54). Click an entry to display a new icon list in the sidebar with configuration entries for that category. Selecting an entry shows the configuration settings on the right pane (see Figure 9-55).
The Appearance section lets you set the desktop theme, manage fonts, choose icon sets, and select application and window styles. The Workspace section lets you set desktop effects, virtual desktops, window actions, startup applications, desktop search. The Network section holds icons for configuring networking preferences, Bluetooth connections, and sharing. Personalization lets you set the settings for user management, the date and time, notifications, online accounts, and file/application associations. Hardware lets you set the printer configuration, power management, multimedia devices (sound), your display resolution, and manage drivers.
Plasma system settings, sidebar view
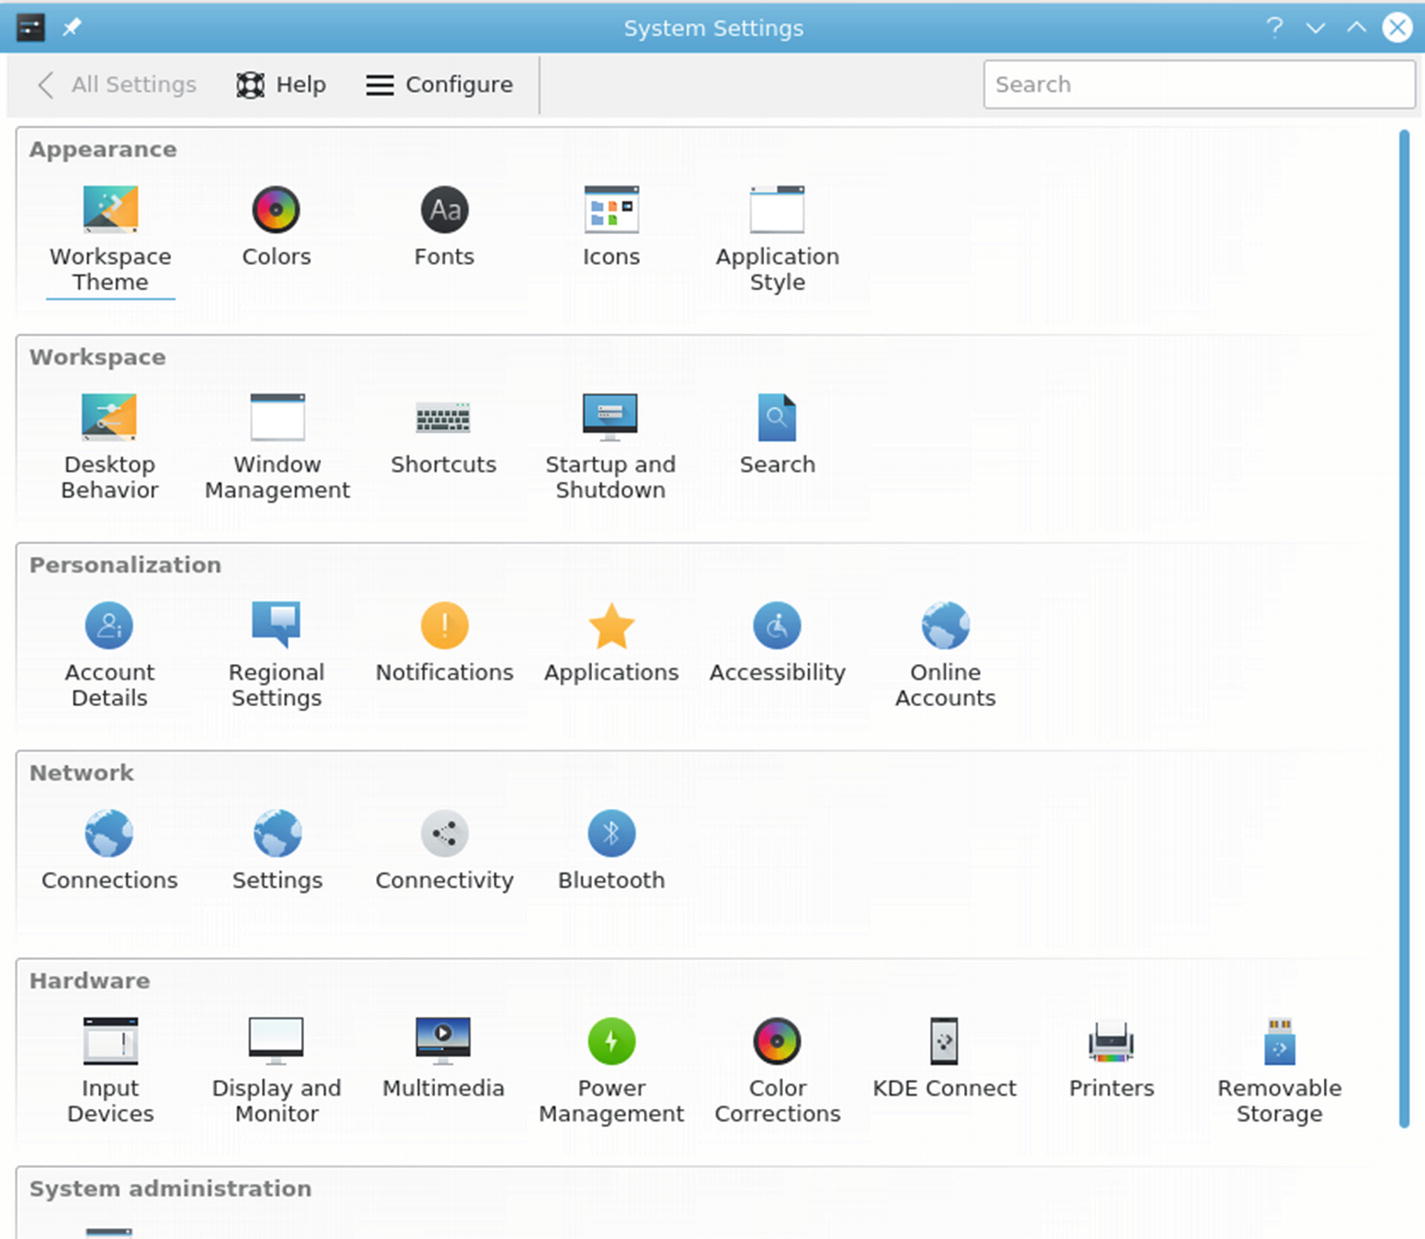
Plasma system settings, icon view
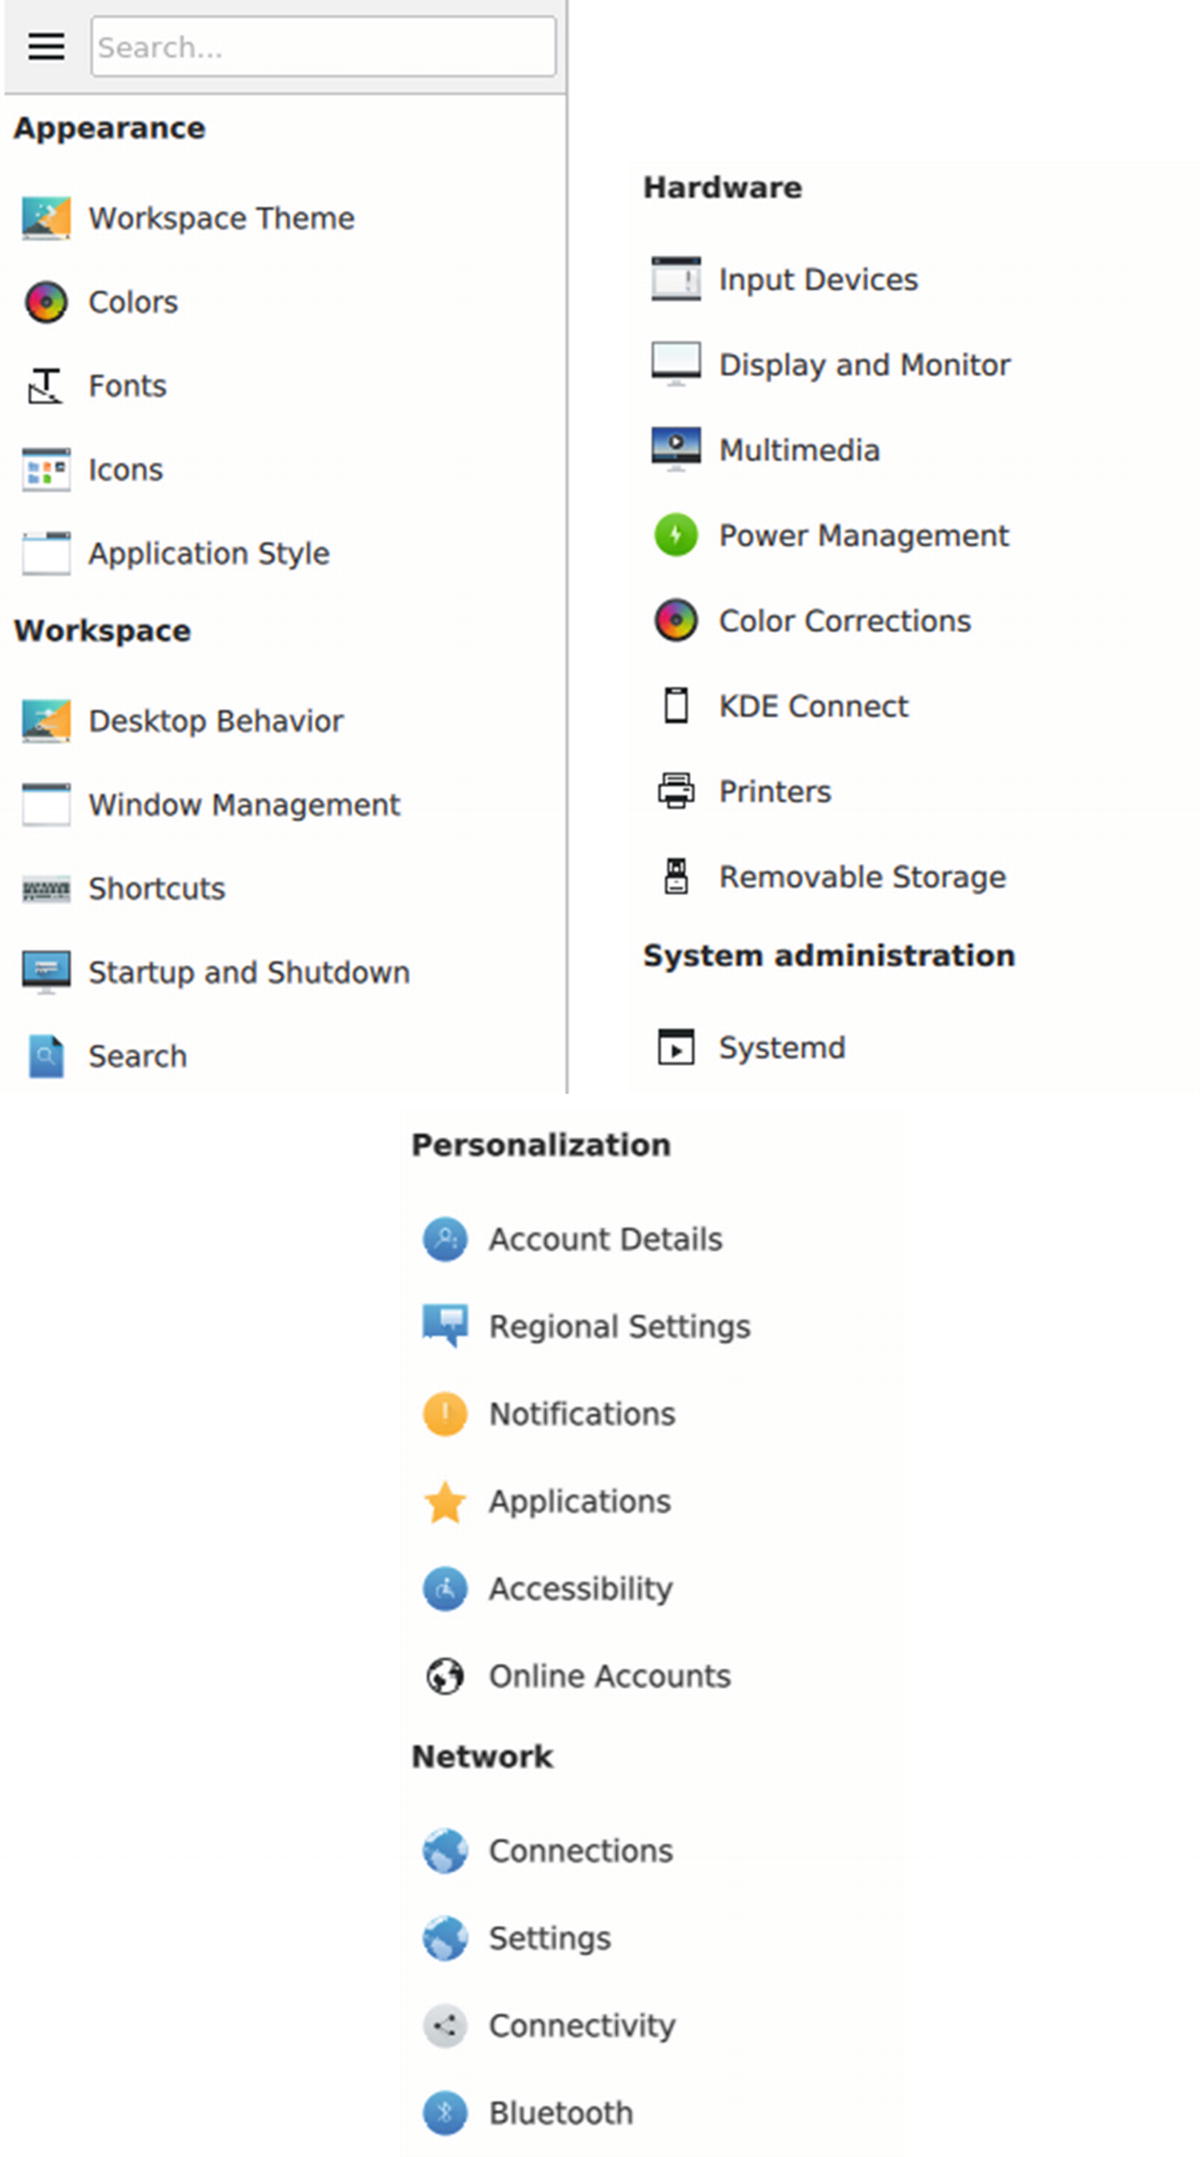
Plasma system settings, sidebar icon list
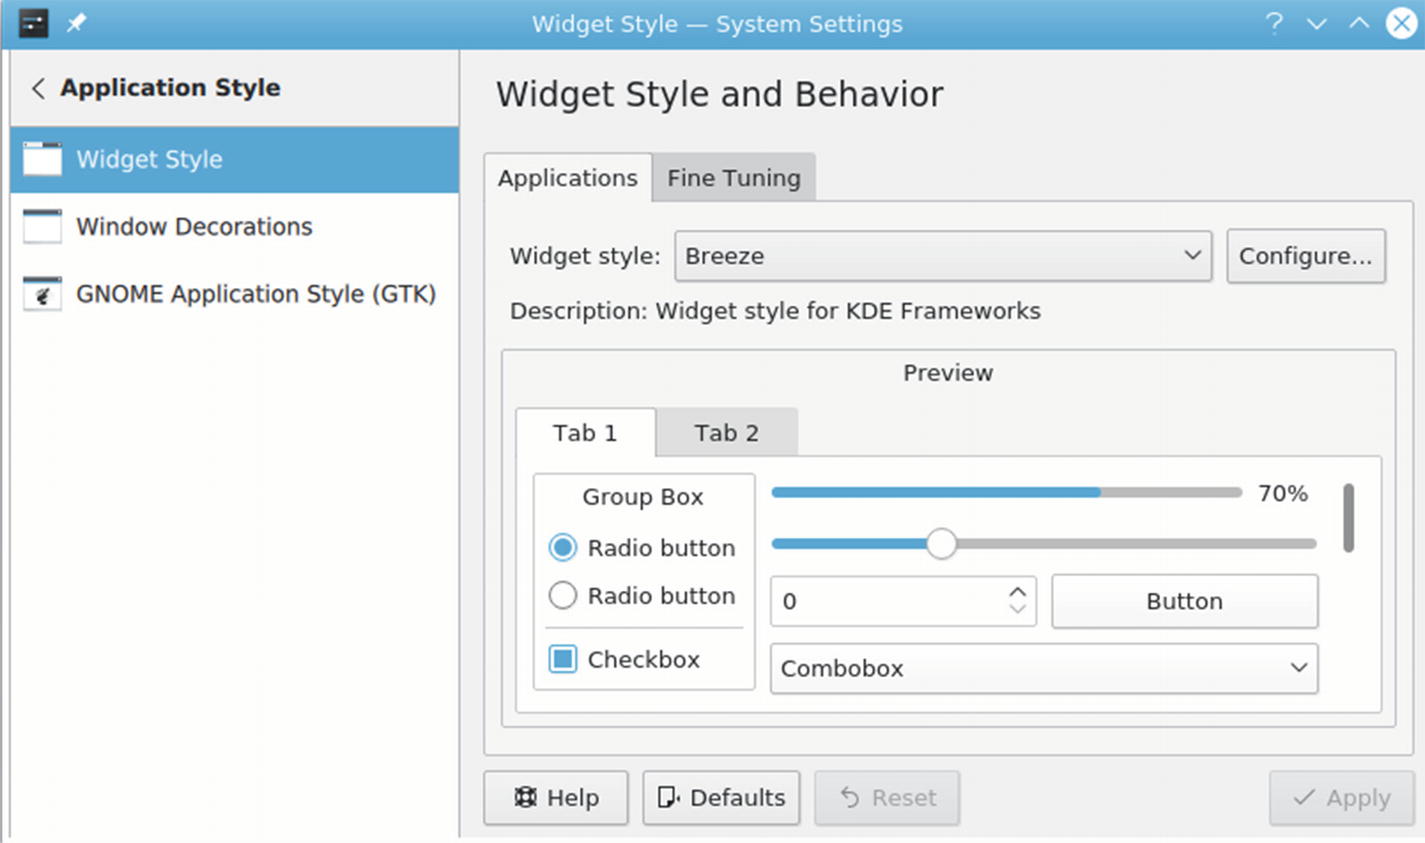
Plasma System Settings ➤ Application Style, Widget Style

Plasma System Settings ➤ User Manager
Plasma Software Management: Discover and Apper
Discover is Plasma's corresponding application to GNOME Software. It uses a simple interface to let you quickly locate and install software. Applications can be easily removed with a click. With Discover , you can also install Plasma (KDE) desktop add-ons, including widgets for desktop and panel. Discover shows a sidebar on the left and a list of applications to the right (see Figure 9-57). You use the Discover sidebar to locate software packages. The Applications entry expands to software categories on the sidebar, which, when selected, will display a list of available and installed packages in the right pane. Clicking on a package entry expands it to a software description with an Install button (installed packages have a Remove button; see Figure 9-58).
The Installed entry lists all your installed packages with the Remove button for easy deletion. You can also use the Search box at the top of the sidebar to locate a package. The Settings entry lists your repositories, which you can enable or disable.
The Plasma add-ons entry on the sidebar provides an extensive set of add-ons to different parts of the Plasma desktop. There are categories for fonts, themes, icons, window effects, window switching, and wallpapers, among others. You use the Plasma Widgets entry to manage your desktop and panel widgets.

Discover Software Manager

Discover Software Manager, application description
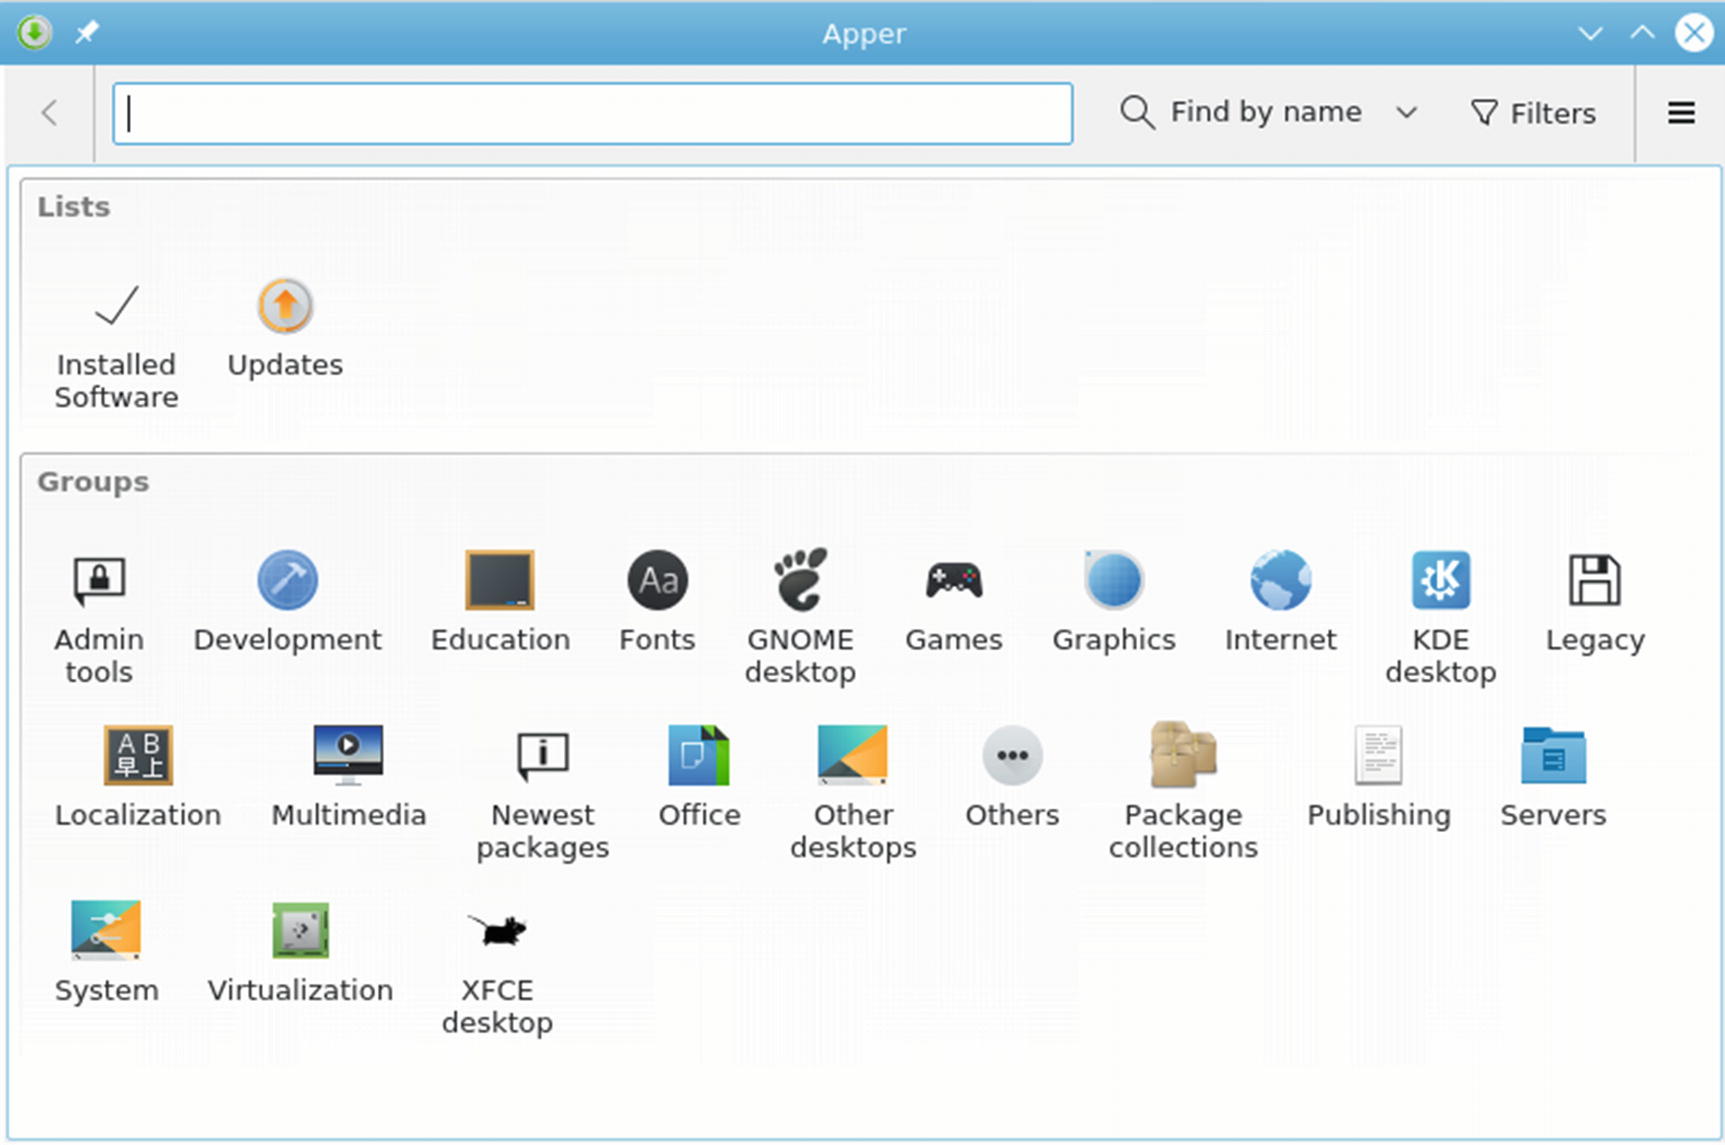
Apper software manager: package categories
The toolbar at the top shows a search box with a menu to qualify the search, along with filters (installed or new packages). A Pending Changes button shows the packages you have decided to install or remove. The configuration button lists a History and Settings. Use Settings to configure Apper. The Lists section has icons for Installed Software and Updates. Use Updates to update your applications and Installed Software to see what software is installed.