To make effective use of your Fedora Linux system, you must know how to configure certain features and services. Administrative operations, such as adding users and installing software, can be performed with user-friendly system tools. This chapter discusses basic system administration operations that you need to get your system up and running, as well as to perform basic maintenance, such as adding new users. You can make changes or additions easily, using the administrative tools described in this chapter.
Configuration operations can be performed from a desktop interface, such as GNOME or KDE, or they can be performed using a simple shell command line, on which you type configuration commands. You can also manually access system configuration files, editing them and making entries yourself. Although these tools are accessible from any user account, they can only be managed by users with administrative access. Such users will first be prompted for their user password before they can use them.
Fedora Administrative Tools
On Fedora, administration is handled by a set of administrative tools developed and supported by Fedora, such as those for user management and printer configuration (see Table 13-1). With GNOME, most administration tools have been integrated into GNOME Settings, superseding the older system-config tools. For example, the GNOME Settings GNOME Users is the default user management tool, instead of the older system-config-users. For printing you can use the GNOME Settings printing tool, instead of system-config-printer. The GNOME Settings was covered in Chapter 3, as most of its tools are used for desktop configuration, instead of administration purposes. Tools that have administrative functions, such as the GNOME Users tool, are described in the administrative Chapters (12, 13, and 14). You can access GNOME Settings from the System Status Area dialog as described in Chapter 3 (wrench/screwdriver icon, bottom left).
Table 13-1
Administrative Tools
Command
Application
Description
GNOME Settings ➤ Details
Date & Time
GNOME Settings date and time configuration tool
firewall-config
Firewall
Configures your network firewall
system-config-printer
Print Settings
Printer configuration tool (older)
GNOME Settings ➤ Devices
Printers
GNOME Settings printer configuration tool
system-config-users
Users & Groups
User and Group configuration tool (older).
GNOME Settings ➤ Details
Users
GNOME Settings user configuration tool
policycoreutils-gui
SELinux Management
SELinux configuration
GNOME Settings
Network and WiFi
GNOME Settings network configuration tools
nm-connections-editor
Network Connections
Network Manager configuration tool (older)
Administrative Access
To perform system administration operations, you must be a user who has administrative access. You can then access administrative tools for specific tasks from any account, temporarily giving you superuser access for just that administrative operation. With administrative access, you can perform tasks such as starting up and shutting down the system, adding or removing users, formatting file systems, and backing up and restoring files, and you may also specify the system’s hostname.
Administrative Access from Normal User Accounts
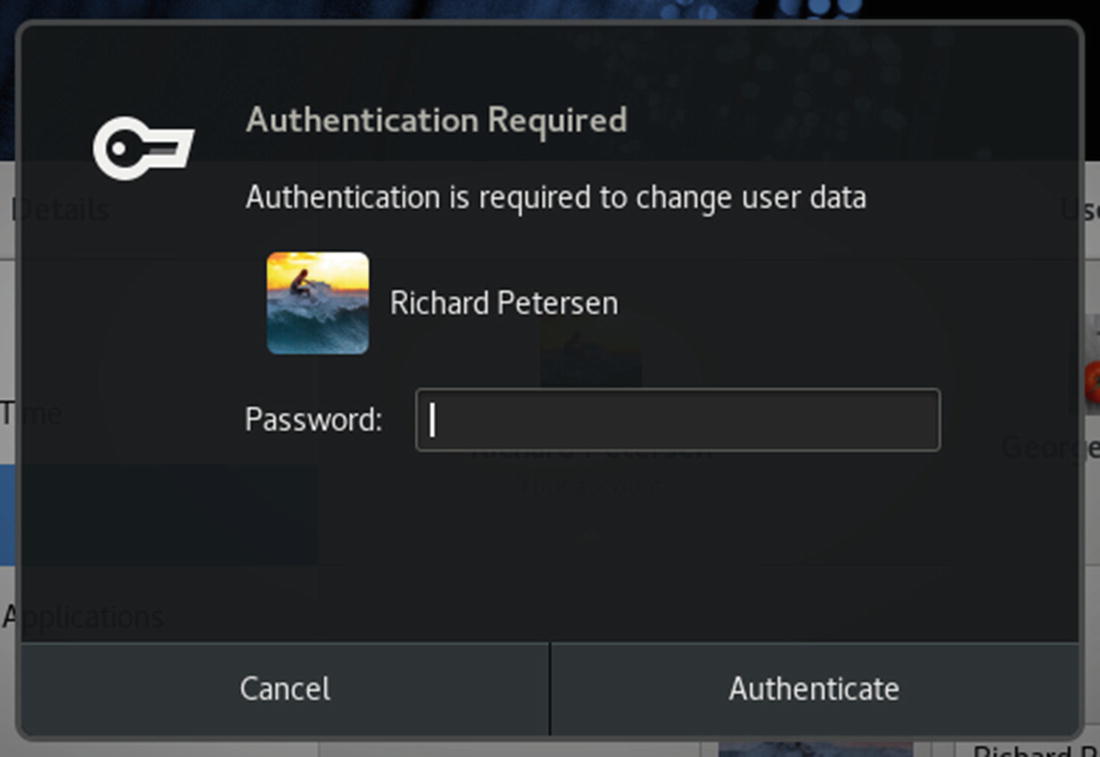
To access an administrative tool, you simply log in to an account that has administrative access and choose the tool you want. A dialog is then displayed that will prompt you to enter your user password. Once you do so, the administrative tool you chose starts up, allowing its functions to have full root user access (see Figure 13-1). The same kind of permission is required for updates and for managing user accounts. When you unlock the Settings ➤ Details ➤ Users tab, you will first be prompted by a dialog for a root user password. For each different administrative tool you start, you must separately enter the root user password.
Figure 13-1
Administrative access authentication dialog
Controlled Administrative Access: sudo
The sudo command allows ordinary users to have limited root user administrative access for a specific task. Users can perform a superuser operation without having full root-level control. You can find out more about sudo at https://www.sudo.ws. Administrative users (users with the account type Administrator as specified by Settings ➤ Details ➤ Users) are configured to use sudo automatically. Any user can be directly configured to have sudo access by editing the /etc/sudoers file. With sudo access, a user can use administrative tools as the root user, giving you direct root user access with desktop capabilities.
sudo Configuration
Access with the sudo command is controlled by the /etc/sudoers file. This file lists users and the commands they can run, along with the password for access. If the NOPASSWD option is set, then users will not require a password. ALL, depending on the context, can refer to all hosts on your network, all root-level commands, or all users. To make changes or add entries, you have to edit the file with the special sudo editing command, visudo. This invokes the vi editor to edit the /etc/sudoers file. Unlike a standard editor, visudo will lock the /etc/sudoers file and check the syntax of your entries. You are not allowed to save changes, unless the syntax is correct. Use the vi editing commands to make changes (see Chapter 5). If you want to use a different editor, you can assign it to the EDITOR shell variable.
sudo visudo
A sudoers entry has the following syntax. The host is a host on your network. You can specify all hosts with the ALL term. The command can be a list of commands, some or all qualified by options such as whether a password is required. To specify all commands, you can also use the ALL term.
user host=command
The following gives the user robert full root-level access to all commands on all hosts:
robert ALL = ALL
Use vi commands to edit the file. You can move to the root user entry and then press the o command to open a new line. Type the new user entry and then press the Esc key. Press Shift+zz when you’ve finished editing.
In addition, you can let a user run as another user on a given host. Such alternate users are placed in parentheses before the commands. For example, if you want to give robert access to the mypic host as the user fineart, you use the following:
robert mypic = (fineart) ALL
By default, sudo will deny access to all users, including the root. For this reason, the default /etc/sudoers file sets full access for the root user to all commands. The ALL=(ALL) ALL entry allows access by the root to all hosts as all users to all commands.
root ALL=(ALL) ALL
To specify a group name, you prefix the group with a % sign, as in %mygroup. This way, you can give the same access to a group of users. The /etc/sudoers file contains samples for a %wheel group.
To give robert access on all hosts to the system-config-users tool, you would use the following:
robert ALL=/usr/bin/system-config-users
If a user wanted to see which commands he or she can run, that user would use the sudo command with the -l option.
sudo -l
Using sudo
Once the user is configured, the user can use sudo to run an administrative command. The user precedes the command with the sudo command. The user is then issued a time-sensitive ticket to allow access.
sudo date
The sudo command becomes very useful when you have to perform an otherwise ordinary task with root user access. This allows you to avoid having to log in as the root user, yet still allows you to have extensive root user access over the system. One very common use is to employ the gedit graphical text editor to edit system configuration files. There is no specific administrative tool to do this, so ordinarily, you would have to log in as the root user to perform this task. With the sudo command, however, you can edit any system configuration file from a normal account. The following example would let you edit the /etc/fstab file, used for automatic file system mounting. Open a terminal window and enter the command. You will be prompted for the user password, then gedit will start as a functional desktop editor.
sudo gedit /etc/fstab
You could even run the file manager as a sudo operation, allowing the file manager full administrative access from any normal account. The file manager will open to the root user account.
sudo files
Logging In To the Root User Account Directly: sudo su
There are situations in which you might want to log in directly to the root user account. If you are performing several administrative tasks at once, or if you have to modify configuration files directly, root user account access may work best. The root user is a special account reserved for system management operations with unrestricted access to all components of your Linux operating system. You can log in as the root user from a terminal window or from the command-line login prompt.
sudo su
When logged in as a user with administrative access on the desktop, you can then log in as a root user, using a terminal window and the sudo su command (su stands for switch user). This is helpful if you just need to quickly run a command as a root user. You can use the sudo su command with the root username, or the sudo su command alone (the root username will be assumed). You will be prompted to enter the root user password.
sudo su root
password:
In the following example, the user logs in as the root user and then runs the nmb script using the service command, which requires root user access.
sudo su
password:
service nmb start
To exit from a sudo su login operation, when you are finished with that account, simply enter exit.
exit
If you log in as the root user with the sudo su command in a terminal window, you cannot run desktop applications from that terminal window as the root user. You can, however, run the Leafpad editor from a root user terminal window, allowing you to use leafpad to edit configuration files. Leafpad is a simple desktop editor.
However, the Wayland display server does not allow root access by default to graphical tools, such as Leafpad. Many of these older graphical administration tools were designed for the older Xorg server and have not been updated for the Wayland server. A workaround uses the xhost command to add an access control for the root user to the local user. In the terminal window, enter the following command to enable root access through the display server. You should only have to do this once each time you log in.
xhost +si:localuser:root
You can then use Leafpad, as shown here, to edit a system configuration file, in this case, /etc/default/grub.
sudo su
leafpad /etc/default/grub
Note
The su command can actually be used to log in to any user, provided you have that user’s password.
Controlled Access with PolicyKit: polkit-1
Designed by the Freedesktop.org project, PolicyKit allows ordinary users and applications access to administration-controlled applications and devices. Currently, it supports several key administrative operations, including Network Manager, Udisks, Packages, Firewall, Samba, and system monitor. Although this could be done with other operations, such as group permissions, PolicyKit aims to provide a simple and centralized interface for granting users access to administration-controlled devices and tools. PolicyKit is used to grant access to shared devices managed by Udisks. This includes most of the devices on your system, including removable ones.
PolicyKit can allow for more refined access. Instead of an all-or-nothing approach, whereby a user has to gain full root-level control over the entire system just to access a specific administration tool, PolicyKit can allow access to specific administrative applications. All other access can be denied. A similar kind of refined control is provided with PAM and sudo, allowing access to specific administrative applications, but administrative password access is still required, and root-level access, though limited to that application, is still granted. You can find out more about PolicyKit at http://hal.freedesktop.org/docs/polkit.
PolicyKit configuration and support is already set up for you. A new version of PolicyKit, polkit-1, is now used for PolicyKit operations. Configuration files for these operations are held in /usr/share/polkit-1. There is, as of yet, no desktop tool available for configuring these settings. The desktop tool polkit-gnome only provides GNOME dialogs for providing authentication, when required by an application or device.
Changing PolicyKit Options
With PolicyKit, administration-controlled devices and applications are set up to communicate with ordinary users, allowing them to request certain actions. If the user is allowed to perform the action, the request is then authorized, and the action is performed.
Difficulties occur if you want to change the authorization setting for certain actions, such as mounting internal hard drives. Currently, you can change the settings by manually editing the configuration files in the /usr/share/polkit-1/actions directory, but this is risky. To make changes, you first must know the action to change and the permission to set. The man page for polkit will list possible authorizations. The default authorizations are allow_any for anyone, allow_inactive for a console, and allow_active for an active console only (user logged in). These authorizations can be set to the following specific values:
auth_admin
Administrative user only, authorization always required
auth_admin_keep
Administrative user only, authorization kept for a brief period
auth_self
User authorization required
auth_self_keep
User authorization required, authorization kept for a brief period
yes
Always allow access
no
Never allow access
You will have to know which PolicyKit action to modify and which file to edit. The action is listed in the PolicyKit dialog, which prompts you to enter the password (expand the Details arrow) when you try to use an application. The File will be the first segments of the action, with the suffix policy attached. For example, the action for mounting internal drives is
By default, PolicyKit is configured to require authorization, using the root password before a user can mount an internal hard drive partition. Should you want to allow users to mount partitions without an authorization request, the org.freedesktop.UDisks2.policy file in the /usr/share/polkit-1 directory has to be modified to change the allow_active default for the filesystem-mount-system action from auth_admin_keep to yes. The auth_admin_keep option requires administrative authorization.
Enter the following to edit the org.freedesktop.udisks.policy file in the /usr/share/polkit-1/actions directory with the nano text editor. Be sure to use the sudo command for administrative access.
If you are configured as a valid sudo user in the /etc/sudoers file, you can use the sudo command instead, which allows you to use desktop editors such as gedit.
<action id ="org.feedesktop.udisks2.filesystem-mount-system">
<description>Mount a filesystem on a system device</description>
This is usually the second action ID. At the end of that action section, you will find the following entry. It will be located within a defaults subsection, <defaults>.
<allow_active>auth_admin</allow_active>
Replace auth_admin_keep with yes.
<allow_active>yes</allow_active>
Save the file. Users will no longer have to enter a password to mount internal partitions.
Note
The System Security Services daemon (SSSD) provides offline access for users relying on remote authentication, such as an LDAP server. The SSSD will cache the authentication method, allowing you to log in offline. Before SSSD, users had to maintain a corresponding local account from which to gain access when offline. SSSD is installed by default. You start it using the sssd daemon. Configuration files are located at /etc/sssd. See https://fedorahosted.org/sssd/ for more details.
User (GNOME Settings ➤ Details ➤ Users)
You can configure and create user accounts using the GNOME Users tool accessible from GNOME Settings as Users. Users does not provide any way to control groups. If you want group control and more configuration options, you can use the GNOME Users and Groups application (system-config-users package).
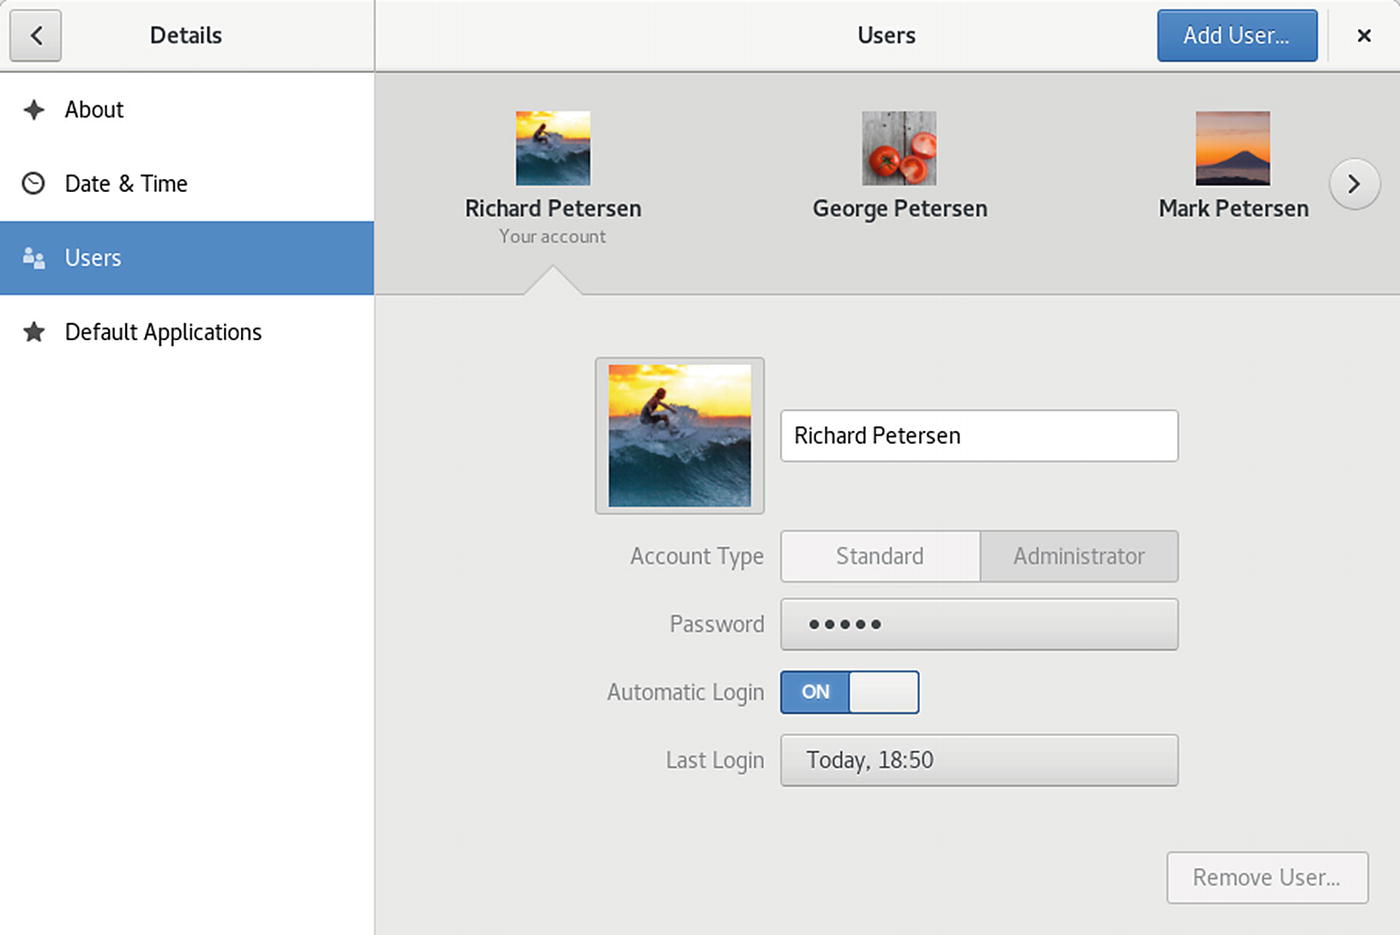
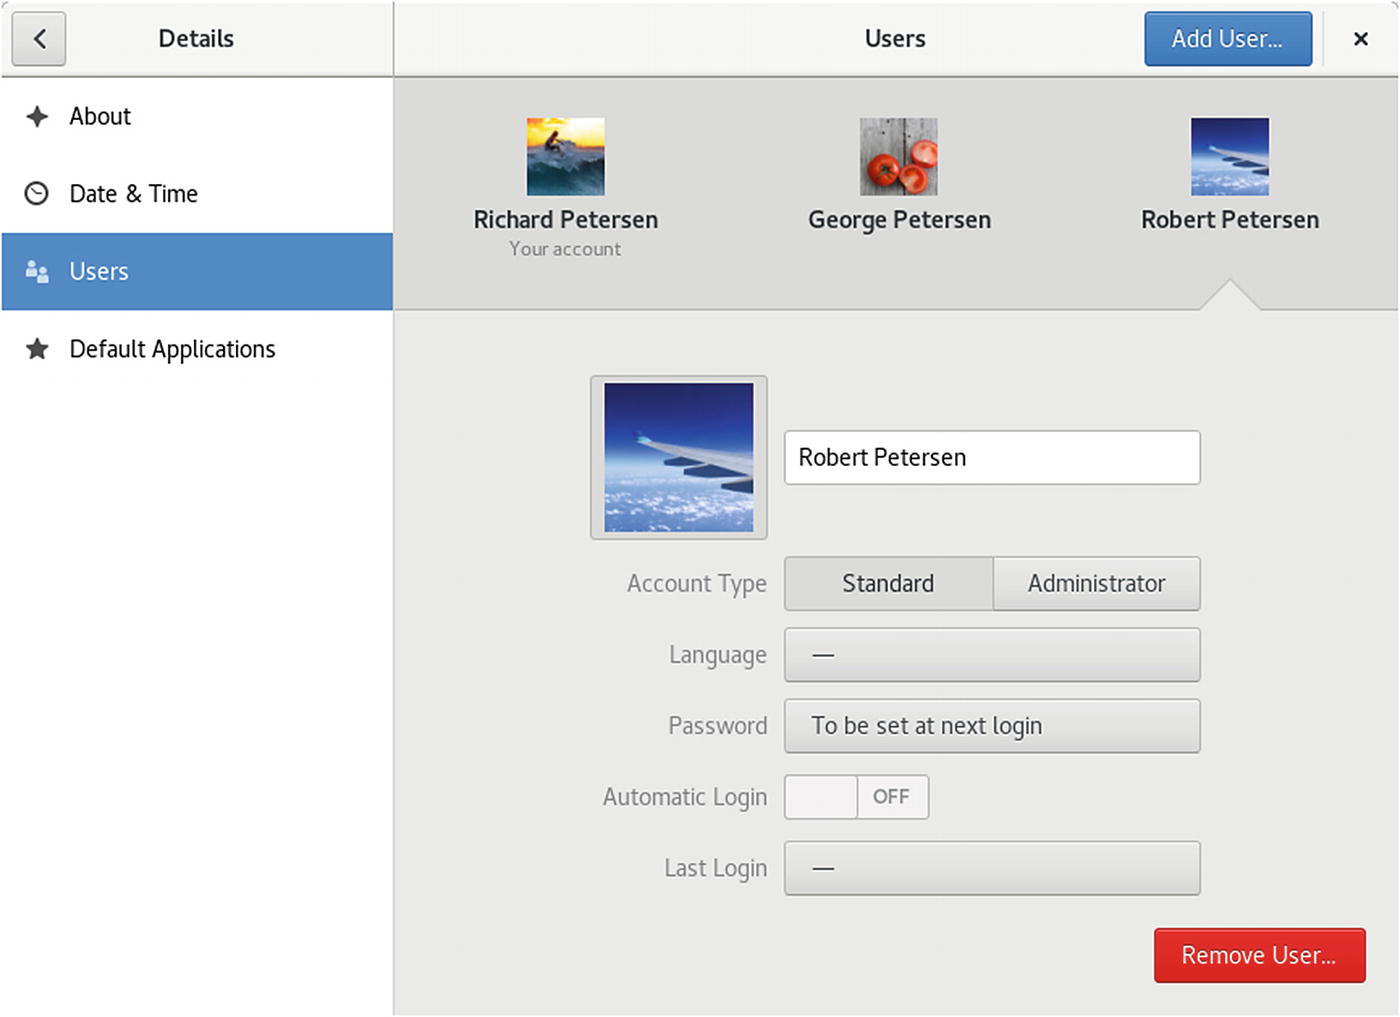
You can access GNOME Users from the Details ➤ Users tab on GNOME Settings. The Users tab displays an icon bar at the top showing a list of configured users with arrow buttons to the right and left to move through the list. Figure 13-2 shows information about a selected user. Initially, at the top of the Users tab is an Unlock button. Click on this button to open an authentication dialog, prompting for your password. Once active, you can then change the change the password, account type, icon, or name for the currently selected user. To remove a user, click its Remove User button on the lower right.
Figure 13-2
GNOME users
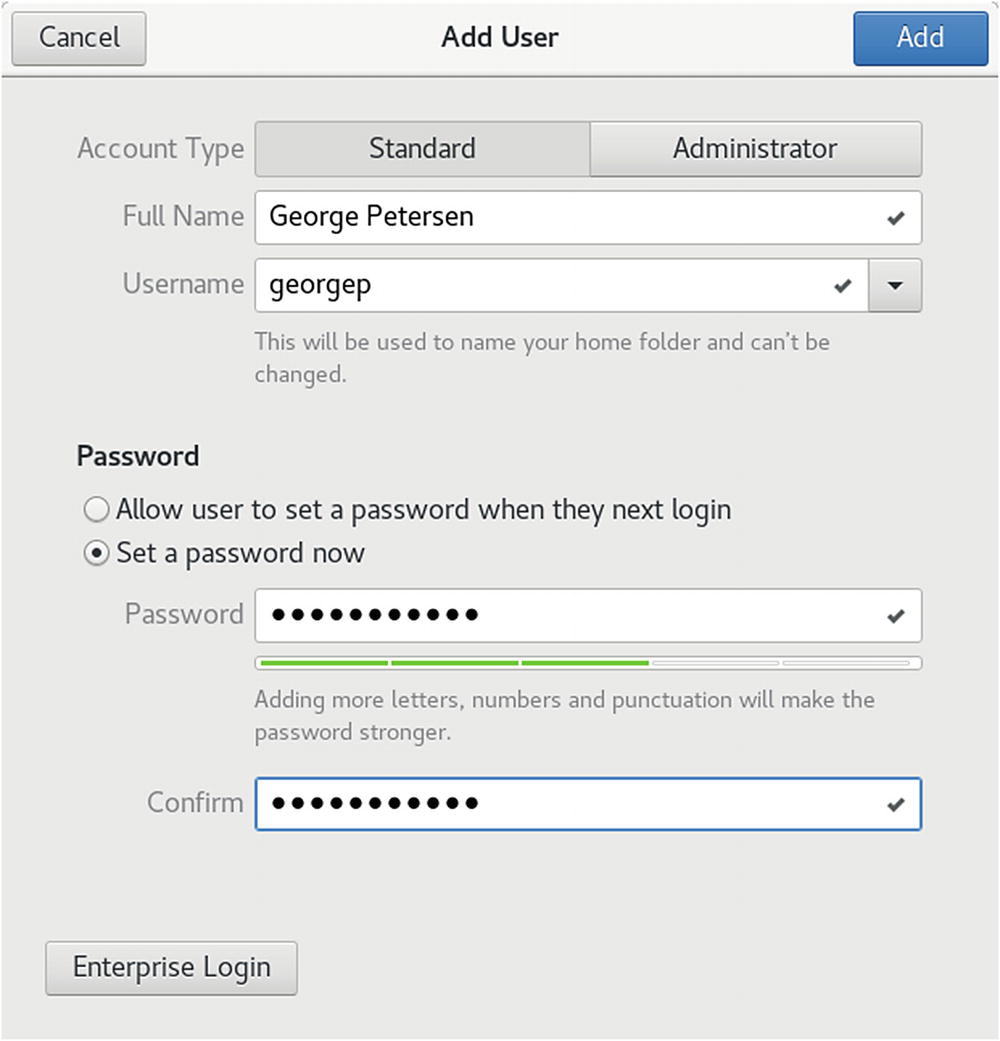
Once authentication is accepted, the Unlock button changes to an Add User button, which you click to add a new user. When you add a new account, the Add User dialog opens, allowing you to set the account type (standard or administrator), the full name of the user, and the username (see Figure 13-3). For the username, you can enter a name or choose from a recommended list of options. You can also choose to set the password at this time. Click the Add button on the upper right to create the user. The new account appears in the icon list of users at the top of the Users tab, showing the name and icon. Selecting the user also shows its account type, language, password, an automatic login option, and the time of the last logon. You can change the account type, language, password, and icon by clicking on their entries.
Figure 13-3
Add a new user
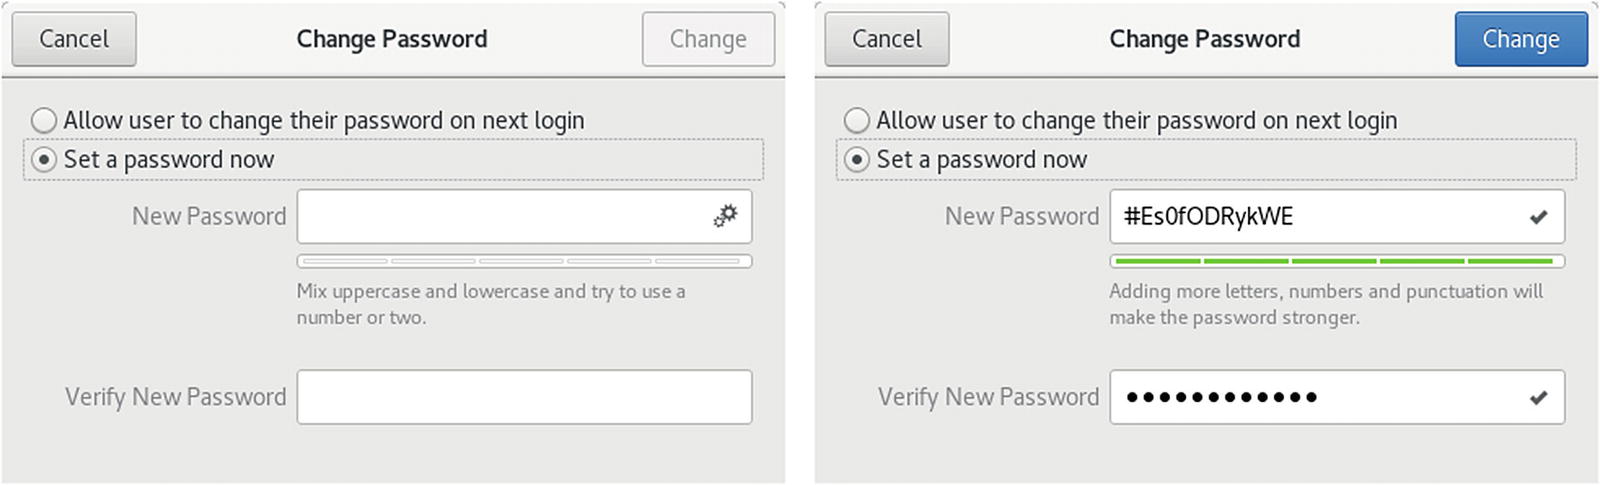
The account remains inactive until you specify a password (see Figure 13-4). You can do this when you add the account, or later. You can also change the password for an account. Click the password entry to open the Change Password dialog in which you can enter the new password (see Figure 13-5). On the right side of an empty Password text box, a password generator button is displayed that will generate a password for you when clicked. Once clicked, a generated password is entered the text box and the button disappears, replaced by a checkmark. Deleting the password to show an empty box once again displays the password generator button. Once the password is selected, the account becomes enabled.
Figure 13-4
Users, inactive user
Figure 13-5
Users, password dialog
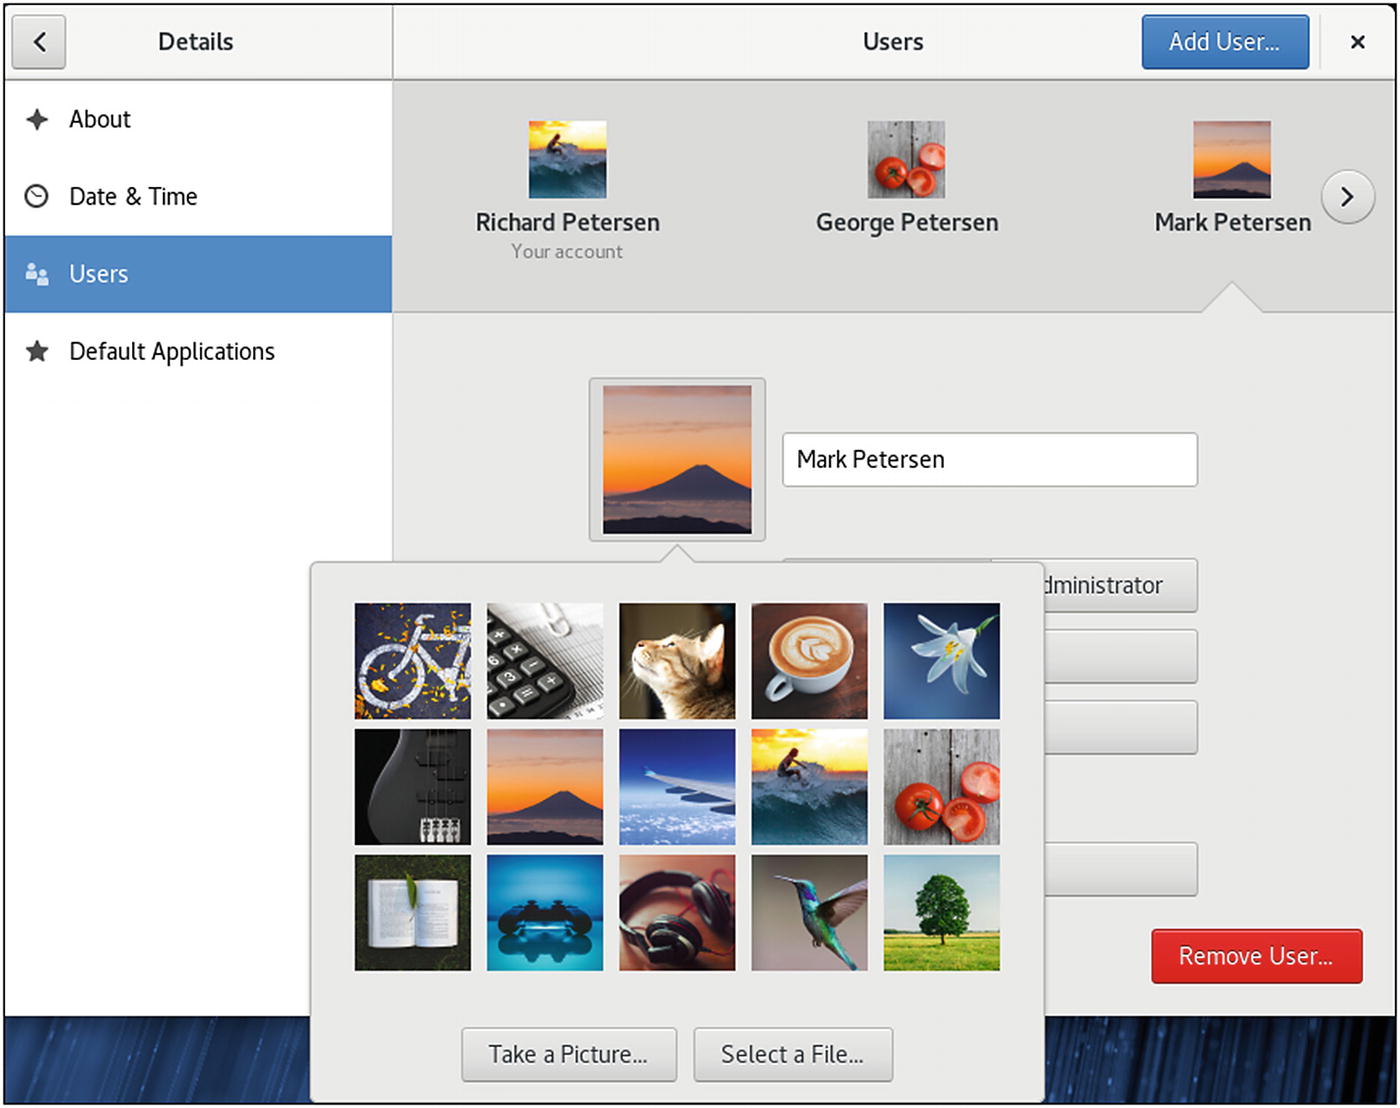
To change the user icon, click the icon image to display a pop-up dialog showing images you can use (see Figure 13-6). You can also take a photo from your web cam (take a photo entry) or select a picture from your Pictures folder (browse for more pictures).
Currently, group configuration is not supported.
Figure 13-6
Accounts dialog, Users icon
Users and Groups Manager: system-config-users
You can also add and manage users by employing the older system-config-users application known as Users and Groups. It is not installed by default. You can install it using Packages. Use the package name system-config-users to locate it on the Packages application.
The Wayland display server does not allow root access by default to graphical tools, such as system-config-users. Many of these older graphical administration tools were designed for the older Xorg server and have not been updated for the Wayland server. A workaround uses the xhost command to add an access control for the root user to the local user. In a terminal window, enter the following command to enable root access through the display server. You have to re-enter this command with each new login session in order to use the older Xorg-based administration applications.
xhost +si:localuser:root
You can then start Users and Groups from Applications ➤ Sundry.
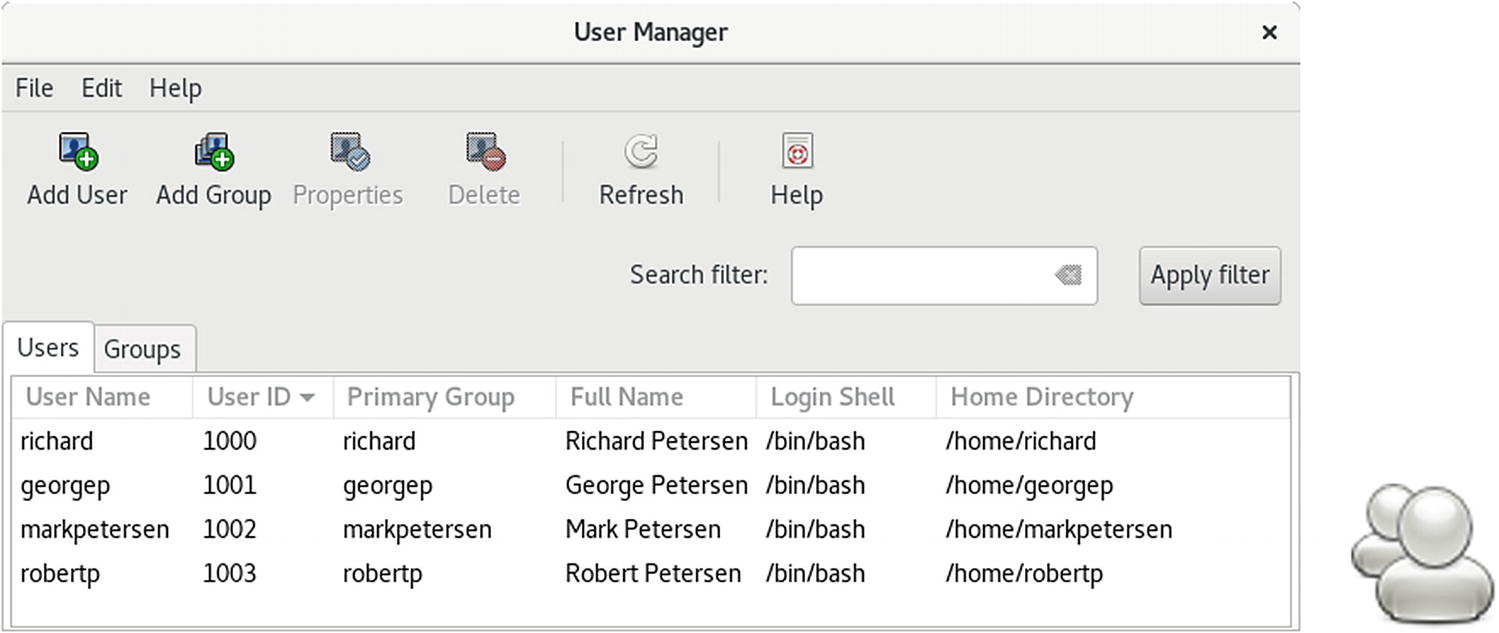
Once installed, you can access User and Groups as Users and Groups. The system-config-users window displays tabs for listing both users and groups (see Figure 13-7). A button bar lists various tasks you can perform, including adding new users or groups, editing current ones (Properties), or deleting a selected user or group. You are prompted for authentication once, when you first open Users and Groups. You can then make changes as you wish.
Figure 13-7
Users and Groups: system-config-users
Users and Groups: New Users
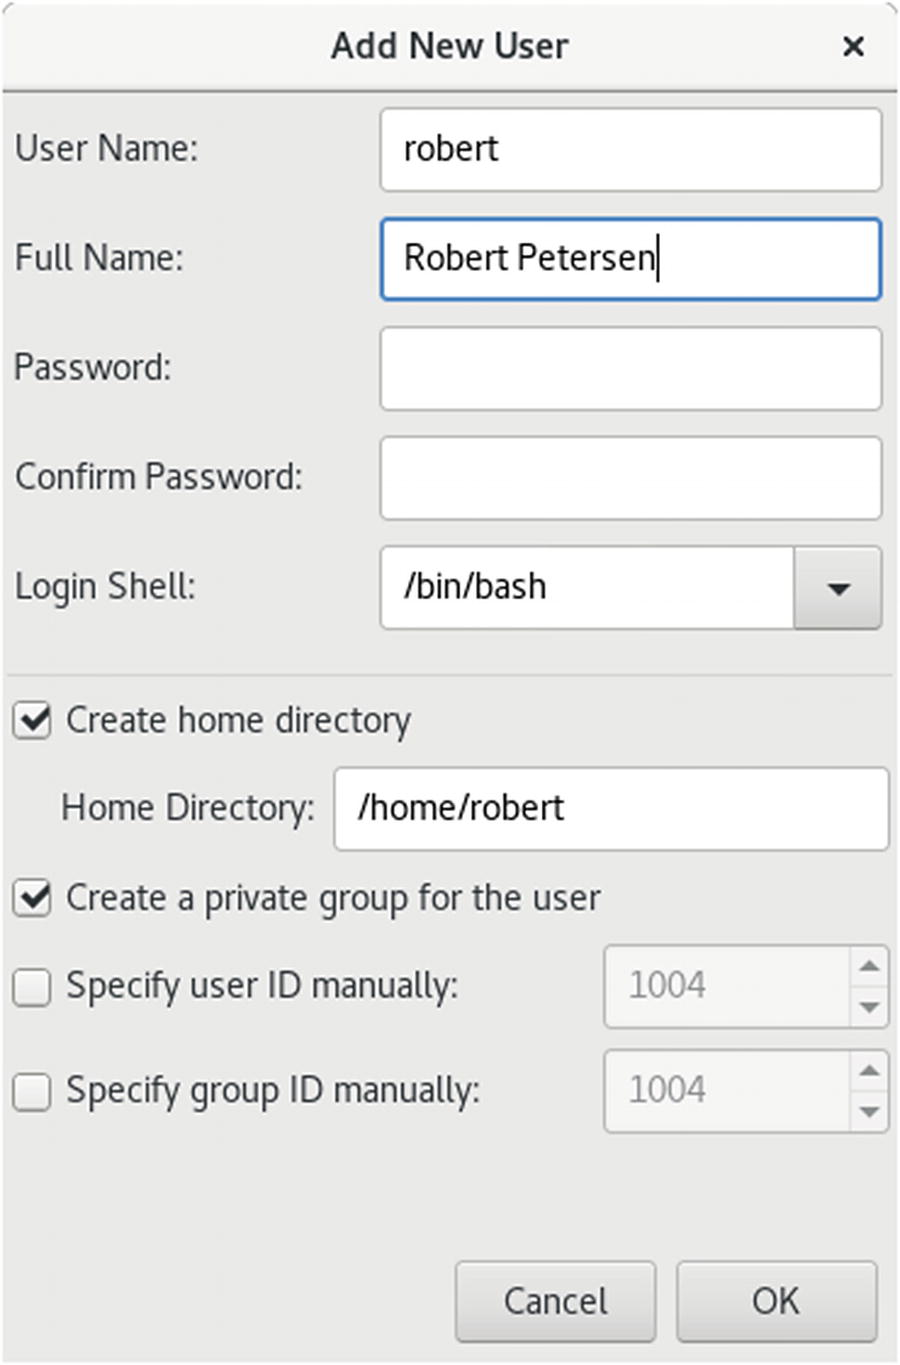
To create a new user, click Add User to open a window with entries for the username, password, and login shell, along with options for creating a home directory and a new group for that user (see Figure 13-8).
Figure 13-8
Users and Groups: Add New User
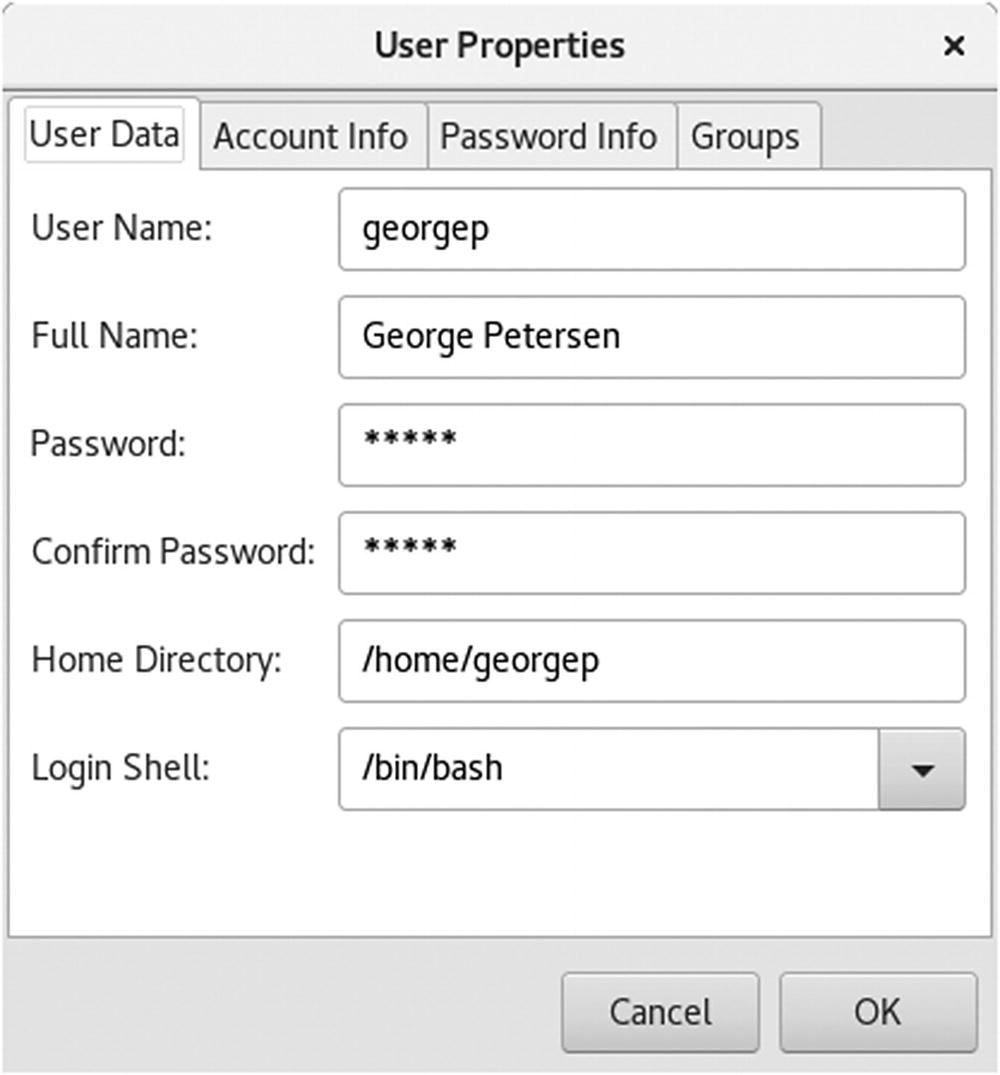
Once you have created a user, you can edit its properties to add or change features. Select the user’s entry and click Properties. This displays a window with tabs for User Data, Account Info, Password Info, and Groups (see Figure 13-9).
Figure 13-9
Users and Groups: User Properties window: User Data tab
On the Groups tab, you can select the groups that the user belongs to, adding or removing group memberships (see Figure 13-10). The Accounts Info tab allows you to set an expiration date for the user, as well as lock the local password. Password Info can enable password expiration, forcing users to change their passwords at certain intervals.
Figure 13-10
Users and Groups: User Properties window: Adding groups to a user
Users and Groups: Groups
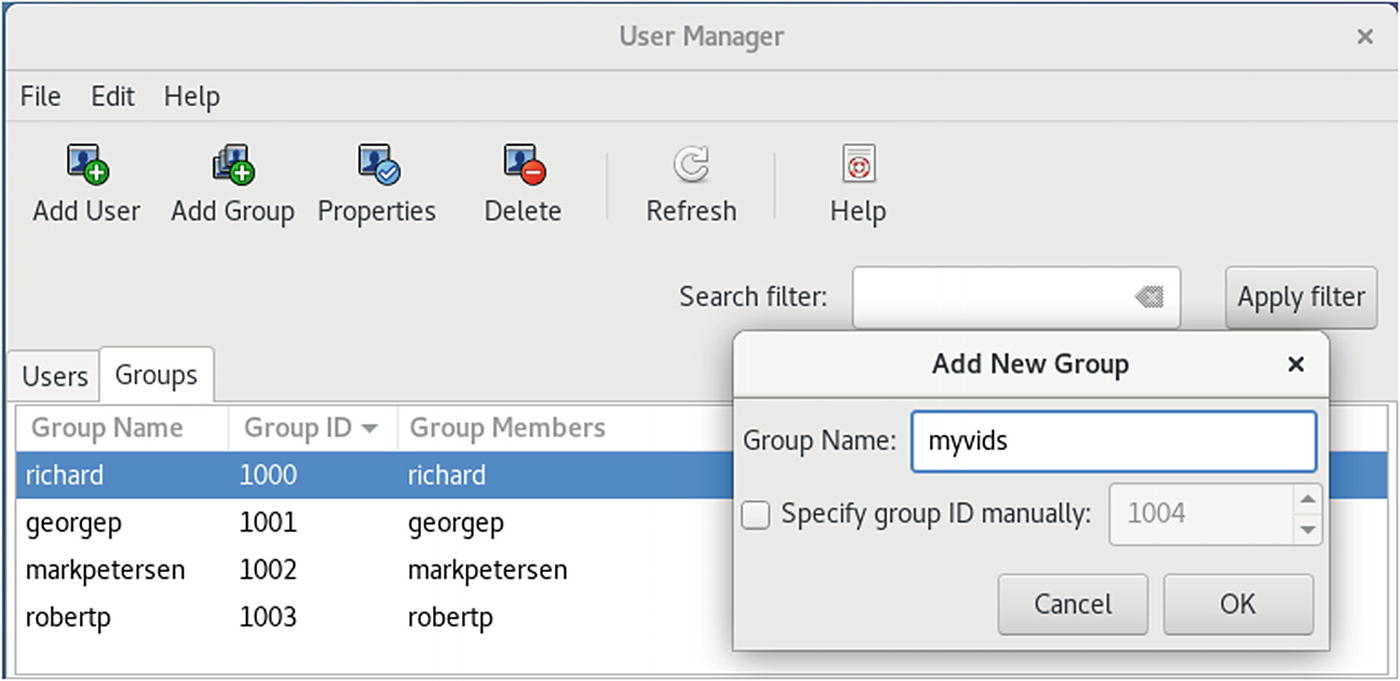
To add a group, click the Add Group button to open a small window in which you can enter the group name. The new group will be listed in the Groups listing (see Figure 13-11). Groups can be used in file and folder permissions to restrict access to a group of users.
Figure 13-11
Users and Groups : Groups panel
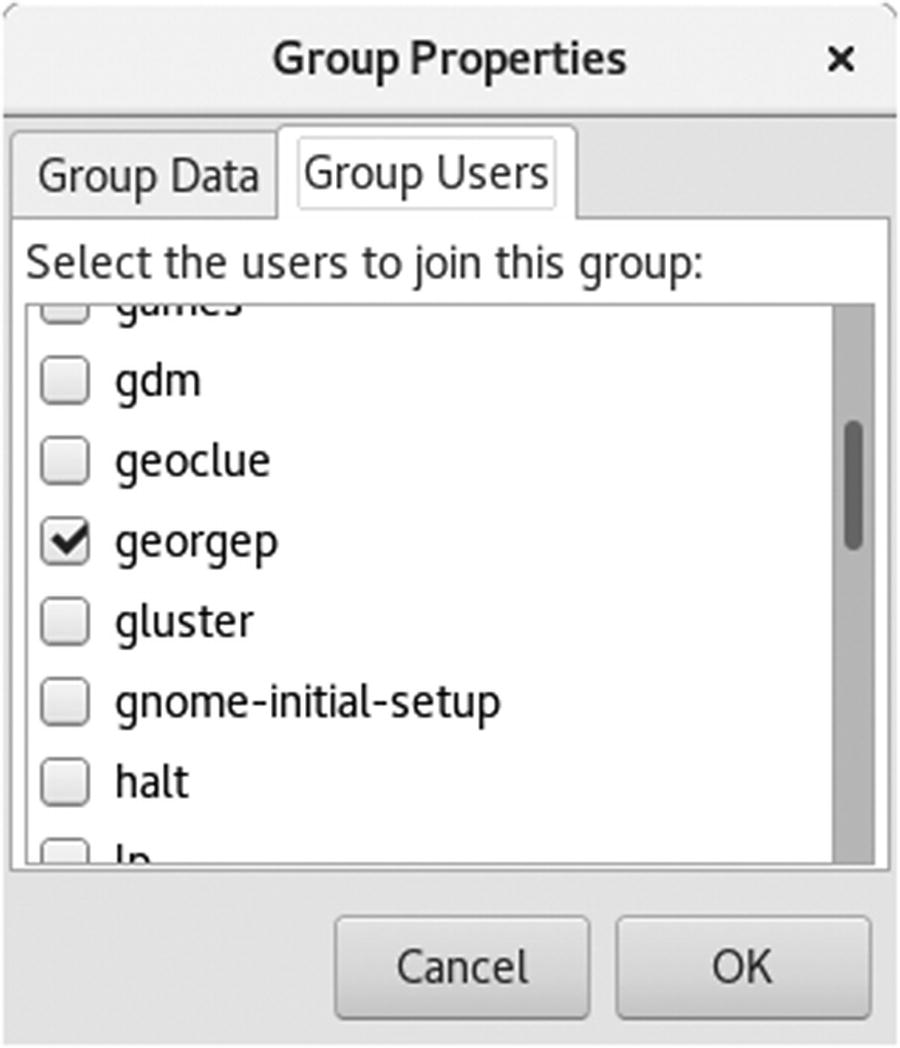
To add users as members of the group, select the group’s entry and click the Properties button. This opens a window with tabs for Group Data and Group Users. The Group Users tab lists all current users with check boxes (see Figure 13-12). Click the check boxes of the users you want to become members of this group.
Figure 13-12
Users and Groups: Group Properties: Group Users panel
If you want to remove a user as a member, click the check box to remove its check. Click OK to affect your changes. If you want to remove a group, select its entry in the Groups panel and then click the Delete button.
You can also add groups to a user by selecting a user in the Users tab and opening its Properties window. Then select the Groups tab and select the groups you want that user to belong to.
Adding and Removing Users with useradd, usermod, and userdel
Linux also provides the useradd, usermod, and userdel commands to manage user accounts. All these commands take in all their information as options on the command line. If an option is not specified, they use predetermined default values. These are command-line operations. To use them on your desktop, you first need to open a terminal window and then enter the commands at the shell prompt with the sudo command.
useradd
With the useradd command, you enter values as options on the command line, such as the name of a user, to create a user account. It then creates a new login and directory for that name using all the default features for a new account.
useradd chris
The useradd utility first checks the /etc/login.defs file for default values for creating a new account. For those defaults not defined in the /etc/login.defs file, useradd supplies its own. You can display these defaults using the useradd command with the -D option. The default values include the group name, the user ID, the home directory, the skel directory, and the login shell. Values the user enters on the command line will override corresponding defaults. The group name is the name of the group in which the new account is placed. By default, this is other, which means the new account belongs to no group. The user ID is a number identifying the user account. The skel directory is the system directory that holds copies of initialization files. These initialization files are copied into the user’s new home directory when it is created. The login shell is the pathname for the particular shell the user plans to use.
The useradd command has options that correspond to each default value. Table 13-2 holds a list of all the options you can use with the useradd command. You can use specific values in place of any of these defaults when creating a particular account. The login is inaccessible until you do. In the next example, the group name for the chris account is set to intro1 and the user ID is set to 578:
sudo useradd chris -g intro1 -u 578
Once you add a new user login, you need to give the new login a password. Password entries are placed in the /etc/passwd and /etc/shadow files. Use the passwd command to create a new password for the user, as shown here. The password you enter will not appear on your screen. You will be prompted to repeat the password. A message will then be issued indicating that the password was successfully changed.
sudo passwd chris
Changing password for user chris
New UNIX password:
Retype new UNIX password:
Table 13-2
Options for useradd and usermod
Options
Description
-d dir
Sets the home directory of the new user.
-D
Displays defaults for all settings. Can also be used to reset default settings for the home directory (-b), group (-g), shell (-s), expiration date (-e), and password expirations (-f).
-e mm/dd/yy
Sets an expiration date for the account (none, by default). Specified as month/day/year.
-f days
Sets the number of days an account remains active after its password expires.
-g group
Sets a group.
-m
Creates user’s home directory, if it does not exist.
-m -k skl-dir
Sets the skeleton directory that holds skeleton files, such as .profile files, which are copied to the user’s home directory automatically when it is created; the default is /etc/skel.
-M
Does not create user’s home directory.
-p password
Supplies an encrypted password (crypt or MD5). With no argument, the account is immediately disabled.
-r
A Red Hat and Fedora–specific option that creates a system account (one whose user ID is lower than the minimum set in logon.defs). No home directory is created unless specified by -m.
-s shell
Sets the login shell of the new user. This is /bin/bash by default, the BASH shell.
-u userid
Sets the user ID of the new user. The default is the increment of the highest number used so far.
usermod
The usermod command enables you to change the values for any of these features. You can change the home directory or the user ID. You can even change the username for the account. The usermod command takes the same options as useradd, listed in Table 13-2.
userdel
When you want to remove a user from the system, you can use the userdel command to delete the user’s login. With the -r option, the user's home directory will also be removed. In the next example, the user chris is removed from the system:
sudo userdel -r chris
Passwords
One common operation performed from the command line is to change a password. The easiest way to change your password on the GNOME desktop is to use GNOME Users and then select your account. Click the Password entry. The Changing Password dialog opens, in which you enter your current password and then the new password.
Alternatively, you can use the passwd command. If you are using GNOME or KDE, you first must open a terminal window (Terminal). Then, at the shell prompt, enter the passwd command. The command prompts you for your current password. After entering your current password and pressing Enter, you are then prompted for your new password. After entering the new password, you are asked to reenter it. This ensures that you have actually entered the password you intended to enter.
$ passwd
Old password:
New password:
Retype new password:
$
Administrative users can also use the passwd command to change the password of any user. Precede the command with sudo and add the username whose password you want to change.
sudo passwd georgep
Display Configuration and Vendor Drivers
Your desktop display is implemented by the X Window System running on the Wayland server. The version used on Fedora is X.org. X.org provides its own drivers for various graphics cards and monitors. You can find out more about X.org at https://www.x.org/wiki/.
X.org will automatically detect most hardware. The /etc/X11/ configuration files will usually hold only keyboard and graphics card information. All other information, such as monitors, will be automatically determined. Should you want to change the screen resolution, use the GNOME Settings ➤ Devices ➤ Displays tab.
As an alternative, you could download and install the drivers and video configuration tools supplied by graphics card vendors such as ATI or NVIDIA. These are provided by RPM Fusion’s nonfree repository (http://rpmfusion.org), when they become available. Due to licensing issues, they are not part of the Fedora repository. Once they are installed, you can use their configurations tools to configure your display. The vendor drivers often provide many more options than the open source X.org drivers, although the X.org drivers tend to be more stable.
The situation is complicated by the fact that Fedora Linux now uses the new Wayland display drivers as the default instead of the X.org drivers. Wayland is the future replacement for X.org but is still under development. Use the following command to see what type of driver you are using.
echo $XDG_SESSION_TYPE
Though the AMD drives usually work well with Wayland, the NVIDIA drivers are still a work in progress. The Xorg drivers do work, so you would switch to Xorg from Wayland, and install the NVIDIA Xorg drivers.
To use Xorg instead, edit the /etc/gdm/custom.conf file and remove the comment character, #, from the following line in the [daemon] section.
#WaylandEnable=false
You can use nano to edit it.
sudo nano /etc/gdm/custom.conf
Because the vendor drivers are designed to work across all distributions, they may conflict with the Fedora X Window System configuration. It is recommended that you use the RPM Fusion packages for the AMD or NVIDIA drivers. These are the same vendor drivers, but with slight configuration modification to ensure Fedora compatibility.
If your X Window System fails to start, you can log in to the command-line interface version (runlevel) by editing your boot loader and placing a 3 at the end of the kernel line. Use the e key to edit a line, and b to boot when finished.
Bluetooth
Bluetooth is a wireless connection method for locally connected devices such as keyboards, mice, printers, and Bluetooth-capable cell phones. BlueZ is the official Linux Bluetooth protocol and is integrated into the Linux kernel. BlueZ is the official Linux Bluetooth protocol and is integrated into the Linux kernel. The BlueZ protocol was developed originally by Qualcomm and is now an open source project, located at http://www.bluez.org/. It is included in the bluez and bluez-libs packages, among others. Check the BlueZ site for a complete list of supported hardware.
Figure 13-13
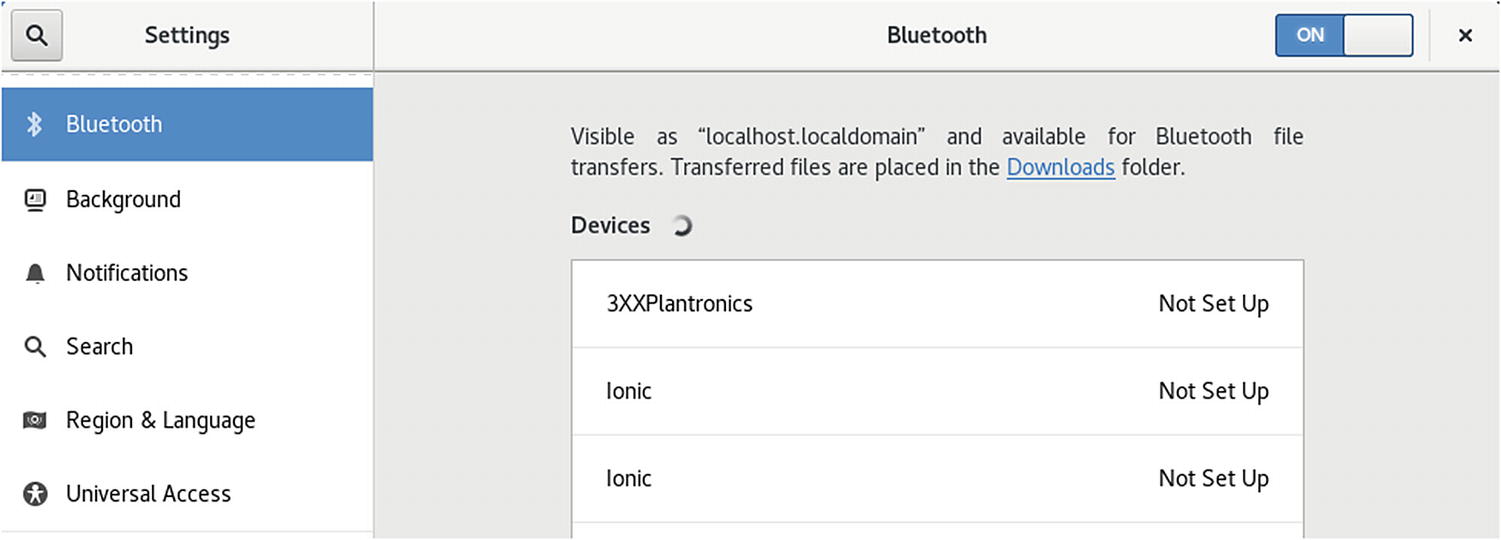
Bluetooth settings (GNOME settings)
If you have Bluetooth devices attached to your system, a Bluetooth entry is displayed on the system status area menu on the top panel. It will display a message showing the number of connected devices if there are any. Click the entry to display items to turn off Bluetooth and for Bluetooth Settings. Should you turn off Bluetooth, Bluetooth will be disabled, and its entry removed from the system status area menu. Use the Bluetooth Settings dialog, accessible from the Settings dialog, to turn it on again.
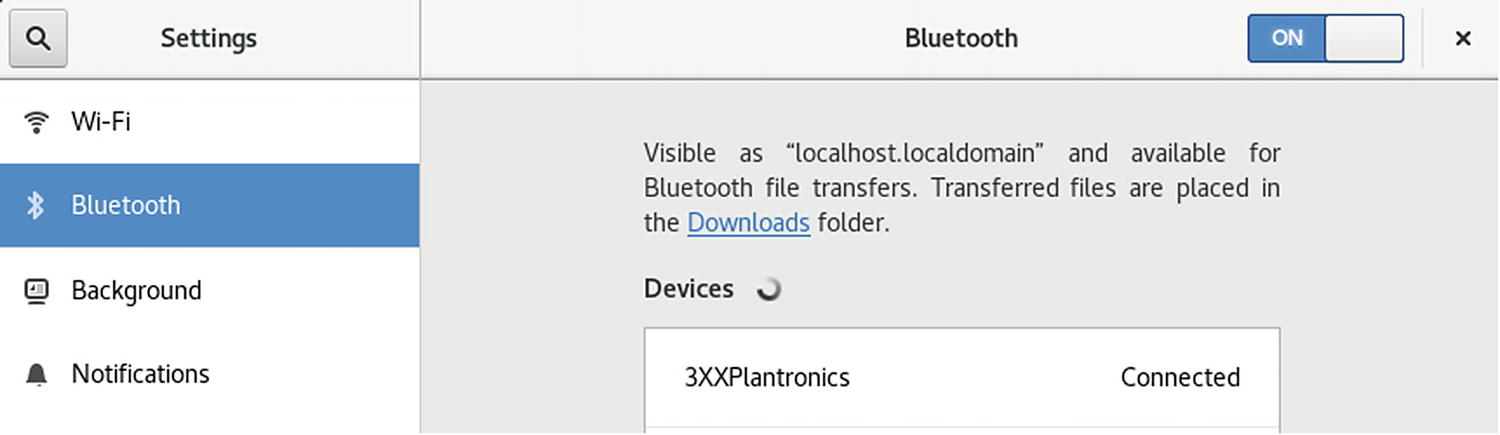
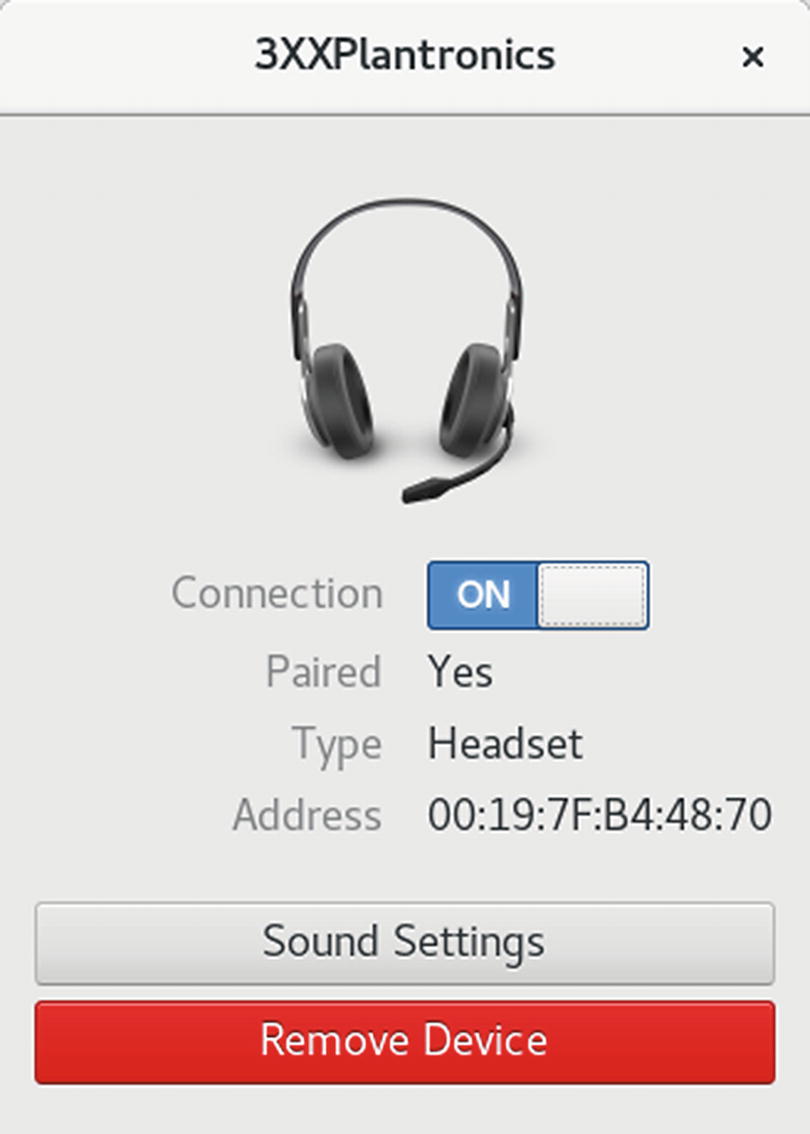
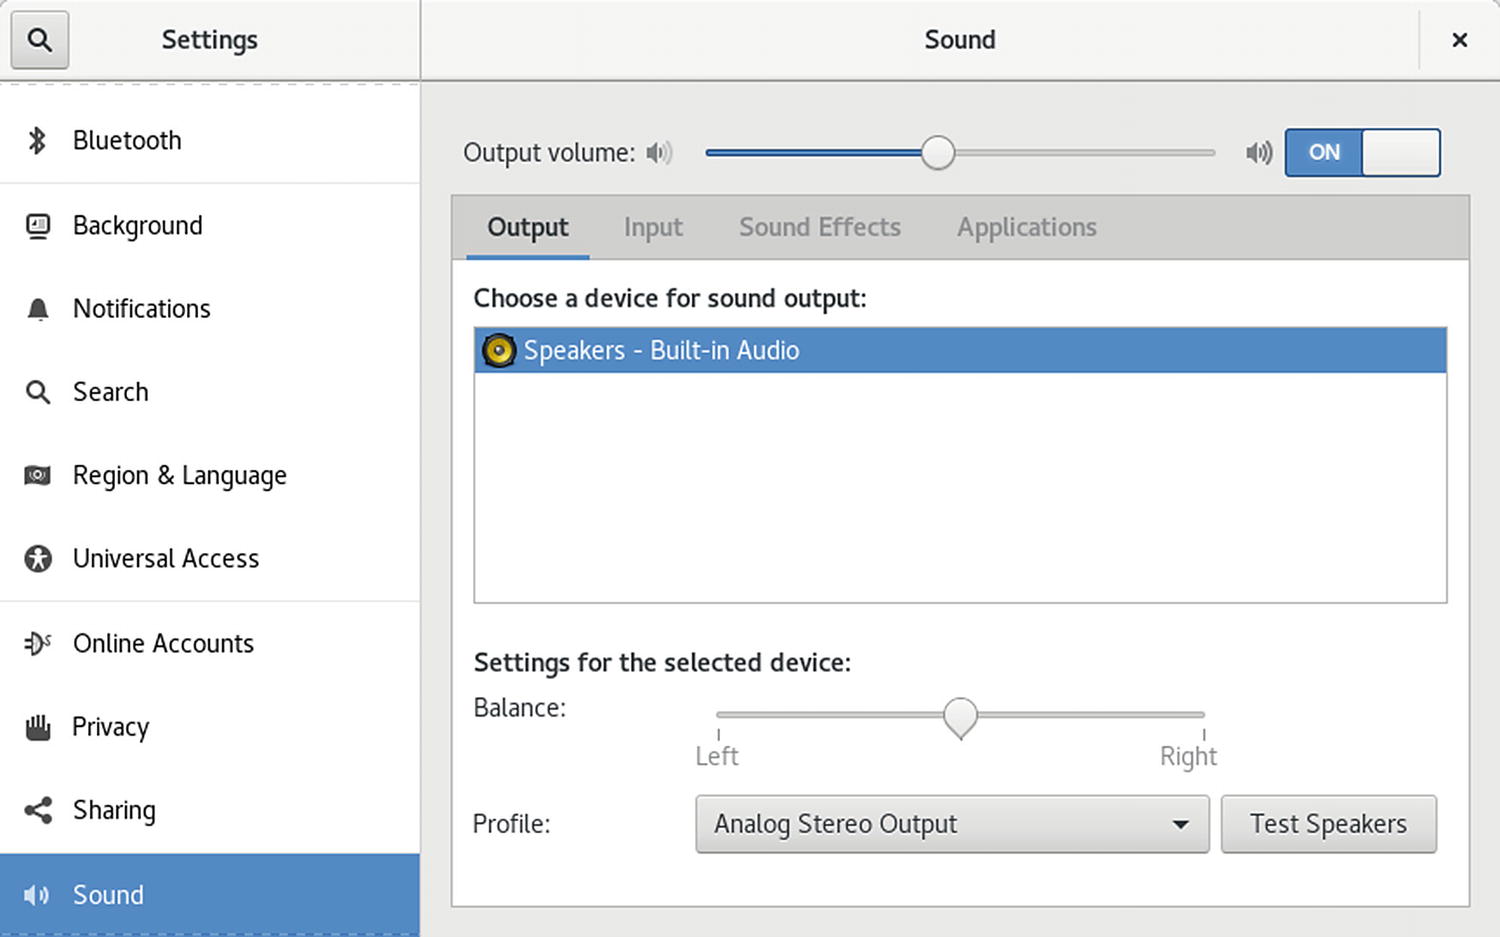
The Bluetooth Settings entry in the System Status Area menu to open GNOME Settings to the Bluetooth tab (see Figure 13-13). You can also access Bluetooth tab on GNOME Settings directly. On the Bluetooth settings tab, a Bluetooth switch at the top right lets you turn Bluetooth on or off. Detected devices are listed in the Devices section at the center. Initially, devices are disconnected (see Figure 13-14). Click on a device entry to connect it. A dialog opens with a detected pin number, which you confirm. Then the device configuration dialog is displayed, with a switch to connect or disconnect the device (see Figure 13-15). Pair, type, and address information are also displayed. If the device supports sound, a Sound Setting button is shown, which opens the Sound tab in Settings that displays that device (see Figure 13-16). To remove the device configuration, click the Remove Device button.
Figure 13-14
Bluetooth Settings: Connected device
Figure 13-15
Bluetooth device configuration
Figure 13-16
Bluetooth sound
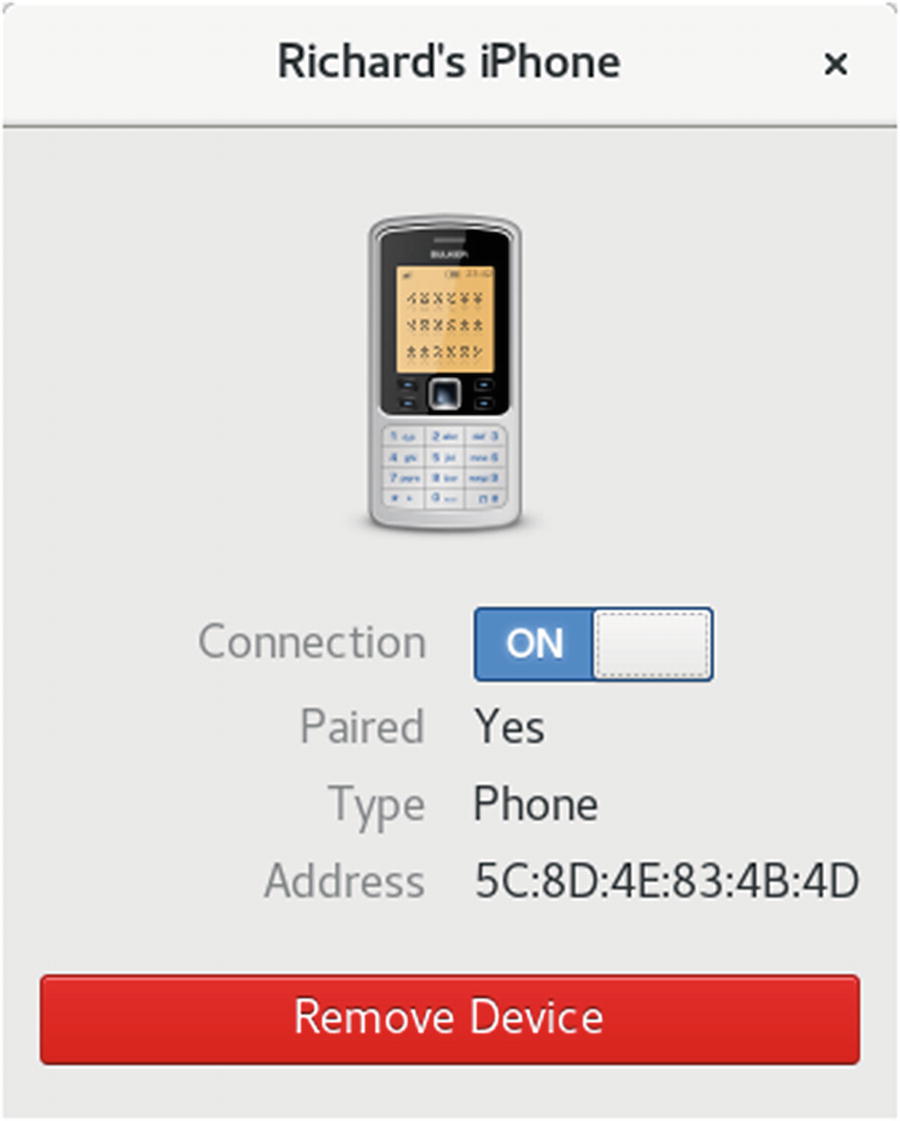
When connecting to a phone (see Figure 13-17), a pin number is detected and displayed. On the configuration dialog, you can choose to connect or disconnect. If you enable a phone to operate as a mobile phone network device (PAN/NAP), then a new entry appears for the device in the system status area menu, which you can expand to list the entries: Use as Internet Connection and Mobile Broadband Setting. When you click the Use as Internet Connection entry, it will change to a Turn Off entry, once you have connected.
Figure 13-17
Bluetooth for phones
Accessing File Systems
Various file systems can be accessed on Fedora easily. Any additional internal hard drive partitions on your system, both Linux and Windows NTFS, will be automatically detected and can be automatically mounted, providing immediate and direct access from your desktop. In addition, you can access remote Windows shared folders and make your own shared folders accessible.
Access Linux File Systems on Internal Drives
Other Linux file systems on internal hard drives will be detected by Fedora automatically. Icons for them will be displayed by clicking the Other Locations entry of any file manager window’s sidebar. Initially, the drive will not be mounted. To mount a file system for the first time, click its icon. You are first prompted to enter your password. Your file system is then mounted. The file system will be mounted under the /media directory and given a folder with the name of the file system label, or, if unlabeled, with the device name. The drive is displayed on the file manager sidebar, with an eject button shown to the right of its entry. To remove the drive, click the eject button for the drive on any file manager window.
Any user with administrative access on the primary console is authorized to mount file systems. You can use the PolicyKit agent to expand or restrict this level of authorization, as well as enabling access for specific users. Users without administrative access are prompted for authentication. Once granted, authentication access will remain in place for a limited time, allowing you to mount other file systems without having to enter your password. These file systems will then be automatically mounted, provided you have left the Remember Authorization checked in the Authenticate window.
Access to Local Windows NTFS File Systems
Linux NTFS (Windows) file system support is installed automatically. Your NTFS partitions are mounted using FUSE, Filesystem in Userspace. The same authentication control used for Linux file systems applies to NTFS file systems. Icons for the NTFS partitions will be displayed by clicking the Other Locations entry of a file manager window's sidebar. Click an entry to mount it. Your NTFS file system is then mounted as a removable device with an eject button appearing in its file manager window. Click the eject button to unmount the device.
The partitions will be mounted under the /run/media directory with their labels used as folder names. If they have no labels, they are given the UUID (Universally Unique Identifier) name as listed in the /dev/disks/by-uuid directory. The UUID is a complex number that uniquely identifies the hard disk device. The NTFS partitions are mounted using ntfs-3g drivers.
Access to Local Network Windows NTFS File Systems
Shared Windows folders and printers on any of the computers connected to your local network are automatically accessible from your Fedora desktop. The DNS discovery service (Avahi) automatically detects hosts on your home or local network and will let you access any of their shared folders directly.
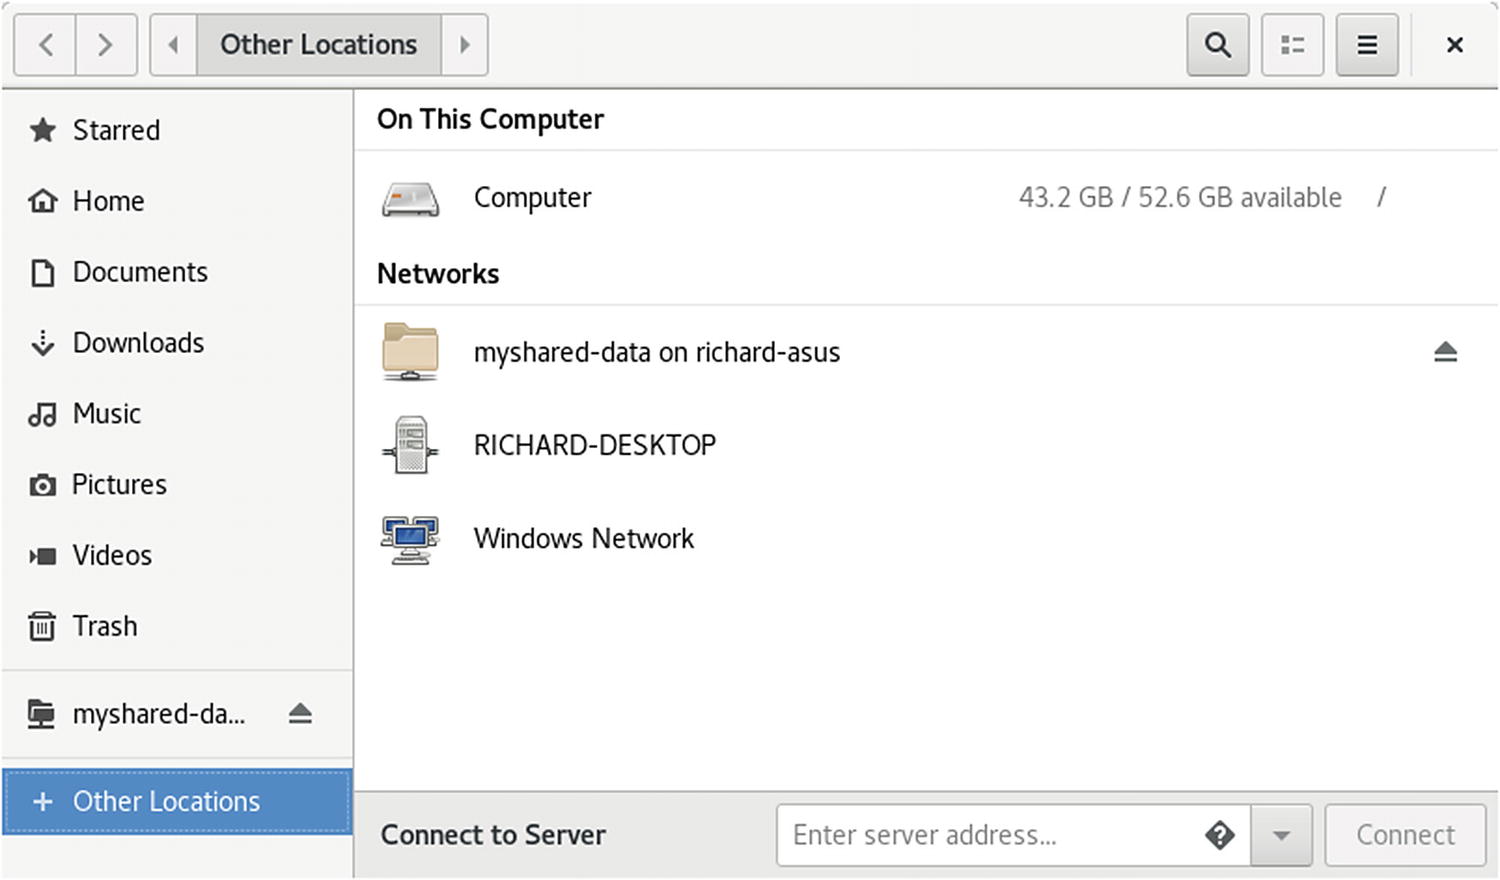
To access the shared folders, click the Other Locations entry of a file manager sidebar (see Figure 13-18). Click the Windows Network icon to see just the Windows machines. However, local systems cannot access your shared folders until you install the Samba sharing server (Samba for Windows systems and NFS for Linux/UNIX systems).
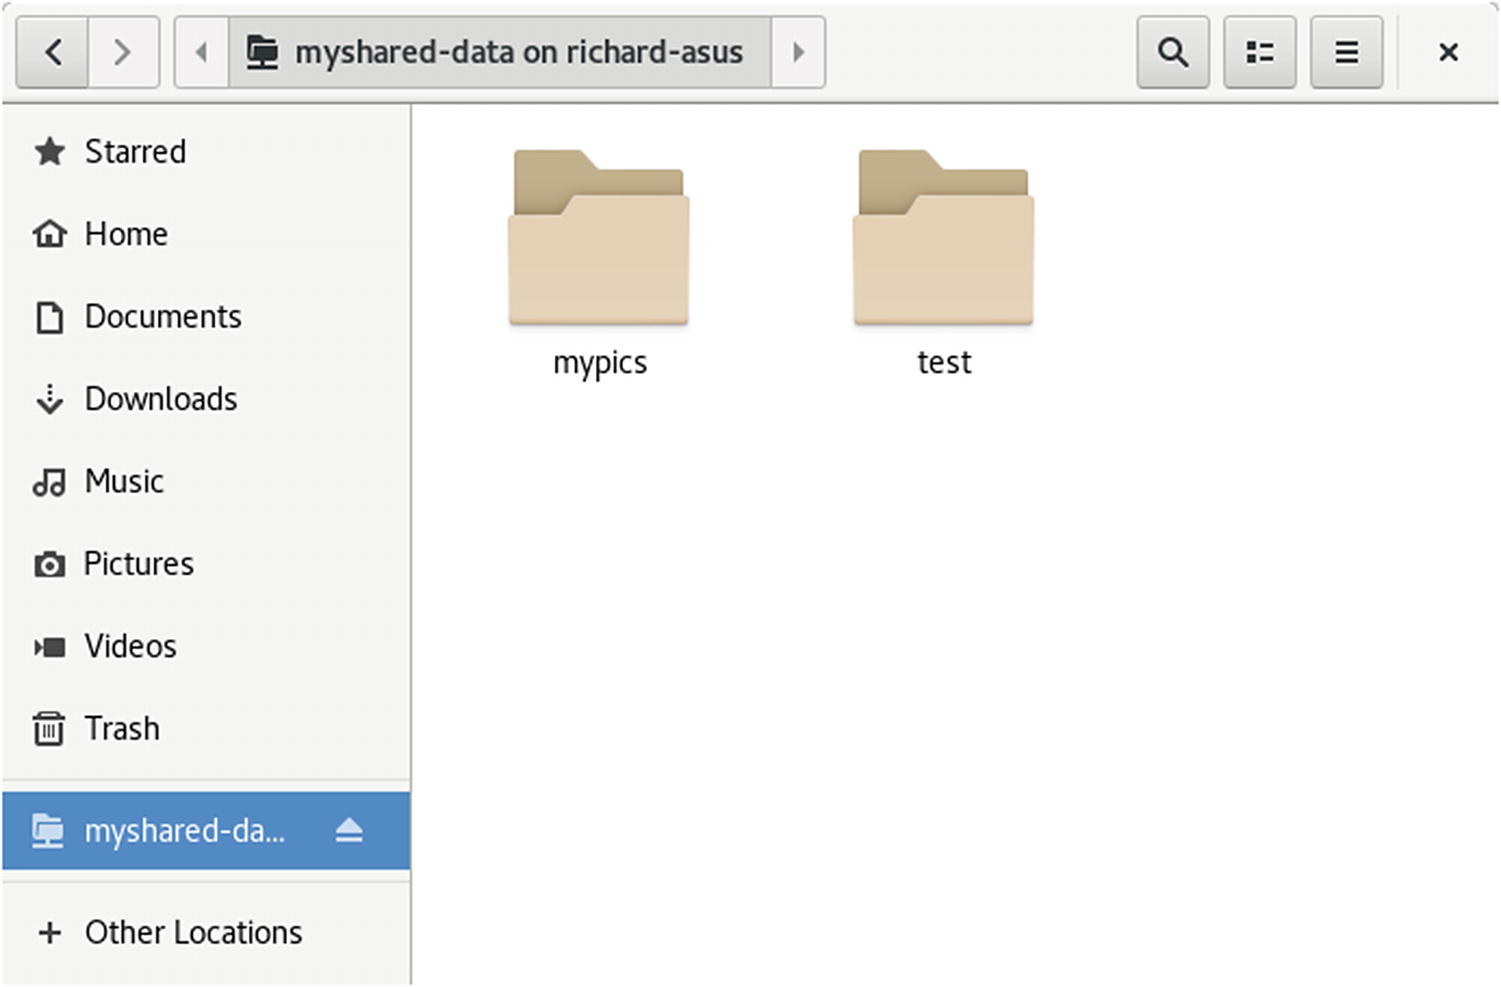
You can also access any shared folder on another Windows host by entering its address in the Connect to Server box at the bottom of the Other Location window. The address of a Windows share always begins with smb://. In Figure 3-19, entering the address smb://myshared-data opened the myshared-data shared folder on the richard-asus host.
Figure 13-18
Network places
Figure 13-19
Remote shares
Permissions on GNOME
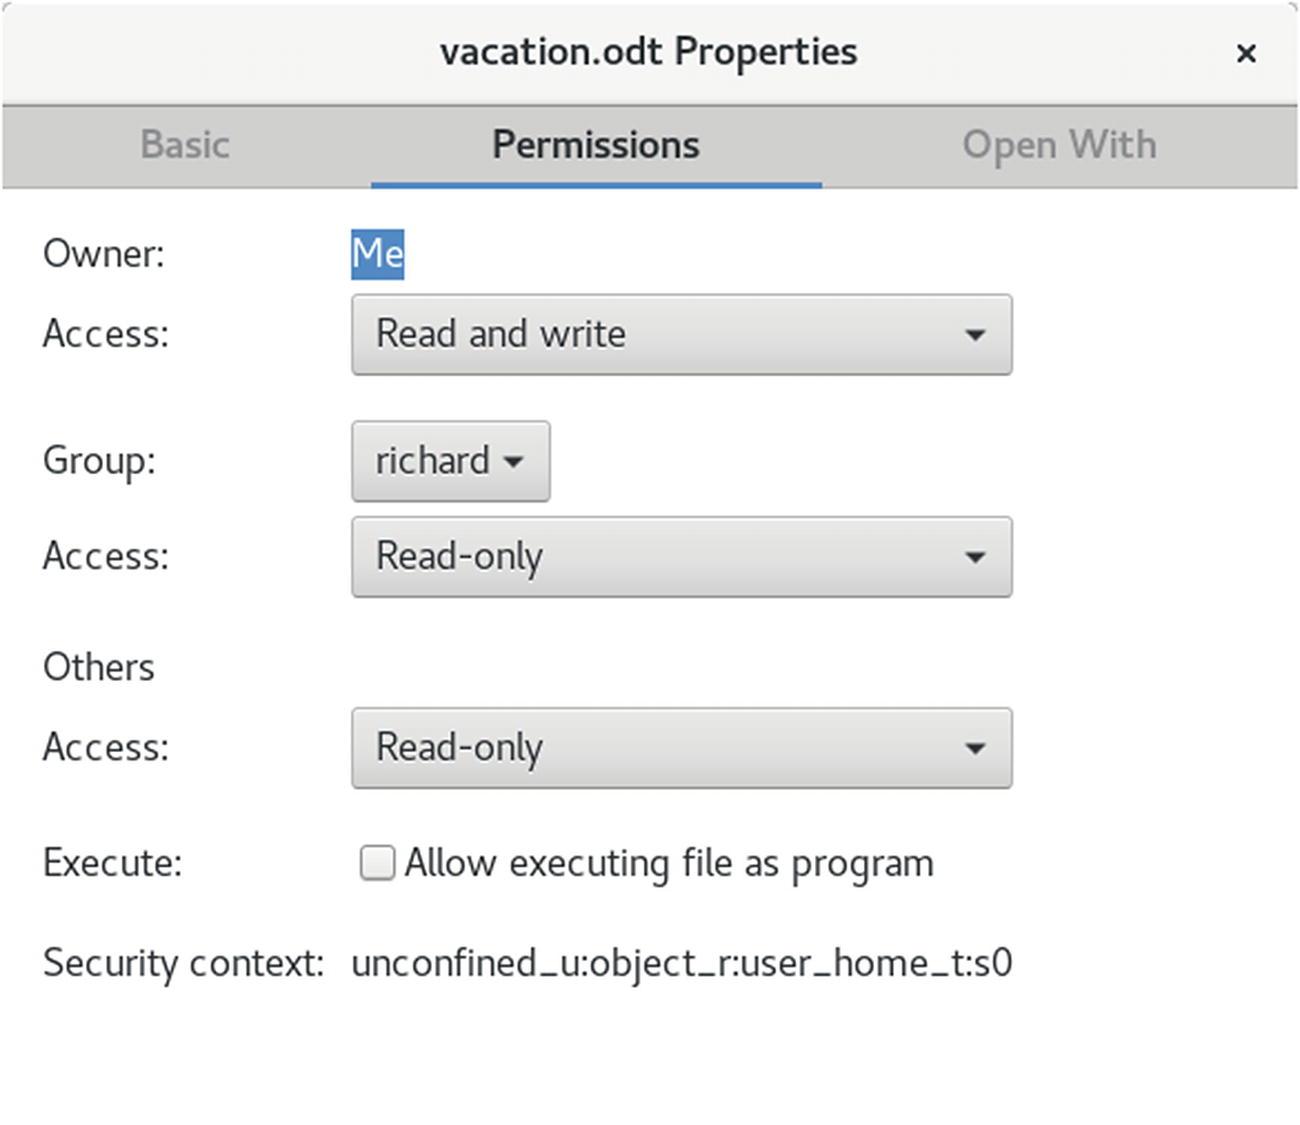
On GNOME, you can set a folder or file permission using the Permissions panel in its Properties window (see Figure 13-20).
Figure 13-20
File permissions
For files, right-click the file icon or entry in the file manager window and select Properties. Then select the Permissions tab. Here you will find menus for read and write permissions, along with entries for Owner, Group, and Others. You can set owner permissions as Read-Only or Read and Write. For the Group and Others, you can also set the None option, denying access. The group name expands to a menu listing different groups; select one to change the file’s group. If you want to execute this as an application (say, a shell script), check the Allow Executing File as Program entry. This has the effect of setting the execute permission.
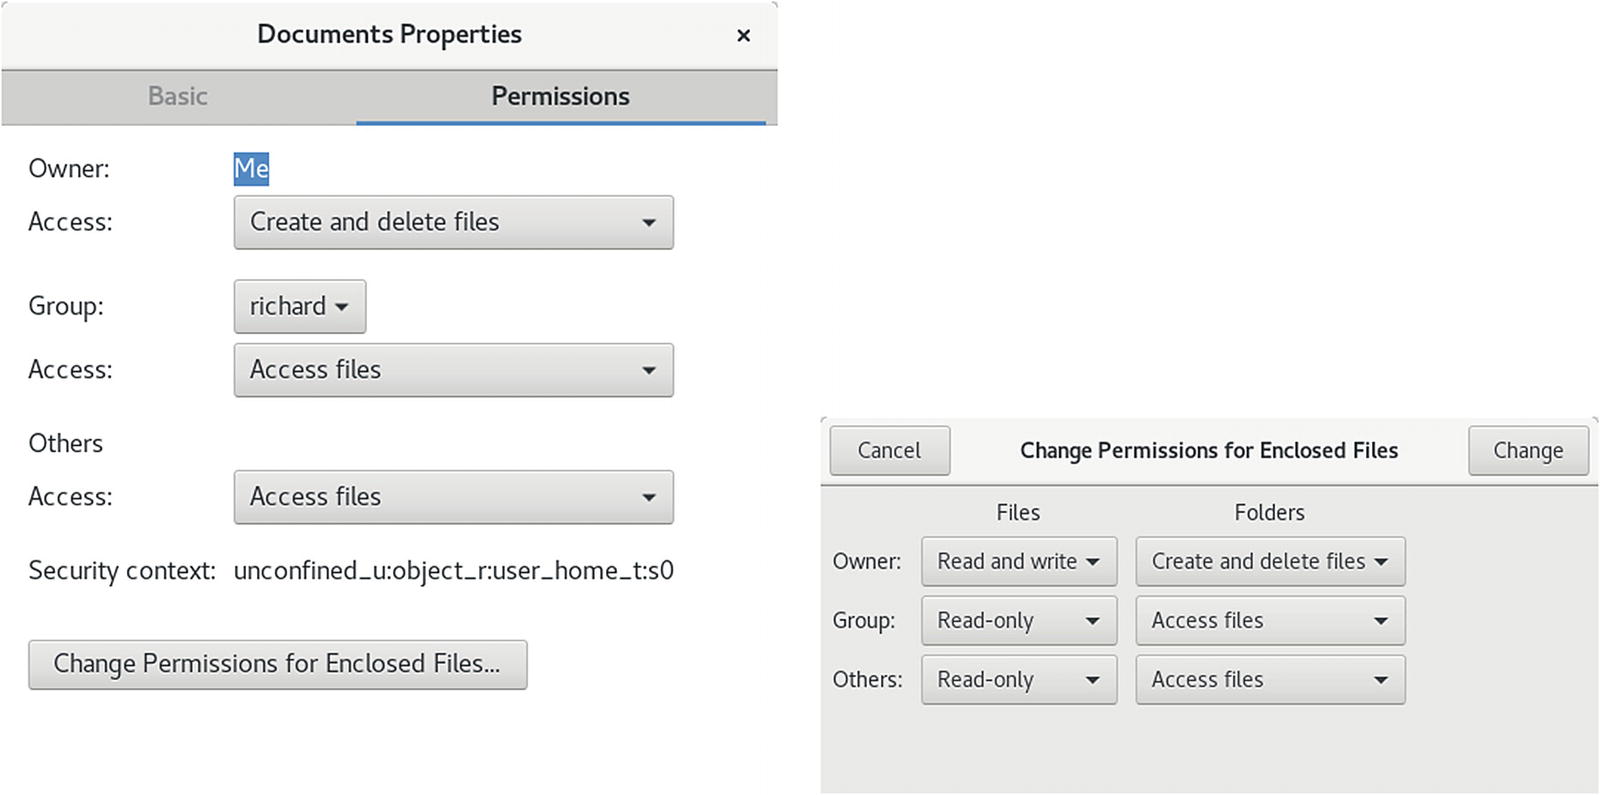
The Permissions tab for folders (directories) Properties dialog operates much the same way, with Access menus for Owner, Group, and Others (see Figure 13-21, left). The Access menu controls access to the folder with options for List Files Only, Access Files, and Create and Delete Files. These correspond to the read, read and execute, and read/write/execute permissions given to folders. The File Access option lets you set permissions for all those files in the folder. They are the same as for files: for the owner, Read or Read and Write. The group and others access menus add a None option to deny access. To set the permissions for all the files in the folder accordingly (not just the folder), click the Change Permissions for Enclosed Files button to open a dialog in which you can specify the owner, group, and others permissions for files and folders in the folder (see Figure 13-21, right).
Note
You can also use the chmod command in a terminal window to change file and folder permissions.
Figure 13-21
Folder permissions
Automatic File System Mounts with /etc/fstab
Although most file systems are automatically mounted for you, there may be instances where you require a file system to be mounted manually. Using the mount command, you can do this directly, or you can specify the mount operation in the /etc/fstab file to have it mounted automatically. Make sure your file system is labeled. Fedora uses labels to identify file systems, not device names. If you have to find out the device name of an unlabeled disk, you can use the fdisk command or the GParted tools, to list all your hard disks, their partitions, and their current device names. You can then use the ext2label command to label a file system. GParted is not installed by default but is available on the Fedora Software repository (use Software or Packages to install it).
All file systems are uniquely identified by their UUID. These are listed in the /dev/disk/by-id directory (or with the sudo blkid command).
sudo blkid
Fedora will use the UUID to identify any unlabeled file system. In the /etc/fstab file, the file system partition devices are listed as a comment and then followed by the actual file system mount operation, using the UUID. The following example mounts the boot file system on a partition identified as 81acc8a9-128a-4860-bae3-999bfee5e0f5 to the /boot directory as an ext4 file system with default options (defaults):
LVM file systems are already labeled. LVM file system device names are located in the /dev directory with a directory for the volume group and device names within that directory for each logical volume in that group. If you use the LVM configuration for your root and swap partitions, there will be a fedora subdirectory in the /dev directory (fedora is the default name). As an example, the file system fedora would have an LVM directory /dev/fedora/. This directory would hold links for the root and swap volumes, root and swap. These link to the actual device files in the /dev directory. The /dev/mapper directory also links the device files, such as /dev/mapper/fedora_localhost--live-root. This is the reference used in the /etc/fstab file to mount the LVM root partition.
If you installed Fedora as fresh install (not an upgrade), you may have to use a mount operation to mount any LVM file systems you had previously. In this case, you would place an entry for the mount operation in the /etc/fstab file. The LVM device name is in the /etc/fstab file. In the following example, the Linux file system labeled mydata1 is mounted to the /mydata1 directory as an ext4 file system type. In addition, an LVM file system, mymedia, is mounted to the /mymedia directory. The logical volume mymedia is part of the logical group, mymedia, which is a directory in the /dev directory, /dev/mymedia/myvideo.
To mount manually, use the mount command and specify the type with the -t ext4 option. Use the -L option to mount by label. List the file system first and then the directory name to which it will be mounted. For a NTFS partition, type ntfs. The mount option has the format:
mount -t type filesystem directory
The following example mounts the mydata1 file system to the /mydata1 directory:
mount -t ext4 -L mydata1 /mydata1
Editing Configuration Files Directly
Although the administrative tools will handle all configuration settings for you, there may be times when you need to make changes by directly editing the configuration files. These are usually text files in the /etc directory or dot files in a user home directory, such as .bash_profile. System configuration files are normally located in the /etc, /usr/share, and /etc/default directories. To change system configuration files, you will need administrative access, requiring you to first log in as the root user. User configuration files are located in dot files in the user’s home directory and don’t require any administrative access. They can be accessed directly by the user.
You cannot use the gedit text editor to edit system configuration files. Nor can you log in as the root user with the GNOME or KDE desktops. Because you can no longer log in to a desktop user interface as the root user, you must log in through the command-line interface. To edit any of the system-wide configuration files, such as those in the /etc directory, you must first have root user access. This you can specify with the sudo command preceding a command-line editor command. Alternatively, you can use the sudo su command to log in as the root user.
As you can no longer log in to the desktop (unless manually configured) as root, you cannot edit system files with a desktop editor like gedit. Instead, you must use a command-line interface editor like vi, nano, Leafpad, or Emacs. Most command-line editors provide a screen-based interface that makes displaying and editing a file fairly simple. Two standard command-line editors are installed by default on your system, vi and nano. In addition, you can install Leafpad or Emacs. Leafpad is easier to use from a terminal window than nano. It will provide mouse support for menus and for editing. Emacs is much more powerful, but, like vi, is more complex.
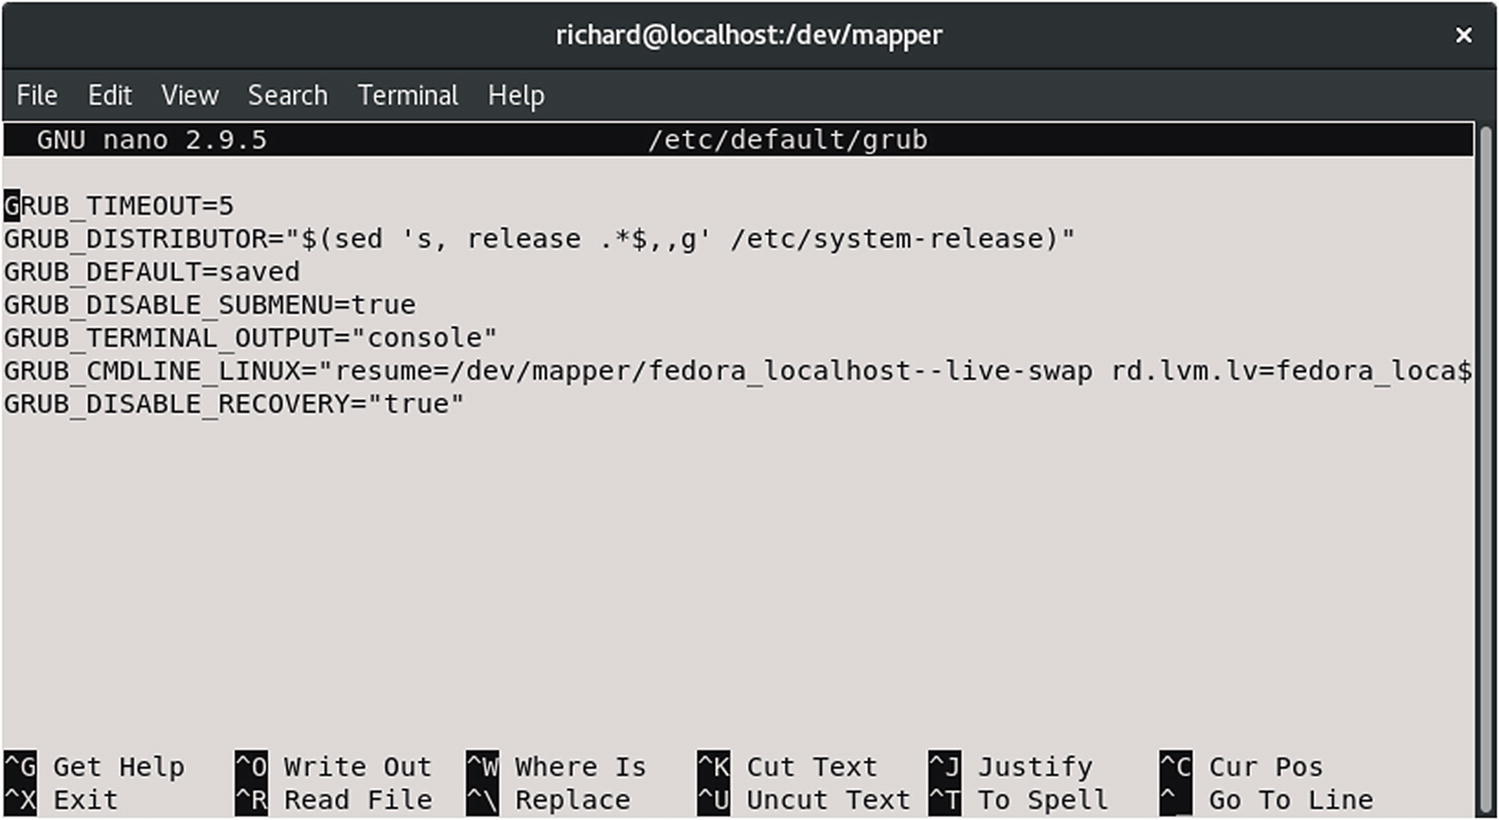
The nano editor is a simple screen-based editor that lets you visually edit your file, using arrow and page keys to move around the file. You use control keys to perform actions. Pressing Ctrl+x will exit and prompt you to save the file; pressing Ctrl+o will save it. You start nano with the nano command. To edit a configuration file, you will require administrative access, so you would have to use the sudo command. Figure 13-22 shows the nano editor being used to edit the /etc/default/grub file.
sudo nano /etc/default/grub
Figure 13-22
The nano editor and system configuration files
Unlike system configuration files, user configuration files (dot files) can be changed by individual users directly. To edit user configuration files, you can use a standard editor, such as vi or Emacs, though one of the easiest ways to edit them is to use the gedit editor on the GNOME desktop.
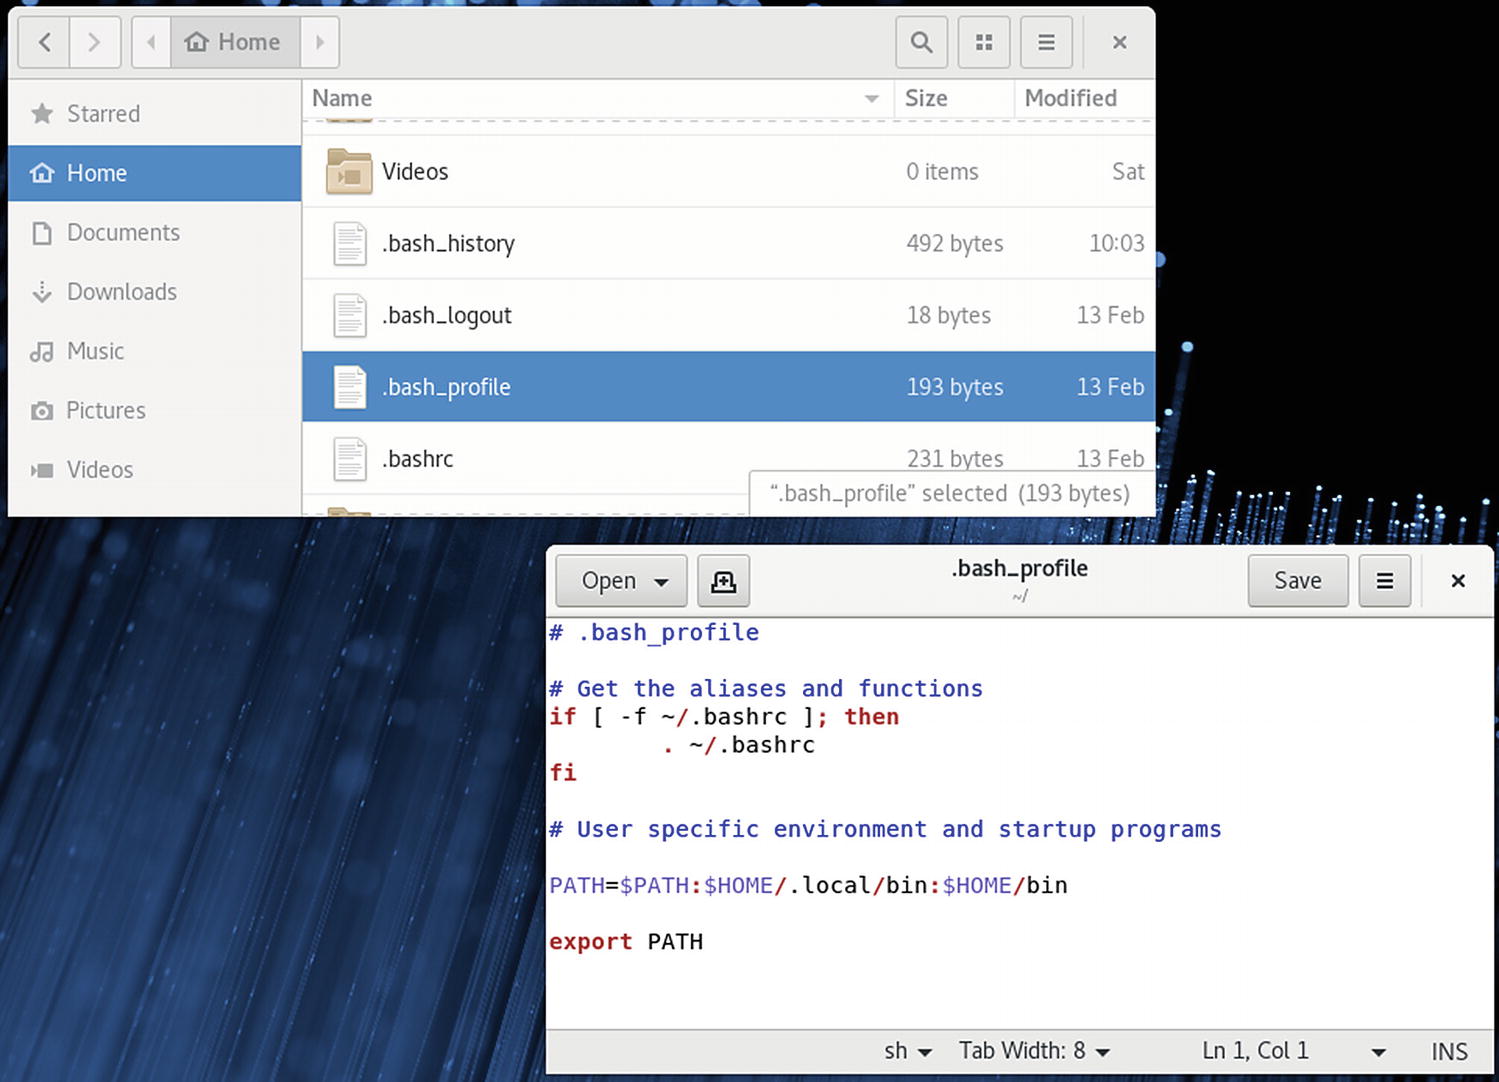
For gedit, user configuration files do not show up automatically. Dot files (hidden files) like .bash_profile have to be chosen from the file manager window, not from the gedit open operation. First, configure the file manager to display dot files. Open any file manager window and, from the View menu, click the Show Hidden Files entry. All your user configuration files will be displayed. Usually you can then just double-click the file to open it in the gedit text editor. Alternatively, you can right-click the file and select Open with Text Editor from the pop-up menu (see Figure 13-23). Gedit will let you edit several files at once, opening a tabbed pane for each. You can use gedit to edit any text file, including ones you create yourself.
Figure 13-23
The Gedit text editor and user configuration files
Note
Be careful when editing your configuration files. Editing mistakes can corrupt your configurations. It is advisable to make a backup of any configuration files you are working on first, before making major changes to the original.
Backup Management: rsync, Déjà Dup, and Amanda
Backup operations have become an important part of administrative duties. Several backup tools are provided on Linux systems, including Amanda and the traditional dump/restore tools, as well as the rsync command for making individual copies. Déjà Dup is a frontend for the duplicity backup tool, which uses rsync to generate backup archives. Amanda provides server-based backups, letting different systems on a network back up to a central server. The dump tools let you refine your backup process, detecting data changed since the last backup. Table 13-3 lists websites for Linux backup tools.
Individual Backups: archive and rsync
You can back up and restore particular files and directories with archive tools such as tar, restoring the archives later. For backups, tar is usually used with a tape device. To automatically schedule backups, you can schedule appropriate tar commands with the cron utility. The archives also can be compressed for storage savings. You can then copy the compressed archives to any medium, such as a DVD, USB drive, or tape. On GNOME, you can use File Roller to create archives easily (Archive Manager).
Déjà Dup frontend for duplicity, which uses rsync to perform basic backups
If you want to remote-copy a directory or files from one host to another, making a particular backup, you can use rsync, which is designed for network backups of particular directories or files, intelligently copying only those files that have been changed, rather than the contents of an entire directory. In archive mode, it can preserve the original ownership and permissions, provided corresponding users exist on the host system. The following example copies the /home/george/myproject directory to the /backup directory on the host rabbit, creating a corresponding myproject subdirectory. The -t specifies that this is a transfer. The remote host is referenced with an attached colon, rabbit:.
rsync -t /home/george/myproject rabbit:/backup
As a precaution, you could first perform a dry run to see what actions your rsync operation will perform. Use the -n option to perform the dry run and add the -v option for details (verbose).
rsync -nvt /home/george/myproject rabbit:/backup
If, instead, you wanted to preserve the ownership and permissions of the files, you would use the -a (archive) option. Adding a -z option will compress the file. The -v option provides a verbose mode.
rsync -avz /home/george/myproject rabbit:/backup
A trailing slash on the source will copy the contents of the directory, rather than generating a subdirectory of that name. Here the contents of the myproject directory are copied to the george-project directory:
The rsync command is configured to use the SSH remote shell by default. You can specify it or an alternate remote shell to use with the -e option. For secure transmission, you can encrypt the copy operation with ssh. Either use the -e ssh option or set the RSYNC_RSH variable to ssh.
You can also run rsync as a server daemon. This will allow remote users to sync copies of files on your system with versions on their own, transferring only changed files, rather than entire directories. Many mirror and software FTP sites operate as rsync servers, letting you update files without having to download the full versions again. Configuration information for rsync as a server is kept in the /etc/rsyncd.conf file. On Fedora, rsync as a server is managed through systemd, using the /lib/systemd/system/rsyncd.service file, which starts rsync with the -daemon option. You can enable it with the systemctl command.
sudo systemctl enable rsyncd.service
You can then start and stop it with the service command in a terminal window. Be sure to use the sudo command.
sudo service rsyncd start
Deja Dup
Deja Dup is a frontend for the duplicity backup tool, which uses rsync to generate backup archives (http://www.nongnu.org/duplicity/). Once installed, you can access Deja Dup from Utilities ➤ Backups.
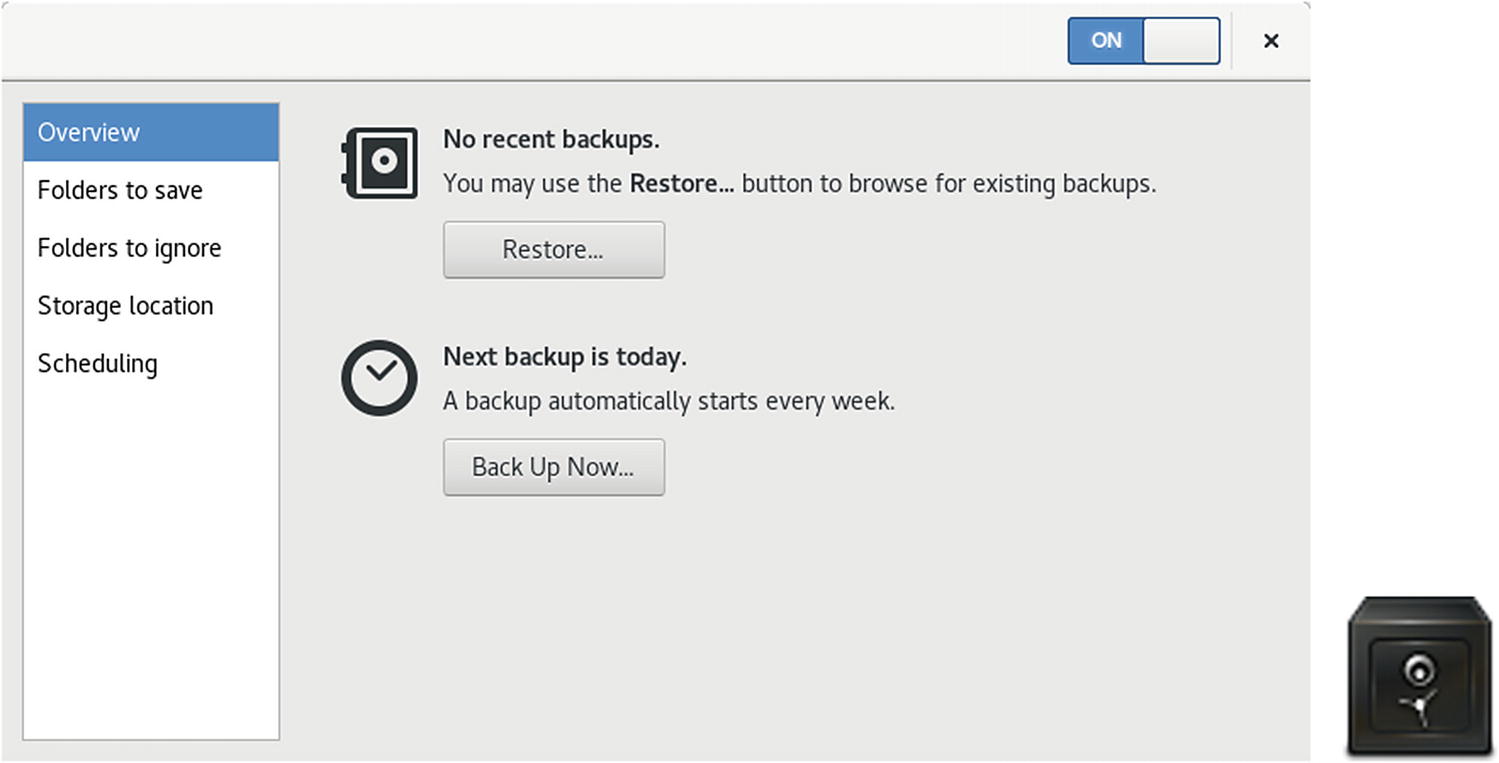
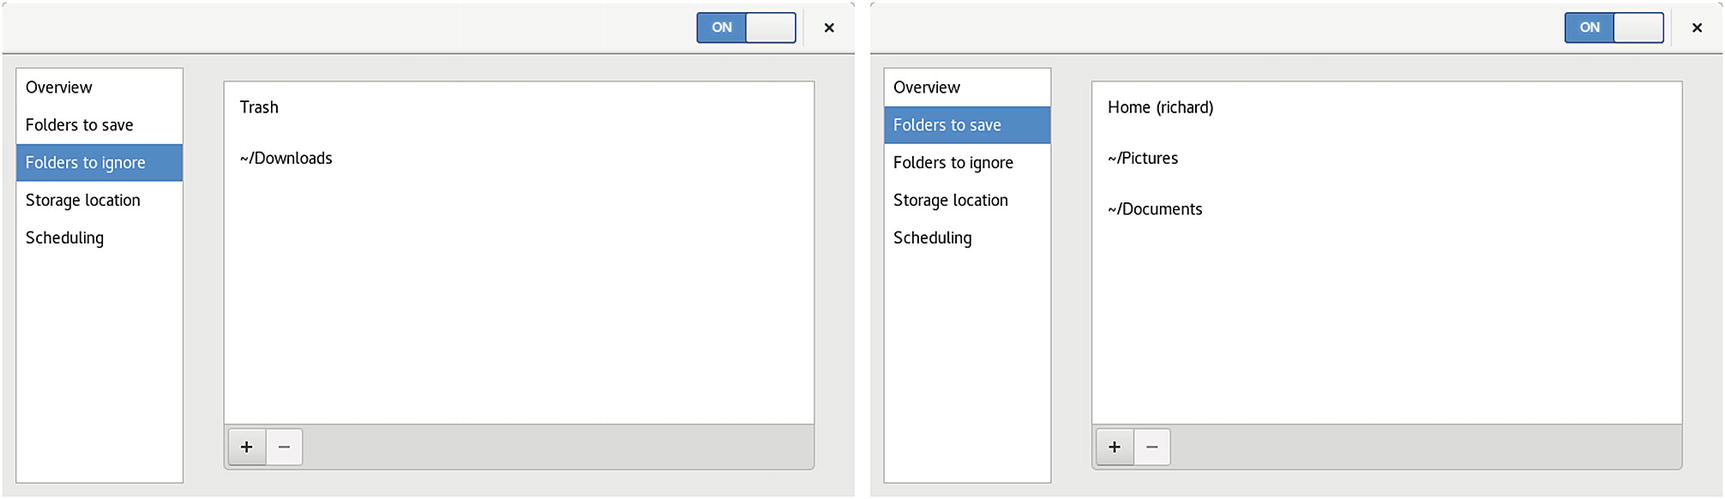
The deja-dup settings dialog shows tabs for Overview, Folders to Save, Folders to Ignore, Storage Location, and Scheduling (see Figure 13-24). A switch at the top right of the dialog allows you to turn automatic backups on and off. The Overview tab provides information about your backup configuration with buttons to restore from a backup and to manually perform a backup, as well as the time of the next scheduled backup.
Figure 13-24
Overview of Deja Dup settings
The Folders to Save tab lets you specify folders you want to back up and folders to ignore (see Figure 13-25). Click the plus button (+) at the bottom of the folders list to add a new folder for backup. Do the same to specify folders to ignore. The minus button removes folders from the list. Your home folder has been added already. The Folders to Ignore tab specifies folders you do not want to back up. The Downloads and Trash folders are selected initially.
Figure 13-25
Deja Dup settings: Folders to save and ignore
The Storage Location tab lets you specify a location to store your backups (see Figure 13-26). You can choose different locations, such as a network server, a cloud account, or a local folder. Choose the one you want from the Backup location menu. With each choice, you are prompted for the appropriate configuration information.
Figure 13-26
Deja Dup settings: Storage for network share and Local folder
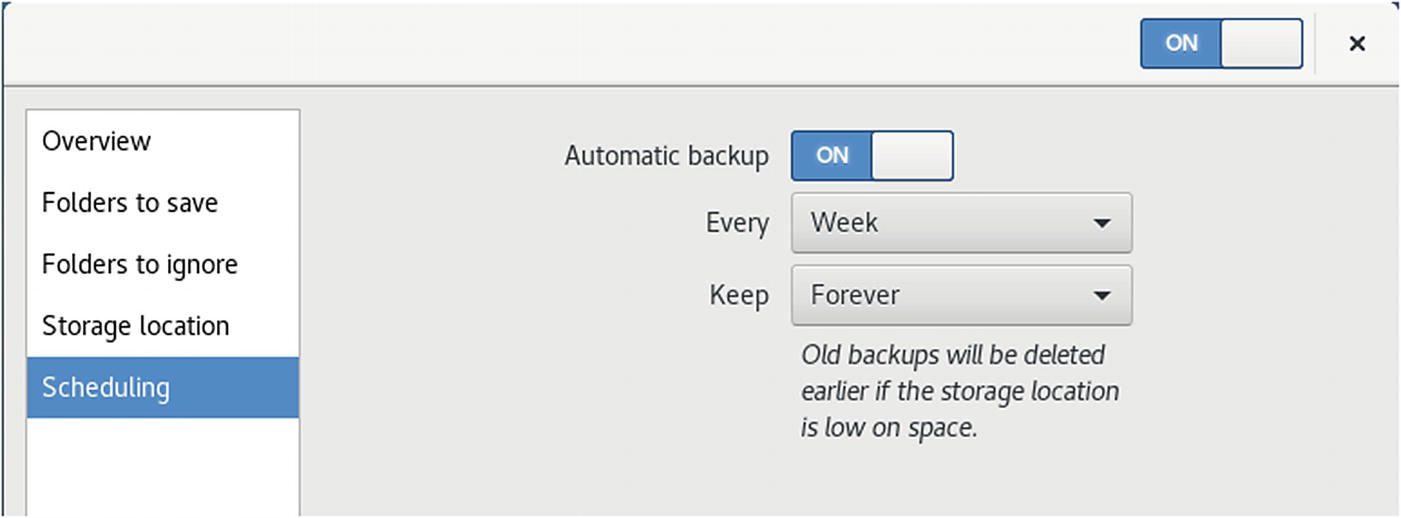
On the Scheduling tab, you can specify the frequency of your backups and how long to keep them (see Figure 13-27). First turn on Automatic backup. Backups can be performed daily, weekly, every two weeks, or monthly. They can be kept for a week, month, several months, a year, or forever.
Figure 13-27
Deja Dup settings: Backup times
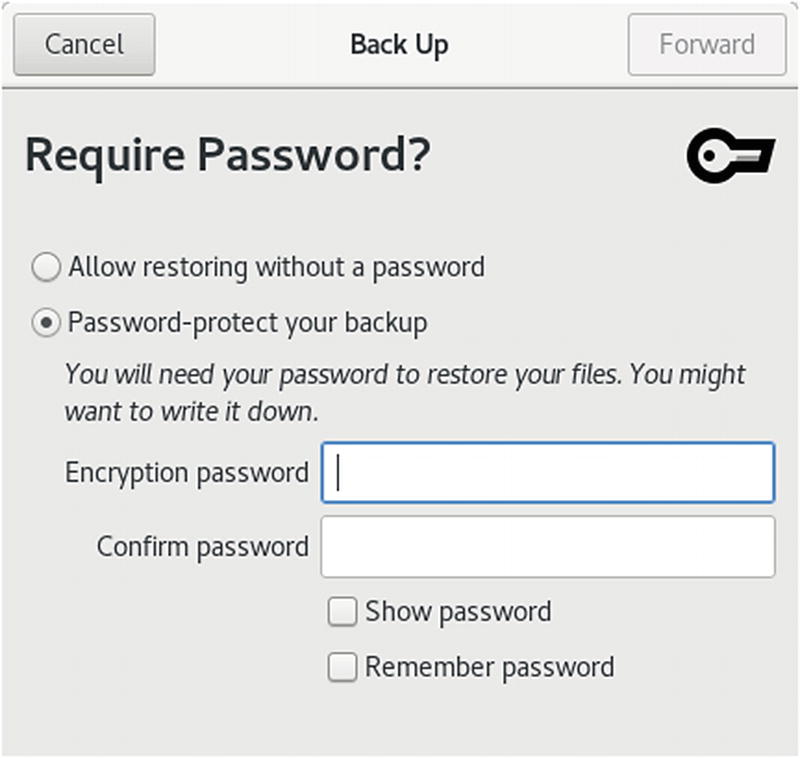
When you perform a backup, you are prompted to back up with or without encryption. For encrypted backups, you are prompted to enter a password, which you will need to restore the files (see Figure 13-28).
Figure 13-28
Deja Dup backup: Encryption
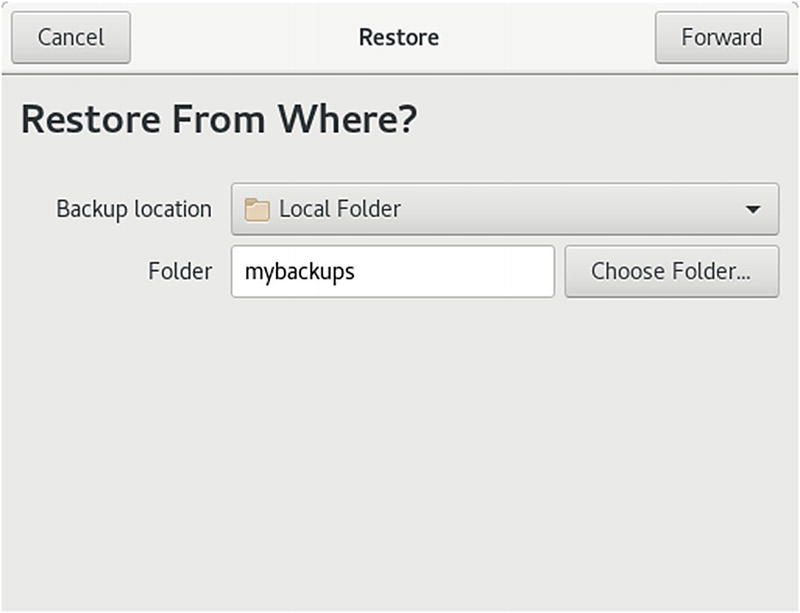
When restoring, you are prompted to specify the location you are backing up from, the backup date to restore from, and whether to restore to the original location or a specific folder (see Figure 13-29).
Figure 13-29
Deja Dup restore
Amanda
To back up hosts connected to a network, you can use the Advanced Maryland Automatic Network Disk Archiver (Amanda) to archive hosts. Amanda uses tar tools to back up all hosts to a single host operating as a backup server. Backup data is sent by each host to the host operating as the Amanda server, where they are written out to a backup medium such as tape. With an Amanda server, the backup operations for all hosts become centralized in one server, instead of each host having to perform its backup. Any host that has to restore data simply requests it from the Amanda server, specifying the file system, date, and filenames. Backup data is copied to the server’s holding disk and from there to tapes. Detailed documentation and updates are provided at http://amanda.org.
Managing Services
You can select certain services to run and the special target (runlevel) at which to run them. Most services are servers like a web server or FTP server. Other services provide security, such as SSH or Kerberos. You can decide which services to use with the chkconfig, systemctl, service, or Cockpit tools.
Enabling Services: Starting a Service Automatically at Boot
Most services are servers like a web server or proxy server. Other services provide security, such as SSH or Kerberos. Services such as the Apache web server, Samba server, and the FTP server are handled by the systemd daemon. You can decide which services to start when the system boots using the systemctl command. chkconfig, service, and Cockpit are simply frontends to the systemctl command.
To have a service start up at boot, you need to first enable it using the systemctl tool as the root user. Use the enable command to enable the service. The following commands enable the vsftpd server and the Samba server (smb). The systemctl command uses the service's service configuration file located in the /lib/systemd/system directory.
sudo systemctl enable vsftpd
sudo systemctl enable smb
Managing Services Manually
Use the start, stop, and restart commands with systemctl to manually start, stop, and restart a service. The enable command starts a service automatically. You can choose to start it manually when you wish using the start command. You can stop and restart a service any time using the stop and restart commands. The condrestart command starts the server only if it is already stopped. Use the status command to check the current status of a service.
sudo systemctl start vsftpd
sudo systemctl restart vsftpd
sudo systemctl condrestart vsftpd
sudo systemctl stop vsftpd
sudo systemctl status vsftpd
You can also use the service command and Cockpit to start, stop, or restart a service. These are simply frontends for the systemctl command that performs the actual operation using systemd.
sudo service start vsftpd
Cockpit
The Cockpit management console (under development by Red Hat) provides a web interface for managing both system administration and Internet servers on your system, as well as servers on your network (http://cockpit-project.org). The web interface works best on a desktop system (Fedora workstation). You can use it to manage your system resources, including services, storage, and networking. Once you install Cockpit, be sure to enable it with systemd, which then allows access by your firewall for both Cockpit and HTTPS. The package name is cockpit.
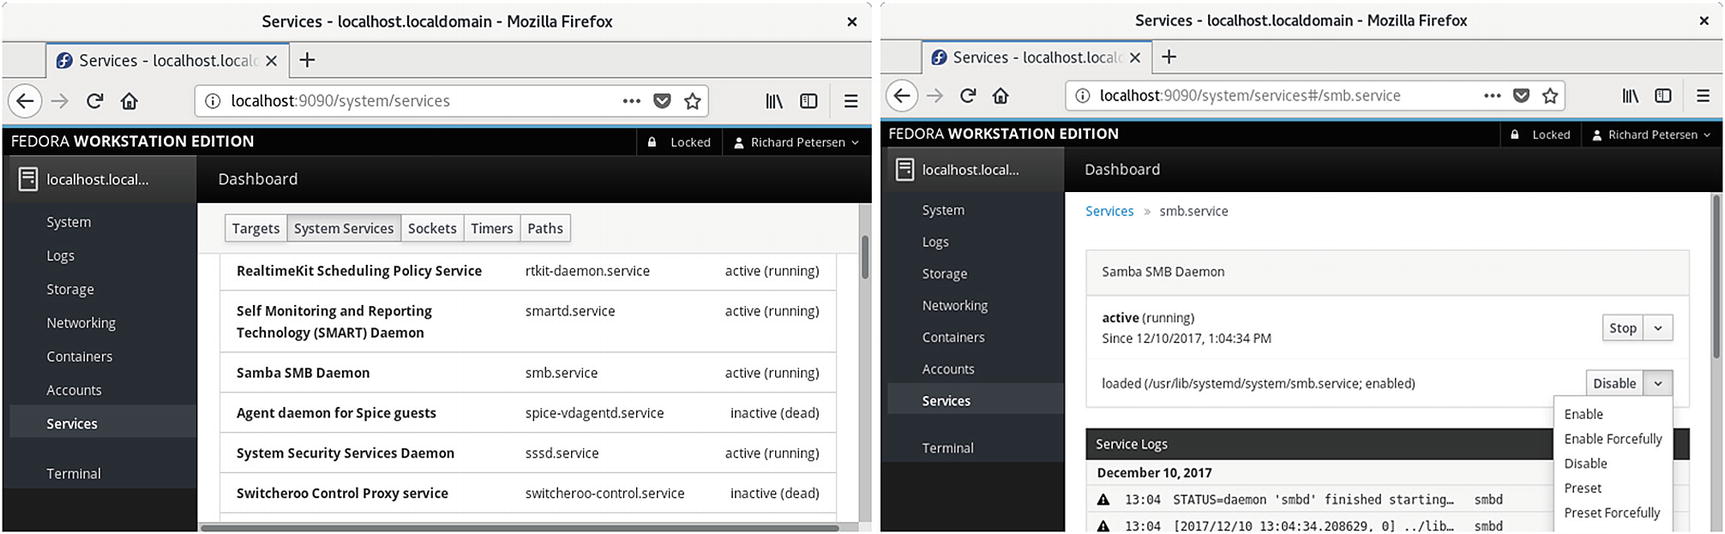
You can access Cockpit using a web browser and accessing port 9090 on your local system, localhost:9090. If you install on the workstation, a Cockpit icon is displayed on the Applications Overview. You click it to open Cockpit in your default browser. The Cockpit page initially prompts you for your username and password. It then shows a listing of the systems on your network. Upon clicking one, you will see links on the left side for administration categories such as system administration, services, networking, and storage. Click on the services link to manage your services. Then click the System Services tab to list the enabled and disabled service, including the network services such as the Apache Web server and the vsftpd FTP server (see Figure 13-30). Click on a service to open a page where you can manage service. Buttons to the right show the current status. Clicking on an arrow button to the right displays a menu for actions you may want to take, such as stopping or restarting a service. If you disable a service, it is moved down to the disabled list. Enabling a service moves it up to the enabled list.
Figure 13-30
Services: Cockpit
Cockpit dynamically updates with systemctl. Should you make changes in a terminal window using systemctl, the changes are immediately shown on Cockpit.
chkconfig
To configure a service to start up automatically when the system boots, you also can use the chkconfig tool, which runs on a command line. The chkconfig command uses the on and off options to select and deselect services for startup.
sudo chkconfig smb on
The chkconfig tool has been modified to work with systemd. You can use chkconfig to turn services on or off (enable or disable). Though chkconfig can turn the systemd service on or off, it was still designed for use by System V services. chkconfig with the --list option lists only System V services, which may not be valid. The reset command does not work with systemd services.
You use the on option to have a service enabled, and the off option to disable it.
sudo chkconfig httpd on
sudo chkconfig httpd off
The service Command
The service command is now simply a frontend for the systemctl command, which performs the actual operation using systemd. The service command cannot enable or disable services. It only performs management operations such as stop, restart, and status. To start and stop services manually, you can use either Cockpit or the service command. With the service command, you enter the service name with the stop argument to stop it, the start argument to start it, and the restart argument to restart it. The service command is run from a Terminal window. You will have to first log in as the root user, using the sudo command, or use the sudo command if configured. The following will start the smb Samba service.
sudo service smb start
In Fedora, the systemd version of the service command actually invokes the systemctl command to run the service’s systemd .service unit file in /lib/systemd/system. If a service is not enabled, systemd will enable it. You can perform the same operations as the service command, using the systemctl command. The following is the equivalent of the previous command.
sudo systemctl start smb
Printing
This section covers the printing-configuration tools: the GNOME Printers tool (GNOME Settings ➤ Devices ➤ Printers) and the older system-config-printer tool (Sundry ➤ Print Settings). Most printers are detected for you automatically. You can use the GNOME Settings Printers tool to turn them on or off and access their print queues. As an alternative, you can still use the older system-config-printer. Both are frontends for the Common UNIX Printing System (CUPS), which provides printing services (www.cups.org).
When you attach a local printer to your system for the first time, the GNOME Printers tool automatically detects the printer and installs the appropriate driver. A message appears briefly in the message tray, indicating that a new printer has been detected. The printer is then listed in both the GNOME Printers tool and in the older system-config-printer. If the detection fails, you can use the GNOME Printers tool, accessible from GNOME Settings ➤ Devices, to set up your printer.
KDE provides support for adding and configuring CUPS printers through the KDE System Settings➤ Printer Configuration dialog. Select the Printer Configuration icon under Hardware. USB printers that are automatically detected will be listed in the KDE Printer Configuration dialog.
Printers can be local or remote. Both are referenced using Universal Resource Identifiers (URI). URIs support both network protocols used to communicate with remote printers and device connections used to reference local printers.
Remote printers are referenced by the protocol used to communicate with them, including ipp for the Internet Printing Protocol used for UNIX network printers, smb for the Samba protocol used for Windows network printers, and lpd for the older LPRng UNIX print servers. Their URIs are similar to a web URL, indicating the network addresses of the system the printer is connected to.
ipp://mytsuff.com/printers/queue1
smb://guest@lizard/myhp
For attached local printers, the URI will use the device connection and the device name. The usb: prefix is used for USB printers; parallel: is used for older printers connected to a parallel port; serial: is used for printers connected to a serial port; and scsi: is used for SCSI-connected printers. For a locally attached USB printer, the URI would be something like the following:
usb://Canon/S330
GNOME Printers: GNOME Settings ➤ Devices
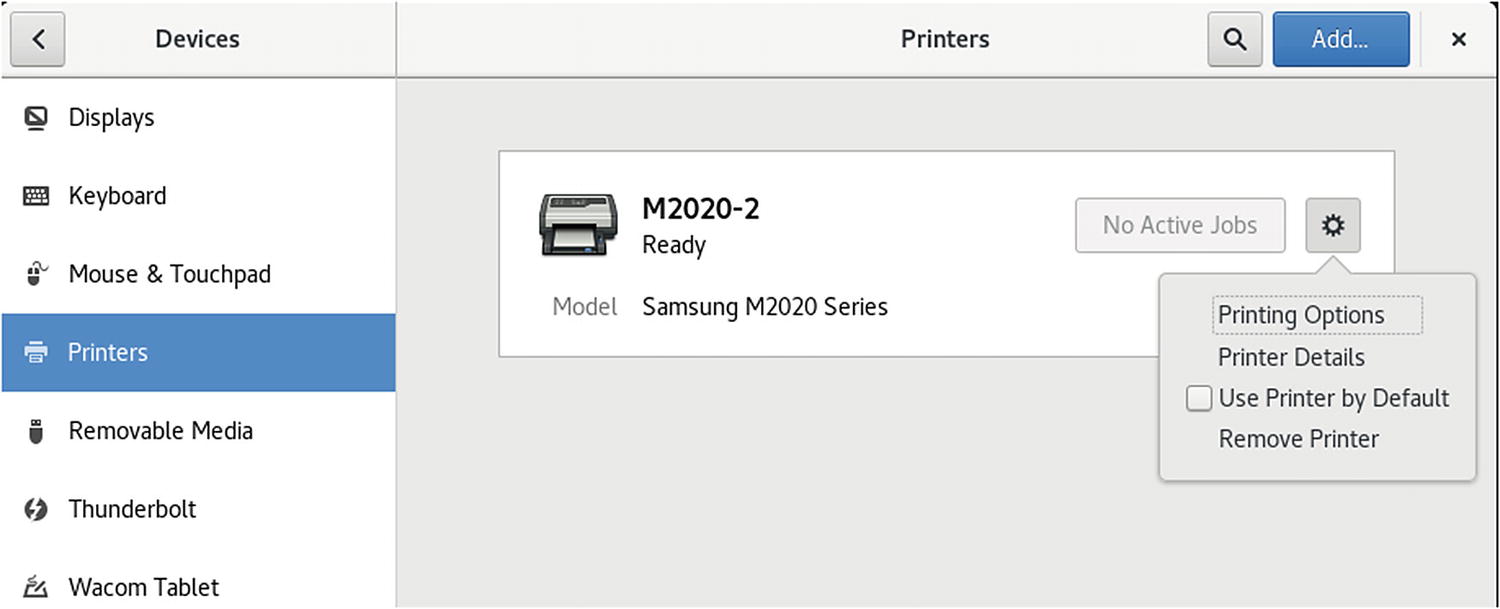
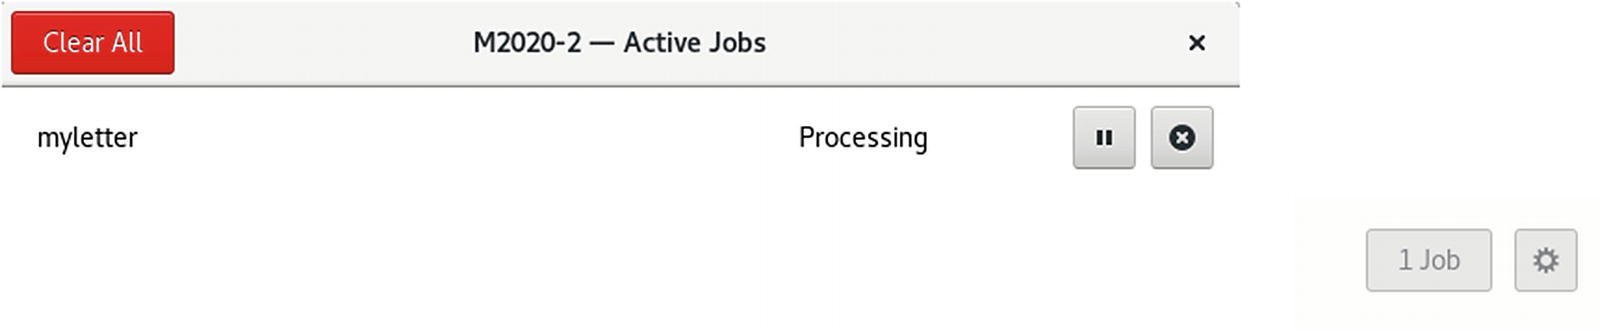
The GNOME Printers tool is accessible from the GNOME Settings ➤ Devices ➤ Printers tab. It lists installed printers, letting you configure them and access their job queues (see Figure 13-31). If no printers are detected, an Add button is displayed on the tab, which you can use to detect your printer. To detect additional printers, you can click the Add button. The Printers tab will list entries for detected and configured printers. A printer entry displays the printer name, model, status, a jobs button with the number of jobs, and a configuration button (gear icon). The jobs button to open a dialog listing active jobs for this printer (see Figure 13-32). For each job entry there are buttons to the right to pause or remove the job.
Figure 13-31
GNOME Settings ➤ Devices ➤ Printers tab
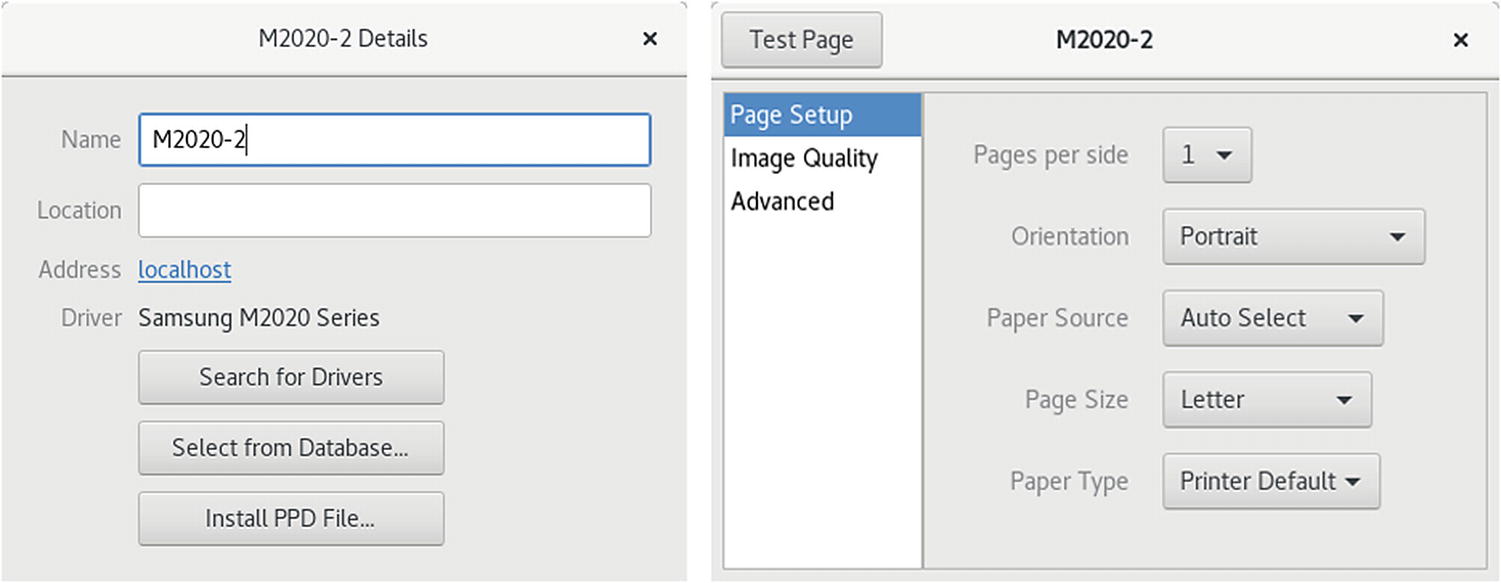
To configure a printer, click the configure button (gear icon) to display a menu with entries for the printer's options, details, default, and removal (see Figure 13-33). Choosing the Use Printer by Default makes it your default printer. The Remove Printer entry removes the printer configuration from your system. The Printer Details entry opens a dialog with printer's details, such as the name, location, address, and driver. There are buttons for selecting a driver from a search, database, or a PPD file. Clicking on the Printing Options entry opens the printer’s options dialog (see Figure 13-33). You can configure printer features, such as page setup, image quality, and color. The Advanced tab lets you set specialized options, such as contrast, ink type, and saturation.
Figure 13-32
GNOME Printers: Jobs
Figure 13-33
GNOME Printers: Details and Options
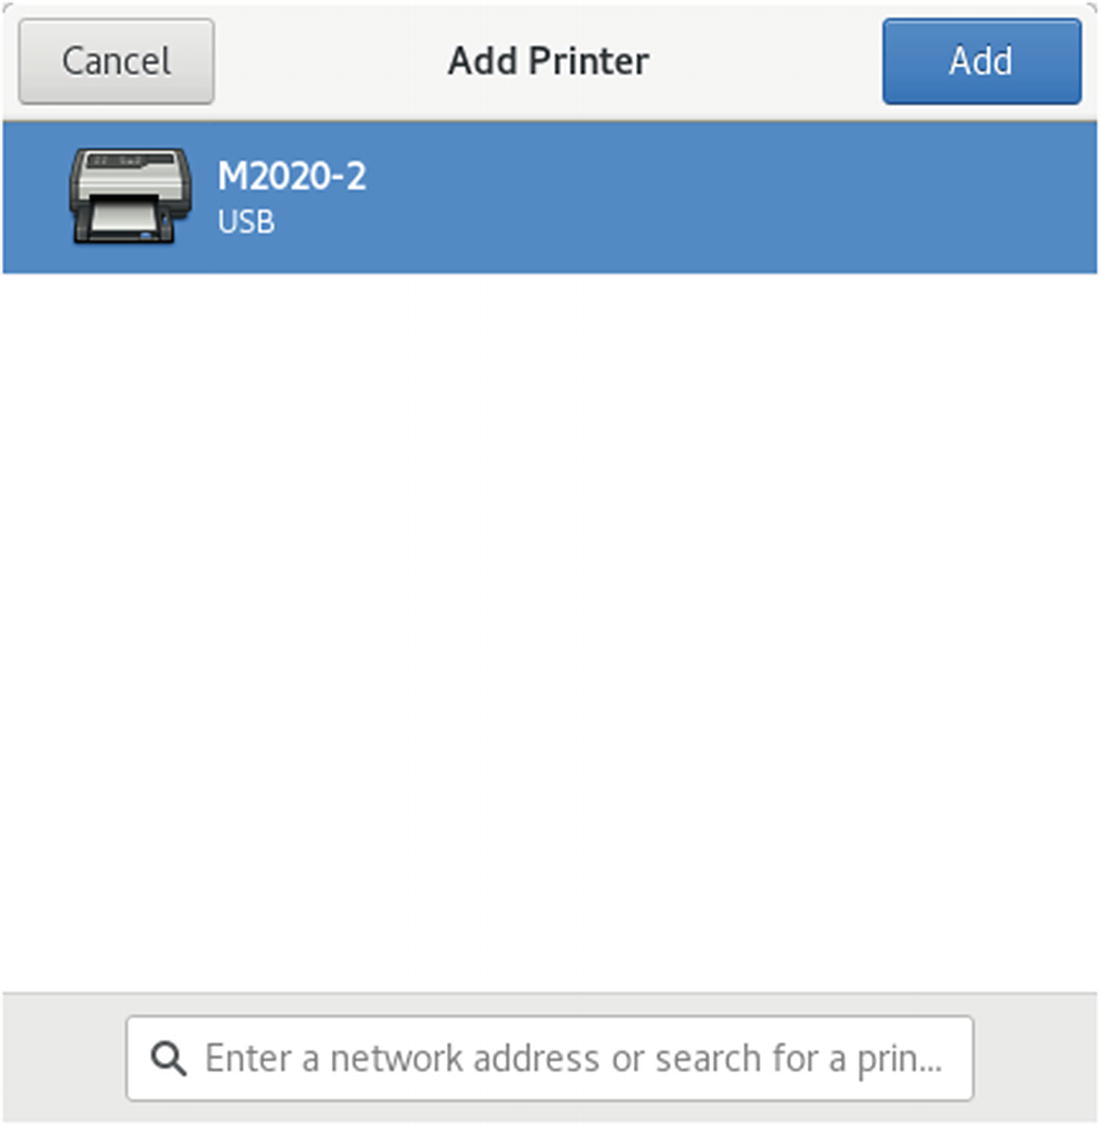
On the Settings ➤ Devices ➤ Printers tab, you can use the Add button to open the Add Printer dialog, which lists printers attached to your system (see Figure 13-34). They are detected automatically. If you know the address of a printer on your network, you can enter it in the search box at the bottom to have it detected and displayed.
Figure 13-34
GNOME Printers: Add printer
Remote Printers
To install a remote printer that is attached to a Windows system or another Linux system running CUPS, you specify its location using special URL protocols. For another CUPS printer on a remote host, the protocol used is ipp, for Internet Printing Protocol, whereas for a Windows printer, it would be smb. Older UNIX or Linux systems using LPRng would use the lpd protocol.
Be sure your firewall is configured to allow access to remote printers. On the Public Services tab (Zones tab) in firewall-config (Sundry ➤ Firewall), be sure that the Samba and IPP services are checked. Samba allows access for Windows printers, and IPP allows access for Internet Printer Protocol printers usually found on other Linux systems. There will be entries for the Samba client and server, as well as for the IPP client and server.
Shared Windows printers on any of the computers connected to your local network are automatically accessible once configured. Supporting Samba libraries are already installed and will let you access directly any of shared Windows printers. Should you want to share a printer on your Ubuntu computer with users on other computers, you must install Samba and have the Server Message Block services enabled, using the smb and nmb daemons. The Samba service should be enabled by default. If not, you can enable it using the systemctl command as the root user. Open a terminal window (Terminal) and then enter a sudo systemctl command for the smb and nmb servers with the enable command.
sudo systemctl enable nmb
sudo systemctl enable smb
On the GNOME Settings ➤ Devices ➤ Printers tab, click the Add button to open the Add Printer dialog that lists the printers attached to your system. If you know the address of a printer on your network, you can enter it in the search box at the bottom to have it detected and displayed. Remote systems that may have printers are also listed. Normally, these require authentication. Select the system you want to access and click the Authenticate button to open a dialog prompting you for a password.
Once you’re granted access, the printers available on that system are listed (see Figure 13-34). To add a printer, select it and then click the Add button. This opens the Select Printer Driver dialog, from which you choose the manufacturer and then the printer model (see Figure 13-35).
Print Settings: system-config-printer
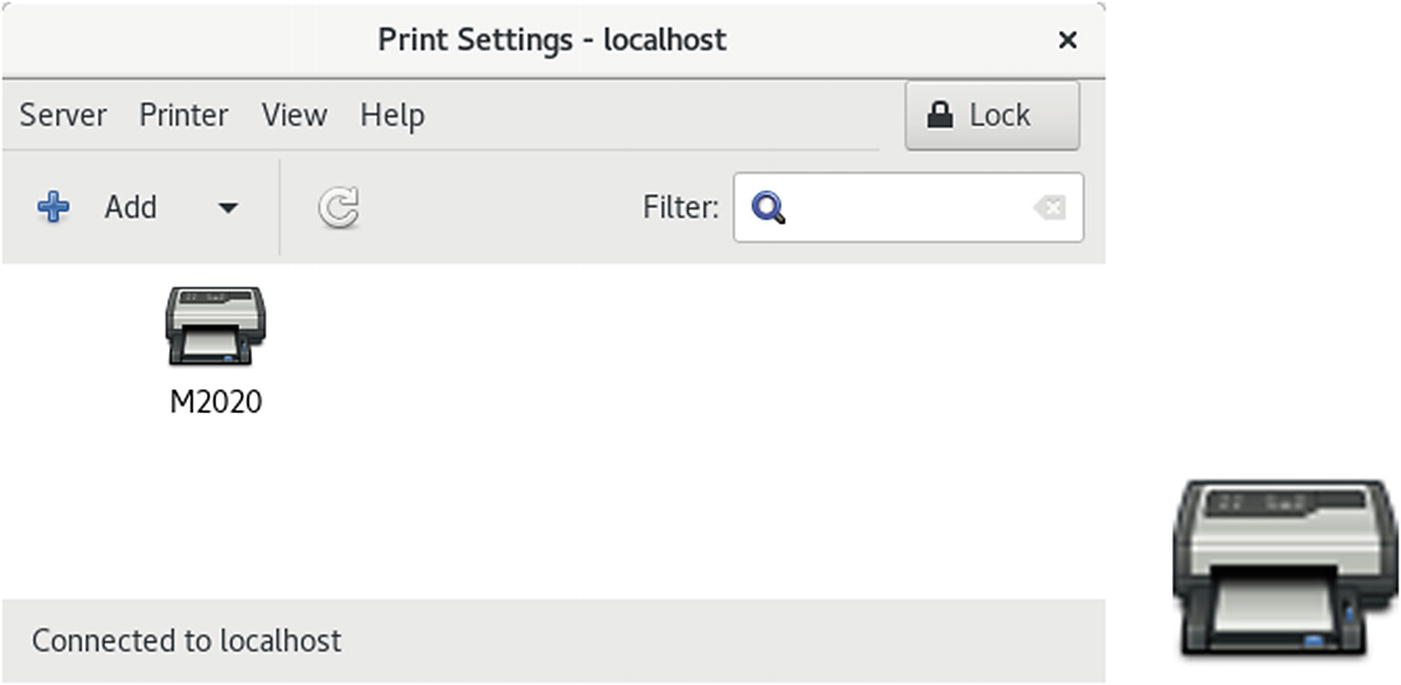
You can also use the older system-config-printer tool to edit a printer configuration or to add a remote printer. You can install the system-config-printer package, Printer Settings on GNOME Software. This utility enables you to select the appropriate driver for your printer, as well as set print options, such as paper size and print resolutions. You can configure a printer connected directly to your local computer or a printer on a remote system on your network. You can start system-config-printer by clicking the Print Settings icon from the Applications overview, Sundry subview. A Print Settings window is displayed, showing icons for installed printers. As you add printers, icons for them are displayed in the Print Settings window (see Figure 13-35).
Figure 13-35
system-config-printer
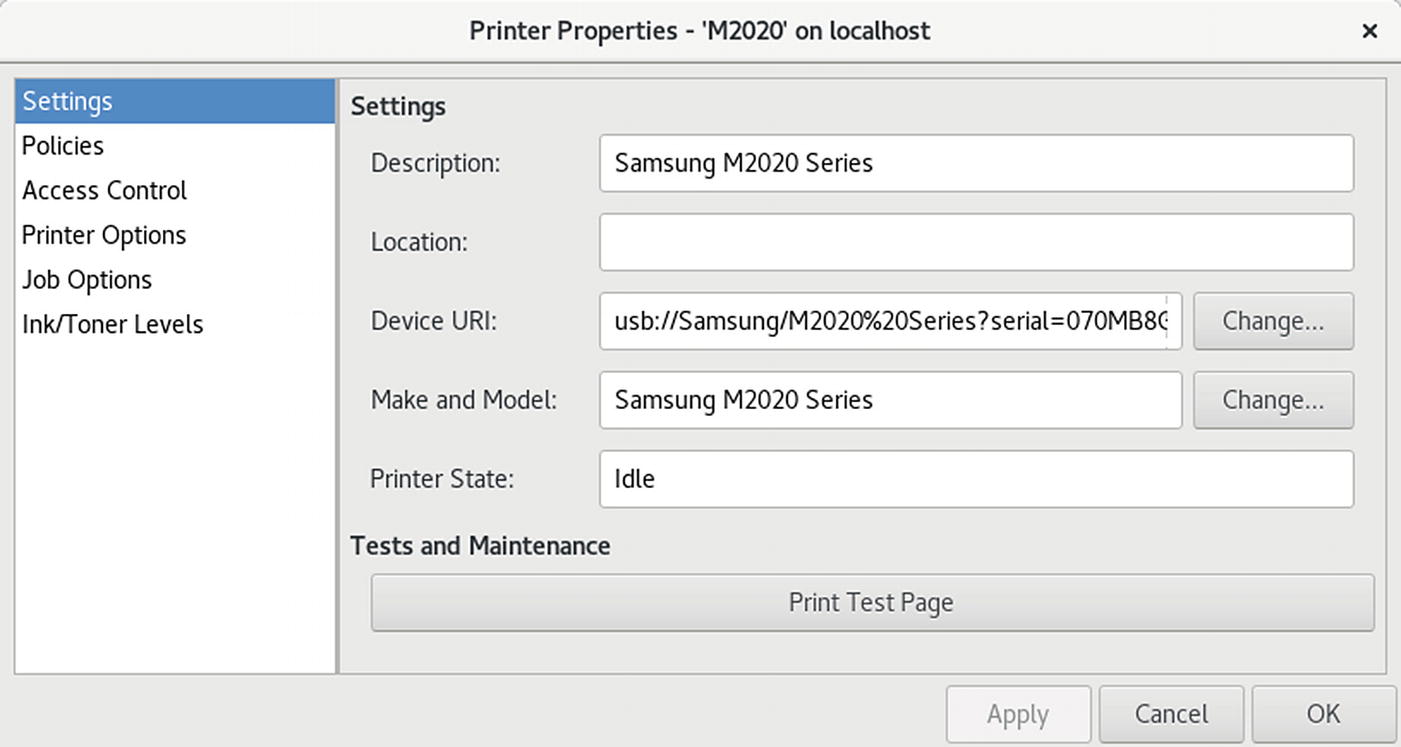
To see the printer settings, such as printer and job options, access controls, and policies, double-click the printer icon or right-click and select Properties. The Printer Properties window opens with six tabs: Settings, Policies, Access Control, Printer Options, Job Options, and Ink/Toner Levels (see Figure 13-36).
Figure 13-36
system-config-printer: Printer Properties dialog
The Print Settings window Printer menu lets you rename the printer, enable or disable it, and make it a shared printer. Select the printer icon and then click the Printer menu. The Delete entry will remove a printer configuration. Use the Set As Default entry to make the printer a system-wide or personal default printer. There are also entries for accessing the printer properties and viewing the print queue.
The Print Settings icon menu is accessed by right-clicking the printer icon. If the printer is already a default, there is no Set As Default entry. The Properties entry opens the printer properties window for that printer.
The View Print Queue entry opens the Document Print Status window, which lists the jobs for that printer. You can change the queue position as well as stop or delete jobs. From the toolbar, you can choose to display printed jobs and reprint them. You will be notified if a job should fail.
To check the server settings, select Settings from the Server menu. This opens a new window showing the CUPS printer server settings. The Common UNIX Printing System (CUPS) is the server that provides printing services (www.cups.org).
To select a particular CUPS server, select the Connect entry in the Server menu. This opens a Connect to CUPS Server window with a drop-down menu listing all current CUPS servers from which to choose.
To add, edit, or remove printers requires root-level access. You have to enter your root user password (set up initially during installation) to edit a printer configuration, add a new printer, or remove an old one. For example, when you try to access the printer server settings, you will be prompted to enter the root user password.
Again, when you edit any printer’s configuration settings, you will be prompted for authorization. Whenever you try to change a printer setting, such as its driver or URI, you are prompted to enter the root password for device authorization.
To make a printer the default, either right-click the printer icon and select Set As Default or single-click the printer icon and then, from the Print Settings window’s Printer menu, select the Set As Default entry. A Set Default Printer dialog opens with options for setting the system-wide default or setting the personal default. The system-wide default printer is the default for your entire network served by your CUPS server, not just your local system.
The system-wide default printer will have a green checkmark emblem on its printer icon in the Print Settings window.
Should you wish to use a different printer as your default, you can designate it as your personal default. To make a printer your personal default, select the entry Set as My Personal Default Printer in the Set Default Printer dialog. A personal emblem, a heart, will appear on the printer’s icon in the Print Settings window.
If you have more than one printer on your system, you can make one the default by clicking the Make Default Printer button in the printer’s properties Settings pane.
The Class entry in the New menu lets you create a printer class. You can access the New menu from the Server menu or from the New button. This feature lets you select a group of printers to print a job, instead of selecting just one. That way, if one printer is busy or down, another printer can be automatically selected to perform the job. Installed printers can be assigned to different classes.
To edit an installed printer, double-click its icon in the Print Settings window or right-click and select the Properties entry. This opens a Printer Properties window for that printer. A sidebar lists the configuration tabs. Click one to display that tab. There are configuration entries for Settings, Policies, Access Control, Printer Options, Job Options, and Ink/Toner Levels.
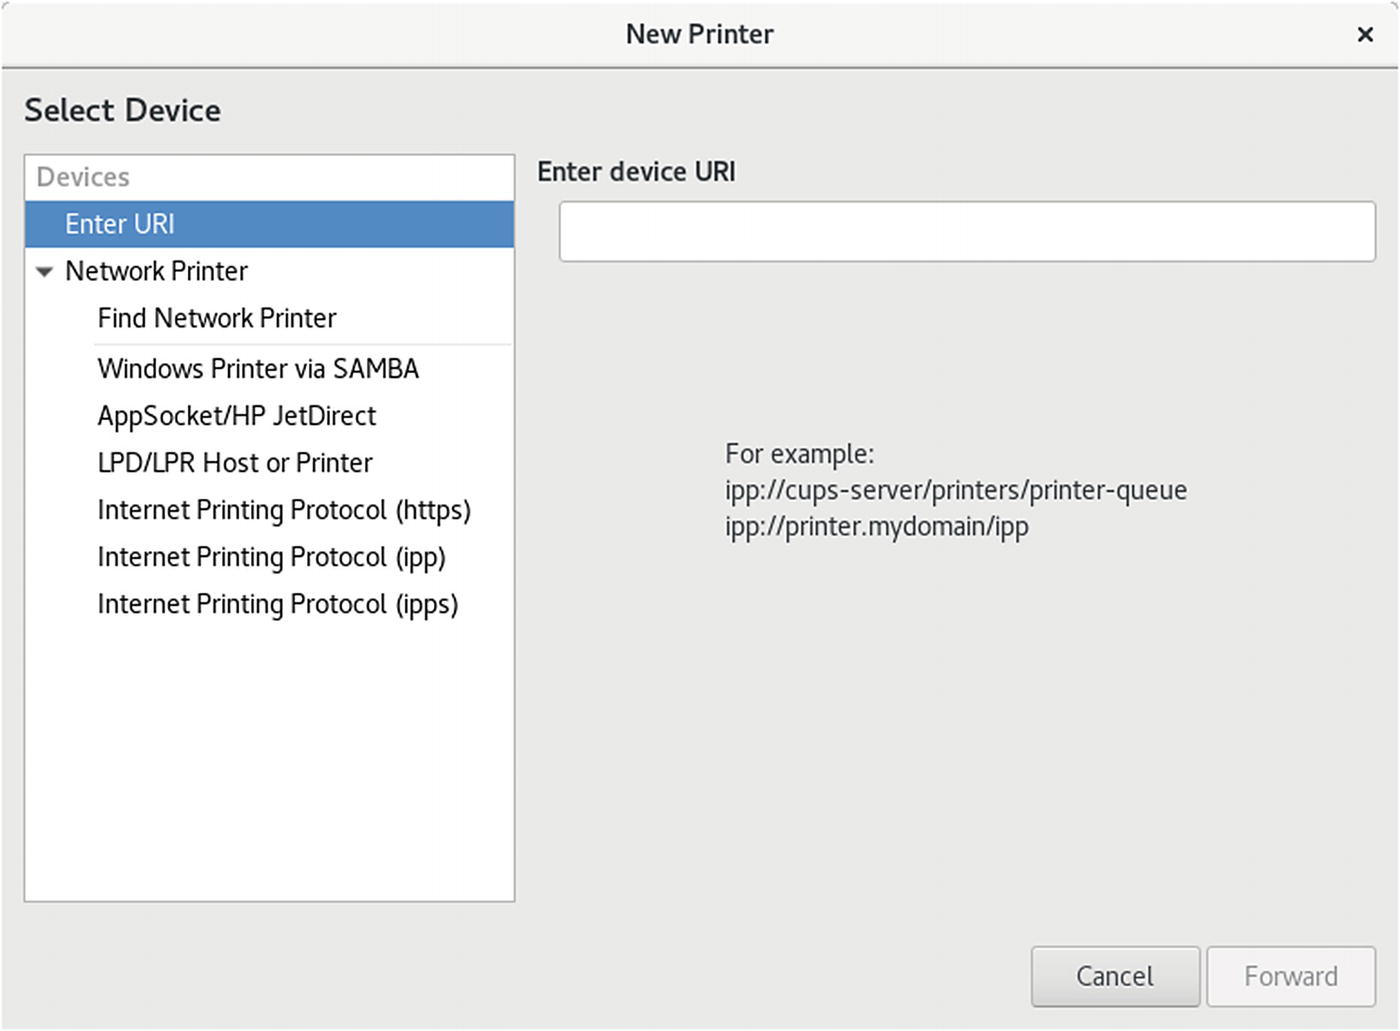
To install a new printer, choose the Server ➤ New ➤ Printer menu entry or click the Add button on the toolbar (see Figure 13-37). A New Printer window opens and displays a series of dialog boxes from which you select the connection, model, drivers, and printer name with location.
Figure 13-37
system-config-printer: New Printer dialog
You can also use system-config-printer to set up a remote printer on Linux, UNIX, or Windows networks. When you add a new printer or edit one, the New Printer/Select Devices dialog will list possible remote connection types. When you select a remote connection entry, a pane will be displayed in which you can enter configuration information.
The location is specified using special URI protocols. For another CUPS printer on a remote host, the protocol used is ipp, for Internet Printing Protocol, whereas for a Windows printer, it is smb. Older UNIX and Linux systems using LPRng use the lpd protocol.