Additional Desktops
Website | Description |
|---|---|
Xfce desktop. Simple lightweight desktop. | |
LXDE desktop. Small desktop for low-power systems. | |
Sugar on a Stick (SoaS) desktop. Education desktop for children. | |
MATE desktop. Enhanced GNOME 2 desktop interface. | |
Cinnamon desktop. Mint desktop base on GNOME 3 with both GNOME 2 and GNOME 2 features. |
Fedora Labs Desktops
Website | Description |
|---|---|
Astronomy: device control tools, astronomy simulation and mapping | |
Design Suite: tools for multimedia and publishing projects | |
Games: sample of games available for Fedora | |
JAM: for musicians; create, edit, and produce music | |
Python Classroom: Python instruction | |
Robotics Suite: Robotic open source software | |
Scientific: Science open source research support tool (graphs, data analysis, math computation) | |
Security Lab: tools for security testing and instruction |
The Xfce Desktop
Xfce is a lightweight desktop designed to run fast without the kind of overhead required for full-featured desktops such as KDE and GNOME. You can think of it as a window manager with desktop functionality. It includes its own file manager and panel, but the emphasis is on modularity and simplicity. Like GNOME, Xfce is based on GTK+ GUI tools. The desktop consists of a collection of modules, such as the thunar file manager, xfce4-panel panel, and the xfwm4 window manager. Keeping with its focus on simplicity, Xfce features only a few common applets on its panel. Its small scale makes it appropriate for laptops or dedicated systems that have no need for complex overhead found in other desktops. Xfce is useful for desktops, such as multimedia desktops, designed for just a few tasks or for computers with limited capabilities, such as older computers. You can find out more about Xfce at https://xfce.org/ .
To install Xfce as an alternative desktop on a system, install the xfdesktop package.
You can also use Xfce as a Live DVD, which you can download from https://spins.fedoraproject.org/ .
The Xfce Live DVD is available in 32-bit and 64-bit versions, such as Fedora-Xfce-Live-x86_64-28-1.1.iso. You can then burn the DVD and run it as a Live DVD. Click the Install icon to install an Xfce-based Fedora system on your computer. Double-click the Install icon to install an LXDE-based Fedora system on your computer. Follow the same basic steps for installing Fedora as for the Fedora Live DVD. The Installation Summary screen shows items for Installation Destination, Date & Time, and Keyboard. Be sure to choose the disks to install on and to check the time zone. Once installed, you use the GDM login screen to log in.
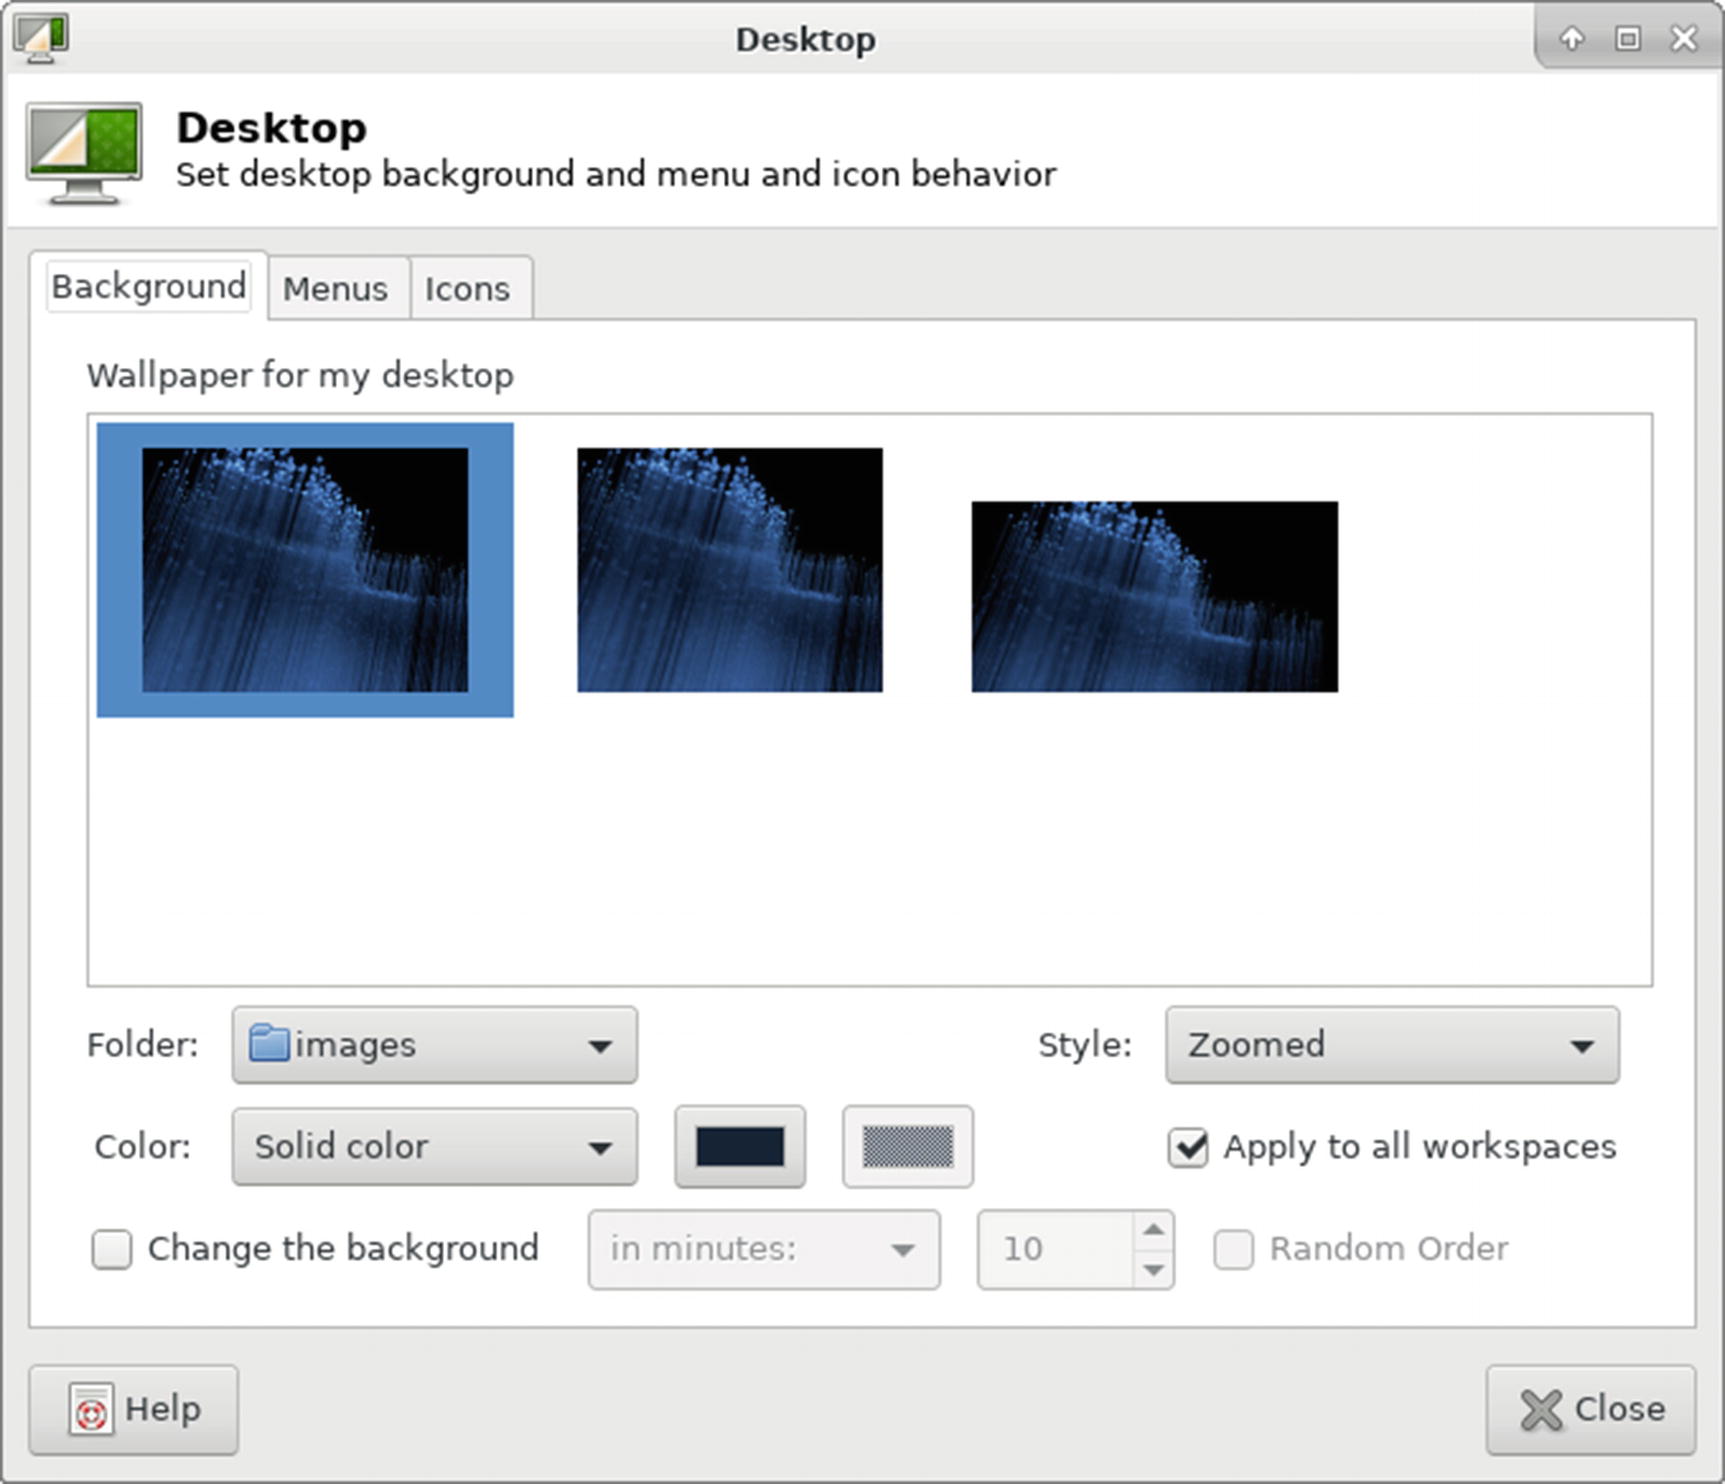
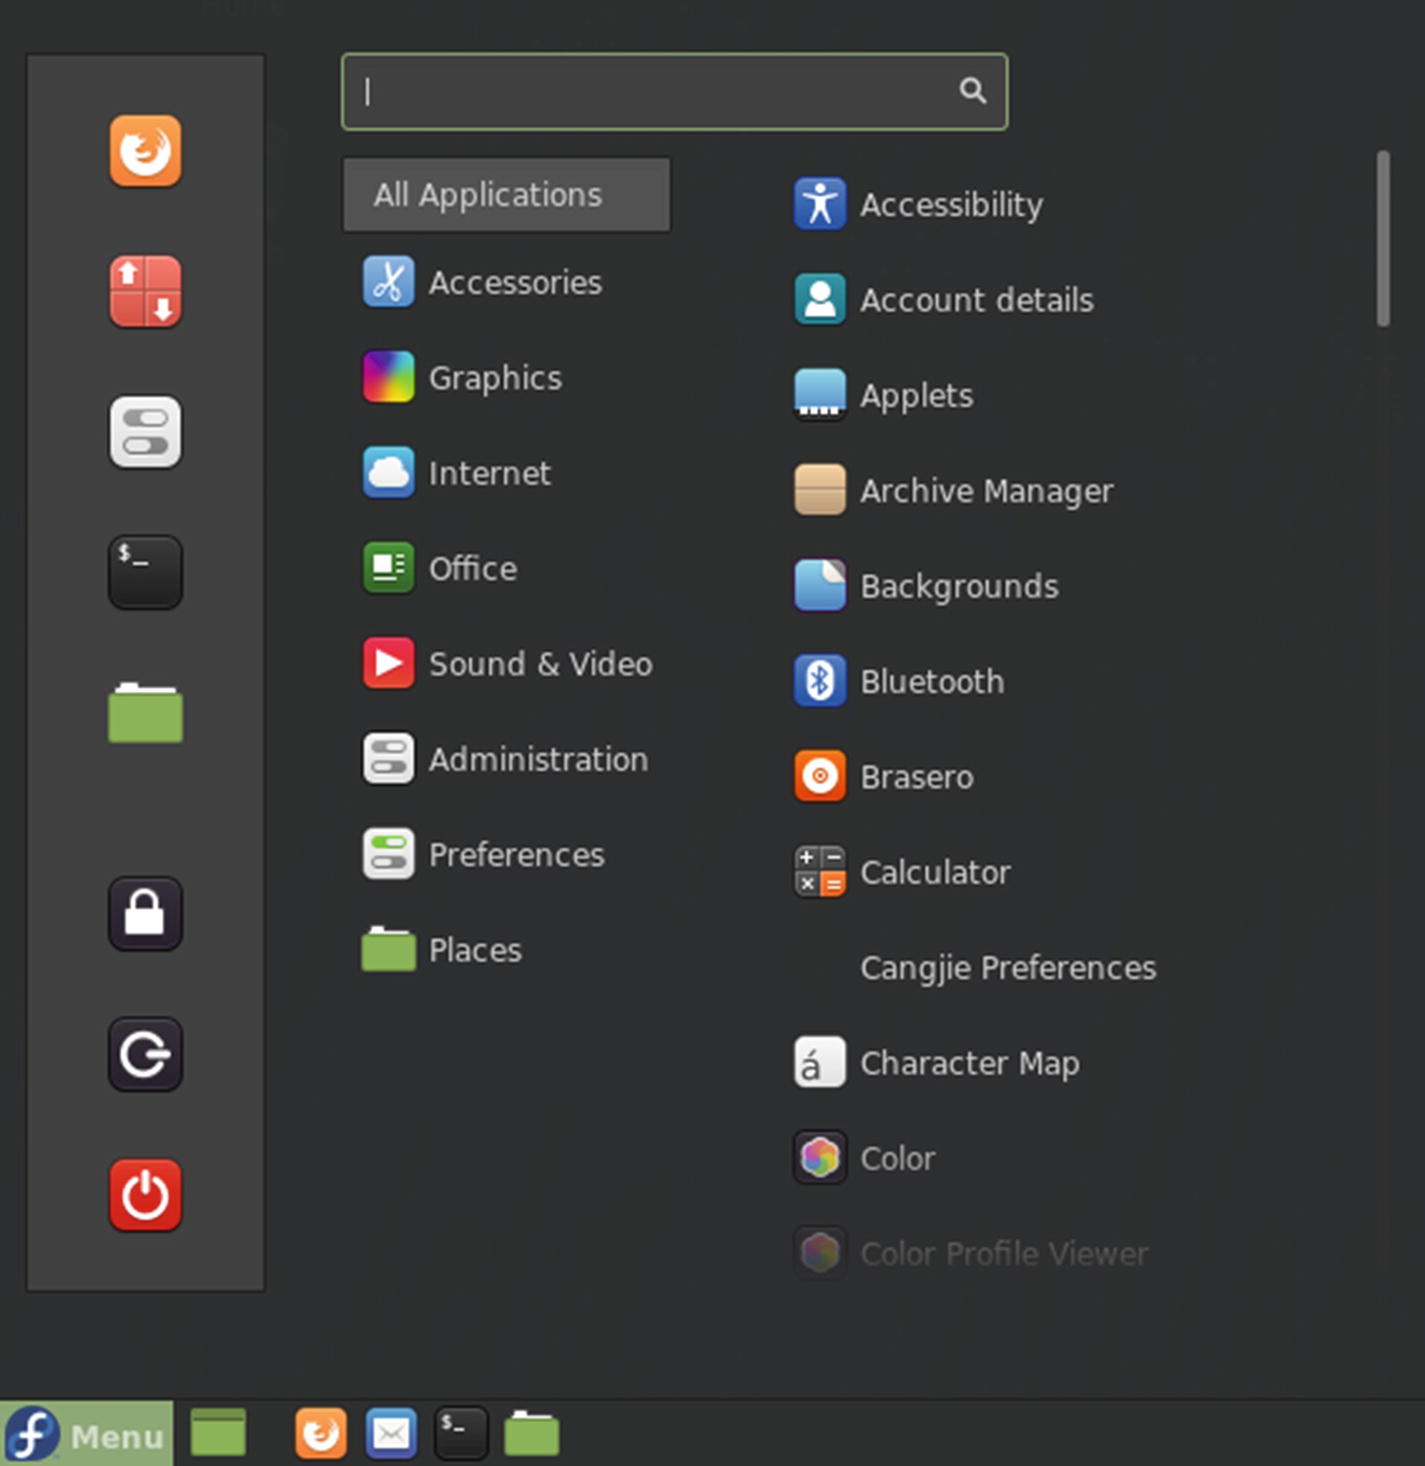
The desktop displays icons for your home directory, file system, and trash (see Figure 11-1). Xfce displays a top and bottom panel. The top panel will have buttons for an applications menu at the left. From this menu, you can access any Fedora software applications, along with Fedora administration tools. To the right of the menu is the task bar, showing buttons for open windows. The left side of the panel shows workspace switcher, time and date, network connections (Network Manager), and the session menus displaying the user name. The session menu has entries for shut down, log out, lock screen, suspend, and switch user. The bottom panel has icons for hide/show desktop, terminal, file manager, web browser, applications finder, and a directory menu for your home folder.

Xfce desktop
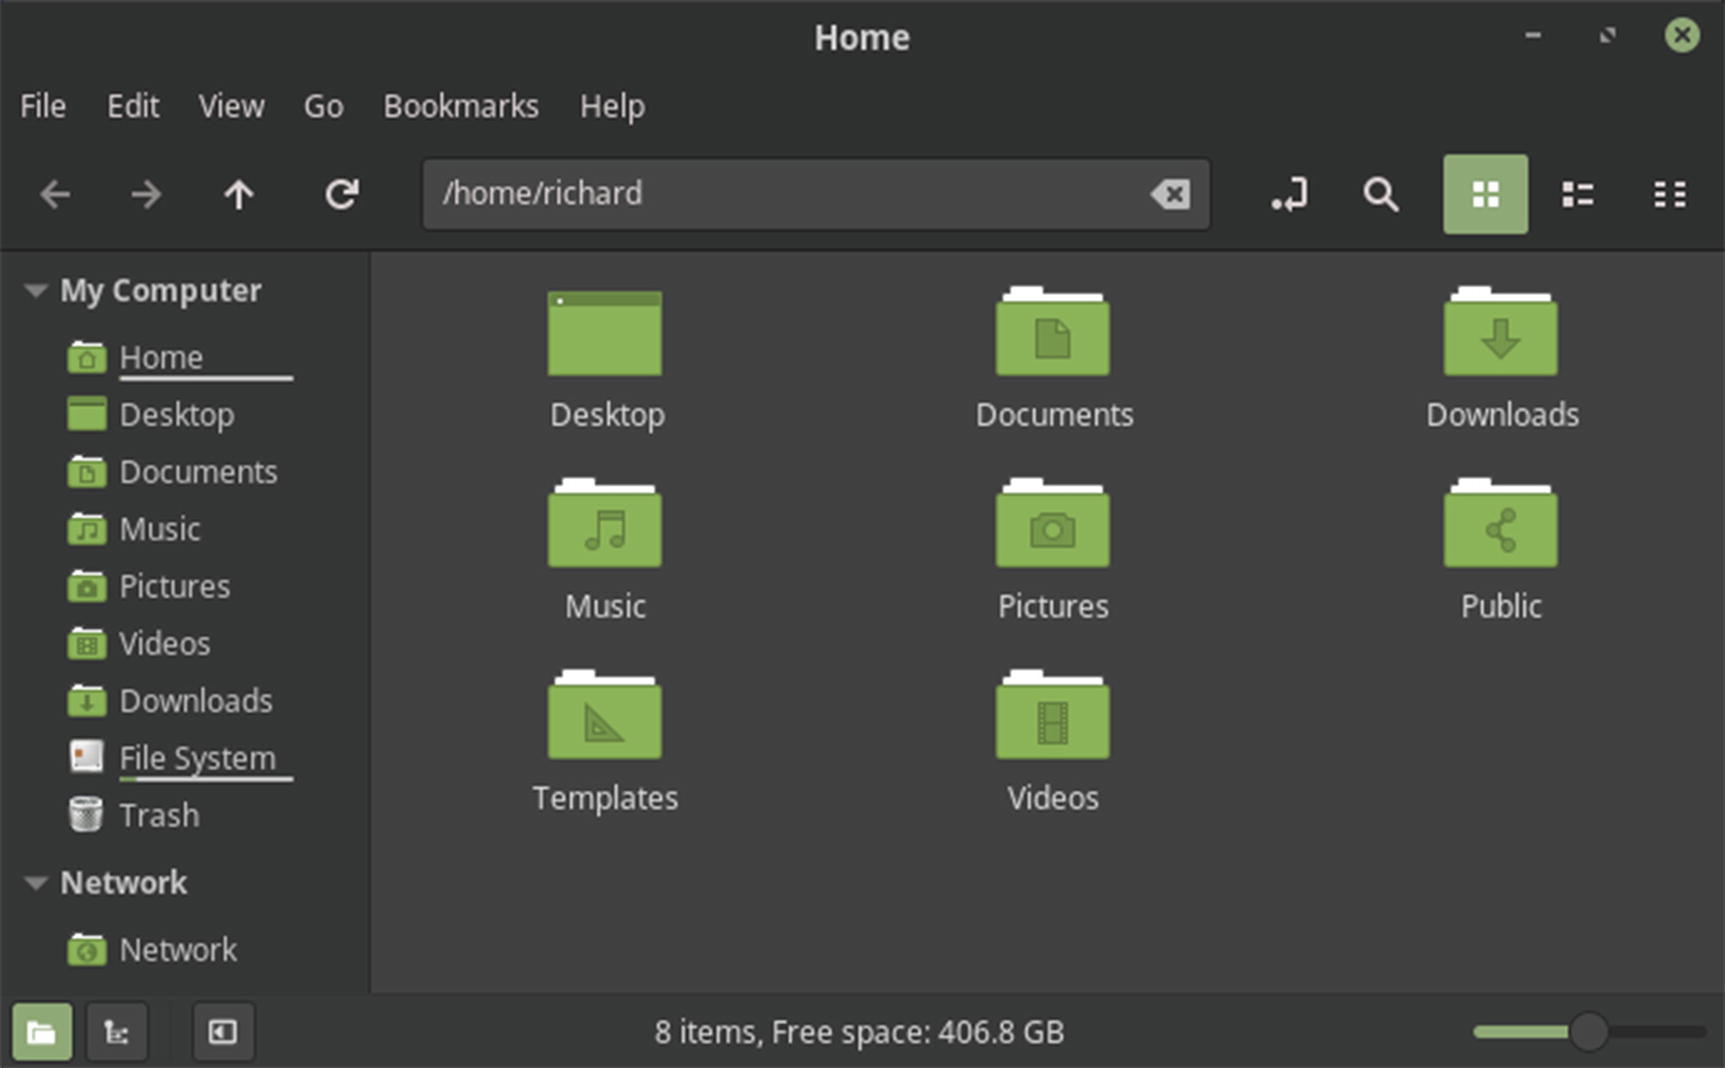
Xfce file manager is called Thunar . The file manager will open a side pane in the shortcuts view that lists entries not only for the home directory but also for your file system, desktop, and trash contents. The File menu lets you perform folder operations, such as creating new directories. From the Edit menu, you can perform tasks on a selected file, such as renaming the file or creating a link for it. You can change the side pane view to a tree view of your file system by selecting from the menu bar View ➤ Side Pane ➤ Tree (Ctrl+t). The Shortcuts entry changes the view back (Ctrl+b).
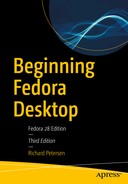
The Xfce Settings Manager
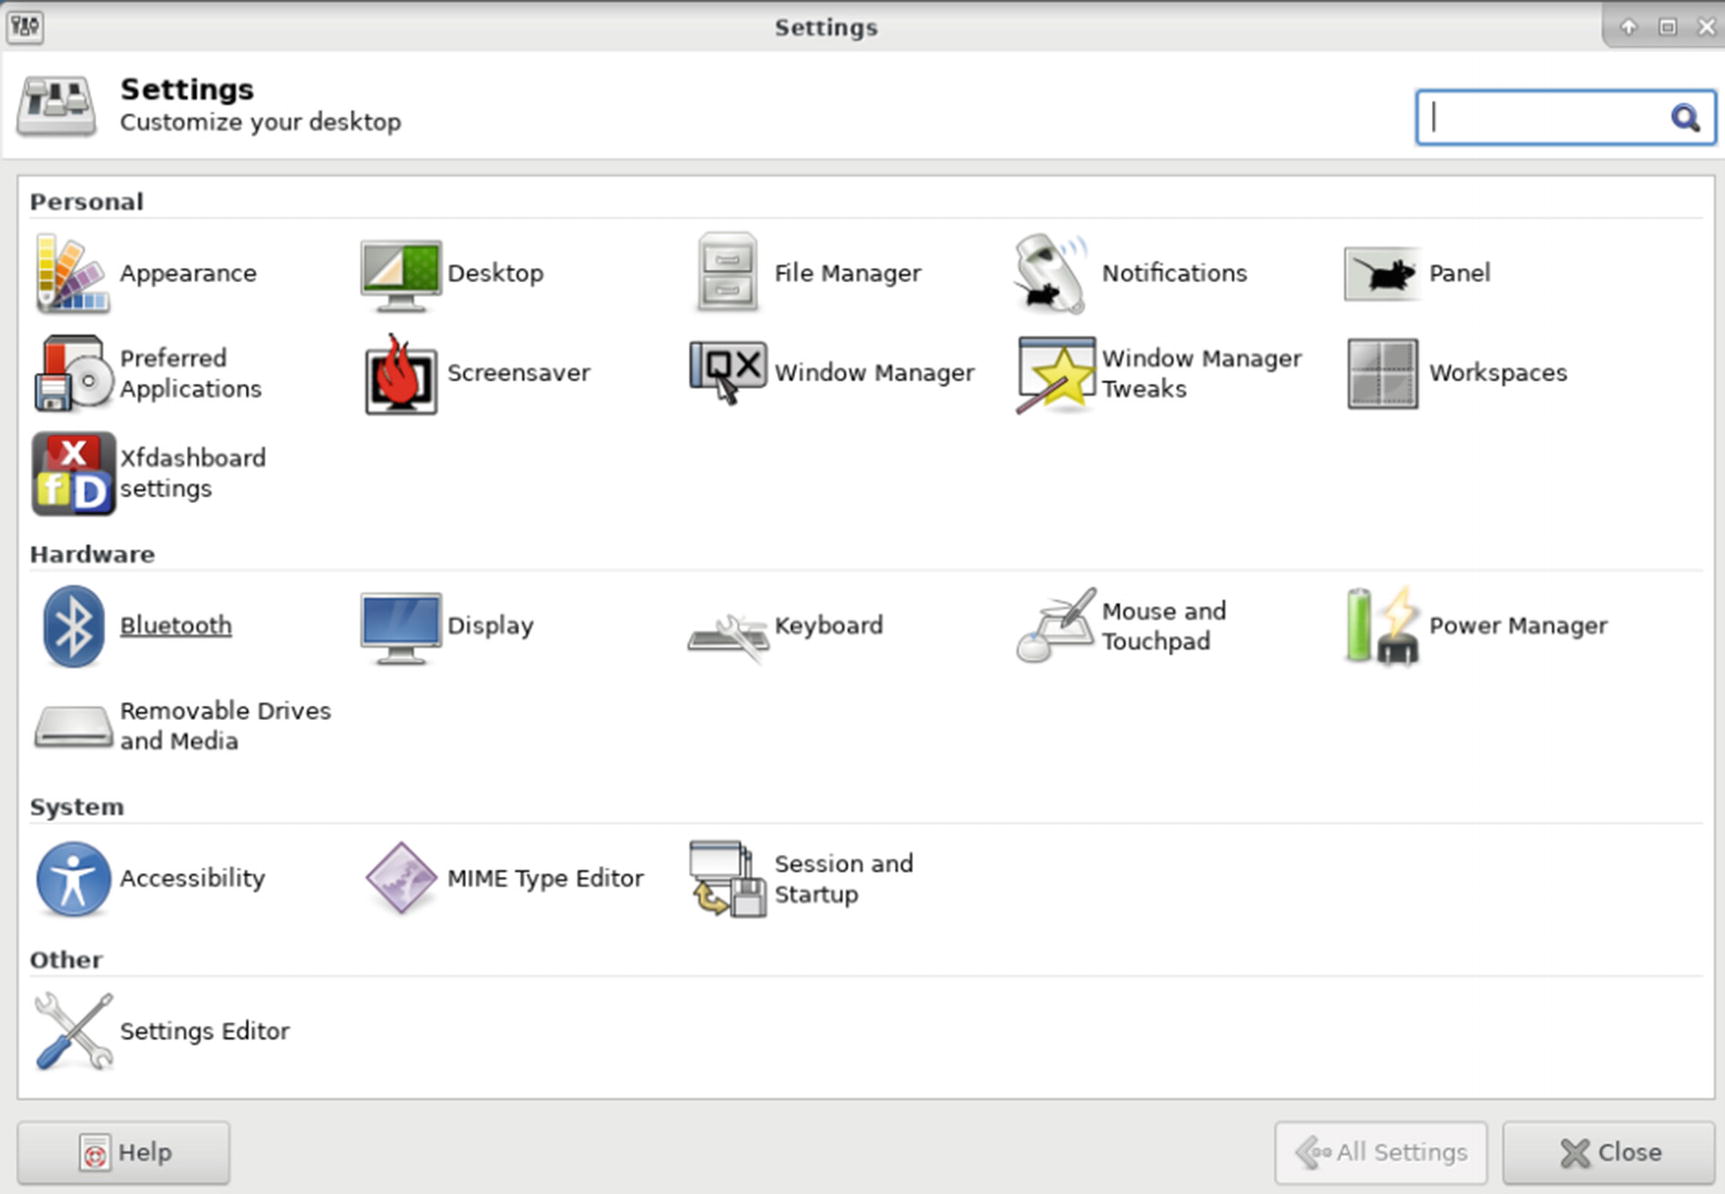
Xfce Desktop configuration
Note
You can also access applications and desktop settings by right-clicking the desktop background to display the desktop menu.
The LXDE Desktop
LXDE (Lightweight X11 Desktop Environment) is another small desktop designed for use on minimal or low-power systems such as laptops, netbooks, or older computers. To install LXDE as an alternative desktop on a system, select the LXDE desktop package on Packages.
You can also use LXDE as a Live DVD, which you can download from https://spins.fedoraproject.org/ .
The LXDE Live DVD is available in 32-bit and 64-bit versions, such as Fedora-LXDE-Live-x86_64-28.1.1.iso. You can then burn the DVD and run it as a Live DVD. Double-click the Install icon to install an LXDE-based Fedora system on your computer. Follow the same basic steps for installing Fedora as for the Fedora Workstation Live DVD. The Installation Summary screen shows items for Installation Destination, Date & Time, and Keyboard. Be sure to choose the disks to install on and to check the time zone.
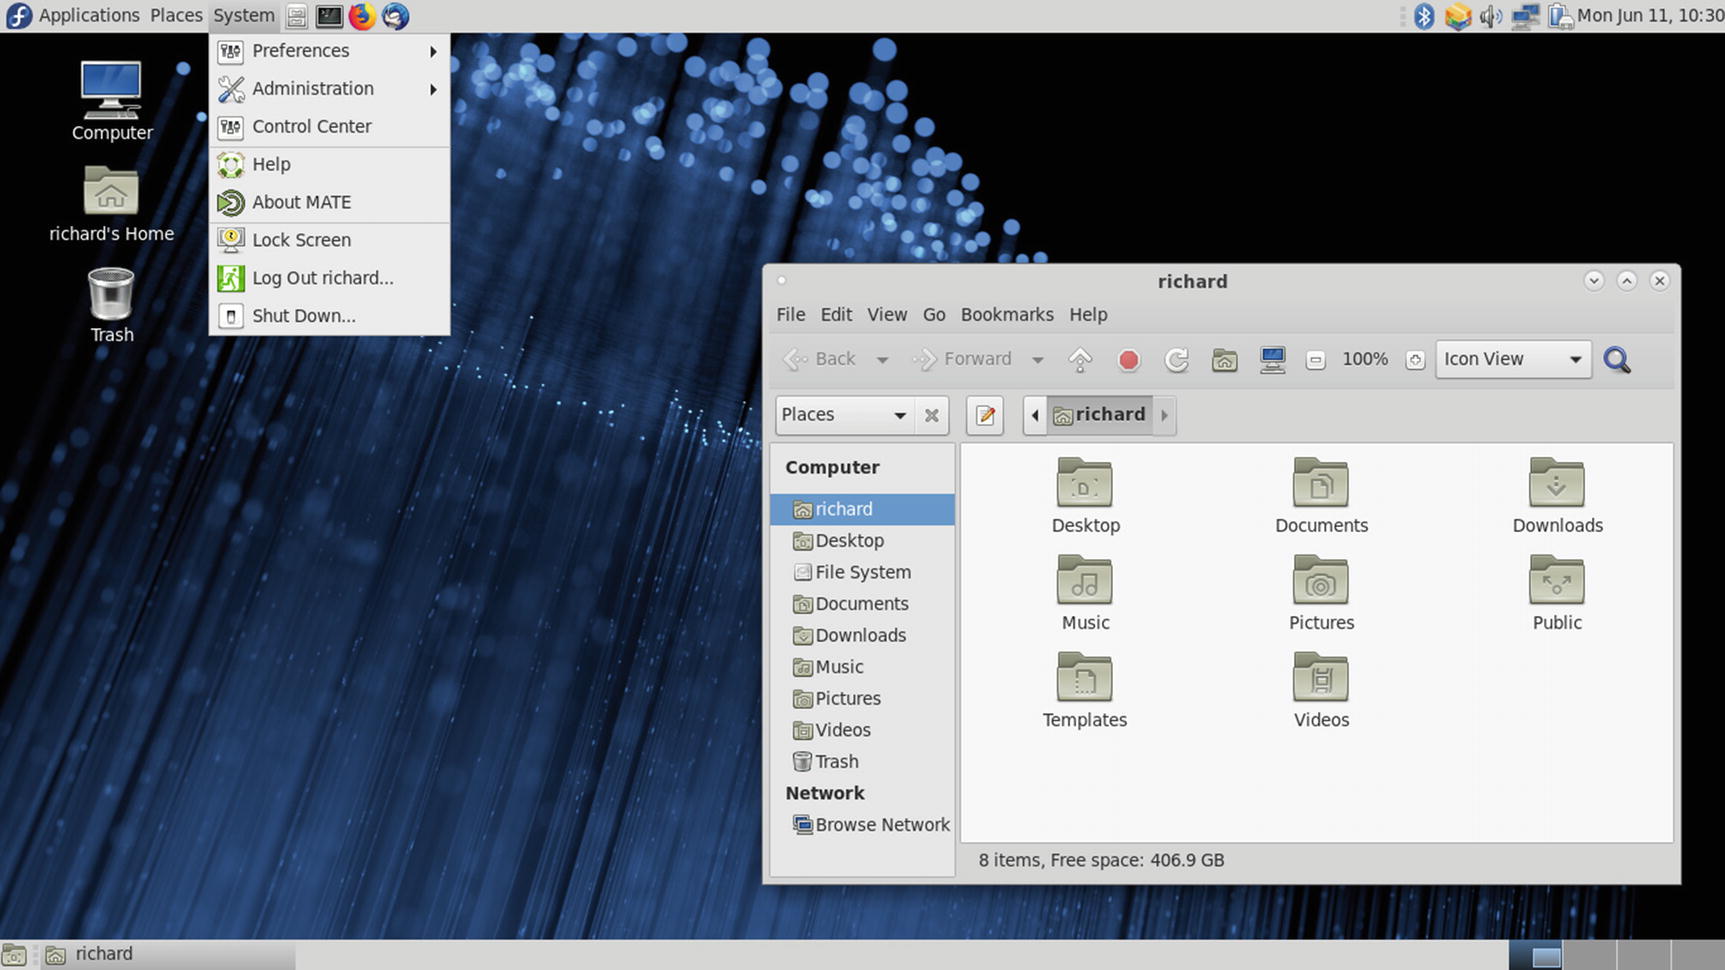
LXDE desktop

LXDE bottom panel
The logout entry on the Fedora applications menu, and the logout button on the right side of the panel, open a dialog with buttons for logout, shutdown, suspend, hibernate, and reboot.
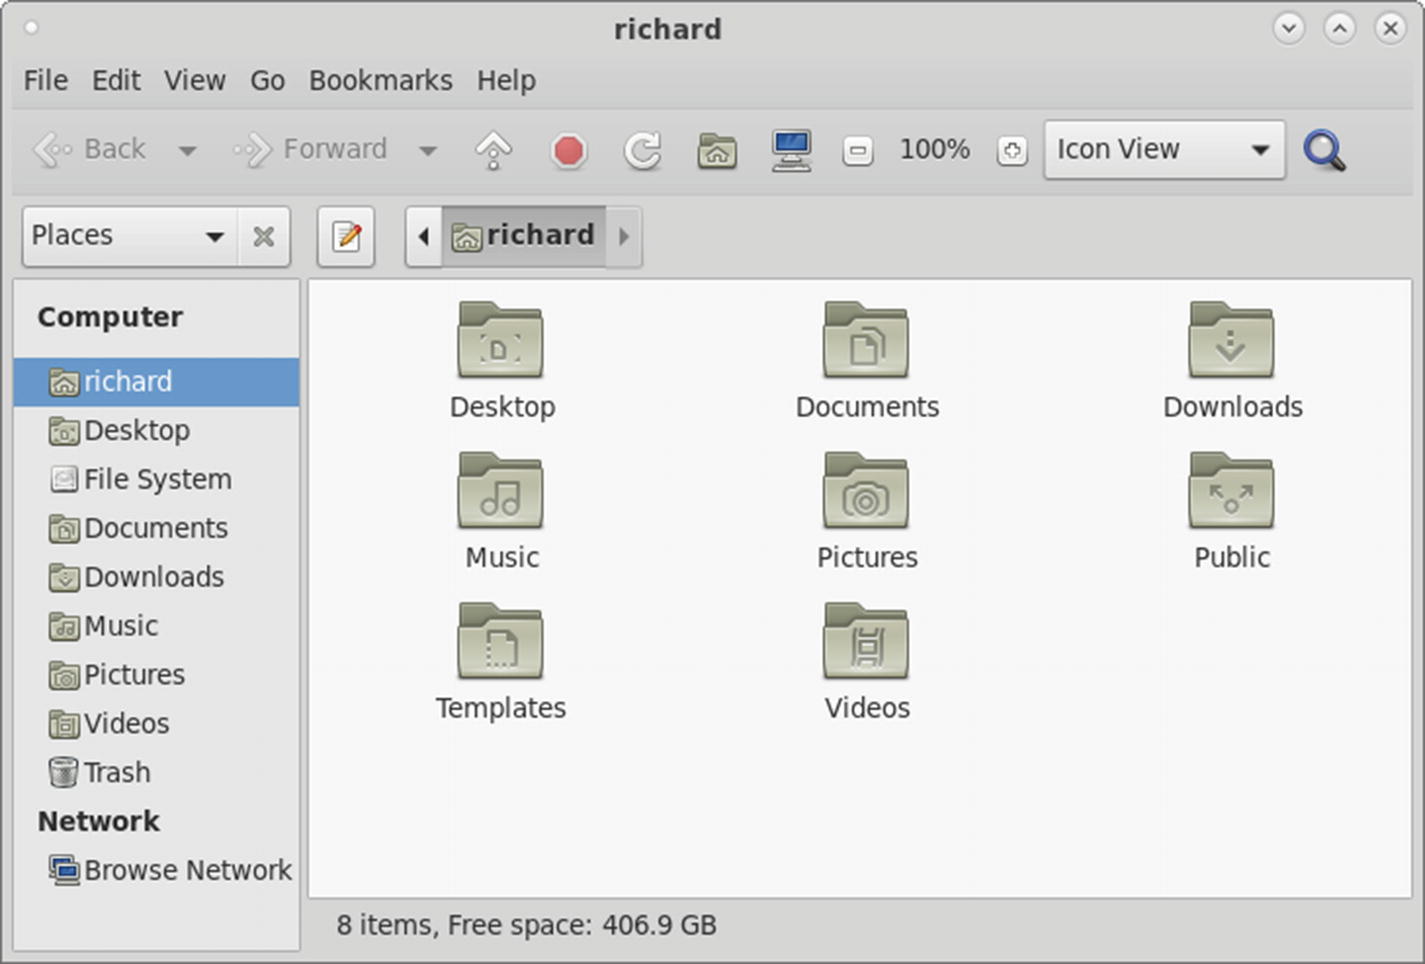
LXDE uses the PC-Man file manager, as shown in Figure 11-4. The button bar performs browser tasks such as moving backward and forward to previously viewed folders. The Home button moves you to your home folder. The folder button with the yellow star will open tabs, allowing you to open several folders in the same window. The side pane has a location (Places) and directory tree view. You can switch between the two using the button at the top of the pane. You can also choose from the View ➤ Side Pane menu.
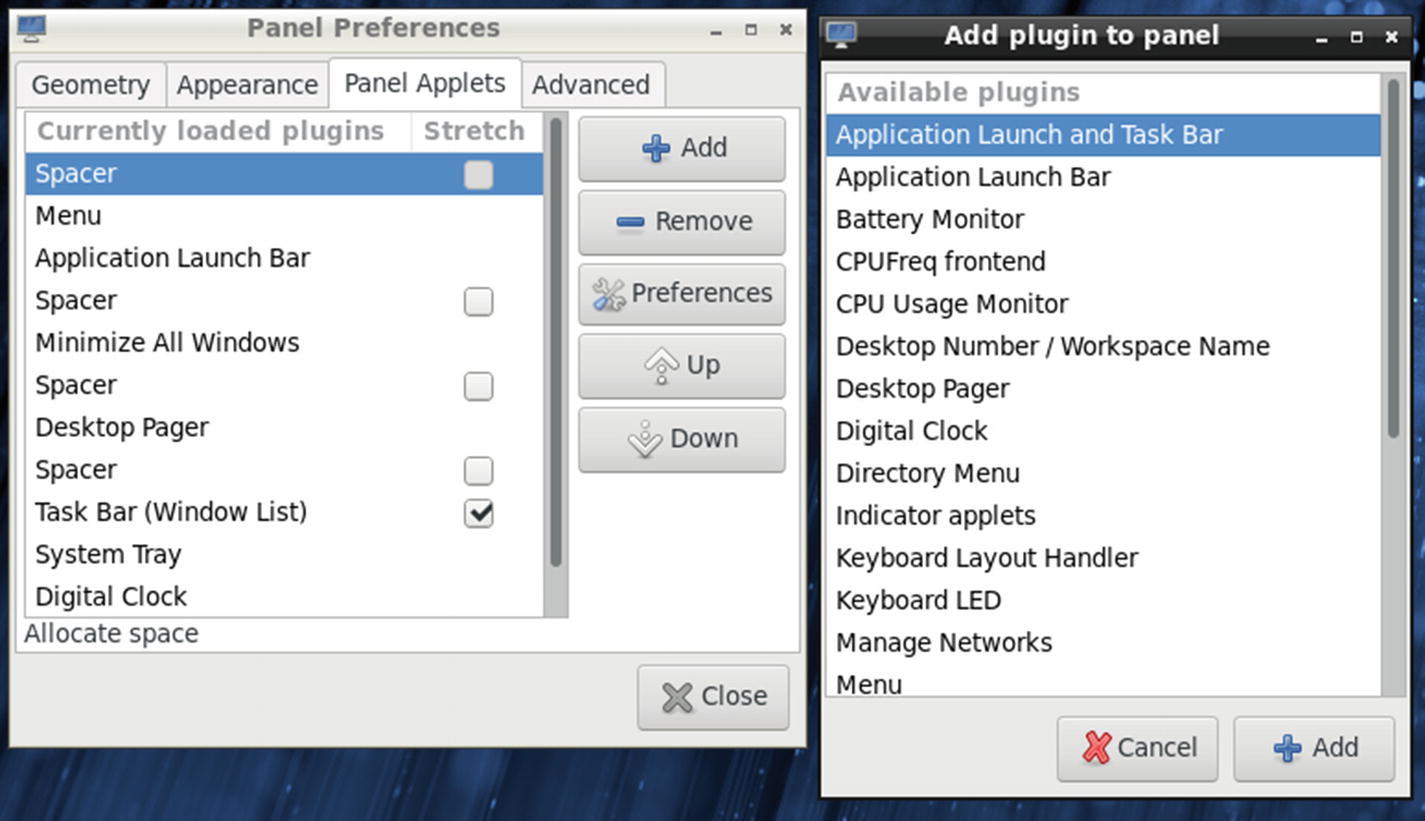
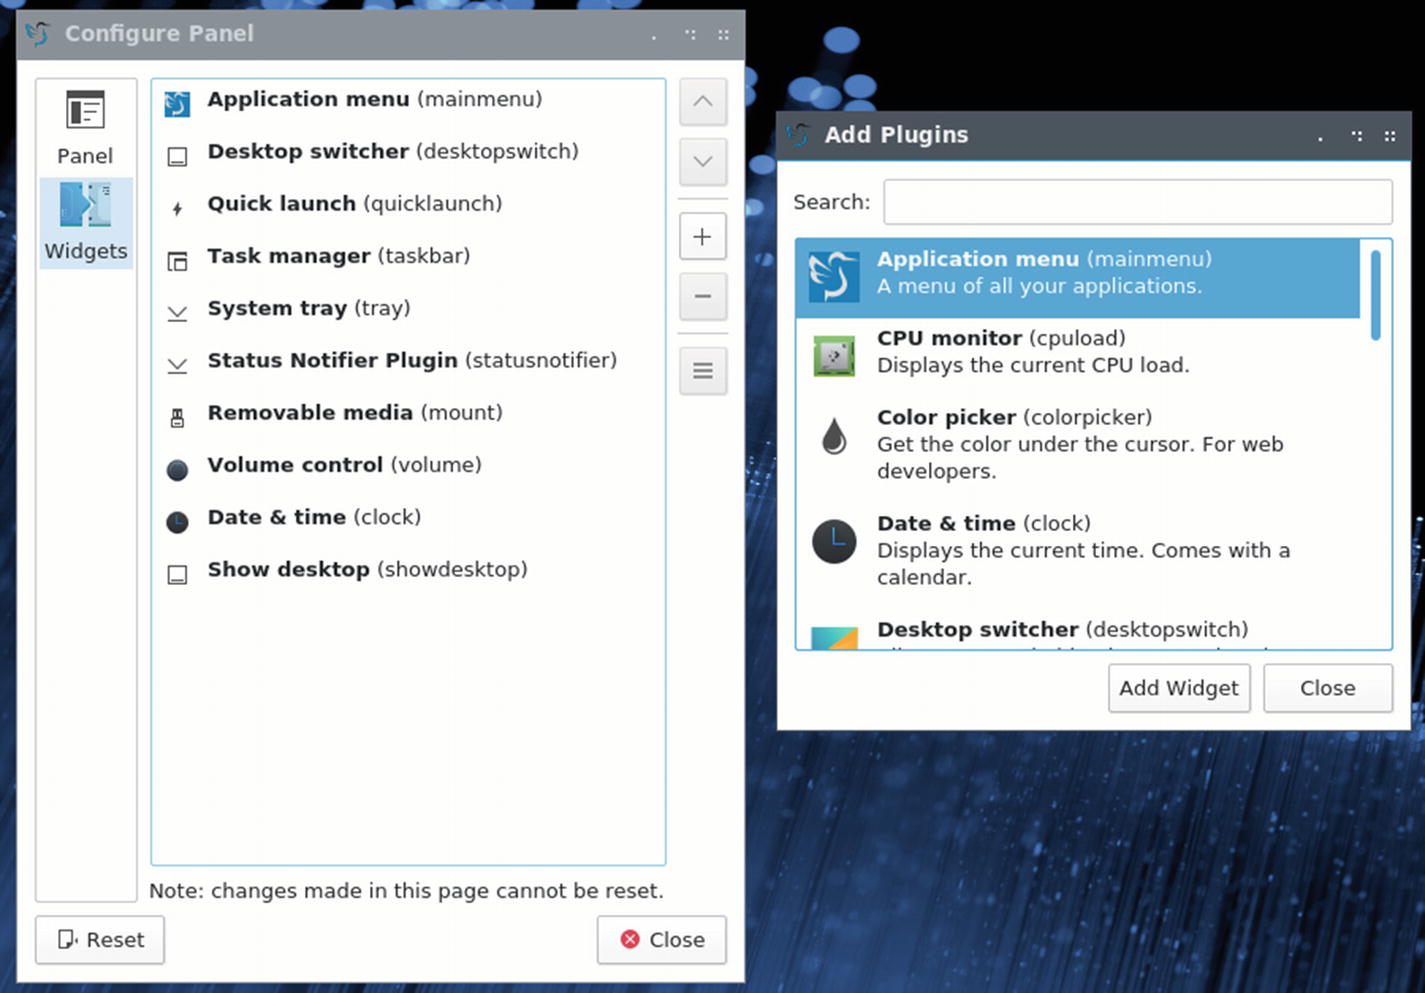
LXDE’s Panel Preferences and plugins
To add a new applet to the panel, click the Add button to open the Add Plugin to Panel window, which will list all available applets and panel features like spaces and separators. Select the one you want and click the Add button (see Figure 11-6, right).
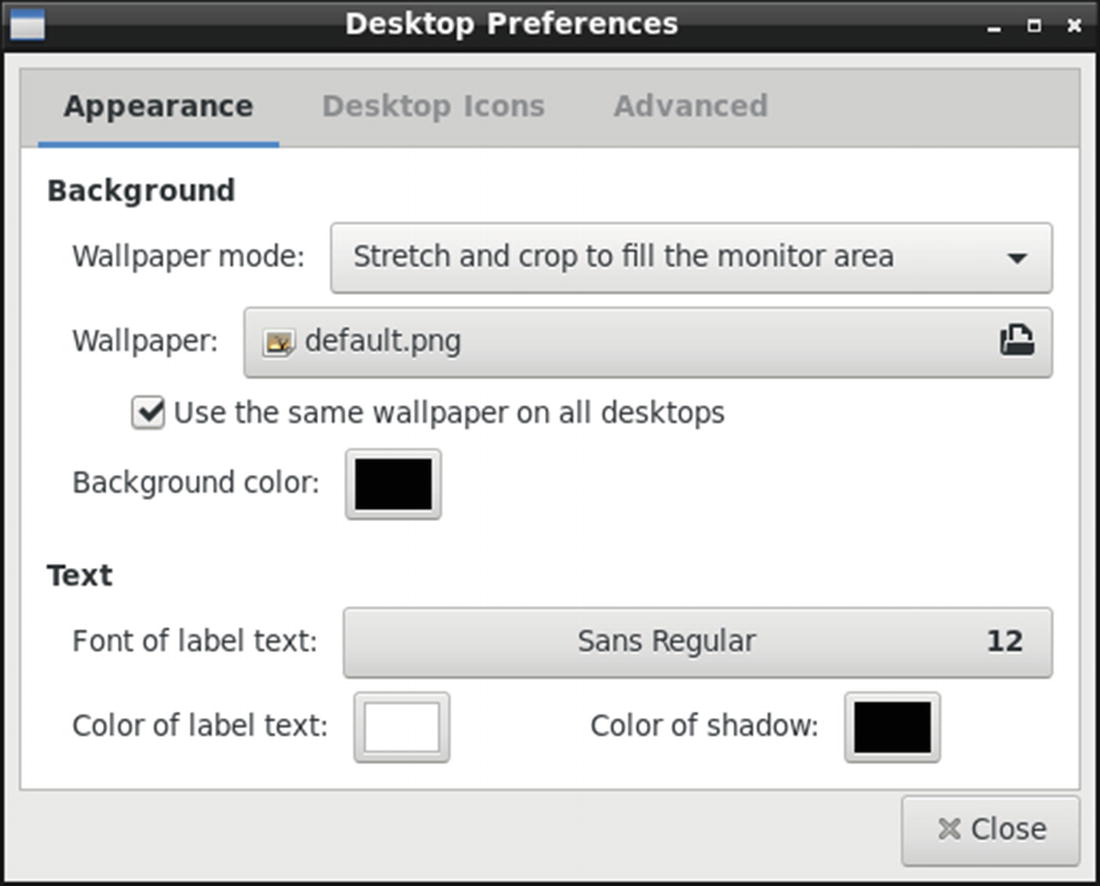
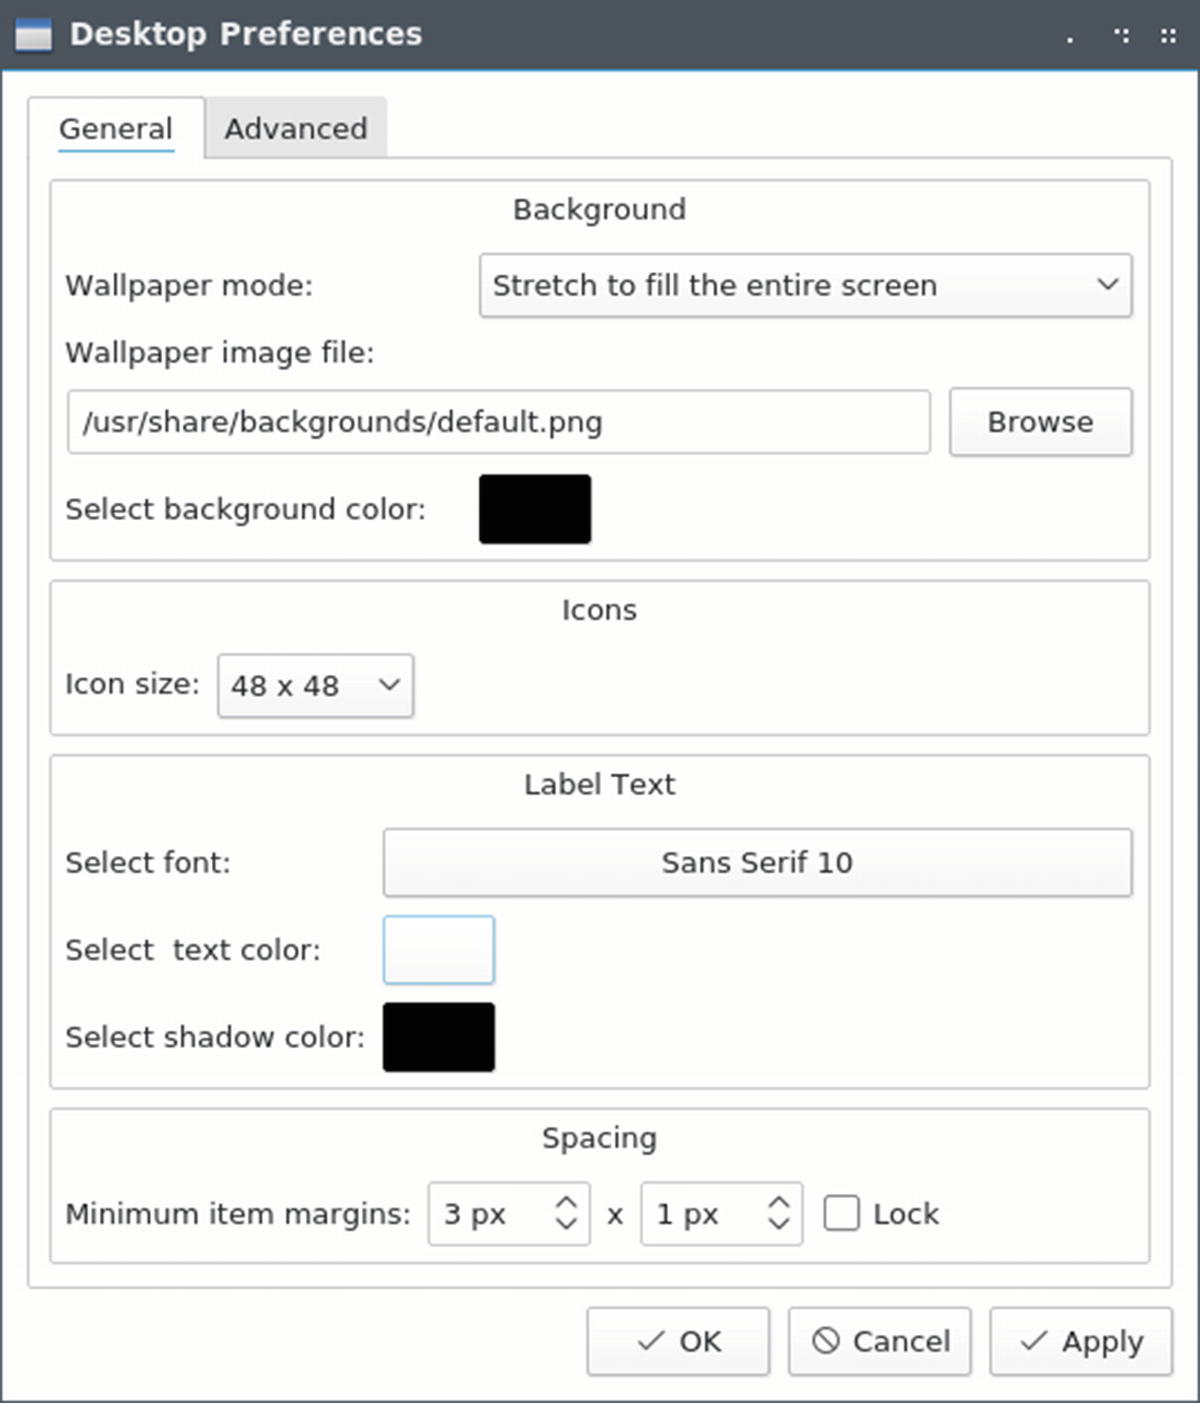
LXDE’s Desktop Preferences dialog
The MATE Desktop
The MATE desktop is designed to be very simple, with a single panel and desktop icons. You can download the Fedora MATE DVD from https://spins.fedoraproject.org/ . To install MATE as an alternative desktop on a system, install the mate-desktop package. On the MATE desktop, the panel appears as a long bar across the bottom of the screen. It holds menus, program launchers, and applet icons. You can display the panel horizontally or vertically, and have it automatically hide to show you a full screen.
MATE desktop (GNOME 2)
On the left side of the top panel is the button for the main menu. To the right of the panel are system tools such as icons for the Network Manager, Update Manager, Power, sound volume, and the clock. With this menu, you can access places and applications. On the bottom panel to the left is the Show Desktop button, which hides your open windows, followed by the Window List applet, which shows button for open windows. To the right is the workspace switcher and the trash.
The remainder of the screen is the desktop, where you can place folders, files, and application launchers. You can use a click-and-drag operation to move a file from one window to another or to the desktop. A click and drag on a file icon with the Ctrl key held down will copy a file. Your home directory is accessed from the Home Folder icon on the desktop. Double-clicking it opens a file manager window for your home directory. A right-click anywhere on the desktop displays a desktop menu with which you can align your desktop icons and create new folders.
To quit the desktop, you use the Quit entry in the menu. Clicking on it opens a menu with options to Suspend, Hibernate, Restart, and Shut Down.
From a user’s point of view, the desktop interface has four components : the desktop, the panels, the main menu, and the file manager. You have a single panel displayed, used for menus, application icons, and managing your windows. When you open a window, a corresponding button for it will be displayed in the lower panel, which you can use to minimize and restore the window.
To start a program, you can select its entry from the Main panel menu bar menus or the MATE menu. You can also click its application icon in the panel (if one appears) or drag-and-drop data files to its icon. To add an icon for an application to the desktop, right-click on its entry in the Main or MATE menu and select Add to Desktop.
MATE Menus
MATE uses a GNOME 2 Main menu as its applications menu on the top panel. The Main menu is referred to in the MATE documentation as the MATE Panel menu bar, and as the Main menu in the Add to Panel dialog. The Main menu is a menu bar that has three menus: Applications, Places, and System. From the Applications menu, you can access your installed software applications. They are arranged by category with submenus for Internet, Graphics, Office, Sound & Video, and Accessories. The System Tool menu lists system applications such as the terminal, Log file viewer, the dconf Editor, and the MATE System Monitor.
From the Places menu , you can access your home and Desktop folders, along with any bookmarks you have set up. You can also access recent documents. The Computer entry opens a file manager window showing your file systems and attached devices. The network entry lets you access shared systems on your network. With Connect to Server, you can set up an FTP connection. The MATE Search Tool lets you quickly search for files on your home folder, file system, bookmarked folders, or a specified folder.
On the System menu you can access Administration tools from the Administration submenu, and Preferences dialogs from the Preferences submenu. The Preferences submenu has submenus for Hardware, Internet and Network, Look and Feel, and Personal, which corresponds to the sections of the Control Center. You can also access the Welcome dialog and the Control Center. There are also entries to log out, shut down, and lock your system. The Help entry opens the MATE desktop help dialog, with detailed documentation on the MATE desktop.
MATE Panels
The panel is the main component of the MATE interface. Through it, you can start your applications, run applets, and access desktop areas. You can think of the MATE panel as a type of tool you can use on your desktop. You can have several MATE panels displayed on your desktop, each with applets and menus you have placed in them. In this respect, MATE is flexible, enabling you to configure your panels any way you want. The MATE panel work the same as the GNOME 2 panel. You can easily add applets to the panel, along with application launchers.
MATE uses the traditional GNOME 2 top and bottom panels by default, though you can add more. The top panel applets for the Main Menu (MATE Main menu bar), a launcher for the Firefox Web browser, and several system applets (see Figure 11-22). The system applets display buttons for the Bluetooth, Network Manager, volume control, the power manager, the clock, and shutdown. If you are using the MATE menu (advanced menu), a single Menu button is shown.

MATE panel
Caja File Manager
Caja file manager with sidebar
Control Center and Preferences
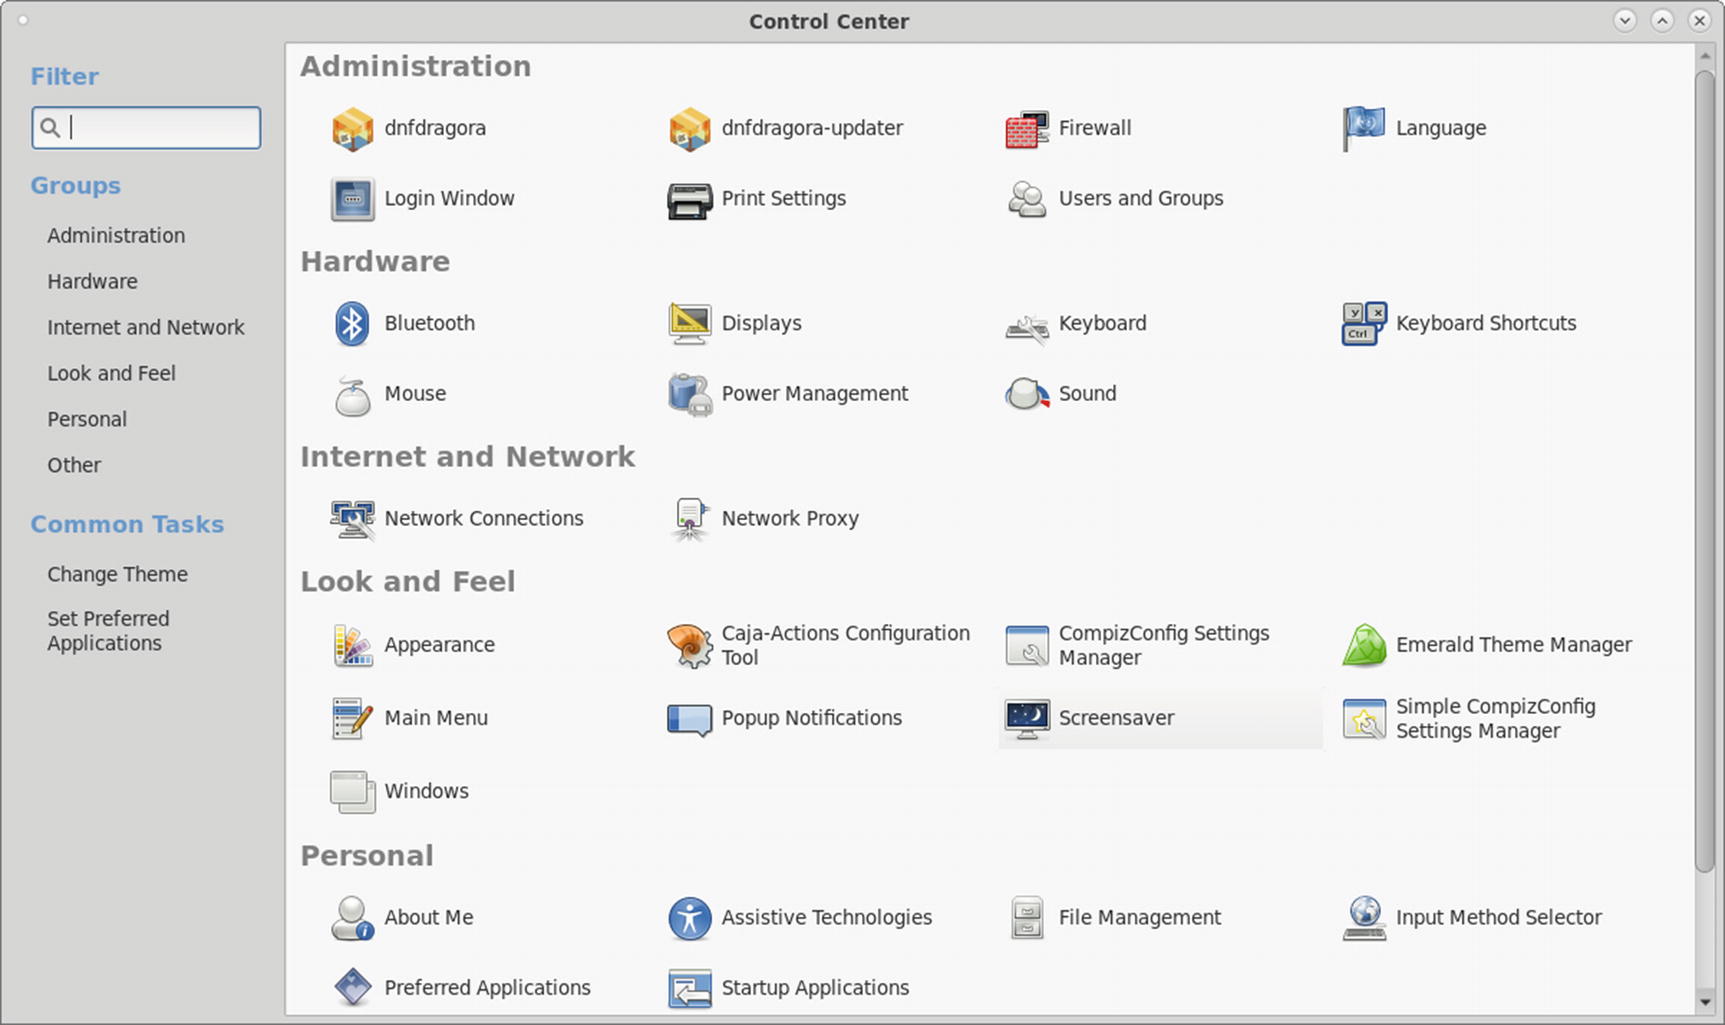
GNOME Control Center
You can configure different parts of your MATE interface using tools listed in the Preferences menu on the MATE and Main menus, and from the Control Center. MATE provides several tools for configuring your MATE desktop.
The keyboard shortcuts configuration (Keyboard Shortcuts) lets you map keys to certain tasks, like mapping multimedia keys on a keyboard to media tasks like play and pause. Just select the task and then press the key. There are tasks for the desktop, multimedia, and window management. In the window management section, you can also map keys to perform workspace switching. Keys that are already assigned will be shown.
The Windows configuration (Windows, in Look and Feel) is where you can enable features like window roll-up (Titlebar Action), window movement key, and mouse window selection.
The Cinnamon Desktop
The Cinnamon desktop is based on GNOME and was developed for the Linux Mint distribution (see Figure 11-12). It uses a variation of the GNOME 3 window manager (Mutter) called Muffin and a variation of the GNOME 3 nautilus file manager called Nemo. Cinnamon, although based on GNOME 3, is designed to work much like a traditional desktop, using a panel, menu, and applets. You can download the Fedora Cinnamon DVD from https://spins.fedoraproject.org/ . To install Cinnamon as an alternative desktop on a system, install the cinnamon-desktop package on Packages. Although the panel operates much like the older GNOME 2 panel, Cinnamon also includes overview modes (a GNOME 3 feature) for workspace (expo) and window selection (scale). You can find out more about Cinnamon at https://cinnamon.linuxmint.com . Numerous enhancements are available from https://cinnamon-spices.linuxmint.com/ , including themes, applets, desklets, and extensions. They can be downloaded and installed directly using the Cinnamon Settings Themes, Applets, Desklets (similar to Plasma plasmoids), and Extensions dialogs.
The Cinnamon desktop is configured using the Cinnamon Settings dialog, which is accessible from the main menu’s dock (third icon) and configures Cinnamon features such as applets and overview access (hot corner).
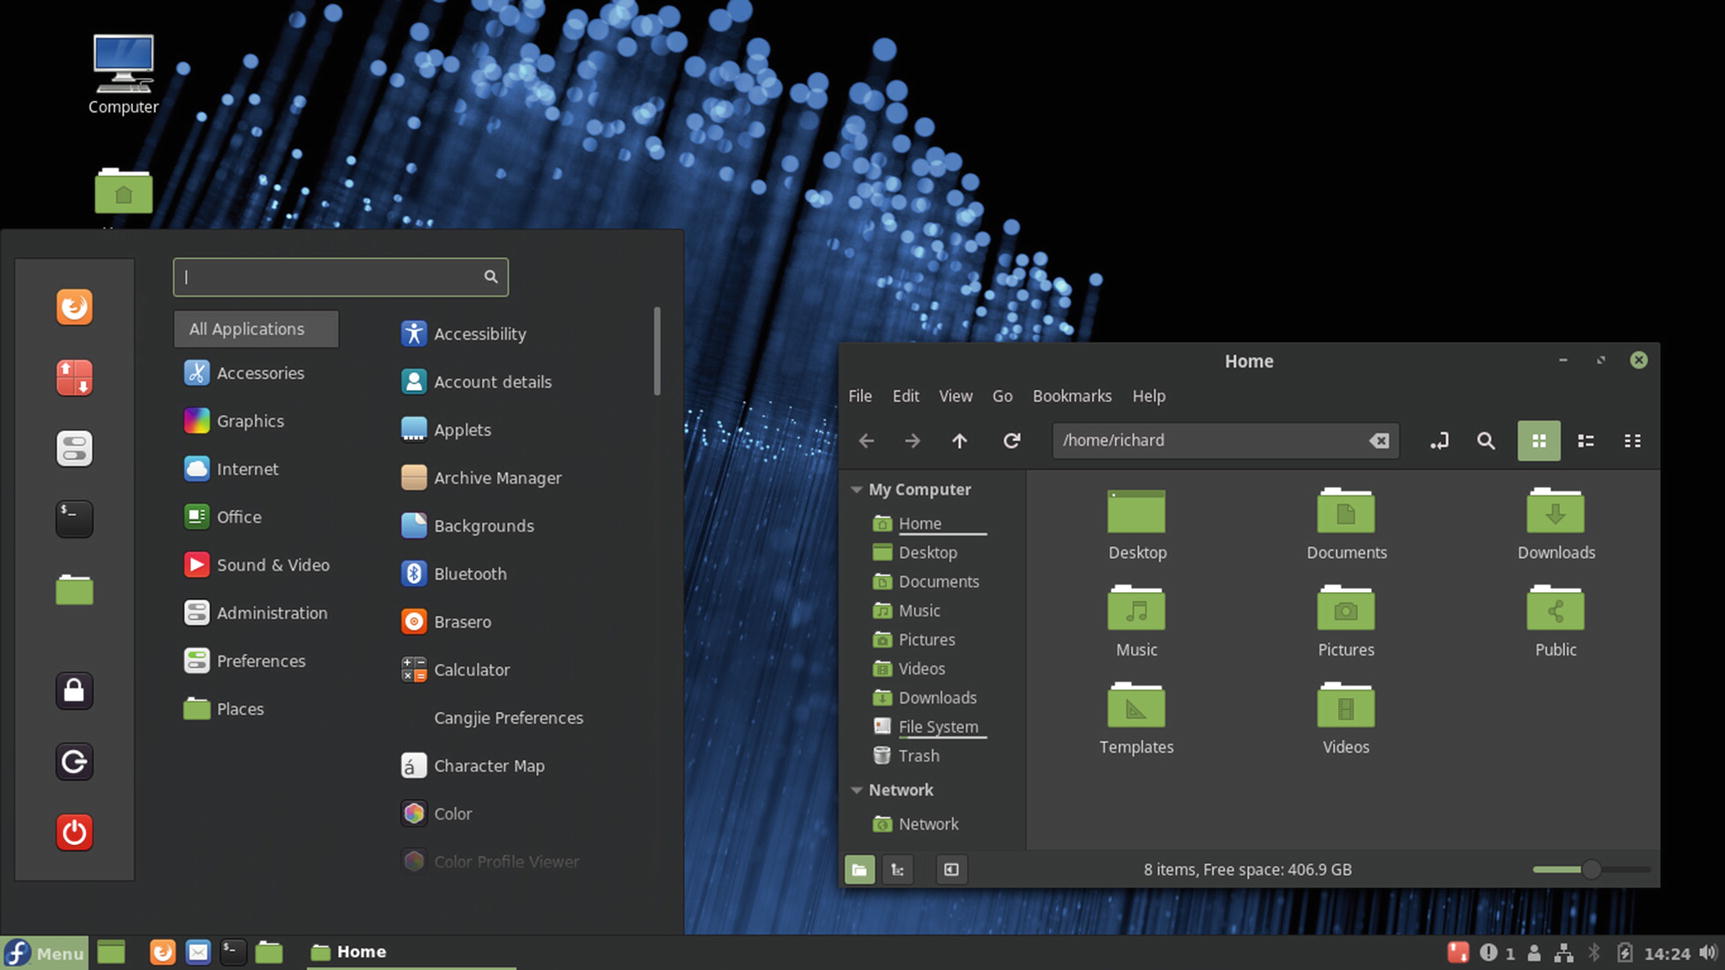
Cinnamon desktop
Cinnamon Panels

Cinnamon’s bottom panel
Panel configuration tasks such as adding applications, selecting applets, setting up menus, and creating new panels are handled from the Panel pop-up menu. Just right-click on the empty space on your panel (the middle) to display a menu with entries for Settings, Troubleshoot, Panel Edit mode, and Panel settings. The pop-up menu lists an additional entry for Add Applets to the Panel. From Settings, you can access commonly used Cinnamon settings such as Applets, Themes, and Menu. From Troubleshoot, you can restart Cinnamon or restore its defaults. You can also turn on the Panel Edit mode, which allows you to change the position of any button on the panel. Using the Cinnamon Settings panel dialog, you can change the position of the panel to the top of the screen or have two panels as GNOME 2 did. You can also change the panel size.
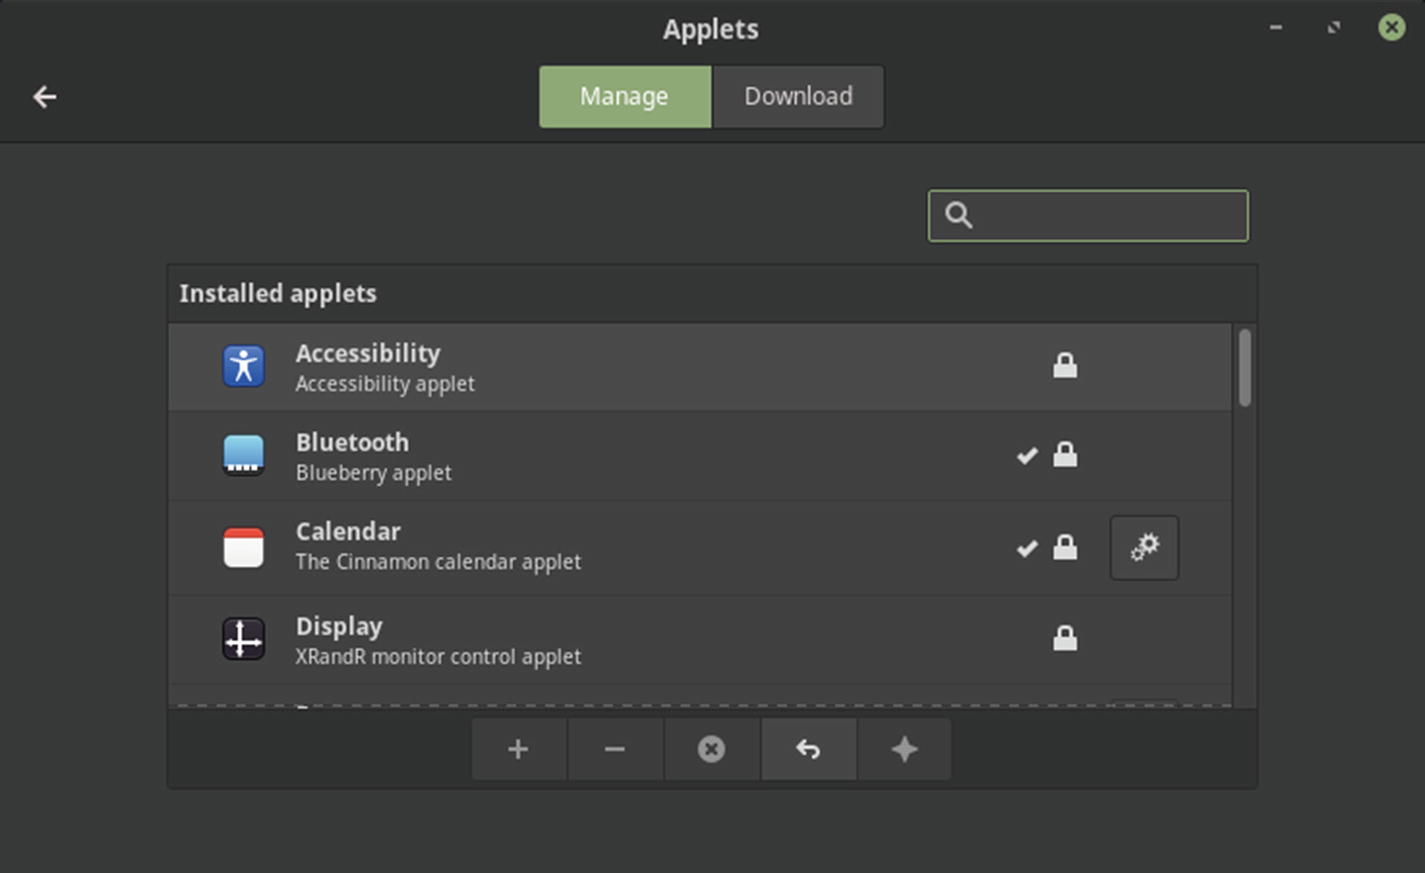
Cinnamon’s applets settings
Cinnamon Settings
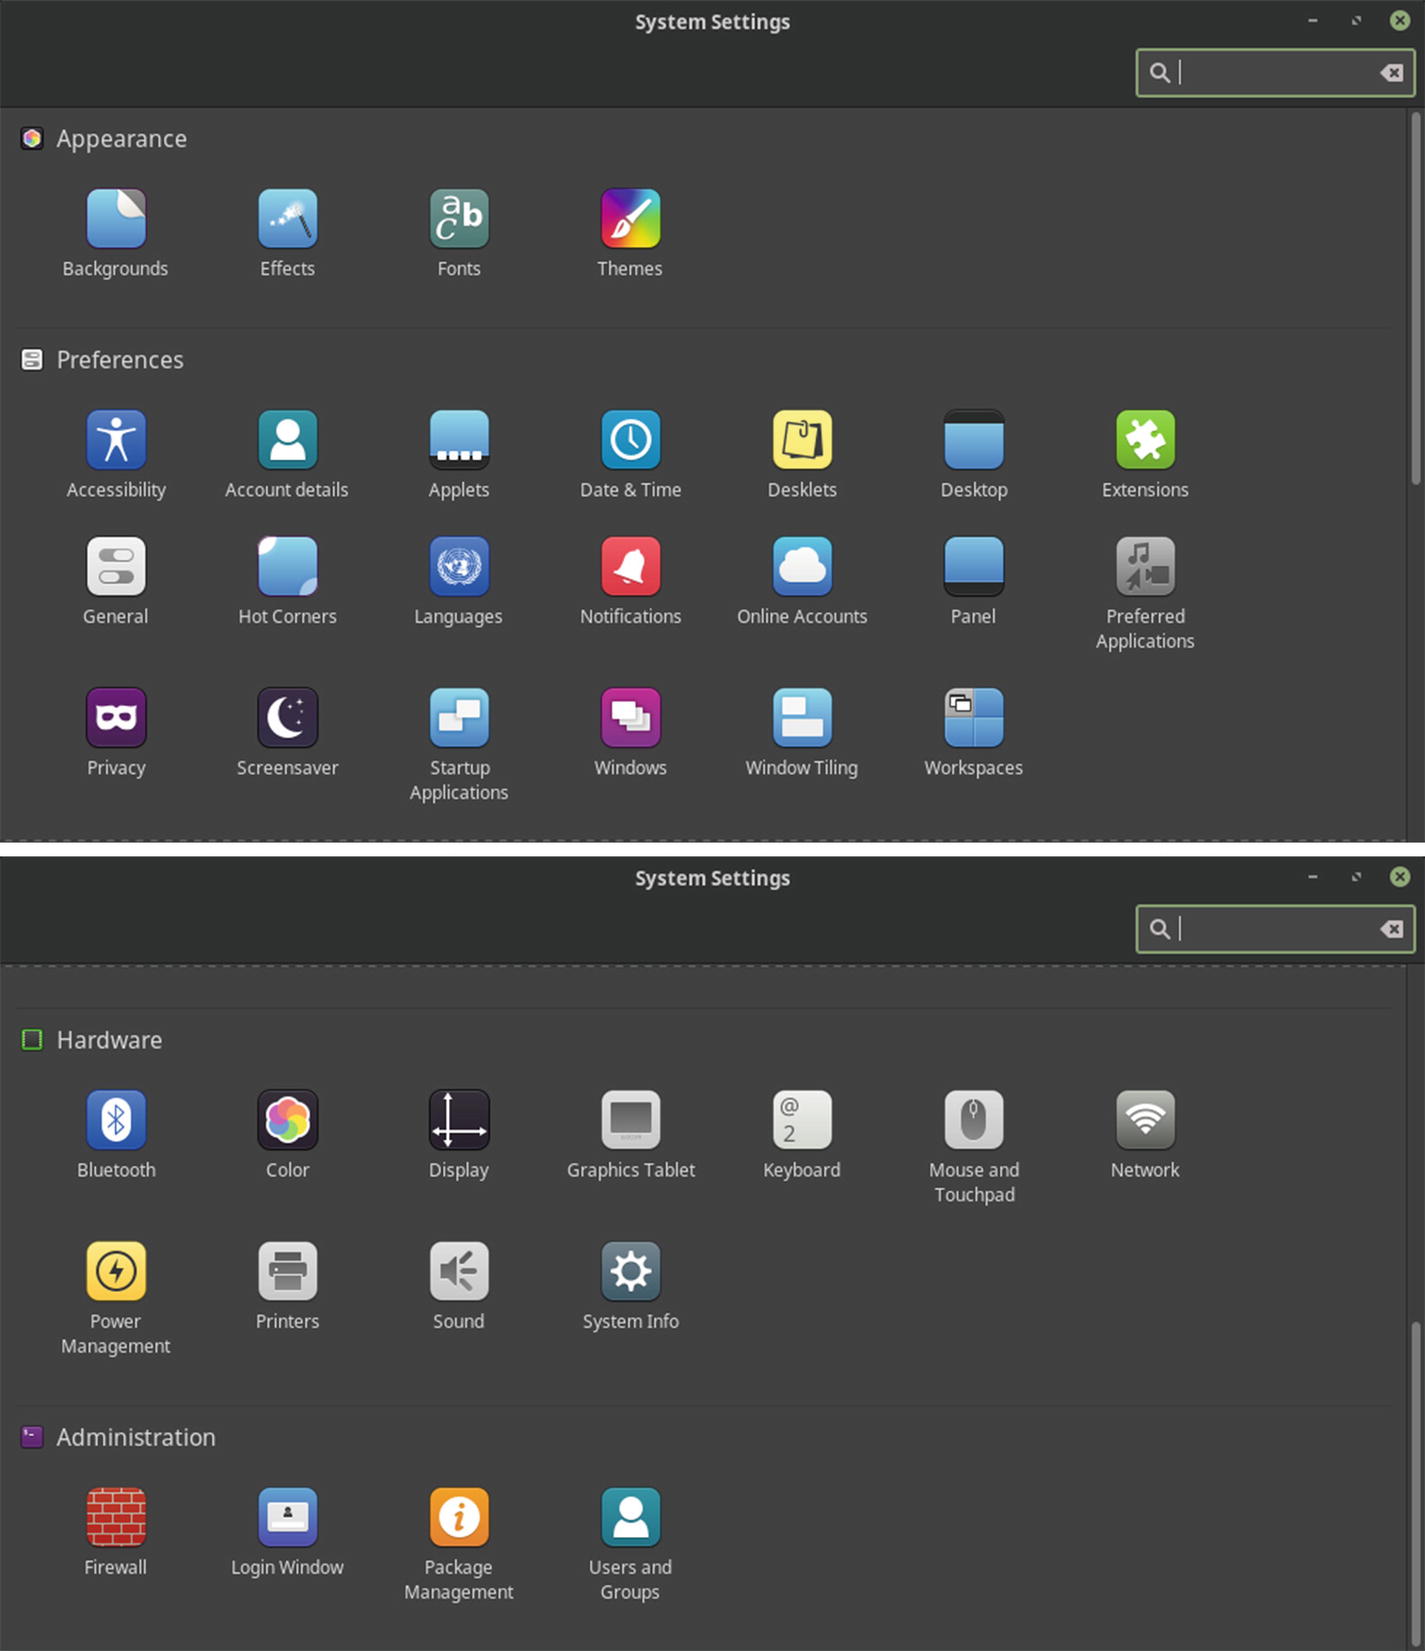
Cinnamon’s System Settings dialog
Cinnamon Menus
Cinnamon’s main menu and favorites
Cinnamon Workspaces
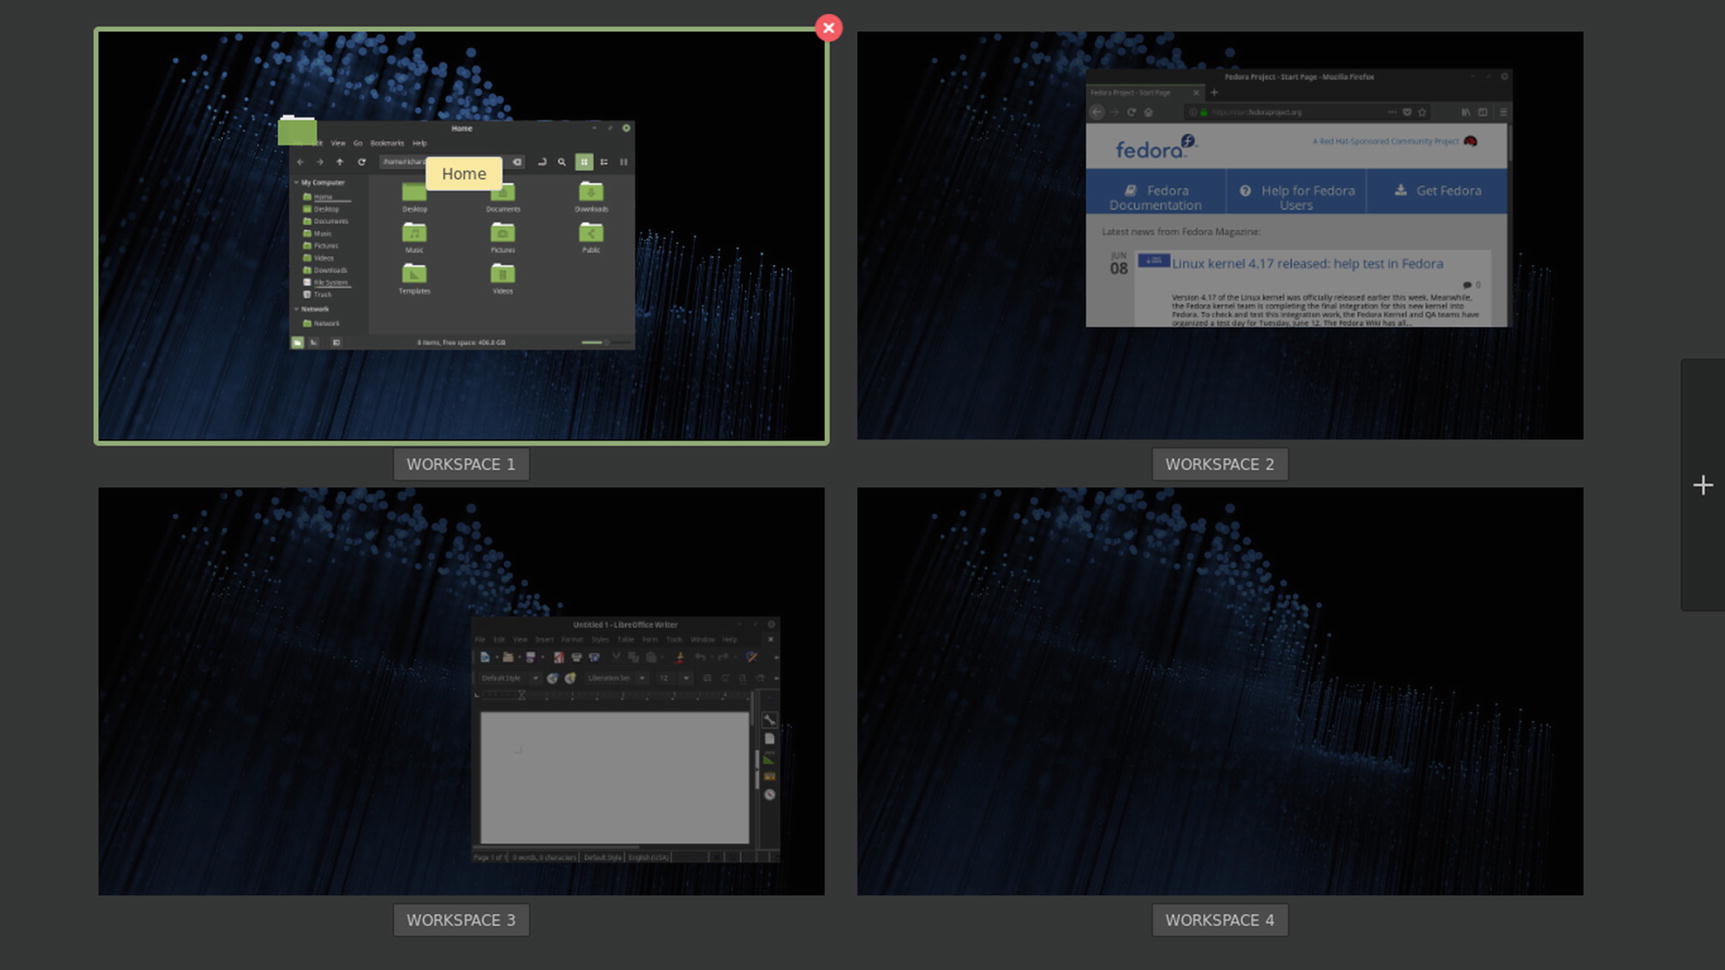
Cinnamon workspace switcher overview

Cinnamon Settings Hot Corners
You can also enable the Scale and Expo applets, which display buttons for the scale and expo overviews. These buttons let you switch to the window selection overview or the window switcher overview from the panel, as shown here:

Cinnamon File Manager
Cinnamon file manager (Nemo)
The LXQT Desktop
LXQT is another small desktop designed for use on minimal or low-power systems such as laptops, netbooks, or older computers. To install LXQT as an alternative desktop on a system, select the LXQT desktop package on Packages.
You can also use LXQT as a Live DVD, which you can download from https://spins.fedoraproject.org/ .
The LXQT Live DVD is available in 32-bit and 64-bit versions, such as Fedora-LXQt-Live-86_64-28.1.1.iso. You can then burn the DVD and run it as a Live DVD. Double-click the Install icon to install an LXQT-based Fedora system on your computer. Follow the same basic steps for installing Fedora as for the Fedora Live DVD. The Installation Summary screen shows items for Installation Destination, Date & Time, and Keyboard. Be sure to choose the disks to install on and to check the time zone.
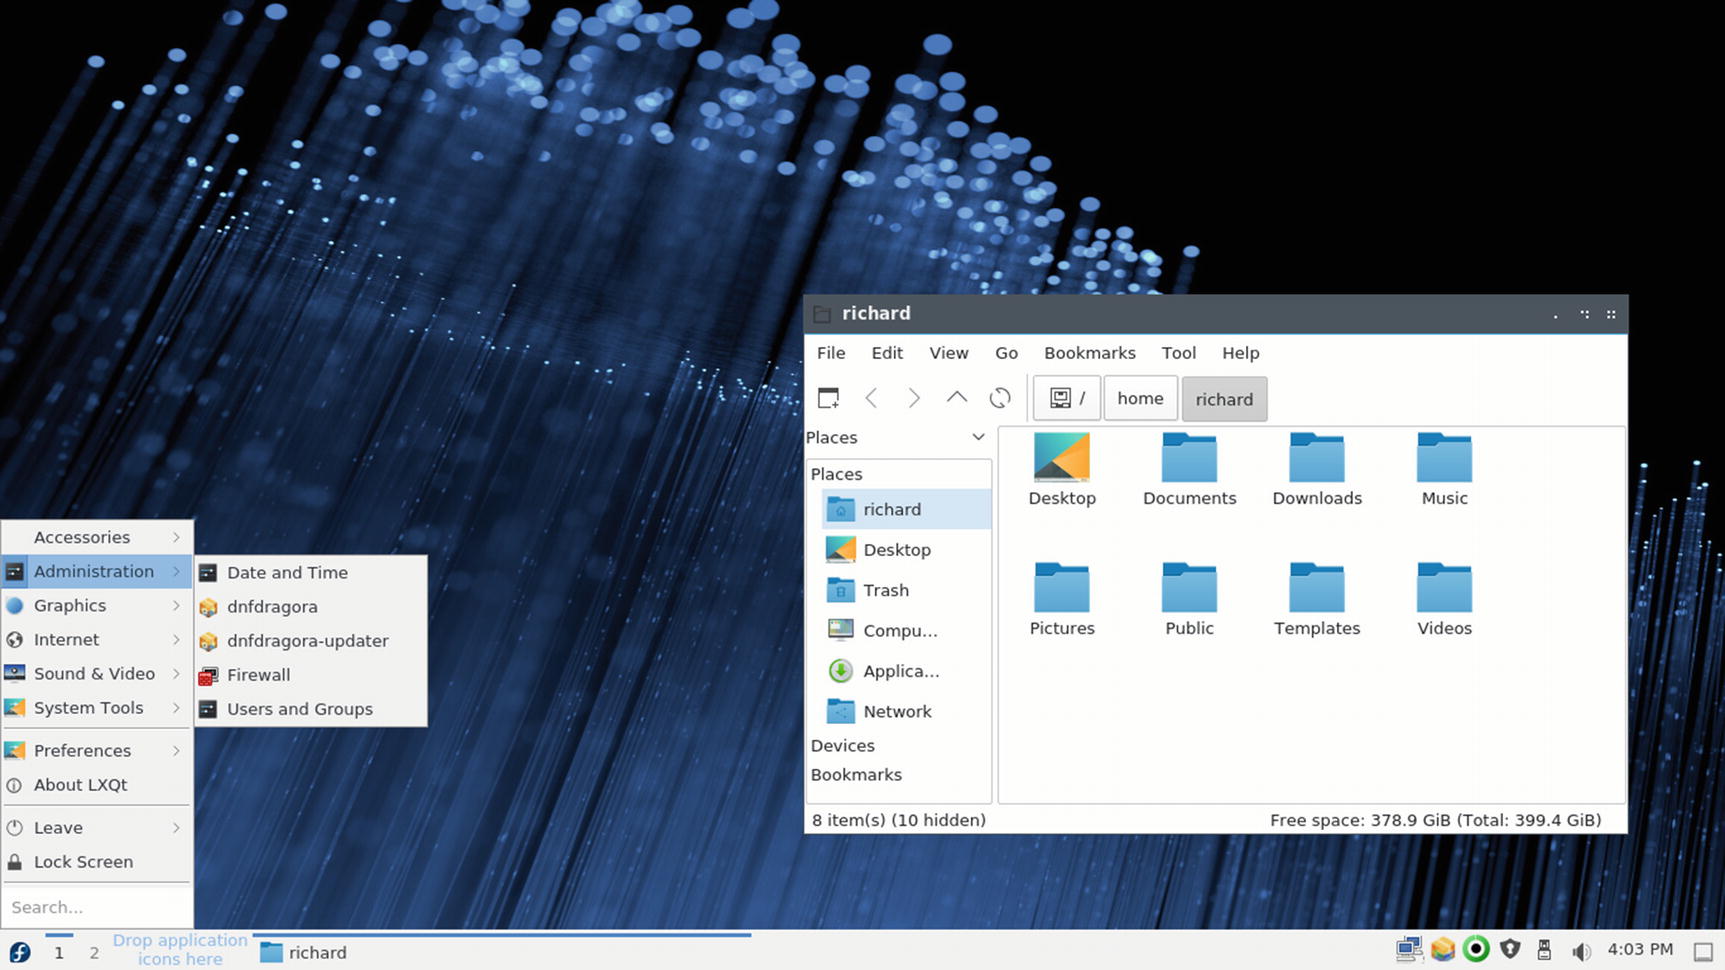
LXQT desktop

LXQT bottom panel
The logout entry on the Fedora applications menu, and the logout button on the right side of the panel, open a dialog with buttons for logout, shutdown, suspend, hibernate, and reboot.
LXQT uses the PC-Man file manager, as shown in Figure 11-20. The button bar performs browser tasks such as moving backward and forward to previously viewed folders. The Home button moves you to your home folder. The folder button with the yellow star will open tabs, allowing you to open several folders in the same window. The side pane has a location (Places) and directory tree view. You can switch between the two using the button at the top of the pane. You can also choose from the View ➤ Side Pane menu.
LXQT’s Panel Preferences and plugins
LXQT’s Desktop Preferences dialog
The Sugar on a Stick (SoaS) Desktop
The Sugar on a Stick (SoaS) learning platform is designed for OLPC (One Laptop per Child) computers.
To install Sugar on an installed Fedora system, select the Sugar Desktop Environment package in the Package Collection category on Packages.
As a separate Live USB spin, the Fedora 28 OLPC desktop has been integrated into the Sugar on a Stick (SoaS) project at https://wiki.sugarlabs.org/go/Sugar_on_a_Stick .
You can find out more about the Fedora spin of Sugar on a Stick at https://spins.fedoraproject.org .
The Sugar on a Stick live ISO image is available in 32-bit and 64-bit versions, such as Fedora-SoaS-Live-x86_64-28-1.1.iso. You can then burn the image to a USB drive.
The Sugar on a Stick project also provides a creation kit that you can use to create your own customized Sugar on a Stick system.
The Sugar desktop initially displays a panel with a circular favorites menu (see Figure 11-24). Each icon will start a simple application, including a calculator, text editor, chat, a moon description, terminal window, web browser, and log. The top panel has buttons on the right for the circular favorites menu, or the list version.

SoaS desktop