
2
Getting Started
WHAT YOU WILL LEARN IN THIS CHAPTER:
- Using Flash Builder 4.5.1
- Creating a Flex mobile project
- Defining run configurations for both desktop and devices
Adobe's portfolio includes numerous software products that enable you to author Flash-based mobile applications. These include Flash Builder, an Integrated Development Environment (IDE) that fully supports the build of Flex Framework and AS3-based mobile projects, Flash Professional for Flash-authored projects, Device Central for emulating content, and the AIR SDK for targeting multiple platforms.
In this chapter you take a close look at Flash Builder, learning how to create a Flex mobile project and how to run that project on the desktop, and also take a look at how to configure the project to run on Apple iOS, BlackBerry Tablet OS, and Google Android.
USING FLASH BUILDER 4.5.1
Flash Builder is the ideal tool of choice for creating mobile applications using the Flex framework. Built on top of Eclipse, an IDE widely used by many Java developers, Flash Builder is a robust development environment.
This book mainly focuses on building applications with the latest version of Flash Builder — at the time of writing, version 4.5.1.
![]() NOTE If you are using Flash Builder 4.5.0, you will need to install the Flash Builder 4.5.1 updater, which you can find on the Adobe website (www.adobe.com/support/flex/downloads_updaters.html).
NOTE If you are using Flash Builder 4.5.0, you will need to install the Flash Builder 4.5.1 updater, which you can find on the Adobe website (www.adobe.com/support/flex/downloads_updaters.html).
Toward the end of this chapter, you are guided through setting up a Flex mobile project using the IDE.
Flash Builder has numerous features that simplify the task of building mobile applications, making it easier and fun.
Cool features in the latest version include wizards to target new devices that support Adobe AIR, such as the BlackBerry Playbook and Google Nexus One. You can run content on supported devices connected to your development environment, so you can install, test, and run an application instantly.
Within the IDE are tabs to switch between a mobile application's source code and the Design view. Within the Design view you can drag and drop components from panels within the IDE. The Source code view supports color schemes that can be applied to AS3 syntax and MXML script, making it easier to code documents. There is also an integrated debugger facilitating testing and advanced code hinting, and autocomplete commands that insert full class paths. Flash Builder is nothing short of a developer's dream.
The official requirements for Flash Builder are listed at the Adobe website (www.adobe.com/products/flash-builder/tech-specs.html).
The following sections take a look at the following Flash Builder features:
- Workspaces
- Flash perspective
- Flash Debug perspective
- Source view
- Design view
Working with Workspaces
Flash Builder enables you to create different workspaces. A workspace contains each of the projects that you create in Flash Builder, and, by default, the workspace is the Flash Builder installation path, but this can be changed. You can also add multiple workspaces to keep collections of projects separate. I recommend for the examples used in this book that you create a workspace and keep the projects separate.
In this section you take a look within the workspace and a closer look at the tools within the IDE used to build Flex and ActionScript-based mobile applications.
Flash Builder includes a number of view panels that provide various features and configurable options for developing and testing applications.
Perspectives are a specific arrangement of view panels displayed together, aimed at providing suitable tools for a particular task.
By default, Flash Builder has two perspectives: the Flash perspective, which contains an arrangement of view panels for authoring your applications, and the Flash Debug perspective, which contains an arrangement of view panels for debugging applications.
Flash Builder will ask you to switch to a different perspective if you are debugging an application.
Using the Flash Perspective
The following lists some of the view panels available in the Flash Perspective by default:
- Editor Area: This is where you can edit files that contain your source code, including .mxml, .as, .xml, and .txt files. MXML source has two subpanels, which are available under the tabs labeled Source and Design. The Source view panel is where the MXML source is written, and the Design view panel is where the appearance of the application can be viewed or edited. When you add visual elements like a button component to the layout in Design view, the changes are automatically reflected in the Source view. The same happens when you add visual elements in the Source view; changes are reflected in the Design view. Using the Design view allows you to drag and drop components to the screen, instead of typing code, allowing you also to visually customize the appearance of the application and individual elements.
- Package Explorer: This is where you can see each of the files within the projects of a workspace. Here you not only see the contents of the project, but if you open an .as or .mxml file you see a detailed list of all class functions, methods, and variables, whether they are public, private, or protected.
- Outline: This is where you can see all the ingredients of an .mxml file or .as file. The outline contains a list of all the import, variable, and method declarations in the file. After opening or selecting an .as file, in the Editor Area you can see a list of imports, functions, methods, and properties utilized by a class in the Outline panel. The Outline panel has controls that enable you to hide non-public members, to hide static functions and variables, and to sort the list alphabetically, making it easier to find an item. Outlines are available only for an .as or .mxml file.
- Problems: This is where you see any particular issues relating to open projects in the workspace. Here you will be given warnings and compiler errors detailing the problem. This details the type of problem along with a description, the resource, the package path, and the line location on which the error has occurred.
- Data/Services: This is where you can create and integrate data services into your applications. In the Data/Services view panel you can specify and connect to a number of different data sources including BlazeDS, ColdFusion, HTTP, LiveCycle Data Services, PHP, WSDL Web Services, and XML. This view panel enables you to connect to remote and local data services while authoring your applications, giving you the option to specify input values for services and returns types, and ultimately generating code snippets to create a service call within the Flex-based project. The Data/Services panel also launches a Test Operation panel, which enables you to select one of the services you've created for your application and specify variables to run and test the service.
- Network Monitor: For Flex-based projects this is where you can monitor and record request times and response times for the particular service request calls an application makes.
Figure 2-1 shows the Flash Perspective with the view panels displayed at the bottom of the IDE and the button highlighted on the top right.
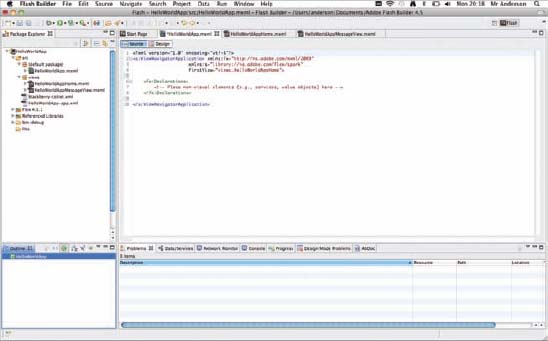
FIGURE 2-1: The Flash Perspective shown from the Hello World App project
Using the Flash Debug Perspective
The Flash Debug perspective contains view panels that enable you to rigorously test your application using a variety of features in a debugging session, including the ability to step through your code while the application is running.
The aim of the perspective is to help you to examine the source code and values assigned to variables, ultimately helping you to find problems in your application. The Flash Debug perspective launches when you select to run a debug session.
When you first run Flash Builder the option to show the Flash Debug perspective is unavailable. You need to have opened it at least once before within the workspace. Navigate to Window ![]() Perspective
Perspective ![]() Flash Debug. You can also open the perspective by clicking the Open Perspective button and then selecting Flash Debug.
Flash Debug. You can also open the perspective by clicking the Open Perspective button and then selecting Flash Debug.
The following lists some of the view panels that are displayed when the Flash Debug perspective is open:
- Breakpoints: This is where you can manage the breakpoints that have been added in your application.
- Console: This is where you can see several outputs from your application while it is running, including runtime errors and trace statements.
- Debug: This panel contains all the controls you need to step through your source code in the debugging session while the application is running.
- Expressions: This is where you can manage expressions on the variables you have set to watch in your application.
- Variables: This panel is where you can find all of the variables in the current thread of the application.
Each of these panels can be seen in Figure 2-2.
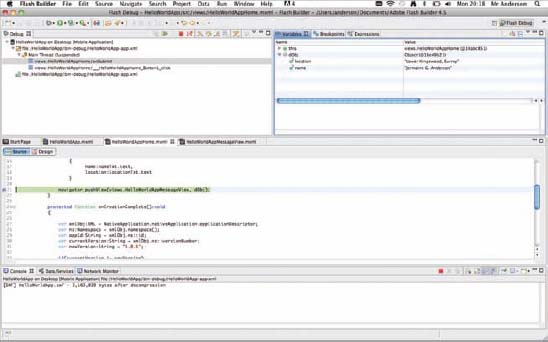
FIGURE 2-2: The Flash Debug Perspective for the Hello World project
Using the Source and Design Views
The Source view is simply the code editor where for the majority of this book you will be spending time following many of the example listings covered (Figure 2-3). Next take a look at the Design view contained within the Editor Area view panel (Figure 2-4). The Design view gives you a preview of your application.
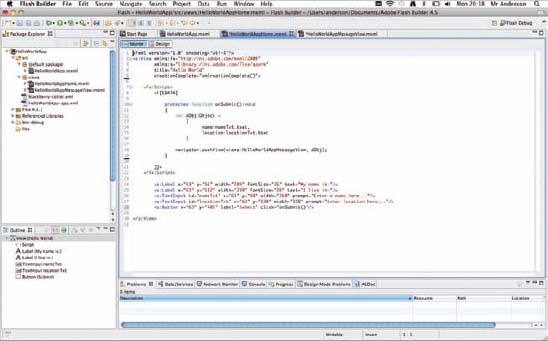
FIGURE 2-3: The Source view of HelloWorldAppHome.mxml
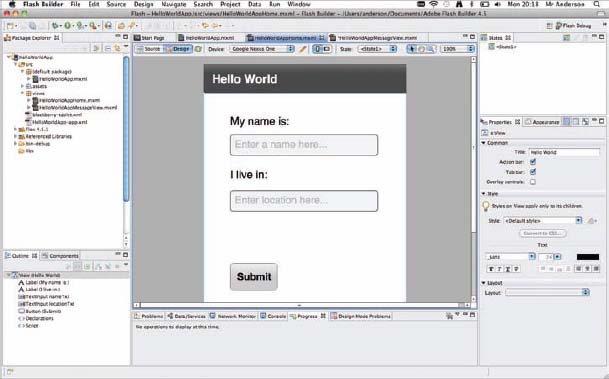
FIGURE 2-4: The corresponding Design view for the Source view of HelloWorldAppHome.mxml
In the Design view are several panels you can use to help facilitate the design of an application:
- Components: This is where you can see each of the Flex user interface components that are available to drag onto the view of the application.
- States: This is where you can manage each of the states available in a view of an application. States represent variations in the user interface, which are usually associated with a task a user has performed, such as changing the orientation of a device.
- Properties: This is where you can set the default properties for each of the components selected in the view.
- Appearance: This is where you can apply a project theme and edit the styles for the project. For mobile applications using Flex, this includes defining the text properties, the color properties, and the content background.
By default, the Components panel appears in the same pane as the Outline view panel on the left of the screen, and the States and Properties view panels appear on the right. The Design view is fully interactive, so you can drag and drop components directly onto the Stage area of the design.
Flash Builder also has controls to select the orientation of the mobile device, so you can choose to preview content in landscape or portrait mode.
![]() NOTE You can only switch to the Design mode when the source is MXML and error free. You cannot switch to Design mode when editing an .as file.
NOTE You can only switch to the Design mode when the source is MXML and error free. You cannot switch to Design mode when editing an .as file.
The Properties view located to the bottom right of the Flash Builder has multiple sections for editing:
- Common: This is where you edit the component properties.
- Style: This is where you define the style properties for a component. Depending on the component these properties may include the chrome color, padding, text, and content background.
- Size and Position: This is where you can provide the width and height of the component.
- Layout: This is where you can set the layout properties for a container component. You can select from one of the default Spark layouts to base the component's layout on, including the HorizontalLayout and the VerticalLayout classes.
When you make updates to the style properties the changes are reflected in the Design view, and depending on which component you select in the Design view, the sublist of properties that appear in the Properties view panel may change.
CREATING A MOBILE PROJECT USING FLASH BUILDER
A number of different features were covered in the previous section on Flash Builder. In this section, you take a look at using the IDE for yourself.
Creating a Hello World App Example
Over the course of this chapter you'll follow the creation of the Hello World App project. This mobile application simply enables you to enter your name onscreen and present it back with the text “Hello World, my name is ...” — a simple example, but enough to get you started using Flash Builder.
Defining the Flex Mobile Project Settings
The first few steps take you through defining the Flex Mobile Project settings, which are usually the first things you encounter when you start a new project.
- In Flash Builder select File
 New Flex Mobile Project to open the New Flex Mobile Project panel.
 - In the Project Location tab, set the Project Name field to HelloWorldApp. Use the default location for the project files, and then for the Flex SDK selection, use the default version (Figure 2-5). The minimum version used should be version 4.5. Once the project location details have been set, click Next.
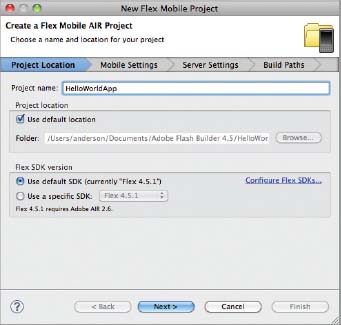
FIGURE 2-5: Setting the Project Location for the Hello World App in the New Flex Mobile Project dialog
Targeting Mobile Devices on Different Platforms
Within the Flex Mobile Project panel, you also target your development for the mobile platforms supported by Flash Builder.
After defining the Project Settings, the next few steps take you through targeting the three mobile platforms: Apple iOS, Google Android, and BlackBerry Tablet OS.
- For the Mobile Settings tab, ensure Apple iOS, Google Android, and BlackBerry Tablet OS are selected in the Target Platforms section. In the Application Template section select View-based Application, ensuring the Initial View Title is set to Hello World. Then at the bottom of the panel, in the Application Settings section, leave the Automatically Reorient checkbox selected (Figure 2-6).
- Return to the section under Target Platforms and select Permission. Select Apple iOS as the platform from the drop-down, which should be the default selection. Notice in the description that you do not need to set permissions for the Apple iOS platform (Figure 2-7).

FIGURE 2-6: Setting the Mobile Settings for the Hello World App in the New Flex Mobile Project dialog
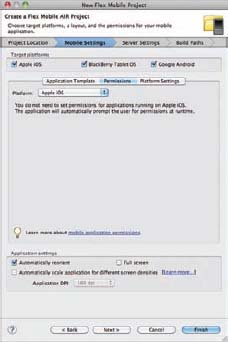
FIGURE 2-7: Setting the permissions for Apple iOS Platform for the Hello World App in the New Flex Mobile Project dialog
- Select BlackBerry Tablet OS as the platform selection from the drop-down. You will see a number of permissions that can be set for your application should it require a particular feature (Figure 2-8).
- Select Google Android as the platform selection from the drop-down. You will see a different set of permissions that can be set, very similar to BlackBerry Tablet OS (Figure 2-9).
FIGURE 2-8: Setting the permissions for BlackBerry Tablet OS for the Hello World App in the New Flex Mobile Project dialog

FIGURE 2-9: Setting the permissions for Google Android for the Hello World App in the New Flex Mobile Project dialog
- Take a look at the Platform Settings tab, with Apple iOS selected as the platform. Here you can set the target devices for the platform. Select from either iPad, both the iPhone and iPod Touch, or all the devices. Leave the default setting in place (Figure 2-10).
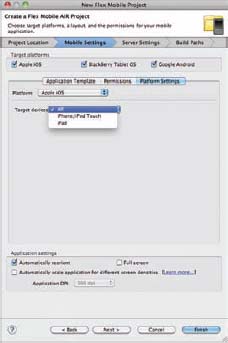
FIGURE 2-10: Configuring the target devices for the Apple iOS platform for the Hello World App in the New Flex Mobile Project dialog
- In the Server Settings tab, under the Server Technology section, leave the default setting for application server type selected as None/Other, and in the Compiled Flex Application Location section leave the default setting for Output Folder set to bin-debug. Then click Next (Figure 2-11).
- In the Build Paths tab, check that the Main Source Folder is set to src, the Main Application File is set to HelloWorldApp.mxml, and the Application ID is set to com.wrox.ch2.HelloWorldApp, before clicking Finish (Figure 2-12).
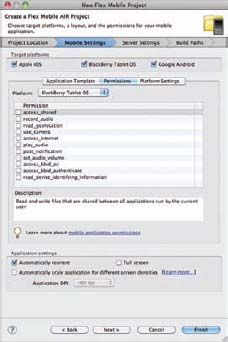
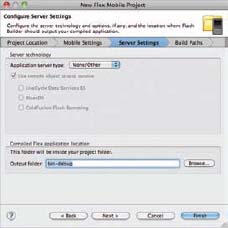
FIGURE 2-11: Confi guring the Server Settings for the Hello World App in the New Flex Mobile Project dialog
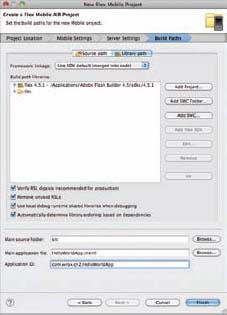
FIGURE 2-12: Setting the Build Paths for the Hello World App in the New Flex Mobile Project dialog
![]() NOTE At this point you should familiarize yourself with the steps under “Defining the Flex Mobile Project Settings” and “Targeting Mobile Devices on Different Platforms” because these will be mentioned only briefly when you start other example projects in later chapters.
NOTE At this point you should familiarize yourself with the steps under “Defining the Flex Mobile Project Settings” and “Targeting Mobile Devices on Different Platforms” because these will be mentioned only briefly when you start other example projects in later chapters.
In the Flash Builder Package Explorer panel, you should see that the Hello World project has now been created, and several files have been automatically generated for the project.
In the src directory, you will see the default package folder, with the main application file HelloWorldApp.mxml.
In the views package folder, you will see a file called HelloWorldAppHelloWorldView.mxml. The name of the file is built from a combination of the project name and the initial view title defined. The file represents the first view class that the application will see when launched.
Rename the class via Flash Builder to HelloWorldAppHome.mxml. Do this by highlighting the file and selecting File ![]() Rename from the Flash Builder menu. In the Rename Class panel that opens, ensure the Update references box is checked, enter HelloWorldAppHome as the name for the file, and then click OK to confirm.
Rename from the Flash Builder menu. In the Rename Class panel that opens, ensure the Update references box is checked, enter HelloWorldAppHome as the name for the file, and then click OK to confirm.
The third file generated is HelloWorldApp-app.xml; this is the AIR application descriptor file template. AIR application descriptor files are explored in more detail in Chapter 3.
Last, the fourth file generated is the blackberry-tablet.xml file, which is generated when you target your projects to run on the BlackBerry Tablet OS. BlackBerry Tablet OS files are explored in more detail in Chapter 3.
Building the Hello World Project
In Listing 2-1 you see the main application file HelloWorldApp.mxml, with the fx and s namespaces defined. Notice here that the firstView property on the application has been set to views.HelloWorldAppHome to reflect the updated filename.

LISTING 2.1: The HelloWorldApp.mxml application file for the Hello World project
<?xml version="1.0" encoding="utf-8"?>
<s:ViewNavigatorApplication xmlns:fx="http://ns.adobe.com/mxml/2009"
                            xmlns:s="library://ns.adobe.com/flex/spark"
                            firstView=“views.HelloWorldAppHome”>

</s:ViewNavigatorApplication>
In Listing 2-2 you see the <s:View> container defined in the HelloWorldAppHome.mxml file. This has been modified slightly from the generated file, with the title property set to display Hello World.
LISTING 2.2: The HelloWorldAppHome.mxml view for the Hello World project
<?xml version="1.0" encoding="utf-8"?>
<s:View xmlns:fx="http://ns.adobe.com/mxml/2009"
        xmlns:s="library://ns.adobe.com/flex/spark"
        title=“Hello World”>

</s:View>
Ensure these two files have been modified as shown in the first two listings, and then follow these steps to build on the example:
- In HelloWorldAppHome.mxml add two <s:Label> components. For the first label set the value of the y position to 56 and the value of the text property to My name is:. Then for the second label set the value of the y position to 182 and the value of the text property to I live in:. Then on both components set the value of the x position to 63, the value of the width property to 289, and the value for the fontSize property to 26 (Listing 2-3).
LISTING 2.3: Adding two <s:Label> components to the view in HelloWorldAppHome.mxml
<?xml version="1.0" encoding="utf-8"?> <s:View xmlns:fx="http://ns.adobe.com/mxml/2009" xmlns:s="library://ns.adobe.com/flex/spark" title="Hello World"> <s:Label x=“63” y=“56” width=“289” fontSize=“26” text=“My name is:”/> - Add two <s:TextInput> components to the view. On the first, set the value of the prompt property to Enter a name here..., the value of the id property to nameTxt, and the value of the y position to 98. On the second component, set the prompt to Enter location here..., the value of the id property to locationTxt, and the y position to 230. Then, on both components, set the value of the x position to 63 and the value of the width property to 350 (Listing 2-4).
LISTING 2.4: Adding two <s:TextInput> components to the view in HelloWorldAppHome.mxml
<?xml version="1.0" encoding="utf-8"?> <s:View xmlns:fx="http://ns.adobe.com/mxml/2009" xmlns:s="library://ns.adobe.com/flex/spark" title="Hello World"> <s:Label x="63" y="56" width="289" fontSize="26" text="My name is:"/> <s:Label x="63" y="182" width="289" fontSize="26" text="I live in:"/> <s:TextInput id=“nameTxt” x=“63” y=“98” width=“350” prompt=“Enter a name here...”/> <s:TextInput id=“locationTxt” x=“63” y=“230” width=“350” prompt=“Enter location here...”/> </s:View> - Add a <s:Button> control to the view. Set the value of the label property to Submit, and the values of the x and y properties to 63 and 402, respectively (Listing 2-5).
LISTING 2.5: Adding a <s:Button> component to the view in HelloWorldAppHome.mxml
<?xml version="1.0" encoding="utf-8"?> <s:View xmlns:fx="http://ns.adobe.com/mxml/2009" xmlns:s="library://ns.adobe.com/flex/spark" title="Hello World"> <s:Label x="63" y="56" width="289" fontSize="26" text="My name is:"/> <s:Label x="63" y="182" width="289" fontSize="26" text="I live in:"/> <s:TextInput id="nameTxt" x="63" y="98" width="350" prompt="Enter a name here..."/> <s:TextInput id="locationTxt" x="63" y="230" width="350" prompt="Enter location here..."/> <s:Button x=“63” y=“402” label=“Submit”/> </s:View> - Save the project, and then open the Design view, where you will see the components you've just added.
- Next add another view to the application to display the message when the user clicks Submit. From the Flash Builder menu select File New MXML Component. Then in the window that opens enter the details for the new view. Enter views in the Package field, and HelloWorldAppMessageView for the Name. Leave the default values for the Layout and Based On fields (Figure 2-13).
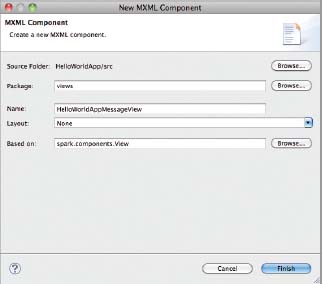
FIGURE 2-13: Creating a new view via the New MXML Component panel for the Hello World App
After clicking OK the file will be generated in the Project Explorer.
- Open the HelloWorldAppMessageView.mxml file, updating the value of the title property to Your message.... Then add a single <s:Label> component to the view, setting the value of the id property to messageTxt, the values of the width and height properties to 100%, the values for the paddingLeft, paddingRight, and paddingTop properties to 20, the value of the color property to #868686, and the fontSize property to 32 (Listing 2-6).
LISTING 2.6: Adding a <s:Label> to the view in HelloWorldAppMessageView.mxml
<?xml version="1.0" encoding="utf-8"?> <s:View xmlns:fx="http://ns.adobe.com/mxml/2009" xmlns:s="library://ns.adobe.com/flex/spark" title=“Your message...”> <s:Label id=“messageTxt” color=“#868686” paddingLeft=“20” paddingRight=“20” paddingTop=“20” width=“100%” height=“100%” fontSize=“32”/> </s:View> - Return to the HelloWorldAppHome.mxml view, and add a new <fx:Script> declaration containing a protected function called onSubmit() (Listing 2-7).
LISTING 2.7: Adding a new function called onSubmit() to the <fx:Script> declaration in HelloWorldAppHome.mxml
<?xml version="1.0" encoding="utf-8"?>
<s:View xmlns:fx="http://ns.adobe.com/mxml/2009"
        xmlns:s="library://ns.adobe.com/flex/spark"
        title="Hello World">

      <fx:Script>

            <![CDATA[

                  protected function onSubmit():void {}

            ]]>

      </fx:Script>

      <s:Label x="63"
               y="56"
width="289" fontSize="26" text="My name is:"/> <s:Label x="63" y="182" width="289" fontSize="26" text="I live in:"/> <s:TextInput id="" x="63" y="98" width="350" prompt="Enter a name here..."/> <s:TextInput id="" x="63" y="230" width="350" prompt="Enter location here..."/> <s:Button x="63" y="402" label="Submit"/> </s:View>
- In onSubmit() create an object called dObj, which will hold two values, a property called name set by the first <s:TextInput> component nameTxt, and a property called location, set by the second <s:TextInput> component locationTxt (Listing 2-8).
- Invoke the pushView() method on the navigator object for the view, supplying views.HelloWorldAppMessageView and dObj as the arguments for onSubmit() (Listing 2-9).
- Assign the onSubmit() method to the click property on the <s:Button> component (Listing 2-10).
LISTING 2.10: Assigning the onSubmit() method to the click property on the <s:Button> component in HelloWorldAppHome.mxml
<s:Button x="63"
          y="402"
          label="Submit"
          click=“onSubmit()”/>
In onSubmit(), you've created a function that will use the data set via the text input fields, pushing the data object dObj and the name and location properties set on that object through to the HelloWorldAppMessageView. To utilize the data object, you will need to update the HelloWorldAppMessageView.
You can use one of the following event properties to handle what happens when the <s:View> component renders to the screen:
- creationComplete: When a component has completed its construction, property processing, measuring, layout, and drawing
- viewActivate: When the current view has been activated
Similar to the click event property used for the <s:Button> component, you assign a method to handle the creationComplete and viewActivate properties.
- Return to the HelloWorldAppMessageView.mxml view, and add a new <fx:Script> declaration containing a protected function called onCreationComplete(). Assign the method to the creationComplete event property on the view (Listing 2-11).
LISTING 2.11: Assigning the onCreationComplete() method to the creationComplete property in HelloWorldAppMessageView.mxml
<?xml version="1.0" encoding="utf-8"?>
<s:View xmlns:fx="http://ns.adobe.com/mxml/2009"
        xmlns:s="library://ns.adobe.com/flex/spark"
        title="Your message... "
        creationComplete=“onCreationComplete()”>

      <fx:Script>

            <![CDATA[

                  protected function onCreationComplete():void {}

            ]]>

      </fx:Script>

</s:View>
- In onCreationComplete() update the value of the text property on the <s:Label> to utilize the name and location properties defined on the view's data object, and incorporate the values into a message saying Hello World, My name is with and I live in phrases (Listing 2-12).
Here you see that the data object for HelloWorldAppMessageView is utilized, and the name and location properties that were set in HelloWorldAppHome are referenced and assigned to the text property on messageTxt. Now, whenever the pushView() method is invoked via the onSubmit() method in HelloWorldAppHome, the onCreationCompete() method will display the text entered by the user.
The Hello World App is now ready for testing. Next you take a look at running your project by setting up run configurations.
DEFINING RUN CONFIGURATIONS
Run configurations are a key feature of Flash Builder that enable you to create and manage how you run and debug your mobile projects. You can elect to run your mobile application on the desktop, or directly on a connected device.
When you run your project on the desktop you can select from a number of devices, enabling you to run your applications using different screen sizes and pixel densities.
The next few sections take you through defining run configurations for desktop and devices.
Running Mobile Applications on the Desktop
First, to set up a project that runs on the desktop, follow these steps:
- In Flash Builder, select Run Run Configurations (Figure 2-14).
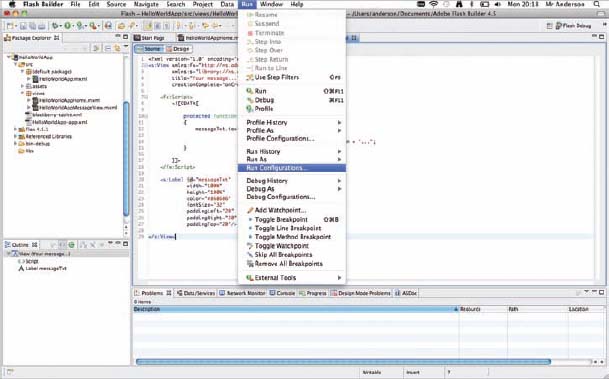
FIGURE 2-14: Navigating to the Run Configurations in Flash Builder
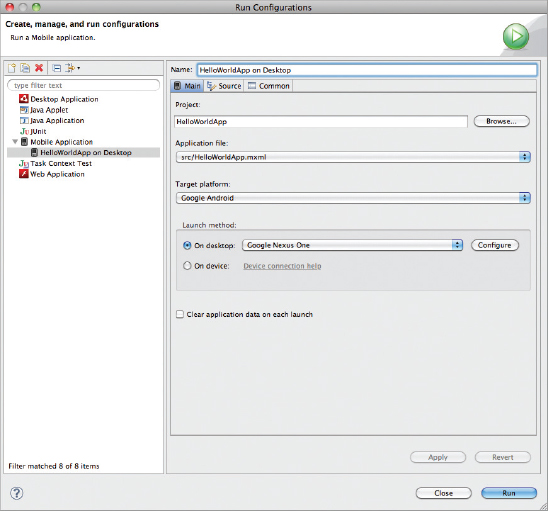
- In the Run Configurations window that opens, select Mobile Application New, to create a mobile configuration type. Then in the Name field for the configuration replace HelloWorldApp with HelloWorldApp on Desktop. Leave the Application File set as src/HelloWorldApp. Then for the Target Platform select Google Android. For the Launch Method, first select On Desktop. Then from the list of devices to run the application on, choose the Google Nexus One. Finally, click Apply. This should update the Mobile Application options in the left-hand panel (Figure 2-15).
FIGURE 2-15: Creating a run configuration for the Hello World App running on the desktop
At this stage you could also elect to choose BlackBerry Tablet OS or Apple iOS and select a device that runs on those target platforms. For the majority of the book the example projects will be emulated using the Google Android platform and the Google Nexus One device profile.
![]() WARNING Be aware that selections for the Target Platform in the Run Configuration window will appear only if you have enabled your application to be targeted on that platform. So, if you have targeted your application to run only on Google Android Platform, neither Apple iOS nor BlackBerry Tablet OS devices will be selectable here.
WARNING Be aware that selections for the Target Platform in the Run Configuration window will appear only if you have enabled your application to be targeted on that platform. So, if you have targeted your application to run only on Google Android Platform, neither Apple iOS nor BlackBerry Tablet OS devices will be selectable here.
Launching the Project
Once your project's run configuration has been defined you will be able to launch your mobile application. To launch the application as it is currently follow these steps:
- Within the Run Configurations window, select Mobile Application Hello World on Desktop and click the Run button.
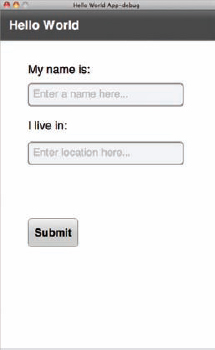
- In the Adobe Debug Launcher (ADL) window that opens you'll see the project as it currently is, running on the desktop (Figure 2-16).
- Enter some details into each of the input fields (Figure 2-17).
- Click the Submit button, and you should see the new view appear with the Hello World message (Figure 2-18).
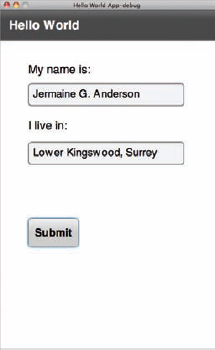
FIGURE 2-17: Hello World App with the name and location fields completed
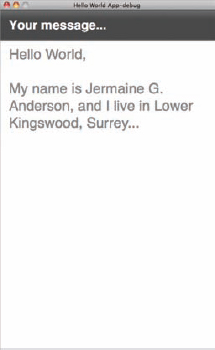
FIGURE 2-18: Hello World App displaying the Hello World message view
In the next section you take a look at the steps to create run configurations on Apple iOS, BlackBerry Tablet iOS, and Google Android devices.
Running Mobile Applications on the Device
Once you've set up a run configuration for the Hello World application on the desktop, return to the Run Configurations window to set up run configurations for an actual mobile device on each of the target mobile platforms supported, starting with Google Android.
Creating Run Configurations for Google Android
Follow the next steps to create a run configuration for devices running the Google Android OS platform:
- Within the Run Configurations window, click the New Launch configuration, and update the name of the configuration to HelloWorldApp on Google Android.
- Leave the Application File set to src/HelloWorldApp.mxml, and then for the Launch Method select On Device.
- Click Apply; the device run configuration will appear in the Mobile Application drop-down (Figure 2-19).
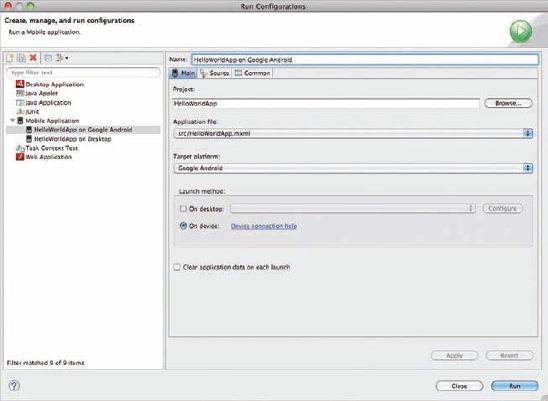
FIGURE 2-19: Run configuration for the Hello World App on Google Android now ready to launch on a USB-connected device
These are the only steps you need to take to create a run configuration for Google Android devices in Flash Builder. You will also need to make sure your device is connected and has USB debugging enabled.
Enabling USB debugging
For Google Android devices running Android version 2.3.4, you need to ensure USB debugging is enabled.
- On the Google Nexus One running Android 2.3.4, navigate to the Development settings. From the Applications menu, select Settings Applications Development.
- In the Development settings, ensure the USB debugging option is enabled, and when asked whether to enable USB debugging, select OK. Also ensure the Stay Awake option is enabled, to prevent your Android device screen from sleeping while you are testing the application (Figure 2-20).
- Once you connect your device via USB you will be able to run mobile applications directly from your Android run configuration. This is indicated by the debugging and USB connection, in the top left of the status bar (Figure 2-21).
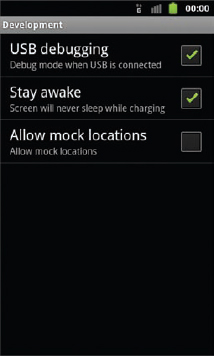
FIGURE 2-20: Development settings for the Google Nexus One device running Android version 2.3.4
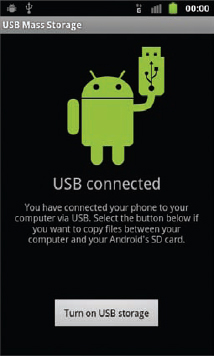
FIGURE 2-21: USB Connected status for the Google Nexus One running Android version 2.3.4
If you have a BlackBerry Tablet OS device like the BlackBerry PlayBook, the next section covers the creating run configurations for BlackBerry Tablet OS.
Creating Run Configurations for BlackBerry Tablet OS
Next take a look at defining a run configuration for devices running the BlackBerry Tablet OS.
- Within the Run Configurations window, click the New Launch configuration, and update the name of the configuration to HelloWorldApp on BlackBerry Tablet OS.
- Leave the Application File set to src/HelloWorldApp.mxml, and then select On Device for the Launch Method.
Unlike the Google Android platform, you will need to configure a BlackBerry Tablet OS device in order for the run configuration to be completed (Figure 2-22).
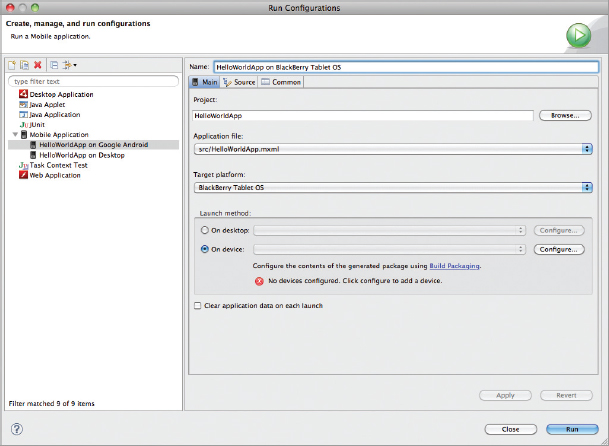
FIGURE 2-22: Creating a run configuration for the Hello World App on a BlackBerry Tablet OS device
- Click the Configure button next to the On Device drop-down. This brings up a Preferences window where you can add test devices to the BlackBerry Tablet OS (Figure 2-23).
The next few steps in Flash Builder require that you use some properties from your BlackBerry Tablet OS device. Here you use the BlackBerry PlayBook, where you will need to obtain an IP address and a password to run you applications on the device.
FIGURE 2-23: Preferences window to create a test device for the Hello World App on the BlackBerry Tablet OS platform
- On your device you will need to enable the development mode. For this go to Settings Security Development Mode then switch Use Development Mode to On, where you should be prompted to enter a password (Figure 2-24). Make a note of the password before clicking OK.
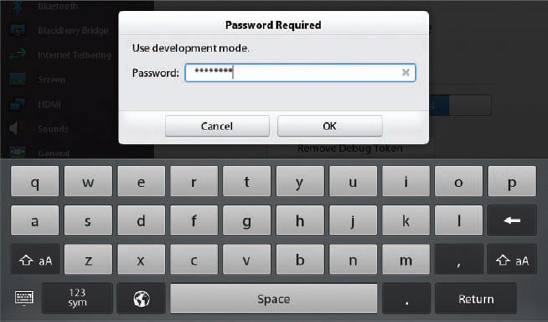
FIGURE 2-24: Enabling the use of the development mode for the Hello World App on a BlackBerry PlayBook
- Next connect your device via USB to your PC or Mac. In the home screen on the device make a note of the IP address from the Development settings on the main bar (Figure 2-25).
 NOTE In Figure 2-25 you will actually see that the PlayBook is connected via USB and Wi-Fi; thus, there are two IP addresses. The first IP address shown, 169.254.168.221, corresponds to the USB connection, whereas the second IP address, 10.0.1.2, is the Wi-Fi network connection. Either can be used for the Device IP, which is set in step 5. However, in this example, follow the USB route. Also, note that the IP address will change whenever you connect your device.
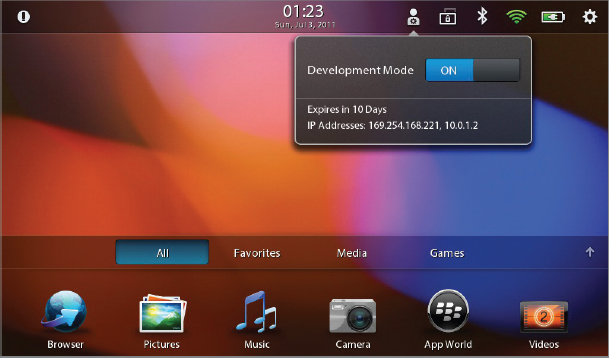
FIGURE 2-25: IP Address displayed when the Development mode is enabled and BlackBerry PlayBook is connected
- Returning to Flash Builder, within the Preferences window, click the Add button, and then in the window that opens enter the details of the BlackBerry Tablet OS device. First set the Device Name to PlayBook. Then for the Device IP and Password fields, use the values you used in steps 4 and 5. Also ensure that the Debug Host IP and Debug Token checkboxes are selected before clicking OK (Figure 2-26).
FIGURE 2-26: Details window when adding a test device for the BlackBerry Tablet OS platform
Before you complete your test device you will need to ensure the device has a debug token installed. This will enable you to run applications on your device that are not digitally signed. For this you will need to register with RIM, who will be able to send you RDK and PBDT versions of a CSJ file, both required to create your debug tokens.
The window in Figure 2-27 shows an example of the completed details you will need to provide when creating a debug token and uploading it straight to the device.

FIGURE 2-27: Details window when creating a debug token for the BlackBerry Tablet OS platform
NOTE For more information on debug tokens, I recommend reading the Running unsigned applications using a debug token article on the BlackBerry Developers website (http://docs.blackberry.com/en/developers). - Once you have completed your test device, the device name and device IP address appear in the Preferences window (Figure 2-28).
FIGURE 2-28: Preferences window with PlayBook test device created for the Hello World App on the BlackBerry Tablet OS platform
- Click OK and return to the Run Configurations window where you will see you are now able use your BlackBerry Tablet OS configuration. Click Apply to save the configuration (Figure 2-29).
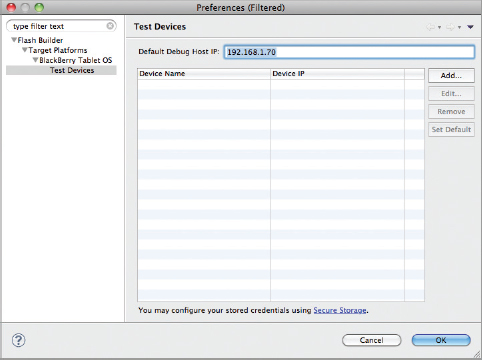
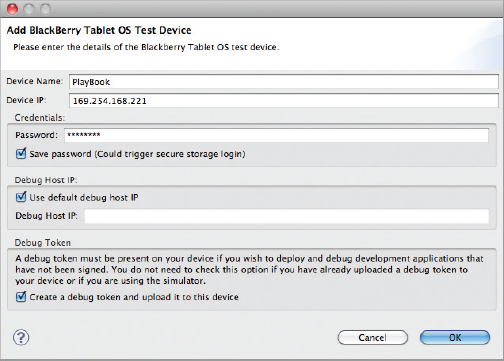
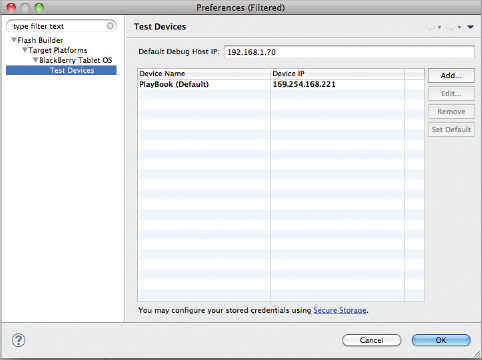
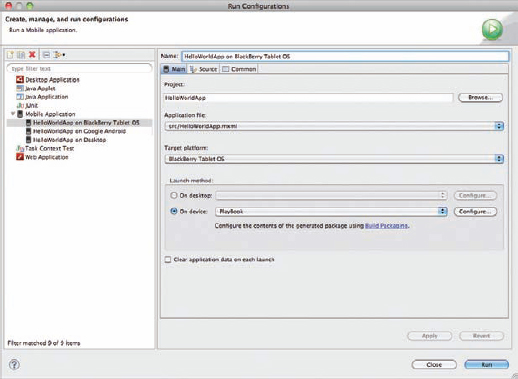
FIGURE 2-29: Run configuration for the Hello World App on BlackBerry Tablet iOS ready for launch to a USB connected device
Creating Run Configurations for Apple iOS
Next take a look at defining a run configuration for devices running on the Apple iOS platform.
- Within the Run Configurations window, click the New Launch configuration, and update the name of the configuration to HelloWorldApp on Apple iOS.
- Leave the Application File set to src/HelloWorldApp.mxml, and then for the Launch Method select On Device. For the Packaging Method select the Fast Packaging option.
Unlike the Google Android and the BlackBerry Tablet OS platforms, for Apple iOS you will have to define the package settings before the run configuration is complete. Note the error message in Figure 2-30.
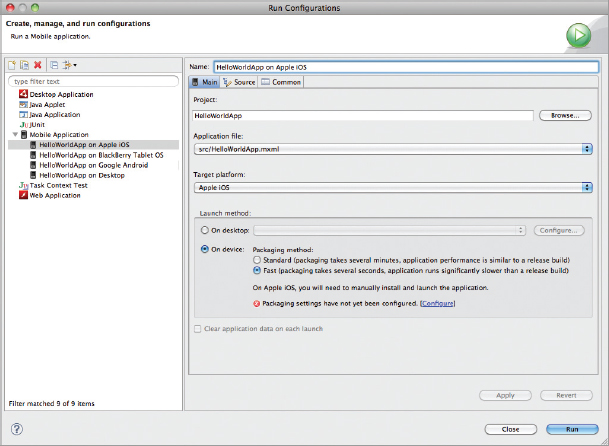
FIGURE 2-30: Creating a run configuration for the Hello World App on the Apple iOS platform
- Click the Configure link next to the error message. This will open the Packaging Properties for the project, where you will need to define the Digital Signature settings.
This requires you to obtain an Apple iOS Developer Certificate and Mobile Provisioning profile, which you will need to install on your device prior to deploying your mobile application. Before you can do this, you need to become a member of the iOS Dev Center.
The window in Figure 2-31 shows an example of the completed Digital Signature details.
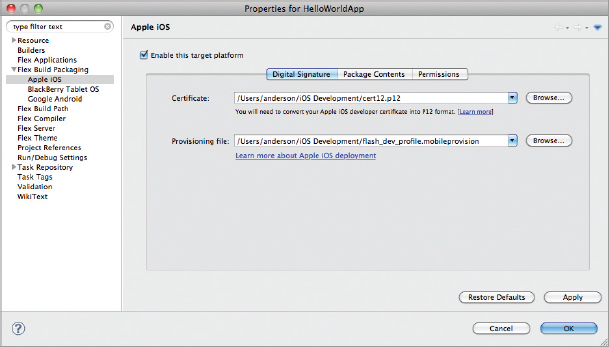
FIGURE 2-31: Properties window for the Hello World App on the Apple iOS platform, displaying paths to a developer certificate and iOS provisioning file
NOTE For more information on generating certi. cates and installing mobile provisioning profiles on your iOS device, visit the iOS Provisioning Portal at the Apple iOS Developer website (http://developer.apple.com/devcenter/ios). - Once you have completed your Digital Signature settings, you will be able to apply the run config settings for the Apple iOS device (Figure 2-32).
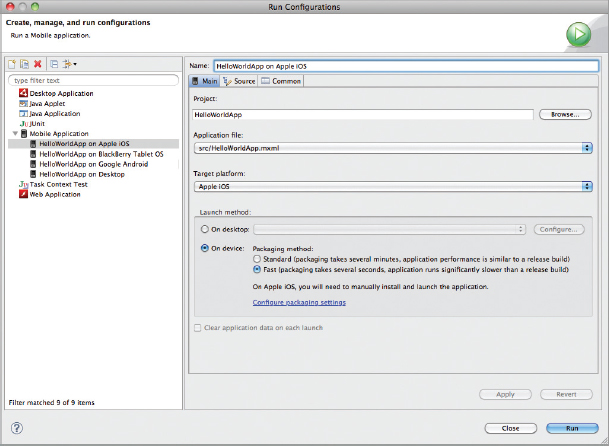
FIGURE 2-32: Run configuration for the Hello World App on Apple iOS ready for packaging
At this stage you have learned how to create configurations for running your mobile applications on a connected device. The next chapter covers building and packaging for the three mobile platforms in more detail.
SUMMARY
In this chapter you created a Flex-based mobile application using Flash Builder. Along the way you also explored the Flash Builder IDE in depth, gaining an understanding of some of the key concepts.
Over the course of the book, the Flash Builder IDE will become more and more familiar as you build on and create further examples.
You learned how to create run configurations that targeted each of the different mobile platforms supported in Flash Builder, and may have noticed the differences in how running on a Google Android is definitely the easier of the three platforms, closely followed by BlackBerry Tablet OS, and then Apple iOS. The latter two both rely on you registering with the development communities of Apple and BlackBerry, before you can get started.
In the next chapter you take a closer look at the AIR application descriptor file and building for each of the mobile platforms in more detail.
EXERCISES
- Create another desktop run configuration for the Hello World App, this time for the BlackBerry Tablet OS platform.
- Add a new <s:Button> component next to the existing Submit button that clears the text in the two input fields when clicked.
- Define a splash image for the application that displays for two seconds.
- Specify a navigational button in the Action Bar that returns the user back to the first view when clicked. Then randomize the color of the Hello World message set on the label each time the message is generated.
![]() WHAT YOU LEARNED IN THIS CHAPTER
WHAT YOU LEARNED IN THIS CHAPTER
| TOPIC | KEY CONCEPT |
| Run configurations for Apple iOS devices | Obtain a developer certificate and provisioning profile from Apple.
Define the package settings. |
| Run configurations for BlackBerry Tablet OS devices | Register with RIM for debug token details.
Create a test device profile. Enable development mode on the device. Set the IP address for the device. Connect the device via USB. |
| Run configurations for Google Android devices | Ensure USB debugging is enabled on the Google Android device.
Connect the device via USB. |