
3
Building AIR Applications for Android, BlackBerry, and iOS Devices
WHAT YOU WILL LEARN IN THIS CHAPTER:
- Setting the properties of an application descriptor file manually
- Specifying image icons for an application
- Setting permissions for Android and BlackBerry applications
- Packaging AIR applications for Android, BlackBerry, and iOS
- Updating AIR applications
In this chapter you'll take a look at some of the elements involved in constructing AIR apps, outside the task of actually coding an application.
First, you'll explore the core components of the AIR application descriptor file, understanding how to specify settings for it, covering image icon assignment, and setting Android permissions and specifying iOS settings.
You'll close the chapter by packaging a mobile application using Flash Builder, and then look at how you can update AIR applications that aren't uploaded to a target platform's marketplace.
AIR APPLICATION DESCRIPTOR FILES
An Adobe AIR application descriptor file contains parameters that are used to identify, install, and launch an AIR application.
Each new project created in Flash Builder automatically generates an AIR application descriptor file template. The AIR application descriptor file name is usually generated by the name of the application set in the Flash Builder New Project wizard, as covered in Chapter 2, in which HelloWorldApp generates HelloWorldApp-app.xml.
This section takes a look at editing an application descriptor file focusing on each of the core elements.
Setting Properties in the AIR Application Descriptor File
The AIR application descriptor file is essentially an XML file consisting of many elements that you need to specify for your mobile applications to be built. When these are packaged and then deployed to the mobile device, the installation of AIR on that device can interpret the package correctly and ascertain where to install files, write directories, and set data. Some of the elements in the application descriptor file are required, and some are optional.
In Table 3-1 you see each of the core elements used in the AIR application descriptor file for mobile applications listed.
TABLE 3-1: AIR Application Descriptor File Elements
| ELEMENT | USAGE |
| <application> | Sets the AIR namespace declaration. Required for building AIR apps. |
| <id> | A unique identity for the application. |
| <filename> | The name used for the Android Package file (APK, .apk file). |
| <name> | Sets the application name displayed on the device. |
| <versionNumber> | The version number of the application. |
| <versionLabel> | Used to display a label to users in the application's installation dialog. |
| <initialWindow> | Contains properties for the initial appearance of the application. |
| <content> | To set the path to the main content .swf file of the application. |
| <visible> | To set the visibility of the content. |
| <fullScreen> | Defines whether the application should use the entire screen of the device. |
| <aspectRatio> | To specify whether the application is in portrait or landscape mode. |
| <autoOrients> | To set whether the orientation of content in the application automatically reorients as the device changes orientation. |
| <supportedProfiles> | Defines the supported profile that best fits the type of AIR application. |
| <icon> | To specify the icon images used to launch the application. |
Manually Editing the Application Descriptor File for the Hello World App
Next you edit the contents of HelloWorldApp-app.xml, the AIR application descriptor file that can be found in the src folder of the Hello World App project from Chapter 2. Here are the steps:
- 1. First, remove the automatically generated content in the HelloWorldApp-app.xml file, as if you were creating the file from the beginning. Then begin with the <?xml> declaration, setting the version attribute to 1.0, encoding to utf-8, and standalone property to no (Listing 3-1).

LISTING 3.1: Setting the XML declaration in the Hello World App AIR application descriptor file
<?xml version="1.0" encoding="utf-8" standalone="no"?>
 NOTE When Flash Builder generates HelloWorldApp-app.xml, it will contain numerous comments for properties used for AIR desktop applications that we're not going to cover here. Nevertheless, those comments would be self-explanatory if you were to read them. Thus, clearing the contents of HelloWorldApp-app.xml will make it easier to convey some of the settings and their corresponding values.
 - 2. Add the AIR 2.7 namespace declaration in the <application> element (Listing 3-2).
Setting an ID for the Application
The recommended form for the AIR application's ID is a dot-delimited, reverse-DNS-style string, as shown in the following snippet:
<id>com.wrox.ch3.AppName</id>
![]() WARNING Each new application you install on a device should have a unique ID associated with it. If it doesn't, chances are it will override an existing application with the same ID.
WARNING Each new application you install on a device should have a unique ID associated with it. If it doesn't, chances are it will override an existing application with the same ID.
- 3. In the HelloWorldApp-app.xml file, set the <id> property for the application to com.wrox.ch3.HelloWorldApp (Listing 3-3).
Setting the Name and Filename Properties
The <name> property in the AIR application descriptor file is used for display purposes. It is the label the end user will see once the application has been installed on the user's mobile device. While the <filename> property is used for the actual file name and file path on the device, it is usually hidden from the end user's view. The value for the filename should be a string with no spaces.
- 4. In HelloWorldApp-app.xml set <filename> to HelloWorldApp and the <name> setting to Hello World App (Listing 3-4).
LISTING 3.4: Setting the Name and Filename properties in the Hello World App AIR application descriptor file
<?xml version="1.0" encoding="utf-8" standalone="no"?> <application xmlns="http://ns.adobe.com/air/application/2.7"> <id>com.wrox.ch3.HelloWorldApp</id> <filename>HelloWorldApp</filename> <name>Hello World App</name>
Setting the Application Version
The <versionNumber> property is required to identify an instance of the application installed on the device. The version number's representation should be a numerical value that incrementally changes each time an update or new release of the mobile application has been produced, since the version number can be used to distinguish between applications that have the same <id> values in their AIR application descriptor files.
Version numbers should contain three integers separated by periods, as shown in the following snippet:
<versionNumber>7.3.6</versionNumber>
The three integers represent the major, minor, and revision numbers assigned for the application's release. These usually refer to an automated build of the application. Each value should be between 0 and 999.
- 5. Returning to HelloWorldApp-app.xml, set the <versionNumber> to 0.9.0 (Listing 3-5).
LISTING 3.5: Setting the Version Number property in the Hello World App AIR application descriptor file
<?xml version="1.0" encoding="utf-8" standalone="no"?> <application xmlns="http://ns.adobe.com/air/application/2.7"> <id>com.wrox.ch3.HelloWorld</id> <filename>HelloWorldApp</filename> <name>Hello World App</name> <versionNumber>0.9.0</versionNumber>
You can also supply the version as a label via the <versionLabel> element, as shown in the following snippet:
<versionLabel>0.9.0 (BETA)</versionLabel>
The <versionNumber> is required and takes precedence over the <versionLabel>, and if <versionLabel> is not used, then the value set in <versionNumber> is displayed to users.
Setting the Supported Profile
Three values can be supplied to <supportedProfiles> for AIR applications:
- desktop: An AIR application for the desktop
- extendedDesktop: An AIR application with support for the native process API on the desktop
- mobileDevice: An AIR application for mobile devices
For AIR mobile applications, you need to set <supportedPropfiles> to the mobileDevice profile.
- 6. In HelloWorldApp-app.xml, under the <versionNumber> declaration, set the <supportedProfiles> property to mobileDevice (Listing 3-6).
LISTING 3.6: Setting the Supported Profiles property in the Hello World App AIR application descriptor file
<?xml version="1.0" encoding="utf-8" standalone="no"?> <application xmlns="http://ns.adobe.com/air/application/2.7"> <id>com.wrox.ch3.HelloWorldApp</id> <filename>HelloWorld</filename> <name>Hello World App</name> <versionNumber>0.9.0</versionNumber> <supportedProfiles>mobileDevice</supportedProfiles>
Setting the Initial Appearance
Several properties can define the initial appearance of the application when it starts up: the content path; whether the content is visible; whether it is showing full-screen; the initial screen orientation; and whether the application changes to a landscape or portrait orientation when the user rotates the device.
The <initialWindow> element of the AIR application descriptor file is what defines these properties. Here you can specify the <content>, <visible>, <fullScreen>, <aspectRatio>, and <autoOrients> elements to specify the properties for the initial appearance of the application.
In the following snippet, the HelloWorldApp.swf is specified at the <content> property, the <visible> property is set to true, <fullScreen> is set to true, <aspectRatio> is set to landscape, and the <autoOrients> property is set to false:
<initialWindow>
<content>HelloWorldApp.swf</content>
<visible>true</visible>
<fullScreen>true</fullScreen>
<aspectRatio>landscape</aspectRatio>
<autoOrients>false</autoOrients>
</initialWindow>
The last two properties set by <aspectRatio> and <autoOrients> indicate that the application will always be in landscape mode, since the application is prevented from automatically changing its orientation. Device orientation is covered in greater detail in Chapter 5.
- 7. In HelloWorldApp-app.xml, under the <supportedProfiles> declaration, add the initial window declaration setting the <content> to HelloWorldApp.swf, the <visible> property to true, the <initialOrientation> property to portrait, and the <autoOrients> property to true (Listing 3-7).
LISTING 3.7: Setting the Initial Window properties in the Hello World App AIR application descriptor file
<?xml version="1.0" encoding="utf-8" standalone="no"?> <application xmlns="http://ns.adobe.com/air/application/2.7"> <id>com.wrox.ch3.HelloWorldApp</id> <filename>HelloWorldApp</filename> <name>Hello World App</name> <versionNumber>0.9.0</versionNumber> <supportedProfiles>mobileDevice</supportedProfiles> <initialWindow> <content>HelloWorldApp.swf</content> <visible>true</visible> <fullScreen>false</fullScreen> <aspectRatio>portrait</aspectRatio> <autoOrients>false</autoOrients> </initialWindow>
Specifying Paths to Image Icons
The launch icon for an application needs to be specified before packaging. Because devices across platforms tend to have different screen resolutions, you need to be very specific about the images you reference. Thus, icon or image size needs to be carefully considered. For the Google Android and Apple iOS platforms, you set paths to the application icons in the AIR application descriptor file. For the BlackBerry Tablet OS platform, you specify the icon in the BlackBerry Tablet settings file, which will be covered in more detail later.
For the BlackBerry PlayBook, the application icon should be supplied as a single 86×86 pixel .png image file that is an image with an 86 pixel width and 86 pixel height.
On Android devices, the icon should be supplied as 36×36, 48×48, and 72×72 pixel .png file images. These icon sizes are used for low-, medium-, and high-density screens, respectively.
On the iPad, iPhone, and iPod Touch iOS devices, there are a number of different screens on the platform that require different sized icons to be packaged for an application. The following details the sizes that can be supplied and where they are used:
- 29×29: Used for the Spotlight and Settings screens of iPhone and iPod Touch devices, and also the settings screen on an iPad.
- 57×57: Used for the Home screens of iPhone and iPod Touch devices.
- 72×72: Used for the Home screen of an iPad.
- 114×114: Used for the Home screen of an iPhone with retina display (e.g., iPhone 4).
The following snippet shows the <icon> declaration in the AIR application descriptor file that specifies the path to each of the image files that can be used on Android and iOS devices:
<icon>
      <image29x29>assets/i29x29.png</image29x29>
      <image36x36>assets/i36x36.png</image36x36>
      <image48x48>assets/i48x48.png</image48x48>
      <image57x57>assets/i57x57.png</image57x57>
      <image72x72>assets/i72x72.png</image72x72>
      <image114x114>assets/i114x114.png</image114x114>
</icon>
The images are located in a folder called assets, in a folder relative to the content and main .swf file. Notice that for each image you need to use a different element in the AIR application descriptor file. For example, to specify a 72×72 pixel file image that can be used for the Home screen of an iPad and a Google Nexus One, the path to the image is specified in the <image72x72> tag.
If you do not supply an icon of a given size, the next largest size is used and scaled to fit the occupied space. For example, on a Google Android device, if the <image36x36> icon is not specified, the <image48x48> declaration is used, and if <image48x48> isn't set, the application will default to <image72x72>.
If you don't specify any of the image icons permitted, or if you incorrectly specify the path to an image, you will see a default application image icon for the application set by the OS.
![]() NOTE For the remaining chapters, the defining of properties in the AIR application descriptor file process is omitted, so you may notice when you install the examples on Android devices that the default system icon is used.
NOTE For the remaining chapters, the defining of properties in the AIR application descriptor file process is omitted, so you may notice when you install the examples on Android devices that the default system icon is used.
Figure 3-1 shows the default Google Android application icon you will see on the device in the three sizes.
Figure 3-2 shows the six application icons that will be used in the Hello World App project.
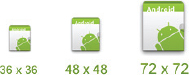
FIGURE 3-1: The default Android application icons, shown in three diff erent sizes

FIGURE 3-2: The application icons used for the Hello World App project, shown in six diff erent sizes
- 8. Ensure the six files, air36x36.png, air48x48.png, air58x58.png, air72x72.png, air86x86.png, and air114x114.png, are present in the src/assets folder of the project (Figure 3-3).
You should notice that once you've added the images and the assets folder, the bin-debug folder gets automatically replicated. Later you'll see a bin-release folder created and used for the final export of the AIR application.
- 9. Returning to the HelloWorldApp-app.xml file, under the <initialWindow> declaration, add the <icon> declaration, setting the paths to the five images, air36x36.png to <image36x36>, air48x48.png to <image48x48>, air57x57.png to <image57x57>, air72x72.png to <image72x72>, and air114x114.png to <image114x114> (Listing 3-8).
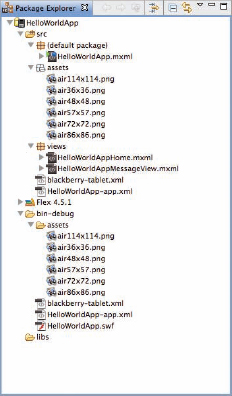
FIGURE 3-3: Package Explorer for the Hello World App project
LISTING 3.8: Setting the Icon properties in the Hello World App AIR application descriptor file
<initialWindow>
      <content>HelloWorldApp.swf</content>
      <visible>true</visible>
      <fullScreen>false</fullScreen>
      <initialOrientation>portrait</initialOrientation>
      <autoOrients>false</autoOrients>
</initialWindow>
<icon>
      <image36x36>assets/air36x36.png</image36x36>
      <image48x48>assets/air48x48.png</image48x48>
      <image57x57>assets/air57x57.png</image57x57>
Referencing the five images, as shown here, will allow application icons to be shown for both Google Android and Apple iOS.
Setting Android OS Permissions
For Android applications the security model for the OS requires that each application requests a particular permission in order to use a feature that has security or privacy implications. These permissions cannot be requested or changed at run time and so must be requested when the application is packaged in the AIR application descriptor file.
When a user installs an Android application, the operating system informs the user which permissions an application is requesting.
Android permissions are specified inside the <android> element of the AIR application descriptor file.
In the following snippet, you'll see that the android:name attribute inside the <uses-permissions> element is specified as the value android.permission.NAME, representing the full name of an Android permission.
<android>
   <manifestAdditions>
      <manifest>
         <data>
            <![CDATA[
               <uses-permission android:name=“android.permission.NAME”/>
            ]]>
         </data>
      </manifest>
   </manifestAdditions>
</android>
Each of the uses-permission statements in the AIR application descriptor file is added directly to an Android manifest document, when you target the Google Android platform in the New Flex Mobile Project wizard, as covered in Chapter 2.
The following lists some of the permissions that are required by AIR Android apps, in order for an application to use particular mobile device features:
- android.permission.ACCESS_FINE_LOCATION: Allows the application to access GPS data through the Geolocation class
- android.permission.CAMERA: Allows the application to gain access to the device's camera
- android.permission.INTERNET: Allows the application to make network requests
- android.permission.READ_PHONE_STATE: Allows the AIR run time to mute audio when an incoming call occurs
- android.permission.RECORD_AUDIO: Allows the application to access the microphone
- android.permission.WAKE_LOCK: Prevents the device from going to sleep while an application is running
- android.permission.DISABLE_KEYGUARD: Disables the key guard and stops the device from locking while an application is running
- android.permission.WRITE_EXTERNAL_STORAGE: Allows the application to write to the external memory card on the device
So, for example, to allow an application to use the camera you would use the android.permission.CAMERA Android permission, as shown in the following snippet:
<android>
   <manifestAdditions>
      <manifest>
         <data>
            <![CDATA[
               <uses-permission android:name=“android.permission.CAMERA”/>
            ]]>
         </data>
      </manifest>
   </manifestAdditions>
</android>
![]() NOTE Throughout this book different AIR application descriptor files will be in use, and depending on the application covered, the file will contain a different value for each of the settings. For instance, in Chapter 10 you need to use the ACCESS_FINE_LOCATION, CAMERA, INTERNET, and RECORD_AUDIO Android permissions.
NOTE Throughout this book different AIR application descriptor files will be in use, and depending on the application covered, the file will contain a different value for each of the settings. For instance, in Chapter 10 you need to use the ACCESS_FINE_LOCATION, CAMERA, INTERNET, and RECORD_AUDIO Android permissions.
- 10. In HelloWorldApp-app.xml, under the <icon> image settings, add an empty <android> declaration (Listing 3-9).
LISTING 3.9: Setting an empty Android permissions declaration in the HelloWorld AIR application descriptor file
<initialWindow>
      <content>HelloWorldApp.swf</content>
      <visible>true</visible>
      <fullScreen>false</fullScreen>
      <initialOrientation>portrait</initialOrientation>
      <autoOrients>false</autoOrients>
</initialWindow>
<icon>
      <image36x36>assets/air36x36.png</image36x36>
      <image48x48>assets/air48x48.png</image48x48>
      <image57x57>assets/air57x57.png</image57x57>
      <image72x72>assets/air72x72.png</image72x72>
      <image114x114>assets/air114x114.png</image114x114>
</icon>
<android>
      <manifestAdditions>
            <![CDATA[
                  <manifest/>
Defining iOS Capabilities
For iOS, you set application settings inside the <iPhone> element of the AIR application descriptor file.
Setting Info Additions
There are a numerous key-value pairs that define particular settings for your application running on iOS. These need to be set within the child element <InfoAdditions>. The following lists commonly used keys and some of their associated values:
- UIApplicationExitOnSuspend: A string that when set to <true/> will exit the application completely and not just suspend it.
- UIDeviceFamily: An array of strings defining the type of iOS device that the application should run on. A value of 1 specifies iPhone and iPod Touch devices, whereas a value of 2 specifies iPad.
- UIPrerenderedIcon: A string that when set to YES will remove the default gloss applied to the application's launch icon on iOS devices.
- UIRequiredDeviceCapabilities: An array of strings listing the device capabilities that are required in order for the application to be installed. Possible values include:
- accelerometer
- auto-focus-camera
- camera-flash
- gps
- location-services
- microphone
- sms
- still-camera
- telophony
- video-camera
- wifi
- UIRequiresPersistentWifi: A string that when set to YES requires the device to have a Wifi connection open for the length of duration the application is running; otherwise, it will close after 30 minutes.
- UIStatusBarStyle: A string determining how the status bar at the top of an iOS device will appear. A value of UIStatusBarStyleBlackOpaque means the status bar will not be clear; a value of UIStatusBarStyleDefault uses the iOS default grey status bar; and a value of UIStatusBarStyleBlackTranslucent sets the status bar to black with an alpha of 0.5.
Setting iOS Screen Resolution
Setting the <requestedDisplayResolution> to high allows you to specify that the application should utilize the full 940 x 640 retina display. This should be set when you want to target iPhone 4, as shown in the following snippet:
<requestedDisplayResolution>high</requestedDisplayResolution>
By default, this property is set to standard, which means the device screen will appear to your application as a standard resolution screen of 480 x 320. The application will try to adapt and upscale a single pixel in standard mode to four equivalent pixels on the high-resolution screen, giving a blurred appearance.
On non-high resolution iOS devices, if the <requestedDisplayResolution> property is set to high, the value is ignored and the application defaults to the standard setting.
- 11. Returning to the AIR application descriptor file, add the iOS capabilities for the application running on an iPhone 4 under the <android> manifest declaration (Listing 3-10).
LISTING 3.10: Setting iOS capabilities for the Hello World App in the AIR application descriptor file
<icon> <image36x36>assets/air36x36.png</image36x36> <image48x48>assets/air48x48.png</image48x48> <image57x57>assets/air57x57.png</image57x57> <image72x72>assets/air72x72.png</image72x72> <image114x114>assets/air114x114.png</image114x114> </icon> <android> <manifestAdditions> <![CDATA[ <manifest/> ]]> </manifestAdditions> </android> <iPhone> <InfoAdditions> <![CDATA[ <key>UIDeviceFamily</key> <array> <string>1</string> </array> <key>UIStatusBarStyle</key> <string>UIStatusBarStyleBlackTranslucent</string> <key>UIPrerenderedIcon</key> <string>YES</string> ]]> </InfoAdditions> <requestedDisplayResolution>high</requestedDisplayResolution> </iPhone> - 12. Lastly, save the file as HelloWorldApp-app.xml.
You've now covered each of the settings required for a valid AIR application descriptor file to run on Google Android and Apple iOS devices. Later you'll you'll take a look at exporting a release package for the application, using this descriptor file via Flash Builder. In the final section on updating AIR applications you also reference several values saved to the file, in particular the <versionNumber> property. Next take a look at the configuration settings required for BlackBerry Tablet OS.
BlackBerry Tablet OS Configuration
The configuration settings for BlackBerry Tablet OS are found in the blackberry-tablet.xml file, which is generated when you choose to include the BlackBerry Tablet OS as a target platform during project setup. In this file you can specify a number of settings and permissions, which are used in addition to the AIR application descriptor file settings and permissions.
QNX is the platform on which the BlackBerry Tablet OS is based. By default, the XML file simply has an <?xml> declaration and an empty <qnx/> node:
<?xml version="1.0" encoding="UTF-8"?>
<qnx/>
The <qnx> element must have nested elements defined to set the appearance and behavior of the application on the device. The following code snippet shows an example of a configuration file:
<?xml version="1.0" encoding="UTF-8"?>
<qnx>
      <author>jganderson</author>
      <authorId>gYAAgFbt6rihu</authorId>
      <category>core.media</category>
      <buildId>1</buildId>
      <platformVersion>1.0.0.0</platformVersion>
      <icon>
            <image>i86x86.png</image>
      </icon>
      <splashscreen>s600x1024.jpg:s1024x600.jpg</splashscreen>
      <permission>access_internet</permission>
</qnx>
The following sections cover each of the core elements.
Setting the Author and Author Id
The <author> and <authorId> values need to match the values specified in the debug token generated for the device.
Setting the Build Id and Platform Version
The <buildId> is a value that represents an incremental build number for your application, which needs to be a whole number. It is combined with the <versionNumber> element of the AIR application descriptor file, which holds the (Major).(Minor).(Revision) values, and represents the build portion of a full version number reference in (Major).(Minor).(Revision).(Build).
The <platformVersion> is the minimum version of the BlackBerry Tablet OS required to run the application. If this number exceeds the number on the device, it won't install.
The following snippet gives an example of how both these elements should be set:
<buildId>1</buildId>
<platformVersion>1.0.6.2390</platformVersion>
Note that the 1.0.6.2390 value specified for the <platformVersion> here is the version of the BlackBerry Tablet OS that had AIR version 2.7.0195 installed.
Setting the Category
On a BlackBerry PlayBook device, there are four categories in which you'll find applications: All, Favorites, Media, and Games.
Every applications installed on the PlayBook appears under the All category. Setting the <category> field in the settings file also allows you to add the application's launch icon to either the Media or Games categories. Specifying core.games adds the application to Games, while setting to core.media adds the application to the Media section, as shown in the following snippet:
<category>core.media</category>
This configuration setting is optional.
Setting the Application Icon
As previously mentioned, you need to define only one application icon in the configuration file for the BlackBerry PlayBook, which needs to be 86px width by 86px height. This is specified as shown in the following snippet:
<icon>
      <image>assets/i86x86.png</image>
</icon>
This configuration setting is also optional.
![]() WARNING The list of icons specified in the AIR application descriptor file override the icon set in the BlackBerry Tablet Settings file. To use your 86×86 icon set in the BlackBerry Tablet settings file, you need to remove those specified in the AIR application descriptor.
WARNING The list of icons specified in the AIR application descriptor file override the icon set in the BlackBerry Tablet Settings file. To use your 86×86 icon set in the BlackBerry Tablet settings file, you need to remove those specified in the AIR application descriptor.
Setting the Permissions
The following lists some of the permissions that need to be added in the configuration settings, in order for an application to use particular device features on BlackBerry Tablet OS:
- access_internet: Allows the application to make network requests
- access_shared: Allows the application to access files and grants access to the file system on the device
- play_audio: Allows the application to access the device PIN and serial number
- read_geolocation: Allows the application to access GPS data through the Geolocation class
- record_audio: Allows the application to access the microphone
- set_audio_volume: Allows the application to control the device's native volume controls
- use_camera: Allows the application to gain access to the device's camera
Permissions are set through the either the <permission> or <action> element of the BlackBerry Tablet OS configuration file.
The following snippet shows how to allow an application to use network services and access GPS data:
<permission>access_internet</permission>
<permission>read_geolocation</permission>
Like with the Google Android platform, permissions can be automatically added to the configuration file when you target the BlackBerry Tablet OS in the New Flex Mobile Application wizard, as covered in Chapter 2.
These configuration settings are optional, but bear in mind if they are not set, you may run into issues not being able to use particular features in your applications.
Setting the Splash Image
While the application is loading you can display an image, known as the splash screen image.
The application can potentially run in both landscape and portrait orientation, so you are able to specify a value representing two images in the <splashscreen> element.
The screen size of the BlackBerry PlayBook is 1024 x 600. In the following snippet, you see the value for <splashscreen> is separated by a colon (:). The first image path, s1024x600.jpg, before the colon, represents the splash image to be shown when the application is in a landscape orientation. The second image path following the colon, s600x1024.jpg, represents the splash image to be shown when the image is in a portrait orientation.
<splashscreen>s1024x600.jpg:s600x1024.jpg</splashscreen>
If only a single image is specified, the device will default to that image, regardless of the size. Remember, though, setting the <autoOrients> and <initialOrientation> properties in the AIR application descriptor file will allow you to control the orientation of the application on launch; so, you could potentially get away with setting one splash image in a situation where your application will only use one orientation.
Also be aware that a splash screen image can also be specified for Flex mobile applications in the main application file. In the following code snippet you see a splash .png image is set to display for 5 seconds before the application launches:
<?xml version="1.0" encoding="utf-8"?>
<s:ViewNavigatorApplication xmlns:fx="http://ns.adobe.com/mxml/2009"
                            xmlns:s="library://ns.adobe.com/flex/spark"
                            firstView="views.HelloWorldAppHome"
                            splashScreenImage="@Embed('assets/splash.png')"
                            splashScreenMinimumDisplayTime="5000"
                            splashScreenScaleMode="none">

</s:ViewNavigatorApplication>
If this were to be set in addition to the <splashscreen> setting, you would have two splash images displayed, with the BlackBerry Tablet OS splash image showing first.
Before moving onto the next section, ensure the blackberry-tablet.xml file for the Hello World App project is updated with the configuration settings specified in Listing 3-11.
LISTING 3.11: Configuration settings for the Hello World BlackBerry Tablet OS Configuration File
<?xml version="1.0" encoding="UTF-8"?>
<qnx>
      <author>authorName</author>
      <authorId>authorId</authorId>
      <category>core.media</category>
      <buildId>1</buildId>
      <platformVersion>1.0.0.0</platformVersion>
      <icon>
            <image>assets/air86x86.png</image>
      </icon>
</qnx>
Note that in Listing 3-11 you will need to replace authorName and authorId with your own values for deploying to a device that has a debug token installed.
Packaging for Google Android
Using Flash Builder, you can package native AIR Android applications via the Export Release Build panel.
Packaging applications requires you to use self-signed digital certificates, which associate the application with an identity, with the aim of forging a trust between the application's creator and an end user. A few of the following steps will reference the creation of a self-signed digital certificate for use with packaging an AIR Android application.
The native application file package for Android is a .apk file. At the end of this section, you should be able to install the Hello World App onto an Android device.
- In Flash Builder, returning to the HelloWorldApp-app.xml file, ensure that only the image paths required for displaying application icons on devices running the Google Android platform are set (Listing 3-12).
- Ensure the Hello World App project is highlighted, and then select File
 Export to open the Export panel (Figure 3-4).

FIGURE 3-4: Selecting the Export option from the File menu in Flash Builder
- In the Export panel that opens, select Flash Builder Release Build (Figure 3-5).
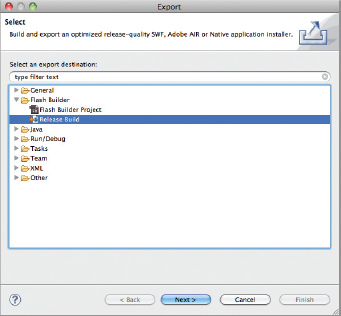
FIGURE 3-5: Selecting the Release Build option from the Export panel in the Hello World App project
- Click Next. In the Export Build Release panel that opens, you should see that the Project, Application, and Base filename settings have been pre-populated with the HelloWorldApp, with the Application field automatically set to HelloWorldApp.mxml. For the Target platforms section, ensure that Google Android is selected and uncheck both Apple iOS and BlackBerry Tablet OS options. For the Export section, leave the Export to folder field blank, as the .apk file package will be created in the project folder. Leave the Base filename field as HelloWorldApp (Figure 3-6).
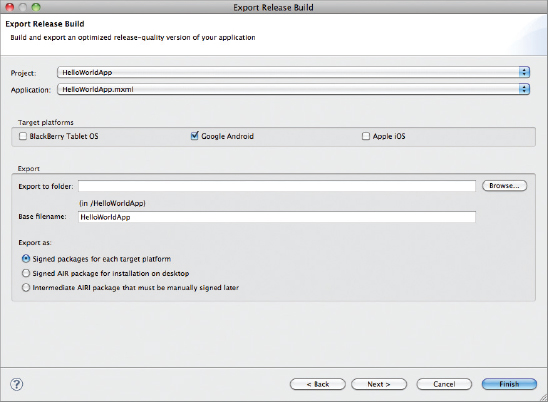
FIGURE 3-6: Setting the details of the Export Release Build for the Hello World App project targeting Google Android
- Still within the Export Release Build panel, click Next. You should see the Exporting release progress status to the bottom of the panel, before being presented with the Packaging Settings. Here you will see Google Android listed as one of the device platforms to the left in the Target platforms area. This panel also contains three tabs. The first is the Digital Signature tab where you can see the Target platforms and specify a Certificate and Password for the packaging. The second is the Package Contents tab, which allows you to see each of the files that will be packaged in the AIR application. The third is the Deployment tab, which allows you to specify whether the application should be installed on the device. Note that there is a No certificate selected error highlighted in the panel at this stage (Figure 3-7).
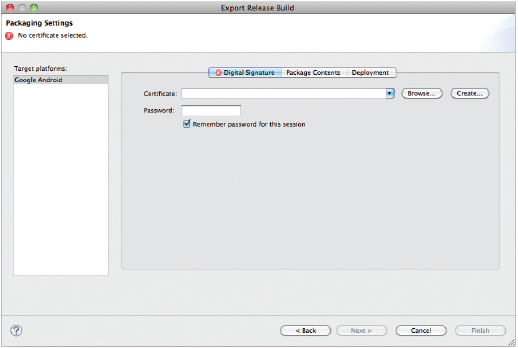
FIGURE 3-7: Displaying the Digital Signature tab for the Hello World App project targeting Google Android
- In the Digital Signature section, create a certificate by clicking the Create button. Then in the Create Self-Signed Digital Certificate panel that opens, enter some details for the Publisher Name, Organizational Unit, and Organization Name. Select the Country, and then enter and confirm a password. Leave the Type selection as 1024-RSA. Save the file as helloWorldCert (Figure 3-8).
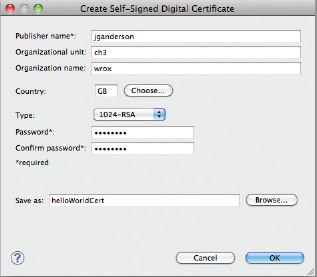
FIGURE 3-8: Creating a Self-Signed digital certificate for the Hello World App project targeting Google Android
- Click the OK button. This will create the helloWorldCert.p12 file. By default, the certificate will be located in the default project workspace for Adobe Flash Builder 4.5, although you can specify an alternative location. After the file is generated, you will be returned to the Digital Signature panel. Complete the section by entering the password that you set for the certificate (Figure 3-9).
FIGURE 3-9: Displaying the completed Digital Signature tab in the Export Release Build panel for the Hello World App project targeting Google Android
- Select the Package Contents tab. Here you should see each of the files that will be packaged in the AIR application installer. Ensure all the items are selected. This should include the application descriptor HelloWorldApp-app.xml, and HelloWorldApp.swf, and the assets folder containing the application icons. These are essentially all the files that are needed by the application (Figure 3-10).
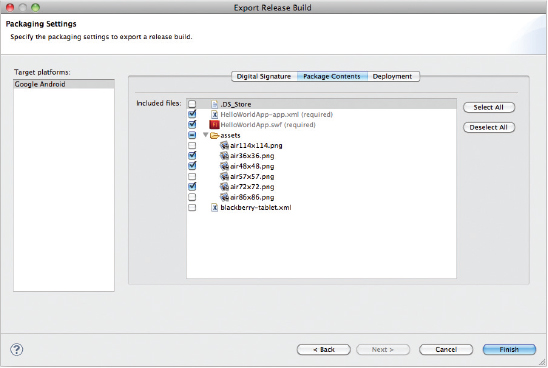
FIGURE 3-10: Displaying the package contents in the Export Release Build panel for the Hello World App project targeting Google Android
- Select the Deployment package and ensure that the option for Install and launch application on any connected device is selected. Here you can also define the Application Store settings. So, if you plan on deploying an application to the Android Market or the Amazon Appstore, you can provide those users who download your application, who don't have the correct version of AIR installed, a URL to obtain the version from the relevant Application Store (Figure 3-11).
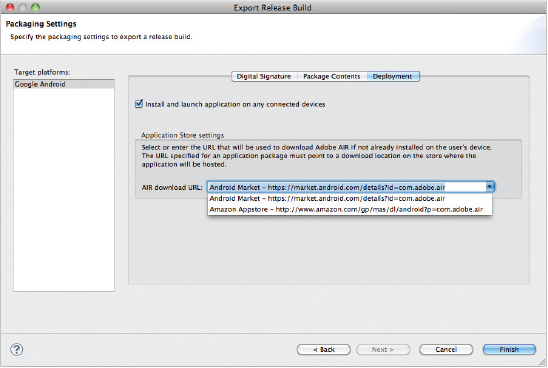
FIGURE 3-11: Displaying the Deployment settings in the Export Release Build panel for the Hello World App project targeting Google Android
- Click the Finish button to finally create the .apk file. At this point, if you had selected the checkbox for automatic deployment, Flash Builder will attempt to automatically install the application onto the device, but only if it is connected via USB. When the publishing is complete, you'll get a message indicating that the application was successfully packaged, but no connected devices were found (Figure 3-12).
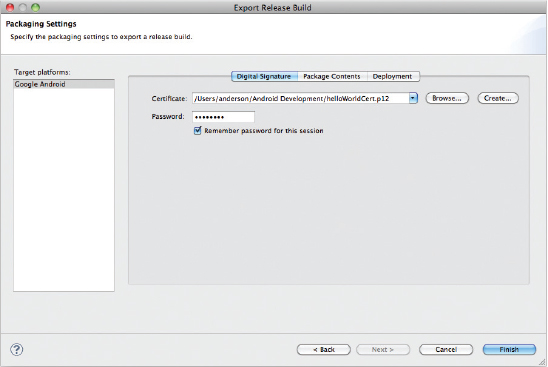
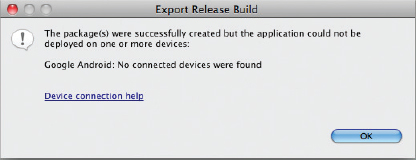
FIGURE 3-12: Confirmation of a successful export release build for the Hello World App targeting Google Android
As you will see in Figure 3-13, the newly generated HelloWorldApp.apk file will be located alongside the project's src folder. You may also see a new folder called bin-release, which contains all the files for the package.
If you have an Android device, try connecting it to Flash Builder via USB and then use the export release function to install the application onto the device. Figure 3-14 shows the app installed on the home screen.
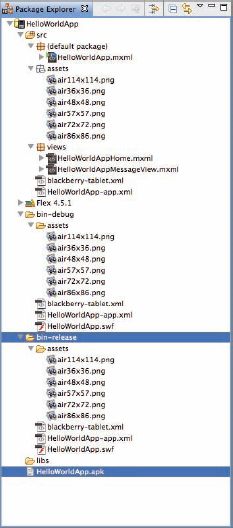
FIGURE 3-13: Package Explorer highlighting the HelloWorldApp.apk file generated for the Hello World App project targeting Google Android
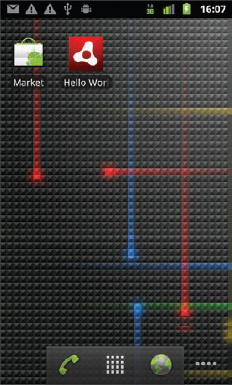
FIGURE 3-14: Hello World App on the home screen of a Google Nexus One running Android 2.3.4
Packaging for Apple iOS
The native application file package for the Apple iOS platform is an .ipa file. At the end of this section, you should be able to install the Hello World App onto an iPhone 4.
Follow the next steps to create a release version of Hello World App using Flash Builder:
- Returning to the HelloWorldApp-app.xml file, ensure that only the image paths required for displaying application icons on devices running the Apple iOS platform are set (Listing 3-13).
- Ensure the Hello World App project is highlighted. Select Project Export Release Build..., to open the Export Release Build panel. Then select Apple iOS as the Target Platform, and ensure the Signed packages for each target platform option is selected in the Export as list (Figure 3-15). Click Next.

FIGURE 3-15: Setting the details of the Export Release Build for the Hello World App project targeting Apple iOS
- In the Digital Signature tab, ensure the Certificate, accompanying Password and Provisioning file have been specified correctly. Then in the Package type field you have the option of Ad hoc package for limited distribution, or Final Release Package for Apple App store. Select Ad hoc (Figure 3-16).
FIGURE 3-16: Displaying the completed Digital Signature tab in the Export Release Build panel for the Hello World App project targeting Apple iOS
- Select the Package Contents tab and ensure each of the required project files are selected, including each of the application icons specified for iOS, and then click Finish to create the .ipa file (Figure 3-17).
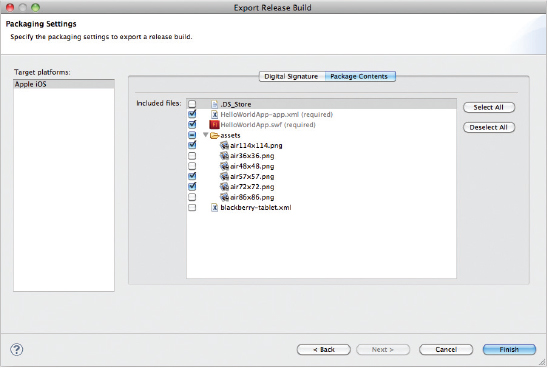
FIGURE 3-17: Displaying the package contents in the Export Release Build panel for the Hello World App project targeting Apple iOS
- In the Package Explorer, you should see the .ipa file located in the root project folder. This should be named HelloWorldApp.ipa (Figure 3-18).
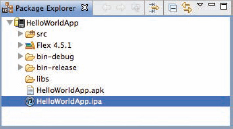
FIGURE 3-18: Package Explorer highlighting the HelloWorldApp.ipa file generated for the Hello World App project targeting Apple iOS
- Double-click the newly created .ipa file. This should open iTunes and install the application into the local library (Figure 3-19).
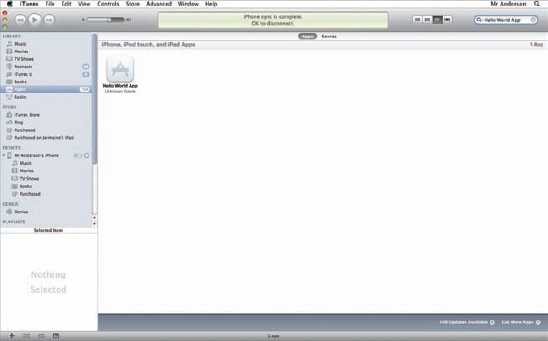
FIGURE 3-19: iTunes displaying the Hello World App installed in the Library
NOTE At this stage, you will probably notice that the application icon for ITunes doesn't have an icon. In the AIR application descriptor file, you will need to specify an image that is 512x512 for the <image512x512> property. - Before transferring the application to an iPhone 4, you will need to connect the device to the computer via USB. Then simply drag and drop the application from the Library to your iPhone (Figure 3-20). The iPhone will display a “sync in progress” status while the application is installing on the device, before revealing the Home screens.
- Navigate through your Home screen on the device to find the Hello World App is installed, with the correct application icon displayed, ready for launch (Figure 3-21).
You can also navigate to the Spotlight screen and search for the Hello World App and find the application there, too (Figure 3-22).
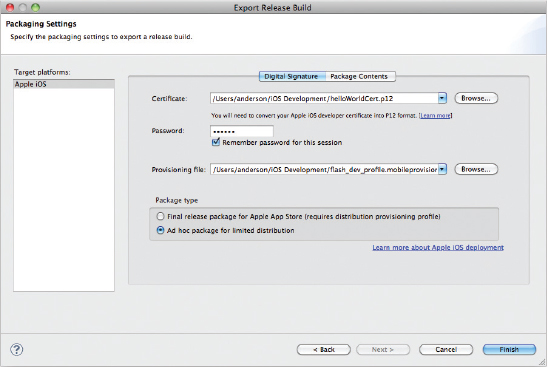
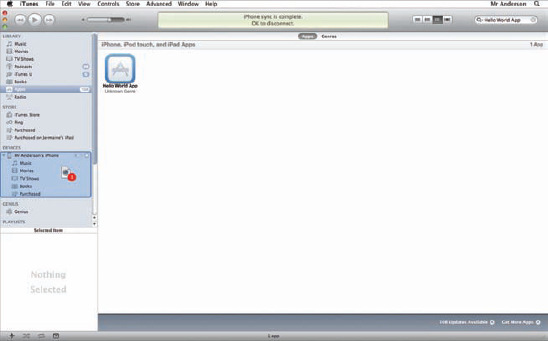
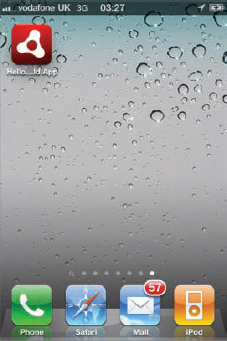
FIGURE 3-21: Hello World App on the home screen of an iPhone 4 running iOS 4.3.3
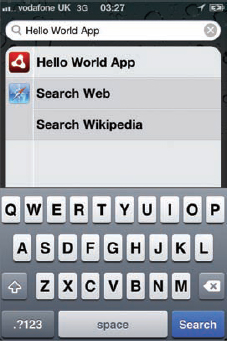
FIGURE 3-22: Spotlight search screen listing the Hello World App on an iPhone 4 running iOS 4.3.3
At this point, realize that the settings defined in the AIR application descriptor file for iOS, while subtle, are significant. If you remember setting the <UIPrerenderedIcon> to YES earlier, then take notice of the gloss that was removed from the default setting, as shown in Figure 3-23.
Also, if you have already run the application on the iPhone 4 without making the changes in this chapter, you will see the difference from the previous chapter — that the <requiredDisplayResolution> setting has made in fully utilizing the screen resolution. Figures 3-24 through 3-26 show the Hello World App in action.
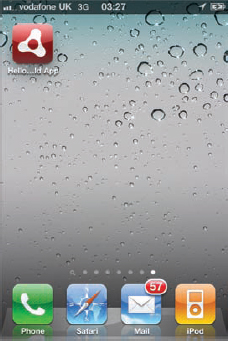
FIGURE 3-23: Default Hello World App icon with no gloss removed on an iPhone 4 running iOS 4.3.3

FIGURE 3-24: Hello World App on an iPhone 4 with iOS 4.3.3
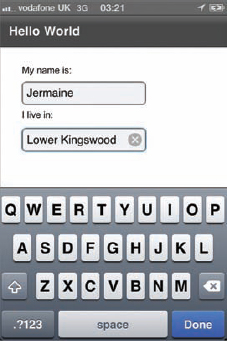
FIGURE 3-25: Entering information using the native keyboard in the Hello World App, running on an iPhone 4 with iOS 4.3.3
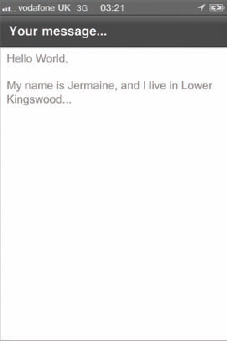
FIGURE 3-26: Message screen in the Hello World App running on an iPhone 4 with iOS 4.3.3
For the remaining chapters, you will need to repeat the steps learned here to package applications for iOS devices.
Packaging for BlackBerry Tablet OS
The native application file package for BlackBerry Tablet OS is a .bar file. At the end of this section, you should be able to create a release package for the Hello World App onto a BlackBerry PlayBook.
Follow the next steps to create a release version of Hello World App for the BlackBerry PlayBook using Flash Builder:
- In HelloWorldApp-app.xml, remove any image references for the application icon. This should be set in the blackberry-tablet.xml file (Listing 3-14).
- Ensure the Hello World App project is highlighted, then select Project Export Release Build..., to open the Export Release Build panel. Select BlackBerry Tablet OS as the Target Platform, and ensure the Export as a signed packages for each target platform option is selected. Click next (Figure 3-27).

FIGURE 3-27: Setting the details of the Export Release Build for the Hello World App project targeting BlackBerry Tablet OS
- In the Digital Signature tab, ensure the Enabling digital signing option has been selected. You will need to have created a debug token and a BlackBerry Tablet OS certificate, as highlighted in Chapter 2 (Figure 3-28).
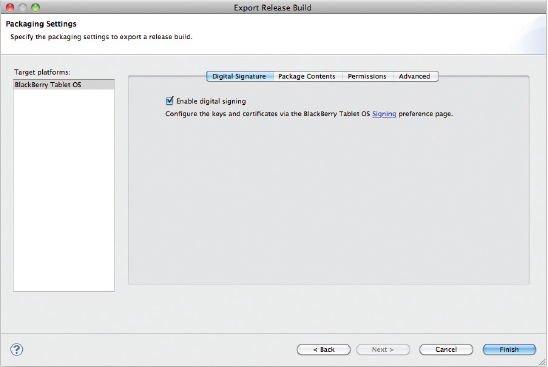
FIGURE 3-28: Enabling the digital signing for the Hello World App project targeting BlackBerry Tablet OS
- In the Package Contents tab, ensure each of the required project files are selected. These should include the BlackBerry Tablet OS configuration file and the 86 x 86 application icon.
- For the Permissions tab and the Advance tab, leave the default settings untouched. Here you would need to specify the permissions, as covered earlier. For the Hello World App, there are no permissions that need to be specified, so leave all the options unselected.
- Click Finish to create the .bar file. In the Package Explorer, you should see the .bar file located in the root of the project folder, named HelloWorldApp.bar (Figure 3-29).
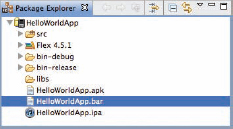
FIGURE 3-29: Package Explorer highlighting the HelloWorldApp.bar file generated for the Hello World App project targeting BlackBerry Tablet OS
Figure 3-30 shows the Hello World App installed on the BlackBerry PlayBook under the Media category.
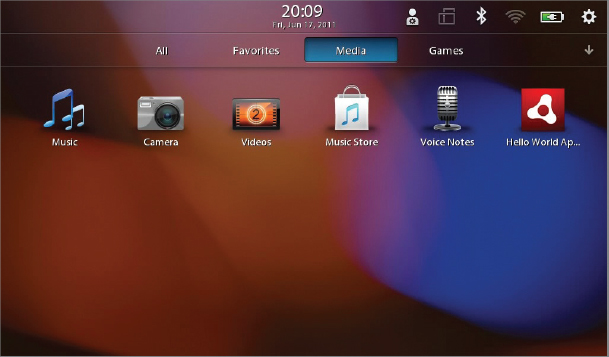
FIGURE 3-30: Hello World App on the home screen of a BlackBerry PlayBook running BlackBerry Tablet OS 1.0.6.2390
UPDATING AIR APPLICATIONS
In this chapter, you've explored targeting each of the platforms supporting AIR mobile applications. For more information, I recommend visiting each platform's Mobile and Devices Developer Center page on Adobe's website:
- Google Android: www.adobe.com/devnet/devices/android.html
- Apple iOS: www.adobe.com/devnet/devices/ios.html
- BlackBerry Tablet OS: www.adobe.com/devnet/devices/blackberry.html
Updating your application involves your amending the <versionNumber> value in the application descriptor file, repackaging the application to the native platform, and uploading the new version of the application to the target marketplace. For Android, this is the Android Market or Amazon Appstore; for BlackBerry, it's AppWorld; and for Apple, it's App Store.
The process of updating an application installed on a device is simple enough for marketplaces and usually the process is automatic. However, when you download a mobile application from the Android marketplace, you can select whether or not to have automatic updates, where you will be notified when an updated version is available. The user could potentially decide to avoid using the marketplace to grab the update, choosing to manually check for new versions. In this scenario, there is a way you can notify users within an application that there is an upgrade available, when they haven't requested automatic updates.
Retrieving Details from the Application Descriptor File
Presenting a user with an update notification in the mobile app involves adding code to your application that uses namespaces to retrieve the descriptor file details and then compares those details with a reference to the new version.
The first step is to programmatically retrieve the version number from the application descriptor file. The following snippet shows how to use the NativeApplication class to retrieve an AIR application's descriptor file and assign the applicationDescriptor property to a variable called xmlObj of XML type:
var xmlObj:XML = NativeApplication.nativeApplication.applicationDescriptor;
Once the application descriptor's XML has been assigned to the variable, the Namespace class can be used to retrieve particular values in the XML file, as shown in the following snippet, where the application id and version number are retrieved and assigned to variables id and currentVersion respectively:
var xmlObj:XML = NativeApplication.nativeApplication.applicationDescriptor;
var ns:Namespace = xmlObj.namespace();
var appId:String = xmlObj.ns::id;
var currentVersion:String = xmlObj.ns::versionNumber;
As previously mentioned, to create an updated release version of your mobile application you will need to update the version number in the application descriptor file.
Using the Version Number
Using the preceding code snippet, the application can check the value of the version number and present the user with a message to indicate there is an update available.
In the following snippet the variable newVersion is assigned the value 1.0.1, a number that represents the new version number for an application. This should be different from the value retrieved from the one present in the application descriptor; you'll recall that earlier, the <versionNumber> property was set to 0.9.0:
var xmlObj:XML = NativeApplication.nativeApplication.applicationDescriptor;
var ns:Namespace = xmlObj.namespace();
var appId:String = xmlObj.ns::id;
var currentVersion:String = xmlObj.ns::versionNumber;
var newVersion:String = "1.0.1";

if(currentVersion != newVersion)
{
      // The version numbers are not the same...
      // Present the user with an update...

} else {

      // The version numbers are the same...
      // No need to present the user with an update...
}
Here the if statement uses the currentVersion value, retrieved from the descriptor file, and checks that number against the value held by the newVersion variable.
The code within the if statement is simply a comment which indicates what can be done.
Essentially the newVersion number should be retrieved from a file residing on a server which can be updated whenever a new release of the application is available.
For this you would have to use the URLLoader class to load in the data from a file on the server. Working with data is covered in detail in Chapter 8.
SUMMARY
This chapter took a detailed look at building applications that target the Google Android, BlackBerry Tablet OS, and Apple iOS platforms, noting the contents of the AIR application descriptor file, specifying the image icons, setting Android and BlackBerry permissions, and packaging applications.
In the next chapter, you will look at touch, multitouch, and gestures, some of the key features introduced in Flash Player 10.1.
Once you have completed some of the following chapters, you may want to return here to package some of the example applications using the steps listed in the walk-through.
EXERCISES
- Package another AIR Android application using the Flash Builder, this time changing some of the initial viewing options. For example, instead of using portrait for the <aspectRatio> try using landscape to see the effect.
- Create and package your own .png file icon for the Hello World App application.
- Try packaging each of the examples found in the later chapters.
![]() WHAT YOU LEARNED IN THIS CHAPTER
WHAT YOU LEARNED IN THIS CHAPTER
| TOPIC | KEY CONCEPT |
| AIR application descriptor files | Be aware of each of the required elements in the AIR application descriptor file. |
| Application IDs | Use reverse-DNS style strings to uniquely identify your application via the Application ID — for example, com.wrox.ch3.HelloWorldApp. |
| Application's initial appearance | To define the initial appearance of the application when it launches, define the <initialWindow> element.
Use the <content>, <visible>, <fullScreen>, <aspectRatio>, <initialOrientation>, and <autoOrients> elements to set the initial appearance of the application. |
| Launch icons | To set an application's icons, define the <icon> element.
Three image sizes are used on Android: 36x36, 48x48, and 72x72. Five image sizes are used across Apple iOS devices: 29x29, 57x57, 72x72, and 114x114, and 512x512. One image size is used on BlackBerry Tablet OS: 86x86. |
| Platform configurations | For the Google Android platform, define the configuration settings within the <android> element of the AIR application descriptor file.
For the Apple iOS platform, define the configuration settings within the <iphone> element. For the BlackBerry Tablet OS platform, define the configuration settings within the <qnx> element of the blackberry-tablet.xml file. |
| Setting permissions | For Google Android, define the <uses-permission> element to manually define each permission that your application uses.
For BlackBerry Tablet OS, define the <permissions> element in the blackberry-tablet.xml file to manually define each permission that your application uses. For Apple iOS, no permissions are defined. |
| Packaging applications | In Flash Builder, use the Export Release Build Panel to generate release packages.
The Google Android platform uses an .apk file package. The Apple iOS platform uses an .ipa file package. The BlackBerry Tablet OS uses a .bar file package. |
| Updating AIR mobile applications | Use the NativeApplication class to retrieve details from the AIR application descriptor file.
Use the <versionNumber> property as an indicator to decipher whether the user needs to be informed of an upgrade. |