
7
Working with the Filesystem
WHAT YOU WILL LEARN IN THIS CHAPTER:
- Creating File and FileStream objects
- Resolving file object paths
- Modifying files and directories
- Using browse dialogs
This chapter takes a look at the AIR File System API in depth, again using Flash Builder to take you through related examples. These will help you to build applications that can create or utilize existing data on a user's mobile device, whether that data is an MP3 file found in the device's native media library, or an image file referenced from the photo gallery.
The key aspect of the API is getting to understand the filesystem, learning how to resolve paths to files, and containing folders on the device. This chapter looks at all this in depth.
![]() WARNING For security reasons the AIR File System API is restricted for use in non-browser Flash applications. Bear this in mind if you intend to create browser-based Flash mobile applications. In addition, Google Android and BlackBerry Tablet OS devices require users to grant usage of certain security levels when using the API.
WARNING For security reasons the AIR File System API is restricted for use in non-browser Flash applications. Bear this in mind if you intend to create browser-based Flash mobile applications. In addition, Google Android and BlackBerry Tablet OS devices require users to grant usage of certain security levels when using the API.
Over the course of this chapter you'll construct a simple example running the majority of features.
READING FROM THE FILESYSTEM
To utilize the filesystem within your Flash mobile applications on a mobile device using AIR, you first need to familiarize yourself with the core classes involved in the API, and pay particular attention to how one points to files and directories in the filesystem.
The File and FileStream Classes
The File and FileStream classes are the key classes that you can use to gain access to the filesystem data on the mobile device using AIR. Both files are located in the flash.filesystem package.
To use the File class in an ActionScript Mobile project, you need to import the class using the following statement:
import flash.filesystem.File;
Similarly, to use the FileStream class in an AS project, you need to import the class using the following statement:
import flash.filesystem.FileStream;
Using Flash Builder with the Flex framework and AIR doesn't require you to import the class in this way. The Files Explorer project therefore doesn't have either of these statements. Bear this in mind when you create your other projects.
The File class provides reference points to information about files and file directories, also giving you the methods to create, modify, and delete files or file directories. The FileStream class provides you with the methods to open, read, write, and modify files on the filesystem.
The File Object
A File object has a number of properties that should uniquely distinguish it from another file object on the filesystem. These properties include:
- url: An absolute reference to a file object on the device
- nativePath: A reference to the file object's path on the device
- name: A string representing the file object's name
- creationDate: A string containing the creation date of the file object, relative to GMT
- modificationDate: A string detailing the last time the file object was modified
- exists: A Boolean that indicates whether the file object exists
- size: A number returning the actual size of the file object
- spaceAvailable: A string representing the total space available on the filesystem in which the file object resides
- creator: A string representing the creator of the file object
- type: A string returning the type of file object
- extension: A string returning the file extension of the file object
- isDirectory: A Boolean that indicates whether or not the file object reference is a directory
- isHidden: A Boolean that indicates whether or not the file object is hidden
- isPackage: A Boolean that indicates whether or not the file object is a package
- parent: Returns a reference to a file object in which the current file or directory resides
You should be familiar with the majority of these properties as entities on your home computer. The modification date is a property of a file used frequently to see when a file was last saved. Looking at the properties, you can easily identify a file object by its name, whether it is a file or a directory, its size, the creation or modification dates, and URL paths.
Next take a look at the different ways in which you can create file objects using AIR.
Creating File Objects from the URL Path
The nativePath and url properties of the file object are references that point to a file object's location on the mobile device.
There are three URL schemes that are supported which can be used to create file objects via the File class constructor: app:/; app-storage:/; and file://.
In the following code snippet the file:// URL scheme is used to create a File object fileObj that attempts to point to Notes, a folder contained in the Documents directory on the filesystem:
var fileObj:File = new File("file:///documents/notes");
The way this file object is created could potentially pose a few problems for cross-platform compatibility and running the app on devices with different mobile operating systems. How does the mobile application know that the Documents or Notes directories exist on a device? And is the file path URL format recognized by the device?
If you don't know whether the file object created is present on the device, you can use the File.exists property of the File object to determine whether a particular file or directory exists — but this is only once the URL path of the file object has been set, again pointing to a potential issue with the URL format. To address differences in URL formats, you can use static properties of the file class to retrieve generic locations on devices, and as you'll see it provides an alternative way to create a file object by referencing a specific location on the device.
Creating File Objects from Static Locations
On a laptop or PC you may be familiar with commonly used file spaces such as Documents and Applications for Mac OS, or My Documents and Programs on a Windows machine. Simply put, these are quick access references to file directories that have certain document types. In essence these are familiar short names given to potentially complex filesystem references.
On mobile devices, users are less familiar with locations such as these, and generally come across physical file directory paths only when using applications designed for this. Applications such as Finder for Mac OS and File Explorer on Windows are designed for large screens, allowing a user to explore whole filesystems, which on mobile devices would be harder to navigate.
The File class has five static properties that you can use to reference commonly used file locations:
- File.applicationStorageDirectory: Returns a file object pointing to a storage directory that is unique to the AIR application installed on a device
- File.applicationDirectory: Returns a file object pointing to the location where the application is installed on the device
- File.desktopDirectory: Returns a file object pointing to an equivalent of the Desktop directory found on Mac OS and Windows machines
- File.documentsDirectory: Returns a file object pointing to an equivalent of a user's Documents directory found on Mac OS and Windows machines
- File.userDirectory: Returns a file object pointing to an equivalent of the Users directory found on Mac OS and Windows machines
The file objects returned by these properties can be used to avoid potential issues like the ones encountered when specifying a hard-coded file-path URL. Each of the file references is pretty much static and can be referenced universally across different platforms using AIR.
Table 7-1 lists example url values returned by each static property on an Android mobile device running Gingerbread 2.3.4
TABLE 7-1: Example URL Property Values Returned on an Android Device
| PROPERTY | VALUE |
| File.applicationDirectory.url | app:/ |
| File.applicationStorageDirectory.url | app-storage:/ |
| File.desktopDirectory.url | file:///mnt/sdcard |
| File.documentsDirectory.url | file:///mnt/sdcard |
| File.userDirectory.url | file:///mnt/sdcard |
From the table you'll see that the Android device returns three distinct file object url values.
![]() WARNING Note that you cannot write to files or directories that have paths that use the app: URL scheme. Nor can you delete or create files or folders that have paths that use the scheme, as modifying content in the application directory is considered a bad practice, and for security reasons, it is usually blocked by the OS.
WARNING Note that you cannot write to files or directories that have paths that use the app: URL scheme. Nor can you delete or create files or folders that have paths that use the scheme, as modifying content in the application directory is considered a bad practice, and for security reasons, it is usually blocked by the OS.
Resolving the Reference Path of a File Object
On Google Nexus One, an Android device running Gingerbread 2.3.4, the File.desktopDirectory, File.documentsDirectory, and File.userDirectory each returns a file object that points to the file:///mnt/sdcard location. To ensure that a file object points to a particular location, you must use the resolvePath() method to refine the target path.
In the following snippet the file object is pointing to the file:///mnt/sdcard/notes directory using the File.documentsDirectory as the initial reference point:
var fileObj:File = File.documentsDirectory.resolvePath("notes");
For the file object created, fileObj, if the Notes directory existed, then fileObj.exists would be set to true. Using the resolvePath() method essentially sets the target path for the file object, whether it exists or not. This is important for creating new files and folders, as you'll see later.
While the url property of a file object gives a precise value to a location, the nativePath property gives the full path to the file object as represented in the host operating system.
Next take a look at using the nativePath property of the file object in the example project.
Creating a Files Explorer App Example
You will need to set up a new Flex Mobile Project in Flash Builder.
Defining the Flex Mobile Project Settings
The following lists a few of the familiar settings you will need to ensure are defined for the project:
- Name: Set the Name for the project to FilesExplorerApp.
- Application ID: Set the Application ID to com.wrox.ch7.FilesExplorerApp.
- Application Template: Set the Application Template to a View-Based Application, setting the initial view title to FilesExplorerAppHome.
Targeting Mobile Devices on Different Platforms
This example project can run on each of the mobile platforms supporting AIR, including Apple iOS, Google Android, and BlackBerry Tablet OS. For Google Android and BlackBerry Tablet OS, a number of permissions need to be set to allow the application to utilize the device's filesystem, whereas for Apple iOS, no permissions need to be defined specifically.
Defining Google Android Permissions
For the AIR Application Descriptor file generated with the project in Flash Builder, FilesExplorerApp-app.xml, ensure the android.permission.WRITE_EXTERNAL_STORAGE permission is included as a manifest addition for the Google Android platform, as shown in the following code snippet:
<android>
   <manifestAdditions>
      <![CDATA[
<manifest>
           <uses-permission android:name=“android.permission.WRITE_EXTERNAL_STORAGE”/>
         </manifest>
      ]]>
   </manifestAdditions>
</android>
Defining BlackBerry Tablet OS Permissions
For BlackBerry Tablet OS applications, you need to specify the access_shared permission, to allow the application to write to the mobile device. Ensure this is set in the blackberry-tablet.xml file, as shown in the following code snippet:
<?xml version="1.0" encoding="UTF-8"?>
<qnx>
      <author>jganderson</author>
      <authorId>gYAAgFbt6rihu</authorId>
      <category>core.media</category>
      <buildId>1</buildId>
      <platformVersion>1.0.0.0</platformVersion>
      <permission>access_shared</permission>
</qnx>
Defining Apple iOS Settings
There are no permissions that need to be defined for the Apple iOS platform.
Creating Run and Debug Configurations
You can elect to run this project on the desktop or directly on your mobile device. For consistency, this chapter uses a Google Nexus One as the connected device.
Building the Files Explorer App
In this section, you begin building the Files Explorer App project in Flash Builder, first taking a look at the nativePath property of the File object.
![]() Displaying the Native Path of a File Object
Displaying the Native Path of a File Object
For the Files Explorer App project, follow the next steps to add a label to the main view that shows the current filesystem directory.
- As shown in Listing 7-1, the main application file, FilesExplorerApp.mxml, has a similar MXML markup as covered in earlier chapters, with the exception of the firstView attribute's value, which is set to views.FilesExplorerAppHome (Listing 7-1).
- Replace the <fx:Declarations> with an <fx:Style> declaration. Inside the <fx:Style> declaration, specify s as the spark namespace. Then define three style declarations for the View, Label, and List components that will be used in the application. For the <s:View> components, define the backgroundColor property as #999999, and color property as #393839. For the <s:Label> components, define the fontSize as 18. Then for the <s:List> components, define the alternativeItemColors property as #CCCCCC and #EEEEEE, define the selectionColor property as yellow, fontSize property as 22, and color property as #393839 (Listing 7-2).

LISTING 7.2: Setting the styles via the <fx:Style> declaration in FilesExplorerApp.mxml
<?xml version="1.0" encoding="utf-8"?> <s:ViewNavigatorApplication xmlns:fx="http://ns.adobe.com/mxml/2009" xmlns:s="library://ns.adobe.com/flex/spark" firstView="views.FilesExplorerAppHome"> <fx:Style> @namespace s “library://ns.adobe.com/flex/spark”; s|View { backgroundColor:#999999; color:#393839; } s|Label { fontSize:22; } s|List { alternatingItemColors: #CCCCCC, #EEEEEE; selectionColor:yellow; fontSize:22; color:#393839; } </fx:Style> </s:ViewNavigatorApplication> - Modify the FilesExplorerAppHome.mxml file, setting the title property to Files Explorer. Then within a <fx:Script> declaration, add a private method called exit() to quit the application, calling NativeApplication.nativeApplication.exit(). Add a protected method stub called readDir() and assign it to the view's creationComplete attribute. Finally, add an <s:layout> declaration container for the view, defining the <s:VerticalLayout> (Listing 7-3).
LISTING 7.3: The FilesExplorerAppHome.mxml view for the Files Explorer project
<?xml version="1.0" encoding="utf-8"?>
<s:View xmlns:fx="http://ns.adobe.com/mxml/2009"
        xmlns:s="library://ns.adobe.com/flex/spark"
        creationComplete=“readDir()”
        title=“Files Explorer”>

      <fx:Script>
            <![CDATA[
                  protected function readDir():void {}

                  private function exit():void
                  {
                        NativeApplication.nativeApplication.exit();
                  }
            ]]>
      </fx:Script>

      <s:layout>
            <s:VerticalLayout/>
      </s:layout>

</s:View>
- Add a <s:Button> component with the label Quit to a <s:navigationContent> declaration. Assign the view's exit() method to the click property on the <s:Button> component. Under the <s:navigationContent> definition add a new <s:Label> component to the main view in FilesExplorerAppHome.mxml. Set the id property of the label to currentDir, the width property to 100%, and the height to 60. Then set the paddingLeft property to 10, the paddingTop property to 15, and the text to read Current Directory. The vertical alignment needs to be set to Middle (Listing 7-4).
LISTING 7.4: Adding <s:Button> and <s:Label> components to the view in FilesExplorerAppHome.mxml
<fx:Script> <![CDATA[ protected function readDir():void {} private function exit():void { NativeApplication.nativeApplication.exit(); } ]]> </fx:Script> <s:layout> <s:VerticalLayout/> </s:layout> <s:navigationContent> - Next, above the readDir() stub, declare a private variable called selectedDir that has the File type (Listing 7-5).
- Within the onCreationComplete() method, assign the documentsDirectory property of the File class to selectedDirectory. Then using the selectedDirectory file object, set the text property of the new label to the nativePath (Listing 7-6).
LISTING 7.6: Setting the text to the native path in FilesExplorerAppHome.mxml
<fx:Script> <![CDATA[ private var selectedDirectory:File; protected function readDir():void { selectedDirectory = File.documentsDirectory; currentDirectory.text = selectedDirectory.nativePath; } private function exit():void { NativeApplication.nativeApplication.exit(); } ]]> </fx:Script> - Run the project using the device run configuration. Using an Android device you should see the native path of the file object device displayed in the application beneath the header (Figure 7-1).

FIGURE 7-1: Displaying the current directory in the Files Explorer App running on Android 2.3.4
![]() Listing the Files of a Directory
Listing the Files of a Directory
Next take a look at how to display the contents of a directory.
- First add a new <s:List> component to the directories view in FilesExplorerAppHome.mxml, directly beneath the <s:Label> component. Set the id property to dirList, set the width property to 100%, the height property to 85%, the fontFamily property to Arial, and the contentBackgroundColor to #B6B3B3 (Listing 7-7).
- Within the readDir() method, declare a new array called docsDirectory, then assign the getDirectoryListing() method on the selectedDirectory file object to the array (Listing 7-8).
- Next populate the List component with the file objects retrieved in docsDirectory using the name property for the label of each row. You will need to instantiate the dataProvider on the List component and then use the addItem() function to define the label representing each file object (Listing 7-9).
LISTING 7.9: Populating the <s:List> component with the file object name property in FilesExplorerAppHome.mxml
protected function readDir():void { selectedDirectory = File.documentsDirectory; currentDirectory.text = selectedDir.nativePath; var docsDirectory:Array = selectedDirectory.getDirectoryListing(); var fileObj:File; dirList.dataProvider = new ArrayCollection(); for(var i:int = 0; i < docsDirectory.length; i++) { fileObj = docsDirectory[i]; dirList.dataProvider.addItem({ label: fileObj.name }); } } - Run the project using the device configuration. Using an Android device, you should now see the contents of the Documents directory for the device displayed beneath its native path as in Figure 7-2.
FIGURE 7-2: Displaying the contents of the Documents directory in the Files Explorer App running on Android 2.3.4
Next modify the list so that only folders are displayed.
- In the for loop, use the isDirectory property on the file object to determine whether the reference is an actual directory and not a file (Listing 7-10).
- Run the project again using the device configuration. Using an Android device, you should now see that only folders are visible in the list (Figure 7-3).
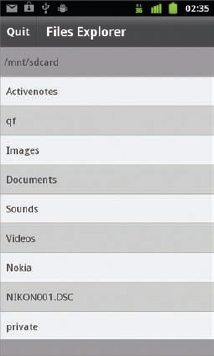
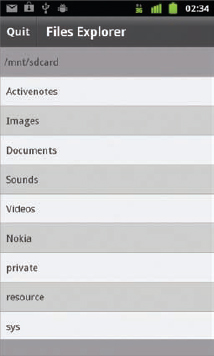
FIGURE 7-3: Displaying only folders contained in the Documents directory in the Files Explorer App running on Android 2.3.4
How It Works
Within readDir() the getDirectoryListing() method is what provides the array of file objects from the selectedDirectory file object to the docsDirectory array. This object points to the reference Documents Directory on the mobile device. The length property on docsDirectory returns the number of file objects in the array. This is used in the for loop to iterate through each file object and display its name property in the List component dirList.
The dirData is used to hold only file objects that are known to be directories; using the isDirectory property all the files are filtered out of the array.
Next take a look at navigating between each directory.
- 7. Add an array called dirData to the private variable list (Listing 7-11).
- 8. Within the readDir() method ensure dirData gets populated with each of the file objects retrieved (Listing 7-12).
LISTING 7.12: Storing data in the Array object in FilesExplorerAppHome.mxml
protected function readDir():void
{
      selectedDirectory = File.documentsDirectory;
      currentDirectory.text = selectedDirectory.nativePath;

      var docsDirectory:Array = selectedDirectory.getDirectoryListing();

      var fileObj:File;
      dirData = [];
      dirList.dataProvider = new ArrayCollection();

      for(var i:int = 0; i < docsDirectory.length; i++)
      {
            fileObj = docsDirectory[i];

            if(fileObj.isDirectory)
            {
                  dirData.push(fileObj);
                  dirList.dataProvider.addItem({ label: fileObj.name });
            }
      }
}
- 9. Next update the <s:List> component. Set the selectionColor property to #00A2FF, the selectedIndex property to a default of 0, and the click property to the readDir() event (Listing 7-13).
LISTING 7.13: Setting a selection color, the selected index, and click event handler for the <s:List> component in FilesExplorerAppHome.mxml
<s:List id="dirList" width="100%" height="85%" fontFamily="Arial" contentBackgroundColor="#B6B3B3" selectionColor=“#00A2FF” selectedIndex=“0” click=“readDir()”/> - 10. Next modify the readDir() method to allow for other file directories to be read. You need to utilize the selectedIndex property of the List component (Listing 7-14.)
LISTING 7.14: Setting the selected directory from the data stored in the data array in FilesExplorerAppHome.mxml
protected function readDir():void
{
      if(dirData)
      {
            selectedDirectory = dirData[dirList.selectedIndex];
} else { selectedDirectory = File.documentsDirectory; } currentDirectory.text = selectedDirectory.nativePath; var docsDirectory:Array = selectedDirectory.getDirectoryListing(); var fileObj:File; dirData = []; dirList.dataProvider = new ArrayCollection(); for(var i:int = 0; i < docsDirectory.length; i++) { fileObj = docsDirectory[i]; if(fileObj.isDirectory) { dirData.push(fileObj); dirList.dataProvider.addItem({ label: fileObj.name }); } } }
- 11. Run the project as it is. You will now be able to select a directory view showing any subfolders it contains. Figure 7-4 shows a folder being highlighted.
Figure 7-5 shows the screen on the device when the folder has been selected. You will also notice that the native path is updated in the display.
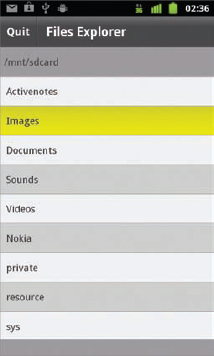
FIGURE 7-4: Navigating to sub-folders in the Files Explorer App running on Android 2.3.4
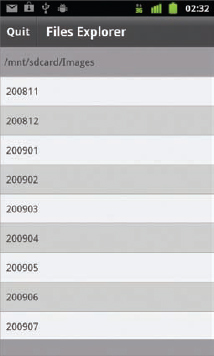
FIGURE 7-5: Displaying the contents of the Images directory in the Files Explorer App running on Android 2.3.4
RUNNING THE FILES EXPLORER APP ON APPLE IOS AND BLACKBERRY TABLET OS DEVICES
For the Files Explorer App running on an Apple iPhone 4, the initial file directory opened by the application will consist of the following URL path:
/var/mobile/Applications/<ID>/Documents
Here the <ID> value represents a unique value generated for the application by the device and could vary from iPhone to iPhone.
For the Files Explorer App running on a BlackBerry PlayBook, the initial file directory will consist of the following path:
/accounts/1000/appdata/com.wrox.ch7.FilesExplorerApp.debug.test<ID>/ shared/documents
Similarly, the <ID> value here also represents a value generated for the application by the device and could vary from PlayBook to PlayBook.
Next take a look at navigating back to the previous directory. For this you need to use the parent property of the file object.
- 12. After the readDir() method, add an empty stub for a new protected method called setParentDir(). Then above the for loop statement in readDir(), make a call to setParentDir() as shown in Listing 7-15.
LISTING 7.15: Adding a method to call the parent directory in FilesExplorerAppHome.mxml
protected function readDir():void
{
      if(dirData)
      {
            selectedDirectory = dirData[dirList.selectedIndex];

      } else {

            selectedDirectory = File.documentsDirectory;
} currentDirectory.text = selectedDirectory.nativePath; var docsDirectory:Array = selectedDirectory.getDirectoryListing(); var fileObj:File; dirData = []; dirList.dataProvider = new ArrayCollection(); setParentDir(); for(var i:int = 0; i < docsDirectory.length; i++) { fileObj = docsDirectory[i]; if(fileObj.isDirectory) { dirData.push(fileObj); dirList.dataProvider.addItem({ label: fileObj.name }); } } } protected function setParentDir():void {}
- 13. In setParentDir() add the parent file object to the List component using the addItem() method. Use square brackets and two dots [..] to denote the parent directory. You also need to ensure that the parent is saved to the directory data array (Listing 7-16).
- 14. Run the project as it is. You will now be able to select a directory and return to the parent directory by selecting [..] (Figure 7-6).
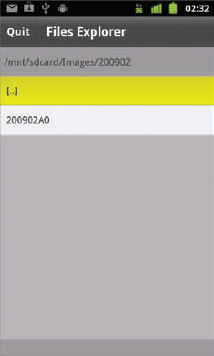
FIGURE 7-6: Navigating to the parent directory in the Files Explorer App running on Android 2.3.4
MODIFYING FILES AND FILESYSTEMS
So far you've learned how to read the filesystem of a mobile device using AIR. In this section you take a look at modifying the filesystem objects.
Creating New Files and Directories
To create files and folders on the mobile device, you need to use a combination of the File, FileStream, and FileMode classes.
Using the FileMode Class
The FileMode class is found in the flash.filesystem package. When creating ActionScript Mobile projects, you need to import the class through the following statement:
import flash.filesystem.FileMode;
When creating a Flex Mobile project in Flash Builder, you don't need to import the class.
The FileMode class provides four static constants. These are flags to define what a FileStream object should do with a File object it receives via the FileStream.open() method. At least one of these properties needs to be supplied as the second parameter in the open() method:
- FileMode.WRITE: To write new data to a file object instance
- FileMode.UPDATE: To update an existing file object instance
- FileMode.APPEND: To append data to a file object instance
- FileMode.READ: To read data from a file object instance
The following sections demonstrate how each of the FileMode properties can be used to read and write strings to a text file using the FileStream.readUTFBytes() and FileStream.writeUTFBytes() methods.
Writing to a File
To write, update, and append a file, you use the writeUTFBytes() method on a FileStream object, supplying the text you want to add to the file as an argument.
In the following code snippet the FileStream object fs opens a text File object called story.txt, resolving a path located in the documents directory. The file stream opens the file and then writes the string “A long time ago,” which is 15 characters, and then closes the file stream:
var fileObj:File = File.documentsDirectory.resolvePath("story.txt");

var fs:FileStream = new FileStream();
fs.open(fileObj, FileMode.WRITE);
fs.writeUTFBytes("A long time ago");
fs.close();
Updating the Contents of a File
In the following code snippet the story.txt file is updated:
var fileObj:File = File.documentsDirectory.resolvePath("story.txt");

var fs:FileStream = new FileStream();
fs.open(fileObj, FileMode.UPDATE);
fs.position = 15;
fs.writeUTFBytes(" in a galaxy far, far away.... ");
fs.close();
Notice that the FileStream.position property on the FileStream object is set to 15. This property represents the current position in the file stream, and has been set so that the existing text in the file is kept and isn't overridden when new text is supplied to the FileStream.writeUTFBytes() method. Following on from the previous code snippet the file should read “A long time ago.” When the update is applied the file should now read “A long time ago in a galaxy far, far away....”
Similarly, appending to a file using the FileMode.APPEND flag in FileStream.open() updates the file, but adds whatever is supplied to the FileStream.writeUTFBytes() method to the end of the file. The following code snippet appends the string “STAR WARS” to the story.txt file:
var fileObj:File = File.documentsDirectory.resolvePath("story.txt");

var fs:FileStream = new FileStream();
Reading the Contents of a File
To read the contents of an existing text file, you need to use the FileStream.readUTFBtyes() method by supplying a reference to the bytesAvailable property on the file stream object.
In the following snippet the story.txt file is read:
var fileObj:File = File.documentsDirectory.resolvePath("story.txt");

var fs:FileStream = new FileStream();
fs.open(fileObj, FileMode.READ);
fs.readUTFBytes(fs.bytesAvailable);
fs.close();
Here the FileStream object fs is again passed a reference to the File object fileObj, which points to the story.txt file. The FileMode.READ flag is also passed to the FileStream.open() method.
If you've followed each of the previous code snippets, the story.txt file should read “A long time ago, in a galaxy far, far away.... STAR WARS.”
Creating a New File Directory
Creating a new file directory simply requires calling the createDirectory() method on the file object. The path to the new folder needs to be resolved using the resolvePath() method, as shown in the following snippet:
var fileDir:File = File.desktopDirectory.resolvePath("untitled folder");
fileDir.createDirectory();
In this snippet the “untitled folder” is created in the Desktop directory.
Moving Files from One Directory to Another
To move a file from one location on the device to another, you need to utilize two file objects. The first file object should point to the originating location, and the second should point to where you want to move the file. You call the moveTo() method on the first file object, supplying the second file object as the parameter as shown in the following snippet:
var originalFile:File = File.documentsDirectory.resolvePath("story.txt");

var newDir:File = File.applicationStorageDirectory.resolvePath("story.txt");

originalFile.moveTo(newDir);
Here the story.txt file is moved from the documents directory to the application's storage directory on the device.
The text supplied to resolvePath() for the second file object is what defines either the new filename if you are moving a file, or the directory.
Moving a Folder
To move a file directory also requires the use of the moveTo() method on the file object. In the following snippet the originalDir file object, which points to the “untitled folder” on the desktop, is moved to the destinationDir file object, which points to a folder called “shapes” in the documents directory.
var originalDir:File = File.desktopDirectory.resolvePath("untitled folder");

var destinationDir:File = File.documentsDirectory.resolvePath("shapes");

originalDir.moveTo(destinationDir);
Here the moveTo() method is called on originalDir, which is the file object representing the directory that you want to move. The destinationDir file object is supplied as the parameter for the moveTo() method.
Copying Files and Directories
Copying a file or a directory also requires two file objects. To copy a file, you need to call the copyTo() method, as shown in the following snippet:
var file:File = File.applicationStorageDirectory.resolvePath("story.txt");

var newFile:File = File.documentsDirectory.resolvePath("story copy.txt");

file.copyTo(newFile);
In the following snippet the originalDir file object, which now points to the “shapes” folder in the documents directory, is copied and a new file directory newDir is created called “shapes copy” via the copyTo() method.
var originalDir:File = File.documentsDirectory.resolvePath("shapes");

var newDir:File = File.documentsDirectory.resolvePath("shapes copy");

originalDir.copyTo(newDir);
The copyTo() method is called on originalDir, which is the file object representing the directory that you want to copy. The newDir file object is supplied as the parameter for copyTo().
Deleting a File from a Location
Removing a file from the filesystem on the mobile device first requires that a file exists. In the following snippet the story copy.txt file is removed from the documents directory via the deleteFile() method:
var fileObj:File = File.documentsDirectory.resolvePath("story copy.txt");

if(fileObj.exists)
      fileObj.deleteFile();
Deleting File Directories
To remove a directory from the filesystem, you call the File.deleteDirectory() method on a File object. Again, you need to ensure that the resolvePath() returns the correct file directory location.
var fileDir:File = File.documentsDirectory.resolvePath("stories");

if(fileDir.exists)
      fileDir.deleteDirectory();
![]() Creating New Files and Folders
Creating New Files and Folders
Returning to the Files Explorer project, add two new options to the main view, new folder and new file. These options will be created to demonstrate exactly how the functions perform.
- First update the view in FilesExplorerAppHome.mxml to include the horizontal group layout component <s:HGroup>, placing it directly beneath the List component dirList. Set the id property of the component to buttonContainer, set the width to 100%, set the horizontalAlign to center, and then set paddingLeft and paddingTop to 10 (Listing 7-17).
LISTING 7.17: Adding a horizontal group component to the view in FilesExplorerAppHome.mxml
<s:List id="dirList" width="100%" height="85%" fontFamily="Arial" contentBackgroundColor="#B6B3B3" selectionColor="#00A2FF" selectedIndex="0" click="readDir()"/> <s:HGroup id=“buttonContainer” width=“100%” horizontalAlign=“center” paddingTop=“10” paddingBottom=“10”> </s:HGroup> - Next add two new <s:Button> components. Set the id property to folderBtn and the label property to New Folder on the first button. Then on the second button set the id property to fileBtn and label to New File. Both height properties of the components should be set to 55 and their fontSize properties should be set to 24, (Listing 7-18).
LISTING 7.18: Adding two new <s:Button> components to the horizontal group component in FilesExplorerAppHome.mxml
<s:HGroup id="buttonContainer"
          width="100%"
          horizontalAlign="center"
          paddingTop="10"
          paddingBottom="10">

      <s:Button id=“folderBtn”
                label=“New Folder”
                height=“55”
                fontSize=“24”/>

      <s:Button id=“fileBtn”
                label=“New File”
                height=“55”
                fontSize=“24”/>

</s:HGroup>
- Next create the FolderView.mxml view. In the Package Explorer panel highlight the Views Package folder. Then select File
 New MXML Component. In the New MXML Component pop-up window that opens, before clicking the Finish button, ensure that the Package field is set to views, the Name field to Folder, the Layout field to spark.layouts.VerticalLayout, and the Based On field to spark.components.View (Figure 7-7). After clicking Finish, the FolderView.mxml file is created in the Views folder of the Package Explorer panel.
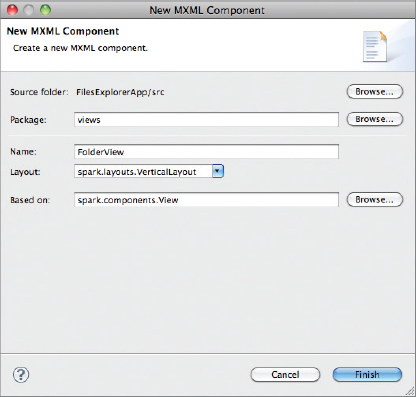
FIGURE 7-7: Creating the FolderView MXML component for the Files Explorer App
- Next modify the FolderView.mxml to include four new components. In FolderView.mxml modify the title property of the view component to read Create a new Folder... and set the creationComplete property to onCreationComplete. In the <s:VerticalLayout> container set the paddingLeft and paddingTop to 10. The <fx:Script> declaration should be added to include the onCreationComplete() stub. Directly beneath the <s:layout> declaration add two <s:Label> components. On the first label, set the id to currentDirectory and the text property to Current Directory. On the second <sLabel>, set the text property to Folder name:, and set the width and height on both labels to 100% and 60, respectively. Add a <s:TextInput> component to the view, setting the id property on the component to directoryName, width to 450, and contentBackgroundColor to #605E5E. Finally, add a <s:Button> component setting the label to Create Folder, height to 55, and fontSize to 24 (Listing 7-19).
LISTING 7.19: Creating the FolderView.mxml view for the Files Explorer App project
<?xml version="1.0" encoding="utf-8"?> <s:View xmlns:fx="http://ns.adobe.com/mxml/2009" xmlns:s="library://ns.adobe.com/flex/spark" creationComplete=“onCreationComplete()” title=“Create a new Folder...” > <fx:Script> <![CDATA[ protected function onCreationComplete():void {} ]]> </fx:Script> <s:layout> <s:VerticalLayout paddingLeft=“10” paddingTop=“10” /> </s:layout> <s:Label id=“currentDirectory” text=“Current Directory” width=“100%” height=“58” verticalAlign=“middle”/> <s:Label width=“152” height=“55” text=“Folder name:” textAlign=“left” verticalAlign=“middle”/> <s:TextInput id=“directoryName” width=“450” contentBackgroundColor=“#605E5E”/> <s:Button label=“Create Folder” height=“55” fontSize=“24”/> </s:View> - Next create the FileView.mxml component for the project. Add a new MXML component, this time setting the Name field to FileView. After clicking the Finish button, the FileView.mxml file should appear in the Package Explorer panel.
- Next modify the File view to include four new components. In FileView.mxml modify the title property of the view to read Create a new File... and set the creationComplete property to onCreationComplete. The <fx:Script> declaration should be added to include the onCreationComplete() stub. In the <s:VerticalLayout> container set the paddingLeft and paddingTop to 10. Directly beneath the <s:layout/> component add two <s:Label> components. On the first label set the id to currentDirectory and the text property to Current Directory; on the second label set the text property to File name: and set the width and height on both labels to 100% and 60, respectively. Add a <s:TextInput> component to the view, setting the id property of the component to fileName, width to 450, and contentBackgroundColor to #605E5E. Add a second label component with the text property set to File Content: and then a <s:TextArea> component with an id property set to fileContent. Then finally add a <s:Button> component setting the label to Create File, the height to 55, and the fontSize property to 24. The basic structure for the File view is very similar to the Folder view. Listing 7-20 highlights the subtle differences.
LISTING 7.20: Creating the FileView.mxml file for the Files Explorer App project
<?xml version="1.0" encoding="utf-8"?>
<s:View xmlns:fx="http://ns.adobe.com/mxml/2009"
        xmlns:s="library://ns.adobe.com/flex/spark"
        creationComplete=“onCreationComplete()”
        title=“Create a new File...” >

      <fx:Script>
            <![CDATA[
                  protected function onCreationComplete():void {}
            ]]>
      </fx:Script>

      <s:layout>
            <s:VerticalLayout paddingLeft=“10”
                              paddingTop=“10”                              />
      </s:layout>

      <s:Label id=“currentDirectory”
               text=“Current Directory”
               width=“100%”
               height=“58”
               verticalAlign=“middle”/>

      <s:Label width=“152”
               height=“55”
               text=“File name:”
               textAlign=“left”
verticalAlign=“middle”/> <s:TextInput id=“fileName” width=“450” contentBackgroundColor=“#605E5E”/> <s:Label width=“203” height=“55” text=“File Content:” textAlign=“left” verticalAlign=“middle”/> <s:TextArea id=“fileContent” width=“450” height=“209” contentBackgroundColor=“#605E5E” verticalAlign=“top”/> <s:Button label=“Create File” height=“55” fontSize=“24”/> </s:View>
- Next modify the FolderView.mxml and FileView.mxml files. Add a private File type variable called selectedDirectory, then in the onCreationComplete() function, set the text property on the currentDirectory label component to the nativePath property on selectedDirectory. Under the closing <fx:Script> tag, add a <s:Button> component to the <s:navigationContent> declaration, to navigate back to the FilesExplorerAppHome.mxml view. Add a private function called back() that calls the navigator.pushView() method of the view, passing a reference to views.FilesExplorerAppHome and the selectedDirectory file object (Listing 7-21).
LISTING 7.21: Displaying the nativePath and adding a back button in FolderView.mxml and FileView.mxml
<fx:Script> <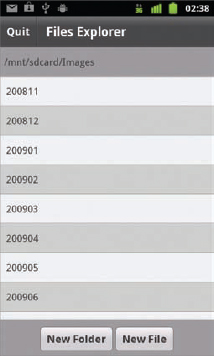
FIGURE 7-8: The New Folder and New File buttons in the Files Explorer App running on Android 2.3.4
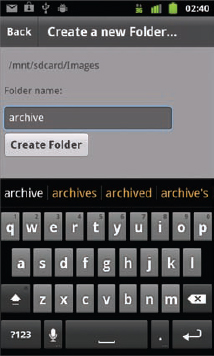
FIGURE 7-9: Creating a new folder called “archive” in the Files Explorer App running on Android 2.3.4
- Enter a name for the folder, then click the Create Folder button. This should generate the new folder in the directory selected from the original list. Then click the Back button in the action bar to go back to the main view. In the main view you now should see the new folder created (Figure 7-10).
- Next select the new folder you have just created, then click the New File button. This takes you to the File view and displays the directory selected from the main view. It also displays a Text field that allows you to specify a name for the new file and a Text field that allows you to enter text for the file. Enter a name for the file, then add some content to the text area. Then click the Create File button. This should generate the new file in the directory selected from the original list. Figure 7-11 shows the FileView.mxml file.
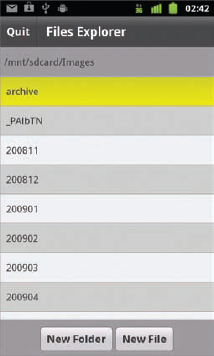
FIGURE 7-10: Displaying the new “archive” folder in the Files Explorer App running on Android 2.3.4
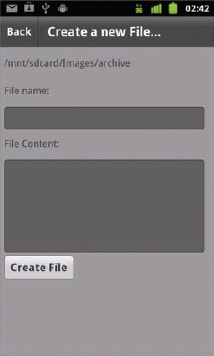
FIGURE 7-11: Creating a new file in the Files Explorer App running on Android 2.3.4
UTILIZING BROWSE DIALOGS
For AIR on Android, three browse methods on the File object allow you to reference image, video, and audio files using the mobile device's native window dialog:
- browseForOpen(): To select a single file
- browseForOpenMultiple(): To select multiple files
- browseForSave(): To select a file to save to
On an Android mobile device, the browse dialog allows the user to select only from audio, image, and video files, as shown in Figure 7-12.
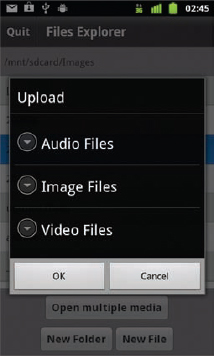
FIGURE 7-12: Displaying the browse dialog to open files in the Files Explorer App running on Android 2.3.4
Opening a Single File
Using the browseForOpen() method on a File object, you can present the user with a browse for open file dialog on the mobile device, which will allow you to reference a file in the application.
The browseForOpen() method takes two parameters. The first parameter is a title to be displayed in the dialog, and the second is an optional file filter that can be used to filter the types of files a user can select for opening.
The following snippet shows how a FileFilter object called audioFilter is defined to display all MP3 file types, before the browseForOpen() method is called on the File object fileDir:
var audioFilter:FileFilter;
audioFilter = new FileFilter("audio", "*.mp3");

var fileDir:File = File.applicationStorageDirectory;
fileDir.addEventListener(Event.SELECT, onSelect);
fileDir.browseForOpen("Select a file...", [audioFilter]);
In the constructor of the file filter the string audio is supplied as a description along with *.mp3, a string representing the MP3 file extension. The browseForOpen() method is given two parameters. The first is the string Select a file..., and the second is an array of FileFilter objects, though here only the mediaFilter object is supplied.
In the example, addEventListener() is called on fileDir to register Event.SELECT, an event that is fired when a user selects an item in the browse dialog. The handler for the event defined as onSelect() returns a file object reference to the file selected in the target property of the Event object e.
Opening Multiple Files
Using the browseForOpenMultiple() method on a File object, you can present the user with a browse file dialog to open and save files. Instead of Event.SELECT being fired when a user selects a media file from the browse dialog, the FileListEvent.SELECT_MULTIPLE event is triggered. The handler for the event returns an array of File objects in the target property instead of just a single file.
The following code snippet demonstrates how to use a browse dialog to select multiple files:
var fileDir:File = File.documentsDirectory;
fileDir.addEventListener(FileListEvent.SELECT_MULTIPLE, onSelect);
fileDir.addEventListener(Event.CANCEL, onCancel);
fileDir.browseForOpenMultiple("Select files...");
In this example addEventListener() is called on the File object fileDir to handle the SELECT_MULTIPLE event. In addition, the Event.CANCEL event is also handled by an onCancel() when the user clicks Cancel.
Take a look at browse dialogs in more detail.
Over the next few steps you'll try utilizing browseForOpenMultiple() by loading multiple images selected from a browse dialog directly into a mobile application.
- Under the exit() method in FilesExplorerAppHome.mxml, add another protected function called selectMedia() that takes a single File object called fileObj as a parameter. In selectMedia() define a FileFilter object called jpgFilter, which filters the jpeg extension *.jpg (Listing 7-29).
- Add an empty stub method called onSelect() that takes a single parameter, Event object e. In selectMedia() register an interest for the FileListEvent.SELECT_MULTIPLE event on fileObj, using onSelect() as the event handler. Then finally call the browseForOpenMultiple() method, supplying a title for the browse dialog and jpgFilter as the single file filter (Listing 7-30).
LISTING 7.30: Adding the SELECT_MULTIPLE event to the File object and calling the browseForOpenMultiple() method in FilesExplorerAppHome.mxml
private function exit():void { NativeApplication.nativeApplication.exit(); } protected function selectMedia(fileObj:File):void { var jpgFilter:FileFilter; jpgFilter = new FileFilter("JPEG Files", "*.jpg"); fileObj.addEventListener(FileListEvent.SELECT_MULTIPLE, onSelect); fileObj.browseForOpenMultiple(“Select 2 image files...”, [jpgFilter]); } private function onSelect(e:Event):void {} - In the onSelect() event handler, the event object triggered by the SELECT_MULTIPLE event type is passed to the method. Navigate to the ImagesView view using the navigator.pushView() method, but only when the event object is of the FileListEvent type. The first parameter of the pushView() method should be the Images view; the second parameter should be the files property returned by the event e, (Listing 7-31).
- Add a <s:Button> to the view in FilesExplorerAppHome.mxml to call the selectMedia() method (Listing 7-32).
LISTING 7.32: Adding a horizontal group component containing the Open multiple media button in FilesExplorerAppHome.mxml
<s:HGroup id=“buttonContainer”
          width=“100%”
          horizontalAlign=“center”>

      <s:Button height=“55”
                label=“Open multiple media”
                click=“selectMedia(selectedDirectory)”
                fontSize=“24”/>

</s:HGroup>


<s:HGroup id="buttonContainer"
          width="100%"
          horizontalAlign="center">

      <s:Button id="folderBtn"
                label="New Folder"
                height="55"
                fontSize="24"/>

      <s:Button id="fileBtn"
                label="New File"
                height="55"
                fontSize="24"/>

</s:HGroup>
- Next create a new view for the project called ImagesView in the Views package. Add an onCreationComplete() event handler method stub in the <fx:Script/> declaration and assign it to the creationComplete property of the view component. Then add a title to the View Selected Files (Listing 7-33).
LISTING 7.33: Assigning values to the title and creationComplete in ImagesView.mxml
<?xml version="1.0" encoding="utf-8"?>
<s:View xmlns:fx="http://ns.adobe.com/mxml/2009"
        xmlns:s="library://ns.adobe.com/flex/spark"
        title=“Selected files...”
        creationComplete=“onCreationComplete()”>

      <fx:Script>
            <![CDATA[
                  protected function onCreationComplete():void {}
            ]]>
      </fx:Script>

</s:View>
- Next under onCreationComplete() add a private method called back() to return to the FilesExplorerAppHome view, and add the call to a button in the <s:navigationContent> declaration (Listing 7-34).
LISTING 7.34: Adding a <s:Button> to navigate back in ImagesView.mxml
<?xml version="1.0" encoding="utf-8"?> <s:View xmlns:fx="http://ns.adobe.com/mxml/2009" xmlns:s="library://ns.adobe.com/flex/spark" title="Selected files..." creationComplete="onCreationComplete()"> <fx:Script> <![CDATA[ protected function onCreationComplete():void {} private function back():void { navigator.pushView(views.FilesExplorerAppHome); } ]]> </fx:Script> <s:navigationContent> <s:Button label=“Back” click=“back()”/> </s:navigationContent> </s:View> - Under the <s:navigationContent> component add a vertical group component <s:VGroup>, with paddingLeft and paddingTop set to 10. Within the vertical group add two <s:Image> components, with their id properties set to img0 and img1 (Listing 7-35).
- After onCreationComplete(), add another private method stub called displayImage() that accepts two parameters: url, a string representing the path to the image; and img, an Image type referencing the image component in which to display. Set the source property of the image object img to the url value passed to the method (Listing 7-36).
- Lastly in onCreationComplete() cast the data object retrieved in the view to an Array variable called selectedFiles. Add a File type variable fileObj. Then iterate through the selectedFiles array and call the displayImage() method supplying fileObj.url, and a reference to the image component id using this[“img” + i] (Listing 7-37).
- Now run the project as it is. Click the Open Multiple Media button. You will see the browse dialog appear, as shown in Figure 7-13.
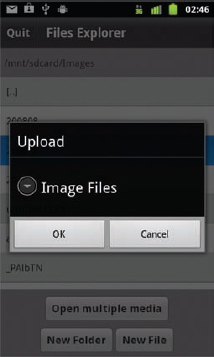
FIGURE 7-13: Browsing for multiple image files in the Files Explorer App running on Android 2.3.4
 NOTE The text supplied as the title parameter for the browseForOpenMultiple() and browseForOpen() methods does not appear in the browse dialog on a Google Nexus One running Android 2.3.4. In Figure 7-13 and Figure 7-14 you will see Upload appear as the title.
 - In the browse dialog, select Image Files, then choose two image files (Figure 7-14).
- Click OK. The ImagesView.mxml view will open and show the images you selected (Figure 7-15).
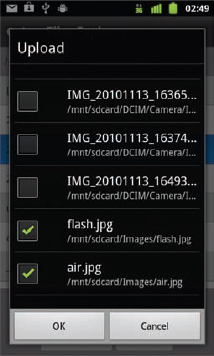
FIGURE 7-14: Selecting the flash.jpg and air.jpg files in the Files Explorer App running on Android 2.3.4
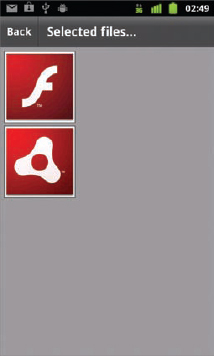
FIGURE 7-15: Displaying the selecting images in the Files Explorer App running on Android 2.3.4
Saving a Single File to a Location
The browseForSave() method presents a dialog containing a list of files, and allows a user to save a file to a location on the mobile device.
The following snippet shows how to call browseForSave():
var fileDir:File = File.applicationStorageDirectory;
fileDir.addEventListener(Event.SELECT, onSelect);
fileDir.browseForSave("Save file...");
As with browseForOpen(), Event.SELECT needs to be registered with the file object to handle when the user selects the OK button to confirm saving the file (Figure 7-16).
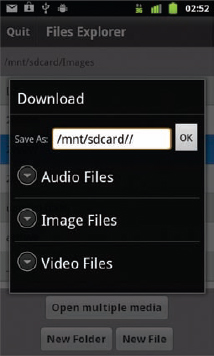
FIGURE 7-16: Saving to a directory using the browse dialog in the Files Explorer App running on Android 2.3.4
![]() NOTE The text supplied as the title parameter for the browseForSave() method doesn't appear in the browse dialog on a Google Nexus One running Android 2.3.4. In Figure 7-16 you will see Download appear as the title, and not Save File as highlighted in the snippet.
NOTE The text supplied as the title parameter for the browseForSave() method doesn't appear in the browse dialog on a Google Nexus One running Android 2.3.4. In Figure 7-16 you will see Download appear as the title, and not Save File as highlighted in the snippet.
SUMMARY
Over the course of this chapter you have learned how to utilize the AIR File System API using a combination of Flash, Flex, and AIR to build the Files Explorer project.
The File and FileStream classes are the key aspects of the AIR File System API, and can be used in a number of ways to read, write, and modify aspects of any existing filesystem via a Flash application, including: listing the files and folders of a directory; creating text files; and selecting media files to open on the device.
In the next chapter you'll use aspects of the AIR File System API to work with app data, focusing more on the application storage directory.
Before moving on to the next chapter, you can integrate a number of functions covered in this chapter into the Files Explorer project. The following set of exercises should allow you to explore these event types and appreciate gestures in more detail.
EXERCISES
- Use a checkbox in the FilesExplorerAppHome.mxml view to toggle between displaying files and folders in the List component.
- Use a button in FilesExplorerAppHome.mxml to read a .txt text file highlighted in the List component.
- In the FileView.mxml add an option to delete a file.
- In the FolderView.mxml add an option to move a folder to another directory.
- Modify the List component used in FilesExplorerAppHome.mxml to display the creation date, size, space available, and (for a file) the file extension.
![]() WHAT YOU LEARNED IN THIS CHAPTER
WHAT YOU LEARNED IN THIS CHAPTER
| TOPIC | KEY CONCEPT |
| Creating file objects | Use one of three URL schemes to create a file object: app:/;
app-storage:/; and file://. |
| Creating file objects from static locations | Use one of five static properties to reference a file object, including:
File.applicationDirectory File.applicationStorageDirectory File.documentsDirectory File.desktopDirectory, and File.userDirectory |
| Resolving file object paths | Use resolvePath() on a file object to refine a target path. |
| Writing to files | Use the FileStream and FileMode objects to write to a file.
Set the file mode to FileMode.WRITE when opening a file stream to write to a file. Use writeUTFBytes() to write content to a file. |
| Modifying files and directories | Use moveTo() on the file object to move to a file path.
Use copyTo() on the file object to make a duplicate of the file object. Use deleteFile() to remove a file. Use deleteDirectory() to remove a folder. |
| Using browse dialogs | Use browseForOpen() to open a single file and use browseForOpenMultiple() to open multiple files.
Use browseForSave() to save a file object to the mobile device. |