
The subject of security has varying degrees of implementation; it's never a black and white answer. The question of how much security is needed is followed up by additional questions regarding the value of what is being protected and the risks, repercussions, and likelihood of it being sought after. For every security measure, there will always be someone trying to circumvent it. In this chapter, we will review the basic security features and an approach to securing the Ticket application. The concepts reviewed here apply to all APEX applications and are specific to the APEX framework.
In your help desk application, you have the requirement to allow users to be maintained inside of the application through the web interface. You will add a section to maintain the user accounts and modify the tab structure to navigate to the newly created form. The form needs to be created first as tabs require a page to reference.
From the application editor screen, click the Create Page button.
Select the option for Blank Page.
Set the page number to 600, then click the Next button.
Enter Users for the name field and set the breadcrumb selection to Breadcrumb. when the page refreshes, ensure the entry name is Users and click the Next button.
Select No for the "Would you like to use tabs for this new page?" option. Click the Next button.
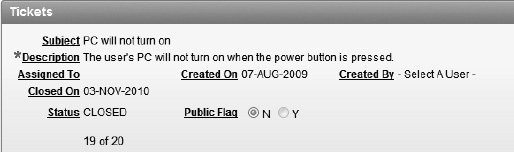
Click Finish to complete the creation of the page. The completed page should be empty as shown in Figure 9-1.
Now that you have a Users page, you will make a modification to your navigation tabs. The web design you desire will have links on the right hand side of the top navigation bar in the location of parent tabs on the page template. APEX supports one and two level tab navigation as part of the Shared Components. When the application was created, the option chosen was the one level tab navigation. To implement two level tabs navigation, you will modify the default page template for the application and modify the tab navigation structure.
Note
Tab maintenance in APEX can be confusing. The easiest change is to go from some level of tabs to no tabs, or from no tabs to one or two levels. In this exercise, you will walk through the steps involved with the converting the existing one level tab to a two level tab configuration to demonstrate the complex configuration change.
Here's the process to follow to implement two levels of tabbed navigation:
Navigate to the Shared Components area of your application.
Under User Interface, click on Themes.
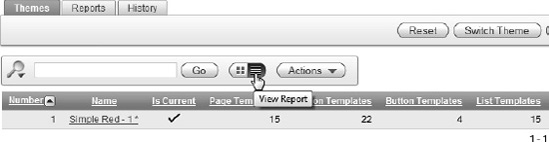
Change the report to list view by clicking on the corresponding display icon as shown in Figure 9-2.
Click on the name of the current theme as indicated by the check mark in the Is Current column.
Under component defaults, set Page to Two Level Tabs – Right Sidebar (optional / table-based) and click Apply Changes.
Navigate back to the Shared Components page.
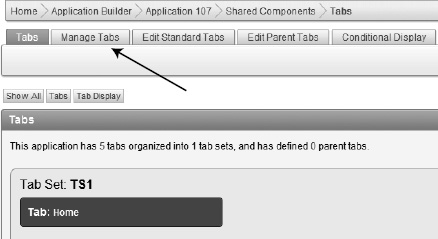
Under Navigation, click Tabs.
Click on the Manage Tabs sub-tab shown in Figure 9-3.
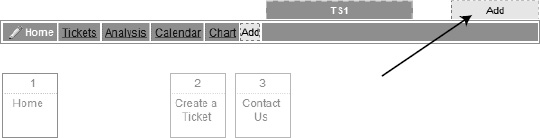
Add a parent tab by clicking on the Add link in the upper right corner, as indicated in Figure 9-4.
Enter Issue Tracker for the parent tab label and click Next.
Enter 1 for the page and click Next.
Click Create Parent Tab.
Add another parent tab by clicking on the Add link, just as before.
Enter Admin for the parent tab label and click Next.
Enter 600 for the page and click Next.
Set the sequence to 20 and click Create Parent Tab.
Click on the Admin tab and then click on the Add button in the lower-left corner indicated in Figure 9-5.
Enter Users for the tab label and click Next.
Enter 600 for Tab Current for Page and click Next.
Leave the sequence value as the default. Click Next.
You do not need a condition at this time, so leave the default condition type. Click Next.
Click Create Tab.
Edit the Users tab by clicking on the Edit icon next to the tab. The icon is shown in Figure 9-6.
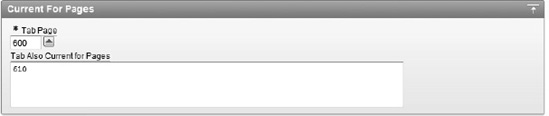
As shown in Figure 9-7, enter 610 in the Tab Also Current for Pages field.
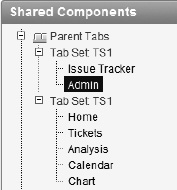
Under Parent Tab Set, set the Parent Tab Set to TS1as, as shown in Figure 9-8.
Scroll to the top of the page and click Apply Changes.


Running the application now shows the results seen in Figure 9-9 for the Issue Tracker tab and Figure 9-10 for the Admin tab. The page that is currently active changes the highlight applied to the different tab elements. The parent tab location is dependent on the template used. In the template shown below, the parent tabs are located in the upper right. The standard tabs in this template are the same as they are for the one level tab layout.


You now have a navigational framework to allow clear distinction of items needed to do the administration of the application. This design is extensible. As the application grows with time, additional features requiring administration could also be added to this navigational structure.
As part of the help desk design, you want to be able to maintain the users from the application. You will configure a table in the database as well as a form and report to allow this information to be maintained by any admin. Locate, upload, and run the script ch9_security_objects.sql. Refer to Chapter 4 if you need step-by-step instructions. You should see 13 rows, all of which complete successfully.
Edit Page 600 of your application.
Create a new region by clicking on the Create button and selecting Region on this page.
Select Form and click Next.
Select Form with Report and click Next.
Select your schema for the table/view owner and click Next.
Enter USERS for the table/view name and click Next.
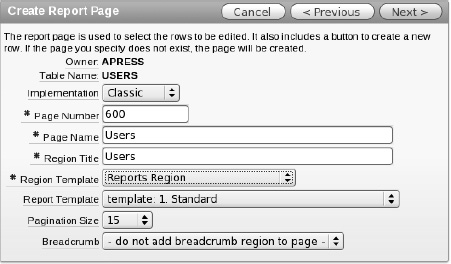
Set the implementation to Classic, enter 600 for the page number, enter Users for both the page name and region title, and set the region template to Reports Region. The settings will look like those in Figure 9-11. Click Next when finished.
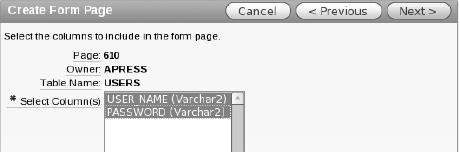
Select USER_ID and USER_NAME and then click Next. Be sure not to select PASSWORD, as it is not needed in the report.
Select any edit link image and click Next.
Enter 610 for the page number and Manage Users for the page name and region title, as shown in Figure 9-12. When finished, click Next.
Ensure that the primary key is set to USER_ID and click Next.
Select Existing Trigger for the primary key source and click Next.
Select the USER_NAME and PASSWORD shown in Figure 9-13 and click Next.
Set Insert, Update, and Delete all to Yes and click Next.
Click Finish.
At the completion of these steps, the help desk application has some additional objects. There is the region on page 600 that is the report of the current users. You will also notice a new page that allows editing of the data values, including all of the processes to do the corresponding database transaction. However, there are a few things that you still need to do for the tabs to display properly for Page 610.
Edit page 610 of the application.
Edit the page attributes by double-clicking on the name of the page.
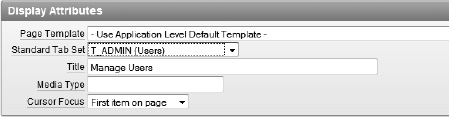
In the Display Attributes region, set the standard tab set to T_ADMIN (Users) and click Apply Changes, as shown in Figure 9-14. This will use the tab set when rendering the page.
Note
This is a different setting than the tab setting that identifies page 610 as being current. If a tab set shows on the page but without a tab highlighted as active, it is because the page is not identified as current in the tab settings. Conversely, if the page is listed as active in the tab settings, but the page does not render any tabs, no tabs will be seen.
Page 610 does not yet have a breadcrumb entry associated with it. You can quickly add one.
Edit Page 600.
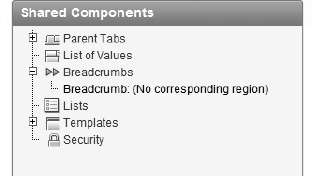
In the Shared Components region on the page, edit the breadcrumb by expanding the breadcrumbs node in the tree and double-clicking on Breadcrumb:(No corresponding region) seen in Figure 9-15.
On the filter applied to the report page, select the breadcrumb named Breadcrumb (if it has not already been selected), clear any entry from Page, and click Set. This will show all of the breadcrumbs for the entire application.
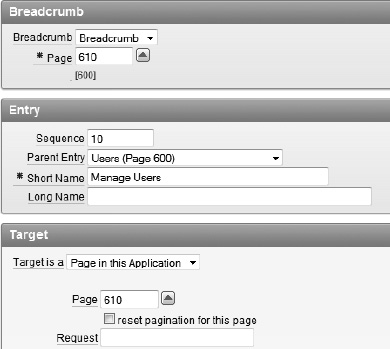
Enter 610 for the page the breadcrumb will associated with. Set the parent name to Users (Page 600), enter Manage Users for short name, enter 610 for page in the Target section, and click Create. The settings are indicated in Figure 9-16.
When completed, page 610 will have a Shared Components breadcrumb entry just as page 600. Running the application will show a breadcrumb entry for the Users Report page and the Manage Users page as shown in Figure 9-17.
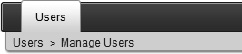
Figure 9.17. Clicking on the Create or Edit buttons of a user record will navigate to page 610, showing the Manage Users breadcrumb.
Note
The breadcrumb entry label has (No corresponding region) as part of the name because there is no breadcrumb region on the current page. So why does it show up when the application is run? In Chapter 5, you moved the breadcrumb region to page 0 so it shows up on every page rendered.
Finally, you need to change the item type of P610_PASSWORD to Password, so that it will accept a user's input but display * characters as the password is typed. This item type is designed not to retrieve data when a record is edited, despite being bound to a database column. Also, the item type will not save any value in session state, meaning it will not remember the value entered after the page processing is complete. This is a security feature to prevent data identified as a password from being retrieved inappropriately.
Edit page 610.
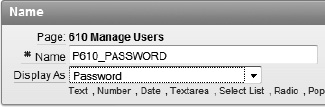
Edit the item P610_PASSWORD.
Set Display As to Password, as shown in Figure 9-18. Click Apply Changes.
As a security measure, when a user account is created, it should require a password to be set.
On page 610, right click the P610_PASSWORD element and click Create Validation.
Select Item Not Null and click Next.
Set the validation name to P610_PASSWORD is not null and click Next.
Enter "A password must be specified" for the error message and click Next.
For a condition, set When Button Pressed to CREATE (Create). Click the Create button when finished.

This completes the navigation and user interface part of the security scheme you will be implementing. With the navigation and maintenance in place, you can now implement the authentication scheme that will utilize the information.
The key step in making a secure application is to understand who the accessing user is. APEX refers to this as authentication. Authentication will answer the question of "who are you?" The APEX tool provides a series of pre-defined authentication mechanisms including a built-in authentication framework and an extensible custom framework. At design time, it's easy to switch between authentication methods by setting the active scheme. There can only be one active authentication scheme at a time for an application. The following are the major types of authentication schemes:
APEX Credentials: Users are managed inside the APEX workspace and are maintained just as workspace developer accounts.
LDAP: The user is an existing LDAP-compliant server such as Active Directory or Oracle Internet Directory.
Oracle Single Sign On: A documented setup to allow authentication to pass between APEX and an existing Oracle SSO server. Logging into the SSO server once will pass the same credentials to all APEX applications.
Database Schema Users: Database user names and passwords determine authentication; not to be confused with data access in an APEX application.
Custom: Allows logic to be determined by the developer. An example of usage is for Internet-facing applications where self-registration may be desired. Another example is when more than one authentication source is used simultaneously such as using two LDAP servers.
Open Door: Used to simulate logging in as different individuals by developer testing. This is not intended to be used as a public authentication scheme.
None: This option is intended to allow all parts of the application to be reachable without needing a user to log in.
Each application has its own set of authentication schemes managed as part of the Shared Components part of the application. Authentication schemes can be copied between applications when needed. This ability to copy is especially useful when a custom authentication scheme has been developed and is desired in more than one application. The authentication schemes also utilize the APEX subscription framework to allow a master copy to be applied to subscribers inside of a single workspace.
In the previous section, the script that was imported included definitions for tables, triggers, and functions. You will use those elements as part of your custom authentication scheme. The key component of the authentication scheme is a function that will compare the given user name and password to the stored values in the USERS table. If there is a match, then the user will be authenticated. You can review the database objects and PL/SQL function code from the SQL Workshop for more details on how this is implemented.
Note
Although the USERS table contains a field named password, it's not the actual password value; it's an encrypted hash of the password. Passwords should not be stored as plain text.
Here's the process to follow to create your authentication scheme:
Navigate to the Shared Components of your application.
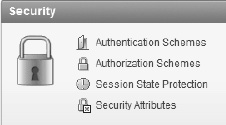
In the Security region, click on Authentication Schemes; it's the first one in the list shown in Figure 9-19.
Click the Create button in the upper right of the Authentication Schemes tab.
Select From Scratch and click Next.
Enter Custom Authentication Scheme for the name and click Next.
Leave the Page Sentry function blank and click Next.
Leave the Session Verification function blank and click Next.
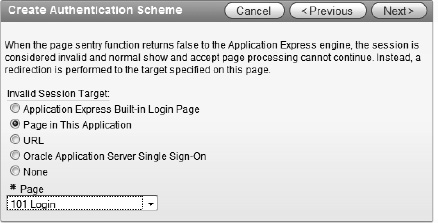
For Invalid Session Target, select the radio button next to Page in This Application. After the page refreshes, set the page to 101 Login, as shown in Figure 9-20. Click Next to continue.
Leave the Pre-Authentication Process blank and click Next.
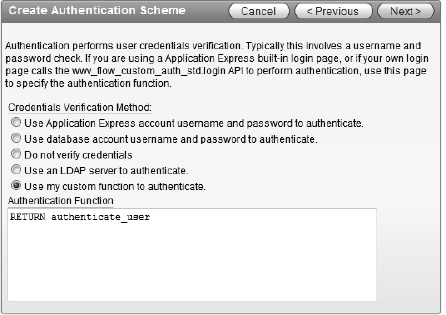
Set the Credentials Verification Method to Use my custom function to authenticate. When the page refreshes, enter
RETURN authenticate_userinto the Authentication Function region and click Next. Figure 9-21 shows the settings applied.Note
There are no parameters used here or any PL/SQL semicolon. This is part of the definition of how APEX handles custom authentication functions. The
authenticat_userfunction that was imported earlier conforms to the expected signature: Function returning a BOOLEAN value with two parameters ofp_usernamevarcahr(255)andp_password varchar2(255).Leave the Post-Authentication Process blank and click Next.
Leave the cookie name, path, and domain blank and click Next.
The logout value utilizes the standard APEX Logout API. The API is used to invalidate the session cookie and redirect to another APEX page after logout. Because of the complex syntax, a copy of the needed value is included as part of the book files under the name
ch9_logout.txt. Click Next after setting the logout URL.wwv_flow_custom_auth_std.logout?p_this_flow=&APP_ID.&p_next_flow_page_sess=&APP_ID.:1
Note
The last parameter is the page where the user will be redirected after logout. The given URL will redirect to page 1.
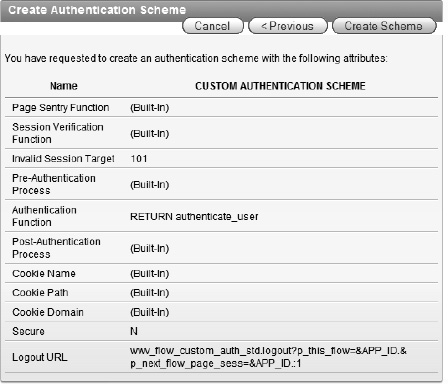
Make sure that the settings match those in Figure 9-21 and click Create Scheme.
Now that you have your custom authentication scheme, you need to activate it, or make it the current scheme.
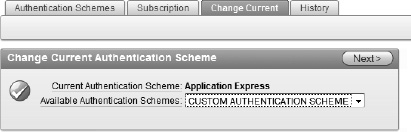
Click the Change Current sub-tab shown in Figure 9-23.
Set the Available Authentication Schemes to CUSTOM AUTHENTICATION SCHEME and then click Next.
Click Make Current.
Run your application and if logged in, log out.
Your application is now using the values stored in the USERS table and will no longer accept your APEX credentials. You can sign on as any of the following users: Scott, Doug, Martin, Karen, Patrick, or Tim; all passwords are "apress" in lower case.
Many aspects of APEX are conditional. One pair of conditions are particularly applicable to the Authentication status: User is the Public User and User is Authenticated. For applications that expose parts to unauthenticated users, this ability to allow functions to public users is very useful.
By applying security rules to the help desk application, usability can be improved by restricting the display of tabs that are not available to the public. This avoids confusion and improves the overall user experience when accessing the application. Let's walk through the application of this condition.
Edit page 1 of the application.
In the Shared Components region, edit the Admin tab by expanding the parent tabs node and double-clicking on Admin. Figure 9-24 shows the location of the Admin tab in the navigation tree.
In the Conditional Tab Display region, set the Tab Display Condition to User is Authenticated (not public) and click Apply Changes. Figure 9-25 shows the expected value of the condition.
Repeat steps 2 and 3 for the Tickets, Analysis, Calendar, and Chart tabs.

Run the application now and click the logout link. The Admin parent tab as well as the remaining standard tabs should disappear, with the exception of the Home tab. Logging in again should restore the display of the tabs as they were previously seen.
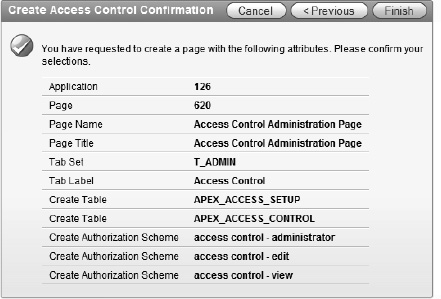
APEX includes a built-in feature for creating an access control framework with three roles: Administration, Edit, and View. The wizard is designed to create data structures to store the roles, pages to edit the assignments, and authorization schemes to be utilized throughout an application. This wizard makes the job of creating basic security capability very easy in an application. The summary of the objects created can be seen in Figure 9-27 as the last step in the wizard.
Run the application and click Create in the developer's toolbar
Select New Page and click Next.
Select Access Control and click Next.
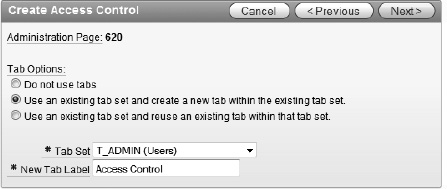
Enter 620 for the administration page number and click Next
Select Use an existing tab set and create a new tab within the existing tab set, allow the page to refresh, and then set the tab set to T_ADMIN (Users), as shown in Figure 9-26.
Enter Access Control for the new tab label and click Next.
Click Finish as shown in Figure 9-27.
With completion of the wizard, all of the objects have been created and are available for use. Before you enable the security utility, you need to add some users to allow you to use the admin functions. Running the application now, you may notice that the user name is simply an open text field. You should create a list of values (LOV)as a shared component that contains all of the users for whom you want to control access. As the access control page is now part of the application, you can alter it as needed. To increase the quality of the data entered, you will update the user field to be a select list.
Edit page 620.
Edit the report attributes for the Access Control List report.
Edit the ADMIN_USERNAME column.
In the Column Attributes region, set Display As to Select List (query based LOV).
In the List of Values region, enter the following SQL Statement in the List of Values Definition and click Apply Changes.
SELECT user_name d, user_name r
FROM users
Next, you need to associate a privilege with each of your users with the Access Control pages.
Run your application.
Click the Access Control sub-tab.
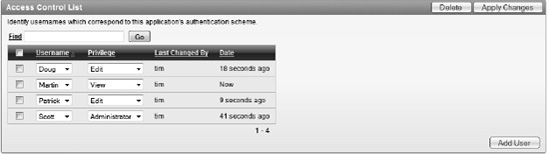
Click Add User.
Select Scott for the username, set the privilege to Administrator and click Add User.
Select Doug for the username, set the privilege to Edit and click Add User.
Select Patrick for the username, set the privilege to Edit and click Add User.
Enter Martin for the username, set the privilege to View and click Apply Changes.
Your results should look similar to those in Figure 9-28. Every time a new user is added, the listing in the report will update. You can now use these users to test the application.
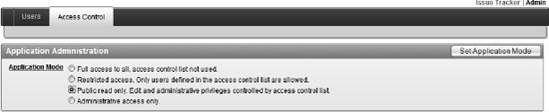
One of the features of the Access Control utility is the ability to enable or disable the enforcement of the utility itself. Running page 620 will show the header seen in Figure 9-30. By default, the Access Control utility is set to full access. To enable the Access Control features, you set the mode using the following steps:
Run page 620.
Select the third application mode to Public read only... and click the Set Application Mode button seen in Figure 9-29.
You now have the editing forms in place and all of the data setup properly, although the application is not utilizing any of the authorization schemes. The last step in this process is to start locking down pages using the authorization schemes.
Edit page 620.
Edit the page attributes by double-clicking on the page name.
In the Security region, set the authorization scheme to access control – administrator, as shown in Figure 9-30. Click Apply Changes when done.
Repeat steps 23 and 24 above for pages 600 and 610.

Now that the new authorization scheme has been implemented, you can test the security behavior. Only a user setup with the Administrator setting on the Access Control page will be able to use the admin pages 600 through 620.
Log into the application as the user Scott and you will be able to navigate all of the administration functions. Logging in as any other user and clicking on the Admin parent tab will result in the message shown in Figure 9-31.
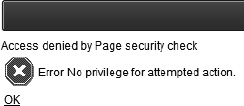
The error message in Figure 9-31 is not very friendly. An application should make every effort to avoid the type of event that would cause a privilege error. In this application, the Admin tab should be removed from the page when it does not meet the access restrictions. You will accomplish this using the same authorization scheme applied to the tab itself.
Edit page 600 in your application.
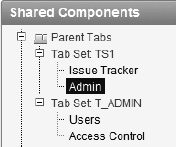
Expand the Parent Tabs node under the Shared Components region, and double-click on Admin indicated in Figure 9-32.
Under Authorization, set the authorization scheme to access control – administrator and click Apply Changes.
Now when running the application, if the user is not privileged with administrator access, the tab will not display. This avoids the event that would cause the user to see the access denied error message.
You have applied the authorization scheme at the page level and tab level for the administration pages. Next, you will remove the ability for a view-only user to create new records by associating the Edit authorization scheme with the button required to create tickets.
Edit page 200 of your application.
Edit the Create button by double-clicking its name.
Under Security, shown in Figure 9-33, set the authorization scheme to access control – edit and click Apply Changes.
Repeat steps 30 and 31 for the Manage Multiple Tickets button.

To test this change, you will log in with the user name Martin. This user has been granted view privileges, so the buttons on page 200 aren't shown. Does this mean that Martin can't create tickets?
Let's review the steps you applied to the Admin pages. Security was first applied to the page itself, and then additional security was applied to prevent the access denied error. In the case of the buttons to create tickets, security to remove the buttons does not prevent the page from being run directly either from the developer tool or from changing the page number in the URL to page 210 or 230.
Note
Important Removing or hiding a button, tab, or other link doesn't secure the target it was pointing at; it only helps reduce errors seen by users on components that are already secure.
The design for the help desk application only has the Multiple Tickets page only available to users with edit privileges, so the entire page will be secured at the edit level. The single record view of a ticket will continue to be visible to all authenticated users, but without the buttons related to record manipulation.
Edit page 210 of your application.
Edit the Create button in the Tickets region by double-clicking its name.
Under Security, set the authorization scheme to access control – edit and click Apply Changes.
Repeat steps 34 and 35 for the Delete and Save buttons as well as the second Create button located in the Ticket Details region.
Edit the Create button by double-clicking its name.
Under Authorization, set the authorization scheme to access control – edit and click Apply Changes.
Repeat steps 40 and 41 for the Delete and Save buttons.
Edit page 230 of your application.
Edit the page attributes by double-clicking on the page name.
In the Security region, set the authorization scheme to access control – edit and click Apply Changes.
Review the application now with different users. Notice how the user Martin can still navigate from the Tickets report to view the details of the ticket, but there are no buttons to modify the records in the database. Even though the form elements are editable, they are not written back to the database without the proper form submission.
Normally, users can edit the contents of an item in APEX. There are instances where you want to prohibit them from doing so, but you don't want to hide the item entirely. At the conclusion of the previous step, the user Martin does not have the ability to edit the ticket information even though the form looks like it can be changed. To assist in preventing changes, each item in APEX has a read-only attribute that you can programmatically set. The approach is similar to how item conditions are managed. Since the read-only attribute can't make use of an authorization scheme, you can use the APEX API APEX_UTIL.PUBLIC_CHECK_AUTHORIZATION to determine whether or not a user has the ability to edit the data. This API takes a parameter of the authorization scheme name and will run the verification returning a Boolean result that can be used in PL/SQL logic.
Navigate to and edit items indicated in Table 9-1 by double clicking on the name on the respective page.
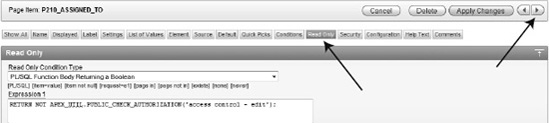
Under the Read Only section, set the condition type to PL/SQL Function Body Returning a Boolean, as shown in Figure 9-34. Set the value for Expression 1 to the following:
RETURN NOT APEX_UTIL.PUBLIC_CHECK_AUTHORIZATION('access control - edit'),Note
I recommend that you use the Page Edit Selection button in the following steps for editing the read-only setting shown in Figure 9-34. The settings for Conditions and Read Only regions are close to each other and contain similar options. Using the selection buttons at the top of the page editor makes navigation much more efficient and prevents confusion with the Conditions region. Clicking on the > icon to advance to the next item is a shortcut for moving between successive items on a page. Your changes will be saved when using the arrows to switch items. Figure 9-34 shows the location in the upper right corner.
When running the application as Martin, information about a ticket on page 210 shows data without the confusion of form elements. Authenticating as any other user will show the data in form elements and display the corresponding buttons. Results of the read-only view are shown in Figure 9-35; compare them to the form in edit mode shown in Figure 9-36.
At this point, the majority of the application is relatively secure. What you don't have is data security applied to segregate the data between application users. Any authenticated user can see and make changes to any other user's records. APEX does not provide any built-in construct for securing data. APEX does support and work well with other Oracle technologies that secure data such as Virtual Private Database, Oracle Label Security, and Transparent Data Encryption.
While there are a number of ways to deal with data segregation and security, one of the simpler methods is to use a view to enforce the data available to a user in place of all references to the base table. This method is effective and works with all versions of the Oracle database. The process works by adding a securing function to the view that utilizes the current APEX user name filtering out the data from other users.
To implement the data security, you will run a script that will create a new view named ticket_SECURE_V and then re-create the other two views, TICKET_ACTIVITY_V and TICKET_V, so that they point to the secured view rather than the TICKETS table directly. Then you will make modifications to the other key components of the pages accessing ticket data to also use the new secure views.
Locate, upload, and run the script
ch9_data_security_script.sql. Refer to Chapter 4 if step-by-step instructions are needed. You should see three rows, all of which complete successfully.Once the script completes, run your application and navigate to the Analysis page. You should notice that only tickets or ticket details that are assigned to the user that you're logged in as appear.
Next, you'll make changes to the source of your reports and tabular form.
Edit page 200 of your application.
Edit the Tickets report by double-clicking on it.
Locate and open the file ch9_report_p200.txt and copy its contents into the Region Source, replacing everything that is there and click Apply Changes.
Run page 200 and notice that you can only see the tickets that are assigned to the current user.
You need to make a similar change on the Manage Multiple Tickets page.
Edit page 230 of your application.
Edit the Manage Multiple Tickets report by double-clicking on it.
Locate and open the file ch9_report_p230.txt and copy its contents into the Region Source, replacing everything that is there and click Apply Changes when complete.
Run page 230 and notice that you can only see the tickets that are assigned to the current user.
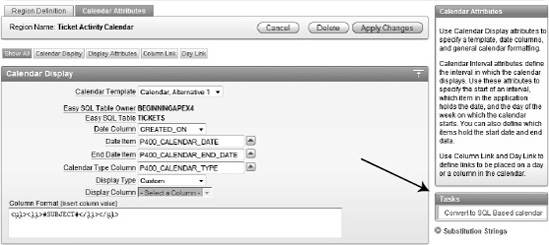
Next, you'll modify the Calendar report.
Edit page 400 of your application.
Right-click the Ticket Activity Calendar and click Edit Calendar.
Under the Tasks region on the right side of the page, click Convert to SQL Based calendar. Figure 9-37 shows the location of the link. Clicking the link will generate a conformation message and remain on the same page.
Locate and open the file ch9_report_p400.txt and copy its contents into the Region Source, replacing everything that is there. Click Apply Changes when complete.
Lastly, you should also apply this rule to the chart, as it is still allowing you to see the status from all records in the system, which is inaccurate.
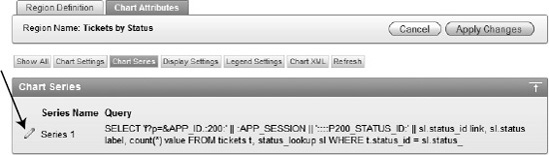
Edit page 500 of your application.
Edit the chart attributes by right-clicking on the chart name and selecting Edit Chart from the context menu.
Edit Series 1 by clicking on the corresponding icon indicated in Figure 9-38.
Locate and open the file
ch9_report_p500.txtand copy its contents into the SQL region, replacing everything that is there and click Apply Changes.Run page 500 and notice that the chart only reflects the status of either unassigned tickets or tickets that are assigned the current user.
This is a huge leap forward in data security, but you're not quite finished yet. You may have noticed that if you edit one of your records on page 210, you can use the Next and Previous buttons in the upper right corner to see records that belong to other users. Thus, you need to plug this security hole as well.
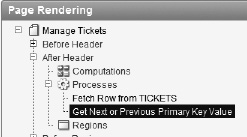
Edit page 210 of your application.
The location of the process Get Next or Previous Primary Key Value is shown in Figure 9-39. Edit the process by double clicking the name.
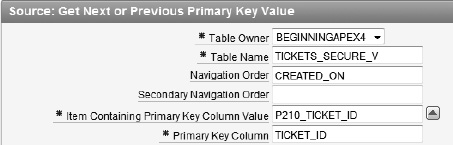
Change the value of table name to
TICKETS_SECURE_Vas shown in Figure 9-40. Click Apply Changes when completed.
Now all of your data is secured based on who is signed on to the system. Or is it?
One of the most common ways to compromise a web application is through a form of attack known as URL tampering. You don't need to be a programmer or hacker to launch this type of attack—all you need to do is alter the URL in your browser. APEX introduced the session state protection feature in release 2.2. When enabled, it adds a checksum value to the URL. If any portion of the URL is altered, the resulting checksum will not match what is expected and the page will simply not render. Implementing session state protection is simple and recommended for any report based on sensitive data.
In the previous exercise, you secured the data from the report pages and a navigation component. However, you did nothing to protect pages 210 and 220 where the actual changes are made. Thus, if a user were to tamper with the APEX URL, it would be quite trivial for them to view and edit other user's tickets. This is easily visible from the page 200 report. The end of the URL link on the report clearly shows P210_TICKET_ID:10 where 10 in this case is the ticket number. Changing that number in the URL directly will cause APEX to fetch the new record ID automatically.
You can prevent this from happening in just a few easy steps, using APEX's session state protection functionality.
Go to the Shared Components region of your application.
In the Security region, click Session State Protection.
Click Page.
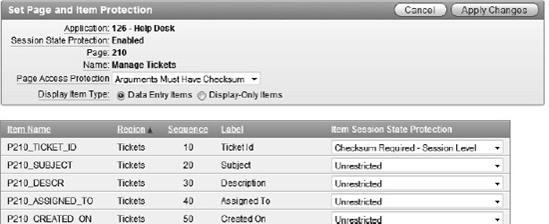
Set Page Access Protection to Arguments Must Have Checksum, set the Display Item Type to Data Entry Items, set the Item Session State Protection for P210_TICKET_ID to Checksum Required – Session Level and click Apply Changes. Figure 9-41 shows the session state protection settings for page 210.
Now run the Tickets report on page 200 in your application. Hover your mouse over the Edit icon and examine the URL. Notice the &cs= portion of the URL. The &cs= parameter is the checksum that was automatically generated by APEX. Alter the value for P210_TICKET_ID in the URL, or remove &cs= and everything to the right, and try to run the page. You will receive an error message similar to that shown in Figure 9-42.

In this chapter, you have applied new security to the help desk application by utilizing the key features of APEX. You implemented a new custom authentication scheme to allow control over users who access the sensitive parts of the application. You also reviewed conditional security with both authenticated and un-authenticated individuals and added parameters to allow the application to be used by both.