You're probably anxious to get started, but there are a few concepts that you should understand before you jump into APEX development headfirst. This chapter will introduce the fundamental development architecture of APEX and then will walk you through the different areas of the developer interface.
You'll be delving deeper into the details as you go through the book and put the architecture to work for you, but it will help tremendously to know how things are structured ahead of time. This chapter is designed to ease you in, but it isn't a complete guided tour of every nook and cranny. Be patient; you'll get there.
APEX was designed from the beginning to be a multi-tenant architecture where many different development environments (called workspaces) could exist within a single APEX instance. For instance apex.oracle.com, Oracle's free hosted instance, holds over 10,000 active workspaces, each of which is a completely separate environment unable to see or interact with any of the other workspaces. You can think of this as Software as a Service (SaaS) or a cloud computing architecture, but basically, it means that each workspace is distinct and segregated from all others.
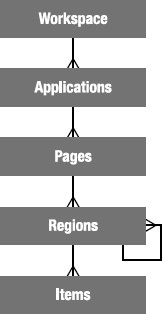
In simple terms, each workspace represents a virtual private container in which developers create and deploy their APEX applications. The development process takes place within the context of a workspace so it's important to know how a workspace is structured. Figure 2-1 uses database entity relationship diagram parlance to help explain the makeup of the objects within a workspace. I'll explore the details in the following sections.
To login to an APEX workspace you must have access to a valid APEX user. There are a number of different user roles available that dictate what you are able to do when you log in. The roles are as follows:
Instance Administrators are special users that manage and maintain the overall APEX instance. They are able to set instance level preferences and messages, create and manage workspaces, monitor space utilization, and many other actions related to the overall APEX installation. Instance Administrators are only able to log into the special INTERNAL workspace, which houses the APEX Admin Services application.
Workspace Administrators are responsible for managing the details of a specific workspace and can manage user accounts related to the workspace, monitor workspace activity, view log files, override developer locks and settings, etc. Although it is not good practice, the Workspace Administrator can also act as a developer, creating and modifying applications.
Developers are the users who create and edit the applications within the workspace. They have access to the underlying tables in the schema(s) assigned to the workspace and may create and modify database objects and stored PL/SQL units. Most people writing APEX applications only need this level of access.
End Users are only able to run applications within a workspace. They do not have direct access to any of the underlying database objects, nor do they have access to any of the APEX development modules. End users can't log directly into a workspace.
APEX Users are specific and unique to a workspace, meaning that you can have a user of the same name in multiple workspaces within a single APEX instance, but each of these users is unique. They can have their own password, settings, and are not linked together in any way.
When you're developing, you should get in the habit of logging in as a Developer as opposed to a Workspace Administrator. There are several safeguards available to help keep developers from stepping on each other within a workspace. If you log in as an administrator, these safeguards will be bypassed and you may accidently interfere with something someone else is working on. While this won't be a problem in a workspace with only one developer, it's still good to get yourself into that habit.
Note
In the context of this book, we'll be using the last three types of user. We're going to assume that APEX has been installed, a workspace has been created, and you have been given the Workspace Administrator's login credentials. If you're using the hosted instance at apex.oracle.com, then the username you were given when you signed up will have the credentials of a Workspace Administrator. If, however, you are using a local instance, either refer to the APEX documentation or get your Instance Administrator to help you set up a workspace.
Although a workspace starts off basically empty, you can have many applications that reside within a workspace. While there is no specific rule, it's likely that all of the applications within a workspace will share something: they might all use the same underlying database objects, target the same user community, or use the same method for authenticating users.
As you build an application, you'll be adding new pages and building out those pages with regions and items. Figure 2-2 shows the hierarchy between the different types of objects.
Applications are basically groups of pages that perform a task (or set of tasks) related to a business function. During the course of this book you'll be building one application within a single workspace, but it's important to know that in a typical development environment, you'll probably be working on many applications across several workspaces.
Pages are the basic building blocks of applications and contain both the user interface components and the programming logic that will process the user's input. We'll cover the rendering of the UI versus the processing of user input later, but for now consider a page roughly equivalent to a screen in desktop UI lingo.
Regions are UI items that serve as content containers. You can have any number of regions on a page, and in APEX 4, regions can be nested within other regions. This gives you the opportunity to create things like dashboards where you might nest a data report region and a graph region within a single parent HTML region.
Items are the HTML form elements that are used to present the UI to the user. These include things such as buttons, select lists, text fields, check boxes, radio groups, etc. There are two categories of items; Page Level Items and Application Level Items; the difference is that the latter is defined at the application level and is not rendered directly on the page. You can think of these as global variables. Page Level Items are defined on a specific page and assigned to a region in order to control where and how they display to the user.
While there is obviously a lot more to an application than these simple building blocks, if you understand the basic hierarchy between these, you'll have a jumpstart when it comes to building your first pages and a solid foundation when it comes to the more intricate tasks.
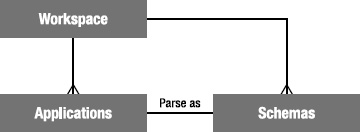
While the relationship between workspaces and applications is straightforward, it becomes a bit more complex when you introduce the relationship with database schemas. Figure 2-3 diagrams this relationship.
When a workspace is created, it is linked with at least one, and possibly many, underlying database schemas. This provides access to database objects such as tables, views, stored PL/SQL program units, etc.
When an application is created, it is assigned a single "parse as" schema from the list of schemas associated with the workspace. A "parse as" schema is the Oracle database user in which all SQL queries and PL/SQL calls run by that application will be executed. So, if your application was defined with a "parse as" schema of DOUG, a query such as:
select * from emp
would execute in the database as if it were written
select * from DOUG.emp
Because APEX applications are portable and may not necessarily be run in the same schema they were developed in, it's not good practice to hard code the schema names into your SQL or PL/SQL. Instead, APEX provides a replacement variable (one of many that you'll be introduced to throughout the course of this book) for the "parse as" schema. The #OWNER# replacement variable will be substituted with the actual "parse as" schema for the application at run time. So the following statement
select * from #OWNER#.emp
would resolve to
select * from DOUG.emp
In the most common implementations a workspace will be created and associated with a single underlying database schema. The applications developed in that workspace will have their "parse as" schema set to the only schema associated with the workspace and will utilize the database objects belonging to that schema.
Where a workspace has more than one schema assigned to it, things can become a little more complex. You might be tempted to think that if you associate three schemas with a workspace, any application in that workspace can automatically access the data in all three schemas. However, you would be mistaken.
Because an application is assigned one—and only one—"parse as" schema, all SQL statements and PL/SQL calls will be executed as that schema. It doesn't matter that the workspace is associated with a given schema; the application itself is not. If you want to access data within a schema other than the application's "parse as" schema, you must make sure the correct database level grants are in place, just as you would when using any other Oracle tool or development environment.
Take the example shown in Figure 2-4 where two tables you wish to join together as part of a SQL statement are owned by two separate schemas.
If your "parse as" schema is DOUG, then you must be specifically granted privileges on the objects within the DAVID schema to be able to access it. To do this, you would sign on to the database as DAVID (or as a DBA) and grant the appropriate database privileges on DAVID.DEPT to DOUG.
In this example, if you needed to join the two tables together in a select statement, granting the SELECT privilege on DAVID.DEPT to DOUG would suffice. Then you could write your select statement as follows:
select e.empno,
       e.ename,
       d.dept_name,
       d.location
  from #OWNER#.emp e,
       DAVID.dept d
where e.dpetno = d.deptno
The #OWNER# substitution variable would be resolved to your "parse as" schema (DOUG) and the join would work correctly as long as the correct privileges were in place.
Note
Because the grants that allow the select from the DAVID schema are put in place at the database level, it is not necessary to associate the DAVID schema to your workspace. You only need to associate a schema to a workspace if you will be using it as the "parse as" schema for an application within that workspace or need to access the schema objects directly from within the SQL Workshop.
As you have learned, an APEX instance can have many workspaces. But how many workspaces should there be? The answer isn't straightforward.
Unless you are a very small organization with very few apps, you probably shouldn't have only one workspace. On the other hand, you probably shouldn't be creating a new workspace for every new application that you code, either.
There are a couple schools of thoughts on this but I tend to think in terms of application suites. If there are a number of applications that are performing similar tasks against the same underlying data sets and are aimed at the same target set of users, then they would probably do well in the same workspace.
The key here is to use your judgment and try to keep things easy to develop and maintain. There is nothing worse than logging into a workspace to find you have to page through tens or even hundreds of apps to find the one you want to work on.
Now that you have a little background on how things are logically architected, it's time to get a closer look at the APEX development environment itself. This section will introduce you to the different sections of the APEX environment and will give you an overview of how things are laid out.
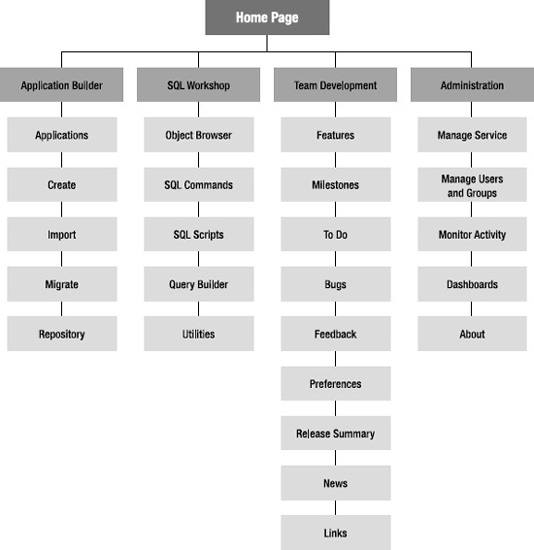
Figure 2-5 shows a hierarchical layout of the APEX menu structure. Later, you'll have a look at each of the main sections and get a glimpse of what's under the covers; this is just an introductory tour. You'll get a much deeper look as we work our way through the development processes.
As you can see, the development environment is broken down into four main sections:
The Application Builder is where you create and modify applications and pages, and it's is where you'll probably be spending most of your time.
The SQL Workshop is where you will deal directly with the underlying database objects and their related data. Think of it as a web-based version of SQL*PLUS with some GUI goodness thrown in to make things easier.
Team Development is the section that lets you enter and track information related to the development of APEX applications.
Administration is where you can manage the details of your workspace, its defaults, users, groups, etc. Be aware that a Workspace Administrator will have more options available to them than a standard developer.
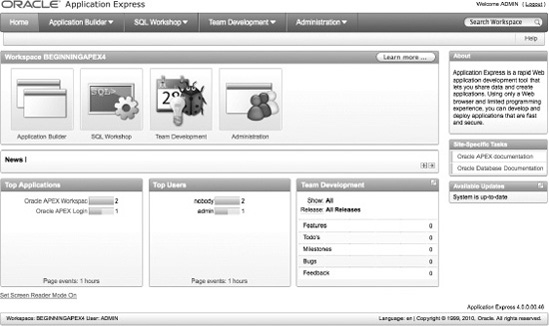
Once you login to your workspace, you'll be presented with the Workspace Home Page, as shown in Figure 2-6. The Home Page is your gateway to the rest of the development environment and provides some high level information about what's going on within the workspace.
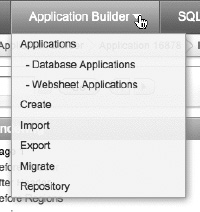
Along the very top is the APEX Logo and to the right of that is the Navigation Bar that contains a welcome message including your username and a logout link enabling you to logout of this workspace and navigate back to the main APEX login page. Just below the Navigation Bar is the main menu bar that will be available to you throughout the developer interface. It gives direct access to many of the sections you'll need to get to quickly while you're developing applications. It's worth noting that each section of the menu bar is broken down into two pieces. For instance, if you were to click directly on the Application Builder item, you would immediately be taken to the Application Builder home page. However, if you were to click on the small downward pointing triangle just to the right, you would be presented with a more detailed drop-down menu that would allow you to choose your destination a bit more granularly, as in Figure 2-7.
At the far right of the menu bar is a search box that allows you to perform context-sensitive searches. The context of the search depends on where you are in the application builder. For instance, if you are on the workspace home page, your search will be across the entire workspace. However, if you are in the Application Builder or the Administration section, the search will be limited contextually to those specific areas.
Beneath the main menu bar is the breadcrumb region. This not only gives you a visual clue of where you are in the hierarchy of the workspace, but each breadcrumb is also a quick link that will take you back to that specific spot in the hierarchy. You'll be creating breadcrumbs in your own application that will perform a very similar job.
Lastly, to the far right of the breadcrumbs is the HELP link. This pops open a new window containing context-sensitive and searchable help for APEX. In my experience, most of the details that are in the PDF manuals provided by Oracle are also contained within the context-sensitive help. This is a great resource for quickly looking things up if you don't have the manuals or PDFs on hand.
The rest of the page is dedicated to either giving you a quick link to the four main sections or providing you with information about what's going on in the workspace. There is a News region, as shown in Figure 2-8, that allows the developers within a workspace to enter information they want others within the workspace to see. If there is more than one news item active, this region will scroll through the news items, wrapping back around to the first item when it has reached the end of the list.
The three regions at the bottom of the home page show an overview of the activity within the workspace. The regions, from left to right, show the Top Applications, Top Users, and Team Development activity within the workspace. In a new workspace, there probably won't be anything in these regions, but as you work your way through the book, you'll see that start to change.
You'll notice that most of the main pages for each section of the development environment adhere to this dashboard style home page interface, the notable exception being the Application Builder. Let's look at that section first.
The Application Builder is the core of the APEX Application Development Environment. While you'll use the SQL Workshop to manipulate the underlying database objects, you'll use the Application Builder to do most of the real work when it comes to coding, testing, and debugging your applications.
Clicking on the Application Builder menu option takes you to the Application Builder home page. Like most of the home pages, it's laid out with the menu bar across the top and regions that hold tasks and quick links down the right hand side.
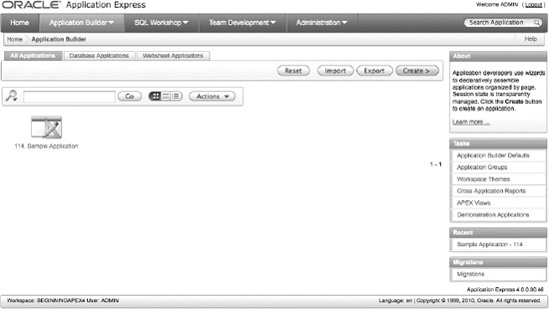
The main difference is that Application Builder's home page does not house any dashboard-style summaries. Instead, this is where you will see a list of the different applications contained within your workspace. (Figure 2-9 provides an example). It is possible, depending on your APEX Instance settings, that you might see some sample applications installed by the workspace administrator, but don't be alarmed if you don't see any applications at all.
Notice the set of tabs above the application list. This tab set provides a high level filter of which applications you see from all of those in your workspace.
All Applications shows all application types (Database and Websheet).
Database Applications shows only those applications that are built on top of a database schema. These are considered standard APEX applications.
Websheet Applications shows only those applications that are Websheet-style applications. These are new to APEX 4 and We'll talk more about them in Chapters ?? and ??.
As you can see, there is one application in my workspace named Demo Application. However, there isn't much information about it other than its name and the Application ID (16878) associated with it. This is where you begin to see the beauty of what APEX can do, not only in the Developer UI, but also in your applications.
The list of applications you see is actually a style of report called an Interactive Report or IR. IRs allow you to customize how the report and its contents are displayed. IRs are used throughout the APEX Development Interface and can also be used when creating your own applications. They're extremely powerful tools and you'll be using them a lot.
On the right side of the page are three regions that show Application Builder related tasks, recently edited applications, and a link to the Application Migration wizard. You'll be dealing more with these later, but for now you want to drill in to see the details of an application.
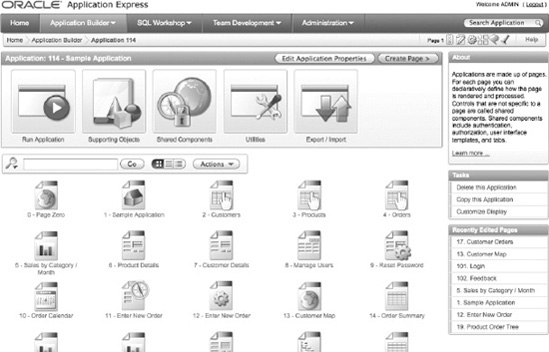
Clicking on one of the applications listed will drill into the Application home page, as shown in Figure 2-10. This page is very similar to the Application Builder home page, but instead shows all the pages within a specific application. Again, it uses an IR, so you can customize the way you see this data.
Again, notice the way the page is structured with page related tasks and recently edited pages presented along the right side of the page. This layout will become a familiar theme as you navigate through the interface.
From here, you can click on any of the listed pages to edit that page. You can also run, export, and import the application, edit the supporting objects or shared components, and access the application related utilities.
We'll wait until you get into the depths of writing an application to go any further in the application builder, but this gives you a flavor of what to expect as you move forward.
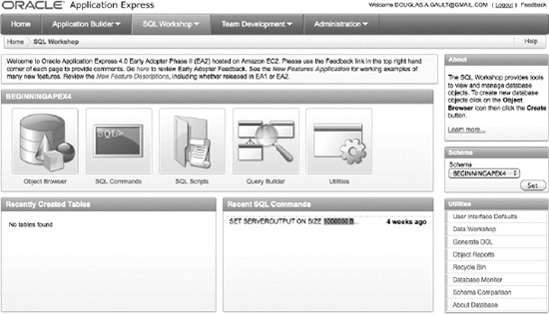
The SQL Workshop is a suite of tools that provide developers the ability to view and manage database objects in the underlying schema(s) assigned to the workspace. The SQL Workshop home page shown in Figure 2-11 provides access to each of the underlying tools and some high level information about recently created objects and commands that that have been run.
Because there may be more than one schema assigned to the workspace, there is a schema selection dialog on the right of the screen that allows you to select and set the default schema for all of the tools. You may change the schema you're working in within each of the tools as well.
Below the Schema Selection dialog is a set of direct links to each of the individual utilities you have access to. You can also reach these by clicking the utilities icon in the main section of the screen.
Scrolling down on this page reveals quick links to creating new database objects. Again, each of these can be done from within the Object Browser, but they are provided here as a quick link to the specific functionality.
Lastly, there is a link to a wizard that will create a PL/SQL API on top of a table or set of tables. This is a handy utility when you need to introduce logic between the UI and the actual data tables.
Each of the individual tools deserves its own introduction, so let's spend some time now looking at what they are and what they can achieve. You'll be using this area of APEX more heavily when you create the database object for your application.
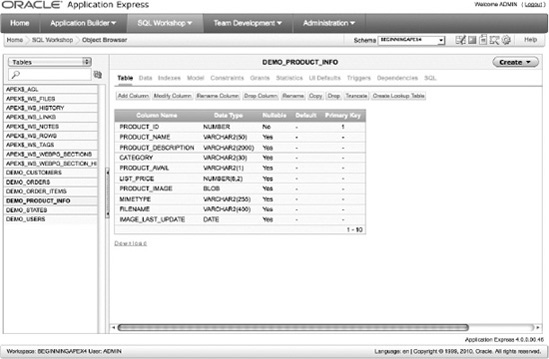
If you've been working with databases for any length of time, you've probably worked with one of the more popular GUI tools that allow you to browse and manage database objects within a schema. The APEX Object Browser is a very similar tool presented to you through your web browser. Figure 2-12 shows the Object Browser being used to examine the table DEMO_PRODUCT_INFO.
The name object browser is somewhat of a misnomer as the tool can actually be used not only to browse the objects in the underlying schema(s), but also to create new objects, browse and edit data, delete objects, and edit object definitions. While there are some limitations to the types of objects it can manipulate, it's powerful enough to do most of the daily tasks that an application developer will need to tackle.
You chose the object type you want to work with by selecting it from the drop down list in the upper left hand corner. You can search the selected object type by entering a text string into the search box just below it and clicking the refresh icon just to the right. Clicking on the name of an object displays its properties and the links to drill into more details.
While the interface for the Object Browser is pretty intuitive, there are some interesting things to note. In the upper right hand corner is a drop down list that allows you to set the current schema. The list contains all schemas currently assigned to the workspace. You can switch between them simply by choosing a new one from the list.
Also, to the right of the drop down list is a set of quick link icons that takes you directly to the other tools within the SQL Workshop.
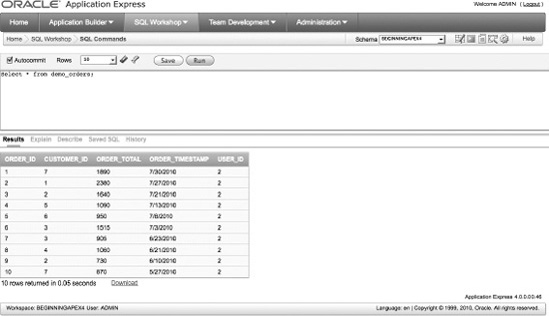
The SQL Command Interface allows you to interact with the underlying schema(s) using standard SQL commands or PL/SQL as you would in any other GUI tool or SQL*Plus. The difference is that you can save the statements for use at a later time. Figure 2-13 shows a simple SQL statement as executed in the SQL Command Interface.
While its core function is quite straight forward, the SQL Command Interface is more robust that it first appears. Beyond the ability to save and retrieve SQL and PL/SQL, it also has the ability to run explain plans on statements and allows you to view your statement history. Therefore, if you ran a script or statement that was particularly useful, but forgot to save it, you still have the potential to retrieve it from the history buffer.
The SQL Command Interface also integrates with the Query Builder (described below) allowing you to load and manipulate saved statements built in the Query Builder.
Note
By default, all SQL statements executed via the SQL Commands Interface are automatically committed. To override this setting and enter into transactional mode, uncheck the Autocommit checkbox in the tool bar. Once this is done, you will can manually commit and rollback your SQL statement.
There is no way to turn off Autocommit permanently so you will need to remember to do this any time you want to enter transactional mode.
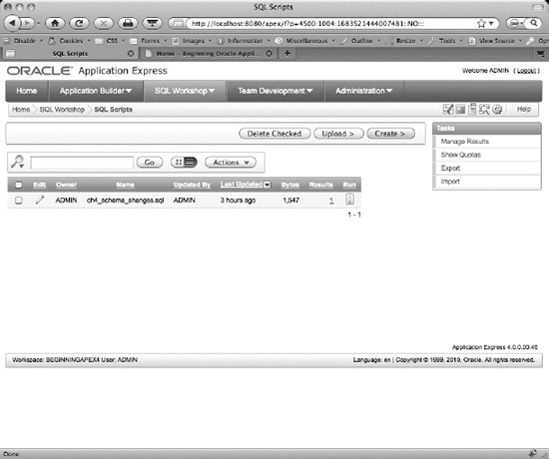
The SQL Scripts Interface allows you to manage and run sets of SQL commands saved into script files. A single script can contain one or more SQL statements or PL/SQL blocks. SQL scripts that are coded outside of APEX can be loaded into the SQL Scripts Repository and edited or run from there. You may also create SQL scripts from scratch using the SQL Scripts Interface. Figure 2-14 shows the main SQL Scripts Interface page.
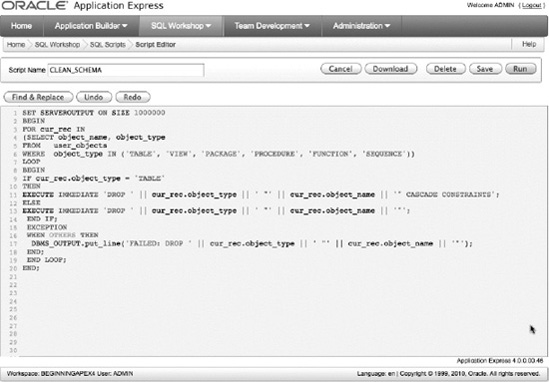
In this example, there is one script, called CLEAN_SCHEMA, loaded into the script repository. By clicking on the edit icon, you can edit the contents of the script, as shown in Figure 2-15. APEX 4 now provides syntax highlighting inside the script editor. The editor also has a Find and Replace function as well as undo and redo.
You can also download the script to a local file so that you can edit it in your favorite local text editor. When you're done, simply cut and paste it back into the editor or upload it as a new script file.
Note
When uploading a script file to the repository, the name of the script must be unique. You can't overwrite an existing script file of the same name with a new version without first deleting the script from the script repository.
Once a script is ready to run, you can click the Run icon in the list (or the Run button in the editor) and you will be stepped through the Run Script wizard. This allows you to choose whether you want to run the script immediately or run it in batch mode. If you chose batch mode, your script will be entered into a queue where it will be executed when it reaches the front of the queue.
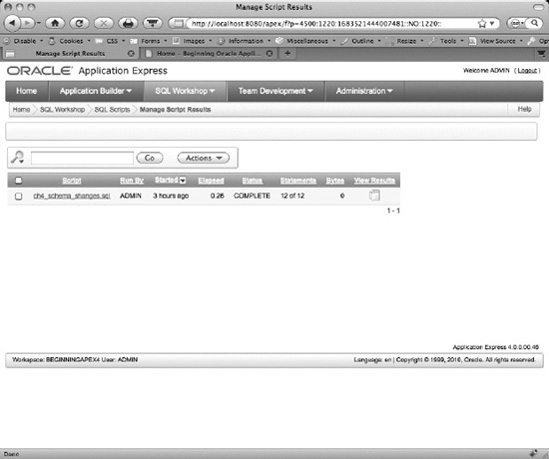
Either way you will be taken to the Manage Script Results page of the SQL Script Interface as shown in Figure 2-16. This screen allows you to see the statusand certain high level details of the script's execution. In the case of scripts that have been submitted in batch mode, you can also see the status of the script within the queue.
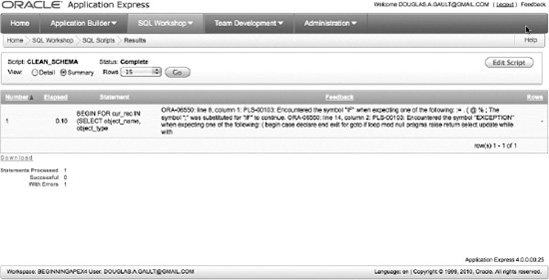
Clicking on the View Results icon will show you the final results of running the script. In Figure 2-17, you can see that the script had an error, the details of which are displayed within the body of the report. If the script were successful, no errors would be shown and the statement results at the bottom of the page would show zero errors.
The Query Builder is a utility that allows you to build SQL Select statements using a more graphical interface. While it's not quite drag and drop, it is fairly intuitive.
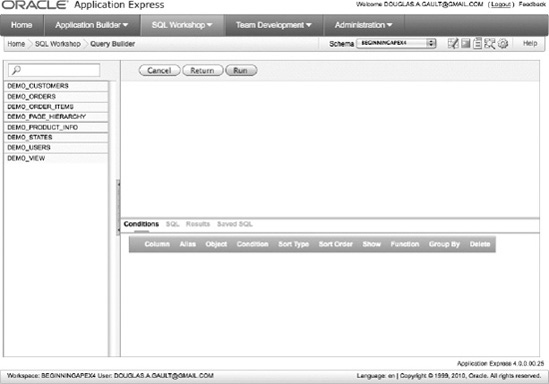
When you first enter the Query Builder, you're presented with a screen that lists all of the tables and views that are available in the currently active schema. Figure 2-18 shows the initial Query Builder screen.
From here you may begin to build your query. To include a table in your select statement, simply click on it in the list to the left. A representation of the table will be placed in the blank region of the screen above the Conditions region. You may add as many tables as you like to your query and may even include the same table more than once simply by clicking on it again. You'll notice that if you include more than one instance of the same table, the new instance will be suffixed with a sequence number differentiating it from the original table.
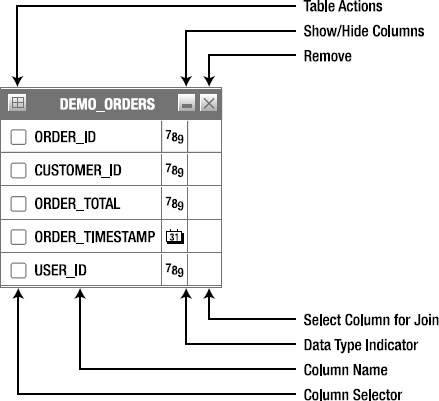
Figure 2-19 shows an example graphical representation for the DEMO_ORDERS table and outlines the different interactive features.
Taken from top to bottom as they appear in Figure 2-19, these action areas are:
Table Actions displays a dialog allowing you to do one of several things:
Check All allows you to quickly select or deselect all columns of the object for inclusion in the query being built.
Add Parent allows you to select and add a parent table, as defined by foreign key relationships, to the query builder.
Add Child allows you to select and add a child table, as defined by foreign key relationships, to the query builder.
Show/Hide Columns expands and collapses the object so that the column definitions are shown or hidden.
Remove deletes the table and any of its related clauses from the select statement.
Select Column for Join is activated by clicking on the blank square next to a column name. This will darken the square and put the Query Builder into "Table Link" mode. Then you can click on another blank square, either within another table or within the same table, and the Query builder will insert an EQUALITY where clause between the two columns in the SQL statement.
Data Type Indicator indicates the data type of the column, such as number, character, date, etc.
Column Name indicates the column name as defined in the table description.
Column Selector allows you to individually select or deselect columns to be included in the SQL Statement for processing. This may also include columns that you may want to use in the where clause but not display in the output of the SQL statement. The basic rule is that you need to select all the columns you want to display, but you do not necessarily have to display all the columns you select.
As you begin to add and join tables and select columns to operate upon, the region at the bottom of the screen will begin to change. This region is subdivided into several tabs, as follows:
Conditions Tab shows one row for each column selected in the area above and allows you to further define its attributes. (More on this feature in just a moment.)
SQL Tab displays the SQL statement as the wizard builds it. While it's not directly editable, you can easily highlight and cut the statement to the clipboard from here.
Results Tab shows the results of running the SQL statement and allows you to download the resulting data in CSV format.
Saved SQL Tab allows you to save, recall, and manage statements that have been built with the Query Builder. There are also filters that allow you to search and limit which saved queries display.
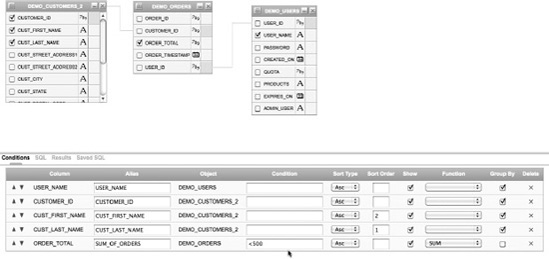
All but the Conditions Tab are self explanatory, so I'll go over this one in a little bit more detail. Figure 2-20 shows an example three table join with five columns selected to operate upon.
In this example, the following modifications have been applied to the query:
Changed the alias of the ORDER_TOTAL column to SUM_OF_ORDERS.
Limited the result set to only those records where ORDER_TOTAL is less than 500.
Sorted the records returned by CUST_LAST_NAME, CUST_FIRST_NAME Ascending.
Performed a SUM function on the ORDER_TOTAL column.
Grouped the query by USER_NAME, CUSTOMER_ID, CUST_FIRST_NAME, CUST_LAST_NAME.
Based on the column selections and the restrictions and changes introduced in the Conditions tab, the SQL statement (as it appears in the SQL Tab) would look like this:
select   "DEMO_USERS"."USER_NAME" as "USER_NAME",
         "DEMO_CUSTOMERS_2"."CUSTOMER_ID" as "CUSTOMER_ID",
         "DEMO_CUSTOMERS_2"."CUST_FIRST_NAME" as "CUST_FIRST_NAME",
         "DEMO_CUSTOMERS_2"."CUST_LAST_NAME" as "CUST_LAST_NAME",
         sum(DEMO_ORDERS.ORDER_TOTAL) as "SUM_OF_ORDERS"
 from     "DEMO_CUSTOMERS" "DEMO_CUSTOMERS_2",
         "DEMO_USERS" "DEMO_USERS",
         "DEMO_ORDERS" "DEMO_ORDERS"
 where    "DEMO_USERS"."USER_ID"="DEMO_ORDERS"."USER_ID"
 and      "DEMO_CUSTOMERS_2"."CUSTOMER_ID"="DEMO_ORDERS"."CUSTOMER_ID"
  and    "DEMO_ORDERS"."ORDER_TOTAL" <500
group by DEMO_USERS.USER_NAME, DEMO_CUSTOMERS_2.CUSTOMER_ID,
 DEMO_CUSTOMERS_2.CUST_FIRST_NAME, DEMO_CUSTOMERS_2.CUST_LAST_NAME
While the query builder is very useful and allows you to put together a basic query fairly quickly using a simple GUI, it does have its limitations. I personally use the Query Builder to get the skeleton of a query defined. I then take the query to the SQL Commands window or into my favorite SQL IDE and I fine tune it from there.
As a final note, it's worth mentioning that the Query Builder is linked to from several places within APEX, so any time you're prompted for a SQL statement (for example, as the basis for a report) you will be able to open the Query Builder in a pop-up window and return the query to the calling form.
The SQL Workshop Utilities section gives you access to tools and reports that help you view and manage information about the underlying database objects and their data. In this section, I'll introduce each tool set and its main purpose. However, the majority of these tools are very straightforward, so in most cases I'll leave the deep details for you to explore on your own.
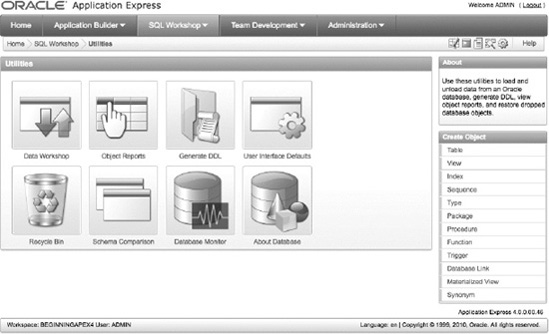
The Utilities home page (as shown in Figure 2-21) presents you with a quick icon based menu to each of the individual utility areas. Clicking on any one of these icons takes you directly to the tools page for that category.
The Data Workshop provides tools that import and export data in many different formats including comma or tab separated, XML, or spreadsheet data. These tools also help you manage files that you have loaded into either the Text or Spreadsheet repository.
The Object Reports provide detailed reporting capabilities on all of the objects within the schemas tied to the workspace. Reports include information about the tables and objects, their sizes, statistics, grants and privileges, their status, and exception reports to show possible problem areas.
The Generate DDL wizard allows you to choose a schema associated with the workspace and generates a script that can be used to recreate some or all of the objects with that schema based on your selection. The generated script does not include any insert statements for the data that resides within the database objects, but it's a good way to easily recreate the underlying objects an application might use.
When an object is dropped, Oracle does not immediately remove the space associated with the table, but instead renames the table and places it and its associated storage in the Recycle Bin. The Recycle Bin utility allows you to view and potentially recover objects that have been dropped from the schemas associated with a workspace. You may also purge the Recycle Bin, allowing the space to be reclaimed by the Oracle database for use somewhere else.
The Schema Comparison utility allows you to compare the objects within two separate schemas and create a difference report. You may choose to compare only certain attributes or all attributes of the objects within the selected schemas. The limitation here is that both schemas must be assigned to the workspace in order for the comparison to take place.
The last two utilities (Database Monitor and About Database) are special utilities that require the user running them to have access to a database login that has been granted the DBA role. The Database Monitor utilities allow the privileged user to view Sessions, Systems Statistics, Top SQL, and Long Operations reports. The About Database report shows detailed information about the database instance and the APEX environment.
The last two functional areas of the UI, Administration and Team Development, are complex enough to truly deserve their own chapters. Therefore, I'll refer you to the chapters that cover these areas in depth. Chapter ?? covers deploying applications; Chapter ?? is about managing workspaces; Chapter ?? goes over team development.
You'll definitely be dipping into administrative tasks throughout this book, so if you want to have a full understanding of administration before we start, I would suggest that you take a detour and read these chapters now to get a good foundation. However if you're prepared to learn on the fly, go to the next section where you'll start the real programming.
The architecture of APEX may seem a bit daunting at first, but once you actually start working with it, things will begin to fall into place and you'll understand more and more about how it all fits together. If you take away only one thing from this chapter, let it be that a workspace is essentially your development sandbox. Everything you do happens in the context of a workspace. Everything else—from a development standpoint—is much like any other development environment. Are you building a new application? Then it needs to be created within a workspace. Do you need access to a schema to build that app? Then it needs to be assigned to your workspace. You get the picture. Now ... on to the fun!


