
Now that you have a graphical representation of what your underlying tables should look like, in the form of an ERD, it's time to dig in and start creating the objects. As mentioned before, you could use your ERD tool to generate the scripts, but to get you used to using the SQL Workshop, you're going to be creating these objects from scratch.
Note
For this and many of the following chapters, you'll need to have downloaded the code that accompanies the book. If you have not already done so, download the code .zip file from this book's home page at www.apress.com. Once the .zip file is downloaded, unzip it to a directory where you can retrieve the files easily.
SQL Workshop's Object Browser is somewhat misnamed, as it not only allows you to view database objects, but also allows you to create and edit them as well. For now, you're going to skip your USERS table; you'll come back to it later in the book. Right now, you're going to focus on your TICKETS and TICKET DETAILS tables. From this point forward, you'll be following step-by-step instructions that will be interspersed with figures and discussions about what you're trying to achieve and why you're doing it the way you are. So let's get started:
Start by logging into your APEX workspace. You'll be presented with the workspace's home page, which, unless you've been doing other work in this workspace, will probably look a little sparse.
Once you're at your workspace home page, use the tabbed navigation bar across the top of the page and pull down the SQL Workshop sub-menu by clicking on the arrow on the right side of the tab (see Figure 4-1).
In the Object Browser, click on the Create button in the upper right hand corner and select Table from the drop-down menu.
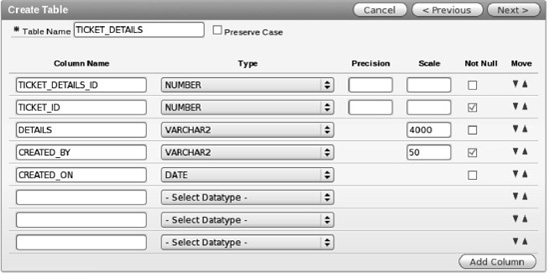
The Create Table Wizard will open. The first screen (Figure 4-2) allows you to name the table and enter the details for each of the columns of the table.

The following wizard will walk you through the steps of creating a table. The first screen allows you to name the table and enter the name and details for each of the columns of the table.
Using the two arrows under the Move column, you can move the columns to what ever order you like. This affects the order in which they are defined and stored in the table.
If you run out of empty rows to enter columns into, you can use the Add Column button to add a new empty column definition row to the form.
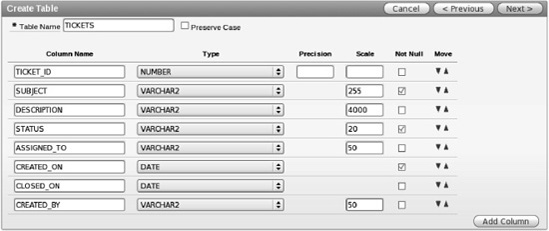
Enter the details for the TICKET table as indicated in the ERD from the end of Chapter 3 and in Figure 4-2. Then click Next.
The next page (Figure 4-3) lets you choose how you would like the primary key to be populated and which column to use as the primary key. The four options for primary key are fairly self-explanatory, but the two in the middle are probably the most common. You're starting from scratch and therefore don't have any existing sequences defined in your database. By selecting "Populate from a new sequence," APEX will create a sequence for you and will create a database trigger on the table that will populate the selected Primary Key column with the next value from the sequence, unless the field already has a value. You're given the chance to name the sequence within this step as well. In this instance, you'll use the default name given.
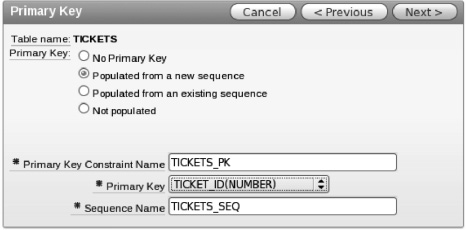
Select the Populated from a new sequence radio button and after the screen changes, select TICKET_ID (NUMBER) for primary key. Click Next.
You're not going to create any foreign keys in this table just yet, so simply leave the defaults and click Next.
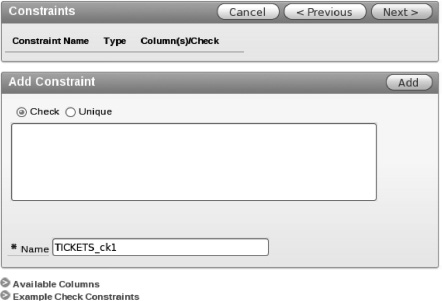
The Constraints screen in Figure 4-4 allows you to add either Unique or Check constraints to the table definition. Add a constraint by defining the constraint in the Add Constraints region and clicking the Add button to add it to the list. Below the Add Constraints region are two help regions. Clicking on the gray arrow to the left of the region title will expand the help and show the columns you defined in the table and examples of how to code various check constraints.
Once you've clicked the Add button, the definition of the constraint is added to the list of constraints at the top of the page. You can define as many constraints on a given table as necessary. Once you're done, simply continue on with the wizard.
You're not going to create any Unique or Check constraints here, so stick with the defaults and click Next.
The final step of the Create Table wizard shows you the code that will be executed and allows you to make any changes. For instance, the Table wizard doesn't allow you to add column level comments, but you could easily add them by editing the text displayed in the SQL region. You can see the code for the USERS table in Figure 4-5.
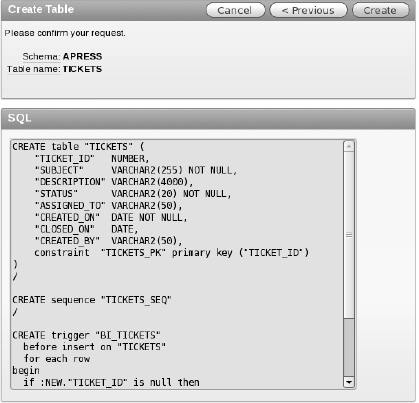
Review the text in the SQL region presented by the Create Table Wizard. Click Create to complete the wizard.
Once you've successfully completed the wizard, you'll be taken back to the Object Browser and the definition of the TICKETS table will be displayed. Take a moment to examine the definition of the table. You should see all the columns that you defined listed. If you click on the Constraints tab across the top of the definition region, you'll see a number of different constraints including the primary key constraint on TICKET_ID.
In the upper left hand corner of the object browser, there is a select list that defines the object type being browsed. Use this select list and choose Sequences. You'll see that APEX created a sequence called TICKETS_SEQ that will be used fill the TICKET_ID.
Once again, use the Object Type select list and chose Triggers. You'll see a trigger named BI_TICKETS (BI stands for "before insert"). Clicking on the Code tab above the trigger details will show the code for the trigger that is using the TICKETS_SEQ sequence to fill the TICKET_ID if it's null. You should see code similar to the following:
create or replace trigger "BI_TICKETS"
  before insert on "TICKETS"
  for each row
begin
  if :NEW."TICKET_ID" is null then
    select "TICKETS_SEQ".nextval into :NEW."TICKET_ID" from dual;
  end if;
end;
Now that you have your Tickets table defined, let's go back and create your TICKET_DETAILS tables. This time you'll be creating a foreign key to the TICKETS table. You'll be creating the foreign key to the TICKETS table as a CASCADE DELETE. This means that if you delete the ticket, the ticket details will automatically be deleted as well.
Start the Create Table wizard using the Create button.
Enter the table name and column definitions based on the ERD and Figure 4-6, and click Next.
The next set of steps is purposefully a bit more vague than the previous ones. You should be used to using the Create Table wizard by now, but if you need a refresher, just look at the previous steps.
Choose to populate the primary key from a new sequence, select TICKET_DETAILS_ID(NUMBER) as the primary key, and click Next.
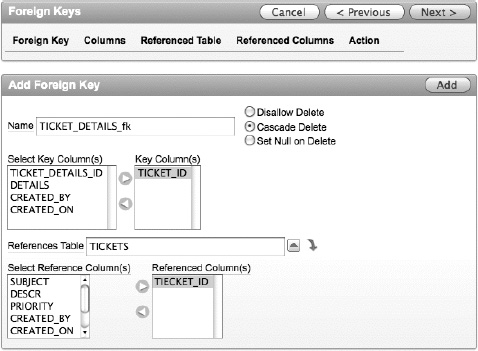
Add a foreign key between the TICKET_ID in the TICKET_DETAILS table and the TICKET_ID in the TICKETS TABLE. Make sure that the Delete action is set to Cascade Delete. Your screen should look similar to that in Figure 4-7.
Once the foreign key is defined, click Next(see Figure 4-8).
No constraints are required for this table. Click Next.
Review the SQL and click Create to complete the wizard.

Now that you have your two base tables defined, you can begin working to migrate the old data into your shiny new data structure. SQL Workshop's Data Workshop utility can be used to load and unload data from an Oracle schema in a number of ways, as shown in Figure 4-9. The Data Load option allows you to choose Text Data, XML Data, and Spreadsheet Data.
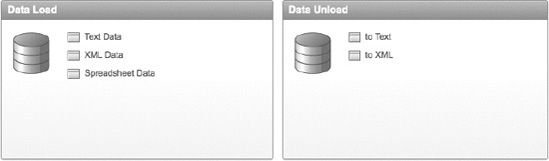
Although three separate options are presented, the Text Data and Spreadsheet Data options actually utilize the same Data Load wizard. There is little or no discernable difference in the actions of the wizard no matter which option you selected.
The third option (XML Data) allows you to load data that has been exported in Oracle's proprietary XML Data Transport format. The format looks like this:
<ROWSET>
<ROW>
  <USER_ID>2</USER_ID>
  <USER_NAME>DOUG</USER_NAME>
  <PASSWORD>A69856770A9AB9CBB0479573FCB3E2A5</PASSWORD>
 </ROW>
 <ROW>
  <USER_ID>3</USER_ID>
  <USER_NAME>DAVID</USER_NAME>
  <PASSWORD>E2E89134B8AC6E1FFC14139A6FB2C10B</PASSWORD>
 </ROW>
</ROWSET>
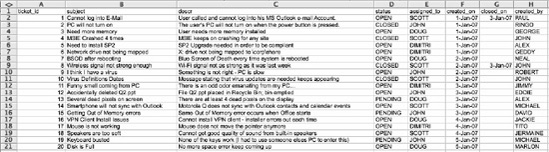
In your imaginary company, your help desk technicians have been using Microsoft Excel to track tickets, so you're going to load the data using the Spreadsheet option. A quick glance at the spreadsheet that your technicians use shows you that they have two separate sheets in the Excel workbook: TICKETS and TICKET_DETAILS.
Knowing that you're going to be loading your data into pre-existing tables that already have primary and foreign keys in place, you need to be careful about how you load the data. TICKET_DETAILS depend upon the Tickets for their parentage so you need to load the TICKETS data first. Your spreadsheet should look like Figure 4-10.
Now that you have the TICKET data in the clipboard, you can switch back to APEX and use the Data Load Wizard to insert this data into your TICKETS table. Here are the steps to follow to load your data from spreadsheet into database:
Locate the helpdesk_spreadsheet.xls file where you downloaded the supporting files for this book and open it with Microsoft Excel. Once it's open, navigate to the TICKETS tab. You'll notice that you have a row for each TICKET and a header row that contains the column headings for each of the columns.
Select all the data, including the column headings, and copy it to the clipboard.
Switch back to your web browser and, using the pull-down menu on the SQL Workshop tab, select Data Workshop.
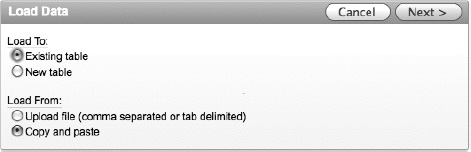
Under the Data Load region, click Spreadsheet Data. You should see the Load Data dialog in Figure 4-11.
In the wizard, select Existing table for Load To and Copy and paste for Load From and click Next.
Select your parse as schema from the Schema select list and click Next. This will be the same schema in which you created your tables in the Object Browser.
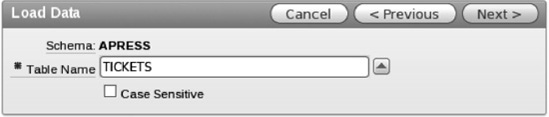
Enter TICKETS for the Table Name, as shown in Figure 4-12, and click Next. This is the table into which you're going to be loading the TICKET data.
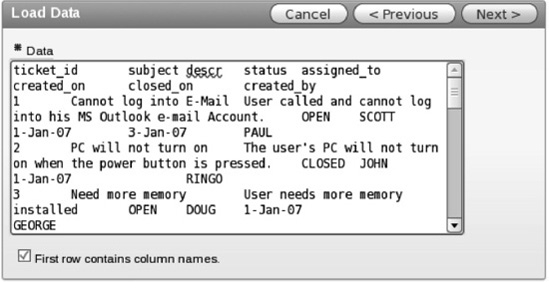
Paste the data that you copied to the clipboard in step 2 into the Data Text area and ensure that First row contains column names box is checked, as in Figure 4-13, and click Next.
Once you click Next, APEX will parse the data you've pasted in and do its best to match the column names in the first row of the spreadsheet data to the column names of the table you're loading the data into. On the next screen, you'll be presented with the column-mapping screen so that you can check its accuracy and, if necessary, make some alterations and corrections.
APEX is very good about matching column names as defined in the spreadsheet with those that have the same name in the table. However, if the names differ, it won't try to guess but instead leaves the mapping to you.
If you scroll to the right, you'll see that APEX didn't map the e-mail address or the phone number in your example to a table column. You'll need to map these data elements to the correct table columns manually. You can do that using the drop-downs shown in Figure 4-14.
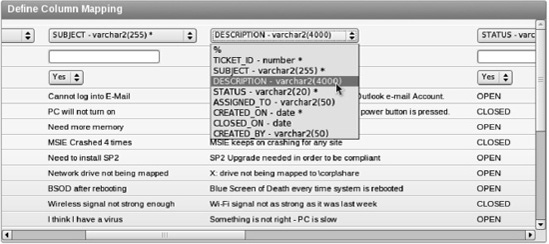
Scroll to the right in the Define Column Mapping region and map the third column to DESCRIPTION using the select list above the column data. Examine the other mappings to make sure that APEX made the correct selections.
When you're sure all the mappings are correct, click the Load Data button to load the data into the USERS table.
After the data is loaded, you'll be presented the Spreadsheet Repository screen in Figure 4-15. That screen shows you that 20 rows were loaded into the database and zero errors occurred during loading.

If you navigate to the Object Browser, select your TICKETS table, and look at the data in that table, you can see that the records that were in your spreadsheet have now been loaded into the database. To finish the job, you'll need to load the data for the TICKET_DETAILS. Here's what to do:
Navigate to the Data Workshop and click on the Spreadsheet Data link in the Data Load region and click Next.
In the wizard, select Existing Table for Load To and Copy and paste for Load From and click Next.
Select your parse as schema from the Schema select list and click Next. This will be the same schema in which you created your tables in the Object Browser.
Enter TICKET_DETAILS for the table name and click Next.
In Microsoft Excel, navigate to the TICKET_DETAILS tab and copy all the data, including the column headings, in that spreadsheet to the clipboard.
In your browser, paste the data that you copied to the clipboard into the Data Text area and ensure that First row contains column names is checked and click Next.
Review the mappings made by APEX in the Define Column Mapping region. This time it should have mapped everything correctly. Click Load Data to complete the data load. The summary should say that 22 records were loaded into the TICKET_DETAILS table with zero errors.
You now have both of the main tables created and loaded with the legacy data. This alone is enough to start developing an application, but you're not quite ready to begin yet.
Have a look at the definitions and data of the tables you just created. They are basically just mirror images of the spreadsheet tabs the technicians were using before. If you examine the data closely, you'll notice that there are still some areas where the data is still not quite normalized the best that it could be.
For instance, in the TICKETS table, you'll notice that the STATUS column only has three values—OPEN, CLOSED, and PENDING—which repeat over and over. The data values in this column indicate that it's a perfect candidate for creating a lookup table. While it's tempting to go off and create the table manually with the Create Table wizard and then manually migrate the data, APEX can actually create lookup tables—complete with their own sequence, trigger, and foreign key—and modify the original table so that it points to the new lookup table, all without you writing a line of code. Here's how:
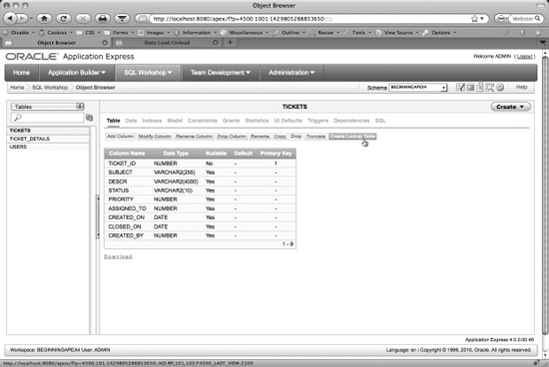
Navigate to the Object Browser and select the TICKETS table in the Object List on the left hand side of the screen. You should see results similar to those in Figure 4-16.
Make sure that the Table tab is selected.
Below the Tab bar is a set of button-like links. Click the Create Lookup Table button, as shown by the mouse arrow in Figure 4-16; it starts the Create Lookup Table wizard.
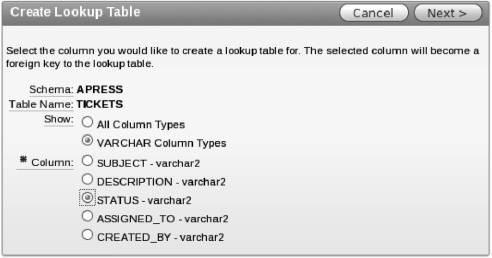
The first page of the Create Lookup Table wizard (Figure 4-17) gives you the option to show only VARCHAR column typesor all column types. It defaults to VARCHAR because it is the most likely to be the candidate for lookup tables. Looking at the columns that are presented in the wizard, you see that one of the VARCHAR columns is your STATUS column.
Select Status as the column from which you want to create the lookup table and click Next.
On this screen you're able to name your lookup table and the sequence that will be related to it. APEX has chosen a reasonable name for your new table and sequence so take the defaults and click Next.
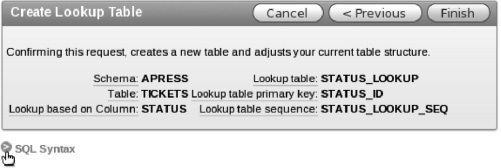
The final screen of the wizard (Figure 4-18) provides you with information about the choices made and the action that is about to be performed. It's easy to miss the SQL Syntax link just below the wizard region. Click on the SQL Syntax link to show the SQL.
Examining the SQL will show the steps that will be taken to create the new lookup table, associated sequence, and trigger; insert the data into the table; and update the data in the originating table so that it references your new lookup table. That's quite a lot of work saved.
Use the Object Browser to examine the objects that were created by the wizard.
The SQL Scripts tool of SQL Workshop allows you to create, upload, manage, and run SQL Scripts. These scripts are similar to SQL*PLUS scripts in many ways. However, if you use scripts written for SQL*PLUS, any SQL*PLUS-specific syntax will be ignored by APEX.
Once a script is created or loaded, it is moved into the Script Repository where it will remain until you decide to remove it. From the script repository, you can decide to edit or run the script. Once you run a script, APEX stores the results for you to view later. For example, you can come back later to review it for possible error messages.
You're going to load and run a script that will modify your underlying data just a bit, and here's why.
In the real world, the spreadsheet you received from your help desk team would have current dates and data in it; however, the ticket dates in the spreadsheet that is downloaded with the .zip file accompanying this book are very likely not current. This would cause you to have to search back in history for the tickets if you were searching by date. This script will update these dates so that they're recent.
Another thing that you need to take into consideration is that you loaded a bunch of data into your tables that already had IDs assigned to them. Because the IDs were loaded with the data, you didn't use your database sequences. Therefore, your sequences are out of synch with your data. You need to drop and recreate your sequences so that the next sequence number is greater than the largest ID used in the associated table.
You're also going to alter the Before Insert trigger that was automatically created on the TICKETS table so that it automatically fills in the CREATED_ON column.
Lastly, you're going to create a function that, when passed a status name such as OPEN, will pass you back the ID for that status. This function will be used in a number of places, as you can't guarantee you know the ID value of a given status. Therefore, this function is the only safe way to get the associated ID for a given status.
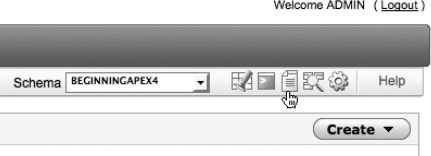
When you're in any of the SQL Workshop tools, there is an icon menu in the upper right corner of the screen that provides quick links to each of the other tools. In Figure 4-19, the hand-shaped pointer is pointing to the SQL Scripts icon.
Here's what to do to create the Lookup function to return status ID codes:
Click on the SQL Scripts icon in the SQL Workshop's Quick Menu. If you're not already in the SQL Workshop, use the pull-down menu from the SQL Workshop tab and chose SQL Scripts.
Click the Upload button in the upper right section of the screen.
Click on Browse to search for the SQL file to upload.
In the pop-up file finder window, locate and select the ch4_schema_changes.sql file and click Upload. You do not need to give the script a name; it will default to the name of the script as it appears at the OS level.
Once the file has been uploaded, you'll be presented with the SQL Scripts report showing the script that you just uploaded. From this point, you can either edit or run the script. If you want to see what the script contains, feel free to edit it. You are able to run the script from the edit screen as well.
Run the script by clicking either the Run button (if you're editing the script) or the Run icon (if you're still viewing the SQL Script report).
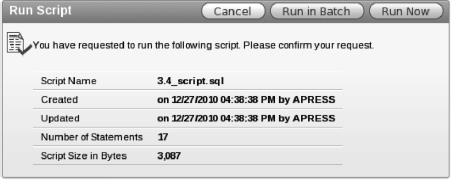
As shown in Figure 4-20, you'll be asked to make a selection between Run in Batch and Run Now. Select Run Now.
The script will be run and you will immediately be taken to the Manage Script Results page. You'll most likely see that your script status is COMPLETE.
Click on the View Results icon at the very right of the report row to see the results of the script. Figure 4-21 shows the button to click.

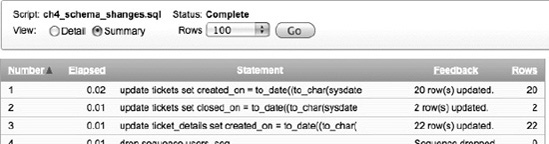
The View Results page allows you to see what happened when the script ran. The default view shows you an overview by displaying the first 50 or so characters of each statement along with some brief feedback and the number of rows affected by the statement. Figure 4-22 shows the results from your run of the script.
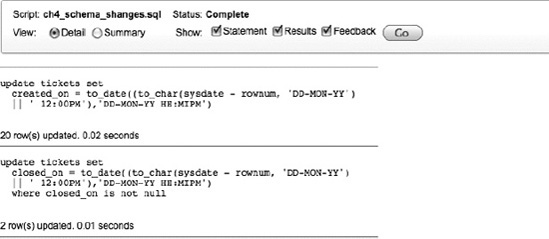
You can, however, get more detailed feedback by changing the report view to Detailed. Doing so will give you far more insight, especially if you have a script that has errors during execution. Figure 4-23 shows a detailed view.
In either view you can quickly see if the script encountered any errors by scrolling to the bottom of the page and looking at the report footer where the report will display the total number of statements processed, the number of those that were successful, and the number that generated errors. Figure 4-24 shows the number of statements process from your run of the script.
Before you start to write your application, one last thing you can do that will make your life easier along the way is to create some User Interface (UI) Defaults. This, in my opinion, is one of the most underutilized features of APEX.
UI Defaults allow you to customize the default display attributes for tables, views, and their columns. They can be used to control many properties including alignment, searchability, display sequence, what type of item is created for a column, default values, and many more.
For instance, when you're creating a new form or report via a wizard (which is most of the time), APEX will ask you if you wish to use UI Defaults. If you select yes and defaults are available, APEX will apply them to the appropriate regions or items based on the tables or columns for which the attributes are defined. UI Defaults are divided into two categories: Attribute Dictionary and Table Dictionary.
The Attribute Dictionary allows you to create more generic UI Defaults based on attribute names. Consider this a more macro level definition.
Let's say you create an Attribute level default for any attribute named PHONE_NUMBER. If a column named PHONE_NUMBER appeared in a table and didn't have Table Dictionary default assigned, the Attribute Dictionary default would take effect.
Dictionary Attribute definitions can also be assigned synonyms, allowing more than one attribute name to share the same actual definition. So, for instance, you could create the synonyms PHONE, TELEPHONE, PHONENUMBER, etc. for the original PHONE_NUMBER definition. If the wizard ran into a column with any of those names, it would apply the PHONE_NUMBER defaults to the APEX item that is created.
The Table Dictionary allows you to define defaults for a specific table or column and those defaults will only be applied to APEX regions or items created for those specific items.
Some things to note about UI Defaults:
Table Dictionary defaults always override those of Attribute Dictionary defaults.
When an item is created using UI Defaults, there is no relationship established with the UI Default. Therefore, if you later change the definition of the UI Default, the changes will not be propagated to previously created items.
Items created before UI Defaults have been established will not inherit properties of the UI Default.
Developers can choose not to use UI Defaults, and even if they are used, can override them after the component is created.
Having said that, UI Defaults do help ensure consistency across your application and make your job much easier as a developer.
UI Defaults can be managed either from the SQL Workshop's Object Browser or from SQL Workshop's Utilities page. Here's what to do:
You'll be taken to the UI Defaults dashboard where things will likely look pretty sparse. This is because you haven't actually created any UI Defaults yet. The first step to creating UI Defaults is to synchronize the Table Dictionary with the database so it knows what tables are in your schema.
This will initiate the Synchronization wizard. This wizard shows you the number of tables with defaults defined, and the number without. In your case, you should have zero tables with defaults and four tables without.
Click the Synchronize Defaults button to begin the synchronization with the database. This may take a little bit of time.
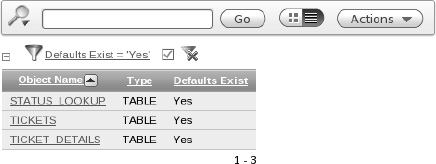
Once the Table Dictionary is synchronized with the definitions is the database, you're presented with the report in Figure 4-25 that shows you each table that now has base UI Defaults.
You can now go and view or edit the UI Defaults for each of these tables. Start by viewing the UI Defaults for the TICKETS table.
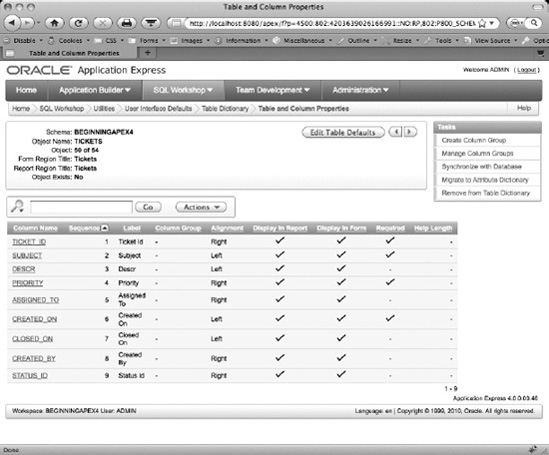
Click on the TICKETS link in the report. You should see the results in Figure 4-26.
On the page in Figure 4-26 you can see an overview of the UI Defaults for the TICKETS table. In the upper portion of the report you see the Table level definitions, including what the Form and Report regions based on this table will be called. In the lower portion is a list of the table's columns, the labels that will be used, how they will be aligned when used in a report, whether they will be displayed in a report or form, whether their Required attribute will be set in a form, and whether or not they have any help text.
Next you'll edit both the Table level and Column level attributes.
Clicking on any of the column names will take you to a page that allows you to set UI Defaults for that specific column. As you peruse the column UI Defaults, you'll notice that several things have been set for you, including the REQUIRED attribute. When APEX synchronized with the database, it saw that certain fields were marked as NOT NULL at the database level and translated those constraints into UI Defaults for you.
APEX also makes some decisions based on the column's data type, such as how to align the column when it's displayed in a report. Use the following information to alter the UI Defaults for the indicated columns:
Label: Subject
Help Text: A brief title for the issue.
Column: DESCR
Label: Description
Help Text: Describes the ticket in detail. Please be as complete as you can.
Resizable: YES
Width: 50
Height: 5
Column: STATUS_ID
Label: Status
If you wish, you can go ahead and set the UI Defaults for any of the other columns and/or tables. Just remember, what you do now will effect what the wizards create for you later, so if something doesn't look exactly like what we're showing in the book, check what you set for UI Defaults.
While SQL Workshop may not measure up to some of the more popular GUI tools, it certainly has the power to do most things you'll need to do with relation to creating and managing tables and data. You've also seen that SQL Workshop has a few built-in but hidden gems like the Lookup Table wizard. Finally, among the many useful utilities is the UI defaults manager, making your job as a developer just a little bit easier.
Sure, you haven't covered SQL Workshop in its entirety, but you've definitely gained a fair amount of insight as to what it's capable one. You'll be using SQL Workshop for a number of other things throughout the book, but don't wait. Go poke around into some of the dark nooks and crannies and see what you find!