
C H A P T E R 8
![]()
How to Secure Your Computer
Linux is widely considered one of the most secure operating systems available. On a basic level, Linux is built from the ground up to be fundamentally sound, and it allows users to work securely without their even noticing it. For instance, it enforces the system of ordinary users who are limited in what they can do, thus making it harder for security breaches such as virus infections to occur.
In addition, Linux contains a firewall that is hardwired into the kernel, called iptables (http://www.netfilter.org). The firewall is considered among the best solutions by practically all computer security experts. Not only that, but it can protect your home PC just as well as it can protect the most powerful supercomputer.
Like many Linux components, iptables can be managed the hard way or the easy way. The hard way requires in-depth knowledge of how networks operate and an ability to hack configuration files, both of which are beyond the skills of many ordinary computer users. Fortunately, several programs act as interfaces to iptables and make it simple to operate (or at least as simple as any equivalent Windows-based software firewall, such as ZoneAlarm from Check Point Software Technologies).
In Ubuntu, this built-in firewall is turned off by default. This is because the developers don't think that Ubuntu requires a firewall, and on a technical level, they're correct. Unlike Windows, Ubuntu has no Internet-facing services (programs that wait for connections from the Internet or local area network). It was just such a service on Windows XP that allowed the Blaster worm to bring the Internet to its knees in 2003 (see http://en.wikipedia.org/wiki/Blaster_worm). Expressed metaphorically, the theory is that without any windows or doors, Ubuntu is difficult, if not impossible, for hackers to break into (or for viruses or worms to infect). However, configuring the firewall with a program like Firestarter, which we examine later in this chapter, can be done so quickly and with such little effort that, in our opinion, there's no reason not to use the Linux firewall.
In addition, as with most versions of Linux, Ubuntu doesn't come with antivirus protection out of the box. This is because there are practically no viruses affecting Linux, and it is reasoned that there simply isn't a need for virus protection. However, as with a firewall configuration program, installing an antivirus program is easily done, and we explain how in this chapter. But first, we spend some time examining more-basic security concepts. Following that, we look at how to set up encryption for files and e-mail so they can be opened only by the intended recipients. Then we cover some elementary steps that you can take to protect your system.
Windows Security vs. Linux Security
If you've switched to Ubuntu from Windows, there's a very good chance that the security failings of Windows featured in your decision. Windows 7 contains many improvements, but Microsoft's record on security over the past few years has not been great. New and serious security warnings have appeared on an ongoing basis, and even now, new and devastating viruses and Trojans make news headlines with worrying frequency (usually described as a PC virus rather than what it actually is—a Windows virus).
One argument is that Windows is the target of so many viruses merely because it's so popular. Although it's true that some of those who write viruses do so because they dislike Microsoft, there's also little doubt that Windows has more than its fair share of security issues.
Many people are still critical of Microsoft's approach to security. For example, from Vista onwards, Windows includes User Account Control (UAC) dialog boxes that appear whenever a system-affecting action is required. However, they are so common that many people stop reading what they warn about and simply click OK by reflex. Many even switch them off. Compare that to Ubuntu: Similar dialog boxes appear whenever a system-affecting action is required, but the Ubuntu password dialog boxes have more of an impact because they appear far less frequently than UAC dialog boxes. Also, here the user's password must be entered. This forces the user to stop and think rather than simply click a mouse button.
Although Windows 7 offers reasonable security, Windows XP, Microsoft's most popular operating system (OS) to date, is considered an easy target for hackers and virus writers. Upon installation, the default user is given administrative privileges. True, a handful of tasks can be performed only by the genuine administrator, but the default user can configure hardware, remove system software, and even wipe every file from the hard disk. Although you would never intentionally damage your own system, computer attackers use various techniques to get you to run malicious software (by pretending it's a different file, for example) or they simply infect your computer across the Internet without your knowledge, which is how most worms work.
Viruses and worms also usually take advantage of security holes within Windows software. As just one example, an infamous security hole within Outlook Express a couple of years ago allowed a program attached to an e-mail message to run when the user simply clicked a particular message to view it. In other words, infecting a Windows machine was as easy as sending someone an e-mail message!
It's a different story with Linux. Viruses and worms are far rarer than they are on Windows. In fact, the total number of viruses and worms that have been found in the wild infecting Linux systems is likely less than 1,000 (one report published in 2005 put the number at 863, and the number is unlikely to have grown much since then). As strange as this may sound to a Windows user, you can have a PC without viruses.
![]() Caution Linux fans constantly note that viruses can't cause a problem on their system because the core of the OS is well protected. However, you should remember that the most important part of any computer system is, arguably, the data on it, so it's worth devoting time and effort to protecting this too. (See the upcoming “Encryption” section for more information.)
Caution Linux fans constantly note that viruses can't cause a problem on their system because the core of the OS is well protected. However, you should remember that the most important part of any computer system is, arguably, the data on it, so it's worth devoting time and effort to protecting this too. (See the upcoming “Encryption” section for more information.)
But although we would love to say that security holes are not found on Linux, the sad truth is that they're a fact of life for users of every OS. Many so-called rootkits—specialized software toolkits that aim to exploit holes within the Linux OS and its software—are available.
The bottom line is that although writing a virus or worm for Linux is much harder than doing the same thing on Windows, all Linux users should spend time securing their system and never assume that they're safe.
Root and Ordinary Users
Although users are the subject of another chapter, allow us to introduce the distinction between the root user account and ordinary users, because this distinction is the foundation on which much of the security model is based. For a more in-depth discussion on the matter, refer to Chapter 21. Linux makes use of something called the root user account. This is sometimes referred to as the superuser account, and that gives you an idea of its purpose in life: the root user has unrestricted access to all aspects of the system. The root user can delete, modify, or view any file, as well as alter hardware settings. Because everything on a Linux system is a file, this gives the root user immense power.
Linux systems also have ordinary user accounts, which are limited in what they can do. Such users are limited to saving files in their own directory within the /home directory (although the system is usually configured so that an ordinary user can read files outside the /home directory too). But an ordinary Ubuntu user cannot delete or modify files outside of their /home directory unless explicitly given this permission by the root user.
The user account you created during the installation of Ubuntu is a limited account, but on some Linux systems, it's possible to type root at the login prompt and, after providing the correct password, actually log in as root and perform system maintenance tasks. Ubuntu is slightly different in that the root account is disabled by default, and users are instead able to borrow superuser powers whenever they're required, in a similar way to Mac OS X. For this to happen, they simply need to provide their own login password. With desktop programs, a password prompt dialog box appears automatically.
Although the root account is disabled, most key operating system files “belong” to the root user, which is to say that only someone with superuser powers can alter them. Ordinary users are simply unable to modify or delete these system files. This is a powerful method of protecting the OS configuration from accidental or even deliberate damage.
![]() Note Along with the root and ordinary user accounts, there is a third type of Linux account, which is similar to a limited user account, except that it's used by the system for various tasks. These user accounts are usually invisible to ordinary users and work in the background. For example, the CD/DVD-ROM subsystem has its own user account that Ubuntu uses to access the CD/DVD-ROM hardware. The concepts of users and file permissions are discussed in more depth in Chapter 21.
Note Along with the root and ordinary user accounts, there is a third type of Linux account, which is similar to a limited user account, except that it's used by the system for various tasks. These user accounts are usually invisible to ordinary users and work in the background. For example, the CD/DVD-ROM subsystem has its own user account that Ubuntu uses to access the CD/DVD-ROM hardware. The concepts of users and file permissions are discussed in more depth in Chapter 21.
ARE YOU A CRACKER OR A HACKER?
Encryption
Encryption is a means of protecting data by encoding it in such a way that the casual observer can't view it without a password/passphrase or a special file known as a cryptographic key (normally abbreviated to key). Encryption is used for privacy purposes and also to verify the identity of the person who originated a file or an e-mail message.
Two types of encryption are normally utilized on home computers and offered by Ubuntu:
File encryption: Files can be encrypted so that they require a secret passphrase to be decrypted. Alternatively, you can encrypt files so that they can be decrypted only by a particular individual.
E-mail encryption: E-mail messages can either be encrypted, so that only the recipient will be able to read them, or signed, so that the recipient can be sure the e-mail genuinely originated from you and not a third party.
Ubuntu's e-mail program, Evolution, supports the digital signing of e-mail as well as full encryption of e-mail sent to others or decryption of e-mail sent to you. The Nautilus file manager can also be used to encrypt files for personal use or so that only a particular individual will be able to decrypt them. Password encryption is also available in applications such as OpenOffice.org, which may be used to write or organize sensitive data such as accounts or confidential correspondence.
![]() Note Although Evolution supports encryption, you don't have to use it. Indeed, many Ubuntu users don't utilize public key encryption, although power users often go this route. And, in general, relatively few people use e-mail encryption.
Note Although Evolution supports encryption, you don't have to use it. Indeed, many Ubuntu users don't utilize public key encryption, although power users often go this route. And, in general, relatively few people use e-mail encryption.
Underpinning Ubuntu's encryption system is a public key encryption system. Two keys are generated by an individual: the private key and the public key. The private key is kept private by the individual who generated it, while the public key is passed around to anyone who wants it (or even published on Internet databases). The two keys are related in that one key can encrypt data so that only the corresponding key can decrypt it.
For example, you could encrypt a file or e-mail message intended for Jane by using her public key, and only Jane would be able to decrypt it, by using her private key. However, and crucially, you would not be able to subsequently decrypt the file, even though you had encrypted it in the first place—data encrypted with a public key cannot then be decrypted with that same public key. Only the private key can decrypt it. If Jane wanted to encrypt a file so that only you could decrypt it, she would need to use your public key. You would then use your private key to decrypt it. No one else would be able to decrypt it after it was encrypted.
When utilized in an e-mail program, public key encryption works in two ways. Someone sending you a message can encrypt it and any attached files with your public key so that only you can read it. This ensures confidentiality. In the same way, you can encrypt a message sent to others by using their public key, so that only they can read it. Alternatively, and more commonly, a digital signature can be added to an e-mail file, even though the e-mail itself is sent unencrypted. This signature is generated from your private key along with the body of the message, and it is decrypted at the other end by using your public key, therefore proving the e-mail could have come only from you. This is known as signing an e-mail message, because it is as if you personally signed it in your own handwriting, thereby vouching for its authenticity. The e-mail is sent in plain text in case the recipient doesn't use public key encryption.
Setting Up for Encryption
To manage your encryption keys, you use the Seahorse application, which comes with Ubuntu. You first generate a key pair (your private key and the public key), and then you can export or publish the public key so others can use it.
Generating a Key Pair
Regardless of whether you want to use Evolution's encryption/signing feature or Nautilus's file-encryption abilities, you must first create a key pair. Here are the steps for doing so:
- Click Applications
 Accessories Passwords and Encryption Keys. This will run the Seahorse application, as shown in Figure 8-1.
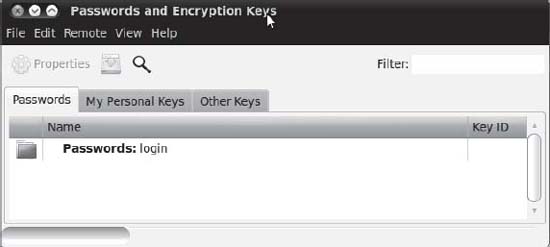
Figure 8-1. Seahorse is an easy-to-use management tool for passwords and encryption keys.
- Click File New and select PGP Key from the available options, as shown in Figure 8-2. PGP, which stands for Pretty Good Privacy, is an industry-standard public key encryption system and is typically used to secure e-mails or files. The Secure Shell key is used as an extra security measure when connecting to remote machines, as discussed in Chapter 25. The Password Keyring can act as a kind of wallet for securely storing a collection of passwords that would then be accessible with a single password. Use the Stored Password option to store a text password in a keyring.
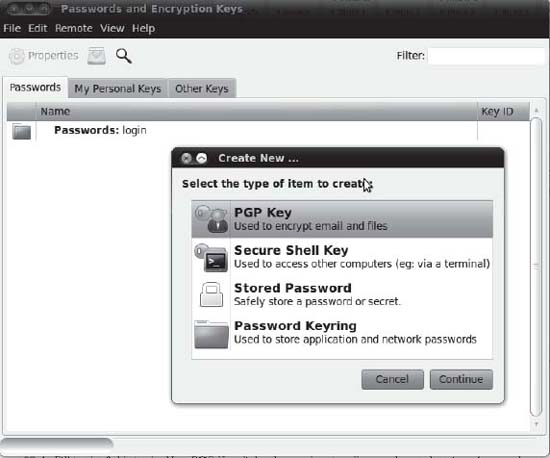
Figure 8-2. Choose PGP Key to create a key pair for e-mail or file encryption.
- The New PGP Key dialog box appears. Fill in a full name, e-mail address, and, optionally, a comment, as shown in Figure 8-3. The e-mail address you use for your PGP key should be the one you will be using for sending e-mails with Evolution (see Chapter 14 for instructions on creating an e-mail account in Evolution). You may also set three advanced options, available in the Advanced Key Options drop-down list:
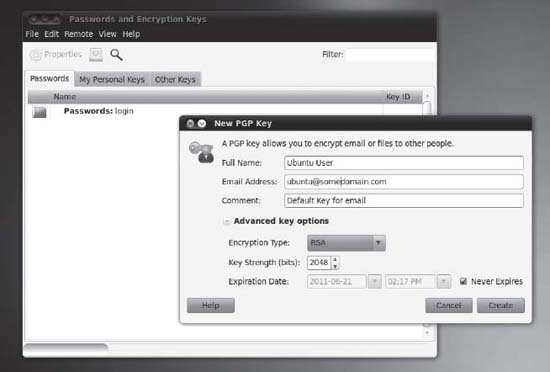
Figure 8-3. Fill in the fields in the New PGP Key dialog box and optionally set advanced options for your keys.
- Encryption Type lets you choose the type of cipher for your new keys. The default is RSA—RSA along with DSA Elgamal are the best choices because they enable you to encrypt, decrypt, sign, and authenticate files and e-mail. DSA (sign only) and RSA (sign only), on the other hand, can only sign files and e-mail.
- The Key Strength option specifies the strength of your key, set in bits. The lower the key strength, the faster it is to encrypt and decrypt, but choosing a lower strength will make it easier for others to crack the encryption. Increasing the key strength means slower encryption, but this should be weighed against the fact that it reduces the chance of your messages being intercepted—to the point where larger keys of 2,048+ bits are currently considered unbreakable. This is why the default is set as 2,048 bits, which is a sensible compromise.
- The Expiration Date option sets an expiration date on your keys. The default is that the keys are set to never expire. An expiration date is useful if you suspect your private key might fall into the wrong hands (for example, if you use a laptop that could get stolen), as the key will be useful only until the expiration date. If you decide to assign an expiration date, you must create a new key before the old one expires and use the old key to sign your new one, in order to maintain authentication.
- Click the Create button to create the keys.
- The Passphrase for New PGP Key dialog box appears. You need to create a passphrase for your new PGP key. This is a block of text (perhaps a sentence or simply a long stream of characters) that will have to be entered when decrypting files you have encrypted while using Nautilus, and encrypted e-mails you receive via Evolution. The best passphrase is easy for you to remember but hard for others to guess; ideally, it should include uppercase and lowercase letters, punctuation, and numbers to make it harder for a brute force dictionary attack (that is, a machine systematically entering real words) to break. Enter your passphrase twice: once in the Password box and again in the Confirm box. As shown in Figure 8-4, the characters won't appear on the screen. Click OK to continue.

Figure 8-4. After the PGP key has been generated, it will be listed on the My Personal Keys tab.
- Wait while the PGP key is being created. Depending on the key length you've chosen, this may take some time. After the process is finished, your new PGP key will be listed in the My Personal Keys tab of the main Seahorse window, as shown in Figure 8-4.
- It's possible to redefine your passphrase at a later date without affecting the actual encrypted files. Right-click the PGP key in the My Personal Keys tab and select Properties. Click the Change Passphrase button and, after you've entered the existing passphrase, you'll be able to add another one. The small + icon shown on the left edge of Figure 8-5 allows you to tag a key with a photo or icon from your system.

Figure 8-5. You can change your passphrase anytime by using the Properties box. You'll need your original passphrase to do it, though.
Exporting Your Public Key
As mentioned earlier, your public key must be shared with others if you want them to be able to encrypt messages or files so that only you can access them, or if you want them to authenticate any signed e-mail messages you send them. To do this, you use Seahorse to export your public key—effectively, to make it available as a file that can be e-mailed to others, or perhaps stored in a flash disk that is given to other people.
![]() Note If recipients of signed e-mail don't have your public key, they won't be able to authenticate your e-mail signature, but they will still be able to read the message and access any attached files. The signature will probably show up as a
Note If recipients of signed e-mail don't have your public key, they won't be able to authenticate your e-mail signature, but they will still be able to read the message and access any attached files. The signature will probably show up as a .pgp file attached to the e-mail. Have you ever received an e-mail message with a file called something like signature.pgp attached? Now you know what it is!
Exporting the key is as simple as running Seahorse (Applications ![]() Accessories
Accessories ![]() Passwords and Encryption Keys), selecting your key in the My Personal Keys tab, and then clicking the Export button. You'll be prompted to save the file to your preferred location, as shown in Figure 8-6. After the file is saved in your
Passwords and Encryption Keys), selecting your key in the My Personal Keys tab, and then clicking the Export button. You'll be prompted to save the file to your preferred location, as shown in Figure 8-6. After the file is saved in your /home directory, you can distribute it in any way you like.
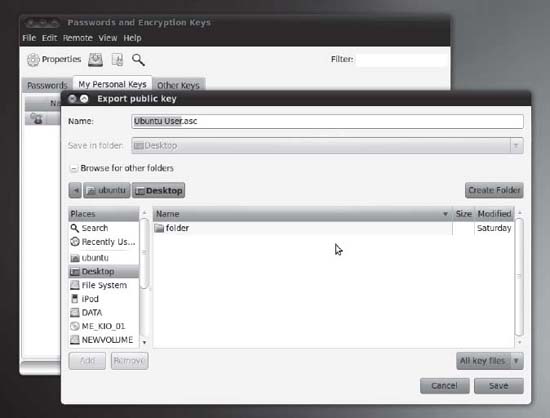
Figure 8-6. Using Seahorse, you can export your public key for distribution.
Publishing Your Public Key
For wider distribution of your public key, you can publish it in a public key server. This makes it easily available to anyone with Internet access, and it is the preferred method of sharing public keys. The steps to publish your key are as follows:
- Run Seahorse (Applications Accessories Passwords and Encryption Keys) and click Remote Sync and Publish Keys.
- The Sync Keys dialog box appears, as shown in Figure 8-7. To be able to sync your key, you first need to click the Key Servers button and specify where your key will be published.
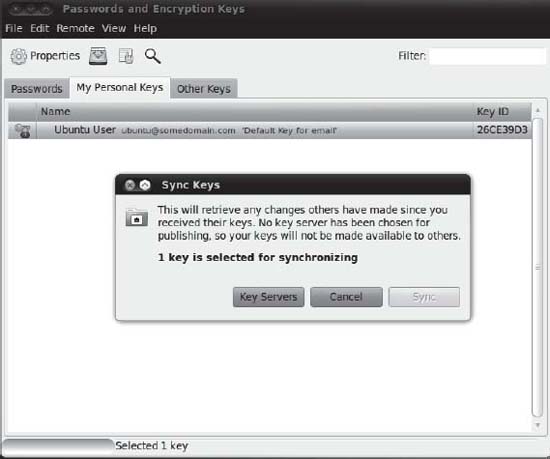
Figure 8-7. You need to edit your key server settings to be able to sync your public key to your preferred key server.
- You will be taken to the Key Servers tab of the Preferences dialog box to customize key server settings. Here you can specify where to look for keys and where to publish your key. The most popular key server to use is
pgp.mit.edu, which you can select from the Publish Keys To drop-down list, as shown in Figure 8-8. Choose your server and then click the Close button. - Back in the Sync Keys dialog box, click the Sync button to publish your key.
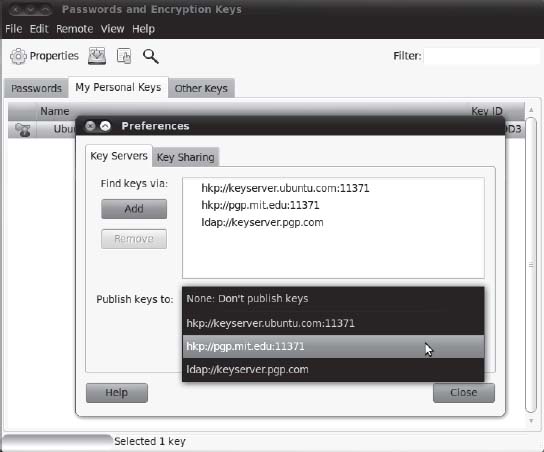
Figure 8-8. Click the Publish Keys To combo box to select where your key will be published.
Importing and Signing Public Keys
To be able to encrypt e-mail or files for others, and also verify their signatures, you need to import and then trust their public keys. You can obtain a public key from the person who created it or from other people who have that person's public key, or look it up from a key server.
If you've obtained the public key file personally (maybe on a floppy disk or via a USB flash drive) and it is accessible on your computer, you can import the key by running Seahorse (Applications ![]() Accessories
Accessories ![]() Passwords and Encryption Keys) and choosing File
Passwords and Encryption Keys) and choosing File ![]() Import. In the file dialog box that appears, browse your folders for the public key file that you would like to import, select that file, and click the Open button. To verify that the key was imported, in the Passwords and Encryption Keys dialog box click Other Keys and make sure that the key you just imported appears in the list.
Import. In the file dialog box that appears, browse your folders for the public key file that you would like to import, select that file, and click the Open button. To verify that the key was imported, in the Passwords and Encryption Keys dialog box click Other Keys and make sure that the key you just imported appears in the list.
You can also look for the key from the key server, which is perhaps easier and preferred by most people. To do so, click the Find Remote Keys… button in the Passwords and Encryption Keys dialog box. The Find Remote Keys dialog box appears. In the Search for Keys Containing text box, type the name of the person you are looking for and click the Search button. In the search results area, select the key you want to import and then click the Import button.
![]() Caution When importing keys from a public key server, you cannot be so sure that these keys are actually owned by persons you want to communicate with in a secure manner. However, one solution for this is the so-called web of trust, whereby people can vouch for the authenticity of a key by signing it. See
Caution When importing keys from a public key server, you cannot be so sure that these keys are actually owned by persons you want to communicate with in a secure manner. However, one solution for this is the so-called web of trust, whereby people can vouch for the authenticity of a key by signing it. See http://en.wikipedia.org/wiki/Web_of_trust for more information.
After the imported key is in the Other Keys tab, you need to sign the key to be able to send encrypted e-mail messages to the person who owns the key. In this way you are telling the system that you trust that the key is valid. You can also use the imported key to verify the authenticity of the e-mail messages you have received from that person. To do so, follow these steps:
- Select the key to sign in the Other Keys tab. So far the key is marked with a Validity value of Unknown. This means that Seahorse has information about the key, but it doesn't know if it is valid or not. Click the Sign public Key button and the Sign Key dialog box appears, as shown in Figure 8-9.
You can answer the question “How carefully have you checked this key?” based on how you verified the key: Not At All, Casually, or Very Carefully. - Your choice for “Others may not see this signature” affects the credibility of the key when you subscribe and sync your relationships to the key server. If you don't select this check box, your trust relationship will be manifested on the key server for the public to see, which is basically saying that you are vouching for the authenticity of this person's key to the public. This is helpful and convenient in reducing the number of keys to sign by others, by trusting the keys signed by you.
- The “I can revoke this signature at a later date” option allows you to revoke the key. This lets you invalidate your trust with the key for reasons such as: the key has been compromised and misused, or if you discover the key is actually a fake.
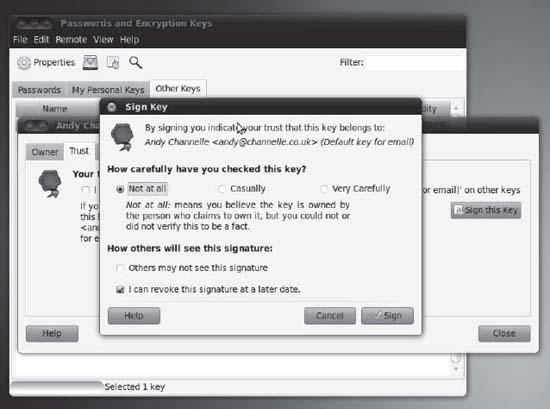
Figure 8-9. Signing a key is a way of vouching for the key's authenticity.
- After making your selections in the Sign Key dialog box, click the Sign button to continue.
- The Enter Passphrase dialog box appears. You need to provide the password you have entered when you created your PGP key. Supply that password and click OK. At this point, the key has been signed and is now listed with a Validity value of Full in the Other Keys tab.
![]() Tip To reduce the number of keys to sign, you can trust the keys signed by the key that you trust. Click the Other Keys tab in Seahorse and then double-click the key to view the key's properties. When the key's properties appear, click the Trust tab and select the option “I have checked that this key belongs to <name> and I trust signatures from <name> on other keys.” Click Close. The key will have a value of Full in the column Trust in the Other Keys tab. When you import new keys that are trusted by this key, those keys will automatically be part of the trusted list in the Trusted Keys tab.
Tip To reduce the number of keys to sign, you can trust the keys signed by the key that you trust. Click the Other Keys tab in Seahorse and then double-click the key to view the key's properties. When the key's properties appear, click the Trust tab and select the option “I have checked that this key belongs to <name> and I trust signatures from <name> on other keys.” Click Close. The key will have a value of Full in the column Trust in the Other Keys tab. When you import new keys that are trusted by this key, those keys will automatically be part of the trusted list in the Trusted Keys tab.
Encrypting and Decrypting Files
After you've set up your encryption keys, you start encrypting files, either to store them in encrypted form within your own system or to pass them on to others. You can also decrypt your own encrypted files or files encrypted by others that are intended for you. These features are integrated into Nautilus, which makes encryption and decryption easy to accomplish.
![]() Tip In order to be able to encrypt and decrypt files, you need to install the package seahorse-plugins. This will expand the capabilities of Nautilus, the file manager, by adding the encryption options to the context menus when you right-click a file or folder. To install the plug-in, go to Ubuntu Software Center and search “seahorse plugins.” An application named Decrypt File will show up. If it is not yet installed, click Install. Refer to Chapter 20 for more information about installing software.
Tip In order to be able to encrypt and decrypt files, you need to install the package seahorse-plugins. This will expand the capabilities of Nautilus, the file manager, by adding the encryption options to the context menus when you right-click a file or folder. To install the plug-in, go to Ubuntu Software Center and search “seahorse plugins.” An application named Decrypt File will show up. If it is not yet installed, click Install. Refer to Chapter 20 for more information about installing software.
Encrypting a File
To encrypt a file, follow these steps:
- Open your /
homedirectory by clicking Places Home Folder. - Select a file or folder that you want to encrypt. Right-click the selected item and select Encrypt…, as shown in Figure 8-10.
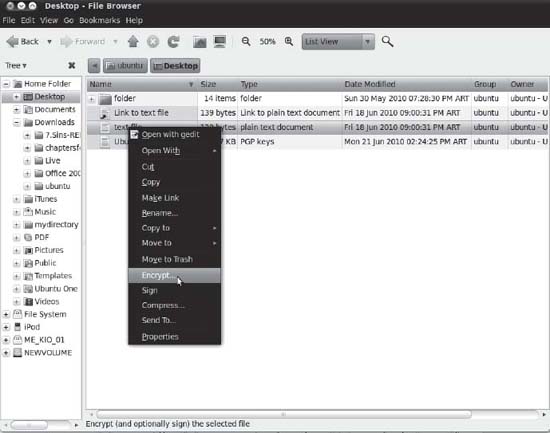
Figure 8-10. Encrypting a file or folder is a context menu option in Nautilus.
- Select the recipients of the encrypted file, as shown in Figure 8-11. To encrypt a file for yourself, put a check alongside your own key. To encrypt for others, put a check alongside their names. Remember that file encryption is performed with the recipient's public key, so you will need to have imported it beforehand. Click OK to continue.
 Caution Remember that the persons you select will be the only ones able to decrypt the file. After the file is encrypted for someone else, you won't be able to decrypt it!
 - If you selected to encrypt more than one file, the Encrypt Multiple Files dialog box will appear, as shown in Figure 8-12. You can opt to encrypt each file separately or have the multiple files packed together in an encrypted compressed file, with the compression type of your choice. Select your preferred settings and then click OK to continue.
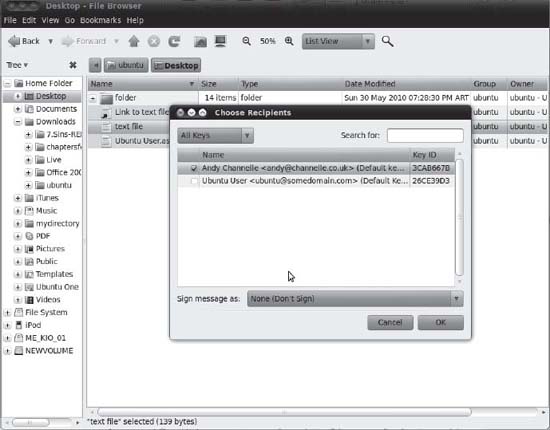
Figure 8-11. Select recipients of the files or folders you would like to encrypt from your created and imported keys.

Figure 8-12. If you are encrypting multiple files, you can opt to encrypt each file or store all files in a compressed file and have that compressed file encrypted.
- After a file or folder has been encrypted, it will appear on your file system as a new file with a
.pgpextension, as shown in Figure 8-13. This can then be passed on to your contact, if the file was encrypted with her public key, or filed away for storage if it was encrypted using your private key. For instructions on how to decrypt the file, see the following section.
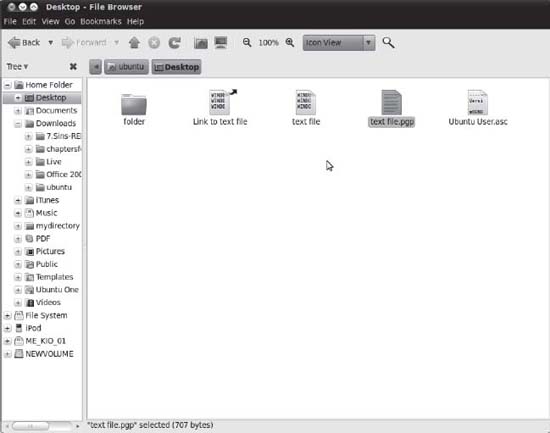
Figure 8-13. The encrypted file has the extension of .pgp.
Decrypting a File
To decrypt a file, do the following:
- Open your
/homedirectory by clicking Places Home Folder. - Select the file that you want to decrypt. The file extension is typically
.pgp. - Double-click the file.
- Type the passphrase that you entered when creating your key earlier.
- The file will then be decrypted in the folder where the encrypted file is stored. It will have its original filename.
Signing and Encrypting E-Mail
After you've set up your encryption keys, you can send e-mail with your digital signature to signify the authenticity of your e-mail, as well as encrypt e-mail so that the intended recipient is the only one capable of reading your mail, and vice versa. As long as you've configured your PGP key, imported keys to trust, and configured your Evolution account, integrating this kind of security is seamless.
To sign and/or encrypt an e-mail message in Evolution, do the following:
- In Evolution, choose File New Mail Message to compose a new e-mail message.
- The Compose Message dialog box appears. Fill in the To field, Subject field, and the message.
- Click Security. To mark the e-mail for signing, select the PGP Sign check box. To mark the e-mail for encryption, select the PGP Encrypt check box.
- Click the Send button to send the e-mail.
- If you chose to sign the message, the Enter Passphrase dialog box appears. Enter the password you assigned when you created your PGP key and then click OK.
Your e-mail will be sent, signed, and encrypted as you specified.
Validating E-Mail
To be able to validate signed e-mail messages you have received from other people, you need to import their public keys and then trust them using Seahorse. When you receive signed e-mail messages, a note indicating the authenticity of the e-mail signature is placed at the very bottom of the message.
Decrypting E-Mail
To decrypt e-mail received from other people, your PGP key needs to be configured in Seahorse. You will need to use your key to decrypt the e-mail.
Just select the e-mail message you want to decrypt, and you will see the Enter Passphrase dialog box. Enter the password to your PGP key and click OK. You will now be able to view the e-mail in plain text form.
Commonsense Security
As you start to understand how Ubuntu works, you'll become more and more aware of commonsense methods that will protect your system. However, we'll outline a few of these now to get you started:
Entering your password: Be very wary if you're asked to enter your password (outside of initial login, of course). You'll be asked to provide your password when following many of the configuration steps within this book, for example, and this is acceptable and safe. But if you're asked to do so out of the blue, you should be suspicious. If the root password prompt dialog box (shown in Figure 8-14) appears when you run a file that shouldn't really need root permissions, such as an MP3 or OpenOffice.org file, you should treat the situation with caution.
Creating perfect passwords: Setting up good security inevitably involves having a good, strong password. The challenge is to create something easy to remember but hard to crack, so it should involve punctuation, numbers, and an assortment of uppercase and lowercase letters. Perhaps you could base a password on a favorite song. For instance,
TiaLTNGO@TQiD1986-4:02is a great password. To remember it, I just need to know that “There is a Light That Never Goes Out” was a track on The Queen is Dead released by The Smiths in 1986, and it was 4 minutes and 2 seconds long. In contrast,password,password4, andandy1302are poor because they are open to dictionary attacks, in the case of the first two, or personal information attack in the third case.Installing new software: Be careful in choosing programs to download and install. Because Linux works on the basis of open source code, theoretically, anyone can tamper with a program and then offer it for download by the unwary. This rarely happens in real life. Even so, it's wise to avoid downloading programs from unofficial sources, such as web sites you find online via a search engine and whose authenticity you cannot totally trust. Instead, get software from the web site of the people who made it in the first place or, ideally, from the official Ubuntu software repositories (discussed in Chapter 20).
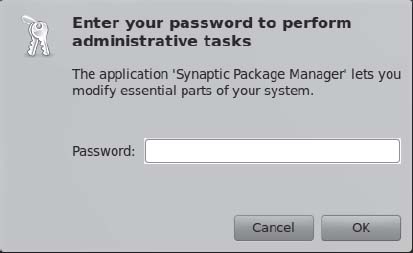
Figure 8-14. Beware if you're asked to type your password out of the blue and for no apparent reason.
Updating your system: Always ensure that your system software is completely up-to-date. As with Windows, many Ubuntu programs have bugs that lead to security holes. Crackers target such vulnerabilities. Downloading the latest versions of Ubuntu software ensures that you not only get the latest features, but also any patches for critical security holes. As with most versions of Linux, updating Ubuntu is easy, and, of course, it's also free of charge. You'll learn how to get online updates in the next section.
Locking up your PC: Attacks can be either remote or local, so in addition to online security, you should limit who has physical access to your computer. Any Ubuntu system can be compromised by a simple floppy boot disk, or even by just selecting the rescue mode entry on the boot menu, which provides the user with root access to the computer. This is for obvious reasons; the idea of a boot disk or the rescue mode is to let you fix your PC should something go wrong, and you cannot do this if you're blocked from accessing certain files. When Linux is used on servers that hold confidential data, it's not uncommon for the floppy and CD-ROM drives to be removed, thus avoiding booting via a boot disk. Such computers are also usually locked away in a room or even in a cupboard, denying physical access to the machine. Another option might be to add a BIOS password to the computer, meaning you'll be prompted for it during the boot process. The method for setting this up depends on your computer type, but generally, look for the BIOS Setup option when the computer is booting. Obviously, make sure you never forget a BIOS password, because a computer that doesn't boot is not very useful.
Online Updates
The Ubuntu notification area (the equivalent of the Windows system tray) at the top right of the screen contains a program that automatically monitors the package repositories and tells you when updates are available. This is the Update Manager. If you haven't yet updated your system, this icon will have probably turned into a white arrow pointing down, enclosed in an orange star, informing you that updates are available. In addition, each time you boot, you will see a speech bubble telling you that updates are available. When your system is completely up-to-date, the icon is not visible.
Clicking the Update Manager icon opens the Update Manager window, as shown in Figure 8-15. To go online and grab the updated files, simply click the Install Updates button at the bottom-right side of the window. You will probably be asked to enter your root password, because system files will need to be altered.
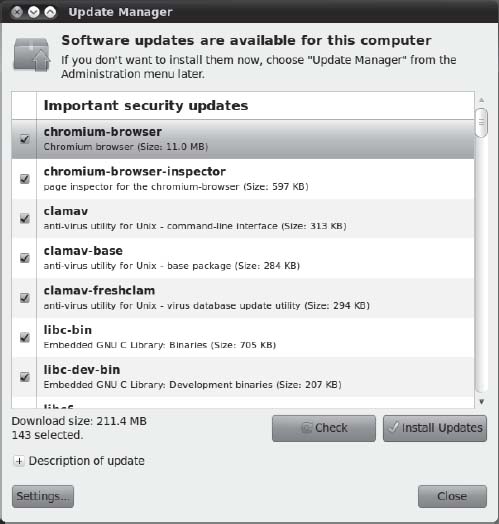
Figure 8-15. You'll be informed if your system is in need of updates, and the Update Manager program can take care of everything for you.
Be aware that some updates are large and may take some time to download, particularly if you're doing it for the first time after installing Ubuntu.
After the downloads have finished, you probably won't need to reboot unless the kernel file has been updated. If you do need to reboot, or if the update requires you to take any other action (such as logging out and then back in again), the Update Manager icon in the notification area will turn into an information icon, or into two encircled arrows. You should then click the icon to see what action you're advised to take.
APPLICATION SECURITY WITH APPARMOR
A sad fact of computing life is that all software applications have bugs of some kind. Some of these are not serious (in fact, they may remain invisible), but some might lead to abnormal program termination, data corruption, or even system failure. The worst bugs provide “back doors” into your system that can be used by crackers to wreak havoc.
Software developers fix reported bugs as quickly as possible (and one benefit of the open source approach is that solutions can come from third parties, speeding up the process), but the gap between discovering the bugs and providing a fix is a time when systems are vulnerable to attack. Taking advantage of such a vulnerability is called a zero-day exploit.
Fortunately, Ubuntu and several other types of Linux distributions have a clever built-in security mechanism called AppArmor, which oversees software applications and ensures that they don't do things that they shouldn't. Effectively, AppArmor “sandboxes” applications so they go only where they should within the system.
AppArmor was included in Ubuntu for the first time with version 7.04 (Feisty Fawn), three years ago. Although it's integrated into the underlying systems, AppArmor has yet to be made easily available to the user for configuration. Currently, the only way to configure AppArmor under Ubuntu is by using the command line. This will probably change in the future.
AppArmor is primarily intended to protect server systems—large computers that store and distribute data to others. As such, AppArmor is not particularly aimed at desktop users, although there is no reason why the intrepid desktop user can't make use of it.
The software works on the principle of least privilege, which means that each application is granted only the bare minimum of system resources it requires to run properly. Should the application prove to have a flaw that allows it to be compromised, the damage would therefore be limited in scope.
AppArmor implements this scope by way of profiling each application. A profile is a configuration file that contains details about what the application may do. AppArmor profiles are stored in /etc/apparmor.d. Profiles can be added by using the Synaptic Package Manager to install the package apparmor-profiles. Additionally, new applications you install may come with their own AppArmor profiles. After additional profiles are installed, they are automatically utilized.
Each application can run in one of two modes:
- Enforce mode: In this mode, AppArmor implements the permissions and capabilities listed in the profile. If the application tries to access a file or use a capability that is not listed in the profile, the operation will not be permitted.
- Complain mode: In this mode, AppArmor records the violations incurred by an application when it violates the rules imposed in the profile and stores them in the system log. These logs can be used later for creating or updating a profile of an application.
To determine which profiles and programs are running in enforce or complain mode, open a terminal window (Applications ![]() Accessories
Accessories ![]() Terminal) and issue the command
Terminal) and issue the command sudo apparmor_status.
To learn more about how to use AppArmor with Ubuntu, including how to create your own application profiles, see https://help.ubuntu.com/community/AppArmor.
Configuring the Ubuntu Firewall
A firewall is a set of programs that protects your PC when it's online. It does this by watching incoming and outgoing connections between your PC and the Internet and allowing through only what it is sure is secure (which usually is what you've asked for). It also attempts to close off various aspects of your Internet connection, so that crackers don't have a way in should they target your system.
The benefit of configuring the firewall is that even if your system has security vulnerabilities because of buggy software, crackers will find it a lot harder to exploit them across the Internet. When someone attempts to probe your system, it will appear to be virtually invisible.
![]() Caution Although software firewalls such as the one built into Linux offer a high level of protection, it's best to use them in concert with a hardware firewall, such as that provided by most DSL/cable broadband routers (curiously, some of these routers actually use Linux's
Caution Although software firewalls such as the one built into Linux offer a high level of protection, it's best to use them in concert with a hardware firewall, such as that provided by most DSL/cable broadband routers (curiously, some of these routers actually use Linux's iptables software as well). Many security experts agree that relying solely on a software firewall to protect a PC affords less than the optimal level of protection.
Although Ubuntu includes a powerful firewall in the form of iptables, you'll also need a program that can manage it. Here we show you how to use Firestarter, available from the Ubuntu software repository, for this purpose. The configured built-in firewall really does provide very strong protection.
![]() Note Power users might choose to configure Ubuntu's firewall without installing Firestarter. The command-line tools
Note Power users might choose to configure Ubuntu's firewall without installing Firestarter. The command-line tools iptables and ufw are installed by default and are preferred by some system administrators. Iptables is a configuration tool used to manage Netfilter, the feature in the kernel that handles the firewall. Unfortunately, with iptables, you need to understand how TCP/IP works and learn cryptic commands to be able to make full use of it. But armed with that knowledge, you can turn your PC into a full-fledged, budget software router with features that rival or surpass hardware routers. Ufw (for uncomplicated firewall) is a configuration tool that also manages the Netfilter firewall. It's easier to use than iptables because a firewall rule in ufw is usually terse and readable by humans.
Installing Firestarter
Let's get started by downloading and installing Firestarter. Follow these steps:
- Choose System Administration Ubuntu Software Center. In the Search box type firestarter as a search term. In the list of results, locate the program and click Install. Enter your password when prompted.
- After the desktop is back up and running, choose System Administration Firestarter, or Application Internet Firestarter. When you run Firestarter for the first time, you'll be prompted for your password. Then a wizard will start to take you through the setup.
- Click the Forward button to continue the wizard beyond the introductory page.
- The first step asks which network interface Firestarter should configure, as shown in Figure 8-16. If you use an Ethernet card, have a wireless card, or attach a broadband modem directly to your computer, the answer will probably be
eth0orwlan0. However, if you use a modem, the answer isppp0.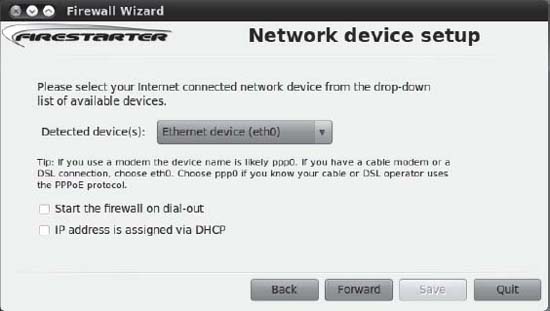
Figure 8-16. Firestarter includes a wizard to walk you through the basics of firewall configuration.
- Put a check in the “IP address is assigned via DHCP” box, unless you're using a dial-up modem. If you are using a dial-up modem, select “Start the firewall on dial-out” check box. After making your choices, click the Forward button.
You're asked whether you want to enable Internet connection sharing. This allows you to turn your computer into an Internet router and can be very useful in certain circumstances. You can activate this later on by running the wizard again. Click Forward to continue. Note To rerun the wizard, simply click Firewall in Firestarter's main window and then click Run Wizard. - The wizard will finish. Click the Save button to save your settings to disk. In addition, ensure that the Start Firewall Now check box is selected. After this, the Firestarter main window opens, and the software is active. You'll also see a new icon appear in the notification area of the desktop. This tells you that the firewall is running and will react to different types of threats or connections.
Configuring Firestarter
Firestarter works by controlling the data that goes into and out of your computer via your Internet or network connection. By default, it blocks every type of uninvited inbound connection but allows every type of outbound connection.
Whenever you click a link on a web page, your computer sends a request for data to the web server hosting the web page. Within a few milliseconds, that data is sent to your computer. This is an inbound data connection. The Linux firewall is clever enough to realize that the data was requested by you, so it is allowed through. However, any uninvited connections are turned away. If, out of the blue, someone attempts to connect to your computer via the popular Secure Shell (SSH) tool, as just one example, he won't be allowed to make that connection. This is a good thing, because it makes your computer secure. Crackers are turned away whenever they try to connect, no matter how they try to connect.
But in some circumstances, allowing uninvited connections is useful. For example, if you create a shared folder for other computers in your office to connect to, they will frequently make uninvited inbound connections to your computer whenever they want to grab a file. Protocols such as BitTorrent, too, rely on many incoming connections. Also, if you want to make use of SSH to connect to your computer remotely, you will need to allow such incoming connections. Therefore, Firestarter lets you allow certain types of inbound connections through.
In the terminology of Firestarter (and many firewall programs), outbound traffic is any kind of data originating on your computer that is sent out on the network and/or Internet. By default, Firestarter allows out all data, no matter what it is. This is described as a permissive policy. But Firestarter can be configured to block all outgoing connections apart from those you configure Firestarter to allow. This is a restrictive policy and can be useful in blocking certain types of programs that “phone home” with personal data about you, such as spyware.
![]() Note Unlike with Windows, we've never heard of a Linux program that contains spyware that “phones home” in this way. Nevertheless, a cautious attitude often pays dividends.
Note Unlike with Windows, we've never heard of a Linux program that contains spyware that “phones home” in this way. Nevertheless, a cautious attitude often pays dividends.
A restrictive policy can also prevent certain types of viruses and worms from spreading. The downside of a restrictive policy is that you must configure Firestarter to take into account every type of outgoing data connection that you do want to allow through, such as those for web browsers, instant messaging programs, and so on.
You can configure Firestarter by clicking the Policy tab in the main program window. Click the Editing drop-down list and choose to configure either the inbound traffic policy or the outbound traffic policy.
![]() Note Firestarter is used only to configure the built-in firewall and doesn't need to be running for the firewall to work. After you've finished configuration, you can quit the program. You'll need to use it again only if you want to reconfigure the firewall.
Note Firestarter is used only to configure the built-in firewall and doesn't need to be running for the firewall to work. After you've finished configuration, you can quit the program. You'll need to use it again only if you want to reconfigure the firewall.
Setting Inbound Rules
For most users, Firestarter's default inbound traffic policy is perfectly acceptable. It configures the firewall to disallow all uninvited incoming data connections, apart from certain diagnostic tools, such as ping, traceroute, and so on. You can choose to disallow those as well, as described shortly in the “Turning Off Diagnostic Services” section.
You may want to allow an incoming connection if you intend to connect to your computer via SSH from a remote location or if you have a shared folder created for other computers in your office. It's a must if you're running the BitTorrent file-sharing application. Additionally, if you run a web server, e-mail server, or other type of server on your computer, you will need to allow the correct type of incoming connection here.
Here's how to set inbound connection rules:
- In the Firestarter main window, click the Policy tab. Select Inbound Traffic Policy in the Editing drop-down list.
- Right-click in the second box on the Policy tab (with the headings Allow Service/ Port/For) and then select Add Rule.
- The Add New Inbound Rule dialog box appears. In the Name drop-down list, select the type of outgoing connection you want to allow, as shown in Figure 8-17. To allow others to access shared folders on your computer, select Samba (SMB). To allow SSH or BitTorrent connections to your computer, select the relevant entry from the list. Selecting the service will automatically fill in the Port box, which you shouldn't alter unless you know exactly what you're doing.
- If you know the IP address of the computer that's going to make the incoming connection, you can click the IP, Host, or Network radio button, and then type in that address. However, the default of Anyone will allow anyone using any IP address to connect to your computer.
- Click Add. Back in the main Firestarter window, click the Apply Policy button on the toolbar.
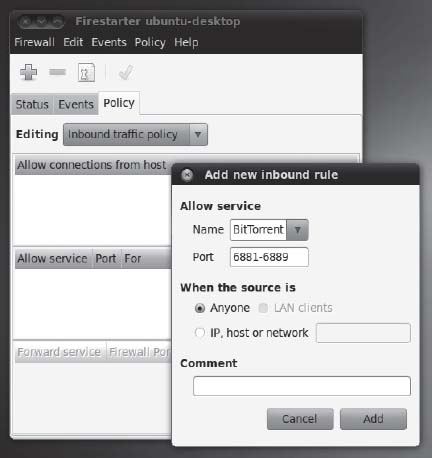
Figure 8-17. Creating an inbound rule enables computers to connect to your PC uninvited, but only if they meet the conditions of the rule.
![]() Note You'll need to return to Firestarter whenever you activate new services on your computer. For example, in Chapter 10, you will look at accessing Windows shares across a network, and you'll need to enable SMB incoming and outgoing access for this to work. In Chapter 25, you will look at using the SSH service, which will have to be allowed through the firewall. In other words, securing your computer isn't something you can do once and then forget about. It's a continual process.
Note You'll need to return to Firestarter whenever you activate new services on your computer. For example, in Chapter 10, you will look at accessing Windows shares across a network, and you'll need to enable SMB incoming and outgoing access for this to work. In Chapter 25, you will look at using the SSH service, which will have to be allowed through the firewall. In other words, securing your computer isn't something you can do once and then forget about. It's a continual process.
Setting Outbound Rules
By default, Firestarter allows all types of outgoing connections and, as with its incoming connections policy, this is by no means a bad choice for the average user. It's certainly the option that involves the least fuss. However, by opting to go with a restrictive traffic policy, you can completely control what kind of data leaves your computer. Any type of data connection that isn't authorized will be refused; as far as the program sending the data is concerned, it will be as if your computer did not have a network or Internet connection.
Here's how to set outbound connection rules:
- In the Firestarter main window, click the Policy tab. Select Outbound Traffic Policy in the Editing drop-down list.
- Click the “Restrictive by default, whitelist traffic” radio button. This option means that by default all outbound traffic will be blocked. You need to add to a “whitelist” the traffic that you want to allow.
- In the second empty box at the bottom of the Policy tab (which has the Allow Service/ Port/For headings), right-click and select Add Rule.
- The “Add new outbound rule” dialog box appears. In the Name drop-down list, select the type of data connection you want to allow. At the very least, you should select HTTP. This will allow your web browser to operate correctly (it's also needed to allow the Ubuntu Software Center and Update Manager programs to work). HTTPS should also be allowed—this is the secure version of HTTP used to access the likes of online banking sites, online shopping services, and some online e-mail services. You should also add a rule for POP3 and another for SMTP, without which your e-mail program won't work. Selecting the type of service will fill in the Port box automatically. You shouldn't alter this unless you know what you're doing.
Note You can add only one rule at a time. You'll have to repeat steps 3 and 4 several times to add rules for each service you want to allow.
- Click the Add button to add the rule. Back in the Firestarter main window, click Apply Policy.
- Test your settings with a program that uses the services you've just authorized.
![]() Caution If you created an inbound rule, you'll need to create a matching outbound rule. If you created an incoming rule for BitTorrent, for example, you'll need to create an outgoing rule for BitTorrent too.
Caution If you created an inbound rule, you'll need to create a matching outbound rule. If you created an incoming rule for BitTorrent, for example, you'll need to create an outgoing rule for BitTorrent too.
You can delete both incoming and outgoing rules by right-clicking their entries in the list and selecting Remove Rule.
Turning Off Diagnostic Services
Certain network tools can be misused by crackers to break into a computer or just cause it problems. In the past, the traceroute and ping tools, among others, have been used to launch denial-of-service (DoS) attacks against computers.
Ubuntu is set to allow these tools to operate by default. If you want to adopt a belts-and-suspenders approach to your computer's security, you can opt to disable them. If you don't know what ping and traceroute are, you're clearly not going to miss them, so there will be no harm in disallowing them. Here's how:
- In the Firestarter main window, click Edit Preferences.
- On the left side of the Preferences window, click ICMP Filtering. Then click the Enable ICMP Filtering check box, as shown in Figure 8-18. Don't put a check in any of the boxes underneath, unless you specifically want to permit one of the services.
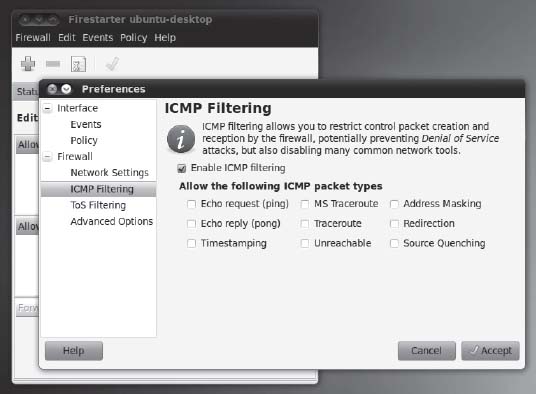
Figure 8-18. By deactivating
traceroute,ping, and other services, you can add extra protection to your PC. - Click the Accept button to finish.
PARANOIA AND SECURITY
Adding Virus Scanning to Ubuntu
As mentioned in the chapter introduction, Linux (and therefore Ubuntu) is not currently affected by many viruses. Nobody knows the true number of viruses affecting Linux, but it is probably less than 1,000, and that's the total since Linux was created back in the early 1990s! At the time of this writing, there are relatively few Linux viruses in the wild, which is to say, actively infecting computers.
However, there can be no room for complacency. It's probable that virus writers will turn their attention to Linux in the coming years as it becomes a popular desktop solution. It's also important to be vigilant because your Ubuntu system may be interacting with Windows computers and may act as a carrier of Windows viruses.
This section describes how to use ClamTk, which is a graphical front end for the Clam AntiVirus (ClamAV) program (http://clamtk.sf.net). ClamAV is an open source, industrial-strength antivirus scanner designed to work on all kinds of computers and operating systems. It detects Windows and even Macintosh viruses, as well as Linux and UNIX viruses. This has obvious benefits if you share files with Windows users—you can inform your friends and colleagues if any files they give you are infected (and bask in the warm feeling that arises when you realize the viruses can't affect your system!).
ClamAV's only drawback is that it is limited to virus scanning. It isn't able to disinfect files, like the more sophisticated virus scanners available for Windows. However, it should be noted that disinfection rarely works very well, as discussed in the ClamAV FAQ (http://clamtk.sf.net).
Installing ClamTk
You can install ClamAV and ClamTk through the Ubuntu Software Center, as follows:
- Choose System Administration Ubuntu Software Center.
- In the Search text box enter clamtk as a search term.
- In the list of results, locate the program Virus Scanner and click the Install button. Enter your password when prompted.
- The whole antivirus system involves a 26MB download.
- Close the Ubuntu Software Center.
Updating the ClamAV Database
Before you scan for viruses, you should update the virus database. You should do this every time you scan, using the ClamTk program.
![]() Note When you installed ClamAV, it added a background service called
Note When you installed ClamAV, it added a background service called freshclam, which periodically downloads updates for ClamAV's database. However, manually updating before scanning is also a good idea, to ensure that you're always using the very latest version of the database at the time of scanning.
In order to update the database, ClamTk needs to access system files, so it needs to be run with root powers. To do this, open a terminal window (click Accessories ![]() Terminal), type gksu clamtk and press Enter. Enter your password when prompted. (
Terminal), type gksu clamtk and press Enter. Enter your password when prompted. (gksu is like sudo, in that it gives the program you specify administrator powers, except it's used for GUI applications.) Click Help ![]() Check for updates. A new window will open, in which you should click “Check for updates” again. It will check for updates to both the virus definition database and the GUI. You might see a warning that your GUI version is out-of-date. This is because the Ubuntu packages are sometimes a version or two behind the main release. However, this isn't a significant issue, and ClamAV can still scan for viruses, and virus definitions will stay up-to-date. When ClamAV is first installed, it automatically grabs the latest database file, so ClamTk will probably report it's already up-to-date the first time an update is run.
Check for updates. A new window will open, in which you should click “Check for updates” again. It will check for updates to both the virus definition database and the GUI. You might see a warning that your GUI version is out-of-date. This is because the Ubuntu packages are sometimes a version or two behind the main release. However, this isn't a significant issue, and ClamAV can still scan for viruses, and virus definitions will stay up-to-date. When ClamAV is first installed, it automatically grabs the latest database file, so ClamTk will probably report it's already up-to-date the first time an update is run.
If you want to update the GUI to the latest version anyway, you could go to ClamTk's webpage at SourceForge.net (http://clamtk.sf.net) and download the .deb file. For more information on how to install programs directly from .deb packages, refer to chapter 20. In brief, when the file finishes downloading, you will be asked if you want to open it with GDebi package manager. Yes, that's what you want to do. It will let you know that there is an older, more supported version of the same application in Ubuntu's own repositories. Click the Install button... at your own risk!
To run ClamTk as a normal user, you can just go to Applications ![]() Accessories
Accessories ![]() Virus Scanner and perform the operation to update the signatures.
Virus Scanner and perform the operation to update the signatures.
Scanning for Viruses
With Windows virus scanners, you might be used to performing whole system scans. This isn't advisable with ClamAV, because it simply isn't designed for that task. Instead, ClamAV is designed to scan user files, such as documents.
![]() Note ClamAV is actually primarily designed to be used in concert with a mail server and to scan incoming or outgoing mail attachments. See the About page at the ClamAV web site (
Note ClamAV is actually primarily designed to be used in concert with a mail server and to scan incoming or outgoing mail attachments. See the About page at the ClamAV web site (http://www.clamav.org/about).
You can try performing a full system scan, but in our tests, several false positives were identified, meaning that ClamAV identified innocent files as containing viruses. Because of this, it's best to use ClamAV to scan just your personal files for viruses, which is to say, those within your /home directory. Bear in mind that this is where all files you import to your computer will likely be installed, so this is where an infection is most likely to be found.
To scan your personal files, follow these instructions:
- Start ClamTk by clicking Applications System Tools Virus Scanner. On the initial launch, you can define whether antivirus signatures are updated for a single user or for all users. If you have a multiuser system, you should choose the latter.
- Before starting the scan, it's useful to ensure that hidden files are scanned. After all, a virus is likely to try to hide, rather than make its presence obvious! This can be done by clicking Advanced Preferences and checking the Scan files beginning with a dot (.*) box.
- Although there's a button on the toolbar that lets you scan your
/homedirectory with a single click, it won't scan recursively. That means it won't scan any folders (or folders of folders) within your/homedirectory, so it isn't of much use. To perform a recursive scan of your/homedirectory, click File Recursive Scan. Then click the OK button in the Select a Directory (Recursive) dialog box. This will select your /homedirectory. Of course, you can also select any other folders to scan at this stage. - The scan will start. Depending on the quantity of files in your
/homedirectory and their sizes, it may take some time. You'll see a live status report beneath the toolbar, showing which file is currently being scanned. When the status line reads “Scanning Complete,” the scan has finished. Running along the bottom of the window will be a complete status report, showing the number of files scanned and the number of viruses found, if any. See Figure 8-19 for an example. If any viruses are found, move on to the next section.
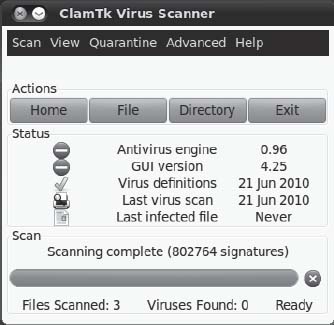
Figure 8-19. You'll see a live status report detailing which files are being scanned below the toolbar in the ClamTk program window.
Dealing with Infections
If any viruses are found, they will be listed in the ClamTk program window. The type of virus that's allegedly infecting the file will be listed in the Status column.
Be aware that ClamTk sometimes reports a virus when it simply can't access a particular file, perhaps because of file permission problems. If this is the case, you'll see Access Denied or Can't Open Directory in the Status column. You can ignore these files.
![]() Tip If you really want to scan files that require superuser permissions, you can run ScanTk with superuser powers. Open a terminal window (Applications
Tip If you really want to scan files that require superuser permissions, you can run ScanTk with superuser powers. Open a terminal window (Applications ![]() Accessories
Accessories ![]() Terminal) and type
Terminal) and type gksu clamtk.
Entries in the list can be right-clicked and quarantined or deleted. Quarantining moves the file to a special directory for inspection or deletion later on. You can manage quarantined files by using the Quarantine ![]() Maintenance menu.
Maintenance menu.
Although your impulse might be to simply delete the file, you should be cautious. Be aware that ClamTk might be reporting a false positive—a file that it thinks is infected with a virus, but which isn't. This is rare but can happen. If you do find a file you know is a false positive, right-click it and select Quarantine. Then click Quarantine ![]() Maintenance. In the list, select the file and click False Positive. This will ensure it's ignored next time you scan.
Maintenance. In the list, select the file and click False Positive. This will ensure it's ignored next time you scan.
So what should you do if you find that a file is infected? First, don't panic. Remember that practically all viruses that ClamAV is likely to find are targeted at Windows systems and don't affect Linux.
![]() Note If we assume there are 140,000 viruses for Windows and fewer than 1,000 for Linux, then in theory, there's a better than 99% chance that any virus ClamAV finds will be a Windows virus!
Note If we assume there are 140,000 viruses for Windows and fewer than 1,000 for Linux, then in theory, there's a better than 99% chance that any virus ClamAV finds will be a Windows virus!
Next, find the name of the virus in the Status column and look it up online to learn more about it. This is the point at which you'll learn whether it's a Linux virus and, if so, its potential impact on your system.
You can hover your mouse over the filename in the scanner window to see its path. If the file is located in your Firefox cache, there's nothing to worry about, and the file can be deleted with impunity—just right-click and select Delete from the menu. In fact, the Firefox cache is where you're most likely to find virus infections, because this is where all the files are temporarily downloaded when you're browsing the web (including HTML files, images, and so on). But, once again, you should remember that most nefarious web sites that attempt to spread virus infections are targeted at Windows users, usually via security holes within Internet Explorer. As a Linux user using the Firefox web browser, you have far less to worry about.
WEB BROWSER SECURITY
It's not enough to rely on antivirus software for safe web browsing. In Firefox, you can tweak settings to enhance the security of browsing. However, note that improved security sometimes equates to reduced features, which can be quite frustrating.
To set security options in Firefox, choose Edit ![]() Preferences. Settings on the following tabs affect browser security (see Figure 8-20):
Preferences. Settings on the following tabs affect browser security (see Figure 8-20):
- Content: You can disable pop-up windows and disable JavaScript. Note that it's quite unlikely that you would want to completely disable JavaScript, because many modern web sites make heavy use of it (including online shopping sites and web-based e-mail, such as Google's Gmail). You could use a third-party plug-in called NoScript (
http://noscript.net). This tool allows you to disable JavaScript, Java, Flash, and other plug-ins that could potentially be harmful to Firefox on all web sites by default. You can easily re-enable these scripts on each web site that you trust through the NoScript applet, located in the lower-right corner of the browser window. - Privacy: You can customize retention of browser history, cookies, and private data. If privacy is of utmost importance, you can select the option “Use custom settings for history” and check the “Clear history when Firefox closes” check box.
- Security: You can customize attack site and forgery detection, passwords, and warning messages. You should customize these settings based on how you use the Web. For example, it's obvious that the “Warn me when sites try to install add-ons” check box should be selected, since malware is distributed this way. And if you transact business on the Web, the “Block reported web forgeries” option offers added protection from getting duped.
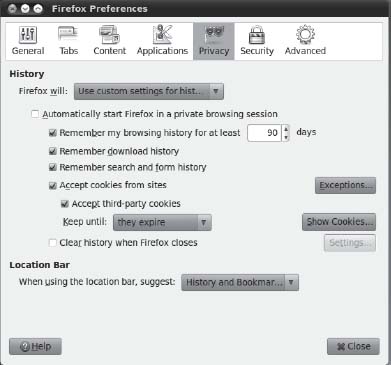
Figure 8-20. Customizing Firefox Privacy settings.
Summary
In this chapter, you've looked at what threats your system faces and how security holes can be exploited by malicious interests. You learned about measures you can take to protect your system, such as updating it online, using AppArmor to guard against errant applications, configuring the system's firewall, using encryption for e-mail and file privacy and authentication, installing an antivirus program, and customizing web browser security. We also discussed some commonsense rules you can follow to keep your system safe.
In the next chapter, we move on to looking at how your Ubuntu system can be personalized and how to set up everything to suit your own preferences.