
C H A P T E R 7
![]()
Getting Everything Up and Running
This chapter guides you through setting up all the essential components of your Ubuntu installation. This includes hardware configuration, as well as setting up e-mail. It covers the post-installation steps necessary to get your system up and running efficiently.
Like all modern Linux distributions, Ubuntu is practically automated when it comes to setting up key hardware and software components. Key software will work from the start, and most hardware will be automatically configured. However, you might need to tweak a few settings to make everything work correctly. Read on to learn more.
Will Ubuntu Support My Hardware?
The age-old criticism that the Linux OS lags way behind Windows in terms of hardware support is long dead. The majority of connectable devices, such as digital cameras and printers, will work with Ubuntu immediately, with little, if any, configuration.
Most underlying PC hardware is pre-configured during installation without your knowledge and without requiring further work, so with luck there will be less hunting around for drivers than you might be used to with Windows. Your graphics and sound cards should work without a hitch, for example. In addition, nearly all USB and FireWire devices you plug in after installation will be supported. (Table 7-1 lists some online sources of information about hardware support for Ubuntu). You'll be surprised at how many user manuals now have a section for Linux—often given equal weight to Mac OS. Documentation for Netgear routers is one example.
However, it's still the case that a substantial number of devices are not supported by Ubuntu. Generally, it's a black or white situation: Ubuntu either works with a piece of hardware or it doesn't.
The types of hardware that Ubuntu doesn't support are often esoteric devices that rely on custom software provided by the hardware manufacturer, but even in mass-market areas such as printers, scanners, and wireless adapters, some manufacturers are still frustratingly uninterested in publishing their own Linux drivers, and even refuse to provide details about the hardware to volunteer programmers who offer to write free and open source drivers at no expense to the company. It's also sometimes the case that brand-new models of hardware won't work with Ubuntu when they first hit the market. Companies prioritize developer resources, so Windows drivers generally get written before Linux drivers. However, as soon as a new piece of hardware comes out, work is usually undertaken to ensure that Linux is made compatible with it, by the company, the community, or a combination of the two. This is especially true of hardware such as printers and scanners, and it's one more reason why you should regularly update your system online.
![]() Tip Before you hit the stores to buy a new piece of hardware, it's a good idea to do a little research. Compatibility with Linux is sometimes listed on the hardware box or at the manufacturer's web site (even if you sometimes need to search through the FAQ section to find out about it). And, of course, others may have tried your particular small object of desire, so searching <hardware name> + Linux compatibility in Google may provide enlightenment.
Tip Before you hit the stores to buy a new piece of hardware, it's a good idea to do a little research. Compatibility with Linux is sometimes listed on the hardware box or at the manufacturer's web site (even if you sometimes need to search through the FAQ section to find out about it). And, of course, others may have tried your particular small object of desire, so searching <hardware name> + Linux compatibility in Google may provide enlightenment.
Table 7-1. Hardware Information Sources
| Hardware | Web Sources |
| Graphics cards | http://xorg.freedesktop.org/wiki/Projects/Drivers |
| Sound cards | http://linux-sound.org/hardware.html |
| Printers | www.linuxfoundation.org/en/OpenPrinting |
| Scanners | www.sane-project.org/sane-supported-devices.html |
| Cameras | www.gphoto.org/proj/libgphoto2/support.php |
| Wi-fi cards | www.hpl.hp.com/personal/Jean_Tourrilhes/Linux/ |
| Laptops | http://tuxmobil.org |
Unfortunately, unlike with Windows, it's not very common to find Linux drivers on the CD that comes with the hardware. Even if you do find a Linux driver supplied, chances are that it will work with only certain enterprise-oriented versions of Linux, such as Red Hat Enterprise Linux or SUSE Linux Enterprise Desktop. Some drivers are usable but imperfect or lack features that are available in their Windows counterparts. At the time of this writing, Ubuntu has yet to gain the kind of momentum that leads manufacturers to specifically produce drivers for it, but this may change in the future, especially as more users encounter the system via Netbooks and mobile devices. Various OEMs have dipped their toes in the open source water. Dell and Shuttle are the biggest names currently bundling Linux with some of their desktop offerings, with smaller specialist companies like System 76 competing with excellent pre-installed offerings.
![]() Note It's possible to use a program called alien to convert software installation packages designed for other distributions into Ubuntu installation files. Doing so isn't complicated but may not work well with driver files because of the subtle differences in where system files are stored across different Linux distributions. You can find more information about alien at
Note It's possible to use a program called alien to convert software installation packages designed for other distributions into Ubuntu installation files. Doing so isn't complicated but may not work well with driver files because of the subtle differences in where system files are stored across different Linux distributions. You can find more information about alien at http://kitenet.net/~joey/code/alien/. It's contained within the Ubuntu software repositories and can be downloaded using the Ubuntu Software Center or Synaptic Package Manager. A graphical front end to alien is available at http://code.google.com/p/foxoman/wiki/PackageConverter.
Using Proprietary vs. Open Source Drivers
As discussed earlier in this book, Linux is an open source OS. This means that the source code underlying Linux programs is available for study and even reuse. This is a good thing when it comes to hardware drivers, because bugs in the code can be spotted and repaired by anyone with an interest in doing so. If you consider that a bug in a graphics driver could mean your PC crashes every 5 minutes, the value of such an approach is abundantly clear.
Unfortunately, some hardware manufacturers don't like to disclose how their hardware works, because they want to protect their trade secrets. This makes it impossible for them to release open source drivers, because such drivers would expose exactly how the hardware operates. Because such companies are aware that growing numbers of people use Linux, they release proprietary drivers, whose source code is not made publicly available (in the same way that Windows code is not released to the public).
Aside from ethical issues surrounding not being able to study the source code, the biggest issue with proprietary drivers relates to bug fixing. To use a proprietary driver is to be at the mercy of the hardware manufacturer's own development and release schedule. If the driver has a serious bug, you'll either have to work around it or put up with troubling issues until the manufacturer offers an update. A few years ago, a proprietary driver for a 3D graphics card stopped any computer it was installed on from going into hibernation mode (that is, suspending to disk). Those using the drivers had to wait months until the fix was released.
Despite this, and although the folks behind Ubuntu strongly support free and open source software, they realize proprietary drivers need to be used in certain situations. For example, it's impossible to use the 3D graphics elements of some graphics cards unless you have a proprietary driver, and this means that visual effects will be unavailable to users who happen to have hardware that isn't currently fully supported by open source drivers.
Because of this, Ubuntu automatically installs wi-fi proprietary drivers by default if no open source alternative exists (or if the open source version is not yet good enough). It also offers the opportunity to easily install some proprietary graphics card drivers if they provide more functionality than the open source versions.
![]() Note Linux sees hardware in a technical way, rather than in the way humans do. If you attach something such as a USB CD-R/RW drive, Linux will recognize the drive hardware and attempt to make it work. It won't try to find a driver for that specific make and model of CD-R/RW drive. Thus, Linux is able to work with a wide range of hardware, because a lot of hardware is similar on a technical level, despite the differences in case design, model names, and even prices!
Note Linux sees hardware in a technical way, rather than in the way humans do. If you attach something such as a USB CD-R/RW drive, Linux will recognize the drive hardware and attempt to make it work. It won't try to find a driver for that specific make and model of CD-R/RW drive. Thus, Linux is able to work with a wide range of hardware, because a lot of hardware is similar on a technical level, despite the differences in case design, model names, and even prices!
Installing Device Manager
When using Windows, you might have come across Device Manager, the handy tool that lists your PC's hardware and provides access to various properties. Ubuntu offers a similar piece of software, as shown in Figure 7-1, but it isn't installed by default.
After you can connect to the Internet (following the instructions in the “Getting Online” section of this chapter), you can install Device Manager by using the Synaptic Package Manager (see the “Installing Software” section of this chapter), as follows:
- Choose Applications
 Ubuntu Software Center.
 - Your cursor is automatically in the search field, so go ahead and type
device manager. - A list of programs will appear. Click Device Manager and then click the Install button that appears. Enter your password when asked.
- A progress bar will show that the software is installing. When it's done, a green tick will appear by the program's icon. You can now close the Ubuntu Software Center window.

Figure 7-1. Ubuntu's Device Manager program can display just about everything you need to know about attached hardware.
If your computer is not yet online, you'll need to use a computer that is online (perhaps another computer, or Windows if you dual-boot) to download the software, and then copy it across to your Ubuntu computer for installation. To download the software, visit the following two addresses in your browser. You will be prompted to download a file after typing each address:
http://us.archive.ubuntu.com/ubuntu/pool/universe/g/gnome-device-manager/gnome-device

-manager_0.2-3_i386.deb


http://us.archive.ubuntu.com/ubuntu/pool/universe/g/gnome-device-manager/libgnome

-device-manager0_0.2-3_i386.deb
After the files are downloaded, copy them to the Desktop on your Ubuntu machine, using a USB memory stick or similar storage device. Right-click the icon for libgnome-device-manager0_0.2-3_i386.deb and select the first choice in the context menu, Open With Gdebi Package Manager. A Package Installer window will appear. Click the Install Package button and supply your password when asked. Close the window when the package has finished installing. Next, right-click the other icon, for gnome-device-manager itself and repeat the same procedure.
After you've installed Device Manager, you can open it by choosing Applications ![]() System Tools
System Tools ![]() Device Manager. You'll need to click View
Device Manager. You'll need to click View ![]() Device Properties to ensure that Device Manager adds the useful (but occasionally overwhelming) Properties tab.
Device Properties to ensure that Device Manager adds the useful (but occasionally overwhelming) Properties tab.
You should be aware of a few important differences between the Windows and Ubuntu versions of Device Manager. Though the aim of Ubuntu's Device Manager is to manage hardware devices, the project is still in its infancy and can provide only hardware information at the time of this writing. On the other hand, Ubuntu's list is far more comprehensive than that in Windows. In Ubuntu, Device Manager thoroughly probes the hardware to discover its capabilities.
Perhaps the biggest difference, however, is that just because a piece of hardware is listed within Ubuntu's Device Manager doesn't mean that the hardware is configured to work with Ubuntu. In fact, it doesn't even imply that the hardware will ever work under Ubuntu. Device Manager's list is simply the result of probing devices attached to the various system buses (PCI, AGP, USB, and so on) and reporting the data.
Nonetheless, Device Manager is the best starting place if you find that a certain piece of hardware isn't working. If a piece of hardware is listed, then it proves, if nothing else, that the system recognizes that the hardware is attached. For example, later in this chapter, we describe how you can use Device Manager to discover crucial details about wireless network devices, which you can then use to install drivers.
Configuring Ubuntu
Unlike some versions of Linux, Ubuntu doesn't rely on a centralized configuration software package. Instead, it uses smaller programs to configure hardware. For example, to configure the network, you'll use the NetworkManager program, and printers are configured using a separate printer configuration program. Because using some of the configuration software involves reconfiguring your entire system, doing so requires administrator privileges. Therefore, you'll be prompted for your login password each time you use some of the programs. In some cases, after you've made changes, you'll need to click the Apply button to put the changes into effect. When you've finished configuration, simply close the program window by clicking the Close button.
![]() Note Ubuntu remembers your password for 5 minutes after you enter it. Therefore, if you open the same application or another that requires administrator privileges within that amount of time, you won't be prompted to enter your password again.
Note Ubuntu remembers your password for 5 minutes after you enter it. Therefore, if you open the same application or another that requires administrator privileges within that amount of time, you won't be prompted to enter your password again.
Configuring Input Devices
Mouse and key repeat speeds are personal to each user, and you may find the default Ubuntu settings not to your taste, particularly if you have a high-resolution mouse such as a gaming model. Fortunately, changing each setting is easy. You'll find the relevant options under the System ![]() Preferences menu.
Preferences menu.
Configuring Mouse Options
Choose System ![]() Preferences
Preferences ![]() Mouse to open the Mouse Preferences dialog box, which has General and Accessibility tabs. On a laptop, you might also see the Touchpad tab.
Mouse to open the Mouse Preferences dialog box, which has General and Accessibility tabs. On a laptop, you might also see the Touchpad tab.
General Mouse Settings
On the General tab of the Mouse Preferences dialog box, shown in Figure 7-2, you can configure several options.
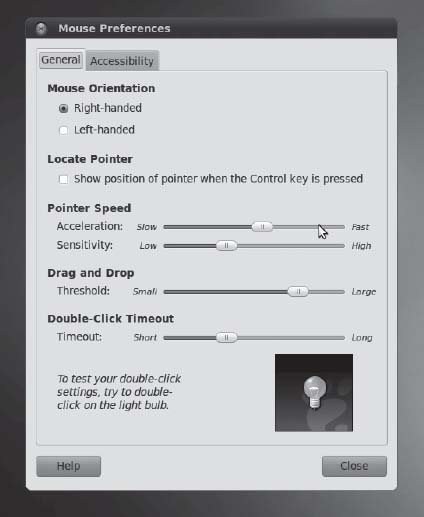
Figure 7-2. The Mouse Preferences dialog box lets you tame that mouse.
These options are as follows:
Mouse Orientation: This option lets you set whether the mouse is to be used by a left-handed or right-handed person. Effectively, it swaps the functions of the right and left buttons.
Locate Pointer: This option allows you to show where the mouse is by displaying a ripple surrounding the mouse pointer when you press the Ctrl key. This can be useful for partially sighted people who may not be able to locate the cursor on a busy Desktop.
Acceleration: This setting controls how fast the mouse pointer moves. Whenever you move the mouse, the pointer on the screen moves a corresponding amount. However, the cursor actually increases in speed the more you move your hand (otherwise, you would need to drag your hand across the desk to get from one side of the screen to the other). This is referred to as acceleration. If you set the acceleration too high, the pointer will fly around the screen, seemingly unable to stop. If you set it too slow, you'll need to swipe the mouse several times to make it go anywhere.
Sensitivity: This setting controls how quickly the acceleration kicks in when you first move the mouse. Choosing a higher setting means that you can move the mouse relatively quickly before it starts to accelerate and cover more screen space. A low setting means that acceleration will begin almost as soon as you move the mouse. Higher sensitivity settings give you more control over the mouse, which can be useful if you use image-editing programs, for example.
Drag and Drop: This setting determines the amount of mouse movement allowed in a dragging maneuver before the item under the cursor is moved. It is designed for people who have limited dexterity and who might be unable to keep the mouse perfectly still when selecting an item. In such cases, a large threshold value may be preferred.
Double-Click Timeout: This is ideal for those who are less physically dexterous, because the double-click speed can be slowed down. On the other hand, if you find yourself accidentally double-clicking items, you can speed it up. Test your settings by double-clicking the lightbulb image.
Changes are made as each setting is adjusted, so to test the new settings, simply move your mouse.
Accessibility Settings
The settings on the Accessibility tab can help people with physical disabilities use the mouse. However, to enable these features, you need to enable Assistive Technologies in Ubuntu first, as follows:
- Open the Assistive Technologies Preferences dialog box (System Preferences Assistive Technologies).
- Select the Enable Assistive Technologies check box and then click the Close and Log Out button (this is necessary to start the background services).
- Select Log Out in the Shutdown dialog box, and then log back in again when prompted.
- After logging in, return to the Accessibility tab of the Mouse Preferences dialog box (System Preferences Mouse).
From the Accessibility tab, you can enable Simulated Secondary Click and dwell click options. Selecting the “Trigger secondary click by holding down the primary button” check box simulates a right-click after you hold the left-click for a certain amount of time (useful for those having trouble right-clicking). The right-click actually occurs when you release the mouse button, for instance bringing up a context menu if you're clicking on a file icon. The amount of time you have to hold down the mouse button can be configured by moving the Delay slider to the left for a faster response or to the right for a longer delay.
A dwell click allows you to simulate a mouse-click action after the mouse pointer has been left idle for a certain amount of the time so, for instance, hovering over an icon for a few seconds could double-click it to launch an application. To enable this feature, select “Initiate click when stopping pointer movement.” You can set the length of the idle time by moving the Delay slider to the left for less idle time or to the right for a longer delay. The Motion Threshold setting determines the amount of pointer movement allowed while the mouse is still considered idle (useful for those who might be unable to control small movements of their hands). Moving the Motion Threshold slider to the left makes the mouse pointer sensitive; moving it to the right makes the pointer less sensitive. You can choose two types of dwell click:
Choose type of click beforehand: This option automatically clicks the mouse when the mouse pointer is idle. If you want to choose the type of mouse click each time, put a check in the box beside Show Click Type Window. This will show a floating window, from which you can select various types of clicks, such as single-click, double-click, and so on. Alternatively, you can choose the mouse click from the Dwell Click applet instead. (Applets are discussed in the “Working with Applets” section later in this chapter.)
Choose type of click with mouse gestures: This option allows you to choose the type of mouse click to execute when the mouse movement is idle by moving the mouse in a certain direction, usually up, down, left, or right. Just wait until the mouse turns into a cross and then move the mouse. After you've performed the movement, the mouse will return to its original location before it was moved. All the mouse movements can be customized by changing the gestures in the drop-down lists for Single Click, Double Click, Drag Click, and Secondary Click.
![]() Note Orca, GNOME's screen reader software, also includes a tool that magnifies the area under the mouse pointer. It is available under System
Note Orca, GNOME's screen reader software, also includes a tool that magnifies the area under the mouse pointer. It is available under System ![]() Preferences
Preferences ![]() Assistive Technologies. Select the Preferred Applications option and set Orca to “run at start.” The software can be used to both magnify an area of the screen under the mouse and, using a speech synthesizer, read onscreen elements out loud.
Assistive Technologies. Select the Preferred Applications option and set Orca to “run at start.” The software can be used to both magnify an area of the screen under the mouse and, using a speech synthesizer, read onscreen elements out loud.
Touchpad Settings
The Touchpad tab appears on laptops only. You can set the following options:
Disable touchpad while typing: It's easy to brush against the touchpad accidentally with the ball of your thumb while you're typing. This option, which is enabled by default, eliminates the problem by disabling the touchpad momentarily after each keypress.
Enable mouse clicks with touchpad: This allows you to simulate a mouse click by tapping the touchpad. Depending on the sensitivity of your touchpad, this is either great or the most annoying thing in the world.
Scrolling options: Like a scroll wheel on a mouse, your laptop's touchpad can be used to scroll pages and images up and down, or even left and right. By default, vertical edge scrolling is enabled, so that running your finger up and down the right edge of the touchpad will scroll web pages up and down. If you enable horizontal scrolling, you will additionally be able to scroll left and right by running your finger along the bottom edge of the touchpad. The two-finger scrolling option disables edge scrolling, and instead makes the touchpad scroll if you have two fingers moving on it at the same time. If you don't like any of these features, you can choose to disable scrolling completely.
Changing Keyboard Settings
Choose System ![]() Preferences
Preferences ![]() Keyboard to open the Keyboard Preferences dialog box. This dialog box has five tabs: General, Layouts, Accessibility, Mouse Keys, and Typing Break.
Keyboard to open the Keyboard Preferences dialog box. This dialog box has five tabs: General, Layouts, Accessibility, Mouse Keys, and Typing Break.
General Settings
The General tab offers Repeat Keys settings and a Cursor Blinking slider. You can alter the rate of key repeat, which can be useful if you often find yourself holding down the Backspace key to delete a sentence; a shorter setting on the Delay slider and a faster setting on the Speed slider can help. However, if you make the delay too short for your typing style, you may find double characters creeping into your documents; typing an f may result in ff, for example.
Modifying the Cursor Blinking slider setting may help if you sometimes lose the cursor in a document. A faster speed will mean that the cursor spends less time being invisible between flashes.
Layouts Settings
On the Layouts tab, you can choose your keyboard model, add an alternative keyboard layout, and configure layout options, as shown in Figure 7-3. Typically, the generic keyboard works fine for most setups. However, if you want to make full use of the extra keys on your keyboard, such as Mail, Web, Power, Sleep, Suspend, and so on, you should select your keyboard model.
If you write in two different languages on your keyboard, it may be helpful to be able to switch between them. Click the Add button, and select the second language from the list. To switch from one language to another, you can add the Keyboard Indicator applet in a panel and toggle from one language to another by clicking the applet.
The Keyboard Layout Options dialog box, accessed by clicking the Options button, lets you select from a multitude of handy tweaks that affect how the keyboard works. For example, you can configure the Caps Lock key to act like a simple Shift key, or you can turn it off altogether. You can configure the Windows key so that it performs a different function too. Put a check alongside the options you want after reading through the extensive list.
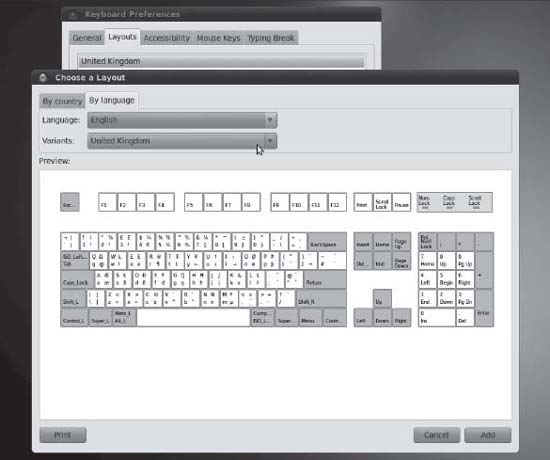
Figure 7-3. You can have more than one language setting in place for a keyboard, which is handy if you need to type in a foreign language.
Accessibility Settings
As with the mouse, there are also accessibility options for keyboard users to help people with physical disabilities. On the Accessibility tab, you can configure the following settings:
General: You have an option to enable/disable (“toggle”) accessibility features with keyboard shortcuts. This is disabled by default.
![]() Caution Do not check the box labeled “Accessibility features can be toggled with keyboard shortcuts” unless you are sure you need it. Once enabled, if you happen to hold down the Shift key for eight seconds, or tap the Shift key five times, a dialog window will appear asking whether you want to enable the Sticky or Slow Keys features. This can be a source of confusion!
Caution Do not check the box labeled “Accessibility features can be toggled with keyboard shortcuts” unless you are sure you need it. Once enabled, if you happen to hold down the Shift key for eight seconds, or tap the Shift key five times, a dialog window will appear asking whether you want to enable the Sticky or Slow Keys features. This can be a source of confusion!
Sticky keys: Some people are unable to hold down more than one key at a time, which is a problem if you want to type a keyboard shortcut such as Ctrl+S to save your work. As its name suggests, the sticky keys feature “holds down” keys such as Shift, Ctrl, and Alt while you press another key on the keyboard. To enable sticky keys, select the Simulate Simultaneous Keypresses check box. You can test sticky keys by running the File Browser (Places
Slow keys: This feature controls the reaction rate of keys. By moving the Delay slider to the left, the reaction rate of the keys becomes faster. By moving the slider to the right, the reaction rate of the keys becomes slower, to the point that you would need to hold the key for a certain amount of time for it to be considered as a key press. This has obvious uses for people with limited dexterity in their fingers, but most people will not want this enabled.
Bounce keys: This feature controls the repetition of letters on the screen when the same key is accidentally pressed. By moving the slider to the left, the repeat rate will be quicker; moving it to the right adds time for the key to be repeated.
At the bottom of the dialog box is a text box for typing to test the settings you've just configured. You can also enable sound notifications by clicking the Notifications button. These notifications will let you know when the keyboard accessibility features have been enabled or disabled. You can set sound alerts for accessibility in general, sticky keys, slow keys, and bounce keys.
Mouse Keys Settings
The mouse keys feature lets you use your numeric keypad to control the mouse pointer. By selecting the “Pointer can be controlled using the keypad” check box and pressing the Num Lock key, you can move the mouse pointer by typing from the numeric keypad.
With mouse keys enabled, the 5 key both simulates a mouse click and acts as the center of a directional wheel surrounding it. The 1, 2, 3, 4, 6, 7, 8, and 9 keys simulate mouse direction. Some numeric keypads have arrows on them to indicate this.
You can move the Acceleration slider to adjust the time it takes while pressing the mouse keys for the mouse movement to reach full speed.
The Speed slider sets the distance offset of the mouse pointer when you press a mouse key. By moving the Speed slider left, the mouse pointer covers a smaller distance when you press a mouse key, giving you the illusion that the mouse movement is slower. By moving the Speed slider right, the mouse pointer covers a larger distance when you press a mouse key, giving you the illusion that the mouse movement is faster.
The Delay slider determines the amount of time to press the mouse keys before the mouse pointer starts to move. You can set the delay by moving the Delay slider to the left for a quicker response time and to the right for a longer delay.
Typing Break Settings
The Typing Break tab features a function that can force you to stop typing after a predetermined number of minutes, to give your fingers and wrists a rest. It does this by blanking the screen and displaying a “Take a break!” message. Note that a notification area icon will appear before the break time to give you advanced warning of the lockout.
Creating Keyboard Shortcuts
Ubuntu lets you define your own keyboard shortcuts for just about any action on the system. To create a shortcut, choose System ![]() Preferences
Preferences ![]() Keyboard Shortcuts. In the dialog box, search through the list for the action you want to create a shortcut for, click it, and then press the key combination you want to use. For example, you might locate the Volume Up and Volume Down entries in the list, click each, and press Ctrl+left arrow and Ctrl+right arrow. Then you will be able to turn the volume of your sound card up or down by holding down Ctrl and tapping the left or right arrow key, respectively.
Keyboard Shortcuts. In the dialog box, search through the list for the action you want to create a shortcut for, click it, and then press the key combination you want to use. For example, you might locate the Volume Up and Volume Down entries in the list, click each, and press Ctrl+left arrow and Ctrl+right arrow. Then you will be able to turn the volume of your sound card up or down by holding down Ctrl and tapping the left or right arrow key, respectively.
![]() Caution Be careful not to assign a shortcut to a popular key. It might be nice to make Totem media player appear when you hit the spacebar, for example, but that will mean that it will start up several times whenever you type a sentence in a word processor! Also be aware that some key combinations are used by applications. Within OpenOffice.org's Writer, for example, the Ctrl+left/right arrow key combination moves you from word to word in a paragraph. If you define those combinations as shortcuts, you will no longer have this functionality.
Caution Be careful not to assign a shortcut to a popular key. It might be nice to make Totem media player appear when you hit the spacebar, for example, but that will mean that it will start up several times whenever you type a sentence in a word processor! Also be aware that some key combinations are used by applications. Within OpenOffice.org's Writer, for example, the Ctrl+left/right arrow key combination moves you from word to word in a paragraph. If you define those combinations as shortcuts, you will no longer have this functionality.
An example of a handy shortcut is to configure your Home folder to appear whenever you press Ctrl+Home. This can be done by locating the Home Folder option under the Desktop heading.
Getting Online
Getting online is vital in our modern Internet age, and Ubuntu caters to all the standard ways of doing so. Linux was built from the ground up to be an online operating system and is of course based on UNIX, which pioneered the concept of networking computers together to share data back in the 1970s. However, none of this is to say that getting online with Ubuntu is difficult! In fact, it's easy.
Regardless of whether you use a mobile broadband connection, a standard wired Ethernet network device or a wireless network device, the same program, NetworkManager, is used to configure your network settings under Ubuntu. Support for many makes and models of equipment is built in, so in most cases, all you need to do is enter a few configuration details.
![]() Note Linux runs about 60 percent of the computers that make the Internet work! If you use Google, Facebook, or Wikipedia, you're using Linux. As your Linux skills increase, you'll eventually get to a stage where you, too, can run your own Internet servers. It sounds difficult but can be quite easy.
Note Linux runs about 60 percent of the computers that make the Internet work! If you use Google, Facebook, or Wikipedia, you're using Linux. As your Linux skills increase, you'll eventually get to a stage where you, too, can run your own Internet servers. It sounds difficult but can be quite easy.
Using NetworkManager
NetworkManager lets users easily manage wireless (also known as wi-fi) and wired connections, as well as mobile broadband connections. An icon for this utility sits in the notification area at the top right of the Desktop and changes according to the type of connection currently active (up/down arrows for wired network, radio waves for wireless network, and so on). NetworkManager automatically detects any wireless networks that are in range, as well as if you're currently plugged in to a wired network. If you automatically connect to a network, a black notification box will appear on the top right of your screen for a few seconds and then fade away.
Clicking the NetworkManager icon will show a list of networks detected. By selecting an entry in the list, you can then connect to the network, and you'll be prompted to configure WEP/WPA protection, if applicable.
![]() Caution At times we have been prompted for the wrong kind of wireless protection—for example, we were asked for a 128-bit WEP key rather than a 64-bit key when trying to connect to a network. In other words, it pays to check that you're being prompted for the right thing, and to select the correct option if you're not. Failure to do so might result in frustration! If you are really stuck, make sure to read your wireless router documentation.
Caution At times we have been prompted for the wrong kind of wireless protection—for example, we were asked for a 128-bit WEP key rather than a 64-bit key when trying to connect to a network. In other words, it pays to check that you're being prompted for the right thing, and to select the correct option if you're not. Failure to do so might result in frustration! If you are really stuck, make sure to read your wireless router documentation.
Following this, the NetworkManager icon will display the signal strength of the connection for as long as you're connected. By clicking it, you'll be able to see at a glance what network you're connected to and any others within range. If you want to switch networks, just click the NetworkManager icon and select a different network in the list. If it's a secure network, you'll be prompted for a password before you're granted access.
![]() Tip By right-clicking the NetworkManager icon, you can opt to completely disable your network hardware if you wish. This is quite useful if you don't need a network and would like to conserve your laptop battery.
Tip By right-clicking the NetworkManager icon, you can opt to completely disable your network hardware if you wish. This is quite useful if you don't need a network and would like to conserve your laptop battery.
NetworkManager settings persist across reboots, provided the network that was last configured is in range. This means that NetworkManager is ideal for all kinds of wireless network users, from those who frequently switch between different networks (that is, mobile workers) to those who just use a single wireless network connection, such as that provided by a wireless network broadband router in a home/small office environment. NetworkManager will also let you switch to a wired (Ethernet) connection, if and when you attach one to your computer.
NetworkManager will automatically detect networks and the type of connection. If you want to manually supply details, such as the IP address and gateway, or the name of the wireless base station—which might be necessary if your base station doesn't broadcast its name or if you need to connect to a specialized setup—you can do so by editing the connection.
Configuring Wired Networking
Every conventional desktop or laptop computer comes with an Ethernet port which is used to make a wired network connection to a router, hub, or switch.
Wireless networking as an alternative is extremely popular, particularly of course for portable devices such as laptops, but connecting via a cable offers advantages in speed, reliability and security. For these reasons wired Ethernet connections are still the standard in office environments. Even at home, if you have a desktop computer located close to your router, you may as well connect them using the Ethernet cable that came with your router.
In most cases, NetworkManager will sense a wired Ethernet connection and automatically connect using the Dynamic Host Control Protocol (DHCP). This means that your computer receives its IP address, gateway, subnet mask, and Domain Name System (DNS) addresses automatically. All routers manufactured today are set up to automatically use DHCP out of the box.
![]() Tip If a DHCP server is not available, Ubuntu will attempt to set up a network automatically using the Zeroconf (or Zero Configuration Networking) system, just like Microsoft Windows systems. (Microsoft refers to this as Automatic Private IP Addressing, but it's also known as link-local.) In other words, if a bunch of computers plug into a hub or router on an ad hoc basis, without being configured and without a DHCP server operating, they will be able to network with each other. To make this work, each computer randomly assigns itself a unique IP address that starts with
Tip If a DHCP server is not available, Ubuntu will attempt to set up a network automatically using the Zeroconf (or Zero Configuration Networking) system, just like Microsoft Windows systems. (Microsoft refers to this as Automatic Private IP Addressing, but it's also known as link-local.) In other words, if a bunch of computers plug into a hub or router on an ad hoc basis, without being configured and without a DHCP server operating, they will be able to network with each other. To make this work, each computer randomly assigns itself a unique IP address that starts with 169.254 with a subnet mask of 255.255.0.0.
If you need to manually specify network details such as IP and router addresses, perhaps because you work in an office environment with nonstandard systems, start by speaking to your system administrator or technical support person to determine the settings you need. Ask the administrator for your IP address, DNS server addresses (there are usually two or three of these), your subnet mask, and the router address (sometimes called the gateway address). The settings you will get from your system administrator will usually be in the form of a series of four numbers separated by dots, something like 192.168.0.233. After you have this information, follow these steps:
- Right-click the NetworkManager icon in the notification area and select Edit Connections from the menu.
- Select the Wired tab from the tab bar and click the Add button. This launches the new network configuration screen, where you can create a profile for the wired network.
- Provide a name for the new connection. Then select the IPv4 Settings tab and change the Method drop-down from DHCP to Manual.
- Click Add and supply the IP address, subnet mask, and gateway address for the device. You should also fill in the areas for DNS Servers and Search Domains. You can add more than one address to these sections by separating each one with a comma. Figure 7-4 shows an example of these settings. Click Apply after filling in the information. The network will be added to the list.
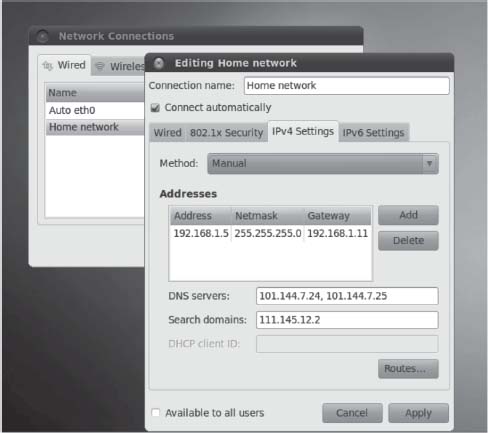
Figure 7-4. Ubuntu will automatically work with DHCP networks, or you can define a static IP address.
![]() Tip If you're using a static IP address with a router, such as that provided by a DSL modem, the DNS address is often the same as the router/gateway address.
Tip If you're using a static IP address with a router, such as that provided by a DSL modem, the DNS address is often the same as the router/gateway address.
Your network connection should now work. If you now have more than one wired network connection set up, you can switch between them by clicking on the NetworkManager icon and selecting the appropriately named connection under Wired Networks. If your newly set up connection isn't working, try rebooting. However, if your system administrator mentioned that a proxy must also be configured, you'll need to follow the instructions in the “Working with a Proxy Server” section later in this chapter.
Connecting to a Wireless Network
A wireless (wi-fi) network is, as its name suggests, a network that does away with cabling and uses radio frequencies to communicate. It's more common for notebooks and handheld computers to use wireless connections, but some desktop computers also do. Indeed, it's increasingly the case that many workplaces are switching to wireless networking, eschewing old-fashioned, cable-based networking.
![]() Note Slowly but surely, wi-fi is replacing wired Ethernet networks. However, sometimes wi-fi networks are impractical or simply undesirable. For example, the metal infrastructure in some buildings means the signal becomes unreliable. Wi-fi is also considered too insecure for some companies, as the wi-fi signal often spreads to the street outside the building. Although such transmissions are nearly always secured and WPA2 is considered secure, wi-fi security implementations have been broken. Ethernet might be considered old technology, but trying to steal data from physical cables is an order of magnitude more difficult, to the point of being practically impossible.
Note Slowly but surely, wi-fi is replacing wired Ethernet networks. However, sometimes wi-fi networks are impractical or simply undesirable. For example, the metal infrastructure in some buildings means the signal becomes unreliable. Wi-fi is also considered too insecure for some companies, as the wi-fi signal often spreads to the street outside the building. Although such transmissions are nearly always secured and WPA2 is considered secure, wi-fi security implementations have been broken. Ethernet might be considered old technology, but trying to steal data from physical cables is an order of magnitude more difficult, to the point of being practically impossible.
Notebooks and PDAs typically use built-in wireless network devices, with an invisible antenna built into the case. However, some older notebooks might use PCMCIA cards, which have an external square antenna, and some desktop computers might use PCI-based wireless cards or USB dongles, which have external rubber/plastic antennas, in the style of old cell phones.
Ubuntu includes support for most wireless network devices. However, it's possible to use Windows wireless network device drivers for unsupported hardware. Also, sometimes Ubuntu appears to support a wireless network device, in that it identifies it and lets you configure it, but you might find that it simply doesn't work (or works very badly, perhaps with an intermittent connection). In this situation, you can also try installing Windows drivers. See the “Installing Windows Wireless Network Device Drivers” section later in this chapter for details.
![]() Note Ubuntu is rare in the Linux world in that it uses some proprietary (closed source) wireless device drivers by default. Ubuntu is, after all, an open source OS and is committed to the goals of free and open source software. The use of proprietary drivers is considered a necessary evil because not all devices have open source drivers right now, and not all open source drivers support all the functions you might be used to (typically, they might not support the WPA functionality of your wi-fi device, for example). The use of proprietary drivers is regarded as a stopgap measure, and it's hoped that manufacturers will realize that it is in their interests to support open source driver development, making proprietary drivers redundant.
Note Ubuntu is rare in the Linux world in that it uses some proprietary (closed source) wireless device drivers by default. Ubuntu is, after all, an open source OS and is committed to the goals of free and open source software. The use of proprietary drivers is considered a necessary evil because not all devices have open source drivers right now, and not all open source drivers support all the functions you might be used to (typically, they might not support the WPA functionality of your wi-fi device, for example). The use of proprietary drivers is regarded as a stopgap measure, and it's hoped that manufacturers will realize that it is in their interests to support open source driver development, making proprietary drivers redundant.
Connecting to a wireless network device is easy with NetworkManager. Just click the NetworkManager icon, and you will see the available wi-fi networks in the Wireless Network list. Networks protected with WEP/WPA have a padlock in the wireless icon to the right of the name, as shown in Figure 7-5. Those that are “open” don't have this padlock.
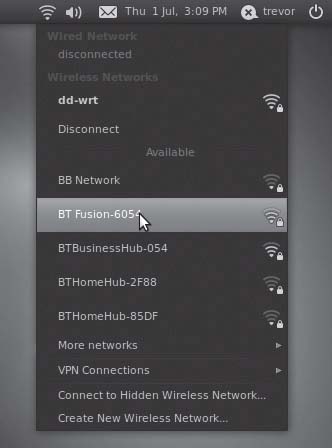
Figure 7-5. Clicking the network icon displays a list of available wireless networks.
You might see many wi-fi networks listed, depending on your location. The wireless base stations are identified by their Service Set Identifier (SSID) or sometimes ESSID, with E standing for Extended.
If the SSID you would like to connect to is not listed by NetworkManager, it could mean that your wireless base station isn't set to broadcast its SSID or, worse, Ubuntu's wi-fi drivers aren't functioning correctly. If it's the former, all you need to do is right-click the NetworkManager icon and select Connect to Other Wireless Network. Then, in the new dialog box, type the SSID under Network Name, set Wireless Security to None or the appropriate security type, fill in the other information depending on the type of wireless security you selected, and click Connect. If it's the latter, you may need to use a Windows driver, as described in the next section.
![]() Tip If you are not offered any wireless networks at all, ensure that the wireless hardware is switched on. Some notebooks have a keyboard combination to turn it off to save battery power. Others have a little switch located on one of the edges of the notebook. Right-click the NetworkManager icon and ensure that Enable Networking and Enable Wireless are both selected.
Tip If you are not offered any wireless networks at all, ensure that the wireless hardware is switched on. Some notebooks have a keyboard combination to turn it off to save battery power. Others have a little switch located on one of the edges of the notebook. Right-click the NetworkManager icon and ensure that Enable Networking and Enable Wireless are both selected.
To connect to a wi-fi network, select the wireless base station you want to connect to in the list. If it isn't protected by WEP/WPA, you will be connected to it automatically.
If the wi-fi network you wish to connect to is protected with WEP or WPA, a dialog box will appear, prompting you for the password/passphrase, as shown in Figure 7-6. In the Wireless Security field, make sure the correct type of security for the wireless network is selected—it's usually right, but don't assume it's automatically correct! By default, the password/passphrase is obfuscated by circle characters so that anyone looking over your shoulder can't see what you're typing. If it helps (and if your shoulder is clear), check the Show Password box. This can be really handy when you're typing a particularly long passphrase.
![]() Note WEP keys come in either hexadecimal (hex) or plain text (passphrase) varieties. Hex keys look similar to this in their 128-bit form:
Note WEP keys come in either hexadecimal (hex) or plain text (passphrase) varieties. Hex keys look similar to this in their 128-bit form: CB4C4189B1861E19BC9A9BDA59. In their 64-bit form, they will be shorter and may look similar to 4D9ED51E23. A passphrase will take the form of a single short sentence. In home and office environments, WPA networks are usually protected with passphrases. In larger corporate or academic environments, you might find that the network is protected with a WPA certificate.
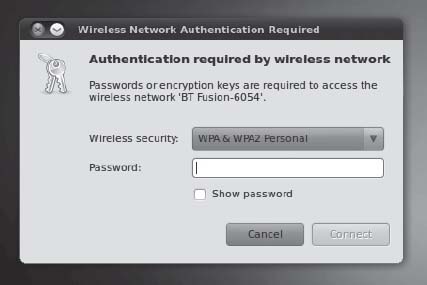
Figure 7-6. Ubuntu is able to join WPA-protected wireless networks.
When you're finished, click the Connect button. You should see the NetworkManager icon start to animate as the program attempts to connect and find an IP address. After a few seconds, when the animation finishes and the icon switches to display signal strength, you should find yourself online.
If your computer doesn't seem to connect, try rebooting. If the hardware doesn't work after this, it might be that the drivers Ubuntu installed by default are incompatible with your network device. In this case, you can try using a Windows wireless network device driver, as described in the next section.
Should you find yourself in the unusual situation of needing to specify the IP address, subnet mask, and gateway for a wireless connection, you can do so using the manual configuration mode of NetworkManager, as outlined in the “Configuring an Ethernet Network Device” section earlier in this chapter. Simply follow the instructions in that section, but select the Wireless Connection entry in the list rather than Wired Connection. In the dialog box that appears, you'll see additional areas for entering your SSID and WEP/WPA protection details.
Installing Windows Wireless Network Device Drivers
NdisWrapper is effectively an open source driver (technically described as a kernel module) that allows Linux to use standard Windows XP drivers for wireless network devices. You might describe NdisWrapper as being a translation layer between the Linux kernel and the Windows drivers, which can be installed by using NdisWrapper's configuration tools.
You should use NdisWrapper in only one of two situations:
Your wireless network hardware simply isn't recognized by Ubuntu: All you see when you click the NetworkManager icon is a Manual Configuration option; you don't see any wireless networks listed. Of course, you should first ensure that the wireless hardware in your computer is switched on—some notebooks offer the facility to deactivate it to save battery life.
Your network hardware is recognized by Ubuntu but fails to work correctly or adequately when you configure it: Perhaps it is unable to associate with wireless base stations, or maybe you can't connect to WPA-enabled base stations and consider WEP too insecure for your surroundings. If this is the case, in addition to installing NdisWrapper, you'll need to undertake an additional step in order to blacklist the existing Ubuntu driver.
Using NdisWrapper is relatively simple, and just a handful of commands are required. However, getting hold of the necessary Windows driver files is harder work because, unfortunately, NdisWrapper isn't designed to work with the usual method of driver distribution: .exe files. Instead, NdisWrapper needs the specific .inf and .sys files that constitute the driver—effectively, the Windows system files. These are contained within the .exe file and must be manually extracted.
![]() Note Sometimes drivers are distributed as
Note Sometimes drivers are distributed as .zip files, in which case the relevant files are easy to get at. Keep your fingers crossed that this will be the case for your particular hardware!
NdisWrapper is far from perfect. Not all wireless devices have been proven to work with it, and it's not necessarily the case that a driver available for Windows will work under Linux. Sometimes trial and error is required. Annoyingly, Windows drivers sometimes appear to work but then prove unreliable. Some might stop working. Some might even crash your system. The best plan is simply to give it a try.
![]() Tip NdisWrapper gets better and better with every new release. This is why it's a good idea to update your system on a regular basis.
Tip NdisWrapper gets better and better with every new release. This is why it's a good idea to update your system on a regular basis.
In the instructions in this section, we explain how to make an Atheros AR5008 wireless network device that's built into an Apple MacBook work under Ubuntu using NdisWrapper. The instructions remain essentially the same for all types of wireless network hardware. However, some specific details, such as download addresses, will obviously differ.
First, you'll need to install the NdisWrapper software and then you can install the necessary Windows drivers. These steps will make your wireless network device available under Ubuntu. Then you can follow the instructions in the previous section to connect to that wireless network.
Installing the NdisWrapper Configuration Tools
NdisWrapper consists of two components: a kernel module and configuration tools. The kernel module comes as part of the default kernel package, so is installed by default, but you will need to install the configuration tools manually.
To do so, ensure you are online using a wired connection to your router have an active wired network connection, following the previous “Configuring an Ethernet Network Device” section. Then start up the Ubuntu Software Center, which you'll find under Applications. Do a search for windows wireless and install the Windows Wireless Drivers package which will come up in the search results. You will need to enter your password when prompted. Installing this package automatically installs not only the graphical Windows wireless driver installation tool, but also the underlying packages ndiswrapper-utils and ndiswrapper-common.
Installing the Windows XP Drivers
After the NdisWrapper configuration software is installed, you can install the Windows XP wireless network device drivers. There are several parts to the procedure:
- Identify the wireless network hardware and then source the appropriate Windows driver. If you're dual-booting with Windows, the drivers may already be available on your Windows partition.
- Extract the necessary
.sysand.inffiles from the driver archive (and possibly.binfiles, although this is rare). - You may need to “blacklist” (that is, tell the system to ignore) the built-in Ubuntu driver, so that NdisWrapper can associate with the hardware.
- Use the NdisWrapper configuration tool to install the Windows driver.
These steps are covered in the following sections. You will need another computer that's already online to download some files and check the NdisWrapper web site for information. If your computer dual-boots, you can use your Windows setup to do this, or if you have an Ethernet port on your computer, you could plug into a wired network.
Identifying Your Wireless Network Hardware and Sourcing Drivers
To identify the wireless network hardware for use with NdisWrapper, you need two pieces of information: the make and model of the hardware and the PCI ID number. The former is the make and model of the hardware as identified by Ubuntu as a result of system probing, rather than what's quoted on the packaging for the wireless network device or in its documentation. These details discovered by Ubuntu will usually relate to the manufacturer of the underlying components, rather than the company that assembled and marketed the computer. The PCI ID is two four-digit hexadecimal numbers used by your computer to identify the device internally (such as 168c:001c). The same PCI ID numbering system is used by both Windows and Ubuntu, which is why it's so useful in this instance.
You can find both the PCI ID and the make/model information by using the Device Manager tool. Follow the instructions in the “Installing Device Manager” section earlier in this chapter if you haven't already installed this program. Then follow these steps:
- Choose Applications System Tools Device Manager. In the left column, find the entry that reads Network Controller, Networking Wireless Control Interface, or WLAN Interface. You might also look for USB Interface, PCI Bridge, or 802.11 to exhaust your search. Then look at the corresponding summary in the right column, where you'll find the make and model of the hardware listed under the Vendor and Model headings. If no useful details are listed, you might need to click the parent entry in the list. On one test system, we found the WLAN Interface entry, but saw the make and model details only after we clicked the Ethernet Controller parent entry in the list on the left.
- Write down the make and model shown in Device Manager. For example, on a test notebook containing an Atheros wireless network device, the make and model read AR5001 Wireless Network Adapter. Remember that these details don't relate to those listed in the instruction manual or computer packaging (our notebook's specification lists the hardware simply as Built-in AirPort Extreme Wi-Fi). This is because Ubuntu is identifying the hardware generically, reading information from its component hardware.
- Click the Properties tab of Device Manager (if this isn't visible, click View Device Properties) and look through the information there for a line that begins
info.udi. Look at the end of the line and make a note of the two sets of characters that are separated by an underscore and preceded bypci_. Look at Figure 7-7 for an example taken from our test machine. Yours may differ, but the line should always end withpci_and then the digits. If it doesn't, you have selected the wrong entry in the list of devices on the left. Try examining a different entry, such as the parent of the entry in the list. - Write down the characters following
pci_at the end of theinfo.udiline. Written alongside each other, the two sets of digits that are separated by an underscore form the all-important PCI ID number. In written form, they're usually separated by a colon. If either of the sets of letters or numbers is fewer than four characters long, simply add zeros before them in order to make four characters. In our test machine, the end of theinfo.udiline reads168c_1c. We add two zeros before1c, making a complete PCI ID of168c:001c. On another PC, the end of the line reads168c_13. Adding two zeros before13gives a PCI ID of168c:0013. - Using another computer that's able to go online, visit
http://sourceforge.net/apps/mediawiki/ndiswrapper/. Under the Documentation heading, click the “List of known working devices” link. This is a community-generated listing of the wireless network devices that have been proven to work with NdisWrapper.
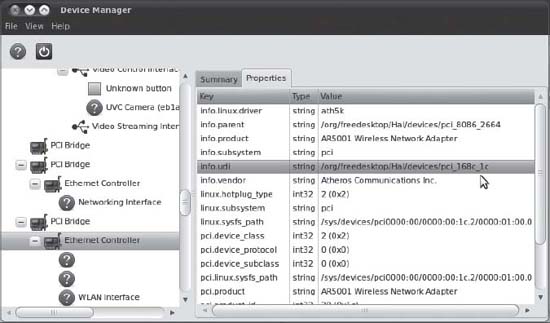
Figure 7-7. Find the PCI ID of your wireless network hardware by looking at the end of the
info.udiline. - The “known to work” cards are grouped in alphabetical order. Select the appropriate list based on the card manufacturer's name. (Remember to use the name you discovered using Device Manager in steps 1 and 2, and not the official name in the computer's manual or packaging.)
- Using the search function of your browser (Ctrl+F within Firefox), look for the PCI ID number you noted earlier, in the format described in step 4. For the example in Figure 7-7, we would search for 168c:001c. In the list, look to match the following things, presented in order of importance:
- The PCI ID
- The model name of the wireless hardware, as reported by Device Manager (listed on the Summary tab)
- The manufacturer and model of the notebook, as mentioned on its case or within its documentation
It's likely many entries in the list may match your PCI ID, so search until you find the one that best matches the model of the hardware. If there are still many matches, search until you find an entry that matches the manufacturer and model of the notebook. You might not be lucky enough to find an exact match for the notebook manufacturer and model, however, and you might need to select the most likely choice. Use your common sense and judgment. If your notebook is manufactured by ASUS, for example, but you can't find the drivers for the exact model, then choose drivers for another ASUS model.
 Caution Watch out for any mention of
 x86_64in the description of the driver file. This indicates that the entry in the list relates to 64-bit Linux. The version of Ubuntu supplied with this book is 32-bit. If you encounter an entry relating tox86_64, keep searching.
- Look within the entry in the list for a direct link to the driver file. Sometimes this isn't given, and a manufacturer web site address is mentioned, which you can visit and navigate through to the driver download section (usually under the Support section on the web site). Download the Windows XP driver release.
Extracting the Driver Components
After downloading the drivers, you'll need to extract the .sys and .inf files relevant to your wireless network hardware. These are all that NdisWrapper needs, and the rest of the driver files can be discarded. However, extracting the files can be hard to do, because often they're contained within an .exe file. (Most driver .exe files are actually self-extracting archive files.) Additionally, the driver file might contain drivers for several different models of hardware, and it's necessary to identify the particular driver .inf file relevant to your wireless network device.
If the driver you've downloaded is a .zip file, your task will probably be much easier. Simply double-click the downloaded .zip file to look within it for the directory containing the actual driver files.
If the driver is an .exe file, it's necessary to extract the files within it. With any luck, you might be able to do this by using an archive tool like WinZip (www.winzip.com), assuming that you've downloaded the file using Windows. Simply open the archive by using the File ![]() Open menu option within WinZip. You may have to select All Files from the File Type drop-down list in order for the
Open menu option within WinZip. You may have to select All Files from the File Type drop-down list in order for the .exe file to show up in the file list. However, if you're using Windows, we recommend an open source and free-of-charge program called Universal Extractor, which can be downloaded from www.legroom.net/software/uniextract. This program can extract files from virtually every kind of archive, including most driver installation files. After it is installed, simply right-click the installation .exe file, and select UniExtract to Subdir. This will then create a new folder in the same directory as the downloaded file, containing the contents of the installer file.
After you've extracted the files within your downloaded driver file, look for the files you need. The driver files will likely be contained in a folder called something like Driver or named after the operating system, like Win_XP. After you've found the relevant directory, look for .inf, .sys, and .bin files (although you may not find any .bin files; they're used in only a handful of drivers). You can ignore any other files, such as .cab and .cat files. Click and drag the .inf, .sys, and .bin files to a separate folder.
The task now is to find the .inf file for your hardware. If there's more than one, you'll need to search each until you find the one you need. You need to look for text that corresponds to the PCI ID you noted earlier. Open the first .inf file in a text editor (double-clicking will do this in Windows) and, using the search tool, search for the first part of the PCI ID, as discovered earlier. For the example in Figure 7-7, we would search for 168c. If you don't find it within the file, move on to the next .inf file and search again. When you get a search match, it will probably be in a long line of text and to the right of the text VEN_. Then look farther along that line to see if the second part of the PCI ID is mentioned, probably to the right of the text that reads DEV_. In the case of the driver file we downloaded for the example, the entire line within the .inf file read as follows (the two component PCI ID parts are shown in bold):
%ATHER.DeviceDesc.001B% = ATHER_DEV_001B.ndi, PCIVEN_168C&DEV_001C
If you find both component parts of the PCI ID in the line, as in this example, then you've found the .inf file you need. (In fact, you'll probably find many lines matching what you need, which is fine.)
You must now transfer the .inf file, along with the .sys and .bin files (if any .bin files were included with the driver), to the computer on which you want to install the drivers. This can be done by putting them onto a floppy disk, CD, or USB memory stick. Create a new directory called driver on the Desktop and save them there.
Your procedure from this point depends on whether Ubuntu recognized your wireless networking device when you first booted but was unable to make it work correctly. If it did, you will need to blacklist the built-in driver so that NdisWrapper can associate with the hardware. If the device wasn't recognized, you can skip straight to the “Using NdisWrapper to Install the Drivers” section.
Blacklisting Existing Drivers
To blacklist the existing built-in driver that didn't work with your wireless device, you need to find out the name of the kernel module and then add it to the /etc/modprobe.d/blacklist file. Here are the steps:
- Open Device Manager (System Administration Device Manager) and then select the entry in the list for your wireless network device. This is the one you discovered in steps 1 and 2 earlier, in the “Identifying Your Wireless Network Hardware and Sourcing Drivers” section.
- Click the Properties tab (if this isn't visible, click View Device Properties) and look for the line that begins
info.linux.driver. Then look in the Value column and make a note of what's there. For example, on one of our test notebooks, the Value column readath5k. Close Device Manager. - Hold down the Alt key on your keyboard and press F2. This will bring up the Run Application dialog. Type the following to open the
blacklistconfiguration file in the Gedit text editor:
gksu gedit /etc/modprobe.d/blacklist.conf - Click Run and enter your password when prompted.
- At the bottom of the file, type the following on a new line:
blacklist modulenameReplace
modulenamewith the name of the module you discovered earlier. For example, on our test system, we typed the following (as shown in Figure 7-8):blacklist ath5k - Save the file and then reboot your computer.
You should now find that the wireless network device is no longer visible when you click the NetworkManager icon, and all you see is a Manual Configuration option. This is good, because it means the hardware no longer has a driver attached, and you can now tell NdisWrapper to use the hardware.
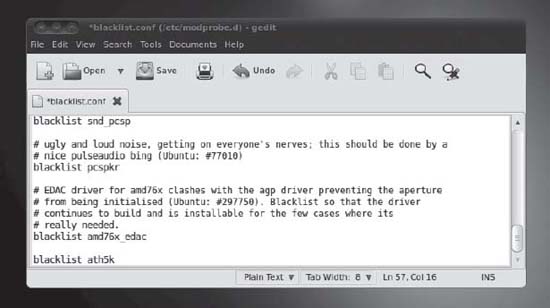
Figure 7-8. To stop Ubuntu from loading its own drivers, you may need to blacklist the module.
Using NdisWrapper to Install the Drivers
On the Ubuntu computer on which you want to install the drivers, you should now have the .inf file from the previous steps, plus the .sys and possibly .bin files that constitute the driver. You should have copied these files from the removable storage device into a new folder on your Desktop named driver.
![]() Note If you've used a USB memory stick to transfer the files, its icon should appear automatically on the Desktop as soon as it's inserted. When you've finished with it, right-click it and select Unmount. You must do this before physically removing any kind of USB memory device, as explained later in this chapter.
Note If you've used a USB memory stick to transfer the files, its icon should appear automatically on the Desktop as soon as it's inserted. When you've finished with it, right-click it and select Unmount. You must do this before physically removing any kind of USB memory device, as explained later in this chapter.
To install the driver by using NdisWrapper, follow these instructions:
- Click System Administration Windows Wireless Drivers. Enter your password when prompted.
- Click the Install New Driver button.
- The Install Driver dialog box appears, prompting you to select the
.inffile for your wireless device. Click the Location drop-down list to open a file-browsing dialog box. - Navigate to the
.inffile you copied to your system, which you have placed in thedriverfolder on your Desktop. Double-click the Desktop folder and then double- click thedriverfolder listed in the right column. Select the.inffile you copied in thedriverfolder and then click the Open button. - Back in the Install Driver dialog box, click the Install button.
- At this point, you should see the driver listed at the left column of the Wireless Network Drivers dialog box. It specifies the name of the driver installed and whether the hardware is installed. If it says the hardware isn't installed, you've probably selected the wrong
.inffile, or might be using the wrong driver file. Return to the previous sections and try to get an alternative Windows driver. - No reboot is necessary, and your wireless network card should work immediately. To test whether the driver works, click the NetworkManager icon and see if there are wireless networks listed. If it works, click Close to exit the Wireless Network Drivers dialog box.
Following this, you should find that the network device is available for configuration. Follow the earlier instructions for connecting to a wireless network.
Removing NdisWrapper Drivers
As mentioned earlier, although NdisWrapper can solve a lot of headaches with nonworking wireless hardware, it isn't perfect. You might find that the Windows driver you install simply doesn't work. In such a case, you can download a different version of the driver and try again. But first you'll need to remove the existing driver.
Choose System ![]() Administration
Administration ![]() Windows Wireless Drivers and enter your password when prompted. In the Windows Network Drivers dialog box, select the driver you want to remove in the left column and click Remove Driver. Click Yes when prompted to confirm the removal. Click Close to exit the tool.
Windows Wireless Drivers and enter your password when prompted. In the Windows Network Drivers dialog box, select the driver you want to remove in the left column and click Remove Driver. Click Yes when prompted to confirm the removal. Click Close to exit the tool.
Connecting to a Mobile Broadband Network
Many countries now have widespread 3G cellular networks capable of delivering data at broadband speeds to mobile devices. Smartphones now come with 3G capability by default, with 3G USB adapters (“dongles”) to plug into your notebook now commonplace on pay-as-you-go or contract arrangements. Higher-end notebooks and Netbooks now come with mobile broadband adapters built as standard.
Ubuntu offers excellent support for mobile broadband devices, whether you want to connect via a 3G USB adapter plugged into your notebook, an inbuilt 3G adapter, or your 3G-enabled cellphone connected (“tethered”) via USB cable.
You can set up your mobile broadband device as follows:
- Connect your 3G device (dongle or cellphone) to your notebook:
- A dongle connected via USB cable should be instantly recognized.
- Cellphones will generally need to be switched into modem mode, and you will need to consult your manufacturer's documentation for details. For example, when you plug a Nokia smartphone into a notebook, a dialog will appear on the phone giving you the option of switching to Mass Storage Mode or PC Suite Mode. Select the latter to make it act as a modem.
- If your notebook has a built-in 3G device, make sure it's switched on.
- Click the NetworkManager icon in the top panel of your Ubuntu Desktop. If your 3G device has been recognized, you should see a extra heading of Mobile Broadband, and under it ”New Mobile Broadband (GSM) connection,” which you should click on to start the New Mobile Broadband Connection setup wizard.
- The three simple steps in this wizard are:
- Choose Your Provider's Country: This will probably be correctly set already, based on the regional and language choices you made when you installed Ubuntu, but check it anyway before you click Forward.
- Choose Your Provider: You should see a list of all the 3G providers operating in your country. Choose yours. In the unlikely event of your provider not being listed, you can enter the name manually. Click Forward.
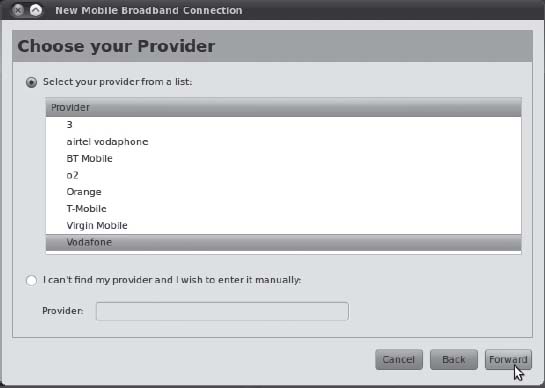
Figure 7-9. Ubuntu's mobile broadband connection wizard makes it straightforward to set up a 3G link.
- Choose Your Billing Plan: Several pre-set options will be shown in the “Select your plan” drop-down. For Vodafone UK, for example, the options are Contract, Prepaid, TopUp, and Go. The correct plan name for your 3G device should be there, but if it's not, there is an additional option of “My plan is not listed,” which will let you set the APN (Access Point Name) manually. (You will have to ask your provider for this information). Click Forward, check the settings, and click Apply.
If you're within a 3G coverage area, your mobile broadband device should now make a connection, and all necessary settings such as IP address, gateway, and domain name servers should be automatically configured.
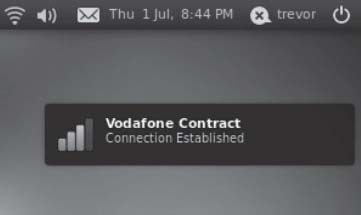
Figure 7-10. Uh-oh. Now that you're set up with a high-speed mobile broadband connection, your boss will expect you to be hard at work wherever you are!
Working with a Proxy Server
Some networks in offices, schools, and universities require that you use a web proxy (often referred to as an HTTP proxy). A proxy is a server computer that provides additional security by providing a single portal to all web pages. It also helps speed up Internet access by storing frequently accessed pages. This means that if ten people request the same web page, there's no need to get the same ten pieces of data from the Internet. The proxy computer can send them its own copies.
You'll need to speak to your system administrator to see whether your location uses a proxy. If it does, your administrator will most likely give you an address, which may take the form of a web address (a URL) or an IP address. When you have this information, follow these steps to configure the proxy:
- Open Network Proxy Preferences (System Preferences Network Proxy).
- On the Proxy Configuration tab, choose one of the three types of proxy configuration:
- By default, the Direct Internet Connection option is selected, meaning that network traffic is routed directly, without using a proxy.
- Manual Proxy Configuration enables you to set the proxy servers and respective ports for HTTP Proxy, Secure HTTP Proxy, FTP Proxy, and Socks Host. You can fill in this information based on the settings you received from your system administrator. If you were provided with one proxy for Internet access, select the Use the Same Proxy for All Protocols check box and fill in the details for the HTTP proxy and port, as shown in Figure 7-11. If your proxy uses authentication, click the Details button. In the HTTP Proxy Details dialog box, select the Use Authentication check box and then supply the username and password. Click the Close button.
- Automatic Proxy Configuration allows you to enter the link (URL) to discover the proxy settings at your location.
- On the Ignored Hosts tab, you can set the list of sites that will bypass the proxy. By default, any site hosted on your own computer is bypassed. You can add and remove sites as well. You normally add intranet (internal) web sites to this list.
- Click the Close button after you're finished making changes to the proxy settings.
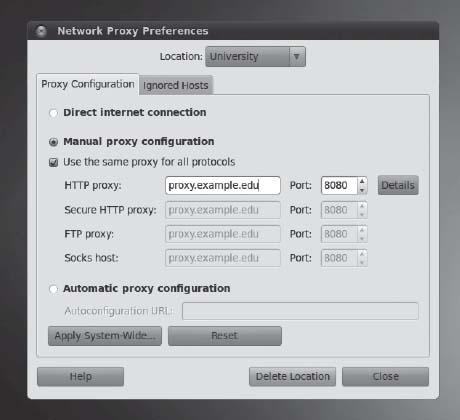
Figure 7-11. Proxy settings can be configured for a variety of locations.
If you have a laptop that is used in various locations, you can set up a series of proxy configurations that can then be selected whenever you move around. To create a new one, select New Location from the Location drop-down at the top of the window, input a name, and then set the appropriate values. After it is saved, each configuration remains available under the Location drop-down.
![]() Tip Some ISPs run proxy servers too. However, unlike proxies in offices, it's typically up to you whether you choose to use them. You might find that using a proxy speeds up your connection, especially when you access popular sites, so it's worth trying out. To find out whether your ISP offers a proxy, visit its technical support web pages or phone its technical support line.
Tip Some ISPs run proxy servers too. However, unlike proxies in offices, it's typically up to you whether you choose to use them. You might find that using a proxy speeds up your connection, especially when you access popular sites, so it's worth trying out. To find out whether your ISP offers a proxy, visit its technical support web pages or phone its technical support line.
Adding a Printer
Ubuntu supports a wide variety of printer models— everything from laser printers to color ink-jet models, and even some of the very old dot-matrix printers.
If you work in an office environment, you might be expected to access a shared printer. Sharing a printer is usually achieved by connecting the device directly to the network. The printer itself typically has special built-in hardware to allow this to happen. Alternatively, the printer might be plugged into a Windows computer, such as a Windows server (or even simply someone's desktop PC), shared so that other users can access it—a setup known as Windows printer sharing. Ubuntu will work with network printers of both types.
![]() Caution The vast majority of printers are now supported by Linux and work brilliantly. However, several manufacturers are still reluctant to release information about how their printers work, making Linux support difficult or impossible. If you're in the market for a new printer, and you want it to work with your Ubuntu system, be sure to check the OpenPrinting printer listings at
Caution The vast majority of printers are now supported by Linux and work brilliantly. However, several manufacturers are still reluctant to release information about how their printers work, making Linux support difficult or impossible. If you're in the market for a new printer, and you want it to work with your Ubuntu system, be sure to check the OpenPrinting printer listings at www.openprinting.org/printers so as to avoid buying an expensive paperweight.
Configuring a Local Printer
A local printer is one that's directly connected to your computer, typically via USB. Any printer you attach to your computer will be configured by Ubuntu automatically and ready to use immediately, as shown in Figure 7-12.
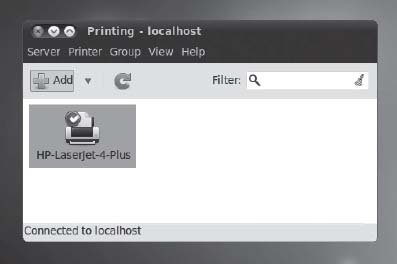
Figure 7-12. Any local printers are automatically configured when you connect them to the computer and then turn them on.
However, if the printer malfunctions when printing, such as churning out paper when a print job is sent to it, printing garbage, or not working at all, you can attempt to configure it yourself. To set up a local printer, follow these instructions:
- Click System Administration Printing. In the Printer configuration window, click the Add button. You'll see the message “Searching for Printers.” This might take a few moments to work through.
- In the New Printer dialog box, you need to select which printer to configure. The printers that Ubuntu detected are listed under Devices. Click the printer you want to use and then click the Forward button to continue. You'll see the message “Searching for Drivers.”
- Select the printer manufacturer. By default, Ubuntu selects the manufacturer that best fits your printer, but you can select another manufacturer from the list. Alternatively, you can provide the PostScript Printer Description (PPD) file if the built-in drivers cannot operate your printer. When you've finished, click Forward.
Tip You can find PPD files on the CD that came with your printer or download them. OpenPrinting (
www.openprinting.org) and Adobe (www.adobe.com/products/printerdrivers/winppd.html) offer many printer drivers for download. - Ubuntu again selects the detected model and corresponding driver for your printer, but you can change these selections. If the default driver simply doesn't work correctly, try a similar but different model. Select the appropriate model in the Model list in the left column and then select the appropriate driver for your printer from the Drivers list in the right column. Click the Forward button to continue.
- You'll be invited to give the printer a name. The default should be OK. You can fill in the Description and Location fields if you want, but these are necessary only if you intend to share the printer across a network. Click Apply when you've finished.
![]() Tip Sharing your printer on the network so that other computers can use it is simple: open the Printer configuration window (System
Tip Sharing your printer on the network so that other computers can use it is simple: open the Printer configuration window (System ![]() Administration
Administration ![]() Printing), select Settings from the Server menu, and put a check in the Publish Shared Printers Connected to This System box. Then click the OK button.
Printing), select Settings from the Server menu, and put a check in the Publish Shared Printers Connected to This System box. Then click the OK button.
After installation has finished, the printer will then appear in the Printer Configuration window. To see whether it's working correctly, double-click to see the printer properties, as seen in Figure 7-13, and then click the Print Test Page button at the base of the window.
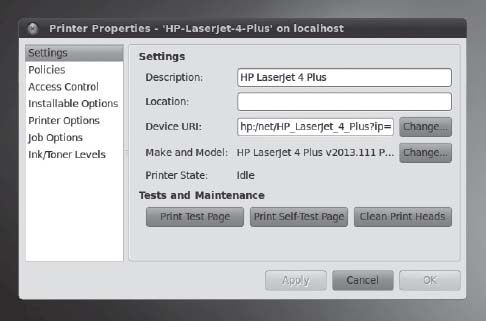
Figure 7-13. After the printer is configured, you can see its properties and test it by printing a test page.
If the printer is installed correctly, you should find yourself with a test page showing color gradations.
If the printer hasn't been installed correctly, it either won't work at all or will start spewing out page after page of junk text. If this is the case, click Cancel Tests (where the Print Test Page button used to be) and then turn off the printer. Delete the printer driver by selecting the printer in the list on the left and clicking the Delete button at the top of the Printer configuration window. Then repeat the installation steps, this time trying different settings.
Configuring a Network Printer
A network printer is one that is not directly connected to your computer. Instead, it connects to the network via an Ethernet cable, or sometimes via a wi-fi adapter. In this way, all computers in the office will be able to use it. It's also possible to share a printer that's attached to your computer to other computers on the network. The sharing is typically done using the Windows networking protocol (SMB). In this case, follow the instructions in the next section.
Some printers have the required server hardware built in, but others might use a special print server module that attaches to the printer's USB or parallel printer port. Ubuntu can work with both types of hardware.
Ubuntu is compatible with UNIX (LPD), HP JetDirect, and Internet Printing Protocol (IPP) server types. These are the most ubiquitous types currently in use for stand-alone printer servers.
Before beginning, you'll need to find out the printer's network (IP) address and, if relevant, the queue name or the port number. You should be able to find out these details by speaking to your network administrator or the person who configured the printer. If it's up to you to configure the network printer, consult its manual to find out how to set a static IP address.
Follow these steps to configure a network printer:
- Click System Administration Printing. In the Printer configuration window, click the Add button.
Tip You can add as many printers as you want. You could configure a local printer (that is, one attached to your computer) and then configure a network printer. - Recent models of network printer will be detected automatically and shown in the Devices list. If so, select the printer name and click Forward and proceed to step 5.
- If your printer isn't automatically detected, you can use the Find Network Printer facility to query the printer across the network and discover which printing protocol it prefers. To do this, click Find Network Printer, enter the network address of the printer in the Host field, and click Find. If all is well, a new entry will be made in the Devices listed, and you can click Forward and proceed to step 5.
- Older printers often aren't discoverable by the preceding methods, in which case you can set the printing protocol manually in the Devices list. If you're unsure of which to choose, try Internet Printing Protocol (IPP). If you wish to connect to a Hewlett Packard (HP) printer with an HP print server attached, select AppSocket/HP JetDirect. (You could also choose LPD/LPR Host or Printer, but this has long been replaced by IPP.) In the Host field, enter the network address of the printer. In the case of HP JetDirect, the default port number should work, unless you have been specifically told to enter a different number. Depending on which server option you chose, you may also need to enter the queue name. If it's IPP, you need to provide the host and printer queue, but Ubuntu makes it easy to set this up. Just type the network address in the Host field, and then click Find Queue. The IPP Browser dialog box will pop up and display a list of printer queues. Select a printer queue and then click OK. Ubuntu will update the entries in the Host and Queue fields automatically. Click the Verify button to check whether you can access the printer with the updated settings. If it fails, try changing the Host field to the printer's network address. After you have the correct settings, click Forward.
- As prompted, choose the printer manufacturer, printer model and driver, and printer name, just as if you were configuring a local printer. See steps 3, 4, and 5 in the previous section for guidance. Click the Apply button after you've made your selections.
- When the printer is installed, select the printer from the list in the Printer configuration window and then click Print Test Page.
If the printer doesn't work, it's likely that you set the wrong server type. Try an alternative type; if you chose IPP the first time, try App Socket/HP JetDirect the second time. Many print servers can emulate a variety of modes, so trying a different setting may work.
If the printer starts spewing out page after page of text, you likely selected an incorrect printer driver. Cancel the job at the printer by clicking Cancel Tests. Next, select the printer in the list on the left and click the Delete button at the top of the window to remove the printer. Then repeat the installation steps, this time trying an alternative driver.
Configuring a Windows/SMB Shared Printer
A Windows (or SMB) printer is one that's directly connected to a computer and then made available across the network via the network sharing function of the OS. Effectively, the computer acts as the printer server. Often, in corporate environments, such printers are attached to server computers, but an individual may share the printer attached to a workstation.
In a home situation, a Windows/SMB share is an excellent and inexpensive way of sharing a printer among many computers. The printer is attached to one PC, and, as long as that computer is switched on, the printer will be available to the other computers in the household.
Assuming that the printer has been correctly set up to be shared on the host computer, connecting to a Windows/SMB printer share is easy. In fact, you may find that Ubuntu finds the printer in the background and sets it up automatically! If you find the printer is available when you choose to print from an application, try it out and see if it works.
However, more likely, you'll need to add it manually. Follow these steps to set up a Windows/SMB shared printer:
- Click System Administration Printing. In the Printer configuration window, click the New Printer button.
- In the Devices list, select Windows Printer via SAMBA.
- Click the Browse button to probe the network to see whether any printer shares are available. More than one might appear, so navigate through the printer shares until you find the desired printer. Select the printer and click the OK button. If you cannot find the printer share listed in the SMB Browser dialog box, you may need to enter the details in the
smb://field manually, as shown in Figure 7-14. This entry will probably take the form of the address followed by the printer name (for example,officepc/epson). Speak to your system administrator or the individual in charge of the shared printer to find out what these are. - Click the Verify button to check whether the printer is accessible. If it succeeds, skip to step 6. If it fails, you may need to supply the username and password to access the shared printer, as described next.
- Select the Authentication Required check box. In the Username and Password fields, type the username and password required to access the shared printer. These can be the login details of any user of the computer or, if the shared computer and printer are configured for Guest access, you can try typing
Guestfor the username and leaving the Password field blank. After the details have been filled in, click Forward. - As prompted, choose the printer manufacturer, model, driver, and name, just as if you were configuring a local printer. See steps 3, 4, and 5 in the “Configuring a Local Printer” section for guidance. Click the Apply button after you've made your selections.
- When the printer is installed, select the printer from the list in the Printer configuration window and then click Print Test Page.
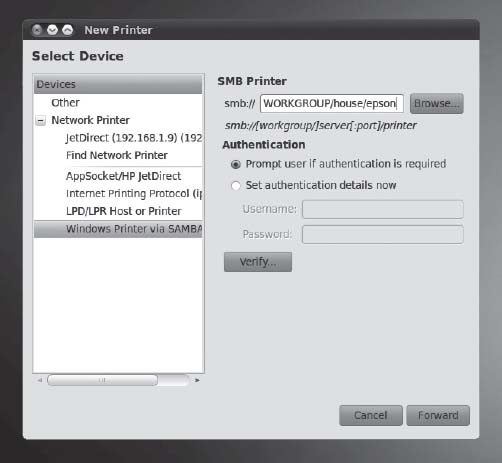
Figure 7-14. Ubuntu should be able to automatically detect any Windows or SMB shared printers on your network.
If the printer makes a noise as if to start printing but then decides not to, you might need to change a setting on the Windows machine. Click Start ![]() Printers and Faxes and then right-click the shared printer's icon. Select Properties and click the Ports tab in the Properties window. Remove the check in the Enable Bidirectional Support box and then click OK. Then restart both the Windows and Ubuntu computers.
Printers and Faxes and then right-click the shared printer's icon. Select Properties and click the Ports tab in the Properties window. Remove the check in the Enable Bidirectional Support box and then click OK. Then restart both the Windows and Ubuntu computers.
If the printer starts spewing out page after page of text instead of the test page, it's likely that you selected the wrong printer driver. Cancel the job at the printer by clicking Cancel Tests. Next, select the printer in the list and click the Delete button at the top of the Printer configuration window to remove the printer. Then repeat the installation steps, this time using an alternative driver.
Administering a Printer
Like Windows, Ubuntu uses the concepts of print queues to handle printing. When you print from an application, the print job is held in the print queue. If the queue is empty, the job is printed immediately. If there are already jobs waiting to be printed, or if a print job is already in progress, the new job is added to the queue.
![]() Tip If you have more than one printer installed (maybe you have a printer attached to your PC but also print to a network printer), you can set one as a default, which will automatically be chosen whenever you choose to print. Click System
Tip If you have more than one printer installed (maybe you have a printer attached to your PC but also print to a network printer), you can set one as a default, which will automatically be chosen whenever you choose to print. Click System ![]() Administration
Administration ![]() Printing. Your current default printer is indicated by a tick in a green circle. If you'd like to make another printer your default, right-click its icon and select Set As Default.
Printing. Your current default printer is indicated by a tick in a green circle. If you'd like to make another printer your default, right-click its icon and select Set As Default.
When you print a document, the Document Print Status icon appears in the notification area (it looks like a printer). Single-click the icon to view the jobs waiting to be printed, if any. Right-clicking a job displays a context menu that lets you cancel, delete, hold, and release the job, and even move it to a different printer.
When you print from applications, Ubuntu will display a unified printer interface, as you might be used to in Windows. You will find similarities when you print in Gedit, GIMP, and Firefox. The only exception is OpenOffice.org, which offers its own simplified print dialog box.
Most applications that use the unified print dialog box will provide additional unique options related to that particular application. For example, the F-Spot photo manager offers settings useful for photographs, such as laying up multiple images on a single page, whereas Gedit offers functions related to basic text printing.
Ensure that you select your printer in the list on the left of the print dialog box (on the General tab) in order to see all the available options.
Using Digital Cameras, MP3 Players, and USB Memory Sticks
Removable storage is the term applied to peripherals that you might attach to your computer and that contain their own storage. Examples include USB memory sticks, external hard drives, MP3 players, digital cameras, and photographic memory card readers. You might also find that devices such as mobile phones are treated as removable storage devices when you attach them directly to your computer.
When you attach any removable storage device, Ubuntu does the following:
- Displays an icon on the Desktop, which you can double-click to view the removable storage device contents.
- Automatically opens a File Browser window showing the contents of the device.
- Adds an icon for the device to the File Browser's Places list, which is also accessible via Places on the top panel.
- If the removable storage device contains digital images (if it's a digital camera, for example), a bar will appear towards the top of the File Browser window with a button which will enable you to import the images to the F-Spot photo library program. You'll learn more about this in Chapter 18, which provides a concise guide to cataloging and manipulating your digital images. Similarly, if your device contains audio files, Ubuntu will detect this and a button will be added enabling you to open these files in the Rhythmbox audio player.
The contents of the removable storage device will be accessible in exactly the same way as any other files on your system. You should be able to copy, delete, and create files on the device, provided the device isn't read-only (if the read-only switch isn't set on a USB memory stick, for example). If the device contains MP3 tunes, you should be able to double-click them to play them, provided the playback codecs are installed (see Chapter 14).
However, a very important rule must be followed when you've finished with removable storage devices under Ubuntu (or indeed any operating system): the device must be safely removed (or in technical terms unmounted) before you physically remove it. This applies also to memory cards that are inserted into a card reader—before removing any card from the card reader, it must be safely removed.
Safely removing is quite simple to do. Just right-click the icon on the Desktop or within the Computer window and select Safely Remove Drive, as shown in Figure 7-15. Make sure you save and close any files that you may have been working on before you do so, or you may see an error. You'll need to close any File Browser windows that might have been browsing the storage device too.
Following this, you can safely physically remove the card or unattach the device. Reinserting it will make it available once again.
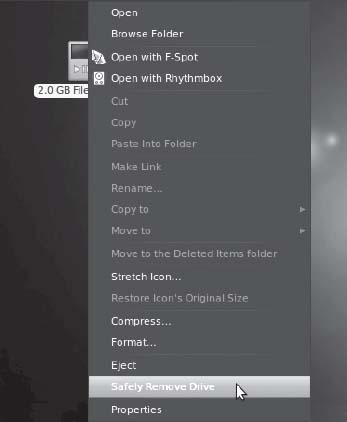
Figure 7-15. You may be tempted to whip out a USB drive as soon as you've copied files to it, but it should be unmounted properly in order to protect your data.
![]() Caution Be very careful not to remove a memory card from a card reader while you're writing to or reading from it on your PC. This will most likely damage the card irreparably. At the very least, it will wipe the contents of the card.
Caution Be very careful not to remove a memory card from a card reader while you're writing to or reading from it on your PC. This will most likely damage the card irreparably. At the very least, it will wipe the contents of the card.
Configuring a Scanner
Scanners may seem like archaic machines that have been superseded by digital cameras or absorbed into multifunction devices, but they're still the best method of transcoding nondigital images and textual documents into a digital format.
A lot of flatbed scanners can be made to work under Ubuntu, but not all types are supported. You can check the list of currently supported scanners by visiting www.sane-project.org. Additional models are added to the list all the time, and this is another reason to make sure your system is completely up-to-date (see Chapter 8, which explains how to update your system software).
The best test of whether your scanner is supported under Ubuntu is simply to see whether it will work. Scanning within Ubuntu is handled by the Simple Scan utility. This is a stand-alone program that operates like the TWAIN drivers that you might have used under Windows.
To configure a scanner and scan images, follow these steps:
- Choose Applications Graphics Simple Scan. On startup, the program attempts to detect your scanner. If it finds a compatible model, Simple Scan will start. If the scanner isn't recognized, a dialog box will appear telling you so.
- Using Simple Scan is as simple as its name suggests. Just lay your original on the scanner and click the Scan button. There's no preview. Simple Scan will go ahead and scan your original at full resolution and display the resulting image. You can then crop, rotate and save the image to disk using the controls in the toolbar. The file types which Simple Scan supports are PNG (lossless), JPEG (compressed), and PDF.
- Under Document Preferences, you can alter the scan resolution for text and photos, according to your scanner's capabilities, and also set the default page size.
Simple Scan should be good enough for most purposes, but if you'd like a little more control over your scanning, with capabilities such as adjusting gamma, contrast and brightness, you might consider installing Xsane, which is available in the Ubuntu Software Center.
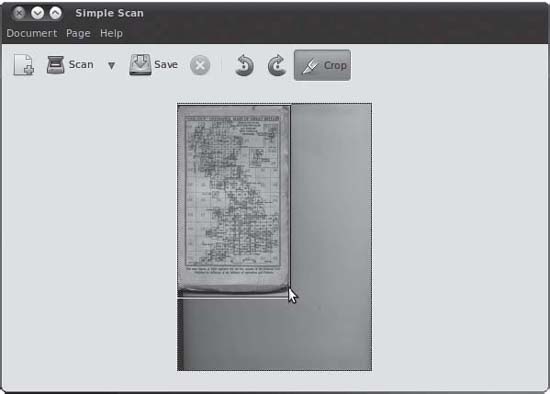
Figure 7-16. The Simple Scan program makes scanning really easy.
Installing 3D Drivers and Activating Desktop Visual Effects
The modern trend is for operating systems to incorporate flashy graphical effects into ordinary Desktop functions. For example, when windows are minimized in Windows Vista, they physically shrink and fade down to the Taskbar. Under Mac OS X, program windows appear to be “poured” into the Dock when minimized. In Windows Vista and Windows 7, when you press Alt+Tab to switch through open programs, the program windows are previewed vertically in a graphical arrangement, and you can flick through them, rather like searching through a card index. These effects are achieved using the 3D processing power of the computer's graphics card, even though the effects aren't necessarily 3D in nature.
![]() Note On a technical level, the technique is known as compositing. What you see on the screen is first drawn in the graphics card memory and then transferred to the screen, rather than everything simply being drawn directly onto the screen.
Note On a technical level, the technique is known as compositing. What you see on the screen is first drawn in the graphics card memory and then transferred to the screen, rather than everything simply being drawn directly onto the screen.
Ubuntu includes similar Desktop visual effects, courtesy of a system called Compiz (www.compiz.org). However, all Desktop visual effect systems have a couple requirements, and these apply to Ubuntu as well:
- For Desktop effects to work, your graphics card (or motherboard graphics chipset) must be comparatively recent. Examples include the ATI Radeon, Nvidia GeForce, and Intel GMA product lines. Most graphics cards manufactured within the last five years with a graphics processing unit (GPU) should be adequate, and very recent models definitely will work.
- The correct graphics drivers must be installed. Currently, Intel GMA and some ATI Radeon graphics cards are supported by default because Intel and ATI provide open source 3D-capable drivers. For other hardware, including Nvidia cards, the manufacturer has not assisted development of open source drivers, and you may need to manually install a proprietary driver. Even for Nvidia cards, the picture is improving, with the open source Nouveau drivers now considered good enough for Ubuntu to install by default.
Note For most graphics cards, the open source graphics drivers will now support 3D Desktop effects. You will probably only need to install the proprietary driver if you want high performance from intensive 3D applications such as Google Earth and first-person shooter games.
Some proprietary 3D graphics drivers are provided under Ubuntu, but only if open source equivalents are missing. It is hoped that open source drivers will one day replace the need for proprietary drivers.
So do you actually need to install new drivers? If you find that Desktop effects are working, the correct drivers are already installed. A good way to test this is to hold down Ctrl+Alt and then tap the left or right arrow key. This will switch to the next virtual Desktop. If the entire desktop physically slides out of the way, Desktop effects are activated. If the Desktop remains static, and a small dialog box appears in the center of the screen to let you choose a virtual Desktop, then Desktop effects are not activated.
A utility called Hardware Drivers lets you manage proprietary drivers for your graphics card. This should appear automatically in the notification area immediately after installation if your hardware requires proprietary drivers.
Follow these instructions to activate the proprietary graphics driver:
- Click the Hardware Drivers icon to run the Hardware Drivers program. If it's not visible, click System Administration Hardware Drivers.
- Supply your password in the authorization dialog box and click OK.
- In the Hardware Drivers window, select the Enabled check box beside your graphics card device driver.
- A dialog box appears, asking you to confirm that you want to enable the driver. It explains that enabling the driver enables visual effects on your Desktop. Click the Enable button.
- The Summary dialog box appears to tell you what new software will be installed. Click the Apply button.
- The driver is downloaded and installed. Then the Changes Applied dialog box appears to tell you that the changes are completed. Click the Close button.
- In the Hardware Drivers window, click the Close button.
- You need to restart the computer so that Ubuntu will use the new driver. Click the session menu (the Power button at the top right of the screen), select Restart, and confirm.
After the new graphics driver is installed, Desktop visual effects should start working immediately, as shown in Figure 7-17. If you experience seemingly random systemwide crashes or freezing after installing a 3D graphics driver, consider reverting to your old setup by using the Hardware Drivers program (System ![]() Administration
Administration ![]() Hardware Drivers) to disable the new driver. Unfortunately, in a small minority of cases, the proprietary driver can prove buggy.
Hardware Drivers) to disable the new driver. Unfortunately, in a small minority of cases, the proprietary driver can prove buggy.
Figure 7-17. Using the correct graphics drivers can add sophisticated effects to your desktop.
Two modes of operation are available for Desktop visual effects: Normal and Extra. Normal is the default and provides a good subset of the available effects: menus fade into view, program windows shrink when minimized, and so on. Extra provides a lot more effects, some of them rather extreme, such as wobbling when you click and move a window, and windows appearing to explode to the corners of the screen when maximized. To switch between the two settings, right-click the Desktop, select Change Desktop Background, and then click the Visual Effects tab in the dialog box that appears. If you would like play with individual effects, install Simple CompizConfig Settings Manager in the Ubuntu Software Center, and then run System ![]() Preferences
Preferences ![]() CompizConfig Settings Manager. The effects are divided into logical sections and can be easily activated and assigned keyboard shortcuts to your taste.
CompizConfig Settings Manager. The effects are divided into logical sections and can be easily activated and assigned keyboard shortcuts to your taste.
Configuring Bluetooth
Bluetooth is the short-range networking facility that allows various items of hardware to work with each other wirelessly. You can use Bluetooth for everything from file transfers between a mobile phone and computer to employing a wireless keyboard or mouse with your desktop computer.
For Bluetooth to work, both devices need to have Bluetooth support. Many mobile phones come with Bluetooth nowadays, as do an increasing number of notebook computers. It's also possible to buy very inexpensive Bluetooth USB adapters.
Bluetooth support is built into Ubuntu and should activate automatically if Bluetooth hardware is present on your PC. You will know if this is the case because a Bluetooth icon will appear in the notification area. This is used to administer all Bluetooth devices that you might want to connect to your computer.
Pairing Bluetooth Devices
When two pieces of Bluetooth-compatible hardware need to communicate on a regular basis, they can get together, a process also known as pairing or bonding. This means that they trust each other, so you don't need to authorize every attempt at communication between the devices. Indeed, some devices won't communicate unless they're paired in this way.
Pairing is simple in practice and works on the principle of a shared personal ID number (PIN). The first Bluetooth device generates the PIN and then asks the second Bluetooth device to confirm it. After the user has typed in the PIN, the devices are paired. Pairing is easily accomplished under Ubuntu and doesn't require any additional software.
As an example, the following are the steps for bonding a mobile phone to an Ubuntu PC. Bonding for devices without a user interface, such as keyboards, is handled differently, as explained in the “Using a Bluetooth Keyboard or Mouse” section a little later in the chapter.
- Ensure that the Ubuntu PC is visible, which is to say that other Bluetooth devices can detect it. Click the Bluetooth icon in the notification area, select Preferences, and make sure that the Always Visible radio button is selected. Click Close.
- You can pair up two devices from either end, but we're going to begin using Ubuntu. To do this, click the Bluetooth icon in the notification area and select “Set up new device.” This launches the Bluetooth New Device Setup. Click the Forward button.
- The device setup probes the ether and finds any connectable devices. These will appear first as a series of numbers and then using their friendly names, as shown in Figure 7-18.
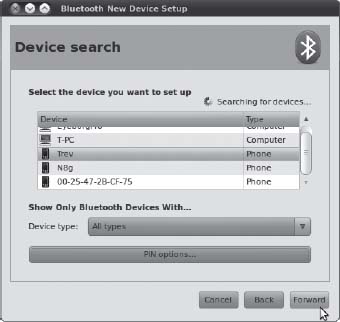
Figure 7-18. A pairing request is easily accomplished through the Bluetooth applet.
- Select the device you want to connect to and click Forward. By default a random five-digit PIN code is created and transmitted, although if you want you can create a custom one by clicking PIN options. The setup window will display this number, and you should receive a prompt on the phone showing the same number and asking if you want to pair with this as a trusted device. Confirm that on your phone and click the Matches button in the Ubuntu setup (fairly soon or it will time out!). The two devices will now be paired.
If you subsequently want to remove the pairing, click the Bluetooth icon and select Preferences. In the list of Devices at the bottom of the dialog box, select the entry for your Bluetooth device and click the Delete button. Don't forget to remove the pairing on the Bluetooth device too.
Transferring Files Between Bluetooth Devices
If you own a Bluetooth-equipped camera phone, you might be used to transferring pictures to your computer using Bluetooth. It's by far the easiest way of getting pictures off the phone and avoids the need for USB cables or card readers. To transfer files via Bluetooth, you can use the Bluetooth applet.
![]() Note Some phones refuse to transfer files unless the phone and computer are paired, so follow the instructions in the previous section first. Phones such as like the Nokia 6680 don't need pairing for file transfer, although each transfer must be confirmed manually.
Note Some phones refuse to transfer files unless the phone and computer are paired, so follow the instructions in the previous section first. Phones such as like the Nokia 6680 don't need pairing for file transfer, although each transfer must be confirmed manually.
Browsing Files on a Remote Device
The easiest way to get files to or from a device is to use Nautilus:
- Click the Bluetooth icon in the notification area and select Browse Files on Device.
- Choose your phone (or other device) from the list and click Browse. You may need to confirm the action on your phone by selecting Yes.
- The File Browser opens up with the folders available on the device (see Figure 7-19). You can then navigate through these and copy files to your Desktop in the usual drag-and-drop fashion. You can also add files to the phone in the same way.
Figure 7-19. You can use the File Browser to access a Bluetooth device.
Sending Files from an Ubuntu PC to Another Device
There are two ways to send files to another Bluetooth device from your Ubuntu PC. The first is to use the Bluetooth applet. The second is to right-click the file in question and select Send To. The second method is useful if you want to send many files at once, and you will have the option of automatically zipping the files into a single archive (but bear in mind that the Bluetooth device receiving the file will need to be able to subsequently unarchive the file).
Using the Bluetooth Applet
Follow these steps to use the Bluetooth applet to send files:
- Click the Bluetooth icon in the navigation area and click Send files to device.
- In the Choose Files to Send dialog box, navigate to the file you want to send and click Open.
- In the Select Device to Send To dialog box, select the target Bluetooth device and click the Send To button.
- The target Bluetooth device might prompt you to accept or deny a file transfer request from Ubuntu. Choose to accept it.
- After the file has been received by the Bluetooth device, click Close.
Using the Send To Option
To send one or more files using the Send To option on the context menu in the File Browser or on the Desktop, follow these steps:
- Either right-click an individual file or folder, or select several files and click one of them. Right-click and select Send To.
- In the Send As drop-down list in the dialog box that appears, select Bluetooth (OBEX Push). In the Send To drop-down list, ensure that your Bluetooth device is selected.
- If you're sending several files, you can put a check in the Send Packed In check box. This will create a new single
.ziparchive and add the files to it automatically. Otherwise, each file will simply be sent one after the other. If you are sending a folder, the Send Packed option is already checked and cannot be unchecked. - Click the Send button. You may be prompted to authorize receipt of the files on the Bluetooth device, so do so. Bear in mind that transfer of many files may take some time because Bluetooth is not a particularly speedy form of data transfer.
- After the file transfer is complete, click the Close button.
Using a Bluetooth Keyboard or Mouse
Your Bluetooth-equipped keyboard or mouse may work automatically under Ubuntu. However, if not, you may need to pair it to your PC, as follows:
- Ensure that the Ubuntu PC is set to be discoverable. Click the Bluetooth icon in the notification area, click Preferences, and make sure that the “Make computer visible” check box is selected. Click Close.
- Switch your keyboard or mouse to discoverable mode. Read the instructions for your device to find out how this is done. On an iGo Stowaway keyboard we used during testing, this required pressing the Ctrl+blue Fn+green Fn keys simultaneously.
- While you're reading the manual, find out whether the device has a default passkey. Mice almost certainly will (and it's nearly always 0000), but keyboards might require you to type one manually when it comes to the pairing request.
- Click the Bluetooth icon and select Preferences. Click the Set up new device button. Ubuntu will search for your input device. In you're surrounded by multiple Bluetooth devices, you might find it useful to narrow down the search to input devices using the Device Type drop-down.
- You should find that your keyboard or mouse is detected automatically and appears in the list below the Select Device heading (if not, ensure that it is still in discoverable mode and hasn't switched itself off). Click the entry for the keyboard or mouse, and then click the Forward button.
- A comment box should pop up on the Ubuntu computer, notifying you of a pairing request between Ubuntu and the keyboard or mouse. Click the Enter Passkey button.
- What happens next depends on whether you're trying to connect a keyboard or mouse. Bear in mind that the process of pairing quickly times out on the Ubuntu computer, so you need to complete the following steps without hesitation:
- In the case of a mouse, enter the passkey that you read earlier in the manual for the mouse. As mentioned, this is usually 0000. After you click OK, the mouse should be paired and should start working.
- Some keyboards also use a default passkey of 0000, and, if so, you can enter that, and the keyboard should be paired. However, some Bluetooth keyboards might require you to enter a passkey created on the computer. In the Authentication Request dialog box on the Ubuntu PC, type a random four-digit passkey—something like 1234 (although for security reasons, you might want to choose something that's slightly less easy to guess). Click OK. On the Bluetooth keyboard, type the same number and press Enter. Following this, you should find that the keyboard is paired with the computer and will work.
- Click Close in the Bluetooth Preferences dialog box.
If the keyboard or mouse does not work after a reboot, try turning it on and off again. If that doesn't work, deactivate the Bluetooth functionality on the PC, perhaps by momentarily unplugging the Bluetooth dongle or, on a notebook, using the relevant keyboard combination to turn off and on again the Bluetooth system.
Configuring Sound Cards
Generally speaking, your sound card shouldn't require any additional configuration and should work immediately after you install Ubuntu. The icon for the volume control applet is located at the top right of the Ubuntu Desktop, and it offers a quick way to control the master volume.
However, if you want to change your balance or microphone level, or if your sound card offers more than stereo output, such as multiple-speaker surround sound, then it might be necessary to take some simple steps to allow full control of the hardware:
- Click the volume control icon (the one that looks like a speaker). A simple volume control will open underneath.
- Click Sound Preferences below the volume slider.
- The Sound Preferences dialog box appears. On most computers, you will have just one simple stereo sound card shown in the Hardware tab, and there won't be much to configure. In the Output tab, you will be able to adjust the balance, should you ever need to, while in the Input tab you can unmute your microphone and adjust the input volume. If your computer has more than one sound card—for example, onboard sound and an external USB 5.1 sound card—you can set which card is active in the Hardware tab and then switch to the Output tab to adjust volume sliders for balance, fade, and subwoofer, as shown in Figure 7-20. On a notebook that has a sound card featuring pseudo-surround sound, we could add a control to alter the intensity of the effect.
When you've finished, click the Close button.
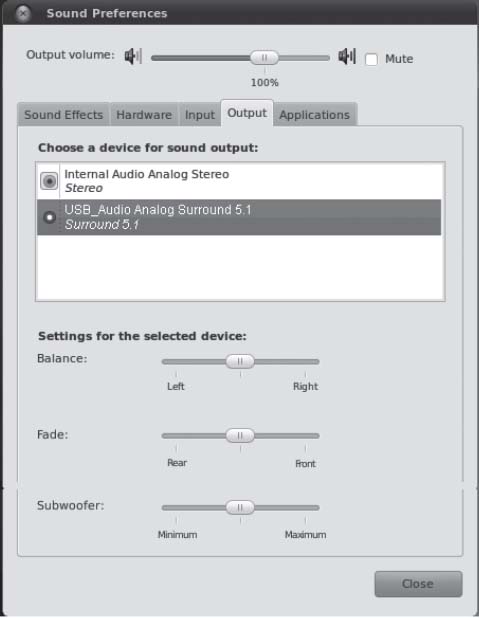
Figure 7-20. In Sound Preferences you can control all aspects of your sound card's output.
Using Power-Management Preferences
Depending on the degree to which your computer supports power-saving functionality, Ubuntu will let you configure your display to go into standby mode after a certain amount of time and will also allow you to configure your notebook to enter sleep (standby) mode. In addition, if you use a notebook computer, Ubuntu might let you configure additional aspects, such as the display brightness. These functions are controlled by using the Power Management Preferences. To start this, click System ![]() Preferences
Preferences ![]() Power Management. If Ubuntu is installed on a notebook computer, you'll see three tabs in the program window: On Mains Power, On Battery Power, and General. If Ubuntu is installed on a desktop computer, you'll see just the On Mains Power and General tabs.
Power Management. If Ubuntu is installed on a notebook computer, you'll see three tabs in the program window: On Mains Power, On Battery Power, and General. If Ubuntu is installed on a desktop computer, you'll see just the On Mains Power and General tabs.
![]() Note Not all PCs are created equal when it comes to power-saving features. Some support more functionality than others. In addition, Ubuntu is compatible with most but not all power-management systems, and it might not be able to support certain power-management functionality on your system, even if such functionality works under Windows.
Note Not all PCs are created equal when it comes to power-saving features. Some support more functionality than others. In addition, Ubuntu is compatible with most but not all power-management systems, and it might not be able to support certain power-management functionality on your system, even if such functionality works under Windows.
Notebooks have the additional tab because it's possible to define two separate power management profiles: one for when the computer is plugged in and one for running on battery power. This makes sense, because you might never want your display to switch off when connected to an outlet, but it's advisable that it should deactivate within, say, 15 minutes of inactivity if the computer is running on battery power (to extend the life of the battery).
The three tabs of the Power Management applet are explained in the following sections.
On Mains Power
If your computer is a desktop PC without a battery, you'll see two options under the On Mains Power tab: Put Computer to Sleep When Inactive For and Put Display to Sleep When Inactive For. The dropdowns next to each of these options allow you to define one of a number of preset time limits before each feature kicks in, including the option of Never. There is also a check box which enables you to spin down the hard disks when possible, at the same time as the computer is put to sleep.
![]() Note The sleep mode can be to either suspend to RAM (that is, standby) or hibernate. You can set this under the General tab.
Note The sleep mode can be to either suspend to RAM (that is, standby) or hibernate. You can set this under the General tab.
If your computer is a notebook computer, you'll see some extra options. Depending on the technology used in your computer, you might see a Set Display Brightness To slider, which you can use to set the brightness of the screen when the power is connected. Whenever mains power is connected, the display brightness will be changed to match this setting.
You may see a When Laptop Lid Is Closed option, with a drop-down list. As it suggests, this will control what happens when the notebook is closed. Depending on the hardware contained in your computer, you might have the choice of doing nothing, blanking the screen, suspending the computer (shutting down all systems but RAM), hibernating (suspending RAM to disk and turning off the notebook), and shutting down the computer. However, not all computers support each of these modes, so the choices you see might vary.
Additionally, you may see a Dim Display When Idle check box, which you can select to conserve power by dimming the screen when your system is idle.
On Battery Power
The options under the On Battery Power tab, present only on a notebook computer, are largely the same as those under the On Mains Power tab, as you can see in Figure 7-21. These settings come into operation the instant the mains power is disconnected from your notebook and the battery kicks in.
Figure 7-21. Notebook users can define an additional power profile that will kick in when the battery is in use.
An extra option appears as the last item in the Actions section: When Battery Power Is Critically Low. Here you can opt to automatically suspend, hibernate, or shut down the notebook when the battery power is nearly gone.
The check boxes at the bottom of the Display section could help save battery power considerably. You may select the Reduce Backlight Brightness option, which as it suggests, sets backlight brightness to a lower setting when you run on battery power. As with On Mains Power, the Dim Display When Idle option may also be available for battery power.
![]() Caution Be aware that sleep mode requires a little battery power to work and will eventually drain your battery, especially if it's already on its last legs.
Caution Be aware that sleep mode requires a little battery power to work and will eventually drain your battery, especially if it's already on its last legs.
General
Under the General tab, you have options to customize button actions and notifications. These settings persist whether the computer is on mains or battery power.
In the Actions section, you can set what happens when the power button is pressed and the computer is active. Effectively, this controls whether pressing the button when Ubuntu is running should shut down the computer, suspend it, or hibernate it. You can select Ask Me, which will cause the standard Quit dialog box to appear (that is, the same dialog that appears if you click the Session Menu icon in the top-right corner of the screen). You can also customize the action for the suspend button. The available actions are to do nothing, suspend, or hibernate. Hibernate writes the contents of RAM to the hard disk and then shuts down the computer. Suspend shuts down most systems of the computer except for the RAM, which is kept active. Then, when you press a key or move the mouse, the computer wakes up almost instantly as the subsystems are reactivated.
![]() Caution Hibernate doesn't work on all systems. The best plan is to test it by bringing up the Session Menu (top-right corner of the screen) and selecting Hibernate. Even if Hibernate appears to work, there are reports of it being unreliable. Some users report that their computer occasionally fails to wake up, causing a loss of data. Therefore, you should always save any open files before using the hibernate function or before leaving your computer unattended for any period in which hibernate mode might kick in automatically. Hibernate will definitely not work unless your swap partition is at least as large as your RAM.
Caution Hibernate doesn't work on all systems. The best plan is to test it by bringing up the Session Menu (top-right corner of the screen) and selecting Hibernate. Even if Hibernate appears to work, there are reports of it being unreliable. Some users report that their computer occasionally fails to wake up, causing a loss of data. Therefore, you should always save any open files before using the hibernate function or before leaving your computer unattended for any period in which hibernate mode might kick in automatically. Hibernate will definitely not work unless your swap partition is at least as large as your RAM.
The General tab also lets you select whether the power icon is visible in the notification area. If you're using a notebook, you can choose to display the icon only when the battery is nearly drained, when your battery is charging or discharging, or regardless of the battery state. Desktop PC users will probably opt not to display the power icon at all. The most fuss-free option is perhaps Only Display an Icon When Charging or Discharging, which is selected by default.
Finally, there's also an extra option you can select to play sounds when error events occur.
![]() Tip The power icon in the notification area will give you an indication of the charge status of your battery if you're using a laptop. If you click it and select Laptop Battery Discharging, a Power Statistics window will be displayed, giving you masses of information about your mains adapter, battery, and processor.
Tip The power icon in the notification area will give you an indication of the charge status of your battery if you're using a laptop. If you click it and select Laptop Battery Discharging, a Power Statistics window will be displayed, giving you masses of information about your mains adapter, battery, and processor.
Summary
In this chapter, you learned how to set up the common types of hardware you might have attached to your computer. Additionally, you looked at configuring various software components that are vital for Ubuntu's correct functioning.
You stepped through getting online with Ubuntu (including joining a wireless network), adding a printer, connecting to a digital camera, configuring a 3D graphics card, and much more.
In Chapter 8, we move on to look at how you can ensure that your system is secure and protected.