
C H A P T E R 13
![]()
Making the Move to OpenOffice.org
You might be willing to believe that you can get a complete operating system for no cost. You might even be able to accept that this offers everything Windows does and much more. But one stumbling block many people have is believing that a Microsoft Office–compatible office suite comes as part of the zero-cost bundle. It's a step too far. Office costs hundreds of dollars—are they expecting us to believe that there's a rival product that is free?
Well, there is, and it's called OpenOffice.org. It is a suite, meaning that it is a bundle of many applications, most of which come preinstalled with Ubuntu, as well as most other Linux distributions. This makes it the Linux office suite of choice. It's compatible with most Microsoft Office files too, and even looks similar and works in a comparable way to previous “classic” releases of Office (i.e., those prior to Office 2007), making it easy to learn. What more could you want?
Similarities to Microsoft Office
OpenOffice.org started life as a proprietary product called StarOffice, created by a German company called StarDivision. Sun Microsystems (now part of Oracle) subsequently bought StarDivision and released the source code of StarOffice in order to encourage community development. This led to the creation of the OpenOffice.org project, a collaboration between open source developers and Sun. This project has released several new versions of OpenOffice.org, and at the time of this writing, the current version is 3.2. This is the version supplied with Ubuntu 10.04.
![]() Note Although Sun opened StarOffice's source code, it continued to sell it, along with some useful extras such as fonts, templates, and technical support. When Oracle bought Sun, StarOffice was rebranded as Oracle Open Office. To the naïve onlooker, it will seem that Oracle is beginning to charge for OpenOffice.org. But this is not so, and it cannot be, because OpenOffice.org is an open source application and a community project that's licensed under the GPL. Oracle can package it and charge for the extra functionality, but the core software will remain free.
Note Although Sun opened StarOffice's source code, it continued to sell it, along with some useful extras such as fonts, templates, and technical support. When Oracle bought Sun, StarOffice was rebranded as Oracle Open Office. To the naïve onlooker, it will seem that Oracle is beginning to charge for OpenOffice.org. But this is not so, and it cannot be, because OpenOffice.org is an open source application and a community project that's licensed under the GPL. Oracle can package it and charge for the extra functionality, but the core software will remain free.
OpenOffice.org features a word processor, a spreadsheet program, a presentation a package, a drawing tool (vector graphics), a web site creation tool, a database program, and several extras. As such, it matches Microsoft Office almost blow by blow in terms of core functionality. See Table 13-1 for a comparison of core packages.
Table 13-1. How the Office and OpenOffice.org Suites Compare
| Microsoft Office | OpenOffice.org | Function |
| Word | Writer | Word processor |
| Excel | Calc | Spreadsheet |
| PowerPoint | Impress | Presentations |
| Visio | Drawa | Technical drawing/charting |
| FrontPage | Writerb | Web site creation |
| Access | Basec | Database |
| Equation Editor | Math | Formula Editor |
a Draw is a vector graphics creation tool akin to Adobe Illustrator. Creating flowcharts or organizational diagrams is one of many things it can do. It is found on the Applications ![]() Graphics menu.
Graphics menu.
b Writer is used for word processing and HTML creation; when switched to Web mode, its functionality is altered appropriately.
c Writer and Calc can be coupled to a third-party database application such as MySQL or Firebird; however, OpenOffice.org also comes with the Base relational database. This must be installed separately—see Chapter 20.
You should find that the functionality within the packages is duplicated too, although some of the very specific features of Microsoft Office are not in OpenOffice.org. But OpenOffice.org also has its own range of such tools not yet found in Microsoft Office!
![]() Tip One extremely useful feature provided with OpenOffice.org, but still missing from Office 2007, is the ability to output high-quality PDF files.
Tip One extremely useful feature provided with OpenOffice.org, but still missing from Office 2007, is the ability to output high-quality PDF files.
OpenOffice.org does have a couple of notable omissions. Perhaps the main one is that it doesn't offer a directly comparable Outlook replacement. However, as we discuss in Chapter 14, the Evolution application offers a highly capable reproduction of Outlook, with e-mail, contacts management, and calendar functions all in one location. In Ubuntu, you'll find Evolution on the Applications ![]() Office menu. Evolution isn't directly linked to OpenOffice.org (although it's possible to share some Evolution contacts data with OpenOffice.org applications), but it retains the overall Ubuntu look, feel, and way of operating.
Office menu. Evolution isn't directly linked to OpenOffice.org (although it's possible to share some Evolution contacts data with OpenOffice.org applications), but it retains the overall Ubuntu look, feel, and way of operating.
OpenOffice.org Key Features
Key features of OpenOffice.org include the ability to export documents in Portable Document Format (PDF) across the entire suite of programs. PDF files can then be read on any computer equipped with PDF display software, such as Adobe Acrobat Reader.
In addition, OpenOffice.org features powerful accessibility features that can, for example, help those with vision disabilities use the programs more effectively. For those who are technically minded, OpenOffice.org can be extended very easily with a variety of plug-ins (see http://extensions.services.openoffice.org) that allow the easy creation of add-ons using many different programming languages.
Although OpenOffice.org largely mirrors the look and feel of Microsoft Office releases prior to the 2007 version (i.e., those releases of Office prior to the major interface overhaul that's found in Office 2007), it adds its own flourishes here and there. This can mean that some functions are located on different menus, for example. However, none of this poses a challenge for most users, and OpenOffice.org is generally regarded as easy to learn.
![]() Note Studies carried out by Sun Microsystems, the corporate sponsor of OpenOffice.org, have shown that it's easier for people to switch to OpenOffice.org from an older version of Office than it is for them to move to Office 2007, which introduces radical interface changes. For more information and to learn more about similar studies, see
Note Studies carried out by Sun Microsystems, the corporate sponsor of OpenOffice.org, have shown that it's easier for people to switch to OpenOffice.org from an older version of Office than it is for them to move to Office 2007, which introduces radical interface changes. For more information and to learn more about similar studies, see www.openoffice.org/product/studies.html.
File Compatibility
In addition to providing core feature compatibility, OpenOffice.org is able to read files from Microsoft Office. A great effort has been made in version 3.2 to add compatibility for Office 2007 formats and password-protected files (i.e., .docx, .xlsx, and .pptx files). Nonetheless, you should always test your files, because sometimes results are less than perfect. However, improvements are being made all the time, and this is just one more reason why you should update Ubuntu frequently to ensure that you have the latest versions of the OpenOffice.org software.
Although file compatibility problems are rare for most simple to moderately complex documents, two issues occasionally crop up when opening Microsoft Office files in OpenOffice.org:
VBA compatibility: OpenOffice.org has partial support for Microsoft Office Visual Basic for Applications (VBA) macros, although work is being undertaken to strengthen this aspect. OpenOffice.org uses a similar but incompatible internal programming language. Such macros are typically used in Excel spreadsheets designed to calculate time sheets, for example. Unfortunately, you won't know whether your VBA macros will work until you give them a try in OpenOffice.org, although the macros will be preserved within the document no matter what (provided you continue to save in the original Microsoft Office format and don't, for example, save the document in an OpenOffice.org file format instead).
Note If compatibility with VBA macros is a deal breaker for you, and you've yet to install Ubuntu, you might try your documents containing VBA macros in the Windows version of OpenOffice.org. This will enable you to see how well they work in advance. You can download the Windows version from
www.openoffice.org.Document formatting: When you create well-polished documents and beautiful presentations, the last thing you want is to lose all your work when you move the files from one computer to another. Sadly, this is often the reality when files are shared between Microsoft Office and OpenOffice.org. Although files can be opened, some formatting may be lost, diminishing the desired visual impact. Sometimes the problem is due to lack of fonts, and we talk about this issue later in this chapter. On other occasions, when you want to distribute your own work, you could just export it as a PDF file, as shown following. Also, you should always test presentations for full compatibility without assuming they will look exactly the same in the different programs. Opening a file is just half the job!
If you find that OpenOffice.org isn't able to open an Office file saved by your colleagues, you can always suggest that they too make the switch to OpenOffice.org. They don't need to be running Ubuntu to do so. Versions are available to run on all Windows platforms, as well as the Mac, and are available from www.openoffice.org.
![]() Note Two versions of OpenOffice.org are available for Mac OS X: the standard release, which at the time of this writing is still rather new and not fully tested, and NeoOffice, which has been adapted to run natively within Mac OS X. For more details, see
Note Two versions of OpenOffice.org are available for Mac OS X: the standard release, which at the time of this writing is still rather new and not fully tested, and NeoOffice, which has been adapted to run natively within Mac OS X. For more details, see www.neooffice.org.
As with the Ubuntu version, versions of OpenOffice.org available for other operating systems are entirely free of charge. Indeed, for many people who are running versions of Office they've installed from “borrowed” CDs, OpenOffice.org offers a way to come clean and avoid pirating software. For more details and to download OpenOffice.org, visit www.openoffice.org.
After your colleagues have made the switch, you can exchange files using OpenOffice.org's native format, or opt to save files in the Microsoft Office file formats (.doc, .xls, .ppt, etc.). Figure 13-1 shows the file type options available in OpenOffice.org's word processor component's Save As dialog box.
![]() Note OpenOffice.org also supports Rich Text Format (RTF) text documents and comma-separated value (CSV) data files, which are supported by practically every office suite program ever made.
Note OpenOffice.org also supports Rich Text Format (RTF) text documents and comma-separated value (CSV) data files, which are supported by practically every office suite program ever made.
When it comes to sharing files, there's another option: saving your files in a non-Office format such as PDF or HTML. OpenOffice.org is able to export documents in both formats, and most modern PCs equipped with Adobe Acrobat or a simple web browser will be able to read them. However, although OpenOffice.org can open and edit HTML files, it can export documents only as PDF files, so this format is best reserved for files not intended for further editing.
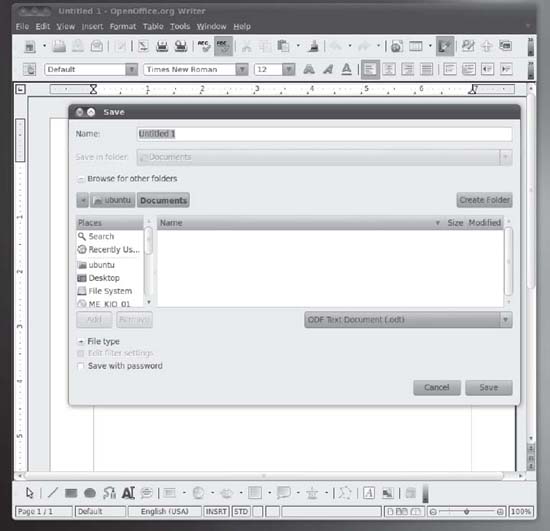
Figure 13-1. All the OpenOffice.org components are compatible with Microsoft Office file formats.
OPEN DOCUMENT FORMAT
The Right Fonts
One key to compatibility with the majority of Microsoft Office files is ensuring that you have the correct fonts. This is an issue even when using Windows. It's common to open an Office document and find the formatting incorrect because you don't have the fonts used in the construction of the document.
Although most Windows systems have many fonts, most people tend to rely on a handful of core fonts, which are defaults on most Windows installations: Arial, Tahoma, Verdana, Trebuchet MS, and Times New Roman. (MS Comic Sans might also be included in that list, although it isn't often used within business documents.)
You can obtain these fonts and install them on your Ubuntu system in several ways. Here we cover two methods: copying your fonts from Windows and installing Microsoft's TrueType core fonts. The latter method is by far the easier way of undertaking this task.
![]() Tip As an alternative to installing Microsoft fonts, you might install the Liberation fonts. These are open source fonts designed to be metrically identical to Arial, Times New Roman, and Courier. In other words, in theory at least, the letter A in one of the aforementioned Microsoft fonts should occupy the same space (and therefore display the same on the screen and when printed) as the letter A in the matching Liberation font. You can install the Liberation fonts by installing the
Tip As an alternative to installing Microsoft fonts, you might install the Liberation fonts. These are open source fonts designed to be metrically identical to Arial, Times New Roman, and Courier. In other words, in theory at least, the letter A in one of the aforementioned Microsoft fonts should occupy the same space (and therefore display the same on the screen and when printed) as the letter A in the matching Liberation font. You can install the Liberation fonts by installing the ttf-liberation package. To learn about package installation, see Chapter 20.
Copying Windows Fonts
If you dual-boot Ubuntu with Windows, you can delve into your Windows partition's font folder and copy every font you have available under Windows. This method is useful if you wish to copy all the fonts you use under Windows, such as those installed by third-party applications. If you wish to get just Arial and Times New Roman, you might want to skip ahead to the next section.
![]() Caution Installing Windows fonts under Ubuntu is a legal gray area. Technically speaking, there's no reason why you shouldn't be able to use the fonts under Ubuntu. Purchasing Windows as well as any software running on it should also mean you purchased a license to use the fonts, and there's no restriction on how or where you use them. But the situation is far from clear. You'd be well advised to read the Windows End User License Agreement (EULA) for more guidance. This can usually be found in the packaging for your computer.
Caution Installing Windows fonts under Ubuntu is a legal gray area. Technically speaking, there's no reason why you shouldn't be able to use the fonts under Ubuntu. Purchasing Windows as well as any software running on it should also mean you purchased a license to use the fonts, and there's no restriction on how or where you use them. But the situation is far from clear. You'd be well advised to read the Windows End User License Agreement (EULA) for more guidance. This can usually be found in the packaging for your computer.
To copy your Windows fonts, follow these steps:
- Click the entry on the Places menu for your Windows partition, so it is mounted and its icon appears on the desktop.
- Create a folder named
.fontsin your Home folder. It will be used to store your personal selection of fonts. - In the Nautilus window displaying the Windows directories, navigate to your Windows fonts folder. The location of this varies depending on which version of Windows you're using. On our Windows Vista test computer, it was located in the
Windows/Fontsdirectory, but on our Windows XP Home test machine, it was located in theWINDOWS/Fontsdirectory. Remember that case sensitivity is important under Ubuntu! - Still in the window displaying your Windows font directory, click View
 List, and then click the Type column header in the window so that the list is sorted according to file extensions. Scroll down to the list of TrueType fonts and select them all. This can be done by clicking the first, holding down Shift, and then clicking the last.
 - Click and drag all the TrueType fonts to the Nautilus window displaying your personal font directory. The fonts will be copied across and installed automatically. In some of our tests, this happened instantly, and there was no indication (such as a dialog box) that copying had happened.
- Close any open program windows and start the programs again. You should find that your Windows fonts are now available.
Installing TrueType Core Fonts
If you don't want to undertake the font-copying maneuver, you can download and install Microsoft's TrueType core fonts. This package contains common Windows fonts, including Arial and Times New Roman.
![]() Note These fonts were made legally available by Microsoft in 1996 for use under any operating system—for more details, see
Note These fonts were made legally available by Microsoft in 1996 for use under any operating system—for more details, see http://en.wikipedia.org/wiki/Core_fonts_for_the_Web.
Here's how it's done (note that these instructions assume that your computer is online):
- Click Applications Ubuntu Software Center. Enter your password to continue.
- In the Quick Search text field at the top of the program window, type msttcorefonts. Select Microsoft Core Fonts and click Install.
- Close all program windows, click System Quit, and opt to log out of the system. Then log back in again. You should now find that the Windows fonts are available in all applications, including OpenOffice.org, as shown in Figure 13-2.
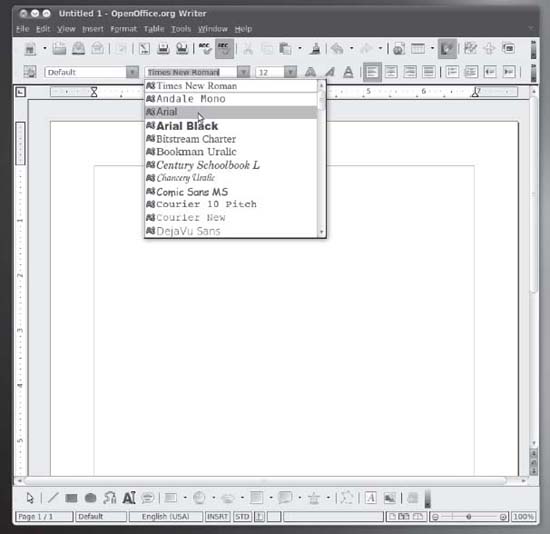
Figure 13-2. Vital Microsoft fonts are just a download away, courtesy of the Ubuntu Software Center.
OTHER LINUX OFFICE SOFTWARE
Introducing the Interface
If you've ever used an office suite such as Microsoft Office, you shouldn't find it too hard to get around in OpenOffice.org. As with Microsoft Office, OpenOffice.org relies primarily on toolbars, a main menu, and separate context-sensitive menus that appear when you right-click. In addition, OpenOffice.org provides floating palettes that offer quick access to useful functions, such as paragraph styles within Writer.
Figure 13-3 provides a quick guide to the OpenOffice.org interface, showing the following components:
Menu bar: The menus provide access to most of the OpenOffice.org functions.
Standard toolbar: This toolbar provides quick access to global operations, such as saving, opening, and printing files, as well as key functions within the program being used. The standard toolbar appears in all OpenOffice.org programs and also provides a way to activate the various floating palettes, such as the Navigator, which lets you easily move around various elements within the document.
Formatting toolbar: As its name suggests, this toolbar offers quick access to text-formatting functions, similar to the type of toolbar used in Microsoft Office applications. Clicking the Bold icon will boldface any selected text, for example. This toolbar appears in Calc, Writer, and Impress.
Ruler: The ruler lets you set tabs and alter margins and indents (within programs that use rulers).
Status bar: The status bar shows various aspects of the configuration, such as whether Insert or Overtype mode is in use. The information and options offered vary depending on which application is in use. Within Writer, for example, a slider to the right of the status bar allows the quick changing of the document's zoom level. If using Calc, you'll see a Sum area that shows the numeric total of any selected cells.
Document area: This is the main editing area.
Most of the programs rely on the standard and formatting toolbars to provide access to their functions, and some programs have additional toolbars. For example, applications such as Impress (a presentation program) and Draw (for drawing vector graphics) have a drawing toolbar, which provides quick access to tools for drawing shapes, adding lines, and creating fills (the blocks of color within shapes).
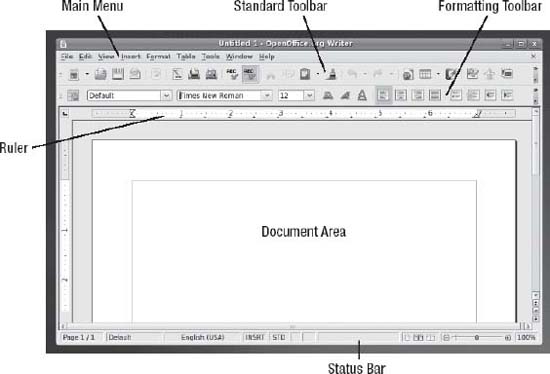
Figure 13-3. The OpenOffice.org interface has several components.
Customizing the Interface
You can select which toolbars are visible on your screen, as well as customize those that are already there. You can also add new toolbars and customize the OpenOffice.org menus. The color scheme of OpenOffice.org can be altered to your tastes, and you can also alter various trivial elements of the interface, such as the size of the icons.
Adding Functions to Toolbars
The quickest way to add icons and functions to any toolbar is to click the small arrow at the right of a toolbar and select the Visible Buttons entry on the menu that appears. This will present a list of currently visible icons and functions, along with those that might prove useful on that toolbar but are currently hidden. Any option already visible will have a check next to it.
Additionally, you can add practically any function to a toolbar, including the options from the main menus and many more than those that are ordinarily visible. Here are the steps:
- Click the small down arrow to the right of a toolbar and select the Customize Toolbar option.
- In the Customize dialog box, click the Add button in the Toolbar Content section to open the Add Commands dialog box, as shown in Figure 13-4.
- Choose a category from the list on the left to see the available commands in the list on the right. The categories of functions are extremely comprehensive. For example, under the Format category, you'll find entries related to specific functions, such as increasing font sizes or setting a shadow effect behind text. Those categories are self explanatory for the most part.
- Select the function you want to add on the right side of the Add Commands dialog box and then click the Add button.
- After you've finished making your choices, click the Close button. You'll then see your new function in the list of icons in the Customize dialog box, under the Toolbar Content heading. The last new icon you chose will be automatically selected.
- Click and drag up or down in the list to move the new function left or right on the toolbar itself (you'll see the toolbar update when you release the mouse button). Alternatively, you can highlight the icon and click the up and down arrows next to the list. To temporarily hide the new icon, or any other icon, remove the check from alongside it.
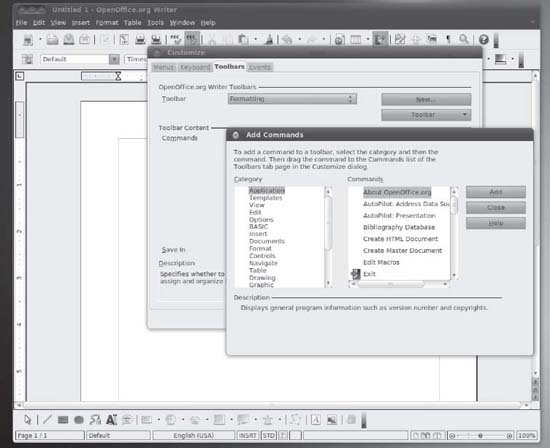
Figure 13-4. Adding a new function to the toolbar is very easy within OpenOffice.org.
Many functions that can be added are automatically given a relevant toolbar icon, but you can choose another icon for a function by selecting the icon in the list in the Customize dialog box, clicking Modify, and then selecting Change Icon. You can also use this method to change an icon that already appears on a toolbar.
![]() Note To delete an icon from a toolbar, click the two small arrows to the right of the toolbar and then select the Customize Toolbar option. Select the icon you want to remove, click the Modify button, and choose to delete it.
Note To delete an icon from a toolbar, click the two small arrows to the right of the toolbar and then select the Customize Toolbar option. Select the icon you want to remove, click the Modify button, and choose to delete it.
Adding a New Toolbar
If you want to add your own new toolbar to offer particular functions, you'll find it easy to do. Here are the steps:
- Click the small down arrow to the right of any toolbar and select Customize Toolbar from the list of options. Don't worry—you're not actually going to customize that particular toolbar!
- In the Customize dialog box, click the New button at the top right.
- Give the toolbar a name. To make the toolbar permanent, keep the default entry in the Save In field, which should read “OpenOffice.org.” To have the toolbar “attach” to the currently open document so that it appears only when that document is opened, select the document's name in the Save In field. Note that this is effective only if documents are saved in native OpenOffice.org file formats.
- Populate the new toolbar, following the instructions in the previous section.
- After you've finished, click the OK button.
You should see your new toolbar either beneath or to the right of the main toolbars. If it is located to the right, you may have to click and drag its move handle at the left of the toolbar to reposition it so that all its features are visible. To hide the toolbar in the future, click View ![]() Toolbars, and then remove the check alongside the name of your toolbar.
Toolbars, and then remove the check alongside the name of your toolbar.
Customizing Menus
You can also customize the OpenOffice.org menus. Here are the steps:
- Choose Tools Customize from the menu bar.
- In the Customize dialog box, select the Menus tab at the top left.
- Choose which menu you wish to customize from the Menu drop-down list. Submenus are indicated with a pipe symbol (|). File | Send indicates the
Sendsubmenu located in theFilemenu, for example. - Select the position where you wish the new function to appear on the menu by selecting an entry in the Menu Content Entries list, and then click the Add button.
- Add commands to the menu, as described earlier in the “Adding Functions to Toolbars” section.
The up and down arrows in the Customize dialog box enable you to alter the position of entries on the menu. You could move those items you use frequently to the top of the menu, for example.
You can remove an existing menu item by highlighting it in the Customize dialog box, clicking the Modify button, and then clicking Delete.
If you make a mistake, simply click the Reset button at the bottom right of the Customize dialog box to return the menus to their default state.
Personalizing the Look and Feel
You can alter the color scheme used in OpenOffice.org by clicking Tools ![]() Options, and then clicking the Appearance entry under the OpenOffice.org heading on the left of the dialog box that appears. Each of the programs in the OpenOffice.org suite has its own heading in the Custom Colors list. To alter a particular color setting, click the drop-down alongside that particular entry under the Color Settings heading.
Options, and then clicking the Appearance entry under the OpenOffice.org heading on the left of the dialog box that appears. Each of the programs in the OpenOffice.org suite has its own heading in the Custom Colors list. To alter a particular color setting, click the drop-down alongside that particular entry under the Color Settings heading.
To alter how toolbars appear (i.e., the size of the icons), click the View option under the OpenOffice.org heading. This preference panel also lets you set the default zoom level under the Scaling heading when starting new documents. You can also deactivate font antialiasing, which can help make some fonts look truer to life compared to printed output, although this option is one of personal preference.
Configuring OpenOffice.org Options
In addition to the wealth of customization options, OpenOffice.org offers a range of configuration options that enable you to make it work exactly how you wish (although it should be pointed out that the default configuration is fine for most users). Within an OpenOffice.org program, choose Tools ![]() Options from the menu to open the Options dialog box, as shown in Figure 13-5.
Options from the menu to open the Options dialog box, as shown in Figure 13-5.
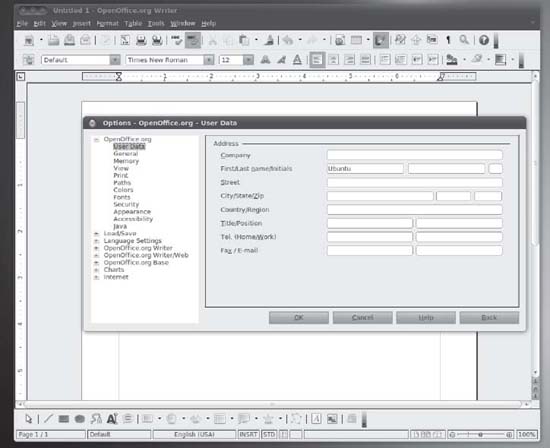
Figure 13-5. Access OpenOffice.org's main configuration options by choosing Tools ![]() Options.
Options.
Most of the configuration options offered within each program apply across the suite, but some settings are specific to each program, in which case you'll find them listed under their own heading on the left of the dialog box.
Using OpenOffice.org Core Functions
Although the various programs within OpenOffice.org are designed for very specific tasks, they all share several core functions that work in broadly similar ways. In addition, each program is able to borrow components from other programs in the suite.
Using Wizards
One of the core functions you'll find most useful when you're creating new documents is the wizard system, which you can access from the File menu. A wizard guides you through creating a new document by answering questions and following a wizard-based interface. This replaces the template-based approach within Microsoft Office, although it's worth noting that OpenOffice.org is still able to use templates.
A wizard will usually offer a variety of document styles. Some wizards will even prompt you to fill in salient details, which they will then insert into your document in the relevant areas.
Note that within some components of OpenOffice.org, such as Writer, the wizards offered on the File menu won't work unless Java Runtime Environment (JRE) software is installed. This can be done quickly and easily by closing any open OpenOffice.org applications, opening the Ubuntu Software Center (Applications ![]() Ubuntu Software Center), and installing the following programs:
Ubuntu Software Center), and installing the following programs:
- Standard Java or Java-compatible runtime (
default-jre) - Office productivity suite (arch-independent Java support files [
openoffice.org-java-common])
You will need to type your password when prompted. The software will probably be in the 200MB range, so it might take a while to download. Installation is automatic; after it has finished, close the Ubuntu Software Center and log out. When you log in again, open any OpenOffice.org application to test the installation by starting a wizard.
![]() Note In case you're wondering why this useful software isn't included by default, you can blame the fact that it's over 200MB. Put simply, it just won't fit on the Ubuntu installation CD-ROM.
Note In case you're wondering why this useful software isn't included by default, you can blame the fact that it's over 200MB. Put simply, it just won't fit on the Ubuntu installation CD-ROM.
Getting Help
OpenOffice.org employs a comprehensive help system, complete with automatic context-sensitive help, called the Help Agent, which will appear if the program detects you're performing a particular task. Usually, the Help Agent takes the form of a lightbulb graphic, which will appear at the bottom-right corner of the screen. If you ignore the Help Agent, it will disappear within a few seconds. Clicking it causes a help window to open. Alternatively, you can access the main searchable help file by clicking the relevant menu entry.
![]() Tip To permanently disable the Help Agent, open any OpenOffice.org application and click Tools
Tip To permanently disable the Help Agent, open any OpenOffice.org application and click Tools ![]() Options, and then select the General heading under the OpenOffice.org heading within the dialog box that appears. Remove the check from the Help Agent box on the right of the program window.
Options, and then select the General heading under the OpenOffice.org heading within the dialog box that appears. Remove the check from the Help Agent box on the right of the program window.
Additionally, OpenOffice.org applications have a useful “What's This?” help option that provides point-and-click help. To activate it, select the entry on the Help menu, and then hover the cursor over any interface option that you want to learn about. After a second or two, a detailed help bubble will appear, providing an explanation. To cancel it, just click anywhere.
Inserting Objects with Object Linking and Embedding
All the OpenOffice.org programs are able to use Object Linking and Embedding (OLE). This effectively means that one OpenOffice.org document can be inserted into another. For example, you might choose to insert a Calc spreadsheet into a Writer document.
The main benefit of using OLE over simply copying and pasting the data is that the OLE item (referred to as an object) will be updated whenever the original document is revised. In this way, you can prepare a report featuring a spreadsheet full of figures, for example, and not need to worry about updating the report when the figures change. Figure 13-6 shows an example of a spreadsheet from Calc inserted into a Writer document.
Whenever you click inside the OLE object, the user interface will change so that you can access functions specific to that object. For example, if you had inserted an Impress object into a Calc document, clicking within the object would cause the Calc interface to temporarily turn into that of Impress. Clicking outside the OLE object would restore the interface back to Calc.
You can explore OLE objects by choosing Insert ![]() Object
Object ![]() OLE Object. This option lets you create and insert a new OLE object, as well as add one based on an existing file. To ensure that the inserted OLE object is updated when the file is, select the Link to File check box in the Insert OLE Object dialog box.
OLE Object. This option lets you create and insert a new OLE object, as well as add one based on an existing file. To ensure that the inserted OLE object is updated when the file is, select the Link to File check box in the Insert OLE Object dialog box.
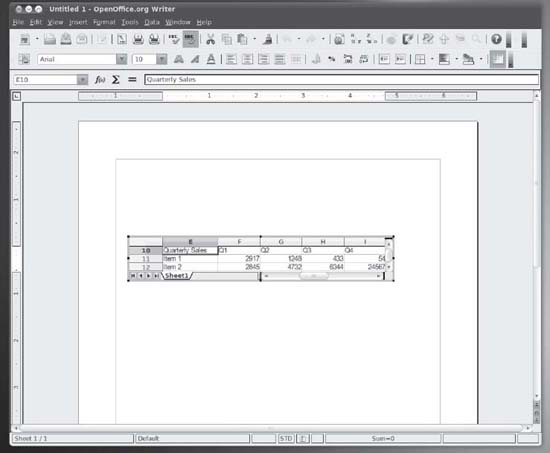
Figure 13-6. OLE lets you incorporate one OpenOffice.org document into another.
Creating Macros
OpenOffice.org employs a powerful BASIC-like programming language, which you can use to create your own functions. Although this language is called BASIC, it is several generations beyond the BASIC you might have used in the past. OpenOffice.org's BASIC is a high-level, object-oriented environment designed to appeal to programmers who wish to quickly add their own functions to the suite.
However, it's possible for any user to record a series of actions as a macro, which is then automatically turned into a simple BASIC program. This can be very useful if you wish to automate a simple, repetitive task, such as the insertion of a paragraph of text, or even something more complicated, such as searching and replacing text within a document.
To record a macro, choose Tools ![]() Macros
Macros ![]() Record Macro. After you've selected this option, any subsequent actions will be recorded. All keyboard strokes and clicks of the mouse will be captured and turned automatically into BASIC commands. To stop the recording, simply click the button on the floating toolbar. After this, you'll be invited to give the macro a name (look to the top left of the dialog box). Then click Save. You can then run your macro in the future by choosing Tools
Record Macro. After you've selected this option, any subsequent actions will be recorded. All keyboard strokes and clicks of the mouse will be captured and turned automatically into BASIC commands. To stop the recording, simply click the button on the floating toolbar. After this, you'll be invited to give the macro a name (look to the top left of the dialog box). Then click Save. You can then run your macro in the future by choosing Tools ![]() Macros
Macros ![]() Run Macro. Simply expand the My Macros and Standard entries at the top left of the dialog box, click Module1, select your macro in the list on the right, and click Run.
Run Macro. Simply expand the My Macros and Standard entries at the top left of the dialog box, click Module1, select your macro in the list on the right, and click Run.
Saving Files
OpenOffice.org uses the OpenDocument range of file formats. The files end with an .ods, .odt, .odp, or .odb file extension, depending on whether they've been saved by Calc, Writer, Impress, or Base, respectively. The OpenDocument format is the best choice when you're saving documents that you are likely to further edit within OpenOffice.org. However, if you wish to share files with colleagues who aren't running Ubuntu, another Linux version, or OpenOffice.org under Windows or Mac OS X, the solution is to save the files as Microsoft Office files. To save in this format, just choose that option from the File Type drop-down list in the Save As dialog box. If your colleague is running an older version of OpenOffice.org or StarOffice, you can also save in those file formats.
Alternatively, you might wish to save the file in one of the other file formats offered in the File Type drop-down list. However, saving files in an alternative format might result in the loss of some document components or formatting. For example, saving a Writer document as a simple text file (.txt) will lead to the loss of all of the formatting, as well as any of the original file's embedded objects, such as pictures.
To avoid losing document components or formatting, you might choose to output your OpenOffice.org files as PDF files, which can be read by the Adobe Acrobat viewer. The benefit of this approach is that a complete facsimile of your document will be made available, with all the necessary fonts and on-screen elements included within the PDF file. The drawback is that PDF files cannot be loaded into OpenOffice.org for further editing, so you should always save an additional copy of the file in the native OpenOffice.org format. To save any file as a PDF throughout the suite, choose File ![]() Export as PDF. Then choose PDF in the File Type drop-down box, as shown in Figure 13-7.
Export as PDF. Then choose PDF in the File Type drop-down box, as shown in Figure 13-7.
![]() Tip You can obtain a plug-in for OpenOffice.org that allows the opening and subsequent editing of PDF files. For more details, see
Tip You can obtain a plug-in for OpenOffice.org that allows the opening and subsequent editing of PDF files. For more details, see http://extensions.services.openoffice.org/project/pdfimport.

Figure 13-7. All the programs in the suite can export files in Adobe PDF format.
Beginning OpenOffice.org Applications
Beyond the common features just explained, each OpenOffice.org application has its own set of specific functionality that allows it to perform its tasks more effectively. Although this book isn't intended to be a full manual of each of them (there are such books out there; we recommend Beginning OpenOffice 3, by Andy Channelle [Apress, 2008]), you will find some useful guidance in the following pages that will let you get started with the most popular applications: the word processor, the spreadsheet application, and the presentation application.
OpenOffice.org Word Processor: Writer
The word processor is arguably the most popular element within any office suite. That said, you'll be happy to know that OpenOffice.org's Writer component doesn't skimp on features. It offers full text-editing and formatting functionality, along with powerful higher-level features such as mail merge. Its most basic function is of course to allow you to write. Having said that, a powerful word processor must also be able to help you give your documents the right look and feel and to check whether your spelling and grammar are correct. Luckily for you, Writer is one such application.
Figure 13-8 shows the most salient features of the Writer interface.

Figure 13-8. The Writer interface should look familiar to anyone with Word 2003 or earlier.
Formatting Text
As in Microsoft Word, formatting text can be done either by applying predefined styles or changing individual aspects of the text, such as font or size. But Writer is much more built around styles than Microsoft Word—enough to make some tasks much easier when you use this functionality.
There are five levels of styles and formatting:
Character: This applies formatting to the selected portion of the text. You will mainly use the formatting toolbar (explained later in this section) to apply formatting at this level.
Paragraph: This allows you to apply formatting for the entire paragraph (i.e., a block of text separated from its neighbors by line breaks).
Frame: Frames are floating boxes into which text or graphics can be inserted. New frames can be created by clicking the entry on the Insert menu. You can apply styles and formatting to all of the content in a frame.
Page: This applies formatting for the entire page, or elements in it, such as footnotes. Most usefully, it allows you to set left- or right-facing pages, which can be useful when creating documents that will be turned into a printed book.
List: This allows you to choose between different bullet point and numbering styles.
The easiest and more straightforward method of applying formatting is by using the formatting toolbar, which is just above the ruler and main document area. By using the toolbar buttons, you can select the type of font you wish to use, its point size, its style (normal, bold, italics, etc.), and more. As with elsewhere in Ubuntu, a tooltip will appear over each icon when you hover the mouse cursor over it.
Instead of using the formatting toolbar, you can format text by using the context menu. Right-click the text you want to format, and a context menu will present options for the font, size, style, alignment, and line spacing. The context menu also enables you to change the case of the highlighted characters—from uppercase to lowercase and vice versa. You can also select the Character, Paragraph, Page, or Numbering/Bullets options for a more complete set of formatting options related to each of those levels (you need to right-click over a frame to make the Frame option appear).
You can also open the Styles and Formatting palette by clicking the button located at the left of the formatting toolbar. The Styles and Formatting palette offers a variety of predefined formatting styles that you can apply to selected text or enable before you begin adding text. You can select the level at which you want to apply the style (Paragraph, Character, Frame, Page, or List), and click the Close button when you have finished. You can also create new styles by clicking the New Styles from Selection button.
Checking Spelling and Grammar
Writer provides features to help clarify your documents, including a spell-checker and a thesaurus. A grammar checker, while not installed by default, can be added as an extension.
Writer is able to automatically spell-check as you type. Any words it considers misspelled will be underlined in red. You can choose from a list of possible corrections by right-clicking the word and selecting from the context menu. You can also add the word to your personal dictionary.
You can change the language of the spell-checker by selecting Tools ![]() Options, and then selecting Language Settings. In Default Languages for Documents, select your local variation. This will become the default for all new documents.
Options, and then selecting Language Settings. In Default Languages for Documents, select your local variation. This will become the default for all new documents.
Checking grammar works in a similar way. Any sentences that OpenOffice.org thinks use bad grammar will be underlined in green. Bear in mind that checking for perfect grammar requires human intelligence, and the rules relied on by OpenOffice.org's grammar checker are far from perfect.
Inserting Pictures
Inserting any kind of graphic—a graph, digital camera photo, drawing, or any other type of image—is easy. Simply choose Insert ![]() Picture
Picture ![]() From File.
From File.
After you've inserted a picture, you can place it anywhere on the page. When you select the picture, a new toolbar appears. This toolbar contains various simple image-tweaking tools, such as those for altering the brightness, contrast, and color balance of the image. Additionally, by clicking and dragging the green handles surrounding the image, you can resize it.
Graphics that are imported into Writer must be anchored in some way. In other words, they must be linked to a page element so that they don't move unexpectedly. By default, they're anchored to the nearest paragraph break, which means that if that paragraph moves, the graphic will move too. Alternatively, by right-clicking the graphic, you can choose to anchor it to the page, paragraph, or character it is on or next to.
The context menu also includes a Wrap option, which lets you set the type of text wrap you want to use. By default, Optimal Page Wrap is selected. This causes the text to wrap down just one side of the picture—the side on which the picture is farthest from the edge of the page. Alternatives include No Wrap, which means that the graphic will occupy the entire space on the page; no text is allowed on either side of it.
Working with Tables
Often it's useful to present columns of numbers or text within a word processor document. To make it easy to align the columns, OpenOffice.org offers the Table tool. This lets you quickly and easily create a grid in which to enter numbers or other information. You can even turn tables into simple spreadsheets, and tally rows or columns via simple formulas.
To insert a table, click and hold the Table icon on the standard toolbar (which runs across the top of the screen beneath the menu). Then simply drag the mouse in the table diagram that appears until you have the desired number of rows and columns, and release the mouse button to create the table.
Whenever your cursor is inside the table, a new toolbar will appear, offering handy options, like the ability to add rows and columns, split an existing cell, alter the styling of a cell, and create a sum cell in which you add the contents of other cells. Once again, simply hover your mouse over each button to find out what it does via a tooltip.
Adding Headers and Footers
You may want to add headers and footers to long documents to aid navigation. They appear at the top and bottom of each page, respectively, and can include the document title, page number, and other information. Headers and footers are created and edited independently of the main document, although they can utilize the same paragraph styles as the main document.
As you might expect, inserting headers and footers takes just a couple of clicks. Choose Insert ![]() Header
Header ![]() Default or Insert
Default or Insert ![]() Footer
Footer ![]() Default, depending on which you wish to insert (documents can have both, of course). Writer will then display an editing area where you can type text to appear in the header or footer. For more options, right-click in the area, select Page, and then click the Header or Footer tab. Here you can control the formatting and nature of the header or footer. Clicking the More button will let you apply borders or background colors.
Default, depending on which you wish to insert (documents can have both, of course). Writer will then display an editing area where you can type text to appear in the header or footer. For more options, right-click in the area, select Page, and then click the Header or Footer tab. Here you can control the formatting and nature of the header or footer. Clicking the More button will let you apply borders or background colors.
You might wish to insert page numbers that will be updated automatically as the document progresses. OpenOffice.org refers to data that automatically updates as a field. You can insert a wide variety of fields by choosing from the submenu that appears when clicking Insert ![]() Fields.
Fields.
To use multiple headers and footers, you need to define them in page styles. In the Styles and Formatting palette (of which we have already spoken), select the Page element and edit the Left Page or Right Page element.
Working Collaboratively
If you work in an office environment, it's unlikely that you'll ever be the only person to read or edit a document you create. Most documents tend to get shared between individuals, especially if you're working in a group or as part of a project. The people behind OpenOffice.org are aware of this, and there are two features in particular that can aid collaborative working: recording changes and notes.
Recording changes: Known as Track Changes in most Microsoft Word products, this feature causes Writer to remember any edits and highlight them within documents. To record changes within a document, click Edit
Inserting a note: To insert a note, first either highlight the text or object (such as a picture) that you'd like the note to be attached to, or simply position the cursor where you want the note to be, and then click Insert
OpenOffice.org Spreadsheet: Calc
Calc, shown in Figure 13-9, is the spreadsheet component of OpenOffice.org. Like most modern spreadsheet programs, it contains hundreds of features, many of which few average users will ever use. However, it doesn't abandon its user-friendliness in the process, and remains very simple for those who want to work on modest calculations, such as home finances or mortgage interest payments. In terms of features, Calc is in many regards practically a clone of Excel, and anyone who has used Microsoft's spreadsheet program will be able to get started with Calc immediately.
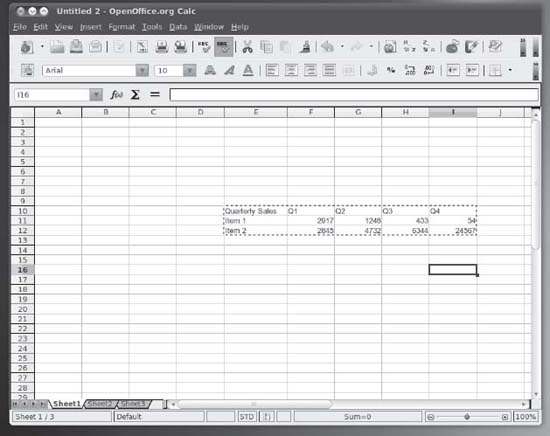
Figure 13-9. Calc has a look and feel common to most spreadsheet programs.
Entering and Formatting Data
As with all spreadsheets, entering data into a Calc document is simply a matter of selecting a cell and starting to type. Although by default cells “expect” to contain numbers, they can be configured to contain various types of data, such as dates or currency. This means that Calc will automatically attempt to set the correct formatting for the cell, if necessary, and also display an error if the wrong type of data is entered (or if the data is entered in the wrong format). Setting the correct cell type is vital with certain types of formulas that might refer to the cell—a formula that requires dates as input won't work if the cells are not set to the Date format, for example.
To change the cell format, ensure that the cell(s) are selected and then click Format ![]() Cells. Ensure that the Numbers tab is selected in the dialog box, and select the format type from the Category list.
Cells. Ensure that the Numbers tab is selected in the dialog box, and select the format type from the Category list.
![]() Note You might find that Calc is clever enough to automatically detect the nature of the data you're entering and set the cell formatting automatically. For example, if you enter a date, Calc will set the format of the cell to Date.
Note You might find that Calc is clever enough to automatically detect the nature of the data you're entering and set the cell formatting automatically. For example, if you enter a date, Calc will set the format of the cell to Date.
However, the default cell format type is Number. As you might expect, this anticipates numbers being entered in the cell by the user, although it's worth noting that text can also be entered without an error message appearing (but you will almost certainly see an error later if you try to involve that cell in a formula!). It's also worth noting that Number-formatted cells into which text is entered aren't automatically formatted as Text cells.
A handful of symbols are not allowed in a number cell if you use the cell to enter plain text. For example, you cannot enter an equal sign (=), because Calc will assume that this is part of a formula.
![]() Tip To enter any character into a Number-formatted cell, including an equal sign followed by a digit, precede it with an apostrophe ('). The apostrophe itself won't be visible within the spreadsheet, and whatever you type won't be interpreted in any special way; it will be seen as plain text.
Tip To enter any character into a Number-formatted cell, including an equal sign followed by a digit, precede it with an apostrophe ('). The apostrophe itself won't be visible within the spreadsheet, and whatever you type won't be interpreted in any special way; it will be seen as plain text.
Entering a sequence of data across a range of cells can be automated. Start typing the sequence of numbers (or words), highlight them, and then click and drag the small handle to the bottom right of the last cell. This will continue the sequence. You'll see a tooltip window, indicating what the content of each cell will be.
Cells can be formatted in a variety of ways. For trivial formatting changes, such as selecting a different font or changing the number format, you can use the formatting toolbar. For example, to turn the cell into one that displays currency, click the Number Format: Currency icon (remember that hovering the mouse cursor over the icon will reveal a tooltip). You can also increase or decrease the number of visible decimal places by clicking the relevant formatting toolbar icon.
For more formatting options, right-click the individual cell and select Format Cells from the menu. This displays the Format Cell dialog box, where you can change the style of the typeface, rotate text, place text at various angles, and so on. The Borders tab of the Format Cell dialog box includes options for cell gridlines of varying thicknesses, which will appear when the document is eventually printed out.
Deleting and Inserting Data and Cells
Deleting data is also easy. Just highlight the cell or cells with the data you want to delete and then press the Delete key. If you want to totally eradicate the cell along with its contents, right-click it and select Delete. This will cause the data to the sides of the cell to move in. You'll be given a choice on where you want the cells to shift from to fill the space: left, right, above, or below.
To insert a new cell, right-click where you would like it to appear and select Insert. Again, you'll be prompted about where you want to shift the surrounding cells in order to make space for the new cell.
Working with Functions
Calc includes a large number of formulas. In addition to simple and complex math functions, Calc offers a range of logical functions, as well as statistical and database tools. Certain formulas can also be used to manipulate text strings, such as dates.
You can get an idea of the available functions by clicking the Function Wizard button on the Formula bar. (This reads f(x) and is located just below the formatting toolbar.) This will bring up a categorized list of formulas, along with brief outlines of what function the formula performs. If you would like more details, use the help system, which contains comprehensive descriptions of most of the formulas, complete with examples of the correct syntax. Just click the Help button and then type the name of the function into the Search text field.
You can reuse formulas simply by cutting and pasting them. Calc is intelligent enough to work out which cells the transplanted formula should refer to, but it's always a good idea to check to make sure the correct cells are referenced.
Sorting Data
Within a spreadsheet, you may want to sort data according to any number of criteria. For example, you might want to show a list of numbers from highest to lowest, or rearrange a list of names so that they're in alphabetical order. This is easy to do within Calc.
Start by highlighting the range of data you wish to sort. Alternatively, you can simply select one cell within it, because Calc is usually able to figure out the range of cells you want to use. Then select Data ![]() Sort from the main menu. Calc will automatically select a sort key, which will appear in the Sort By drop-down list. However, you can also choose your own sort key from the drop-down menu if you wish, and you can choose to further refine your selection by choosing up to two more sort subkeys from the other drop-down menus.
Sort from the main menu. Calc will automatically select a sort key, which will appear in the Sort By drop-down list. However, you can also choose your own sort key from the drop-down menu if you wish, and you can choose to further refine your selection by choosing up to two more sort subkeys from the other drop-down menus.
Using Filters
The filter function in Calc lets you selectively hide rows of data. The spreadsheet user can select which criteria to use to filter the rows, or select Autofilter to choose from a drop-down list that appears in the cell at the top of the column.
Using filters can be useful when you're dealing with a very large table of data. It helps isolate figures so you can compare them side by side in an easy-to-follow format. For example, you could filter a table of sales figures by year.
To use the filter function, start by highlighting the data you wish to see in the drop-down list. Make sure the column header for the data is included too. If you're using the filter feature on a table of data, this selection can be any row or column within the table, although it obviously makes sense to use a column that is pertinent to the filtering that will take place. After you've selected the data to filter, choose Data ![]() Filter
Filter ![]() Autofilter. Click Yes if asked whether you want the first line to be used as the column header. You should find that, in place of the column or row header, a drop-down list appears. When a user selects an entry in the list, Calc will display only the corresponding row of the spreadsheet beneath.
Autofilter. Click Yes if asked whether you want the first line to be used as the column header. You should find that, in place of the column or row header, a drop-down list appears. When a user selects an entry in the list, Calc will display only the corresponding row of the spreadsheet beneath.
To remove a filter, choose Data ![]() Filter
Filter ![]() Remove Filter.
Remove Filter.
Creating Charts
Charts are useful because they present a quick visual summary of data. Calc produces charts through a step-by-step wizard, so it becomes very easy indeed. You need to highlight the data you want to graph and choose the Insert ![]() Chart menu option.
Chart menu option.
A wizard dialog box appears, and a rough draft of the chart appears behind. You can click and resize the chart at this point, although this is best done after the chart has been properly created.
Just follow the wizard to create the graph. You can select the chart type, define the range of cells to be used, and write a title for your chart. After you've created a chart, you can alter its size by clicking and dragging the handles at the corners and edges. Depending on the type of chart, you might also be able to change various graphical aspects by double-clicking them. However, keep in mind that the graph is actually a picture, so the properties you can edit are limited (e.g., you can only do simple things like changing the color and size of various elements).
The chart is linked to your data. Whenever your data changes, so will your chart. This is done automatically and doesn't require any user input.
OpenOffice.org Presentation: Impress
Impress, shown in Figure 13-10, is the presentation package within OpenOffice.org. At first glance, it appears to be the simplest of the key OpenOffice.org components, and also the one that most borrows the look and feel of some versions of Microsoft Office. However, delving into its feature set reveals more than a few surprises, including sophisticated animation effects and drawing tools. Impress can also export presentations as Adobe Flash–compatible files, which means that many Internet-enabled desktop computers around the world will be able to display the files, even if they don't have Impress or even Microsoft PowerPoint installed.
Creating a Quick Presentation
As soon as Impress starts, it will offer to guide you through the creation of a presentation by using a wizard. This makes designing your document a matter of following a few steps.
You'll initially be offered three choices: Empty Presentation, From Template, and Open Existing Presentation. Templates in Impress consist of two parts: the design elements, such as backgrounds, and the slide structure, which provides a range of slide styles. After clicking the Create button in the wizard, which you can do at any point in the wizard, Impress will launch. The first step is to choose a layout for your initial slide. You can preview these on the right side of the program window. A variety of design concepts are available, ranging from those that contain mostly text to those that feature pictures and/or graphs.
Working in Impress
You'll notice three main elements in the program window, from left to right. The following list describes these panes and how you work with them:
Slides pane: This pane shows the slides in your presentation in order, one beneath the other. Simply click to select whichever slide you want to work on, or click and drag to reorder the slides. To create a new slide, right-click in a blank area on the Slides pane and select the option from the small menu that appears. Right-clicking any existing slide will present a range of options, including one to delete the slide. The Slides pane can be torn off the main interface and positioned anywhere on the screen. To dock it back once again, hold down the Ctrl key and double-click the space next to where it reads “Slides.”
Main work area: This is in the middle of the program window; it lets you edit the various slides, as well as any other elements attached to the presentation, such as notes or handout documents. Simply click the relevant tab at the top of the work area. The tabs are as follows:
- Normal: This is a simple full-scale preview of the slide as it will appear within the presentation, and is entirely editable. Items can be clicked and moved around.
- Outline: Here you can roughly draft headings for each slide. The intention of this view is to let you quickly brainstorm ideas, or simply get ideas down as quickly and efficiently as possible. Pressing Enter after each line within the outline creates a new slide according to the heading you've just typed.
- Notes: This lets you prepare printed notes that you may want to provide with the printed version of the presentation. Every slide can have a page of notes attached to it. After the Notes view is selected, a letter-sized page will be shown. The top half will contain a preview of the slide, while the bottom half will contain a text area for typing notes.
- Handout: This lets you set the formatting of the handouts (i.e., the printed version of the presentation designed to be given to the audience). Each sheet of printed paper can contain between one and nine slides, depending on the selected design. To alter the layout of the handout, either click and drag the elements within the preview, or select a different design in the Layouts preview on the right of the program window.
- Slide Sorter: The Slide Sorter tab shows thumbnail previews of the slides side by side, effectively in chronological order. You can click and drag each to reorder, or right-click each slide to change its properties (such as changing the transition effect).
Tasks pane: Here you can access the elements that will make up your presentation, such as slide layouts, animations, and transition effects. Select the slide you wish to apply the elements to in the Slides pane, and then click the effect or template you wish to apply in the Tasks pane. In the case of animations or transitions, you can change various detailed settings relating to the selected element. As with the Slides pane, this can be undocked, but it has a View menu for redocking it to the window (pressing Ctrl while double-clicking also works).
In addition, Impress has a Drawing toolbar, which appears at the bottom of the screen. This lets you draw various items on the screen, such as lines, circles, and rectangles, and also contains a handful of special-effects tools, which we'll discuss later in this chapter, in the “Applying Fontwork” and “Using 3D Effects” sections.

Figure 13-10. The main sections of the Impress interface
You can hide each on-screen item by clicking the View menu and then removing the check next to it. Alternatively, by clicking the vertical borders between each pane, you can resize the pane and make it either more or less prominent on the screen. This is handy if you wish to temporarily gain more work space but don't want to lose sight of the previews in the Slides pane, for example.
Animating Slides
All elements within Impress can be animated in a variety of ways. For example, you might choose to have the contents of a particular text box fly in from the edge of the screen during the presentation. This can help add variety to your presentation and perhaps even wake up your audience, but be aware that too many animations can look unprofessional. They should never get in the way of your message.
Setting an animation effect is simply a matter of clicking the border of the object you wish to animate in the main editing area so that it is selected, selecting Custom Animation in the Tasks pane, and then clicking the Add button. In the dialog box that appears, select how you want the effect to work.
With each animation, you can select the speed you wish it to play at, ranging from very slow to fast. Simply make the selection at the bottom of the dialog box.
After the animation has been defined and you've clicked OK, it will appear in a list at the bottom of the Custom Animation pane. You can choose to add more than one animation to an object by clicking the Add button again (ensuring the object is still selected in the main editing area). The animations will play in the order they're listed. You can click the Change Order up and down arrows to alter the order.
To fine-tune an effect you've already created, double-click it in the list to open its Effect Options dialog box (you can even add sound effects here). Under the Timing tab, you can control what cues the effect, such as a click of a mouse, or whether it will appear in sequence with other effects before or after in the list.
Applying Fontwork
The Fontwork tool lets you manipulate text in various playful ways, such as making it follow specific curved paths. You can find this tool on the drawing toolbar, located at the bottom of the program window. (It's the icon that's an A in a frame.)
When you click the icon, the Fontwork Gallery dialog box appears, offering a choice of predefined font effects. Don't worry if they're not quite what you want, because after you make a choice, you'll be invited to fine-tune it.
After you've made the selection, the dummy text Fontwork will appear on the screen. Editing the text is simple: just double-click the Fontwork text and type your own words (note that, confusingly, the text will appear underneath the fontwork itself, rather than in a dialog box). When you've finished, click outside the Fontwork selection.
Using 3D Effects
In addition to Fontwork effects, Impress includes a powerful 3D tool, which can give just about any on-screen element a 3D flourish (this tool is also available in some other OpenOffice.org applications). To use it, create a text box or shape by using the Drawing toolbar at the bottom of the screen. Then right-click the text box or shape and select Convert ![]() To 3D.
To 3D.
![]() Note The 3D option is designed simply to give your object depth. If you want to create a genuine 3D object that you can rotate in 3D space, select 3D Rotation Object.
Note The 3D option is designed simply to give your object depth. If you want to create a genuine 3D object that you can rotate in 3D space, select 3D Rotation Object.
You can gain much more control over the 3D effect by right-clicking it and selecting 3D Effects.
Exporting a Presentation As a Flash File
If you plan to put your presentation online, or you want to send it to a colleague who doesn't have Impress or PowerPoint installed, outputting your presentation as a Flash animation could be a good idea. The process is simple. Just choose File ![]() Export, and then select Macromedia Flash (SWF) in the File Type drop-down list (SWF is the Flash file extension, which stands for Shockwave Flash). No further configuration is necessary.
Export, and then select Macromedia Flash (SWF) in the File Type drop-down list (SWF is the Flash file extension, which stands for Shockwave Flash). No further configuration is necessary.
In order to play the file, it needs to be opened within a web browser that has Flash Player installed. This can be done by choosing File ![]() Open on most browsers, although you can also drag and drop the SWF file onto the browser window under Microsoft Windows. There shouldn't be much of a problem with compatibility, because Flash Player is ubiquitous these days. If the web browser doesn't already have Flash installed, it's easy to download and install it (see
Open on most browsers, although you can also drag and drop the SWF file onto the browser window under Microsoft Windows. There shouldn't be much of a problem with compatibility, because Flash Player is ubiquitous these days. If the web browser doesn't already have Flash installed, it's easy to download and install it (see www.adobe.com/products/flashplayer).
When the Flash file is opened in a web browser, the presentation starts. You can progress through it by clicking anywhere on the screen.
Summary
This chapter gave a general introduction to OpenOffice.org, providing an overview of what you can expect from the programs within the suite. In particular, we focused on the extent of the suite's similarities with Microsoft Office and discussed issues surrounding file compatibility with Microsoft Office. We also looked at how Windows fonts can be brought into Ubuntu, which aids in successfully importing and creating compatible documents.
We gave you a crash course on the options that can be applied globally and also on the salient features of the most important applications within the suite: Writer, Calc, and Impress.