
Chapter 9
Programming the Interface
WHAT YOU WILL LEARN IN THIS CHAPTER:
- Using iUI to program and style your IOS web app
- Developing a web app that closely resembles native IOS apps
- Discovering how CSS and JavaScript can work together
The previous two chapters surveyed the UI standards and guidelines that you need to keep in mind as you design a web app that works well on iPhone and iPad. With these design principles in hand, you are ready to apply them as you develop and program your web app.
In order to demonstrate how to implement an IOS interface, I walk you through a case study application I am calling iRealtor. The concept of iRealtor is to provide a mobile house-hunter application for potential buyers. The current pattern for Internet-based house hunting is to search MLS listings online, print out individual listing addresses, get directions, and then travel to these houses. However, with iRealtor, all of those tasks can be done on the road with an IOS-based application. The design goals of iRealtor are to provide a way for users to do the following:
- Browse and search the MLS listings of a local realtor
- Get a map of an individual listing directly from its listing page
- Access information about the realtor and easily contact the realtor using IOS phone or mail services
- Browse other helpful tools and tips
Because the target user for this app uses an iPhone, most design decisions need to target the smaller iPhone UI. However, because some users may use an iPad, I want to make sure that the app is fully functional and usable when used on the larger iPad device.
As you look at these overall objectives, an edge-to-edge navigation design looks like an obvious choice given the task-based nature of the application. The realtor information is relatively static, but the MLS listings need to be database-driven. Therefore, the app takes advantage of Ajax to seamlessly integrate listing data into the application.
Here’s an overview of the technologies that are for iRealtor:
- XHTML/HTML and CSS for presentation layer
- JavaScript for client-side logic
- PHP or other server-side technology to serve MLS listing data (not included in case study example)
As I walk you through the application, I examine both the custom code I am writing for iRealtor as well as the underlying styles and code that power it. I am using the iUI framework (available at http://code.google.com/p/iui) to achieve a native-looking IOS UI. However, no matter the framework you decide to choose after working through this case study you will have a solid grasp on the key design issues you need to consider.
The top level of iRealtor is best presented as an edge-to-edge navigation-style list that contains links to the different parts of the application. When assembled, the iPhone design looks like Figure 9-1. The iPad design is shown in Figure 9-2.


TRY IT OUT: Creating the index.html of Your Web App
Follow the steps below to create the iUI-based shell for your web app.
1. Create a new blank document in your text editor.
2. Add the following HTML to your document:
<!DOCTYPE html>
<html>
<head>
<title>iRealtor</title>
<meta content="yes" name="apple-mobile-web-app-capable" />
<meta name="viewport"
   content="width=device-width; initial-scale=1.0;
   maximum-scale=1.0; user-scalable=0;"/>
<link rel="stylesheet" href="iui/iui.css" type="text/css" />
<link rel="stylesheet" href="iui/t/default/default-theme.css" type="text/css"/>
<script type="application/x-javascript" src="iui/iui.js"></script>
<body>
</body>
</html>
Code snippet index.html
3. Save your file.
How It Works
In this short exercise, you built the initial shell of your web app. You start off with a basic HTML document, linking the iUI style sheet and scripting library files that you’re using for this web app. The apple-mobile-web-app-capable instruction opens the app full screen when a user launches it from the IOS device home screen. The viewport meta tag tells Safari exactly how to scale the page and sets 1.0 scale and does not change layout on reorientation. It also specifies that the width of the viewport is the size of the device (device-width is a constant). These properties ensure that iRealtor behaves like a web application, not a web page.
Examining Top-Level Styles
The iUI framework uses a core set of base styles in iui.css and allows more platform-specific and theme-based styles to be defined in a secondary style sheet. The default style sheet for IOS is default-theme.css.
The default style sheet used by iUI sets up several top-level styles. The body style in default-theme.css sets up the default margin, font-family, and colors.
body {
    font-family:     Helvetica, Arial, Sans-serif;
    margin:          0;
    color:           #000000;
    background:      #FFFFFF;
}
The iui.css adds additional styles, uses -webkit-user-select and -webkit-text-size-adjust to ensure that iRealtor behaves as an application rather than a web page. Here’s the definition in iui.css:
body {
    overflow-x: hidden;
    -webkit-text-size-adjust: none;
}
For IOS web apps, it is important to assign -webkit-text-size-adjust: none to override the default behavior.
All elements, except for the .toolbar class, are assigned the following properties in iui.css:
body > *:not(.toolbar) {
    box-sizing: border-box;
    -webkit-box-sizing: border-box;
    -moz-box-sizing: border-box;
    -o-box-sizing: border-box;
    display: none;
    position: absolute;
    width: 100%;
    height: auto;
    -webkit-transition-duration: 300ms;
    -webkit-transition-property: -webkit-transform;
    -webkit-transform: translate3D(0%,0,0);
}
In landscape mode, the padding-top changes for these elements in default-theme.css:
body[orient="landscape"] > *:not(.toolbar) {
    padding-top:    32px;
}
The orient attribute changes when the orientation of the viewport changes between portrait and landscape. You can see how this works later in the chapter.
The iUI framework uses a selected attribute to denote the current page of the application. From a code standpoint, the page is typically either a div or a ul list. Here’s the reference in iui.css:
body > *[selected="true"] {
    display: block;
}
Links also are assigned the selected attribute:
ul > li > a[selected],
ul > li > a:active,
.panel > ul > li > a[selected],
.panel > ul > li > a:active {
    color: #fff;
    background-color:#194fdb;
    background-repeat: no-repeat, repeat-x;
    background-position: right center, left top;
    background-image: url(listArrowSel.png), url(selection.png);
}

ul > li > a[selected="progress"] {
    background-image: url(loading.gif), url(selection.png);
}
The ul > li > a[selected="progress"] style in default-theme.css is used to display an animated GIF showing the standard IOS loading animation.
Adding the Top Toolbar
The first UI element to add is the top toolbar, which serves a common UI element throughout the application. To create the toolbar, use a div element assigning it the toolbar class:
    <!-Top iUI toolbar->
    <div class="toolbar">
        <h1 id="pageTitle"></h1>
        <a id="backButton" class="button" href="#"></a>
        <a class="button" href="#searchForm">Search</a>
    </div>
The h1 element serves as a placeholder for displaying the active page’s title. The a backbutton is not shown at the top level of the application, but is used on subsequent pages to go back to the previous page. The Search button allows access to the search form anywhere within the application. Here are the corresponding style definitions for each of these elements.
In iui.css:
.toolbar {
    box-sizing:         border-box;
    -webkit-box-sizing: border-box;
    -moz-box-sizing:    border-box;
    -o-box-sizing:      border-box;
    -webkit-transform:  translateX(0);
}

.toolbar > h1,
.button {
    overflow:           hidden;
    white-space:        nowrap;
    text-overflow:      ellipsis;
    -o-text-overflow:   ellipsis;
    -ms-text-overflow:  ellipsis;
}

.button {
    text-decoration:             none;
    white-space:                 nowrap;
    -webkit-tap-highlight-color: rgba(0,0,0,0);
}

.leftButton {
    left:               6px;
    right:              none;
}

#backButton {
    display:            none;
}
The default-theme.css adds some IOS-specific styling:
.toolbar {
    padding:        0 10px 10px 10px;
    height:         45px;
    background:     url(toolbar.png) #6d84a2 repeat-x;
    background-size:auto 100%;
}
.toolbar > h1 {
    position:       absolute;
    left:           50%;
    width:          150px;
    margin:         1px 0 0 -75px;
    padding:        10px 0;
    height:         auto;
    font-size:      20px;
    color:          #FFFFFF;
    font-weight:    bold;
    text-shadow:    rgba(0,0,0,.6) 0 -1px 0;
    text-align:     center;
}
body[orient="landscape"] .toolbar > h1 {
    width:          300px;
    margin:         1px 0 0 -150px;
    padding:        6px 0;
    font-size:      16px;
}

.button {
    position:       absolute;
    top:            8px;
    right:          6px;
    width:          auto;
    margin:         0;
    padding:        0 3px;
    color:          #FFFFFF;
    line-height:    30px;
    font-family:    inherit;
    font-size:      12px;
    font-weight:    bold;
    text-shadow:    rgba(0,0,0,.6) 0px -1px 0;
    border-width:   0 5px;
    background:     none;
    -webkit-border-image:   url(toolButton.png) 0 5 0 5;
    -moz-border-image:      url(toolButton.png) 0 5 0 5;
    border-image:           url(toolButton.png) 0 5 0 5;
}
body[orient="landscape"] .button {
    top:            3px;
    right:          3px;
    line-height:    26px;
}

#backButton {
    left:           6px;
    right:          auto;
    padding:        0;
    max-width:      55px;
    border-width:   0 8px 0 14px;
    -webkit-border-image:   url(backButton.png) 0 8 0 14;
    -moz-border-image:      url(backButton.png) 0 8 0 14;
    background:             url(backButton.png) repeat-x;
}
#backButton[selected],#backButton:active {
    -webkit-border-image:   url(backButtonSel.png) 0 8 0 14;
    -moz-border-image:      url(backButtonSel.png) 0 8 0 14;
    background:             url(backButtonSel.png) repeat-x;
}
The body > .toolbar class style is set to 45px in height. The .toolbar > h1 header emulates the standard look of an application caption when in portrait mode and body[orient="landscape"] > .toolbar > h1 updates the position for landscape mode. Notice that the limited width of the iPhone viewport dictates use of overflow:hidden and text-overflow:ellipsis.
Adding a Top-Level Navigation Menu
After the toolbar is created then the top-level navigation menu needs to be created. Under the iUI framework, use a ul list, such as the following:
<ul id="home" title="iRealtor" selected="true">
    <li><a href="#featuredListings">Featured Listings</a></li>
    <li><a href="#">Buying & Tips</a></li>
    <li><a href="#calculator">Mortgage Calculator</a></li>
    <li><a href="#meetOurTeam">Meet Our Team</a></li>
    <li><a href="#">View Our Gallery</a></li>
    <li><a href="http://www.myirealtor.com" target="_self">Visit Our Web Site</a>
    </li>
</ul>
Code snippet index.html
The title attribute is used by iUI to display in the toolbar’s h1 header. The selected attribute indicates that this ul element is the active block when the application loads. Each of the menu items is defined as an a link inside of li items. The href attribute can point to either another div or ul block inside the same file (called a panel) using an anchor reference (such as #meetOurTeam). Alternatively, you can also use Ajax to load a block element from an external URL. Table 9-1 displays the four types of links you can work with inside iUI.
TABLE 9-1: iUI Link Types
| LINK TYPE | DESCRIPTION | SYNTAX |
| Internal URL | Loads a panel that is defined inside the same HTML page | <a href="#meet_our_team"> |
| Ajax URL | Loads document fragment via Ajax | <a href="listings.html"> |
| Ajax | Loads document fragment via Ajax replacing contents of the calling link | <a href="listings1.html" target="_replace"> |
| External URL | Loads external web link | <a href="index.html" target="_self"> |
The styles for the list items and links are as follows in default-theme.css:
body > ul > li {
    margin:         0;
    border-bottom:  1px solid #E0E0E0;
    padding:        8px 0 8px 10px;
    font-size:      20px;
    font-weight:    bold;
    list-style-type:none;
}
body[orient="landscape"] > ul > li {
    font-size:      18px;
}

body > ul > li > a {
    margin:     -8px 0 -8px -10px;
    padding:    8px 32px 8px 10px;
    color:      inherit;
    background: url(listArrow.png) no-repeat right center;
    text-decoration:    none;
}
Notice that listArrow.png is displayed at the right side of the list item’s a link.
DISPLAYING A PANEL WITH AN INTERNAL URL
If you are linking to another block section inside the same page then you simply need to add the code. For example, the Meet Our Team item links to the following div:
<div id="meetOurTeam" class="panel" title="Meet Our Team">
    <h2>J-Team Reality</h2>
    <fieldset>
        <div class="row">
            <p class="normalText">Lorem ipsum dolor sit amet, consect etuer adipis
cing elit. Suspend isse nisl. Vivamus a ligula vel quam tinci dunt posuere.
Integer venen atis blandit est. Phasel lus ac neque. Quisque at augue.
Phasellus purus. Sed et risus. Suspe ndisse laoreet consequat metus. Nam
nec justo vitae tortor fermentum interdum. Aenean vitae quam eu urna
pharetra ornare.</p>
            <p class="normalText">Pellent esque habitant morbi tristique
senectus et netus et malesuada fames ac turpis egestas. Aliquam congue.
Pel lentesque pretium fringilla quam. Integer libero libero, varius ut,
faucibus et, facilisis vel, odio. Donec quis eros eu erat ullamc orper
euismod. Nam aliquam turpis. Nunc convallis massa non sem. Donec non
odio. Sed non lacus eget lacus hend rerit sodales.</p>
        </div>
    </fieldset>
</div>
Code snippet index.html
The id attribute value of the block element is identical to the href value of the source link (except for the # sign). The div element is assigned the panel class, and the title attribute supplies the new page title for the application. Inside the div element, the h2 element provides a header, whereas the fieldset element, which is commonly used as a container inside of iUI destination pages, is used to house the content. Figure 9-3 displays the results for iPhone and Figure 9-4 shows the same page in iPad.


The panel class and fieldset styles are shown in the following code. In addition, the default h2 style is provided:
body > .panel {
    padding-left:   10px;
    padding-right:  10px;
    background: #c8c8c8 url(pinstripes.png);
}
body > .panel > *:first-child {
    margin-top: 10px;
}
body > .panel > h2 {
    margin:         0 0 8px 14px;
    font-size:      inherit;
    font-weight:    bold;
    color:          #4d4d70;
    text-shadow:    rgba(255,255,255,.75) 2px 2px 0;
}

body > .panel > ul > li {
    list-style:     none;
    padding:        12px;
}

fieldset > .row {
    min-height:     42px;
}
fieldset > .row > p {
    width:          auto;
    height:         auto;
    padding:        12px;
    margin:         0;
    text-align:     left;
} }
The panel class property displays the vertical pinstripes, which is a standard background for IOS applications. The fieldset, used primarily for displaying rows, is used because it provides a white background box around the text content the page displays.
CREATING A SECONDARY NAVIGATION LIST
In iRealtor, tapping the Featured Listings menu item (<li><a href="#featuredListings">Featured Listings</a></li>) should display a list of special homes that are being featured by this fictional local realtor. Here’s the code:
<ul id="featuredListings" title="Featured">
    <li><a href="#406509171">30 Bellview Ave, Bolton</a></li>
    <li><a href="#">21 Milford Ave, Brandon</a></li>
    <li><a href="#">10 Main St, Leominster</a></li>
    <li><a href="#">12 Smuggle Lane, Marlboro</a></li>
    <li><a href="#">34 Main Ave, Newbury</a></li>
    <li><a href="#">33 Infinite Loop, Princeton</a></li>
    <li><a href="#">233 Melville Road, Rutland</a></li>
    <li><a href="#">320 Muffly, Sliver</a></li>
    <li><a href="#">1 One Road, Zooly</a></li>
</ul>
Code snippet index.html
The result is a basic navigation list, as shown in Figure 9-5 (and, for iPad in Figure 9-6). The first entry specifies a local URL that the app loads when that entry is selected. The MLS listing destination page is in Figure 9-8 later in the chapter.


DESIGNING FOR LONG NAVIGATION LISTS
In the iRealtor sample app, the sizes of the individual screens contain a limited amount of data so that I can package all of these screens within a single HTML page using internal links.
However, in a real-world situation, this single-page approach could become problematic if you are dealing with large amounts of data. Therefore, you can use Ajax to break up your application into chunks, yet still maintain the same integrated look and feel of a single page app. When you use Ajax, iUI and other frameworks enable you to load content into your application on demand by providing an external URL. However, the document that is retrieved needs to be a document fragment, not a complete HTML page.
iUI fully encapsulates XMLHttpRequest() for you. Therefore, when you supply an external URL in a link that does not have target="_self" defined, iUI retrieves the document fragment and displays it.
What’s more, although a document fragment such as the one shown in the previous section previously works fine for small amounts of data, the performance quickly drags with long lists. To deal with this issue, iUI and other frameworks enable you to break large lists into manageable chunks by loading an initial set of items, and then providing a link to the next set (see Figure 9-7). This design emulates the way the IOS Mail app works with incoming messages.
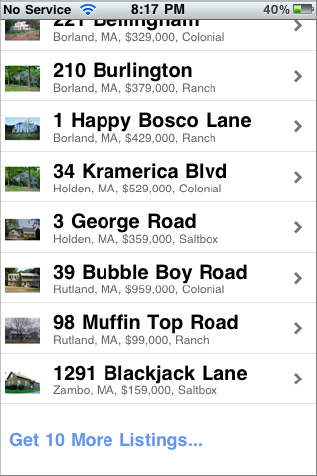
To provide this functionality in your application, create a link and add target="_replace" as an attribute. iUI loads the items from the URL replacing the current link. As with other Ajax links, the URL needs to point to a document fragment, not a complete HTML file. Here’s the link added to the bottom of the listings ul list:
<li><a href="listings1.html" target="_replace">Get 10 More Listings.</a></li>
When using the target="_replace" attribute, you need to use a fragment of a ul element and not a different structure. For example, the following document fragment is valid to use with a _replace request:
<li>item 1</li>
<li>item 2</li>
<li>item 3</li>
However, the following document fragment would not be correct because it is not valid inside a ul element:
<ul>
<li>item 1</li>
<li>item 2</li>
<li>item 3</li>
</ul>
Each of the MLS listings in iRealtor has its own individual destination page that is accessed by a local URL, such as the following:
<a class="listing" href="#406509171">20 May Lane</a>
The design goal of the page is to provide a picture and summary details of the house listing. But, taking advantage of iPhone’s services, suppose you also want to add a button for looking up the address in the Map app and an external web link to a site providing town information. Figures 9-8 and 9-9 show the end design for this destination page.

The document fragment for this page is as follows:
<div id="406509171" title="20 May Lane" class="panel">
    <div style="text-align: center">
        <img class="panelImage" src="images/406509171.png"/>
    </div>
  <h2>Details</h2>
    <fieldset>
            <div class="row">
                <p>MLS: 406509171</p>
            </div>
            <div class="row">
                <p>Address: 20 May Lane</p>
            </div>
            <div class="row">
                <p>City: Acton</p>
            </div>
            <div class="row">
                <p>Price: $318,000</p>
            </div>
            <div class="row">
                <p>Type: Single Family</p>
            </div>
            <div class="row">
                <p>Acres: 0.27</p>
            </div>
            <div class="row">
                <p>Rooms: 6</p>
            </div>
            <div class="row">
                <p>Bath: 1</p>
            </div>
  </fieldset>
   <br/>
    <a  class="whiteButton" target="_self"
    href="http://maps.google.com/maps?q=20+May+Lane,+Acton,+MA">
    Map To House</a>
   <br/>
    <a  class="whiteButton" target="_self"
    href="http://www.mass.gov/?pageID=mg2localgovccpage&L=3&L0=Home&L1=
    State%20Government&L2=Local%20Government&sid=massgov2&selectCity=Acton">
    View Town Info</a>
   <br/>
</div>
Code snippet index.html
Note several things in this code. First, the div element is assigned the panel class, just as you did for the Meet Our Team page earlier in the chapter. Second, the individual items of the MLS listing data are contained in div elements with the row class. The set of div row elements is contained in a fieldset. Third, the button links to the map and external web page are assigned a whiteButton class. Figures 9-8 and 9-9 shows the page as it looks in iPhone.
Yes, it works in iPad, too. Figure 9-10 shows the look.

The styles for this page come from both iui.css and from a custom style I added to index.html. First, here are the row class and label styles in default-theme.css (if you recall, the fieldset is defined earlier in the chapter):
fieldset > .row {
    min-height:     42px;
}
fieldset > .row > p {
    width:          auto;
    height:         auto;
    padding:        12px;
    margin:         0;
    text-align:     left;
}
fieldset > .row > label {
    margin:         0 0 0 14px;
    line-height:    42px;
    font-weight:    bold;
}

body > .panel > ul > li:first-child > a,
body > .panel > ul > li:first-child,
fieldset > .row:first-child {
    -webkit-border-top-left-radius:     10px;
    -webkit-border-top-right-radius:    10px;
    -moz-border-radius-topleft:         10px;
    -moz-border-radius-topright:        10px;
    border-top-left-radius:             10px;
    border-top-right-radius:            10px;
}
body > .panel > ul > li:last-child > a,
body > .panel > ul > li:last-child,
fieldset > .row:last-child {
    -webkit-border-bottom-left-radius:  10px;
    -webkit-border-bottom-right-radius: 10px;
    -moz-border-radius-bottomleft:      10px;
    -moz-border-radius-bottomright:     10px;
    border-bottom-left-radius:          10px;
    border-bottom-right-radius:         10px;
    border-bottom:  0;
}
The row class emulates the general look of an IOS list row found in such locations as the native Settings and Contacts apps. The .row:first -child.row: and last-child style adds the rounded corners to the top and bottom of the fieldset. The .row > label style defined in iui.css emulates the look of IOS Settings.
What’s more, to style the house image I needed to add a custom style in index.html:
.panelImage
{
    border:                 1px solid #888;
    -webkit-border-radius:  6px;
    -moz-border-radius:     6px;
    border-radius:          6px;
}
Code snippet index.html
This style rounds the corners of the image and adds a border around it, providing a much more pleasing IOS-looking effect.
However, before leaving this page, notice the two buttons at the bottom of the page:
    <a  class="whiteButton" target="_self"
    href="http://maps.google.com/maps?q=20+May+Lane,
    +Acton,+MA">Map To House</a>
   <br/>
    <a  class="whiteButton" target="_self"
    href="http://www.mass.gov/?pageID=mg2localgovccpage&L=3&L0=Home&L1=
   State%20Government&L2=Local%20Government&sid=massgov2&selectCity=Acton">
   View Town Info</a>
Code snippet index.html
The first button, when clicked, sends the user to the Maps app on the IOS device and displays the specified address. Figure 9-11 shows the result in iPhone.

The application pages that have been displayed have either been edge-to-edge navigation lists or destination panels for displaying content. However, you probably have a need to create a modal dialog. When a user is in a dialog, he needs to either perform the intended action (such as a search or submittal) or cancel out. Just as in any desktop environment, a dialog is ideal for form entry.
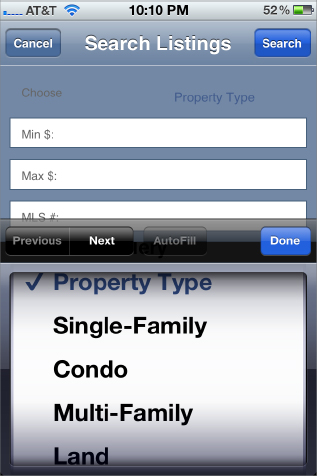
iRealtor needs dialog boxes for two parts of the application’Search and the Mortgage Calculator. The user can access the Search dialog by tapping the Search button on the top toolbar. Here’s the calling link:
<a class="button" href="#searchForm">Search</a>
The link displays the internal link #searchForm. This references the form element with an id of searchForm:
<form id="searchForm" title="Search Listings" class="dialog"
   name="searchForm" action="search.php" method="GET">

   <div class="toolbar">
      <h1>Search Listings</h1>
      <a class="button leftButton" type="cancel">Cancel</a>
      <a class="button blueButton" href="javascript:formname.submit()">Search</a>
   </div>

    <fieldset>
        <div class="row">
        <label for="proptype">Choose</label>
        <select id="proptype" name="proptype" size="1">
            <option value="">Property Type</option>
            <option value="SF">Single-Family</option>
            <option value="CC">Condo</option>
            <option value="MF">Multi-Family</option>
            <option value="LD">Land</option>
            <option value="CI">Commercial</option>
            <option value="MM">Mobile Home</option>
            <option value="RN">Rental</option>
            <option value="BU">Business Opportunity</option>
        </select>
        </div>
        <div class="row">
        <label>Min $:</label>
        <input type="text" name="minPrice"/>
        </div>
        <div class="row">
        <label>Max $:</label>
        <input type="text" name="maxPrice"/>
        </div>
        <div class="row">
        <label>MLS #:</label>
        <input type="text" name="mlsNumber"/>
        </div>
     </fieldset>
</form>
Code snippet index.html
The dialog class indicates that the form is a dialog. The form elements are wrapped inside a fieldset. The action buttons for the dialog are actually defined as links. To be specific, the Cancel and Search links are defined as button leftButton and button blueButton classes, respectively. These two action buttons are displayed in a toolbar div defined inside the form itself. The toolbar div also displays the h1 content as the dialog title.
A select list defines the type of properties that the user wants to choose from. Three input fields are defined for additional search criteria.
Figure 9-12 shows the form when displayed in the iPhone viewport, and Figure 9-13 shows the same form in iPad. Per IOS guidelines, the bottom part of the form is shaded to obscure the background page. Figure 9-14 displays the IOS-specific selection list that is automatically displayed when the user taps in the select element. Finally, Figure 9-15 shows the pop-up keyboard that is displayed when the user taps in the input fields.


Consider the CSS styles that are used to display this dialog. From default-theme.css, there are several rules to pay attention to:
body > .dialog,
body[orient="landscape"] > .dialog {
    top:        0px;
    z-index:    2;
    background: rgba(0, 0, 0, 0.8);
    padding:    0;
}
body > .dialog > div.toolbar {
    float:      left;
    width:      100%;
}

body > .dialog > fieldset {
    margin:         0;
    border:         none;
    padding:        10px 0 0 0;
    border-top:     1px solid #b3becd;
    background:     #7388a5 repeat-x;
}

body > .dialog > fieldset > div.row {
    padding:        0 10px;
    border:         0px;
    background-color:   transparent;
    -webkit-border-radius:  0;
}
body > .dialog > fieldset > div.row > label {
    position:       absolute;
    margin:         0;
    padding:        10px 8px 10px 12px;
    font-weight:    normal;
    line-height:    1em;
    font-size:      12px;
    color:          #666;
}
body > .dialog > fieldset > div.row >
   input:not([type|=radio]):not([type|=checkbox]) {
    font-size:      12px;
    font-weight:    bold;
    padding:        8px 0 6px 120px;
    border:         1px solid #47607c;
    -webkit-border-radius:  0px;
    background-color:       #fff;
}
The body > .dialog rule places the form over the entire application, including the top toolbar. It also defines a black background with .8 opacity. Notice the way in which the .dialog > fieldset > label style is defined so that the label element appears to be part of the input element.
When you submit this form, it is submitted via Ajax to allow the results to slide in from the side to provide a smooth transition.
You may, however, have other uses for dialogs beyond form submissions. For example, suppose I’d like to include a simple JavaScript-based mortgage calculator in iRealtor that is accessible from the top-level navigation menu. Here’s the link:
<li><a href="#calc">Mortgage Calculator</a></li>
The link accesses the document fragment contained in an external URL that contains the following form:
<form id="calculator" class="dialog">
   <div class="toolbar">
      <h1>Mortgage Calculator</h1>
      <a class="button leftButton" type="cancel">Cancel</a>
      <a class="button blueButton" href="javascript:formname.submit()">Search</a>
   </div>

   <fieldset>
        <div class="row">
            <label for="amt">Loan amount</label>
              <input class="calc" type="text" id="amt" name="amtZip"/>
        </div>
        <div class="row">
            <label for="ir">Interest rate</label>
            <input class="calc" type="text" id="ir" name="irZip"/>
        </div>
        <div class="row">
            <label for="term">Years</label>
            <input class="calc"  type="text" id="term"
            onblur="calc()"name="termZip"/>
        </div>
        <div class="row">
            <label for="payment">Monthly payment</label>
            <input class="calc" type="text" readonly="true" id="payment"/>
        </div>
        <div class="row">
            <label for="total">Total payment</label>
            <input class="calc" type="text"  readonly="true" id="total"/>
        </div>
   </fieldset>
</form>
Code snippet index.html
NOTE The first three input elements have a dummy name attribute that includes Zip in it. The Zip string prompts the numeric keyboard to display rather than the alphabet keyboard. The last two input elements don’t need it because they are read-only.
The purpose of the form is for the user to enter information in the first three input elements and then call the JavaScript function calc(), which then displays the results in the bottom two input fields. Because the calculation is performed inside a client-side JavaScript, no submittal is needed with the server.
The JavaScript function calc() resides in the document head of the index.html file. Here’s the scripting code:
<script type="application/x-javascript">
function calc() {
   var amt = document.getElementById('amt').value;
   var ir =  document.getElementById('ir').value / 1200;
   var term =  document.getElementById('term').value * 12;
   var total=1;
   for (i=0;i<term;i++) {
      total = total * (1 + ir);
   }
   var mp = amt * ir / ( 1-(1/total));
  document.getElementById('payment').value = Math.round(mp*100)/100;
  document.getElementById('total').value = Math.round(mp * term *100)/100;
}
</script>
Code snippet index.html
This routine performs a standard mortgage calculation and returns the results to the payment and total input fields. Figures 9-16 and 9-17 show the calculator in action on iPhone.


Listing 9-1 provides a full code view of the index.html file.
LISTING 9-1: index.html
<!DOCTYPE html>
<html>
<head>

<title>iRealtor</title>
<meta content="yes" name="apple-mobile-web-app-capable" />
<meta name="viewport"
   content="width=device-width; initial-scale=1.0;
   maximum-scale=1.0; user-scalable=0;"/>
<link rel="stylesheet" href="iui/iui.css" type="text/css" />
<link rel="stylesheet" href="iui/t/default/default-theme.css" type="text/css"/>
<script type="application/x-javascript" src="iui/iui.js"></script>

<script type="application/x-javascript">
function calc()
{
   var amt = document.getElementById('amt').value;
   var ir =  document.getElementById('ir').value / 1200;
   var term =  document.getElementById('term').value * 12;
   var total=1;
   for (i=0;i<term;i++)
   {
      total = total * (1 + ir);
   }
   var mp = amt * ir / ( 1 - (1/total));
  document.getElementById('payment').value = Math.round(mp*100)/100;
  document.getElementById('total').value = Math.round(mp * term *100)/100 ;
}
</script>

<style>

.panelImage
{
    border:                 1px solid #888;
    -webkit-border-radius:  6px;
    -moz-border-radius:     6px;
    border-radius:          6px;
}

</style>

</head>

<body>

<!-- Top toolbar -->
<div class="toolbar">
    <h1 id="pageTitle"></h1>
    <a id="backButton" class="button" href="#"></a>
    <a class="button" href="#searchForm">Search</a>
</div>

<!-- Home menu -->
<ul id="home" title="iRealtor" selected="true">
    <li><a href="#featuredListings">Featured Listings</a></li>
    <li><a href="#">Buying & Tips</a></li>
    <li><a href="#calculator">Mortgage Calculator</a></li>
    <li><a href="#meetOurTeam">Meet Our Team</a></li>
    <li><a href="#">View Our Gallery</a></li>
    <li><a href="http://www.myirealtor.com"
        target="_self">Visit Our Web Site</a></li>
</ul>

<!-- Featured Listings -->
<ul id="featuredListings" title="Featured">
    <li><a href="#406509171">30 Bellview Ave, Bolton</a></li>
    <li><a href="#">21 Milford Ave, Brandon</a></li>
    <li><a href="#">10 Main St, Leominster</a></li>
    <li><a href="#">12 Smuggle Lane, Marlboro</a></li>
    <li><a href="#">34 Main Ave, Newbury</a></li>
    <li><a href="#">33 Infinite Loop, Princeton</a></li>
    <li><a href="#">233 Melville Road, Rutland</a></li>
    <li><a href="#">320 Muffly, Sliver</a></li>
    <li><a href="#">1 One Road, Zooly</a></li>
</ul>

<!-- Calculator -->
<form id="calculator" class="dialog">
    <div class="toolbar">
      <h1>Mortgage Calculator</h1>
      <a class="button leftButton" type="cancel">Cancel</a>
      <a class="button blueButton" href="javascript:formname.submit()">Search</a>
    </div>

    <fieldset>
        <div class="row">
            <label for="amt">Loan amount</label>
            <input class="calc" type="text" id="amt"/>
        </div>
        <div class="row">
            <label for="ir">Interest rate</label>
            <input class="calc" type="text" id="ir"/>
        </div>
        <div class="row">
            <label for="term">Years</label>
            <input class="calc"  type="text" id="term"
            onblur="calc()"/>
        </div>
        <div class="row">
            <label for="payment">Monthly payment</label>
            <input class="calc" type="text" readonly="true"
            id="payment"/>
        </div>
        <div class="row">
            <label for="total">Total payment</label>
            <input class="calc" type="text"  readonly="true"
            id="total"/>
        </div>
    </fieldset>
</form>


<!-- Meet Our Team -->
<div id="meetOurTeam" class="panel" title="Meet Our Team">
    <h2>J-Team Reality</h2>
    <fieldset>
        <div class="row">
            <p class="normalText">Lorem ipsum dolor sit amet,
consect etuer adipis cing elit. Suspend isse nisl. Vivamus
a ligula vel quam tinci dunt posuere. Integer venen atis
blandit est. Phasel lus ac neque. Quisque at augue. Phasellus
purus. Sed et risus. Suspe ndisse laoreet consequat metus.
Nam nec justo vitae tortor fermentum interdum. Aenean vitae
quam eu urna pharetra ornare.</p>
            <p class="normalText">Pellent esque habitant morbi
tristique senectus et netus et malesuada fames ac turpis egestas.
Aliquam congue. Pel lentesque pretium fringilla quam. Integer
libero libero, varius ut, faucibus et, facilisis vel, odio.
Donec quis eros eu erat ullamc orper euismod. Nam aliquam
turpis. Nunc convallis massa non sem. Donec non odio. Sed
non lacus eget lacus hend rerit sodales.</p>
        </div>
    </fieldset>
</div>

<!-- House Listing -->
<div id="406509171" title="20 May Lane" class="panel">
    <div style="text-align: center">
        <img class="panelImage" src="images/406509171.png"/>
    </div>
  <h2>Details</h2>
    <fieldset>
            <div class="row">
                <p>MLS: 406509171</p>
            </div>
            <div class="row">
                <p>Address: 20 May Lane</p>
            </div>
            <div class="row">
                <p>City: Acton</p>
            </div>
            <div class="row">
                <p>Price: $318,000</p>
            </div>
            <div class="row">
                <p>Type: Single Family</p>
            </div>
            <div class="row">
                <p>Acres: 0.27</p>
            </div>
            <div class="row">
                <p>Rooms: 6</p>
            </div>
            <div class="row">
                <p>Bath: 1</p>
            </div>
  </fieldset>
   <br/>
    <a  class="whiteButton" target="_self"
        href="http://maps.google.com/maps?q=
        20+May+Lane,+Acton,+MA">Map To House</a>
   <br/>
    <a  class="whiteButton" target="_self"
   href="http://www.mass.gov/?pageID=
    mg2localgovccpage&L=3&L0=Home&L1=State%20
    Government&L2=Local%20Government&sid=massgov2
    &selectCity=Acton">View Town Info</a>
   <br/>
</div>


<!-- Search Form -->
<form id="searchForm" title="Search Listings"
   class="dialog" name="searchForm" action="search.php"
   method="GET">

   <div class="toolbar">
      <h1>Search Listings</h1>
      <a class="button leftButton" type="cancel">Cancel</a>
      <a class="button blueButton" href="javascript:formname.submit()">Search</a>
   </div>

    <fieldset>
        <div class="row">
        <label for="proptype">Choose</label>
        <select id="proptype" name="proptype" size="1">
            <option value="">Property Type</option>
            <option value="SF">Single-Family</option>
            <option value="CC">Condo</option>
            <option value="MF">Multi-Family</option>
            <option value="LD">Land</option>
            <option value="CI">Commercial</option>
            <option value="MM">Mobile Home</option>
            <option value="RN">Rental</option>
            <option value="BU">Business Opportunity</option>
        </select>
        </div>
        <div class="row">
        <label>Min $:</label>
        <input type="text" name="minPrice"/>
        </div>
        <div class="row">
        <label>Max $:</label>
        <input type="text" name="maxPrice"/>
        </div>
        <div class="row">
        <label>MLS #:</label>
        <input type="text" name="mlsNumber"/>
        </div>
     </fieldset>
</form>

</body>
</html>
When you use a framework such as iUI, you have a main JavaScript file (such as iui.js) that powers all of the UI behavior for you when you include it in your document head. However, because the framework takes control over many aspects of the environment, a solid understanding of the library’s internals can be invaluable to you.
NOTE Note that the material in this section is advanced, but you may find it a helpful walkthrough of the scripting underpinnings of an IOS web app.
The following example is iui.js. The iui.js consists of the object window.iui, three listeners for load and click events, and several supporting routines. All of the JavaScript code is enclosed in an anonymous function with several constants and variables defined:
(function() {
var slideSpeed = 20;
var slideInterval = 0;
var currentPage = null;
var currentDialog = null;
var currentWidth = 0;
var currentHash = location.hash;
var hashPrefix = "#_";
var pageHistory = [];
var newPageCount = 0;
var checkTimer;
// **** REST OF IUI CODE HERE ****
})();
The anonymous function creates a local scope to allow private semi-global variables and avoid name conflicts with applications that use iui.js.
On Document Load
When the HTML document loads, the following listener function is triggered:
addEventListener("load", function(event)
{
    var page = iui.getSelectedPage();
    var locPage = getPageFromLoc();

    if (page)
        iui.showPage(page);

    if (locPage && (locPage != page))
        iui.showPage(locPage);

    setTimeout(preloadImages, 0);
    if (typeof window.onorientationchange == "object")

        window.onorientationchange=orientChangeHandler;
        hasOrientationEvent = true;
        setTimeout(orientChangeHandler, 0);
    }
    setTimeout(checkOrientAndLocation, 0);
    checkTimer = setInterval(checkOrientAndLocation, 300);
}, false);
The getSelectedPage() method of the JSON object iui is called to get the selected page’the block element node that contains a selected="true" attribute. This node is then passed to iui.showPage(), which is the core routine to display content.
setTimeout() is often used when calling certain JavaScript routines to prevent timing inconsistencies. Using setTimeout(), iUI calls an image preloader function to load application images.
Getting back to iui.showPage(), its code is as follows:
showPage: function(page, backwards)
{
    if (page)
    {
        if (page == currentPage)
        {
            console.log("page = currentPage = " + page.id);
            iui.busy = false;
            return;
        }

        if (currentDialog)
        {
            currentDialog.removeAttribute("selected");
            sendEvent("blur", currentDialog);
            currentDialog = null;
        }

        if (hasClass(page, "dialog"))
        {
            iui.busy = false;
            sendEvent("focus", page);
            showDialog(page);
        }
        else
        {
            sendEvent("load", page);
            var fromPage = currentPage;
            sendEvent("blur", currentPage);
            currentPage = page;
            sendEvent("focus", page);

            if (fromPage)
            {
                if (backwards) sendEvent("unload", fromPage);
                setTimeout(slidePages, 0, fromPage, page, backwards);
            }
            else
            {
                updatePage(page, fromPage);
            }

        }
    }
}
The currentDialog semi-global variable is evaluated to determine whether a dialog is already displayed. (currentDialog is set in the showDialog() function.) This variable would be null when the document initially loads because of the line var currentDialog = null; earlier in iui.js, which runs every time the document loads.
The node is then evaluated to determine whether it is a dialog (containing class="dialog" as an attribute) or a normal page. Although the opening page is usually considered a normal page, you may want to have a login or initial search dialog.
Loading a Standard iUI Page
For normal pages, iUI assigns the value of currentPage to the variable fromPage and then reassigns currentPage to the page parameter. If fromPage is not null (that is, every page after the initial page), then iUI performs a slide-in animation with a function called slidePages(). The fromPage, page, and backwards variables are passed to slidePages().
However, because this is the first time running this routine (and fromPage equals null), the updatePage() function is called:
function updatePage(page, fromPage)
{
    if (!page.id)
        page.id = "__" + (++newPageCount) + "__";

    location.hash = currentHash = hashPrefix + page.id;
    pageHistory.push(page.id);

    if(hasTitle) {
        var pageTitle = $("pageTitle");
        if (page.title)
            pageTitle.innerHTML = page.title;
        var ttlClass = page.getAttribute("ttlclass");
        pageTitle.className = ttlClass ? ttlClass : "";
    }

    if (page.localName.toLowerCase() == "form" && !page.target)
        showForm(page);

    var backButton = $("backButton");
    if (backButton)
    {
        var prevPage = $(pageHistory[pageHistory.length-2]);
        if (prevPage && !page.getAttribute("hideBackButton"))
        {
            backButton.style.display = "inline";
            backButton.innerHTML = prevPage.title ? prevPage.title : "Back";
            var bbClass = prevPage.getAttribute("bbclass");
            backButton.className = (bbClass) ? 'button ' + bbClass : 'button';
        }
        else
            backButton.style.display = "none";
    }
    iui.busy = false;
}
The updatePage() function is responsible for updating the pageHistory array, which is required for enabling the Safari Back button to work even in single-page web apps, such as iRealtor. The value of the node’s title attribute is then assigned to be the innerHTML of the top toolbar’s h1 pageTitle.
If the page name contains the string form in it then the showForm() function is called. Otherwise, the routine continues on, looking to see if a backButton element is defined in the toolbar. If so, then the page history is updated and button title is updated.
Subsequent pages always bypass the direct call to updatePage() and use the slidePages() function instead. Here is the code:
function slidePages(fromPage, toPage, backwards)
{
    var axis = (backwards ? fromPage : toPage).getAttribute("axis");

    clearInterval(checkTimer);

    sendEvent("beforetransition", fromPage, {out:true});
    sendEvent("beforetransition", toPage, {out:false});
    if (canDoSlideAnim() && axis != 'y')
    {
      slide2(fromPage, toPage, backwards, slideDone);
    }
    else
    {
      slide1(fromPage, toPage, backwards, axis, slideDone);
    }

    function slideDone()
    {
      if (!hasClass(toPage, "dialog"))
          fromPage.removeAttribute("selected");
      checkTimer = setInterval(checkOrientAndLocation, 300);
      setTimeout(updatePage, 0, toPage, fromPage);
      fromPage.removeEventListener('webkitTransitionEnd', slideDone, false);
      sendEvent("aftertransition", fromPage, {out:true});
      sendEvent("aftertransition", toPage, {out:false});
      var linkObj = document.getElementsByTagName('a'),
      for (var i = 0; i <= (linkObj.length-1); i++) {
        linkObj[i].removeAttribute('selected'),
      }
    }
}
The primary purpose of slidePages() is to emulate the standard IOS slide animation effect when you move between pages. It achieves this by using JavaScript timer routines to incrementally update the style.left property of the fromPage and the toPage. The updatePage() function (discussed previously) is called inside a setTimeout routine.
Handling Link Clicks
Because most of the user interaction with an IOS web app is tapping the interface to navigate the application, the event listener for link clicks is, in many ways, the “mission control center” for iui.jss. Check out the code:
addEventListener("click", function(event)
{
    var link = findParent(event.target, "a");
    if (link)
    {
        link.setAttribute("selected", "true");
        setTimeout(function(){ link.removeAttribute("selected");}, 100);

        if (link.href && link.hash && link.hash != "#" && !link.target)
        {
            followAnchor(link);
        }
        else if (link == $("backButton"))
        {
            if(window.history)
                history.go(-1);
            else
                iui.goBack();
        }
        else if (link.getAttribute("type") == "submit")
        {
            var form = findParent(link, "form");
            if (form.target == "_self")
            {
                // Note: this will not call any onsubmit handlers!
                form.submit();
                return;  // allow default
            }
            submitForm(form);
        }
        else if (link.getAttribute("type") == "cancel")
        {
            cancelDialog(findParent(link, "form"));
        }
        else if (link.target == "_replace")
        {
            followAjax(link, link);
        }
        else if (iui.isNativeUrl(link.href))
        {
            return;
        }
        else if (link.target == "_webapp")
        {
            location.href = link.href;
        }
        else if (!link.target)
        {
            followAjax(link, null);
        }
        else
            return;

        event.preventDefault();
    }

    var div = findParent(event.target, "div");
    if (div && hasClass(div, "toggle"))
    {
        div.setAttribute("toggled", div.getAttribute("toggled") != "true");
        event.preventDefault();
    }

}, true);
This routine evaluates the type of link:
- If it is an internal URL then the page is passed to followAnchor(), which, among other things, calls iui.showPage().
- If the backButton is tapped then history.back() is triggered.
- Dialog forms typically contain Submit and Cancel buttons. If a Submit button is tapped then submitForm() is called. If a Cancel button is tapped then cancelDialog() is called.
- External URLs that have target="_replace" or that do not have target defined are Ajax links. Both of these call the followAjax() method.
- If it is none of these, then it is an external link with a target="_self" attribute defined and the default iUI behavior is suspended and the link is treated as normal.
Loading a Dialog
If the node that is passed into the main showPage() function is a dialog (class="dialog"), then the showDialog() function is called, which in turn calls showForm(). These two functions are shown in the following code:
function showDialog(page)
{
    currentDialog = page;
    iui.addClass(page, "show");

    if (hasClass(page, "dialog"))
        showForm(page);
}

function showForm(form)
{
    form.onsubmit = function(event)
    {
        event.preventDefault();
        submitForm(form);
    };

    form.onclick = function(event)
    {

        if (event.target == form && hasClass(form, "dialog"))
            cancelDialog(form);
    };
}
The showForm() function assigns event handlers to the onsubmit and onclick events of the form. When a form is submitted, the submitForm() function submits the form data via Ajax. When an element on the form is clicked, then the dialog is closed. The following code shows the routines that are called from a typical dialog box:
function submitForm(form)
{
    if (!iui.busy)
    {
        iui.busy = true;
        iui.addClass(form, "progress");
        iui.showPageByHref(form.action, encodeForm(form), form.method || "GET",
         null, clear);
    }
    function clear() {   iui.removeClass(form, "progress"); }
}

function encodeForm(form)
{
    function encode(inputs)
    {
        for (var i = 0; i < inputs.length; ++i)
        {
            if (inputs[i].name)
                args[inputs[i].name] = inputs[i].value;
        }
    }

    var args = {};
    encode(form.getElementsByTagName("input"));
    encode(form.getElementsByTagName("textarea"));
    encode(form.getElementsByTagName("select"));
    encode(form.getElementsByTagName("button"));
    return args;
}

function cancelDialog(form)
{
    return iui.removeClass(form, "show");
}
EXERCISES
1. Using iUI, how do you define multiple screens inside the same HTML page?
2. How do you define a navigation list that is replaced by new data coming from an Ajax source?
3. When evaluating frameworks, such as iUI, how important is it to consider support for iPad as well as other mobile platforms?
Answers to the Exercises can be found in the Appendix.
• WHAT YOU LEARNED IN THIS CHAPTER
| TOPIC | KEY CONCEPTS |
| Defining a multi-screen, single page web app | Frameworks like iUI and jQuery Mobile enable you to define full apps inside a single HTML file |
| Using iUI framework | Creating your UI and logic in HTML and linking in the framework’s CSS and JS files for styling and functionality |