Chapter 10
Making Applications Fast and Responsive
In This Chapter
![]() Thinking about your app at multiple levels of design
Thinking about your app at multiple levels of design
![]() Applying nonfunctional requirements to iOS apps
Applying nonfunctional requirements to iOS apps
![]() Measuring your app’s performance
Measuring your app’s performance
![]() Constructing your app so it runs as fast as possible
Constructing your app so it runs as fast as possible
![]() Using threading to make your application responsive
Using threading to make your application responsive
An app that's fully accepted by users must meet two kinds of requirements: functional and nonfunctional. The former describes what the app must do (that is, the functions it must perform); the latter provides guidelines on how the app must work (for example, how fast it should operate, how reliable it must be, and so on).
While functional requirements are about describing the right app, nonfunctional requirements are about how to build the app correctly. In this chapter, I focus on nonfunctional requirements.
After discussing nonfunctional requirements, I talk about how to design software to meet nonfunctional requirements. I describe how app design actually takes place at multiple levels, from the architecture of the system, to the design of the objects and interactions, to the choice of algorithms.
Finally, I explain how you can apply these concepts to make apps for mobile devices. I focus on two nonfunctional requirements: performance and responsiveness. (I cover two more, security and reliability, in the next chapter.)
I explain how to make iOS apps run fast by showing you techniques and tools for optimizing your app's performance. I then discuss an important facet of performance known as responsiveness and how to achieve it using threading.
Becoming Familiar with Nonfunctional Requirements
As I mention in the introduction, nonfunctional requirements (NFR) provide guidelines on how to build an app correctly (such requirements are also known as quality requirements or design requirements).
Let me start with a categorization and examples of NFR. Say that you're building a wayfinding app that will plot a route from one location to another. Here are the general categories of NFR and examples for each, specifically in the context of the wayfinding app:
- Performance: This is essentially how fast your app works. A performance requirement for the wayfinding app could be that it plot a route in less than 20 seconds.
- Responsiveness: This requirement ensures that your app is ready to respond to a user’s input or an external event no matter what it's doing currently. For example, does your app allow the user to switch to another function even while it's busy calculating a route.
- Scalability: Scalability is how well your app deals with increasing use, or size of data. For example, you might require that the time your app takes to plot a route is linear with the distance between the two points.
- Usability: This relates to how easily people can use your app. A measure of usability could be the time it takes for end users to become familiar with your app's functions, without training or help.
- Reliability: This is the percentage of time that your app works correctly to deliver the desired results, despite potential failures in its environment. For the wayfinding app, it's the percentage of time that it correctly plots the route, given that the network may not be available or that bandwidth may be limited. You might require that your app work with a reliability of 99 percent, which means that in a given 24-hour day, it can fail to plot a route for no more than one percent of the day, or about 15 minutes.
 The term availability can be used interchangeably with reliability. I prefer to use reliability in this book because most people are more likely to understand that word.
 - Security: Say that your app saves all the previous routes it calculated and lets you reuse a saved route rather than recalculate it. If security isn't a requirement, you can store all app data in unencrypted files and on the SD card. If security is an issue, however, you can encrypt the files and store them in the app’s private file area so that their content isn’t easily accessible and so that they're deleted when the app is uninstalled.
- Modifiability: This requirement governs how easily your app may be changed. For the wayfinding app, this requirement might state that the app can use more than one map without needing to be rebuilt.
- Maintainability: This relates to the ease at which your app finds bugs and fixes them. For example, if a map is incorrect, can you fix the problem simply by downloading a correct map or do you have to purchase the next version of the app.
Cost is also often important. When you build an app, you must decide which nonfunctional requirements apply to your app. You also have to refine your NFRs so that you can test them. For example, for a performance NFR, you must be able to measure the speed of your application at the appropriate places (such as while the screen appears).
Certain nonfunctional requirements are especially important for mobile devices. These requirements are performance and responsiveness, which I discuss in the sections “Optimizing an Application's Performance” and “Ensuring Responsiveness in Your Apps,” later in this chapter. Also, Chapter 11 covers security and reliability.
 Don't attempt to meet all possible nonfunctional requirements in an app. Why spend resources implementing features that users won’t value? Instead, define and, wherever applicable, quantify the extent to which you want to meet the NFR. Also, NFR always involves trade-offs. Meeting a single nonfunctional requirement can sometimes cause your app not to meet another one. For example, performance and security are often at cross-purposes. Increased security is often implemented by encrypting and decrypting stored data. However, having to decrypt data in order to use it, and encrypt it after the app is done using it takes time, thereby reducing the app’s performance. The trick with meeting NFRs is to find the right balance.
Designing Your App at Multiple Levels
When you design an app, you have to design it at more than one level. You first have to decide on the design decisions that will affect all the components of the app. These are called architectural decisions. Architectural decisions need to be made first and are very hard to change once you start building your software because they affect many, if not most, of the components of your app.
An example of an architectural decision is the decision to build the app on the iOS framework. A second, related, architectural decision is to use Objective-C as the development language. You can clearly understand why this decision has to be made early. You can also see that moving away from this decision (say, by deciding to build an Android app) will essentially cause you to throw most of your work away and restart almost from scratch.
You often have little choice in making certain architectural decisions. For example, if you want to make apps run on iOS devices, your best choice currently is to use the iOS Framework and Objective-C.
Apple provides the highest level of support for Objective-C, so developing apps in Objective-C is significantly easier than using C or C++ (although this can be done). In this case, the architectural decision to use Objective-C is a no-brainer.
After the architecture is set (yes, like cement), you're ready to begin the second level of design, as follows:
- Partitioning your application into classes
- Allocating methods to classes
- Mapping the design of the architecture formulated at the first level of design
These generic steps are discussed in detail in Chapters 6 and 7. Incidentally this level of design is certainly difficult to modify once decided upon, but certainly it's not as hard to change as the architecture.
In the third level of design, you have the choice of using
- Algorithms (say, for sorting).
- Data structures (using a hash table to find a value in a contact list — for example, a phone number — corresponding to a key, such as the name of the contact).
Abstracting the data structures and algorithms inside classes or methods so that they're compartmentalized really helps when you try to change their structures.
- Low-level coding practices (such as what you name variables, how you write loops, and so on).
Code is relatively easy to change; all you need is a good editor, a few hours to hack your way through the existing code, and strong coffee to keep you awake throughout the process.
Optimizing an Application's Performance
In this section, I talk about app performance in iOS, using the example Tic-Tac-Toe application introduced in earlier chapters.
Architectural choices related to performance include decisions such as whether to use a database (that is, Core Data) or files, whether to build screens using 2D graphics or widgets, and whether to access the network every time your app needs data or to store certain data locally.
 Core Data is slower in some cases; however, it's faster if you're retrieving bits of data that are already stored.
The following list describes the requirements-driven architectural decisions made in the Tic-Tac-Toe application earlier in the book, and the reasons for making them:
- Programming language: The app uses Objective-C because of its built-in support and easy app development. These choices outweigh gains in performance you might make by writing native (C or C++) code, especially considering that the app doesn't have an extraordinary need for high performance.
- Data storage: User preferences are stored via the built-in preference classes because of their programming convenience. The app uses Core Data to store login and password information because this information is so frequently stored and retrieved, a task that Core Data excels in. For example, use of this information is much higher than for the number of registered users added, a task that Core Data is slower in doing.
- Graphics: For speed, the app uses raw 2D graphics rather than widgets for the board. (The graphics in the Tic-Tac-Toe app are uncomplicated, so widgets would work as well.)
Note that early on in the Tic-Tac-Toe app, a couple of deliberate decisions were made about data structures and algorithms. The primary data structure decision is to represent the grid as a two-dimensional array and to encapsulate it inside a class named Grid so that you can change this implementation if it turns out to be too slow. (The design process shown in Chapter 7 concludes that the grid should be its own class, which serves as a validation for the design process.)
Less computation in your coding practices will improve your app's performance. Here are some actions you can take to do so:
- Save intermediate results in variables and then reuse them, especially in loops. Here's a simple example of this technique, taken from the
androidTakesATurnmethod in theTTTGameSessionViewControllerclass:...
// Play at that square
pickedX = [picked x];
pickedY = [picked y];
[activeGame play:pickedX :pickedY];
[gameView placeSymbol:pickedX :pickedY];
... - Avoid internal getters and setters. Access member variables directly when within the class, instead of using the getters and setters. Doing so avoids the overhead of an additional method call. You can see this process in the
GameGridclass, where the locations in the two-dimensional array member variablegridare accessed directly instead of using the accessor methodssetValueAtLocation(...)andgetValueAtLocation(...), which is how the grid is accessed outside the class by client classes such asBoardandGame. - Avoid creating unnecessary objects. Instances of the Objective-C
NSStringclass (though appearing to be elementary data types) are objects, so limit their number, as well. This tactic is illustrated in theSymbolclass in Tic-Tac-Toe, where you use the Singleton pattern so that only one instance of anX, anO, and aBlanksymbol is ever created; also, symbols are defined as enumerated types rather than as strings. - Know the framework libraries well, and use them wherever possible instead of writing your own code. Because the library-implemented code is optimized (for example, by using assembler code), using it is more efficient than writing equivalent code, even after the compiler tries to optimize it.
An excellent set of old-but-gold techniques around low-level coding practices for efficiency is Jon Bentley’s rules for writing efficient programs. You can find summaries of these techniques at various places on the web by entering Jon Bentley writing efficient programs in your favorite search engine. You can also check out the Jon Bentley on Writing Efficient Programs link in the web resources for this chapter at www.dummies.com/go/iosprogramminglinks.
Using Instrumentation for Code Optimization
You can expend a lot of time optimizing code, only to see no real improvement in the performance of your program. To make your optimization efforts pay off, develop the habit of profiling (or instrumenting) your app’s code to determine the level of its performance and where it's spending most of its time. Follow these steps to profile your code:
- Within Xcode, choose Xcode⇒Open Developer Tool⇒Instruments.
The Instruments screen appears showing all the available instrumentation templates (see Figure 10-1).
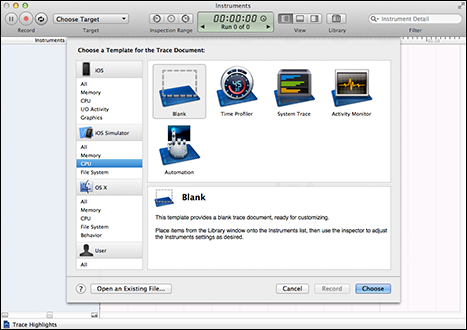
Figure 10-1: Selecting an instrument.
- Select Time Profiler.
An Instruments screen appears with the selected instrument in the left panel — in this case, the Time Profiler — a blank display area in the middle, and the Library of instruments in a panel on the right (see Figure 10-2).
A button with the text All Processes appears at the top of this screen. (Hover the cursor over this picker, and you see the Choose Target to Record Trace Data From tooltip.)
- Select the device you want to run the instrumentation on.
- Click the Choose Target button.
A list of running applications appears.
- From the list of applications, select the Tic-Tac-Toe app. The label for what used to be the Choose Target button changes to Tic-Tac-Toe.

Figure 10-2: Instruments screen after selecting the Time Profiler.
- Press the red Record button at the top-left corner of the Instruments screen.
Your app starts, and the Time Profiler starts recording timing information. The Record button changes to Stop.
- Play four or five games, taking each game as far as possible.
- Click the Stop button to stop profiling.
Now things get interesting. A panel on the profiler window just below the Instrumentation panel (see Figure 10-3) shows a list of methods, in the order of their contribution to overall execution time. As you review this list of methods, you start to come across methods from Tic-Tac-Toe. You see that drawRect is consuming large chunks of time. Drill into this method by clicking the arrow to the left, as shown in Figure 10-3, and notice that getBitMapForSymbol is the true culprit.
This is certainly cool, but let me now show you something even cooler. Double-click the method, and you see the source code of the method, showing the percentage of time contributed by each statement. You can clearly see that the memory allocation and initialization of the X, O, and Blank image objects are taking most of the time in this method (see Figure 10-4).

Figure 10-3: Seeing time consumed in each method.

Figure 10-4: Seeing the percentage of time spent in each statement.
The fact that these images are the same for every move (and, in fact, for every game) gives you a clear path to optimizing this code. You can create a set of static variables to hold these images, along with a Boolean flag bitMapsInitialized that indicates whether these variables have been initialized, as shown in the following code:
static BOOL bitMapsInitialized = NO;
static UIImage *imageBlank=nil;
static UIImage *imageX=nil;
static UIImage *imageO=nil;
Then you change the code in getBitmapForSymbol to load the images only once, as shown here:
-(UIImage *) getBitmapForSymbol{
if (!bitMapsInitialized){
NSString* imagePath =
[[NSBundle mainBundle]
pathForResource:@"Images.bundle/x" ofType:@"png"];
imageX = [[UIImage alloc] initWithContentsOfFile:imagePath];
imagePath =
[[NSBundle mainBundle]
pathForResource:@"Images.bundle/o" ofType:@"png"];
imageO = [[UIImage alloc] initWithContentsOfFile:imagePath];
imagePath =
[[NSBundle mainBundle]
pathForResource:@"Images.bundle/blank" ofType:@"png"];
imageBlank = [[UIImage alloc] initWithContentsOfFile:imagePath];
bitMapsInitialized=true;
}
UIImage *imageSelected = imageBlank;
if (self == [TTTSymbol SymbolXCreate]) imageSelected = imageX;
else if (self == [TTTSymbol SymbolOCreate]) imageSelected = imageO;
return imageSelected;
}
Figure 10-5 shows a profile run after the optimization is in place. The time expended in getBitmapForSymbol has dropped from about 1500 milliseconds to around 6. Not only that, the overall runtime has dropped by a third.
The optimized code is in the class already, just commented out. I left in both the un-optimized and optimized codes to make illustrating this example easier. Incidentally, this particular example is a real one. The performance issue was identified and solved, thanks to yours truly for actually using the Time Profiler.

Figure 10-5: Profiler run after optimization.
Though this section explains how to use the profiling tools to judiciously micro-optimize an application's performance, your app could run on multiple hardware platforms (such as iPad, iPhone, or iPod Touch). Each device runs on different processors at different speeds, with different computational add-ons (such as a video coprocessor) that affect the speed of your app differently. If performance on a specific platform is especially important to you, profile and optimize for that platform.
Ensuring Responsiveness in Your Apps
One nonfunctional requirement of special concern in mobile apps is responsiveness. Mobile app developers must ensure that their apps don’t even appear to freeze, become sluggish, or fail to respond to user input.
Ensuring responsiveness isn't the same as optimizing performance.
Even though your app may operate as fast as possible, it must appear as though the user controls it, even when it's actively working. For example, refreshing a web page might take a long time because the network or the server providing the page is slow. Obviously, your app can't do anything about speeding the refresh, but whenever this type of operation takes place, your app must not freeze — and it should, for example, allow the user to abandon the sluggish activity.
Ensuring responsiveness by using threading
The primary technique to achieve responsiveness is threading. The idea is to move the operation that's likely to take a long time from the main thread and execute its operations on separate (additional) threads using the thread functionality in iOS.
The following simple pseudocode shows you how a thread can be used to load an image from a network:
- (void) viewDidLoad {
CreateThread {
Image b = [self loadImageFromNetwork]; // user written method
// do something with the image
...
}
// While the image s loading do something more or even exit the method
...
}
Now, I'll show you a couple of examples, one from Tic-Tac-Toe and one from the iOS framework.
Implementing threading for responsiveness in Tic-Tac-Toe
To illustrate responsiveness and how to use threading for it, I'm implementing computer play in Tic-Tac-Toe — that is, you'll have the option to play against the computer in Tic-Tac-Toe. The computer, in this case, isn't very smart, and you’ll beat it most every time. (Making a smart Tic-Tac-Toe player out of the computer isn’t the goal of the program; illustrating responsiveness is.)
Although the computer isn’t going to actually play very smartly, it will make every effort to look like it's thinking before it actually plays, which it does by waiting for random amounts of time before making each move.
So here goes (and please follow along in Xcode; all the code I show here comes from TTTGameSessionViewController.m). First, I enhance the Game Session screen to allow you to set an option to play the computer using a UISwitch control. The new screen looks like the one shown in Figure 10-6.
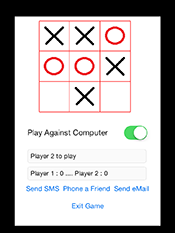
Figure 10-6: Playing against the computer in Tic-Tac-Toe.
To save this setting, I created a BOOL property called playComputer and an IBAction callback for the UISwitch that sets this variable. This method is called changeOpponent. The property declaration and synthesis of the property is shown here:
@property (nonatomic) BOOL playComputer; // In TTTGameSessionViewCOntroller.h
@synthesize playComputer; // In TTTGameSessionViewCOntroller.m
The code for the IBAction callback is
- (IBAction) changeOpponent:(id)sender{
NSLog(@"Value %d", changeOpponentSwitch.on);
playComputer = changeOpponentSwitch.on;
if(playComputer) [self scheduleComputersTurn];
}
This method does a couple of things. First, it sets the playComputer flag appropriately. It also starts the computer by calling scheduleComputersTurn.
Now let me show you how the computer does the playing, starting with scheduleComputersTurn:
- (void) scheduleComputersTurn {
int randomDelay = arc4random()%TTTDELAY;
[boardView disableInput];
NSLog(@" Delay = >%d< seconds", randomDelay);
[self performSelector:@selector(computerTakesATurn) withObject:nil
afterDelay:randomDelay];
}
What's going on in this code is pretty clear. You generate a random delay between zero and TTTDELAY seconds. (TTTDELAY is a #defined constant in TTTGameSessionViewController and is set to 10.)
You can find out more about arc4random and about generating random numbers in general by following the Generating Random Numbers on iOS link in the web resources page for this book at www.dummies.com/go/iosprogramminglinks.
The performSelector method (shown here) then makes computer play happen (by calling computerTakesATurn) in the background, and on a separate thread:
[self performSelector:@selector(computerTakesATurn) withObject:nil
afterDelay:randomDelay];
You might logically ask, “How can I test whether computerTakesATurn is really happening in the background on a separate thread?” After you’ve made a move and the computer is “thinking,” click the Exit button. You'll see that the screen is still responsive and that the game exits right away.
Just for grins, illustrate lack of responsiveness. Comment out the call to performSelector just shown and replace it with a call to sleep for the same random delay and a direct call to computerTakesATurn, as shown in the following code:
- (void) scheduleComputersTurn {
int randomDelay = arc4random()%TTTDELAY;
[boardView disableInput];
NSLog(@" Delay = >%d< seconds", randomDelay);
//[self performSelector:@selector(computerTakesATurn) withObject:nil
afterDelay:randomDelay];
sleep(randomDelay);
[self computerTakesATurn];
}
Now play the game again. You'll see that when the computer is thinking (this time in the foreground and on the main thread), the app is totally unresponsive.
Threading for responsiveness in iOS components
Certain iOS framework components automatically move long-lived operations to separate threads (so that you don’t have to do it). Take a look at the method helpWithWebView in TTTHelpViewController.m, as shown here:
- (IBAction) helpWithWebView: (id) sender{
NSString *wikpediaURLString = @"http://en.wikipedia.org/wiki/Tictactoe";
NSURL *wikepediaUrl = [NSURL URLWithString:wikpediaURLString];
NSURLRequest *requestObj = [NSURLRequest requestWithURL:wikepediaUrl];
[helpWebView loadRequest:requestObj];
}
loadRequest actually launches a separate thread to load the URL so that the application remains responsive while the page is being loaded. You can test this in the same way you tested game playing for responsiveness. Click Help in WebView (see Figure 10-7) and before the page loads, click Exit. The screen immediately exits.

Figure 10-7: Testing Help in WebView for responsiveness.
Other Performance Considerations for iOS Apps
Now that you’ve seen the main techniques and tools for improving performance, I’d like to present more considerations for performance specific to iOS apps.
- Reduce the amount of memory used by your app by creating only necessary objects, eliminating memory leaks, and using small images and resources. The amount of free memory available and the performance of your app are strongly correlated.
You can use Instruments to help quantify memory use as well as to find leaks.
- Reduce power consumption by optimizing your app’s use of the CPU, networking, location, and sensor services. Try not to use polling when you check for data or the status of an operation. Instead, set up a listener in a separate thread that will notify you when the data is available or when the status changes. Also turn off the sensors when they aren't needed.
You can use the Energy Diagnostics instrument to analyze energy use. For more on this instrument, check out the Energy Diagnostics link in the web resources for this chapter at www.dummies.com/go/iosprogramminglinks.
- Connect to external servers only when needed, transmit the smallest amount of data needed, and use compact data formats (JSON rather than XML). Transmit data in bursts.
- The main thread is where your app handles touch events and other user input. Creating separate threads to perform long-running or potentially unbounded tasks leaves the main thread free to continue processing user input.
- Modify your code to use floating-point math wherever possible. Hardware-based floating-point computations are typically much faster than their software-based fixed-point equivalents.
- Apple provides a service called iCloud to which users can back up the data of their apps. You can configure your app to back up to iCloud. Because backing up to iCloud is a time-, network- and energy-consuming operation, ensure that your app handles backing up to iCloud as efficiently as possible. You do so by placing temporary files in specific directories where temporary files are supposed to be written (that is,
<Application-Home>/Library/Cachesand<Application-Home>/tmp). Files in these locations aren't backed up to iCloud.I talk about handling files in Chapter 6.
You can find more information about improving the performance of iOS apps on the iOS developer website starting with the Basic iOS Performance Tips link in the web resources for this book at www.dummies.com/go/iosprogramminglinks.