Chapter 13
Harnessing iOS Device Capabilities
In This Chapter
![]() Incorporating e-mail, SMS, and telephony
Incorporating e-mail, SMS, and telephony
![]() Writing programs that use audio and video
Writing programs that use audio and video
![]() Discovering the capabilities on your device
Discovering the capabilities on your device
![]() Detecting orientation, acceleration, and rotation using sensors
Detecting orientation, acceleration, and rotation using sensors
![]() Analyzing the OO design of components used in this chapter
Analyzing the OO design of components used in this chapter
Mobile devices are powerful computing platforms and can accommodate a wide range of hardware capabilities. New iOS devices often have high-performance cameras, as well as a built-in GPS and one or more sensors.
Now that Apple has made the iOS platform developer friendly by opening up the platform to outside developers, you can design apps that can control a camera and take photographs, make phone calls and send text messages, and record and play audio and video. Also, your device can sense movement and rotation through its sensors. You can use these capabilities to detect orientation, acceleration, and rotation.
In this chapter, you find out how to incorporate these capabilities into your apps using Xcode. In some cases, you simply reuse functionality from the iOS framework or built-in apps on your system; in others, you can directly use iOS classes to create finer-grained control. I show you examples of both these strategies in this chapter.
Along the way, I point out quirks in the iOS framework, such as differences in how to handle various media (audio, video, and images). Also, dealing with sensors is complicated because not all devices have all sensors, and every sensor is different.
Finally, it's next to impossible to properly develop and test programs that use the capabilities described in this chapter on an emulator. You really need an actual iOS device. So buy, beg, borrow, or steal (well, okay, don't steal) a device if at all possible.
Integrating E-Mail, SMS, and the Phone into Your App
In this section, I show you how to write apps that send e-mail and text messages and make phone calls. As usual, I’ve integrated these capabilities into the Tic-Tac-Toe app.
Sending e-mail from your app
Suppose that after playing the Tic-Tac-Toe application, a user is excited about his high score and wants to send the score to a friend. From the Tic-Tac-Toe app, he selects Send eMail (see Figure 13-1).

Figure 13-1: Using e-mail, SMS, and telephony from Tic-Tac-Toe.
The user can then select names from the device's address. After he does so, an e-mail composition window appears on the device with the recipient’s address, subject, and the message already inserted, as shown in Figure 13-2. The user just selects Send, and off the e-mail goes.

Figure 13-2: E-mail composition window.
For this example to work properly, the user must already have an e-mail account set up on his device. If not, an iOS error message appears, as shown in Figure 13-3. When he touches OK, he returns the game session screen.

Figure 13-3: Error message if an e-mail account isn't already set up.
You can find the code for sending e-mail in the Game Session view controller (in the file TTTGameSessionViewController). In this section, you start by looking at the method sendScoresByEmailWithAddress. (If you need a refresher on selecting a contact from the Address Book, refer to Chapter 6.)
- (void) sendScoresByEmailWithAddress:(NSString *)address {
MFMailComposeViewController* mailController =
[[MFMailComposeViewController alloc] init];
mailController.mailComposeDelegate = self;
[mailController setToRecipients:[NSArray arrayWithObjects
:address,nil]];
[mailController setSubject:@"I rock at Tic-Tac-Toe!"];
NSString *scoreText = [[NSArray arrayWithObjects :firstPlayerName,
@":",
[NSNumber numberWithInt:scorePlayerOne],
@"....",
secondPlayerName,
@":",
[NSNumber numberWithInt:scorePlayerTwo],
nil]
componentsJoinedByString:@" "];
[mailController setMessageBody:scoreText isHTML:NO];
[self presentViewController :mailController
animated:YES
completion:nil];
}
- (IBAction) sendScoresByEmail:(id)sender {
MFMailComposeViewController* mailController =
[[MFMailComposeViewController alloc] init];
mailController .mailComposeDelegate = self;
[mailController setSubject:@"I rock at Tic-Tac-Toe!"];
NSString *scoreText = [[NSArray arrayWithObjects :firstPlayerName,
@":",
NSNumber numberWithInt:scorePlayerOne],
@"....",
secondPlayerName,
@":",
[NSNumber numberWithInt:scorePlayerTwo],
nil]
componentsJoinedByString:@" "];
[mailController setMessageBody:scoreText isHTML:NO];
[self presentViewController:mailController animated:YES
completion:nil];
}
The iOS framework has a class called MFMailComposeViewController that serves as a view controller for the mail composition window (refer to Figure 13-2). You create an instance of this view controller, set the subject and message body properties, and ask the view managed by the view controller to show itself using presentViewController. The user still must press Send to actually send the message.
Note one interesting line in this code, though:
mailController .mailComposeDelegate = self;
If you were to say, “Aha! The Game Session view controller is setting itself as a delegate to the mailController,” you'd be absolutely right. Setting itself up as a delegate allows the calling code, in this case Game Session view controller, to assign a callback method to be called after the e-mail is sent. Here is the code for this callback method, named didFinishWithResult:
- (void)mailComposeController:(MFMailComposeViewController*)controller
didFinishWithResult:(MFMailComposeResult)result
error:(NSError*)error;
{
if (result == MFMailComposeResultSent) {
NSLog(@"Email sent!");
}
[controller dismissViewControllerAnimated:YES completion:nil];
}
This method checks whether it was called with a successful result (MFMailComposeResultSent) and writes an appropriate log entry. It also dismisses the mail composition window and underlying view controller. You also can do more extensive error handling within this method, as you see in the SMS example in the next section.
 Using the preceding iOS components to send e-mail (and SMS messages, as I explain in the next section) requires you to include the following
 #import statement in your code:
#import <MessageUI/MessageUI.h>
Don’t forget to include this line; otherwise, your app won’t compile.
Sending an SMS from your app
Sending an SMS from your app (see Figure 13-4) is very similar to sending e-mail.

Figure 13-4: Sending SMS from the Tic-Tac-Toe app.
In other words, a view controller and a view for sending SMS are provided within the iOS framework. Here's how to create this view controller and view and use it to send a message:
- (IBAction) sendScoresBySMS:(id)sender {
MFMessageComposeViewController *smsController =
[[MFMessageComposeViewController alloc] init];
if([MFMessageComposeViewController canSendText]){
NSString *scoreText = [[NSArray arrayWithObjects:
@"I rock at Tic-Tac-Toe! ",
firstPlayerName,
@":",
[NSNumber numberWithInt:scorePlayerOne],
@"....",
secondPlayerName,
@":",
[NSNumber numberWithInt:scorePlayerTwo],
nil]
componentsJoinedByString:@" "];
smsController.body = scoreText;
smsController.messageComposeDelegate = self;
[self presentViewController:smsController
animated:YES
completion:nil];
}
}
As in the e-mail example in the previous section, a delegate is assigned as a callback method. This callback method is called when the message is sent, or if it couldn't be sent (for example, if the network timed out), or if the user cancelled the send. The code for the callback method is shown here:
- (void)messageComposeViewController:
(MFMessageComposeViewController*)smsController
didFinishWithResult:(MessageComposeResult)result{
switch (result){
case MessageComposeResultCancelled:
NSLog(@"SMS Message Cancelled");
break;
case MessageComposeResultFailed:
NSLog(@"SMS Message Failed");
break;
case MessageComposeResultSent:
NSLog(@"SMS Message Sent!");
break;
default:
break;
}
[smsController dismissViewControllerAnimated:YES completion:nil];
}
This method is very similar to the equivalent callback for sending e-mail. However, note that, in this method, I have tried to handle both success as well as the failure completion conditions.
Placing telephone calls from your app
Apple doesn’t yet provide a good way of using telephony functionality in your app. The only thing you can do is launch the telephone application from your code, with the telephone number previously entered, if required, as shown here:
- (IBAction) phoneAFriend:(id)sender {
UIApplication *applicationObject = [UIApplication sharedApplication];
NSURL *callURL = [NSURL URLWithString:@"telprompt://614-555-1234"];
if ([applicationObject canOpenURL:callURL]){
[[UIApplication sharedApplication] openURL:callURL];
} else {
NSLog(@"Phone call failed. Probably no phone on device");
}
}
In this code, I added a test that uses the canOpenURL method to check whether your device can actually make phone calls.
After the user completes the call, your application reappears. This approach isn't the greatest way to integrate telephone calling on your app, but it's the only convenient approach that's available from Apple. There are techniques to embed telephony into your app (to make it, for example, like the Skype app), but they're beyond the scope of this book.
Playing and Capturing Audio, Video, and Images
In this section, you find out how to use an audio player, a recorder, and a camera. Before beginning, however, it's important to know that iOS provides more than one framework with these capabilities, each at a different level of abstraction. When you're developing apps that use these capabilities, use the highest-level abstraction available that does what you need.
For example, if you just want to play movies, you can use the Media Player framework (with the class MPMoviePlayerController or the class MPMoviePlayerViewController). To easily record video, you can use the UIKit framework (specifically, the class UIImagePickerController).
For greater control over media, iOS provides the AV Foundation, which is one of several frameworks that you can use to play and create time-based audiovisual media. You can use the AV Foundation to examine, create, edit, and re-encode media files. You can also receive and process real-time input streams (for more details, see the link labeled The iOS AV Framework in the web resources for this book at www.dummies.com/go/iosprogramminglinks).
And then (as shown in Figure 13-5) there are the Core Audio, Core Media, and Core Animation frameworks, where you really get into the nitty-gritty of media encodings.

Figure 13-5: The Media frameworks in iOS.
Chapter 12 also has an example of the principle of using the highest level of abstraction. In that chapter, I use the UIWebView object when displaying a web page (instead of trying to render the page using the base UIView class).
I discuss playing and recording video and audio and working with images next. In these examples, I use a higher-level abstraction as well as a lower-level abstraction from the iOS framework for video; for audio, I use a lower-level abstraction that allows finer control; and for images, I use an abstraction that's somewhere in the middle of the available abstractions.
Playing and recording video
This section starts by showing you how to use a high-level abstraction, the MPMoviePlayerViewController class, to play video. Here is the code (in the Video view controller, from the file TTTVideoViewController.m):
- (IBAction) playVideo:(id)sender{
MPMoviePlayerViewController *moviePlayer =
[[MPMoviePlayerViewController alloc] initWithContentURL:movieURL];
[self presentMoviePlayerViewControllerAnimated:moviePlayer];
}
Simplicity itself! All you need is a URL that points to a movie file on the file system or to an Internet URL with which to instantiate the movie player. The player's UI handles stopping, starting, and so on (see Figure 13-6).

Figure 13-6: Movie playback using the built-in media player.
The member variable movieURL is set in the viewDidLoad method that's called after the display is initialized for this view controller (a sample movie is now saved in a resource file named Videos.bundle), as shown here:
- (void)viewDidLoad{
[super viewDidLoad];
// Do any additional setup after loading the view.
NSString* videoPath =
[[NSBundle mainBundle] pathForResource:@"Videos.bundle/SampleVideo"
ofType:@"MOV"];
movieURL = [NSURL fileURLWithPath:videoPath];
}
The following example shows you how to use an abstraction that's one level lower than the preceding one. Here, I demonstrate the recording of a video using the lower-level method recordVideo:
- (IBAction) recordVideo:(id)sender{
UIImagePickerController *imagePicker =
[[UIImagePickerController alloc] init];
imagePicker.sourceType = UIImagePickerControllerSourceTypeCamera;
imagePicker.mediaTypes =
[[NSArray alloc] initWithObjects: (NSString *) kUTTypeMovie, nil];
imagePicker.delegate = self;
[[UIApplication sharedApplication] setStatusBarHidden:YES];
[self presentViewController:imagePicker animated:YES completion:nil];
}
When this method is called, a screen with a camera interface appears (see Figure 13-7). Using this screen, video recording can be started and stopped. When video recording is done, this screen transfers control back to the calling view controller.
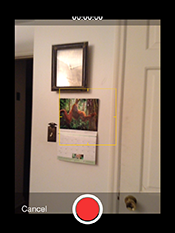
Figure 13-7: Recording video using the camera.
The following two methods are the callback methods called by the Image picker (notice how the Video view controller registers itself as a delegate with the ImagePicker object):
imagePickerControllerDidCancelis called when the recording is cancelled. It simply dismisses the picker and shows the iOS status bar again.- (void) imagePickerControllerDidCancel: (UIImagePickerController *) picker {
[[UIApplication sharedApplication] setStatusBarHidden:NO];
[picker dismissViewControllerAnimated:YES completion:nil];
}didFinishPickingMediaWithInfostarts by showing the iOS status bar again and dismisses the picker. It then saves the recorded video in the camera roll of the device. Finally, this method sets the member variablemovieURLto point to this new video, so when you select Play Video again, the newly recorded movie plays.- (void) imagePickerController:(UIImagePickerController *) picker
didFinishPickingMediaWithInfo :(NSDictionary *) results {
NSURL *moviePathURL =
[results objectForKey:UIImagePickerControllerMediaURL];
NSString *moviePath = [moviePathURL path];
movieURL = moviePathURL;
//Save in camera roll
if (UIVideoAtPathIsCompatibleWithSavedPhotosAlbum (moviePath)){
UISaveVideoAtPathToSavedPhotosAlbum (moviePath, nil, nil, nil);
}
[[UIApplication sharedApplication] setStatusBarHidden:NO];
[picker dismissViewControllerAnimated:YES completion:nil];
}
Playing and recording audio
Now it's time to deal with audio, using classes from the AV framework (which is yet one more level down). You can find all this code in the Audio view controller (TTTAudioViewController.h and TTTAudioViewController.m) and follow along. Figure 13-8 shows this view controller's screens.
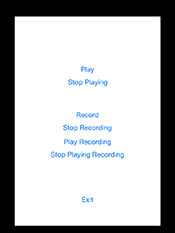
Figure 13-8: Working with audio in Tic-Tac-Toe.
In this example, you go top down, starting with the ViewDidLoad method where member variables are initialized and an audio-visual session starts:
- (void)viewDidLoad{
[super viewDidLoad];
// Do any additional setup after loading the view.
localRecorder = nil;
localPlayer = nil;
localRecordPlayer = nil;
playFileURL = nil;
recordFileURL = nil;
[[AVAudioSession sharedInstance]
setCategory:AVAudioSessionCategoryPlayAndRecord error:nil];
}
Here is an example of playing an audio file within an app:
- (IBAction) play:(id)sender{
if (playFileURL == nil){
NSString* audioPath =
[[NSBundle mainBundle]
pathForResource:@"Audio.bundle/SampleAudio-Cut"
ofType:@"mp3"];
playFileURL = [NSURL fileURLWithPath:audioPath];
}
localPlayer =
[[AVAudioPlayer alloc] initWithContentsOfURL:playFileURL error:nil];
[localPlayer setDelegate:self];
[localPlayer play];
}
As with the ImagePicker example in the previous section, the Audio view controller has registered itself as a delegate. Therefore, audioPlayerDid-FinishPlaying is called when the player finishes with the clip:
- (void) audioPlayerDidFinishPlaying :(AVAudioPlayer *)player
successfully:(BOOL)flag{
NSLog(@"Done playing!");
}
Finally, here is how the player is stopped:
- (IBAction) stopPlaying:(id)sender{
[localPlayer stop];
}
As you can see, the app doesn't just rely on the user interface of a built-in audio app; it has finer-grain control over the player.
Working with images
The last media type covered here demonstrates how you work with images, at an abstraction level similar to working with video recordings. As always, feel free to follow along in the Image view controller (files named TTTImage-ViewController.h and TTTImageViewController.m). Figure 13-9 shows this view controller displaying a sample image (BookFront.png in the resource file Images.bundle).

Figure 13-9: The Image view controller displaying a sample image.
Again, I start by showing you how variables are initialized in the ViewDidLoad method (specifically, note the initialization of the member variable localImage).
- (void)viewDidLoad{
[super viewDidLoad];
// Do any additional setup after loading the view.
NSString* imagePath =
[[NSBundle mainBundle] pathForResource:@"Images.bundle/BookFront"
ofType:@"png"];
localImage = [[UIImage alloc] initWithContentsOfFile:imagePath];
}
Here you see how images are shown:
- (IBAction) showImage:(id)sender{
imageView.image = localImage;
[imageView setNeedsDisplay];
}
Finally, here is the takeImage method that contains code for taking the picture:
- (IBAction) takeImage:(id)sender{
UIImagePickerController *imagePicker =
[[UIImagePickerController alloc] init];
imagePicker.sourceType = UIImagePickerControllerSourceTypeCamera;
imagePicker.mediaTypes =
[[NSArray alloc] initWithObjects: (NSString *) kUTTypeImage, nil];
imagePicker.delegate = self;
[[UIApplication sharedApplication] setStatusBarHidden:YES];
[self presentViewController:imagePicker animated:YES completion:nil];
}
The code for taking a still image is almost identical to that for recording a video. The only difference is that the mediaTypes property of the imagePicker object is set to kUTTypeImage (whereas it's set to kUTTypeMovie when recording a video). By now, you're probably boringly familiar with the use of the view controller as a delegate object to imagePicker and with the purpose of the following two methods: imagePickerControllerDidCancel and didFinishPickingMediaWithInfo. This imagePickerControllerDidCancel is called when the user cancels the operation:
- (void) imagePickerControllerDidCancel:(UIImagePickerController *) picker {
[[UIApplication sharedApplication] setStatusBarHidden:NO];
[picker dismissViewControllerAnimated:YES completion:nil];
}
Figure 13-10 shows the camera while taking a still image.

Figure 13-10: The camera while taking a still picture.
As you can see, didFinishPickingMediaWithInfo is called after the picture is taken. Here, I set the newly taken image into the image view of the Image view controller (see Figure 13-11).
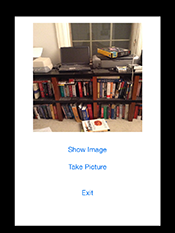
Figure 13-11: Image embedded in an Image view.
- (void) imagePickerController: (UIImagePickerController *) picker
didFinishPickingMediaWithInfo: (NSDictionary *) results {
localImage =
(UIImage *)[results objectForKey:UIImagePickerControllerOriginalImage];
imageView.image = localImage;
[imageView setNeedsDisplay];
[[UIApplication sharedApplication] setStatusBarHidden:NO];
[picker dismissViewControllerAnimated:YES completion:nil];
}
One final comment before I close this section. The code for using the video recorder within an app and the code for taking images as well as the code for sending e-mail and SMS are very similar in structure. In both cases, an object of a task-specific view controller is instantiated by the view controller currently running. In the e-mail case, it's the MFMailComposeViewController; in the SMS case, it's the MFMessageComposeViewController; and in the video recording and image capture cases, it's the UIImagePickerController. The currently running view controller then sets itself as a delegate within the task-specific view controller. Finally, the task-specific view controller is presented, and the current view controller exits.
When the task-specific view controller (that is, the instance of the UIImagePickerController, the MFMailComposeViewController, or the MFMessageComposeViewController) exits, the delegate method of the original view controller is called, either to process the data returned by the recorder or the camera or to deal with errors and cancellations.
Seeing the Capabilities Available on Your Device
It's often necessary for the app to query whether certain capabilities are available on the device — for example, to see whether there's network connectivity and, if so, what kind. You also may want your app to check whether a camera is on the device and whether the camera allows both video and still pictures. In general, it's good programming practice to test for such device capabilities before trying to use them. These tests help prevent your code from crashing or hanging and, in general, improve the user's experience.
Next, I show you how to do such tests. You can find this code in the listCapabilities method in the Sensors view controller (relevant files are TTTSensorsViewController.h and the corresponding TTTSensorsViewController.m file), so as always, feel free to follow along.
Testing for network availability
First, I cover how you test for the network. Before you can write the code to do the actual test, you must put two additional files (Reachability.h and Reachability.m) into your project.
Apple makes these files available for download from the iOS Developer site at the Reachability Sample Code link in the web resources for this book at www.dummies.com/go/iosprogramminglinks. You can also find these files in the Tic-Tac-Toe project, but they're current only as of the date this book is published.
After you download the files into your project, you need to include Reachability.h in all the appropriate files (see TTTSensorView
Controller.h for an example). You're then ready to use the functionality provided in Reachability.m, which includes being able to check whether a specific host is reachable, to check on available networks, and to get periodic notifications as the status networks changes.
I show you next how to figure out whether a network is reachable and, if so, which one — Wi-Fi or a wide area network (WAN, that is, a network based on a wireless service). To follow along, look at the method listCapabilities found in the file TTTSensorsViewController.h:
- (IBAction) listCapabilities:(id)sender{
// Testing for the network
NSMutableString *textVal = [[NSMutableString alloc] init];
NSString *networkReachability=nil;
Reachability *reachFacade =
[Reachability reachabilityForInternetConnection];
NetworkStatus status = [reachFacade currentReachabilityStatus];
if (status==NotReachable) networkReachability = @"No network
";
else if (status==ReachableViaWiFi)
networkReachability = @"Wifi available
";
else if (status==ReachableViaWWAN)
networkReachability = @"WAN available
";
[textVal appendString:networkReachability];
...
}
You start by calling a Factory method named reachabilityForInternetConnection of the Reachability class to get an instance ReachFacade of type Reachability. The reachFacade object then has a method currentReachabilityStatus that can be used to check for available connections.
This method returns the best available connection. A device might have both a WAN and a Wi-Fi connection; however, there's no method to see whether both are available.
Testing for sound and camera capabilities
The method listCapabilities also has the code for testing for sound playing, sound recording, and a camera.
Here's the code for testing the camera for its capabilities:
- (IBAction) listCapabilities:(id)sender{
...
BOOL cameraAvailable =
[UIImagePickerController isSourceTypeAvailable:UIImagePickerControllerSourceTypeCamera];
if (cameraAvailable == YES)
[textVal appendString:@"Camera is available
"];
NSArray *cameraTypes = [UIImagePickerController
availableMediaTypesForSourceType:
UIImagePickerControllerSourceTypeCamera];
int count = [cameraTypes count];
for (int i = 0; i < count; i++) {
NSString *cameraCapability = [cameraTypes objectAtIndex:i];
if (CFStringCompare ((CFStringRef) cameraCapability,
kUTTypeMovie,
0))
[textVal appendString:@"Video capability is available
"];
if (CFStringCompare ((CFStringRef) cameraCapability,
kUTTypeImage,
0))
[textVal appendString:@"Still capability is available
"];
}
...
[listOfSensorsView setText:textVal];
...
}
The much simpler code for testing audio capabilities is
- (IBAction) listCapabilities:(id)sender{
...
AVAudioSession *audioSession = [AVAudioSession sharedInstance];
if (audioSession.inputAvailable == YES)
[textVal appendString:@"Audio input device is available
"];
...
}
...
)
Figure 13-12 shows how the Sensors view controller appears after it discovers all the capabilities on the device.

Figure 13-12: Displaying the capabilities of an iOS device.
Declaring an app's needs in the .plist file
In addition to knowing how to check for capabilities on the device, you need to know how an app declares the capabilities that it needs. You do so in the app's Info.plist file. Every app needs such a file. For the Tic-Tac-Toe app, the .plist file is Tic-Tac-Toe-Storyboard-Info.plist. Take a look at the .plist file from Tic-Tac-Toe, and you'll see that Tic-Tac-Toe requires Wi-Fi (see Figure 13-13).

Figure 13-13: Specifying app requirements in the Info.plist file.
You can also see that I specified that Tic-Tac-Toe run only in Portrait mode. When this is the only mode set, the app will stay in Portrait mode even when you turn the device sideways or upside down.
For more information on the Info.plist file, go to www.dummies.com/go/iosprogramminglinks and follow the link labeled The Property List (Info.plist) File.
Bringing in the Outside World with Sensors
You've arrived at the penultimate section of this chapter. In this section, I describe one more set of capabilities on your device: its built-in sensors. Just like the GPS senses location (refer to Chapter 12), other sensors on the device are aware of phenomena taking place in the outside world (for example, temperature, the pull of gravity, orientation, magnetic fields, ambient light, and sound). These sensors can feed these sensed values to your app. Your app can then use these values to provide cool functionality. For example, by sensing acceleration as well as twisting, your app can make the phone a device for monitoring your golf swing.
Sensors in the iOS framework operate at two layers of abstraction. At the lowest level of abstraction are the base sensors, such as the acceleration sensor (or accelerometer) and the temperature sensor, that return the actual sensed values. The accelerometer returns the raw values of acceleration in three dimensions. At the next level of abstraction are virtual sensors that interpret raw sensor values returned by the other sensors to provide a higher-order value. An example of such a sensor is the orientation sensor, which interprets the raw values of acceleration in the three dimensions to figure out orientation changes.
Sensing orientation
Because the acceleration sensor interprets the raw values of acceleration in three dimensions to figure out orientation changes, the orientation sensor is considered a high-order sensor.
As with all sensors, the orientation sensor must be started from your code before it will return any values. Once it's running, the orientation sensor starts sending changes in orientation to your app. To help you understand how this happens, I start with the ViewDidLoad method of the Sensor view controller (see files named TTTSensorsViewController.h and TTTSensorsViewController.m). Here is the relevant extract from this method:
- (void)viewDidLoad{
...
// start listening for orientation changes
[[NSNotificationCenter defaultCenter]
addObserver:self
selector:@selector(orientationChanged:)
name:@"UIDeviceOrientationDidChangeNotification"
object:nil];
[[UIDevice currentDevice] beginGeneratingDeviceOrientationNotifications];
...
}
In the preceding code, the Sensor view controller adds itself as an observer to the device’s notification manager and registers to observe orientation change events. Then the method call to [[UIDevice currentDevice] beginGeneratingDeviceOrientationNotifications] starts the process of monitoring the orientation.
Orientation change events are caught and saved by the orientationChangedmethod shown here:
- (void) orientationChanged: (NSNotification *) orientationNotification {
deviceOrientation = [[UIDevice currentDevice] orientation];
}
Finally, getOrientation can be used to read the saved orientation and display it appropriately. Here's the code for getOrientation:
- (IBAction) getOrientation:(id)sender{
NSString *orientationString=nil;
switch (deviceOrientation){
case UIDeviceOrientationUnknown:
orientationString = @"Unknown";
break;
case UIDeviceOrientationPortrait:
orientationString = @"Portrait";
break;
case UIDeviceOrientationPortraitUpsideDown:
orientationString = @"Portrait Upside Down";
break;
case UIDeviceOrientationLandscapeLeft:
orientationString = @"Landscape Left";
break;
case UIDeviceOrientationLandscapeRight:
orientationString = @"Landscape Right";
break;
case UIDeviceOrientationFaceUp:
orientationString = @"Face Up";
break;
case UIDeviceOrientationFaceDown:
orientationString = @"Face Down";
break;
default:
orientationString = @"Unknown";
}
[orientationTextView setText:orientationString];
}
getOrientation is called when the button labeled Get Orientation is selected. If you set the device on a table and keep it still, bring up the Sensor view controller, and select Get Orientation, the orientation is shown as Unknown. The correct orientation is shown only when you move the device after the Sensor view controller screen appears.
Sensing the accelerometer, gyroscope, and magnetometer
An iOS device has several sensors. However, Apple provides a convenient interface to access only three of them — the accelerometer, the gyroscope, and the magnetometer. The light sensor, for example, has only an internal, undocumented programming interface, which means that (for some reason) Apple discourages apps that use the light sensor.
In any case, in this section, I show you how to use the three with well-documented interfaces — again, the accelerometer, the gyroscope, and the magnetometer.
As with the orientation sensor, the process for these sensors begins by starting and initializing a listener that (you guessed it) listens for sensor events. Here is the code from the ViewDidLoad method of the Sensors view controller:
- (void)viewDidLoad{
...
accelerationTextView.enabled = NO;
gyroscopeTextView.enabled = NO;
magnetometerTextView.enabled = NO;
...
// Set up the motion manager
self->motionManager = [[CMMotionManager alloc] init];
self->motionManager.accelerometerUpdateInterval = 1;
self->motionManager.gyroUpdateInterval = 1;
self->motionManager. magnetometerUpdateInterval = 1;
...
}
The object that gives you access to sensor events is an instance of the CMMotionManager class. You need to create one, and only one, instance of this class (that is, you must treat it like a Singleton, even though it isn’t). Then you set properties like the update interval for each of the sensors.
Next, you start the monitoring using the methods startAccelerometer-UpdatesToQueue, startGyroUpdatesToQueue, and startMagnetometer-UpdatesToQueue, as shown in the method startMonitoringSensors (which is called when you press the Start Monitoring button):
- (IBAction) startMonitoringSensors:(id)sender{
[self->motionManager
startAccelerometerUpdatesToQueue:
[NSOperationQueue currentQueue]
withHandler:^(CMAccelerometerData *accelerometerData,
NSError *error) {
[self
handleAccelerationUpdates:accelerometerData.acceleration];
}
];
[self->motionManager
startGyroUpdatesToQueue:
[NSOperationQueue currentQueue]
withHandler:^(CMGyroData *gyroscopeData, NSError *error) {
[self handleGyroUpdates:gyroscopeData.rotationRate];
}
];
[self->motionManager
startMagnetometerUpdatesToQueue:
[NSOperationQueue currentQueue]
withHandler:^(CMMagnetometerData *magnetometerData,
NSError *error) {
[self handleMagnetometerUpdates:
magnetometerData.magneticField];
}
];
}
Each of these methods is called with an inline handler block using the with
Handler construct. These inline handler blocks call the handle Acceleration Updates, handleGyroUpdates, and handleMagnetometerUpdates. These methods are as follows:
- (void) handleAccelerationUpdates: (CMAcceleration) accelerationData {
NSLog(@"Acceleration.x >%f<
", accelerationData.x);
NSLog(@"Acceleration.y >%f<
", accelerationData.y);
NSLog(@"Acceleration.z >%f<
", accelerationData.z);
if (((accelerationData.x > 1.0)||(accelerationData.x < -1.0))||
((accelerationData.y > 1.0)||(accelerationData.y < -1.0))||
((accelerationData.z > 1.0)||(accelerationData.z < -1.0))){
[accelerationTextView setText:@"I’M GOING FAST"];
}else{
[accelerationTextView setText:@"TOO SLOW"];
}
}
- (void) handleGyroUpdates: (CMRotationRate) gyroRotationRate {
NSLog(@"Rotation x >%f<
", gyroRotationRate.x);
NSLog(@"Rotation y >%f<
", gyroRotationRate.y);
NSLog(@"Rotation z >%f<
", gyroRotationRate.z);
if (((gyroRotationRate.x > 0.5)||(gyroRotationRate.x < -0.5))||
((gyroRotationRate.y > 0.5)||(gyroRotationRate.y < -0.5))||
((gyroRotationRate.z > 0.5)||(gyroRotationRate.z < -0.5))){
[gyroscopeTextView setText:@"WHEEE!"];
}else{
[gyroscopeTextView setText:@"SPIN ME FASTER!"];
}
}
- (void) handleMagnetometerUpdates: (CMMagneticField) magneticField {
NSLog(@"Magnetic field x >%f<
", magneticField.x);
NSLog(@"Magnetic field y >%f<
", magneticField.y);
NSLog(@"Magnetic field z >%f<
", magneticField.z);
static float savedX=0.0, savedY=0.0, savedZ=0.0;
float change = pow((magneticField.x - savedX), 2.0) +
pow((magneticField.y - savedY), 2.0) +
pow((magneticField.z - savedZ), 2.0);
NSLog(@"Magnetic field change >%f<
", change);
if (change > 3000.0){
savedX = magneticField.x;
savedY = magneticField.y;
savedZ = magneticField.z;
[magnetometerTextView setText:@"I SENSE SOMETHING!"];
}else{
[magnetometerTextView setText:@"ALL CLEAR!"];
}
}
These methods log the raw data (see Figure 13-14).
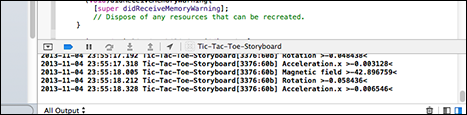
Figure 13-14: Raw sensor readings displayed by use of NSLog.
The preceding sensor methods also interpret the raw sensor values to generate the view shown in Figure 13-15. That is, the sensors use heuristics to provide meaningful insights:
- The accelerometer measures acceleration in g-forces, where 1 g-force is equivalent to the pull of the Earth’s gravity.
If the accelerometer senses movement greater than the Earth’s gravitational pull in any direction, it excitedly displays the message, I’M GOING FAST! Otherwise, it displays TOO SLOW.
- The gyroscope measures rotation of the device’s three axes in radians per second (1 radian per second means about a sixth of a rotation every second). Therefore, if it senses most any rotation, it prints WHEE!
- In the magnetometer code, I use a distance heuristic to sense a large change in the magnetic field.
If such a change occurs, the app shows I SENSE SOMETHING!
If nothing changes for one interval, it goes back to thinking the coast is clear.

Figure 13-15: The Sensor view controller screen showing interpreted sensor values.
Examining OO and Other Design Principles in this Chapter
This chapter includes several OO techniques and design principles used in the frameworks, as well as related examples. Also some tradeoffs were made in the frameworks and in the Tic-Tac-Toe app. I discuss these techniques, design principles, and tradeoffs in this section.
Seeing uses of loose coupling
Using telephony in the app (see the method phoneAFriend in TTTGameSessionViewController.m) is a clear example of loose coupling. The only information that must be provided to the telephone application is a URL. This is considered loose-coupling because your app doesn't need to know anything about the telephone application beyond this URL.
Incidentally, loose coupling doesn't apply only to an external component. In the playVideo method of the Video view controller (TTTVideoViewController.m), you can see a similar loosely coupled use of the media player. You can see similar loose coupling in the use of UIWebView in the method helpWithWebView in the Help view controller (TTTHelpViewController.m — see Chapter 12 for more on this topic).
Using delegation for customized processing
Several of the components previously shown utilize the delegation design technique. In fact, you’d be hard put to find a place where delegation is not used. Here are places where you see clear use of delegation:
- In
sendScoresbySMSandsendScoresByEmail(both inTTTGameSessionViewController.m), the invoking view controller (Game Session) sets itself as a delegate to the invoked view controller (the e-mail composer or the message composer). When the invoked view controller (the e-mail or message composer) finishes, the callbackdidFinishWithResultis the delegate method called in order to handle any cleanup tasks after the e-mail or SMS is sent or cancelled. - In both the
playandrecordmethods of the Audio view controller (TTTAudioViewController.m), the invoking view controller is set as a delegate to the audio player and the audio recorder. The delegate methods in this case areaudioPlayerDidFinishPlayingandaudioRecorderDidFinishRecording. - In the
takeImagemethod of the Image view controller (TTTImageViewController.m) and therecordVideomethod of the Video view controller (TTTVideoViewController.m), the invoking view controller is set as a delegate to theimagePickerobject. The delegate methods for both dealing with still images and video recordings areimagePickerControllerDidCancelanddidFinishPickingMediaWithInfo. - There are several places where delegation is used in the sensor processing examples:
- The
viewDidLoadmethod of the Sensor view controller. It registers itself as a delegate to the app's notification center and asks to be notified of changes in orientation.The delegate callback method
orientationChangeddeals with these events.
- The
- The method
startMonitoringSensorsshows how the base sensors — the accelerometer, gyroscope, and magnetometer — define inline delegate functions to handle the events they generate that are registered withmotionManager, an instance of theCMMotionManagerclass.
Using design patterns
This chapter includes several examples of design patterns being used, mostly in the functionality provided by the iOS framework. Probably the most-used pattern is Singleton. It's often used in conjunction with the Factory Method pattern, as shown in the following examples:
- The following line of code is in the
viewDidLoadmethod of the Audio view controller (see fileTTTAudioViewController.m):[[AVAudioSession sharedInstance]
setCategory:AVAudioSessionCategoryPlayAndRecord error:nil];Here, the method
sharedInstanceis a Factory Method used to return the Singleton instance of theAVAudioSession. - In the
viewDidLoadmethod of the Sensors view controller (TTTSensors-ViewController.m), you see the following:[[UIDevice currentDevice] beginGeneratingDeviceOrientationNotifications];
Here also,
currentDeviceis a Factory Method that returns the Singleton object that represents the device. - Singletons may also be implicit, in that you're asked to treat certain classes as classes for generating Singleton objects. In the previous
viewDidLoadmethod, you saw the instantiation of amotionManager. Although it looks like a normal creation of an object from a class, Apple’s Developer site asks that you create only one instance of the object to ensure that the program works correctly (refer to the CoreMotion link in the web resources for this chapter at www.dummies.com/go/iosprogramminglinks).
In all these cases, an object that provides an interface to access a set of services is being returned. In some cases (such as with the motionManager), the system provides these services. The Singleton class is then acting as a Façade for these services by providing an easy-to-use interface and hiding the gory details underneath.
Finally, you also encounter the Observer pattern in the Sensors view controller. Here are the lines in the startMonitoringSensors method:
[self->motionManager
startAccelerometerUpdatesToQueue:
[NSOperationQueue currentQueue]
withHandler:^(CMAccelerometerData *accelerometerData, NSError *error){
[self handleAccelerationUpdates:accelerometerData.acceleration];
}
];
The inline handler attaches a listener for a particular event (the accelerometer change event) to the motionManager object.
Design tradeoffs in Tic-Tac-Toe
In this chapter, I made one design tradeoff in Tic-Tac-Toe. I also found a tradeoff in the iOS framework.
I had intended to encapsulate all the UI for the Game Session view controller (see TTTGameSessionViewController.m) inside GameView. Had I done so, I would have needed to make GameView the delegate for the mail, SMS, and video and camera composers and to implement all the callbacks there. This seemed to be too complicated, so, as a design purity versus effort tradeoff, I left the implementations for sending SMS, e-mail, and telephony in the Game Session view controller. I also left this controller as the delegate for the SMS and e-mail composers.
Take a look at a small design tradeoff in the iOS framework. Notice that the UIImagePickerController class handles both the video and the still camera. My guess is that because the camera has both video and still capabilities, the iOS framework designers thought that the software interface should be the same.
However, in my opinion, this approach overloads the UIImagePickerController class. Although initiating the video and the still image is similar, handling playback of the video after it's taken differs from the way the still image is handled. For the video, playback involves using the media player. The still image, on the other hand, is embedded in a view (a UIImageView). Should the iOS framework provide two separate pickers for stills and videos? I think so.