The jQuery DataTables plugin provides a wide variety of extensions that can enhance the functionality of the plugin dramatically.
Note
To see a list of all available extensions for the DatatTables library, see https://datatables.net/extensions/index
The ColReorder extension allows users to reorder table columns by clicking and dragging the column header to the location they prefer. To enable column reordering for your DataTables HTML table, complete the following steps:
- Open the
_Layout.cshtmlfile and add a reference to thedataTables.colReorder.cssfile:<link rel="stylesheet" type="text/css" href="https://cdn.datatables.net /colreorder/1.3.1/css/colReorder.bootstrap.min.css" />
- Open the view
.cshtmlfile and add a reference to theDataTablescolReorderextension JavaScript file:<script type="text/javascript" charset="utf8" src="//cdn.datatables.net /colreorder/1.3.1/js/dataTables.colReorder.min.js"></script>
- Lastly, using jQuery, add an event handler to initialize the
DataTablesplugin and the colReorder extension after the page has loaded:$('#customer-table').DataTable({ colReorder: true }); - When navigating to the page, you should now be able to drag and reorder the columns in the table. A blue line will be displayed when dragging a column, as illustrated in the following screenshot:

Tip
Notice that all the style sheets and JavaScript files for the extensions are referenced from the
DataTablesCDN. The CDN is available at cdn.datatables.net
The ColVis extension adds a button to the top of a DataTable, which, when clicked on, displays a list of column names in the table with a checkbox next to it. The user can then deselect the column names they do not wish to see in the grid.
To enable the column visibility extension, perform the following steps:
- Open the
_Layout.cshtmlfile and add a reference to the Bootstrap 4-specific stylesheet of theDataTablesbuttons extensions:<link rel="stylesheet" type="text/css" href="https://cdn.datatables.net /buttons/1.1.2/css/buttons.bootstrap4.min.css" />
- Open the
view.cshtmlfile and add a reference to theDataTablesbuttons extension, the Bootstrap 4-specific buttons extension, as well as the buttons ColVis extension:<script type="text/javascript" src="//cdn.datatables.net/buttons/1.1.2/js/dataTables.buttons.min.js"> </script> <script type="text/javascript" src="//cdn.datatables.net/buttons/1.1.2/js/buttons.bootstrap4.min.js"> </script> <script type="text/javascript" src="//cdn.datatables.net/buttons/1.1.2/js/buttons.colVis.min.js"> </script>
- Lastly, using jQuery, add an event handler to initialize the
DataTablesplugin and the ColVis extension after the page has loaded:$('#customer-table').DataTable({ dom: 'Bfrtip', buttons: [ 'colvis' ] });
The code in the last step uses the dom parameter in order to specify where the control element is placed in the DOM. For buttons, use the letter B. When navigating to the view, you should see a button next to the search box with which you can show or hide columns in the table, as shown in the following screenshot:

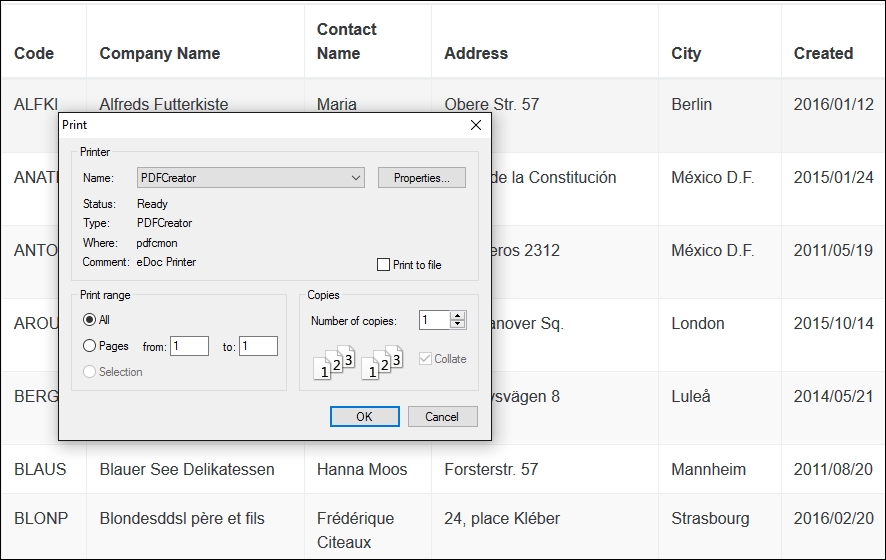
Using the same DataTables extension, you can add a toolbar to the table with which the user can copy the data inside the table to the clipboard or present a print view of the data inside the table. It is a really simple way to give your users the ability to export or print their data.
To enable the copy and print functionality for the tables, perform the following steps:
- Open the
_Layout.cshtmlfile and add a reference to the Bootstrap 4-specific stylesheet of theDataTablesbuttons extensions:<link rel="stylesheet" type="text/css" href="https://cdn.datatables.net /buttons/1.1.2/css/buttons.bootstrap4.min.css" />
- Next, open the view and add a reference to the
DataTablesButtons extension, the Bootstrap 4-specific buttons extension, the HTML 5 buttons extension, as well as the print button extension:<script type="text/javascript" src="//cdn.datatables.net/buttons/1.1.2/js/dataTables.buttons.min.js"> </script> <script type="text/javascript" src="//cdn.datatables.net/buttons/1.1.2/js/buttons.bootstrap4.min.js"> </script> <script type="text/javascript" src="//cdn.datatables.net/buttons/1.1.2/js/buttons.html5.min.js"> </script> <script type="text/javascript" src="//cdn.datatables.net/buttons/1.1.2/js/buttons.print.min.js"> </script>
- Lastly, using jQuery, add an event handler to initialize the DataTable plugin and add the print and copy buttons to it after the page has loaded:
        $(document).ready(function () {
            $('#customer-table').DataTable({
                dom: 'Bfrtip',
                buttons: [
                   'copy', 'print'
                ]
            });
        });
When opening the view with the DataTable, you should see two buttons above the DataTable, as shown in the following screenshot:

When the user clicks on the Copy button, they should see a message informing them that the number of rows in the table has been copied to their clipboard:

If the user clicks on the Print button, a new browser window will open with a printer friendly version of the data inside the DataTable and the print dialog will be displayed: