- Scaling microservices to bigger development teams
- Scaling microservices to meet growing demand
- Understanding basic security concerns
- Strategies for converting a monolith to microservices
- Tips for building with microservices on a budget
We’ve spent the whole book working towards a production microservices application, so where to now? It’s time to see what microservices can offer us in the future.
Throughout this book, we’ve taken many shortcuts that helped us get started quickly and cheaply with microservices. These shortcuts make it simpler to learn microservices and to bootstrap our fledgling application. Even though FlixTube is a simple application built with a relatively simple process, we are still using microservices, and this is an architecture that provides us many pathways towards future scalability.
In this chapter, we discuss how to manage a growing microservices application. How do we scale up to a bigger development team? How do we scale up to meet growing customer demand? We also need to talk about basic security concerns and how they relate to microservices. Then, we’ll briefly touch on what it takes to convert an existing monolith to microservices.
We’ll finish the book by reiterating the techniques that can make bootstrapping a microservices application simpler, easier, and cheaper. This is practical advice that can help a small team, a startup, or a solo developer kickstart their own microservices application while still having a future full of possibilities for scalability!
11.1 Our future is scalable
Microservices offer us numerous pathways to achieve a scalable product. In this chapter, we will look at the kinds of things we must do moving forward to scale our application and workflow so that we can grow our development team around our growing application. We’ll follow up by looking at how to scale the performance of our application for greater capacity and throughput.
You probably don’t need any of these techniques yet; you only need these when your application has grown big enough to expand your development team. Or when your customer-base has increased and you need to scale up for better performance.
We are moving into very advanced territory here, and this chapter mostly gives you a taste of the ways in which you can scale your application in the future. This is really just the tip of the iceberg; but it’s enough to give you an awareness of the path ahead.
The problems we’ll address in this chapter are good problems to have. If you come to the point where you must scale up, that’s a good thing. It means your business is successful. It means you have a growing customer base. At this point, you can be really happy you chose a microservices architecture because it makes scaling up much more straightforward.
This chapter isn’t intended to be hands on. Think of it as some insight as to where your microservices journey might go in the future. That said, many of these techniques are fairly easy to try, but in doing so, you might make a mistake and inadvertently break your application cluster.
Don’t try any of this on your production infrastructure that existing staff or customers depend upon. But do feel free to go back to chapter 9 and follow the instructions there to boot a new production instance of FlixTube. You can use that for experimentation. That gives you a risk-free way to try out anything in this chapter that sounds interesting.
11.2 Scaling the development process
First, let’s tackle scaling our development process. In this book, so far, we have experienced the development process and production workflow from the point of view of a single developer working on a small microservices application. Let’s now raise our focus up to the level of the team. The simple process we have thus far used can actually work to a certain extent for a small team:
-
Developers working on a single codebase, writing and testing code on their development workstations
-
Developers pushing code changes to the hosted code repository, which triggers the continuous delivery (CD) pipeline to deploy the application to production
This simple process is a great way to get started and move quickly when building a new application. But we can only take it so far. Our fledgling development process suffers from the following problems:
-
We don’t want code going directly from developers to customers. We’d like our developers to be able to test their code in a production-like environment, but we want that “work in progress” to be buffered from customers to ensure that it works well before inflicting it on them.
-
We don’t want developers interfering with each other. As we grow our development team, developers working in a single code base will be treading on each other’s toes more frequently (for example, causing merge conflicts and breaking the build).
-
Our single code repository and CD pipeline is not scalable. To manage the complexity of our growing application, we must break it apart so that even though the application might grow extremely complex, each individual microservice remains small, simple, and manageable.
To build a scalable development process, expand to multiple teams, and make the most of microservices, we must do some restructuring.
11.2.1 Multiple teams
As we evolve our application, we’ll be adding more microservices to the mix to implement features and expand our application’s capabilities. As the workload grows, we’ll also have to grow the team to handle it. At some point, when our single team grows too large, we’ll need to split it into multiple teams. This keeps our teams small and allows us to benefit from the communication and organizational advantages that come from small teams.

Figure 11.1 When starting a new application, it should be small enough that one team can manage all microservices by themselves.
Applications based on microservices provide natural seams that can be used to carve up the application for development by multiple teams. Figure 11.1 shows what our team structure looks like in the early stages of development, when we are using our simple development process.

Figure 11.2 As we grow our application, the development can be split so that separate teams are managing independent microservices or groups of microservices.
Figure 11.2 shows what our structure might look like after we have grown and split into separate teams. We have carved up the application so that each team is responsible for a different set of microservices with zero overlaps. This helps stop the teams from interfering with each other. Now, we can grow our team of teams to any size we like by dividing our application up along microservices boundaries.
Each team owns one or more microservices, and typically, they are responsible for their own microservices-all the way from coding, through testing, and then into production. The team is usually responsible for the operational needs of their microservices, keeping these online, healthy, and performant.
Of course, there are many ways to implement this, and the team structure and development process for any two companies will differ in the details. But, this method of organizing self-reliant teams is scalable. This means we can grow a huge company around a huge application and still have an effective development process.
11.2.2 Independent microservices
To this point, the FlixTube application we have developed lives in a single code repository and has a single CD pipeline. You can see in figure 11.3 how this looks.
Using a so-called mono (monolithic) repo (monorepo) is a great way to get started when working on any new microservices project. It makes the bootstrapping process simpler and easier, and we’ll spend much less time creating and maintaining our development infrastructure (the infrastructure that supports our development process).

Figure 11.3 When starting a new microservices application, it is simpler to have a single code repository and a single CD pipeline for the entire application.
Having a monorepo and a single CD pipeline makes things easier at the start, but unfortunately, it eliminates a major benefit of using microservices. Having a single repo and CD pipeline means that we have to release all microservices in lockstep. We don’t actually have the ability to independently release updates to our microservices! This means that with each deployment, we risk breaking our entire application! This is a situation that’s no better than having a monolith! Our deployment process is monolithic!
You might recall from way back in chapter 1 that we actually defined a microservice as a small software process having its own independent deployment schedule (see section 1.5). We haven’t actually achieved that yet, and to gain the most benefit from using microservices, we really have to make those independently deployable. How this should look is indicated in figure 11.4.
Having separate code repositories and multiple CD pipelines allows more granular control over our deployments. If we can independently update our microservices one at a time, then we have a much lower deployment risk. Instead of breaking our entire application with each deployment, we only risk breaking a single microservice.

Figure 11.4 As we grow our application, we’ll need to split our microservices out to separate code repositories and CD pipelines to gain the benefit that comes with independently deployable microservices.
If changing to multiple repos and CD pipelines seems like a huge amount of work and too much additional complexity, I completely sympathize with you! In fact, I’d argue that this one thing is responsible for much of the perceived complexity normally attributed to microservices.
At this point, I’d like to reiterate that having a monorepo and a single CD pipeline is still a good way to start any new microservices application. It keeps things simple in the early days of development. Once you convert to multiple code repositories and multiple CD pipelines, it becomes more complex to manage and maintain, at least at the application level. That just comes with the territory.
Even though our application as a whole will ultimately become incredibly complex (this is inevitable for modern enterprise applications), if we can switch our perspective down to a single microservice, the picture looks very different. Things suddenly seem a lot simpler. Because the complexity gets added slowly, it is more manageable. And by focusing on individual microservices (which are simple) rather than focusing on the whole application (which is bound to be complex), the overall complexity of the application becomes much less impactful.
This is what actually saves the day for complexity in microservices applications. An individual microservice is a tiny and easily understood application with a small codebase. It has a relatively simple deployment process. Each microservice is simple and easy to manage, even though these work together to build powerful and complex applications. This change of perspective from complex application to simple microservice is important for managing complexity.
Splitting our development process into microservice-sized chunks adds some additional complexity, but it pales in comparison to how complex our application may eventually become. By redirecting our focus from whole application complexity to individual microservices, we have essentially freed our application to scale to truly enormous proportions, even when each and every microservice remains just as simple to work with as it ever was.
Don’t be too enthusiastic about making this change to independently deployable microservices, however. If you make this change too early, you might find that you are paying for the cost of the transition at a time when it’s still too early to gain benefit from it. You don’t want to pay the cost before you can make use of the benefit.
Good software development is all about making good trade-offs. Stick with a monorepo and a single CD pipeline for as long as that makes sense for you. But be aware that it’s not supposed to be this way. As your application grows more complex and as you grow your team, this simple approach eventually breaks down. There comes a point when splitting our deployment pipelines is necessary to scale up, while maintaining a productive development process.
11.2.3 Splitting the code repository
Our first task is to split our monorepo into multiple code repositories so that we have a distinct and separate repository for every microservice. Each new repo will contain the code for a single microservice and the code for deploying it to production.
We also need a separate code repository for the Terraform code that creates our infrastructure. This is the code that creates our container registry and Kubernetes cluster. This code doesn’t belong to any particular microservice, so it needs its own code repository.
Figure 11.5 illustrates how we can take our FlixTube project from chapter 9 and break it up into multiple code repositories. To build each new repo, we invoke git init to create a blank repo, then copy the code into the new repo and commit it. Otherwise, we might want to take the extra steps required to preserve our existing version history (see the following sidebar).

Figure 11.5 When we split our repository, the subdirectory for each microservice becomes its own separate Git repository.
11.2.4 Splitting the continuous delivery (CD) pipeline
Splitting apart our monorepo is fairly easy. At the same time, we must also split our monolithic CD pipeline and this is a more difficult task. We now need to create a separate deployment pipeline for each microservice.
Fortunately, we can create a single microservice deployment pipeline and then reuse it for every microservice (if necessary, making small changes for the custom requirements of each microservice). Our per-microservice CD pipeline will independently deploy a single microservice, triggered automatically when updated code is pushed to the microservice’s hosted code repository. Figure 11.6 illustrates this process.
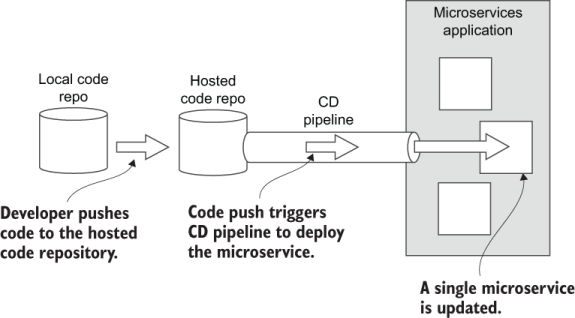
Figure 11.6 Pushing code to the hosted code repository for a microservice triggers the CD pipeline, which deploys a single microservice.
The Terraform code for the deployment of a single microservice is like the code we saw in chapter 9; indeed, it is a cut-down version of that code. We can develop this Terraform code using an iterative process like we did throughout chapters 6 and 7. Once we are happy that the deployment pipeline works for a single microservice, we can copy it into the code repo for every microservice-with the code parameterized by name for each microservice.
Each code repository then needs to have its pipeline enabled and configured. If you are using Bitbucket Pipelines for your CD like we did in chapters 7 and 9, you can enable it for each repository as shown in section 7.7.2. Then you must add a separate configuration file for each repository as illustrated in figure 11.7.

Figure 11.7 The code repository for each microservice has its own separate configuration for continuous delivery (CD).
Extracting Docker builds from Terraform
At this point, we can revisit how we do Docker builds. We are now able to extract these from the Terraform code. If you remember from chapter 7, we kept things simple by having our entire deployment process performed within Terraform.
Actually, that’s not 100% true; I didn’t mention it at the time, but doing everything within Terraform was a necessary workaround due to how we created all of our infrastructure within Terraform in the first place. This included the creation of our container registry. If we had tried to extract Docker from Terraform, we’d have found that on the first deployment, we couldn’t push our images to the container registry because it hadn’t yet been created!
This catch-22 situation is not helped by the fact that the Docker provider for Terraform does not support building and publishing Docker images (seriously, it should be upgraded to support this properly). This is why we were forced to use local-exec and null_resource in Terraform as a kind of ugly hack (see section 7.6.2 for a reminder).
Things are different now though. We’ve separated our Terraform code into multiple repositories, and our infrastructure code has been separated from our microservices code. In between creating our infrastructure and deploying our microservices, we can build and publish our Docker images simply by invoking Docker directly within the continuous delivery (CD) pipeline (using the build and push commands that we learned in chapter 3).
We can create a single configuration and then reuse it as a template for each microservice. Our “single microservice” configuration for Bitbucket Pipelines is shown in listing 11.1. We have two steps in this deployment process. The first step directly uses Docker to build and publish the image for the microservice. The second step uses Terraform to deploy the microservice to our Kubernetes cluster.
Listing 11.1 Bitbucket Pipelines configuration file for a single microservice (bitbucket-pipelines.yaml)
image: hashicorp/terraform:0.12.29                                    ①
pipelines:
  default:
      - step:                                                         ②
          name: Build microservice
          services:
            - docker                                                  ③
          script:
            - export NAME=$BITBUCKET_REPO_SLUG                        ④
            - export VERSION=$BITBUCKET_BUILD_NUMBER                  ⑤
            - export IMAGE=
            ➥ $DOCKER_REGISTRY/$NAME:$VERSION                        ⑥
            - docker build -t $IMAGE
            ➥-file ./Dockerfile-prod .                               ⑦
            - docker login $DOCKER_REGISTRY --username $DOCKER_UN
            ➥-password $DOCKER_PW                                    ⑧
            - docker push $IMAGE                                      ⑨

      - step:                                                         ⑩
          name: Deploy to cluster
          deployment: production                                      ⑪
          script:
            - export NAME=$BITBUCKET_REPO_SLUG                        ⑫
            - export VERSION=$BITBUCKET_BUILD_NUMBER                  ⑫
            - export IMAGE=$DOCKER_REGISTRY/                          ⑫
            ➥ $NAME:$VERSION                                         ⑫
            - chmod +x ./scripts/deploy.sh
            - ./scripts/deploy.sh                                     ⑬
① Sets the base image as Terraform so we can use Terraform within the CD pipeline
② Step 1: Builds and publishes the Docker microservice for the microservice
③ Enables the use of Docker within the CD pipeline
④ Uses the name of the code repository as the name of the microservice
⑤ Uses the build number as the version number for the Docker image
⑥ Composes the image name from the name of the microservice and its version
⑦ Builds the production version of the Docker image
⑧ Logs into our private container registry
⑨ Pushes the new Docker image to the container registry
⑩ Step 2: Deploys the updated microservice to the Kubernetes cluster
⑪ Tracks what’s currently deployed to production (you can then view what’s deployed in the Bitbucket Pipelines dashboard).
⑫ Environment variables must be copied to each step.
⑬ Executes the deployment shell script and uses Terraform to deploy the microservice
11.2.5 The meta-repo
Is using separate code repositories getting you down? Do you find yourself craving the simpler days of managing your application through a single code repository? Well, here’s some good news.
We can create a meta-repo that ties together all our separate repositories into a single aggregate code repository. You can think of the meta-repo as a kind of virtual code repository. This means we can claw back some of the simplicity and convenience of the monorepo without sacrificing the flexibility and independence of having separate repositories. To create a meta-repo, we need the meta tool, available here:
A meta-repo is configured by creating a .meta configuration file that lists a collection of separate repositories. See figure 11.8 for an example of where a .meta file would live in relation to the FlixTube project. Listing 11.2 shows the structure of this file.
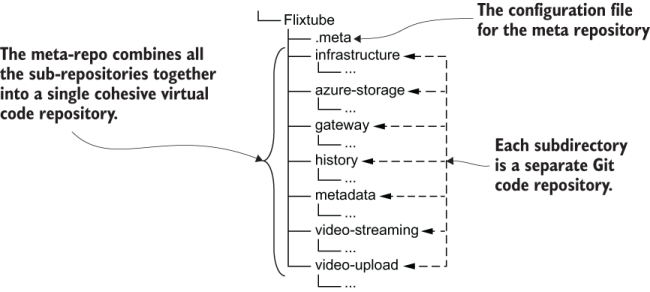
Figure 11.8 The .meta configuration file ties together separate repositories into a meta-repo.
Listing 11.2 Configuring FlixTube’s meta code repository (.meta)
{
  "projects": {                                                            ①
    "gateway": "[email protected]:bootstrappingmicroservices/gateway.git", ①
    "azure-storage": "[email protected]:bootstrappingmicroservices/        ①
    ➥ azure-storage.git",                                                 ①
    "video-streaming": "[email protected]:bootstrappingmicroservices/      ①
    ➥ video-streaming.git",                                               ①
    "video-upload": "[email protected]:bootstrappingmicroservices/         ①
    ➥ video-upload.git",                                                  ①
    "history": "[email protected]:bootstrappingmicroservices/history.git"  ①
    "metadata": "[email protected]:bootstrappingmicroservices/             ①
    ➥ metadata.git",                                                      ①
  }                                                                        ①
}L
① Lists the separate code repositories that comprise this meta-repo
Note In the listing, the code repos link to Bitbucket code repositories, but these could just as easily be GitHub repositories or link to anywhere else where we host our code repositories.
Using meta allows us to run single Git commands that affect the entire collection of repositories. For example, let’s say we’d like to pull code changes for all the microservices under the FlixTube project at once. We can use meta to do that with a single command:
meta git pull
We are still working with separate code repositories, but meta allows us to invoke commands simultaneously against multiple code repositories at once, so that it feels much like we are back to working with a monorepo.
Meta gives us a lot of additional flexibility. We can use it to create our own custom sets of microservices. As a developer on a big team, you can create a meta-repo just for the set of microservices that you normally work on. Other developers can have their own separate meta-repos. You might even like to create multiple meta-repos so that you can easily switch between different sets of microservices, depending on what you are currently working on.
As a team leader, you can create separate meta-repos for different configurations of your application, each with its own Docker Compose file. This makes it easy for your team members to clone the code for a complete set of microservices. Then they can use Docker Compose to boot that application configuration. This is a great way to provide an “instant” and manageable development environment for team members!
11.2.6 Creating multiple environments
As we gain customers for our application, it becomes important that we buffer them against problems from ongoing “work in progress” or protect them from new features that are partially completed or only partially tested. The development team needs a production-like environment in which to test their code before putting it in front of customers.
Each developer must test their code on their development workstation, but that’s not enough. They must also test their code once it is integrated with changes from other developers. To make it as “real” as possible, this testing should be done in a production-like environment-just not the one that our customer is using!
We need a workflow for our developers to take their changes on a journey from development workstation, through an integration environment, into a test environ-ment, and finally, once all the tests have passed, on to the customer-facing environment. Although no two companies will have exactly the same workflow, you can see what a typical workflow looks like in figure 11.9.

Figure 11.9 Progressing code changes, through development and test environments, before getting to production
Setting up multiple environments is actually simple, and we already have most of what we need in our existing Terraform code that was presented in chapter 9. We had already parameterized our code with an app_name variable that we used to create separate application resources based on the name we assigned to it (revisit section 6.10 where we first added this variable).
We could now use app_name (set from the command line) when invoking Terraform to create different instances of FlixTube for testing and production. We just need to provide different names for each instance. For example, we could set app_name to flixtube-development, flixtube-test, or flixtube-production to create our separate environments.
We can improve on this, though, as in listing 11.3. We can make it simpler to create new environments by introducing a new variable called environment. We then convert app_name to a computed local variable that depends on the value of environment.
Listing 11.3 Setting the app_name local variable to the environment name in Terraform (an update to chapter-9/example-1/scripts/variables.tf)
variable "environment" {}                       ①
locals {
  app_name = "flixtube-${var.environment}"      ②
}
① Adds a new Terraform variable that specifies the current environment. We need to provide this when running Terraform via the command line, setting it to development, test, or production, for example.
② Creates a local variable for “app_name” that builds separate versions of the application for each environment (e.g., flixtube-development, flixtube-test, or flixtube-production).
Introducing this new variable (environment) allows us to set the current environment from the command line. Listing 11.4 shows how we input a value from another variable called ENVIRONMENT.
We can reuse the same Terraform project to create as many separate environments as we like, all hosted in the same cloud account but differentiated by name (e.g., flixtube- development, flixtube-test, or flixtube-production). You can use this to create a workflow like that in figure 11.9 or something even more sophisticated, depending on what you need.
Listing 11.4 Updated deployment script to set the environment (an update to chapter-9/example-1/scripts/deploy.sh)
cd ./scripts
terraform init
terraform apply -auto-approve
    -var "app_version=$VERSION"
    -var "client_id=$ARM_CLIENT_ID"
    -var "client_secret=$ARM_CLIENT_SECRET"
    -var "environment=$ENVIRONMENT"                     ①
    -var "storage_account_name=$STORAGE_ACCOUNT_NAME"
    -var "storage_access_key=$STORAGE_ACCESS_KEY"
① Parameterizes our Terraform code by the environment name. We pass in the name of the environment being deployed through an OS environment variable.
11.2.7 Production workflow
We can now create multiple environments and use them to stitch together a testing workflow to protect our customers against broken code. The remaining question is, how do we trigger the deployment for any particular environment? This is simpler than you might think.
We can use separate branches in our code repository to target deployments to different environments. Figure 11.10 shows an example setup for this. It’s a fairly simple branching strategy, but there are more sophisticated versions in the wild.

Figure 11.10 Code from development, test, and production branches is automatically deployed to the appropriate environment.
Our development team works in the development branch. When they push code to that branch, it triggers a CD pipeline that deploys to the development environment. This allows our whole team to integrate and test their changes frequently, together in a production-like environment.
How frequently should the developers push code changes? As often as possible! Once per day, if not multiple times per day. The less time we have between code merges, the less we’ll see errors caused by conflicting changes and bad integrations. This is the idea behind continuous integration, an important practice that underpins continuous delivery (CD).
Less frequently (say once per week), we’ll merge from the development branch to the test branch. This triggers the deployment to the test environment. Code merges from development to test are less frequent, and this gives us time to test, fix problems, and stabilize the code before we hand it over to our customers.
Finally, when the code in the test branch is good to go (say every 1-2 weeks), we then merge it to the production branch. This deploys updated microservices to production so that our customers can get their hands on whatever awesome new features and bug fixes we’ve added.
This workflow can be applied with or without automated testing. It gives plenty of room for testing and allows managers to make a conscious decision to deploy to production. Of course, automated testing makes this so much better and much more scalable! If an automated test fails at any point in the workflow, the deployment is automatically not allowed. When such problems occur, the team must work together to rectify the situation. The addition of good automated testing means we can safely ramp up our deployment frequency, to the point where many modern companies deploy to production on a daily basis.
If we use Bitbucket Pipelines, we can easily configure separate CD pipelines for each branch as listing 11.5 shows. This version of the bitbucket-pipelines.yaml configuration file includes separate sections for each branch. Each section is essentially the same, but we can wire through separate environment variables to configure which production environment is used to deploy each branch.
Listing 11.5 Configuring separate CD pipelines for each branch (bitbucket-pipelines.yaml)
image: hashicorp/terraform:0.12.6
pipelines:
  branches:                                       ①
    development:                                  ②
      - step:
          name: Build microservice
          script:
            # ... Commands to build and publish the microservice ...
      - step:                                     ③
          name: Deploy cluster
          script:
            # ... Commands to deploy the microservice to the
                   dev environment ...
    test:                                         ④
      - step:
          name: Build microservice
          script:
            # ... Commands to build and publish the microservice ...
      - step:                                     ⑤
          name: Deploy cluster
          script:
            # ... Commands to deploy the microservice to the
                   test environment ...
    production:                                   ⑥
      - step:
          name: Build microservice
          script:
            # ... Commands to build and publish the microservice ...
      - step:                                     ⑦
          name: Deploy cluster
          script:
            # ... Commands to deploy the microservice to the
                   prod environment ...
① Creates separate CD pipelines for each branch in our Git repository
② Configures the pipeline for the development branch
③ Deploys to the development environment
④ Configures the pipeline for the test branch
⑤ Deploys to the test environment
⑥ Configures the pipeline for the production branch
⑦ Deploys to the production environment
One thing to pay attention to when you implement this multi-branch/multi-environment strategy is that each environment needs its own separate Terraform state. We first configured a Terraform backend for CD in section 7.7.4. Back then, we hard coded the connection to Azure storage in the Terraform file backend.tf. We must change this now so that we can set the storage configuration from the command line. We’ll then change it for each separate environment.
To start with, we must remove the key field from our backend configuration as shown in the following listing. This is the value that we need to vary, depending on the environment. We’ll set it as a command-line argument rather than hard code it.
Listing 11.6 Configuring backend storage for Terraform state with multiple environments (an update to chapter-9/example-1/scripts/backend.tf)
terraform {
    backend "azurerm" {                        ①
                                               ①
        resource_group_name  = "terraform"     ①
        storage_account_name = "terraform"     ①②
        container_name       = "terraform"     ①
                                               ①
    }                                          ①
}
① Configures the backend as in chapter 7, but we remove the “key” field, which we now set separately for each environment.
② You’ll have to choose a different name for your storage account. This is a globally unique name so you won’t be able to choose terraform.
Now, we can configure the key field for the Terraform backend from the command line as shown in listing 11.7. Essentially, what we do is to tell Terraform to store its state configuration in a file whose name is different, depending on the current environment being deployed. For example, it could be called terraform-development.tfstate for the file that tracks the state of the development environment, and terraform-test .tfstate and terraform-production.tfstate for the other two environments.
Listing 11.7 Updated deployment script to set the backend configuration based on the environment (an update to chapter-9/example-1/scripts/deploy.sh)
cd ./scripts
terraform init
    -backend-config=
    ➥ "key=terraform-${ENVIRONMENT}.tfstate"      ①
terraform apply -auto-approve
    -var "app_version=$VERSION"
    -var "client_id=$ARM_CLIENT_ID"
    -var "client_secret=$ARM_CLIENT_SECRET"
    -var "environment=$ENVIRONMENT"
    -var "storage_account_name=$STORAGE_ACCOUNT_NAME"
    -var "storage_access_key=$STORAGE_ACCESS_KEY"
① Initializes the “key” field of the backend configuration for the environment we are currently deploying
11.3 Scaling performance
Not only can we scale microservices applications to larger development teams, we can also scale these up for better performance. Our application can then have a higher capacity and can handle a larger workload.
Using microservices gives us granular control over the performance of our application. We can easily measure the performance of our microservices (for an example, see figure 11.11) to find the ones that are performing poorly, overworked, or overloaded at times of peak demand.
If using a monolith, however, we would have limited control over performance. We could vertically scale the monolith, but that’s basically it. Horizontally scaling a monolith is much more difficult. And we simply can’t independently scale any of the “parts” of a monolith. This is a bad situation because it might only be a small part of the monolith that causes the performance problem. Yet, we would have to vertically scale the entire monolith to fix it! Vertically scaling a large monolith can be an expensive proposition.
Instead, with microservices, we have numerous options for scaling. We can independently fine-tune the performance of small parts of our system to eliminate bottlenecks and to get the right mix of performance outcomes. There are many advanced ways we could tackle performance issues, but in this section, we’ll overview the following (relatively) simple techniques for scaling our microservices application:
Scaling often requires risky configuration changes to our cluster. Don’t try to make any of these changes directly to a production cluster that your customers or staff are depending on. At the end of this section, we’ll briefly look at blue-green deployment, a technique that helps us manage large infrastructure changes with much less risk.

Figure 11.11 Viewing CPU and memory usage for microservices in the Kubernetes dashboard
11.3.1 Vertically scaling the cluster
As we grow our application, we might come to a point where our cluster generally doesn’t have enough compute, memory, or storage to run our application. As we add new microservices (or replicate existing microservices for redundancy), we will eventually max out the nodes in our cluster. (We can monitor this in the Azure portal or the Kubernetes dashboard.) At this point, we must increase the total amount of resources available to our cluster. When scaling microservices on a Kubernetes cluster, we can just as easily make use of either vertical or horizontal scaling.
Figure 11.12 shows what vertical scaling looks like for Kubernetes. We scale up our cluster by increasing the size of the virtual machines (VMs) in the node pool. We might start with three small-sized VMs and then increase their size so that we now have three large-sized VMs. We haven’t changed the number of VMs; we’ve just increased their size.

Figure 11.12 Vertically scaling your cluster by increasing the size of the virtual machines (VMs)
In listing 11.8, we change the vm_size field from Standard_B2ms to Standard_ B4ms. This upgrades the size of each VM in our Kubernetes node pool. Instead of two CPUs, we now have four (one for each VM). Memory and hard-drive are also increased. You can compare Azure VM sizes for yourself here:
We still only have a single VM in our cluster, but we have increased the size of it. Scaling our cluster is as simple as a code change. Again we see power of infrastructure-as-code, the technique where we store our infrastructure configuration as code and make changes to our infrastructure by committing code changes that trigger our CD pipeline.
Listing 11.8 Vertically scaling the cluster with Terraform (an update to chapter-9/example-1/scripts/kubernetes-cluster.tf)
default_node_pool {
    name = "default"
    node_count = 1
    vm_size = "Standard_B4ms"      ①
}
① Sets a bigger VM for each of the nodes in the cluster
11.3.2 Horizontally scaling the cluster
In addition to vertically scaling our cluster, we can also scale it horizontally. Our VMs can remain the same size, but we simply add more of these. By adding more VMs to our cluster, we spread the load of our application across more computers.
Figure 11.13 illustrates how we can take our cluster from three VMs up to six. The size of each VM remains the same, but we gain more computing power by having more VMs.

Figure 11.13 Horizontally scaling your cluster by increasing the number of VMs
Listing 11.9 shows the code change we need to make to add more VMs to our node pool. Back in listing 11.8, we had node_count set to 1, but here we have changed it to 6! Note that we have reverted the vm_size field to the smaller size of Standard_B2ms.
In this example, we increase the number of VMs, but not their size; although, there is nothing stopping us from increasing both the number and the size of our VMs. Generally, though, we might prefer horizontal scaling because it is less expensive than vertical scaling. That’s because using many smaller VMs is cheaper than using fewer but bigger and higher-priced VMs.
Listing 11.9 Horizontal scaling the cluster with Terraform (update to chapter-9/example-1/scripts/kubernetes-cluster.tf)
default_node_pool {
    name = "default"
    node_count = 6              ①
    vm_size = "Standard_B2ms"
}
① Increases the size of the node pool to 6. The cluster is now powered by six VMs!
11.3.3 Horizontally scaling an individual microservice
Assuming our cluster is scaled to an adequate size to host all the microservices with good performance, what do we do when individual microservices become overloaded? (This can be monitored in the Kubernetes dashboard.)
The answer is that for any microservice that becomes a performance bottleneck, we can horizontally scale it to distribute its load over multiple instances. This is shown in figure 11.14. We are effectively giving more compute, memory, and storage to this particular microservice so that it can handle a bigger workload.

Figure 11.14 Horizontally scaling a microservice by replicating it
Again, we can make this change using code. In fact, we already did this in listing 10.2 from chapter 10. A snippet of the code is repeated again here in listing 11.10.
We’ll set the replicas field to 3. In chapter 10, we made this change for redundancy. Having multiple instances means that when any single instance fails the others can temporarily pick up its load while it restarts. Here we make the same change to the replicas field, but this time for performance reasons. Often, we need to make this change for both reasons. We’d like to have redundancy and good performance, and this is solved by creating replicas of our microservices where necessary.
Listing 11.10 Horizontally scaling a microservice with Terraform (an update to chapter-9/example-1/scripts/modules/microservice/main.tf)
spec {
    replicas = 3       ①
    selector {
        match_labels = {
            pod = var.service_name
        }
    }
    template {
        metadata {
            labels = {
                pod = var.service_name
            }
        }
        spec {
            container {
                image = local.image_tag
                name  = var.service_name
                env {
                    name = "PORT"
                    value = "80"
                }
           }
        }
    }
}
① Sets the number of replicas for the microservice to 3. We can now distribute load evenly among three instances of this microservice.
11.3.4 Elastic scaling for the cluster
Moving into even more advanced territory, we can now think about elastic scaling, which is a technique where we automatically and dynamically scale our cluster to meet varying levels of demand. At periods of low demand, Kubernetes can automatically deallocate resources that aren’t needed. At periods of high demand, it can allocate new resources to meet the increased load. This makes for substantial cost savings because, at any given moment, we only pay for the resources that we need to handle the load on our application at that time.
We can use elastic scaling at the cluster level to automatically grow our cluster when it’s nearing its resource limits. Yet again, this is just a code change. Listing 11.11 shows how we can enable the Kubernetes autoscaler and set the minimum and maximum size of our node pool.
You can update the Terraform code in scripts/kubernetes-cluster.tf (from example-1 in chapter 9) from the code in listing 11.11 to enable horizontal scaling for the FlixTube Kubernetes cluster. The scaling works by default, but there are many ways we can customize it. Search for “auto_scaler_profile” in the Terraform documentation to learn more:
https://www.terraform.io/docs/providers/azurerm/r/kubernetes_cluster.html
Listing 11.11 Enabling elastic scaling for the cluster with Terraform(an update to chapter-9/example-1/scripts/kubernetes-cluster.tf)
default_node_pool {
    name = "default"
    vm_size = "Standard_B2ms"
    enable_auto_scaling = true      ①
    min_count = 3                   ②
    max_count = 20                  ③
}
① Enables Kubernetes cluster autoscaling
② Sets the minimum node count to 3. This cluster starts with three VMs.
③ Sets the maximum node count to 20. This cluster can automatically scale up to 20 VMs to meet demand.
11.3.5 Elastic scaling for an individual microservice
We can also enable elastic scaling at the individual microservice level. Listing 11.12 is a sample of Terraform code that can give a microservice a “burstable” capability. The number of replicas for the microservice is expanded and contracted dynamically to meet the varying workload for the microservice (bursts of activity).
You can add the code in listing 11.12 to the end of the Terraform code in the scripts/modules/microservice/main.tf file from example-1 in chapter 9. Then, to enable elastic scaling for FlixTube microservices, invoke terraform apply. The scaling works by default, but can be customized to use other metrics. See the Terraform documentation to learn more:
www.terraform.io/docs/providers/kubernetes/r/horizontal_pod_autoscaler.html
To learn more about pod auto scaling in Kubernetes, see the Kubernetes docs at:
https://kubernetes.io/docs/tasks/run-application/horizontal-pod-autoscale/
Listing 11.12 Enabling elastic scaling for a microservice with Terraform (an addition to chapter-9/example-1/scripts/modules/microservice/main.tf)
resource "kubernetes_horizontal_pod_autoscaler" "service_autoscaler" {
  metadata {
    name = var.service_name
  }
  spec {
    min_replicas = 3      ①
    max_replicas = 20     ①
    scale_target_ref {
      kind = "Deployment"
      name = var.service_name
    }
  }
}
① Sets the range of instances for this microservice. It starts at 3 instances and can scale up to 20 to meet variable levels of demand.
11.3.6 Scaling the database
The last kind of scaling we’ll look at is scaling our database. Back in chapter 4, you might remember we talked about the rule that each microservice should have its own database (see section 4.5.4).
There are multiple problems in sharing databases between microservices; one is that it severely limits our scalability. Consider the situation depicted in figure 11.15. We have multiple microservices sharing one database. This is a future scalability nightmare!
These microservices are not independent. The shared database is a fixed integration point among these, and it can become a serious performance bottleneck. If microservices share data, these will be tightly coupled. This severely limits our ability to restructure and refactor in the future. By sharing databases, we are hampering our own future ability to address performance problems.
This scenario can completely destroy the “easy” scaling that we’ve worked so hard to achieve. If we want to structure our application like this, we might as well not be using microservices at all!

Figure 11.15 Why we don’t share databases between microservices (except possibly for replicas of the same microservice)
Instead, our application should look like figure 11.16. Every microservice has its own separate database. These microservices are independent, and that means we can easily apply horizontal scaling if necessary.

Figure 11.16 Each separate microservice should have its own database.
At this point, I’d like to make it clear that just because we must have separate databases doesn’t mean we also require separate database servers. There is a cost to managing database servers, and usually, we’d like to keep that cost down. It’s perfectly OK to have a single database server that contains our separate databases as figure 11.17 illustrates. Having just one database server for your whole application makes it simpler and cheaper to get started with microservices.

Figure 11.17 It’s completely OK to have separate databases running on a shared database server (this is the simplest way to get started).
In the future, if we find that the workload for any particular database has grown too much, we can easily create a new database server and move that database to it as figure 11.18 shows. When needed, we can create dedicated servers for whichever of our databases need the extra compute, memory, or storage.

Figure 11.18 As your application grows larger, you can scale it by splitting out large databases into their own independent database servers.
Need an even more scalable database? We used MongoDB in this book, and it offers a database sharding feature (illustrated in figure 11.19). This allows us to distribute a single large database over multiple VMs. You might never need this level of scalability. It’s only required for extremely large databases, but it’s good to know we have this option if we ever need it.

Figure 11.19 For extremely large databases, we might need MongoDB’s sharding feature to distribute a single large database across multiple VMs.
11.3.7 Managing changes to infrastructure
Making changes to infrastructure is a risky business, and it needs to be well managed. Make a mistake with any of the scaling techniques you have just read about and you can bring down your entire cluster. It’s best that we don’t make these kinds of changes to customer-facing infrastructure, so in this section, I present a technique for keeping such risky changes at arm’s length from our customers.
The technique is called blue-green deployment. We create two production environments and label these as blue and green. We can easily do this because in section 11.2.6, we parameterized our Terraform code to create different environments distinguished by name.
The first environment we create is labeled as the blue environment. Our customers use our application via our domain name (e.g., www.company.com). We then route them via DNS record to the blue environment. Now, to protect our customers, we’d prefer not to make any risky changes to the blue environment (regular and frequent updates to individual microservices are OK though, because that doesn’t risk any impact to the infrastructure).
To make any risky or experimental changes (like experimenting with scaling), we create a whole new production infrastructure that we label as the green environment. Our developers now work in the green environment, so any work they do is separated from the blue environment that our customers use. This is shown in figure 11.20.
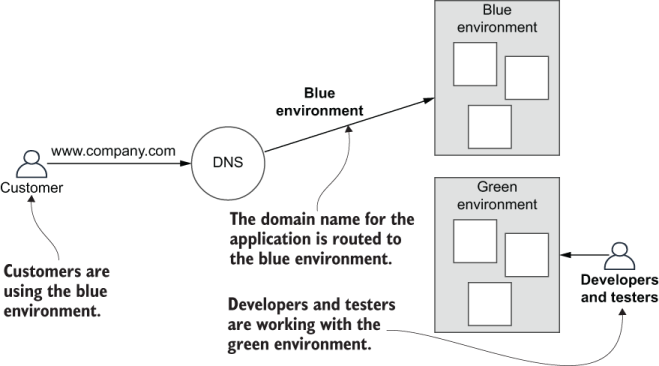
Figure 11.20 Customers use the blue environment, while developers and testers work with the green environment.
Once work on the green environment is completed, is tested, and is known to be working well, we can simply switch the DNS record from blue to green. Our customers can now use the green environment, and our developers and testers can change over to working with the blue environment. This is shown in figure 11.21.
Should any issue be discovered with the new green environment, we can simply flip the DNS switch back to the blue environment and restore working functionality for our customers. In the future, we can continue to flip between blue and green environments, thus keeping our customers protected from potentially risky changes to our infrastructure.

Figure 11.21 When the green environment is ready and tested, customers are switched over to it. Developers and testers then switch to the blue environment and continue working. When the blue environment is ready and tested, customers switch again, and the cycle continues.
11.4 Security
We have briefly talked about security at various points throughout the book. We haven’t done it any justice though, because security is very important--even at the early stages of development. So much so that security really deserves its own book.
Well, thankfully, there is a great book on security specifically for microservices: Microservices Security in Action by Prabath Siriwardena and Nuwan Dias (Manning, 2020). For now though, let’s understand some of the basics.
Every application needs some level of security. Even if your data is not sensitive, you don’t want anyone to be able to fraudulently modify it. Even if your systems are not critical, you don’t want an attacker to disrupt your system and processes.
We must make effective use of security techniques like authentication, authorization, and encryption to mitigate against malicious use of our application or data. We might also have to structure our data to protect the privacy and anonymity of our customers according to the regulations in our particular region. FlixTube doesn’t have any of this yet, although, we have taken some care already with the following:
-
The only microservice exposed to the outside world (and, therefore, exposed to attack) is the gateway microservice. This is by design! Our internal microservices are not directly accessible from outside our cluster.
-
Although, initially, we exposed our RabbitMQ server and MongoDB database to the world for early experimentation, we quickly closed those off. We did this to prevent direct external access to these crucial resources. This is important! Don’t expose such critical resources to the outside world unless you are 100% sure these are protected against attack.
In the future, we’d like to upgrade FlixTube with at least the following security features:
-
HTTPs for the connection with our customers. This will encrypt their communications, and using an external service like Cloudflare means you can get this online quickly.
Of course, the level of security needed by any given application is only as important as the systems and data we are trying to protect. The amount of security we add to FlixTube is going to be much less than the security that’s needed by a banking application or government website.
Security has to come from both ends of the organization. Your company should have security policies and a strategy that meets the requirements of the domain and your customers. Then, you and every other developer have a role to play in thinking about and implementing security according to the standards of your company. We should be writing simple, yet secure code. And as with defensive programming (see section 10.4.2), we should adopt a defensive mindset when it comes to security.
First and foremost, when writing code and building microservices, we should ask how would someone attack this system? This primes our mind to proactively address security issues at the time when it can make the most difference: before we are attacked.
11.4.1 Trust models
FlixTube’s needs are simple enough that we can adopt a security model of internal trust, also known as trust the network (depicted in figure 11.22). In this model, we do all the authentication at the entry point to the system (the gateway microservice). The microservices within the cluster all trust each other implicitly and rely on the security of the underlying network to protect them from external attack.
The internal trust model is a simple way to get started with microservices. Simple is often better than complicated when it comes to security because simple offers fewer places for security problems to hide. We must be careful when introducing more complex security, because any kind of added complexity can actually introduce security loopholes.

Figure 11.22 An internal trust model. Authentication is applied to external requests at the gateway. Internal microservices trust each other and communicate without authentication.
If your security needs are higher than FlixTube’s, then the internal trust model might not be enough. This will also be the case if you have multiple clusters and you have microservices that need to communicate across clusters.
A more secure model that you should consider is called trust nothing or zero trust (depicted in figure 11.23). In the zero trust model, all connections between microservices-both internal and external-are authenticated. Microservices do not automatically trust each other. We are making the assumption that any particular microservice could be hijacked or compromised, especially if the microservice is hosted externally in some other cluster.
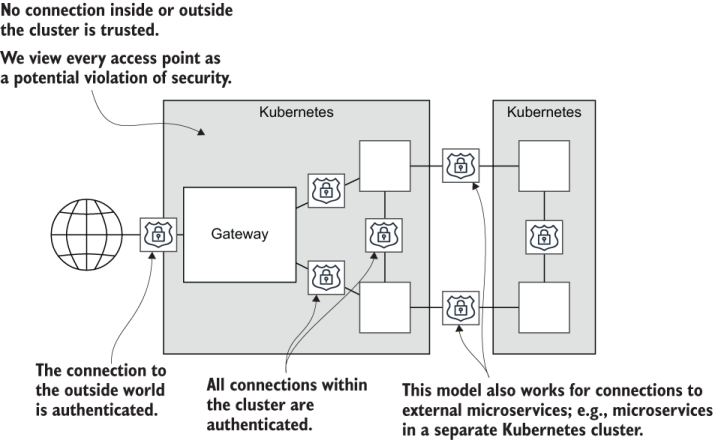
Figure 11.23 A trust nothing model. All connections, both internal and external, are authenticated. This model supports connections to external microservices.
11.4.2 Sensitive configuration
Any application has sensitive configuration data that needs to be protected. You might remember in chapter 7 that we stored our Azure credentials in Bitbucket repository variables (section 7.7.6). After splitting out the deployment code for infrastructure and microservices at the start of this chapter (in section 11.2.3), we also needed a place to store credentials for our private container registry.
As we build our application, there will be other passwords, tokens, and API keys that we’ll need to store securely. We could store any of this sensitive information in our code, and that would certainly be convenient. But it means that anyone who has or can get access to our code will also have access to operational information that can easily be used to subvert or take down our application.
Bitbucket repository or account variables (or similar, depending on your CD provider) are a good way to store this information. You might, however, prefer to have a solution that’s independent of your source control or CD provider. For that scenario, Kubernetes has its own storage solution for secret configuration. You can read about it here:
If that doesn’t suit your needs, there are various other products that can help. As an example, you might like to learn more about Vault, another open source product from Hashicorp (the developers of Terraform). Find out more at
11.5 Refactoring to microservices
Way back in chapter 1 (section 1.1), I promised that after learning how to build a microservices application from scratch, that we’d eventually come back and discuss more on how to refactor an existing monolith to microservices. How we go about converting a monolith will be different in the details for any given monolith. There are so many ways we could go about this, but in this section, I’ll leave you with some basic strategies and tactics for conversion that anyone can use.
The basic idea is the same as any development process. As was introduced in chapter 2 (section 2.4), it’s all about iteration, small and simple changes, and keeping the code working as you go (illustrated in figure 11.24).
Conversion of a monolith is a huge job (depending on the size and complexity of the monolith), and a big bang conversion is unlikely to be successful. The only safe way to get to the other side is through small and manageable chunks of work, with extremely thorough testing along the way.
We can’t just stop working on the product either. We still have a responsibility to add the features and fix the bugs that are requested by the business. It’s also essential that we keep the product working; we just can’t let problems build up.

Figure 11.24 Refactoring a monolith to microservices can only be done in an iterative sequence of small and well-tested steps.
Do you really need microservices?
Before you start converting your monolith to microservices, you really need to ask: are microservices really necessary? The conversion to microservices is likely to be long and difficult. It will introduce significant complexity, and it will test the patience and resolve of your development team.
These are important questions. Make sure you have good answers.
Plan your conversion and involve everyone
You can’t simply strike out toward microservices in the dark! To stand the best chance of success, you need a documented vision about what your product will look like when you arrive.
Use domain driven design (DDD) to model your business as microservices (see the end of this chapter for a book reference). Aim for a simple architecture. Plan for the immediate future and not for the far off uncertain future. Work backward from your architectural vision to what you have now. This is the sequence of changes you must make to convert to microservices. This doesn’t have to be planned in detail, but you do need a general idea of where you are going.
We need a vision of what we are building, an idea of how we are going to get there, and an understanding of why this is important. Plans always change. As they say, “a battle plan never survives contact with the enemy” (paraphrased from Helmuth von Moltke, the Elder). But this doesn’t mean we shouldn’t plan! Instead, we should be planning to allow for change to occur naturally during the process as we learn more about how our application should be structured. And we should revisit and revise our plan, updating it so that it remains relevant for as long as we follow the plan.
The conversion plan should be created together with the team (or a subset of representatives) because implementing this conversion will be a shared and difficult exercise. You need to have everyone invested in it.
It’s not enough just to have made a plan. Now you must communicate it to the wider company. Make sure the developers know what’s expected of them. Communicate with other business departments, describing it in a language that’s meaningful to them, so they know why this is taking place and the value it brings. Everyone, absolutely everyone, must understand the high stakes of this operation!
Before and during the conversion, you should invest significant time getting to know your monolith. Create test plans. Conduct experiments. Understand its failure modes. Develop an idea of what parts of it are going to break through each step of the conversion.
Good automation is crucial to any microservice project. Before and during the conversion, you should be constantly investing in and improving your automation. If you aren’t already on top of your infrastructure and automation, you need to start working on it right away (even before starting the conversion!). You might find that changing your company’s mindset around automation is actually the most difficult part of this process.
You need reliable and fast automated deployment (chapters 6 and 7). Any features that you convert should either have automated testing already, or you should implement automated testing with good coverage while you are converting the feature to microservices (chapter 8).
With microservices, you can’t get away from automation. If you can’t afford to invest in automation, you probably can’t afford to convert to microservices.
Build your microservices platform
Before the conversion starts, you need a platform on which you can host newly created microservices. You need a production environment to host microservices as these are incrementally extracted from your monolith (as shown in figure 11.25).
In this book, you have the recipe to build one such platform. Create a private container registry and create your Kubernetes cluster according to chapters 6 and 7. After creating your first microservice, now create a shared template for your team: a blank microservice that can be the starting point for every other microservice. If you have different types of microservices, create multiple templates, one for each type.
Create your automated testing pipeline and make it easy for developers to use. Create documentation, examples, and tutorials so your developers can quickly understand how to create and deploy new microservices to your platform.
Figure 11.25 Small chunks of your monolith can be incrementally extracted and moved into your Kubernetes cluster.
Now look for existing components in your monolith that align with microservices in your architectural vision. These present great opportunities for chunk-by-chunk extraction of components from your monolith to microservices as figure 11.26 illustrates.
If you struggle to find natural seams, your job will be much more difficult. If your monolith is a giant ball of mud or full of spaghetti code, you may have to refactor first or refactor during extraction. Either way, it’s going to be tricky. To be safe, your refactoring should be supported by automated testing. It will get messy--be prepared.

Figure 11.26 A monolith will usually have natural seams. Use these to identify individual components that can be incrementally extracted to microservices.
Extract the parts that change most frequently
When deciding what order to convert components to microservices, prioritize those components that are changing the most. Having those parts of the monolith extracted early to microservices brings immediate and practical benefits, and you’ll start to feel the impact straightaway. This early bang for the buck should make a measurable improvement to your development pace. It will reduce your deployment risk, and it can help you convince others that the conversion is going well.
By repeatedly extracting small chunks to microservices and testing as we go, we’ll safely convert our monolith to a microservices-based application (figure 11.27). It’s not going to be easy. It will probably take a long time (multiple years, depending on the size and complexity of your monolith). But it is doable! We just have to keep chipping away at it, one small piece by one small piece, until the job is done.

Figure 11.27 Iteratively extract small chunks of your monolith to microservices, always testing and keeping it working. Eventually, your application will be decomposed to microservices.
When we establish our architectural vision, we are aiming for what I call the developer’s utopia of microservices. This is the place where we all want to live-if only we could. You have to be aware, though, that we aren’t really aiming for some perfect instantiation of a microservices application. Sure, that would be nice. But honestly, it’s probably not necessary to get all the way there.
Getting to perfection has a diminishing return on investment, and it’s rarely going to be worthwhile to try and push all the way through to it. Besides, it’s not possible to arrive at perfection because no one will ever agree completely on what that means. But it is still possible to move in that general direction and to make things much better along the way.
Every step on our journey to microservices should be selected to have a positive impact for our customers, our application, our development process, or our business. If at any time we find that continuing along the conversion is not delivering value, we must stop and reassess what we are doing.
Perhaps we are going about it the wrong way? Or, maybe we have now extracted all the value that is possible and pushing further ahead won’t continue to improve things. This could leave us with a partially converted monolith, but so what? Whatever works for you is OK. We are all aiming for good outcomes for our business, and we shouldn’t feel embarrassed at all about what it actually takes to achieve that, however it might look. If it does the job, it does the job. End of story.
As you can see in figure 11.28, there is an infinite spectrum of possibilities between the monolith and the developer’s utopia of microservices. Who can say where on this continuum your application belongs? Certainly not me. Only you can decide that.

Figure 11.28 A timeline of conversion to microservices. In the early days, you get a high return on your investment (ROI). As you proceed, however, you’ll get diminishing ROI, and it might not make sense to go all the way to the developer’s utopia of microservices.
11.6 Microservices on a budget
Distributed architectures have always been a useful and powerful way to deliver complex applications. Microservices are popular now because of the current confluence and combination of cloud technologies, modern tools, and automation. This has made microservices more achievable and more cost-effective than ever before.
But a microservices application is still a complex thing to build. Even though each individual microservice is simple, you might struggle with the complexities of the application as a whole, especially if you are a small team, solo developer, or a lean startup.
Throughout this book, we have learned various tips and techniques that make it easier to learn microservices and get started with those. These will continue to help you in the future, should you need them. I present these insights here, again, in a more concise form.
-
Educate yourself to use modern tools and make the best use of those! Rolling your own tools is time-consuming, difficult, and a distraction from what you should be doing: delivering features to your customers.
-
Start with a single code repository and a single continuous delivery (CD) pipeline. Later, when you have separated out multiple code repositories, create one or more meta-repos to bring these back together (as outlined in section 11.2.5).
-
Use a single database server that hosts one database per microservice.
-
Create a Kubernetes cluster with a single VM. Create only a single instance for each microservice (no replicas). In the beginning, you probably don’t need redundancy or performance. This helps keep costs down.
-
Use external file storage and an external database server, making your cluster effectively stateless. This lowers the risk for experimenting with your cluster. You might break your clusters, but you won’t lose your data. It also supports the blue- green deployment technique presented earlier (section 11.3.7).
-
Use Docker Compose to simulate your application on your workstation for development and testing. Employ live reload for fast development iterations.
-
In the early days, you might not need automated testing, but it is essential for building a large maintainable microservices application. When building a minimal viable product (MVP) for a startup, however, you don’t need it. It is too early in the product’s lifecycle to make such a big commitment to infrastructure. We must prove our product before we can invest in the more advanced infrastructure!
-
You might not have automated testing, but you still need to test! Set up for efficient and reliable manual testing. You need a script to quickly start your application on a development workstation, from nothing to a testable state, in a short amount of time. You can use Docker Compose and database fixtures to achieve this.
-
Docker makes it easy to deploy third-party images to containers running in your cluster. That’s how we deployed RabbitMQ in chapter 5. You can find many other useful images on DockerHub: https://hub.docker.com/.
-
Invest early in your automation, especially continuous delivery through automated deployment. You will rely on this every working day, so make sure it works well.
11.7 From simple beginnings . . .
Just look at how far we have come together! We started by creating a single microservice. Then we learned how to package and publish it using Docker. We learned how to develop and test multiple microservices on our development workstation using Docker Compose. Ultimately, we created a production environment in the cloud on Kubernetes and deployed our microservices-based application to it with Terraform.
Complexity management is at the heart of modern development. That’s why we invest time learning advanced architectural patterns like microservices.
What a great journey this has been! But I’m sad to say that our time together has come to an end. Your journey will continue, of course, and I wish you all the best in building your own complex applications with microservices.

Figure 11.29 Our journey from a single microservice to multiple microservices running in production
11.8 Continue your learning
For one final time, let’s finish the chapter with some references to books that will help you learn more and carry your understanding and knowledge forward. To learn more about domain driven design (DDD), read the original book on it:
If you don’t have much time, you can find a good summary in the free ebook, Domain Driven Design Quickly by Abel Avram and Floyd Marinescu (InfoQ, 2018), available here:
To better understand security for microservices, read
To learn more details on theory on development with microservices, pick any of these books:
-
Microservices in Action by Morgan Bruce and Paulo A. Pereira (Manning, 2018)
-
Microservices in .NET Core, 2nd ed., by Christian Horsdal Gammelgaard (Manning, 2020)
-
Developing Microservice APIs with Python by José Haro Peralta (Manning, 2020)
Summary
-
To gain the most benefit from microservices, we must separate out our code repository and continuous delivery (CD) pipeline. This ensures that each microservice can be deployed independently. It also allows separate teams to take ownership for separate microservices.
-
Using a meta-repo, we can regain some of the convenience of the monorepo (mono repository) after we have separated our code repositories.
-
Having independent CD pipelines means we’ll have a scalable deployment pipeline.
-
We can create multiple environments (e.g., development, test, and production) by parameterizing our Terraform deployment code.
-
We can configure separate CD pipelines for each branch (e.g., development, test and production) in our code repositories. Pushing code to a branch triggers the pipeline and deploys to the appropriate environment.
-
For increased performance, we have numerous options, including
-
We should always have a single database per microservice so that we have options for scaling our data storage.
-
Blue-green deployment switches our customers among alternating environments and is a safe way to manage potentially risky infrastructure upgrades.
-
Security for microservices is as important as any application, if not more so, given that a microservice application might have many gateways.
-
We can employ security techniques such as authentication and authorization to protect access to our system.
-
We can employ integrity protection techniques to protect our data and secure privacy and confidentiality for our customers.
-
Refactoring from a monolith to microservices can only be accomplished through a series of small and well-tested steps.
-
There are many ways we can make microservices more affordable and less complex when we are starting out. This makes microservices an effective and efficient starting point for startups, small teams, and solo developers.