- Building production infrastructure for your application
- Working with Terraform to script the creation of infrastructure
- Creating a Kubernetes cluster to host microservices
- Interacting with your Kubernetes cluster
Finally, we arrive at the most exciting chapters of the book! The next two chapters are also probably the hardest so far, but do follow along with the examples. That’s how you’ll learn the most and gain real experience bringing your own application to production.
In this chapter and the next, we will create a Kubernetes cluster and deploy containers to it: a MongoDB database, a RabbitMQ server, and of course, our video streaming microservice. In the next chapter, we’ll also build a continuous delivery (CD) pipeline that automatically deploys our updated code to production. The examples in these two chapters are designed for you to follow along with step by step to build our infrastructure and application. This closely emulates the real process of prototyping new infrastructure and is close to what I really do in my own development.
These chapters are two parts of what we need for production deployment. In chapter 6, this chapter, we’ll build our production infrastructure. By the end of this chapter, we’ll have a fresh container registry and an empty Kubernetes cluster ready and waiting to host our application. In chapter 7, we’ll continue the effort and learn how to deploy our microservices through an automated deployment pipeline. Let’s begin!
6.1 New tools
This chapter introduces two new tools: Kubernetes and Terraform. These tools are so important that they made it into the title of the book! We’ll use Terraform to create the infrastructure for our microservices application, including our Kubernetes cluster.
Table 6.1 New tools in chapter 6
6.2 Getting the code
To follow along with this chapter, you need to download the code or clone the repository.
-
You can clone the code using Git like this:
git clone https://github.com/bootstrapping-microservices/chapter-6.git
For help on installing and using Git, see chapter 2. If you have problems with the code, log an issue against the repository in GitHub.
6.3 Getting to production
The day has arrived. We are taking our application to production. It might seem like it is too early to take this small application to production, but actually, in normal development situations, I really do advocate going to production as early as possible. Maybe not as early as this, but I do believe it’s a good idea to go to production while your application is still small. Why is that?
Going to production means putting our application where our customers can see it and use it. Putting our product in front of users is essential to getting feedback, adapting to their needs, and building valuable features. If we don’t go to production, we won’t get that feedback. Having a deployment pipeline that allows for rapid and reliable updates is the best tool we have for experimenting and figuring out how to make a great product.
Also, while our application is still small, this is the best time to build a CD pipeline and to go to production. When our application is small, it’s easier to deploy. But this task becomes progressively more difficult as our application grows larger.
Figure 6.1 shows what we’ll do in this chapter. We’ll use Terraform on our development workstation (or personal computer) to build infrastructure in the cloud. We’ll use code to create our container registry and our Kubernetes cluster. Then, in chapter 7, we’ll learn how to put this on automatic with continuous delivery (CD). But for now, we’ll learn to evolve our development infrastructure by manually invoking Terraform.

Figure 6.1 Prototyping our infrastructure with Terraform
6.4 Infrastructure as code
Infrastructure as code is the name of the technique we’ll use in this chapter to bring our application to production. It’s called infrastructure as code because rather than manually creating infrastructure (say, through a GUI, as we did with our private container registry in chapter 3), we will write code that creates our infrastructure.
Not only will this code describe our infrastructure, but we will also execute it to actually create our infrastructure. Using code to create infrastructure means that we can reliably and repeatedly create and recreate our infrastructure on demand and as often as we like.
The fact that this code both describes and builds our infrastructure makes it a form of executable documentation. It’s a statement about how we want our infrastructure to look, and unlike normal (i.e., non-executable) documentation, it’s a form of documentation that’s never going to go out of date.
Through infrastructure as code, creating and updating our infrastructure becomes a kind of coding task. The best form of infrastructure as code uses a declarative language instead of a procedural one. This means it describes the configuration and layout of the infrastructure instead of the step-by-step instructions for building it. We prefer the declarative format because we can let our tools do the heavy lifting, and these can figure out the best way to make changes to our infrastructure.
Figure 6.2 illustrates the concept of infrastructure as code. The code for our infrastructure lives in a code repository such as Git. From there, we execute it to create, configure, and maintain our cloud-based infrastructure.

Figure 6.2 Infrastructure as code uses executable code to create infrastructure.
Infrastructure as code is not just important because we can use our well-tested code to reliably and repeatedly create our infrastructure. It’s also important because it’s what allows us to automate the creation and maintenance of our infrastructure. As such, it’s a crucial enabler for continuous delivery, which we’ll see in the next chapter where we build our automated deployment pipeline.
6.5 Hosting microservices on Kubernetes
By the end of the next chapter, we’ll run multiple containers in the production environment for our application. These containers are hosted on a managed version of Kubernetes that is running in the cloud (you can think of this as Kubernetes as a service).
Note Kubernetes is a computing platform for managing container-based applications. It was originally created by Google but is now managed by the Cloud Native Computing Foundation, a committee that has huge industry support and is also responsible for many other interesting projects.
Kubernetes is commonly known as a container orchestration platform. This tells us all we need to know. Kubernetes can manage and automate the deployment and scaling of our containers. Kubernetes is the production backbone of our microservices application. I like to think of it as a platform for microservices.
6.5.1 Why Kubernetes?
There are many reasons to use Kubernetes. The simplest reason is to avoid vendor lock-in. All the main cloud vendors offer their own container orchestration services that are good in their own right. But each of these also offers a managed Kubernetes service, so why use a proprietary service when you can instead use Kubernetes? Using Kubernetes means our application can be portable to any cloud vendor.
I believe it’s worthwhile to learn Kubernetes (at least the basics) because the knowledge is transferable. Although, in this book, we host our Kubernetes cluster on Microsoft Azure, you can take the Kubernetes skills with you and use them on whichever cloud you most prefer.
Kubernetes has a reputation for being complicated. And certainly, it is if you want to install it on your own hardware or if you want to deep dive and become an expert. Fortunately, for the rest of us, building a managed Kubernetes cluster in our favorite cloud platform is much easier, to the point where (at least on Azure) we can create it in the GUI in a handful of clicks. We won’t create our infrastructure manually through a GUI though. Instead, we’ll create our cluster through Terraform code.
Kubernetes emerged from the vast experience of Google, then it was turned over to the community. This means you can fork the code and contribute to Kubernetes yourself-assuming you have a desire to be lost down that particular rabbit hole!
Kubernetes allows us to build applications that are scalable in multiple ways. That’s something we’ll talk more about in chapters 10 and 11. In this chapter and the next, however, we’ll learn the absolute basics. That’s enough to build a production cluster to which we can deploy our small microservices application.
Most importantly, Kubernetes has an automatable API. This is what will allow us to build our automated deployment pipeline in chapter 7. Kubernetes is becoming an industry standard for microservices, and I expect it to continue in that direction. It’s well supported and has a great community and a large ecosystem of tools.
To me, Kubernetes is the universal computing platform. It’s supported by all the major cloud players. No matter where we end up, we can take Kubernetes with us. Kubernetes is open source and you can find the code here:
https://github.com/kubernetes/kubernetes
6.5.2 How does Kubernetes work?
A Kubernetes cluster is composed of multiple computers. Each computer is called a node. Each node is actually a virtual machine (VM). We can add as many VMs as we need to our cluster to control the amount of computing power available to our application. And, each node can host multiple pods. A pod is the basic unit of computation in Kubernetes.
Figure 6.3 illustrates an example of the arrangement of nodes and pods. The depicted cluster has three nodes (it is powered by three VMs). However, the cluster we create in this chapter only has a single node. That’s because our simple application doesn’t need much computing power. It also means we won’t pay for more VMs than we actually need. Scaling up to more nodes is easy though, and we’ll look at a real example in chapter 11.

Figure 6.3 The structure of a Kubernetes cluster
Each pod can actually host multiple containers, as figure 6.4 shows. This can be the basis for many interesting architectural patterns (such as the well-known sidecar pattern for proxies and authentication).
In this book, though, we are keeping things simple. Each pod will host only a single container or microservice. Even though figure 6.4 shows a pod with multiple containers, for the purposes of this book, you can think of a pod as a container or as a microservice if that’s a simplification that is helpful for you.

Figure 6.4 The structure of a Kubernetes pod
6.6 Working with the Azure CLI
Before we can start working with Terraform, we need the Azure CLI up and running. That’s the simplest way for us to authenticate Terraform so that it has access to our Azure account and to give it permission to create infrastructure on our behalf in Azure. It’s also really handy to have the Azure CLI because it’s a useful way to interact with our Azure account and manage our cloud resources.
6.6.1 Installing the Azure CLI
You can find the instructions for installing the Azure CLI here:
https://docs.microsoft.com/en-us/cli/azure/install-azure-cli
Choose your platform and follow the instructions to install it. After installing the Azure CLI, you can test it from your terminal with the following command:
az --version
At the time of writing, I’m using version 2.9.1. Future versions should be backward compatible.
6.6.2 Authenticating with Azure
The main reason we install the Azure CLI is simply to authenticate with our Azure account. We can do that from the terminal by running the following command:
az login
Running this command opens a browser so you can sign in to your Azure account. If it doesn’t automatically open your browser, you’ll have to manually check the output, open the URL, and then enter the code. The output of the command gives instructions:
To sign in, use a web browser to open the page https://microsoft.com/devicelogin
➥ and enter the code XXXXXX to authenticate.
After entering the code, click Next. Now sign in to your Azure account with your username and password. After signing in, you will see a message in your browser like this:
You have signed in to the Microsoft Azure Cross-platform Command Line
➥ Interface application on your device. You may now close this window.
You can now close your browser and return to the terminal. The az login command completes and displays a JSON formatted list of your Azure subscriptions. If you only just signed up for Azure for this book, you should see only one subscription. If you already use Azure for work you might see multiple subscriptions listed.
The authentication is saved locally, and from now on, you can issue other commands against your Azure account without having to sign in each time. We can test which Azure subscription we are working with using this command:
az account show
The output from this command shows us the current default subscription. We can view a list of all subscriptions with this command:
az account list
The output is a JSON formatted list of subscriptions. Each subscription has an id field that is a unique ID for the subscription. You’ll also notice that the current default subscription is marked by having its isDefault field set to true. This field is set to false for any other subscriptions in the list.
At this point, you should verify that you are using the right subscription to follow along with the examples in this book. For example, if you have access to subscriptions from your employer, you probably shouldn’t use those for your own learning and experimentation (or at least, check with your boss first). If you need to change the current working subscription, you can set a new default with the following command:
az account set --subscription=<subscription-id>
Replace <subscription-id> with the ID of the subscription that you want to set as the default. After changing the default subscription, double-check it again with this command:
az account show
This is just to be absolutely sure that we are using our own subscription to follow along with the examples. We don’t want to accidentally use an Azure subscription from our employer.
6.6.3 Which version of Kubernetes?
Let’s do something practical with the Azure CLI to understand how it can be useful. Toward the end of this chapter, we’ll create our managed Kubernetes cluster. It will be helpful to know in advance which versions of Kubernetes are available in the location where we are creating it.
To interact with the Azure Kubernetes service via the Azure CLI, we’ll use the aks subcommand. Here’s an example that lists versions of Kubernetes in the West US region:
az aks get-versions --location westus
The output is a JSON formatted list that shows the available versions of Kubernetes in that location. The output will be more readable for us if use the table style of output like this:
az aks get-versions --location westus --output table
You should now see something like this:
KubernetesVersion    Upgrades
-------------------  --------------------------------
1.18.4(preview)      None available
1.18.2(preview)      1.18.4(preview)
1.17.7               1.18.2(preview), 1.18.4(preview)
1.16.10              1.17.7
1.15.12              1.16.10
1.15.11              1.15.12, 1.16.10
From this list, you should select the most recent stable (non-preview) version of Kubernetes. That’s 1.18.8 at the time of writing. But by the time you read this, there will be a more recent version. It’s quite possible that version 1.18.8 will have also been expired (no longer available through Azure). Be sure to choose a version number that’s currently available!
Make a note of the version number. We’ll need it soon to create our cluster. You could choose a preview version of Kubernetes, say, if you wanted to evaluate the latest release. But normally for production use, we’d prefer to use the latest stable version.
6.6.4 What have we achieved?
We’ve installed the Azure command-line tool (Azure CLI). This is a useful tool for interacting with our Azure account from the terminal. We used it to authenticate with our Azure account.
Note Terraform needs to be authenticated with Azure so that it can create infrastructure on our behalf.
As a practical example, we used the Azure CLI to query for the versions of Kubernetes that are available for use in our chosen location. We noted the most recent version number of Kubernetes, and we’ll use that later to create our cluster.
6.7 Creating infrastructure with Terraform
Now we are coming to the point where we’ll actually start to create our infrastructure! We could build our infrastructure manually, either using the GUI from our cloud vendor (e.g., the Azure portal) or via the command line (e.g., the Azure CLI). In this book, though, we’ll build our infrastructure in an automated fashion using code.
From here on in, we’ll use infrastructure as code to automate the process of infrastructure creation and, hence, make it reliable and repeatable. Automation allows us to later scale up our application without scaling up our manual workload. We’ll do this with Terraform, an amazingly flexible tool for executing Hashicorp Configuration Language (HCL) code.
HCL is the declarative configuration language in which we’ll define our infrastructure. Executing this code with Terraform actually creates our infrastructure in the cloud.
Note In the future, I’ll refer to HCL simply as Terraform code.
Terraform supports multiple cloud vendors through plugin providers as figure 6.5 illustrates. For the examples in this chapter, we use Terraform to create infrastructure on Microsoft Azure.
If learning HCL seems in any way daunting, remember this: HCL is actually just like YAML or JSON, but it’s a different format. Hashicorp created HCL to be a human-readable configuration format that is also machine-translatable to YAML and JSON. Think of it as YAML or JSON but structured so that it’s more friendly for humans.

Figure 6.5 Using Terraform to build infrastructure with various cloud vendors
6.7.1 Why Terraform?
Terraform is a tool and a language for configuring infrastructure for cloud-based applications. Terraform makes it easy to reliably and repeatedly configure cloud infrastructure. It’s incredibly flexible, as its functionality is extended through plugin providers. This is how it supports multiple cloud vendors! Terraform already has robust providers implemented for Azure, AWS, and Google Cloud.
Just like with Kubernetes, we’ll again learn transferable skills that can be used with all the major cloud vendors. No matter which cloud we use, we can make use of Terraform to build our infrastructure. We can even create our own providers and extend Terraform to work with platforms that it doesn’t yet support. To seal the deal, Terraform supports Kubernetes, and we’ll also use it to deploy containers to our cluster.
Terraform does just about everything we need to create our application’s automated deployment pipeline. It’s an all-in-one tool for scripting infrastructure because, even for the things it can’t do, we can fill the gaps ourselves. In the next chapter, you’ll see one simple method we can use to extend the functionality of Terraform to cover those areas that it can’t yet handle.
To me, Terraform seems like the universal configuration language. It’s one language we can use to create all of our infrastructure. Terraform is open source, and you can find the code here:
https://github.com/hashicorp/terraform
6.7.2 Installing Terraform
Installing Terraform is simply a matter of downloading the binary executable for your operating system and moving it to a directory that’s included in your system’s PATH environment variable. Download the latest version of Terraform from here:
https://www.terraform.io/downloads.html
After installing Terraform, test it from your terminal with the following command:
terraform --version
At the time of writing, I’m using version 0.12.29. Future versions should be backward compatible.
6.7.3 Terraform project setup
Before we get started with Terraform, let’s become familiar with what a Terraform project looks like. Figure 6.6 shows a fleshed out Terraform project. This is what example-3 from chapter 7 looks like. You don’t have to look at chapter 7 yet or even open that particular code example right now. We are just looking at the structure of that project in figure 6.6 to become familiar with what a Terraform project looks like.
As you can see in figure 6.6, a Terraform project is composed of a number of Terraform code files; those are the files ending in the .tf extension. These files contain the Terraform code that, when executed by Terraform, creates the infrastructure for our application.
There are a lot of files here. That’s because we are looking at a more complex example from the next chapter. Don’t be concerned! In a moment, we’ll start with example-1 from this chapter (chapter 6), which is much simpler.
You should be able to read the filenames in figure 6.6 and get an idea of their purpose. That’s because I’ve used a naming convention where each script file is named according to the piece of infrastructure that it creates. When you read through the filenames in figure 6.6 (or any project in chapters 6 and 7), you should read it like this: resource-group.tf is responsible for creating an Azure resource group; database.tf is responsible for deploying the database; and so on.
Let’s try this now. Read through the filenames in figure 6.6 and have a go at guessing the purpose of each one. Mostly, it should be obvious; although, there are a couple of files that are outside the naming convention. Don’t be concerned if you can’t figure it all out; all will be explained throughout this chapter and the next.

Figure 6.6 The structure of a more complete Terraform project (we have jumped forward to see example-3 from chapter 7).
Note in figure 6.6 that we have co-located the code for the video streaming microservice alongside the Terraform code files. It lives under the video-streaming subdirectory in the same code repository. This should explain why we are storing the Terraform code files under the scripts subdirectory. That keeps our infrastructure code separate from the code for our microservices.
The structure and filenames in this example project are not dictated by Terraform. It just happens to be the convention we’ll use in these examples. For your own projects, a different structure might be better, so feel free to experiment and find the best structure for your own project.
To keep things simple while learning, and because this is a good way to start a new microservices project, we’ll co-locate our infrastructure and microservices code. You might already realize that this monolith-like project structure eliminates some of the benefits of using microservices in the first place. Don’t worry too much about that right now. Just know that this simple structure is only for the early days of our new application. As we grow our application, we’ll need to convert it to a more scalable structure, but that’s something we’ll discuss in chapter 11. For the moment, let’s stick with this simple project structure.
6.8 Creating an Azure resource group for your application
After looking at the advanced project structure of example-3 from the next chapter, let’s now dial back the complexity and look at the much simpler example-1 from this chapter. We need to start our Terraform journey somewhere, and our starting points should always be simple. This is the case with example-1, which contains the simplest Terraform code from which we can start to create our deployment pipeline.
The first thing we do is to create an Azure resource group that groups together all the other Azure resources we’ll build throughout this chapter. Back in chapter 3, we manually created a resource group through the Azure Portal GUI. Now, we create a resource group again, but this time, we aren’t doing it manually. We’ll build it through code using Terraform.
Figure 6.7 shows what we’ll do in this section. Example-1 contains two Terraform code files: providers.tf and resource-group.tf. The script file, resource-group.tf, is the one that actually creates the resource group. The other file, providers.tf, contains configurations for the Terraform provider plugins.
We will use the terraform apply command to execute our Terraform code. Figure 6.7 shows how our code files are input to Terraform, which executes our code and creates a FlixTube resource group in Azure (shown on the right of figure 6.7).

Figure 6.7 Using Terraform to create an Azure resource group
The file providers.tf isn’t technically necessary to this process. We could delete it, and this example would still work. It’s useful to have this file, though, because this is where we can put our code for configuring the providers that we use. In a moment, we’ll talk about providers.tf in more detail.
6.8.1 Evolutionary architecture with Terraform
Terraform is a tool for building our infrastructure in an iterative fashion-something we call evolutionary architecture. In this chapter, you can experience this iterative method of building infrastructure for yourself.
At this point, we will start to write Terraform code. You have a choice about how to follow along with the examples in this chapter and the next one:
-
Start with example-1 and then iteratively update your example project to evolve your infrastructure as you read through this chapter and the next
-
Start each example fresh and build new infrastructure for each example in this chapter and the next
All of the examples in chapters 6 and 7 can run standalone, so you can easily start your infrastructure from any point by jumping ahead to any of the examples and invoking Terraform for that code. However, the best way for you to follow along, the way that is most like “real” development, is to iteratively update your code and evolve your infrastructure in a step-by-step manner (that’s the first option mentioned). To follow along in this way, you should create a separate working directory for your evolving project, for example:
mkdir working
Then copy the example-1 code to it:
cp -r chapter-6/example-1/* working
Now you can follow along with the examples in chapters 6 and 7. Each time you get to a new example, copy over the new code to your working project like this:
cp -r chapter-6/example-2/* working
To execute these commands on Windows, you should consider installing Git for Windows. It comes with many Linux commands compiled to work under Windows. Here’s the link:
Alternatively, on Windows you can use WSL2 or Linux running under a Vagrant VM. See chapter 3 and appendix A for more details.
The example code in chapters 6 and 7 is designed to be used in this evolutionary way, and thus, emulates the real iterative process of infrastructure development. Figure 6.8 shows this process. Note how we use multiple iterations of the terraform apply command as we edit our infrastructure code. Through this, we progressively add to and update our growing infrastructure.
Tip It’s best to use Git to keep track of the updated code that you copy into your working project.
After copying the code from example-1, create a new Git code repository and commit the code. Then, after you copy each new example to your working project, you can use git diff to understand the new changes that are going in. At each iteration, commit the updated code and continue with the next example.
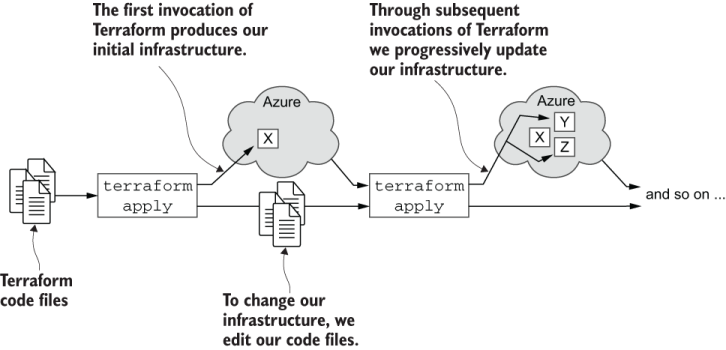
Figure 6.8 Iterative evolution of infrastructure with Terraform
This might all seem like a lot of work. I understand you are busy, and you might not have time to follow along using the evolutionary method. If that’s the case, feel free to jump directly to any example in this chapter that you might like to run. These are all designed to run standalone, so you can follow along whichever way you like.
I will say this, though, if you do want to follow along with every example, then the iterative evolutionary approach is actually more efficient. That’s because at each step of the iteration, Terraform only creates those resources that don’t already exist.
If instead, you run each example on its own, you will end up running Terraform to create a complete infrastructure for each example. That’s the least efficient way to do this. Creating a Kubernetes cluster from scratch is slow, but updating an existing Kubernetes cluster is much quicker! Following along with the evolutionary approach can actually save you some time!
6.8.2 Scripting infrastructure creation
Listing 6.1 shows our first Terraform code file. It doesn’t get much simpler than this. Using the Azure provider, we will create an Azure resource group simply by declaring it in three lines of Terraform code.
Listing 6.1 Creating an Azure resource group (chapter-6/example-1/scripts/resource-group.tf)
resource "azurerm_resource_group" "flixtube" {     ①
  name = "flixtube"                                ②
  location = "West US"                             ③
}
① Declares an Azure resource group. This resource group will contain all the resources we create, so it’s a fundamental beginning for our new infrastructure.
② Sets the name of the resource group
③ Sets the location (data center) where the resource group will be created
Through Terraform code, we are defining the components of our infrastructure. In listing 6.1, we have defined the first piece of our infrastructure. We have declared an Azure resource group called flixtube that has the type, azurerm_resource_group. This is a Terraform resource type that comes from the Azure provider and gives us the ability to create a resource group on Azure. Soon we’ll run Terraform, and it will create this resource group in our Azure account just how we have configured it.
6.8.3 Initializing Terraform
We have taken the first steps in creating our infrastructure. We wrote a simple script that creates an Azure resource group. But before we invoke Terraform and execute this script, we must first initialize Terraform.
When we initialize Terraform, it downloads the provider plugins required for our script. At this point, we only need the Azure provider. To initialize Terraform, first change directory to the location of the Terraform code:
cd chapter-6/example-1/scripts
Now run the terraform init command:
terraform init
You should see some output indicating that the Azure provider plugin is downloaded; for example,
Initializing the backend...
Initializing provider plugins...
- Checking for available provider plugins...
- Downloading plugin for provider "azurerm" (hashicorp/azurerm) 1.43.0...
Terraform has been successfully initialized!
Once this completes, we are now ready to execute our Terraform code. We must always run the terraform init command at least once for each Terraform project before we execute any Terraform code in that directory. You must also run it at least once for each new provider that you use. Each time you invoke terraform init, it only downloads those providers that it has not yet cached.
If you are following along with the examples in chapters 6 and 7 in the evolutionary way proposed in section 6.8.1, then you only need to do the initialization for each example that includes a new provider. Otherwise, if you run each example standalone, you’ll just need to remember to run terraform init for each example.
Don’t worry if you forget to run terraform init, it won’t cause you any problem. When you forget, Terraform reminds you that you need to do that first.
6.8.4 By-products of Terraform initialization
With Terraform initialized, we can now inspect the files that the init command has created or downloaded in the scripts subdirectory. Have a look through the scripts directory and see what you can find. Figure 6.9 shows the example-1 project after running terraform init.

Figure 6.9 Files downloaded or created while running terraform init.
You’ll notice there’s a hidden subdirectory, .terraform, that was created, and it contains a bunch of files. This is the place where Terraform stores the provider plugins that it has downloaded. These are cached here so they can be reused each time we invoke Terraform.
6.8.5 Fixing provider version numbers
Before we invoke Terraform for the first time, let’s talk about that other file in our project. Listing 6.2 shows the code for providers.tf. This is the file where we define and configure all of our Terraform provider plugins.
Listing 6.2 Configuring Terraform provider plugins (chapter-6/example-1/scripts/providers.tf)
provider "azurerm" {       ①
    version = "1.38.0"     ②
}
① Sets the name of the provider plugin
② Sets the version of the provider plugin to download and use
Technically, we don’t need this file yet, and we don’t need to declare our providers ahead of time. We can simply invoke terraform init, and it is smart enough to figure out which providers we need and download those for us.
This is convenient when starting a new project. We can simply start writing Terraform code to create our cloud infrastructure, and we don’t have to declare our providers upfront. Then, when we invoke terraform init, it downloads the latest versions of the providers we need. Terraform lists the versions of the plugins it downloads in the output, like this extract from the earlier output:
- Downloading plugin for provider "azurerm" (hashicorp/azurerm) 1.43.0...
This is a great way to get started, but it can lead to unexpected problems down the road. For example, in the future, you might find yourself unwittingly upgraded to a new version of the Azure provider that isn’t 100% backward compatible with the version you originally used (yes, that happened to me). As a result, your Terraform code can break in ways that are often difficult to predict or understand.
Fortunately, we can preemptively solve this by fixing our versions to those that we have tested and that we trust. You can see the current version of any provider by inspecting the output from terraform init and then hard-code this version number into your providers.tf file (as shown in listing 6.2).
Eventually, our Terraform code must run completely unattended in our automated CD pipeline (which we’ll create in chapter 7). Our code must be bullet-proof and fixing our version numbers makes our Terraform code more reliable. This means that in the future, we won’t be exposed to having our dependencies changed underneath us.
We can also use the providers.tf as a place to configure other parameters to providers. We’ll see an example of this in the next chapter.
6.8.6 Building your infrastructure
After initializing our Terraform project, we are ready to invoke the terraform apply command to execute our Terraform code and build the first iteration of our infrastructure. If you need to, refer back to figure 6.8 for a graphical depiction of the apply command. From the same directory where you invoked the init command, run this command:
terraform apply
The apply command gathers together and executes all of our Terraform code files. (So far we only have two code files, but soon we’ll have more.) When you invoke the apply command you’ll see output like this:
An execution plan has been generated and is shown below.
Resource actions are indicated with the following symbols:
  + create

Terraform will perform the following actions:

  # azurerm_resource_group.flixtube will be created
  + resource "azurerm_resource_group" "flixtube" {
      + id       = (known after apply)
      + location = "westus"
      + name     = "flixtube"
      + tags     = (known after apply)
    }

Plan: 1 to add, 0 to change, 0 to destroy.

Do you want to perform these actions?
  Terraform will perform the actions described above.
  Only 'yes' will be accepted to approve.

  Enter a value:
This output describes the planned update to our infrastructure. Terraform is telling us the changes that it is about to make. (You can also use the terraform plan command to get this output separately.)
Terraform is now waiting for us to approve the plan before it continues and actually makes the update to our infrastructure. It’s a good idea at this point to scan the output and double-check that the upcoming changes are OK and what we expect. Once happy with the plan, type yes and press Enter to allow Terraform to proceed.
Terraform now creates the infrastructure we requested. In this case, on our first invocation of Terraform, the flixtube resource group is created in our Azure account. This should happen pretty quickly (because at the moment it’s still a small script and doesn’t do much). Then you’ll see a success message like this:
azurerm_resource_group.flixtube: Creating...
azurerm_resource_group.flixtube: Creation complete after 5s [id=/subscriptions/219aac63-3a60-4051-983b-45649c150e0e/resourceGroups/flixtube]
Apply complete! Resources: 1 added, 0 changed, 0 destroyed.
The output gives a quick summary of what was added, changed, and deleted. In this case, it confirms what we already know, that we have created one cloud resource, our Azure resource group.
Now let’s manually check what the change looks like. Open your web browser and navigate to the Azure portal at https://portal.azure.com/. You can check for yourself that an Azure resource group has indeed been created in your Azure account. In the portal, click Resource Groups and verify that the flixtube resource group is now in the list. This is what your first Terraform code just created!
Of course, you don’t always need to check that every resource has been created by manually inspecting the Azure portal. We are only doing this in the first instance so that you can connect the dots about what just happened.
6.8.7 Understanding Terraform state
At this point, after invoking terraform apply in our project for the first time, Terraform will have generated its state file terraform.tfstate. You should see this file in the same directory as your Terraform code files.
It’s important that we understand Terraform’s persistent state management; although, most of the time we won’t care what’s in the state file. But it’s good to know why it’s there and how to deal with it.
Let’s take a look at our Terraform state file and see what it looks like after we have created our first piece of infrastructure. This is a good time to look at the state file: while it’s still small and easily understandable. Invoke the cat command to display the state file:
cat terraform.tfstate
Your output will look something like this:
{
  "version": 4,
  "terraform_version": "0.12.29",
  "serial": 1,
  "lineage": "dc5cb51c-1ab4-02a5-2271-199538b7655a",
  "outputs": {},
  "resources": [
    {
      "mode": "managed",
      "type": "azurerm_resource_group",
      "name": "flixtube",
      "provider": "provider.azurerm",
      "instances": [
        {
          "schema_version": 0,
          "attributes": {
            "id": "/subscriptions/219aac63-3a60-4051-983b-
            ➥ 45649c150e0e/resourceGroups/flixtube",
            "location": "westus",
            "name": "flixtube",
            "tags": {}
          },
          "private": "bnVsbA=="
        }
      ]
    }
  ]
}
You can see that our Terraform state file has one item in the resources field. The details of the resource group we just created were recorded in this state file.
The first time we invoked terraform apply, the state file is generated. Subsequent invocations of terraform apply use the state file as input. Terraform loads the state file and then refreshes it from the live infrastructure. Figure 6.10 shows how successive invocations of Terraform are connected by both the live infrastructure and the state file.
You might like to know at this point what exactly is the point of the state file? If our infrastructure is defined in our Terraform code, and Terraform can know the current state directly from the live infrastructure, why must it persist the state in a separate file? There are two points to consider to understand why the state file is necessary:
-
This Terraform project doesn’t own all the infrastructure in your Azure account.
-
As we make changes to our Terraform code (to change our infrastructure), it becomes out of sync with the live infrastructure. (We are relying on Terraform to change the live infrastructure to make it look like our declared infrastructure.)

Figure 6.10 Understanding Terraform state is crucial to working with Terraform.
Let’s consider the first point. An Azure subscription may well be shared among multiple projects. Infrastructure in that account can have been created by other Terraform projects or even by entirely different means (e.g., created manually in the Azure portal or with the Azure CLI tool).
As you follow the examples in this book, you most likely have an entire Azure subscription dedicated to it. But this won’t be the case if you are working for a company that is managing multiple projects or if you are managing multiple projects yourself. In that case, an Azure subscription is shared between projects, with the subscription containing multiple sets of infrastructure.
The point I’m making is that Terraform can’t and, indeed, doesn’t assume that it owns everything in the Azure account that it is allowed to access. What this means is that Terraform can’t simply read the live infrastructure and assume that it owns everything. It can only assume ownership of infrastructure that is either declared in our infrastructure code or that is recorded in the state file. The first thing that Terraform does is load your code and your state file. That’s how it knows which set of infrastructure it owns.
Terraform always wants to be up to date though, so after loading the state file, it refreshes the state directly from the live infrastructure. This allows Terraform to handle configuration drift when the actual state has changed (e.g., because someone tweaked it manually) from the previously recorded state.
You can see how this might affect performance as well. Terraform only queries those parts of the live infrastructure for which it is responsible; those parts which it knows about because of the recorded state. If, instead, it queried all live infrastructure, that could be an expensive and time-consuming operation, depending on the total amount of infrastructure that exists in our Azure account.
Now, let’s consider the second point mentioned. As we change our Terraform code (to change our infrastructure), it becomes out of sync with our live infrastructure. That’s because we are leading changes to the infrastructure with changes in the code. That’s why we call it infrastructure as code.
We can add, update, and delete infrastructure by modifying our code. How does Terraform know what’s changed? Terraform compares its recorded state with what’s in our code. Terraform then automatically figures out the precise set of changes it needs to update our infrastructure. It’s amazing when you think it through, just how smart Terraform is and how much work it can do on your behalf.
Now you know more than you probably wanted to about Terraform state, but honestly, it’s crucial that we have a good understanding of Terraform state before we can implement it properly in our CD pipeline. We’ll come to that in the next chapter. As you proceed through the examples in this chapter and the next, feel free to look at the state file again to see how it grows and changes.
6.8.8 Destroying and recreating your infrastructure
We have bootstrapped our infrastructure! It’s not much yet, but it’s a good start. Before we continue evolving our infrastructure, let’s take some time out to experiment with destroying and rebuilding it.
The reason we are choosing this moment to experiment is that it’s more efficient to do this experimentation while our infrastructure is small. At the end of this chapter, we’ll have added a Kubernetes cluster, and that will take much more time to destroy and rebuild.
Not to mention that eventually, you’ll need to clean up these Azure resources anyway. You don’t want to end up paying for those (unless, of course, you are developing a real product). It costs money to run this infrastructure ; although, I hope you are starting with the free credit from Azure. But don’t leave it running longer than you need it!
Now, go ahead and destroy your current infrastructure with the Terraform destroy command like this:
terraform destroy
Your output will look something like this:
An execution plan has been generated and is shown below.
Resource actions are indicated with the following symbols:
  - destroy
Terraform will perform the following actions:
  # azurerm_resource_group.flixtube will be destroyed
  - resource "azurerm_resource_group" "flixtube" {
      - id       = "/subscriptions/219aac63-3a60-4051-983b-
      ➥ 45649c150e0e/resourceGroups/flixtube" -> null
      - location = "westus" -> null
      - name     = "flixtube" -> null
      - tags     = {} -> null
    }
Plan: 0 to add, 0 to change, 1 to destroy.
Do you really want to destroy all resources?
  Terraform will destroy all your managed infrastructure, as shown above.
  There is no undo. Only 'yes' will be accepted to confirm.
  Enter a value:
Just like the apply command, destroy shows us its plan. These are the changes it will make. To continue, we must type yes and press Enter. Terraform does the work and displays a summary:
azurerm_resource_group.flixtube: Destroying... [id=/...
azurerm_resource_group.flixtube: Still destroying... [id=/subscriptions/219aac63-3a60-4051-983b-45649c150e0e/resourceGroups/flixtube, 10s elapsed]
[id=/subscriptions/219aac63-3a60-4051-983b-45649c150e0e/resourceGroups/flixtube, 50s elapsed]
azurerm_resource_group.flixtube: Destruction complete after 54s
Destroy complete! Resources: 1 destroyed.
When you have finished with each example in the book, you should invoke destroy to clean up the infrastructure that you created. If you are evolving your infrastructure using the iterative method from section 6.8.1 and following this all the way to the end of chapter 7, then you won’t need to invoke destroy again until the end.
You could also manually delete Azure resources through the Azure portal or the Azure CLI tool. But it’s easier to do this with the destroy command. It also means you won’t accidentally delete other infrastructure, say, if you are sharing the Azure subscription with other projects.
After your practice run with terraform destroy, it’s simple to rebuild your infrastructure. For that, we’ll simply invoke terraform apply again:
terraform apply
Practice this as many times as you want. This process of destroying and rebuilding your infrastructure helps you comprehend the fact that you are actually managing infrastructure with executable code! You can destroy and create your infrastructure at will with no manual effort. At this early stage, this doesn’t seem like much, but the significance of this increases as your infrastructure and application grow larger and more complex.
In fact, you may have already realized that we can use our Terraform code to create multiple copies of our infrastructure! In chapter 11, we’ll learn how to parameterize our Terraform code to create separate instances for development, testing, and production. If that doesn’t excite you, I don’t know what will.
6.8.9 What have we achieved?
We now have Terraform installed and we have built our fledgling infrastructure. Terraform is the tool we use for infrastructure as code. This is the technique where we store our infrastructure configuration as executable code (e.g., in Terraform code files) that we can use to create, manage, and destroy our infrastructure.
We also created our first Terraform code files and initialized our project using terraform init. Then we invoked terraform apply to create an Azure resource group. And we learned how to destroy and recreate our infrastructure using terraform destroy followed by terraform apply.
6.9 Creating your container registry
The next step for our infrastructure is to create a private container registry. We’ll use this registry in the next chapter to publish Docker images for our microservices.
If you remember back in chapter 3, we learned how to build and publish Docker images. In that chapter, we manually created a container registry through the GUI in the Azure portal. Now that we have a basic understanding of Terraform, we will revisit that territory and create our registry with code.
6.9.1 Continuing the evolution of our infrastructure
We are now moving to example-2 in the chapter 6 code repository. At this point, if you are working in an iterative manner and continuing onward from example-1, you should copy the example-2 code to the working directory you created earlier in section 6.8.1:
cp -r chapter-6/example-2/* working
If you are instead working with each example as a separate project, you should destroy the infrastructure you created from example-1:
cd chapter-6/example-1/scripts
terraform destroy
After destroying the example-1 infrastructure, you can move to example-2 and initialize it:
cd chapter-6/example-2/scripts
terraform init
6.9.2 Creating the container registry
Listing 6.3 shows the newest Terraform code file that creates our container registry. To get this code to work you need to change the name of the registry. That’s because Azure container registry names must be unique. It won’t let you use the same name I have chosen (flixtube).
If you are following along, go into container-registry.tf now. Change the name of the registry to something else.
Listing 6.3 Creating our private container registry (extract from chapter-6/example-2/scripts/container-registry.tf)
resource "azurerm_container_registry"
➥ "container_registry" {                          ①
  name = "flixtube"                                ②
  resource_group_name = azurerm_resource_group
  ➥ .flixtube.name                                ③
  location = "westus"                              ④
  admin_enabled = true                             ⑤
  sku = "Basic"                                    ⑥
}
... code omitted here ...
① Declares the container registry resource
② Sets the name of the container registry. This has to be unique, so you must change this to something else.
③ Sets the name of the resource group and creates a link to another resource
④ Sets the location of the container registry
⑤ Enables the admin account so we can remotely authenticate with the registry
⑥ Using the basic SKU costs less and is easier because storage is managed automatically.
Note In case you were wondering, a SKU or stock keeping unit is a different version of a product. What this means here is that we are using the Basic version of the container registry.
Take note of how the value of resource_group_name is set from the properties of a resource that is defined in another file (the file resource-group.tf that we looked at in figure 6.1). These two resources are now linked via the Terraform resource graph. This is how Terraform manages the dependencies between resources. It’s how Terraform knows the order in which it should execute our script files.
Terraform must create the resource group before it can populate our Azure account with other resources (such as the new container registry). Let’s invoke the apply command to add this new piece of infrastructure:
terraform apply -auto-approve
Note that we use the -auto-approve argument this time. That means we don’t have to type yes each time to approve the changes. This is convenient while we are prototyping our infrastructure, but it becomes essential in the next chapter, when we create our CD pipeline. At that point, we will need to invoke Terraform in an automated and unattended manner. There will be no person there to do the approval! Because of this, we’ll now start using -auto-approve to run Terraform in non-interactive mode.
We start to create more complex infrastructure now, so you might have to wait a bit longer than last time. Once it’s finished, you’ll see output similar to before; Terraform is showing us what’s changed in our infrastructure. Tacked on the end, though, you’ll see some new output. This gives us the details we need to authenticate with our new container registry. We’ll learn more about this new output in the next section.
Outputs:

registry_hostname = flixtube.azurecr.io
registry_pw = +2kGfgth0beCHPh+VIf9fqJhAf7zEqX6
registry_un = flixtube
6.9.3 Terraform outputs
Terraform (or the underlying plugin providers) often produces configuration information that we need to know. In the previous section, we created our new container registry. In listing 6.3, you saw that we enabled the admin user for the registry. This allows us to authenticate and interact with our registry (pushing and pulling Docker images).
Note Enabling the admin user causes Terraform to generate a username and password. We need to take note of these details so we can later use those to login to our registry.
We can use Terraform outputs to extract generated configuration details from our Terraform code. In listing 6.4, you can see multiple outputs declared. This causes these values to be displayed in the terminal when we execute this code. We’ll also use outputs in multiple other code files, so look for these in future code listings.
Listing 6.4 Terraform outputs (extract from chapter-6/example-2/scripts/container-registry.tf)
... code omitted here ...
output "registry_hostname" {              ①
  value = azurerm_container_registry.
  ➥ container_registry.login_server      ②
}
output "registry_un" {                    ①
  value = azurerm_container_registry.
  ➥ container_registry.admin_username    ②
}
output "registry_pw" {                    ①
  value = azurerm_container_registry.
  ➥ container_registry.admin_password    ②
}
② Sets the values to be output
6.9.4 What have we achieved?
We have continued to evolve our infrastructure by creating a container registry. This is something we’ll need in the next chapter, when we publish Docker images for our microservices.
In this section, we added a new Terraform code file and executed it. This created the new container registry in our Azure account. Finally, we learned about how we can use Terraform outputs to display pertinent information about the resources and infrastructure that was created.
6.10 Refactoring to share configuration data
You might have noticed in recent code listings that we are starting to repeat certain configuration values from file to file. This can be a problem when it comes to changing these values. Ideally, we’d like to be able to change important values in one place and have these shared between all our Terraform code files. We can achieve this with Terraform variables, so now we’ll refactor our code to share configuration data.
6.10.1 Continuing the evolution of our infrastructure
We now move to example-3 in the chapter 6 code repository. At this point, if you are working in an iterative manner and continuing from earlier examples, you can now copy the example-4 code to the working directory you created earlier in 6.8.1:
cp -r chapter-6/example-3/* working
Otherwise, you can jump directly to example-3 and run terraform init in the chapter-6/ example-3/scripts directory. If you do this, don’t forget to first destroy any infrastructure you created for earlier examples.
6.10.2 Introducing Terraform variables
Example-3 in the chapter 6 code repository is a refactoring of example-2, modified to share configuration values between code files, adding a new file called variables.tf. Listing 6.5 shows the new code file.
In the listing, you can see how Terraform global variables are defined for some of our most important configuration values. We have variables defined for the name of our application (flixtube), the location of our data center (West US), and more like that.
Listing 6.5 Setting Terraform global variables (chapter-6/example-3/scripts/variables.tf)
variable "app_name" {     ①
    default = "flixtube"
}
variable location {       ①
  default = "West US"
}
① Sets default values for global variables that we use across multiple Terraform code files
At this point, if you are following along, you should edit variables.tf and set a unique name for your application. In listing 6.5, the name is set to flixtube. There are various Azure resource names that will be set from this variable and some will need to be unique for your own version of this project (e.g., the name of your container registry).
Listings 6.6 and 6.7 show how we use our new variables. You can see that the name of our resource group and the name of our container registry are both set from the value of the app_name variable. We can also set the locations of these resources from the location variable.
Listing 6.6 Resource group configuration with variables (chapter-6/example-3/scripts/resource-group.tf)
resource "azurerm_resource_group" "flixtube" {
  name = var.app_name            ①
  location = var.location        ②
}
① Sets the name of the resource group from the app_name variable
② Sets the location from the location variable
Listing 6.7 Container registry configuration with variables (extract from chapter-6/example-3/scripts/container-registry.tf)
resource "azurerm_container_registry" "container_registry" {
  name = var.app_name                                         ①
  resource_group_name = azurerm_resource_group.flixtube.name
  location = var.location                                     ②
  admin_enabled = true
  sku = "Basic"
}
... code omitted here ...
① Sets the name of the container registry from the app_name variable
② Sets the location from the location variable
We have refactored our Terraform code and shared some pertinent configuration values between our code files using Terraform variables. We now have one convenient place to go to change these values. For example, let’s say that we want to change the location of our application. We can do this simply by changing the location variable in variables.tf.
6.11 Creating our Kubernetes cluster
Now we arrive at our most vital piece of infrastructure. We need a platform on which to host our microservices in production, and for this, we’ll use Terraform to create a Kubernetes cluster in our Azure account.
6.11.1 Scripting creation of your cluster
Continuing with example-3, now let’s look at the code to create our Kubernetes cluster. Listing 6.8 is a new Terraform code file that defines the configuration of our cluster.
We are making continued use of our Terraform variables here, and some of these fields will already be familiar to you. Fields such as name, location, and resource _group_name require no new explanation. However, there are other fields that will be completely new.
Listing 6.8 Creating our Kubernetes cluster (chapter-6/example-3/scripts/kubernetes-cluster.tf)
resource "azurerm_kubernetes_cluster" "cluster" {        ①
    name = var.app_name
    location = var.location
    resource_group_name = azurerm_resource_group.flixtube.name
    dns_prefix = var.app_name
    kubernetes_version = "1.18.8"                        ②

    linux_profile {                                      ③
        admin_username = var.admin_username
        ssh_key {
            key_data = "${trimspace(tls_private_key.key.public_key_openssh)}
                    ➥ ${var.admin_username}@azure.com"
        }
    }                                                    ③
    default_node_pool {                                  ④
        name = "default"
        node_count = 1
        vm_size = "Standard_B2ms"
    }                                                    ④
    service_principal {                                  ⑤
        client_id = var.client_id
        client_secret = var.client_secret
    }                                                    ⑤
}
output "cluster_client_key" {
  value = azurerm_kubernetes_cluster.cluster.kube_config[0].client_key
}
output "cluster_client_certificate" {
  value = azurerm_kubernetes_cluster.cluster.kube_config[0]
  ➥ .client_certificate
}
output "cluster_cluster_ca_certificate" {
  value = azurerm_kubernetes_cluster.cluster.kube_config[0]
  ➥ .cluster_ca_certificate
}
output "cluster_cluster_username" {
  value = azurerm_kubernetes_cluster.cluster.kube_config[0].username
}
output "cluster_cluster_password" {
  value = azurerm_kubernetes_cluster.cluster.kube_config[0].password
}
output "cluster_kube_config" {
  value = azurerm_kubernetes_cluster.cluster.kube_config_raw
}
output "cluster_host" {
  value = azurerm_kubernetes_cluster.cluster.kube_config[0].host
}
① Declares the resource for our Kubernetes cluster
② Specifies the version of Kubernetes we are using. By the time you run this code, this version may no longer be available on Azure. See section 6.6.3 for how to choose a version number.
③ Sets authentication details for our cluster
④ Configures the nodes for our cluster
⑤ Configures authentication details to allow the cluster to interact with Azure
Notice in listing 6.8 how we specify which version of Kubernetes to use. If you’ll recall, we decided on this back in section 6.6.3. Then we provide an SSH key that we can use to interact with our cluster. We are linking to the tls_private_key resource that is defined in the file private-key.tf. In this code file, we use a different Terraform provider to generate an SSH key. You haven’t seen this yet in a code listing. But if you are curious and want to understand how the SSH key is generated, take a look for yourself in the file example-3/scripts/private-key.tf.
Listing 6.8 is also where we define the nodes and VM size that powers our cluster. Note here that we are building our cluster on only a single node. Although we could easily add more, but we’ll save that for chapter 11. For now, configuration of the service principal is what we must focus on next. Repeated here from listing 6.8, we link Azure authentication details into the configuration of our cluster:
    service_principal {
        client_id     = var.client_id
        client_secret = var.client_secret
    }
A service principal is an authentication mechanism for Azure. It allows our cluster to authenticate with Azure so that it can create Azure load balancers as external endpoints for our customer-facing microservices (e.g., our front-end gateway).
We use two new Terraform variables, client_id and client_secret, which are defined in the latest version of variables.tf. We didn’t give these variables default values. That’s because these contain sensitive authentication details, and for security reasons, we’d prefer not to include their values in our codebase.
6.11.2 Cluster authentication with Azure
We can’t create our cluster just yet. If we invoke the apply command at this point, Terraform will ask us to provide values for the variables client_id and client_secret (because we didn’t supply default values for these in the code).
These variables provide our Kubernetes cluster with the authentication details for our Azure subscription. To fulfill these variables, we must first create a service principal in Azure. That’s like a separate access account that allows our cluster to interact with Azure on our behalf.
It is possible to create the service principal completely in Terraform, and it would be ideal if we could do that. After all, the service principal is only another aspect of our infrastructure, and we’d prefer to have our entire infrastructure created by Terraform.
Unfortunately, at the time of writing, this doesn’t work reliably. Although the Azure provider does cater to creating service principals, for some reason, it doesn’t deal with the timing of creation properly. It takes time for the service principal to propagate through Azure, and there is no way of delaying the creation of the cluster until the service principal is ready. If we attempt this in Terraform, we will end up creating a cluster before the service principal exists. This results in an error because the creation of the cluster requires the service principal to already be in place.
Due to this problem with the Azure provider (which might be fixed by the time you read this), we can’t reliably create the service principal from Terraform. Instead, we’ll resort to using the Azure CLI tool for this task. This is actually OK because we only have to create the service principal once, and thereafter, we will simply continue using it. Before you can create the service principal, you must know the ID of your Azure subscription, which you can do with the following command:
az account show
Pick out the value from the id field and use it create your service principal:
az ad sp create-for-rbac --role="Contributor"
➥-scopes="/subscriptions/<subscription-id>"
When you run that command, you should replace <subscription-id> with your own subscription ID. The output from the command will look something like the following:
{
  "appId": "a2016492-068c-4f37-a32b-6e6196b65488",
  "displayName": "flixtube",
  "name": "http://flixtube",
  "password": "deb781f5-29e7-42c7-bed8-80781411973a",
  "tenant": "f88afda7-7b7b-4fb6-a093-6b254e780c4c"
}
We have created a service principal for our cluster to authenticate with Azure. Jot down your own values for the fields appId and password (these will be different than mine!). You’ll need these in a moment to input the values for the Terraform variables client_id and client_secret.
6.11.3 Building your cluster
We are now ready to run our latest Terraform code to create our Kubernetes cluster. Invoke the apply command:
terraform apply -auto-approve
Terraform prompts you to enter the variables that don’t have values. The first is client _id:
var.client_id
  Enter a value:
Here you should enter the appId value for your service principal. Then Terraform prompts you for client_secret:
var.client_secret
  Enter a value:
Now enter the password value for your service principal. Terraform now creates your Kubernetes cluster. This can take some time; you might like to grab a cup of coffee.
Note If you have a problem with the version number I’ve used (1.18.8), it is probably because that version is no longer available on Azure. See section 6.6.3 for instructions on how to choose an available version.
At the end, you’ll see a load of Terraform outputs that give you configuration and authentication details for your new cluster. Take note of these following values. These are the credentials we need to interface with our new Kubernetes cluster.
6.11.4 What have we achieved?
Well done! We just created a Kubernetes cluster. If you had previously been convinced that Kubernetes is complicated, you might now be surprised at just how simple this was!
This is a significant achievement on the road to production. Again, we continued the evolution of our architecture, adding a Kubernetes cluster to our existing infrastructure. Along the way, we did some refactoring and used Terraform variables to share important values between our various Terraform code files.
We also created a service principal for authentication with Azure. The Kubernetes cluster uses this when it needs to create Azure load balancers. We’ll talk about those in the next chapter.
6.12 Interacting with Kubernetes
Now that we have a Kubernetes cluster, how do we interact with it? Figure 6.11 shows the methods of interaction we have at our disposal. Briefly, these are
In this chapter, we created a Kubernetes cluster using Terraform. In the next chapter, we’ll expand on this and learn how to interact with the cluster to deploy containers. Once again, we’ll use Terraform.
In this book, the primary way we interact with Kubernetes is with Terraform. But it’s also useful for us to understand the other methods of interaction so we can test the cluster we just created. We’ll round out this chapter by interacting with our cluster using Kubectl and the Kubernetes dashboard.

Figure 6.11 Methods of interacting with Kubernetes
6.12.1 Kubernetes authentication
Before interacting with your Kubernetes cluster, we must first authenticate with it. In section 6.11.3, you took note of the following outputs from Terraform. These are the credentials you need to authenticate with your cluster.
At this point, you could try and manually set up your authentication details. To do this, you would create the file .kube/config under your home directory and then type into it your Kubernetes credentials. Unfortunately, this setup is not a trivial exercise! But happily, we are using Azure and the Azure CLI tools to automate this set up for us with the following command:
az aks get-credentials --resource-group flixtube --name flixtube
When you invoke aks get-credentials, be sure to replace both instances of flixtube with the name of your own application. This is the name that you set for your app_name variable back in section 6.10. Invoke the command according to this template:
az aks get-credentials --resource-group <your-app-name>
➥-name <your-app-name>
After running this command, the Azure CLI tool creates your Kubectl config file. You can take a look at it with the following command:
cat ~/.kube/config
You can learn more about the manual setup of the Kubectl config file here:
6.12.2 The Kubernetes CLI
With the configuration in place, we can now use the Kubernetes CLI (Kubectl) to interact with our cluster.
Instructions for installing Kubectl can be found here:
https://kubernetes.io/docs/tasks/tools/install-kubectl/
Installation is simply a matter of downloading the correct binary executable for your operating system and adding it to your system path. When you have installed Kubectl, you can test it with the following command:
kubectl version
This shows you the version numbers for both Kubectl on your local computer and for your Kubernetes cluster, which might look something like this:
Client Version: version.Info{Major:"1", Minor:"19",
    GitVersion:"v1.19.3",
    GitCommit:"1e11e4a2108024935ecfcb2912226cedeafd99df",
    GitTreeState:"clean", BuildDate:"2020-10-14T12:50:19Z",
    GoVersion:"go1.15.2", Compiler:"gc", Platform:"windows/amd64"}
 version.Info{Major:"1", Minor:"18", GitVersion:"v1.18.8",
    GitCommit:"73ec19bdfc6008cd3ce6de96c663f70a69e2b8fc",
    GitTreeState:"clean", BuildDate:"2020-09-17T04:17:08Z",
    GoVersion:"go1.13.15", Compiler:"gc", Platform:"linux/amd64"}
This is a little hard to read! But if you scan across from Client Version, you’ll find GitVersion, which shows you the version of Kubectl. You can see that I am using version 1.19.3. You can then scan across from Server Version to find GitVersion, which shows you the version of Kubernetes. You can see that my cluster is on version 1.18.8 of Kubernetes.
Kubectl is the official and primary method of interaction with Kubernetes. Anything that can be done with Kubernetes can be done from Kubectl-configuration, deployment of containers, and even monitoring live applications.
In this book, we mostly control Kubernetes through Terraform code. That’s a higher level and more expressive way to work with Kubernetes. It’s also nice that we can maintain a simple deployment pipeline and keep all of our infrastructure and deployment code in Terraform. But that’s not always possible in real-world production systems; although, we are able to achieve that for the simple examples in this book.
We should, however, learn the basics of Kubectl because it is the official interface to Kubernetes, and it is also what underlies the Kubernetes provider for Terraform. We need to know it at least because it’s the best way to debug our Kubernetes cluster, which is something we’ll look at in chapter 10. With that in mind, let’s test the authenticated connection to our Kubernetes cluster with the following command:
kubectl get nodes
The get nodes command shows the list of the nodes that are powering our cluster. We have created a cluster with a single node, so the output will be quite short; something like this:
NAME                              STATUS   ROLES   AGE   VERSION
aks-default-42625609-vmss000000   Ready    agent   21m   v1.15.7
That’s it for now. We’ll return to Kubectl and learn more commands in upcoming chapters. If you desire, you can continue to learn and experiment with Kubectl here:
https://kubernetes.io/docs/reference/kubectl/overview/
6.12.3 The Kubernetes dashboard
Kubectl is one way to interact with Kubernetes. Another is through the Kubernetes dashboard, and once we have Kubectl setup and authenticated, we can use it to access the dashboard.
Installing the Kubernetes dashboard
The Kubernetes dashboard is not installed by default. Although, we can install it easily with the following command:
kubectl apply -f
➥ https://raw.githubusercontent.com/kubernetes/dashboard/v2.0.4/aio/deploy/
➥ recommended.yaml
Connecting to the Kubernetes dashboard
We can’t directly connect to the Kubernetes dashboard. It’s simply not exposed to the public. However, given that we have already authenticated Kubectl to connect to our cluster, we can use Kubectl to create a proxy that allows us to access the dashboard from our development workstation:
kubectl proxy
If you are running the proxy within a Vagrant VM and want to access it from your host operating system, you need to change its bound IP address so that it’s externally accessible:
kubectl proxy --address=0.0.0.0
The proxy allows us to use the full Kubernetes REST API, which is accessible at http://localhost:8001. You can open that URL in your browser and see what it returns.
If you’d like to explore the Kubernetes HTTP API, you can do so using the curl command, Postman, or Visual Studio Code REST Client. You can learn more about the proxy command here:
https://kubernetes.io/docs/reference/generated/kubectl/kubectl-commands#proxy
Now with the REST API available, we can go through the proxy to get to the dashboard. Open this rather long and awkward URL in your web browser:
http://localhost:8001/api/v1/namespaces/kubernetes-dashboard/services/https:kubernetes-dashboard:/proxy/
After opening the dashboard, we come to its authentication screen. We can authenticate by selecting our Kubeconfig file as shown in figure 6.12. This config file is the one we looked at earlier in section 6.12.1, which you can find in your home directory at ~/.kube/config.
Note If you are working under a Vagrant VM, you must copy this file out of the VM to your host operating system so that you can select it and authenticate with the dashboard.
To learn more about installing and connecting to the Kubernetes dashboard, read the information on this web page:
https://kubernetes.io/docs/tasks/access-application-cluster/web-ui-dashboard/

Figure 6.12 Authentication for the Kubernetes dashboard
Exploring the Kubernetes dashboard
With the Kubernetes dashboard open in our browser, we can graphically inspect our cluster using the GUI. This is a great way to understand our cluster and learn about Kubernetes! I encourage you to spend some time exploring this dashboard by yourself before moving on. As you work through the next chapter, you’ll be able to return to this dashboard and see the containers that we will soon deploy.
Figure 6.13 shows you the overview page of the dashboard. This is where you will start your exploration. The dashboard is the first place to come, especially in the early days, when something is wrong with your cluster or any of the containers it is hosting. We’ll learn more about how the dashboard can help with debugging in chapter 10.

Figure 6.13 The Kubernetes dashboard
6.12.4 What have we achieved?
We have our Kubernetes cluster online and are ready to start deploying our microservices to it. In this book, we mostly use Terraform code to interact with our cluster, but we just learned about two other ways of interacting with it: the Kubernetes CLI and the Kubernetes dashboard.
-
The Kubernetes CLI (known as Kubectl) is used to configure and query our cluster from the terminal. It gives us a lower-level API for administration and debugging.
-
The Kubernetes dashboard is a visual GUI for interacting with our cluster. It allows us to visually explore the variety of resources that are available to use with Kubernetes. As well as being a good tool for debugging, it’s also a great educational tool to better understand Kubernetes.
In the next chapter, we’ll continue to learn about interacting with Kubernetes through Terraform code.
6.13 Terraform review
This has been another big chapter! I bet it now makes the Docker chapter look a lot simpler in retrospect.
To review, Terraform is a universal tool for the creation and configuration of cloud-based infrastructure. So far, we have used it to create the entire infrastructure for our microservices application (with the exception of the Azure service principal). Before continuing, let’s review the Terraform commands we have added to our toolkit.
Table 6.2 Review of Terraform commands
6.14 Continue your learning
In this chapter, we learned how to create a production environment based on Kubernetes. To build our production environment, we used Terraform and the technique called infrastructure as code. We’ll continue to learn more about both Terraform and Kubernetes in the next chapter.
Kubernetes itself is a deep and complex technology, definitely the most complex we will talk about in this book. You might spend many months working with it before you dig all the way to the bottom! In this book, we barely scratched the surface, but we covered enough to get our application deployed to production. To dive deeper into these topics, I recommend the following books:
-
Core Kubernetes by Jay Vyas and Chris Love (Manning, est. Summer 2021)
-
Terraform in Action by Scott Winkler (Manning, est. Spring 2021)
-
GitOps and Kubernetes by Billy Yuen, Alexander Matyushentsev, et. al. (Manning, est. Spring 2021)
-
Kubernetes Quickly by William Denniss (Manning, est. Summer 2021)
-
Learn Kubernetes in a Month of Lunches by Elton Stoneman (Manning, est. February 2021)
You can learn more about Kubernetes by reading the Kubernetes documentation here:
The documentation for Terraform is available here:
To find out what else you can do with the Azure CLI tool, read the documentation here:
You can read more about the managed Kubernetes service on Azure here:
Summary
-
Infrastructure as code is a technique where we store our infrastructure configuration as code. Editing and executing that code is how we update our infrastructure.
-
We use Terraform to script the creation of cloud resources and application infrastructure from code.
-
Terraform must be initialized before it can be used, and we should fix our provider version numbers to avoid nasty surprises.
-
Terraform state maintains a record of the system we created and makes future modifications to the system more efficient.
-
We created production infrastructure for our application on Azure: a container registry and a Kubernetes cluster.
-
We can use Terraform outputs to find out key details of the infrastructure that was created.
-
The Terraform resource graph ensures that resources created by Terraform are created in the correct order.
-
Kubernetes is a computing platform with support for multiple cloud vendors.
-
Kubernetes has an automatable API. This allows us to build a continuous delivery pipeline (more in the next chapter).
-
We interact with our cluster not only using Terraform, but also with the Kubernetes CLI (kubectl) and the Kubernetes dashboard.