CHAPTER 7
Cloud Computing and Private Clouds
In this chapter, we will cover:
• Cloud computing models
• Elements of cloud
• Sizing the solution
• Selecting images
Before we start talking about private clouds, we should get our heads completely around what cloud actually means. Then, we should talk different types of cloud services. Finally, once we are all on the same page about this whole cloud thing, we can talk about making cloud platforms private. This may seem unusual because people often think about cloud in terms of the providers and how do you bring Amazon or Microsoft into your home. Or your enterprise. Neither of which is going to happen. Unless you’re Amazon or Microsoft. And if you are either of those, a, good on you, and, b, it seems unlikely you’re reading this book, all things considered.
Cloud, or cloud computing, is a new term for a very old concept. Ultimately, cloud computing is about outsourcing. Why do we call it cloud computing? This is about computing services that are offered using traditional web-based technologies, such as the Hypertext Transfer Protocol (HTTP). Management typically takes place through a web interface and often accessing the service is done through a web interface as well. The cloud refers to an unspecified and unknown location. Just some place out in the great Internet. Ultimately, it doesn’t matter where the service is being offered from, as long as users have Internet access. This also allows the outsourcing to be available to any user. Access is no longer restricted to those who are directly connected to the network where the service is being offered.
There are important elements that make a cloud service, and it’s not entirely about where the service is located or how someone would get access to it. Of course, those are also important, but there is much more to it that revolves around what is necessary for any service provider to function and offer any outsourced computing solution. Oddly, you don’t have to make use of services that are located in the Internet. Based on the properties that are essential for a cloud service, it is possible to create a cloud service inside a local network. You don’t have to rely on external service providers to make use of all of the functions that make cloud services what they are. You are building a lab. You can create your own cloud environment inside of your lab. It won’t have all the same capabilities of a service provider, but it will be more than adequate for what you’d use it for. If it isn’t, there are always providers that can offer up services for you outside of your own environment.
Cloud Services
We have been outsourcing computing services almost as long as we have had computers. In fact, IBM introduced the first data processing service bureau in 1932. These were opened in large cities, offering data processing to companies who couldn’t have their own data processing equipment. At the time it wasn’t computers as we know them today. Instead, they were something called tabulating machines that used punch cards. As computers evolved, so did the service bureau business. Right up through the 1980s anyway, you could hire a company to do your computing tasks for you.
The same is essentially still true. Rather than renting out processing time on a large mainframe or even a mini computer, as so many companies did (speaking as someone who worked for a company that was essentially a service bureau in the early 1980s), today we rent out virtual versions of the very machines we have on our desktops or on our laps. It’s the same computing power. The difference is, with cloud services, you don’t have to worry about all the physical hassles. No power concerns. No cooling. No floor space. No racks. No pinched fingers and banged knuckles from trying to install servers into the racks. No dealing with your favorite computer manufacturer trying to get the server yesterday when you absolutely positively had to have it last week.
The reason companies like Amazon got into the cloud provider space is they had a lot of capacity for computing and storage they weren’t using. They had built these enormous infrastructure setups because they had to have them in the business they were in. Amazon needed capacity to handle their e-commerce business. That computing space wasn’t always fully utilized. Why not monetize the under-utilized power you had. The same was true of Google. They had to have a lot of computing power, and Google built their infrastructure on a lot of really basic, inexpensive systems. They built in redundancy so it wasn’t a big deal if they had a hardware failure. They didn’t pay a lot for the hardware so it was easy and cheap to swap in a replacement. What they learned on the redundancy side, though, to account for all those failures provided them an infrastructure companies could make use of that they wouldn’t normally have access to.
One of the great things about using a cloud provider is that you not only get the systems, but you also get the administration that you’d otherwise have to either do yourself or pay someone to do it for you. Instead of just getting a virtual machine to do with as you like, you can also just have everything right up through the application taken care of for you. Don’t worry about making sure you have all of your operating system patches applied when you start or that you have a nicely hardened installation. You don’t have to take care of any of that. All you need to do is focus on the parts that are directly relevant to you—usually the application you are developing. Or, in the case of testing, the application you are working with. Why would you want to install the operating system and then install all the prerequisites (after getting rid of a bunch of other software and services you don’t need) for the application platform you are going to use? Just let someone else take care of it for you. Personally, I’m a big fan of someone else’s problems (SEPs). If I can make something someone else’s problem, my life has just gotten easier.
That’s what it comes down to when you are using cloud services. You are making a whole lot of things someone else’s problem. Cloud providers will happily provide you with a bare operating system that you can do with as you please, called infrastructure as a service, or they will offer you the operating system and an application stack to develop or deploy your application onto. This is called platform as a service. Sometimes, these same cloud providers will be the foundation for something called software as a service, where another company has bought platform as a service and built their own application on top of it. They then offer the application to those who want to use it. This is called software as a service. Finally, if you are using software as a service, you may need a place to store the results (documents) of that software. You may use storage as a service.
Infrastructure as a Service
Remember the time when we had a VMware ESXi server up and running and we were installing virtual machines to it? Yeah, me too. That’s a bit like infrastructure as a service. The providers make it even easier than that, though. Rather than doing the operating system installation, you can select an operating system, and have it deployed automatically for you. What you will get is essentially the end result of a provisioning process, almost instantly. Certainly a lot faster than if you had to install the operating system yourself, after selecting all the parameters for the virtual machine. And installed correctly without a lot of unnecessary services. All the work you probably don’t bother to go through, hoping the operating system vendor has done all the right things for you.
There is something to be said for learning from the process of installing an operating system. However, that’s usually not the point of the exercise. You generally just want to get started with what your actual task is. Let’s make it as easy as possible to do that. First, we start with a self-service web interface. No more submitting a help desk ticket (not that you would if you were building your own lab, necessarily, unless you really had a thing for tickets) to get a system stood up. Just go to a web portal and start whatever service you want.
Usually, when you are using infrastructure as a service (IaaS), you have a couple of decisions to make. The first is what operating system you want to use. A provider like Microsoft or Amazon Web Services (AWS) will have operating system images they maintain, but you may also be able to find a community developed image for a specific flavor of operating system that the service provider doesn’t have directly. When it comes to Linux, as an example, there are a lot of different options. A provider like AWS will have a preferred distribution, and you may find it hard to locate the one distribution you really need. You have the option to either find a community-generated image to use or to create your own image to use.
The next choice you have to make is the size of your system. This is often a different process from what you would expect if you were provisioning your own system. Rather than having carte blanche in disk and memory sizes (within the constraints of your physical hardware) or even number of processors to apply to the problem, you will generally be presented with a set of sizes. You can see an example of this in Figure 7-1. You will see that rather than being given a configuration dialog where you select memory, disk, and processor, you are presented with different sizes where the memory and number of processors have already been determined for you.

Figure 7-1 AWS instance size
These were the options available for the operating system select, which was Amazon’s version of Linux. You may notice you select the operating system and then the size rather than the other way around. The size options would typically be a result of the operating system selected since some operating systems will require more resources than others.
Once you have selected the options you want, your system will be provisioned, usually within seconds, and you will have access to a complete operating system instance to do with as you please. Keep in mind that when you are selecting a cloud platform, you are going to pay for the resources you use. Some of this has to do with the size of the image—the processor utilization for instance—but also the amount of work it’s going to do, meaning you will typically pay for network bandwidth used. This is sort of like walking into a buffet or a cafeteria, filling your plate and then taking it to the cashier where your plate is weighed. You pay for what you take/use. This is actually reasonably economical since you are only paying for what you use rather than paying for an enormous system with far more capacity than you really need and then paying in tricking increments for power, cooling, etc. You’re still paying for trickling increments, but you don’t have this power hungry beast sitting in a rack (or on your floor) making noises and emitting heat you don’t really have a use for in the summer months. As we look through the various offerings, we’ll talk some about costs for the cloud offerings. It may be worthwhile for you to compare those costs against what you would spend for physical infrastructure, taking into consideration how long you would be using cloud services versus amortizing physical hardware.
Platform as a Service
The problem with IaaS is what do you do with it once you have the operating system. Big blank canvas. Terrific. I mean, it’s not like you’re going to run a desktop in a cloud instance, more than likely, so a big, wide open operating system installation isn’t going to be of much help. You need more. You need something to do with it. One would assume you had a reason for going out and standing up an instance of the operating system. Well, why not just start there rather than starting at the bottom and having to build on top? Just select a platform you want to build on top of and let your cloud provider provision not only the operating system but also the application platform too. Since you are in a cloud environment, you are expecting to be Internet facing (if you aren’t, a cloud environment probably isn’t the right answer—think about your basement), which means you probably have a web-based application in mind. This means you need a language to build on top of. Not to mention libraries or frameworks.
Great. You’ve decided to step up to the next level of quality. Now select your paint and trim and we can go on from here. Seriously, though, you still have decisions to make. Maybe the only development language you know (assuming you are building yourself, though even if you are using a pre-built setup, this still applies so hang tight) is Java. Great. We have a whole row of Java environments for you, if you’ll just step to this side of the lot, we can take a look at them. A cloud provider like Microsoft or Amazon will have multiple Java application servers to select from. Of course, you don’t have to select Java. You can also use a .NET application server or PHP or Ruby.
The point of using platform as a service is to take all of the administration work of installing the application server and hardening the operating system out of your hands. You can focus on developing, or deploying, the actual application you are going to be using.
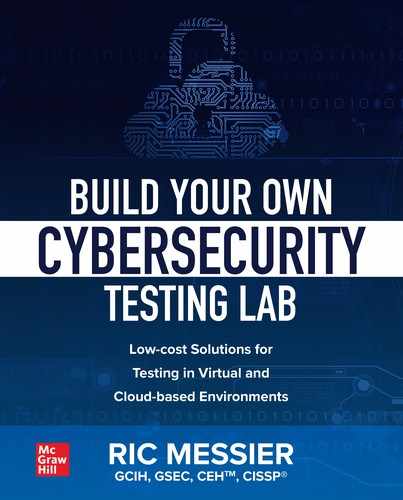
Each cloud provider is going to be different in terms of what they are offering for options. Of course, you’d expect Microsoft to have .NET servers available, but they actually offer a very broad range of application servers in Azure, their cloud platform, as shown in Figure 7-2. No matter what type of application you are developing, or testing, you will likely find a platform you can use in Azure. The other heavyweight providers like Amazon and Google will have similar offerings. This is not to say that you can’t find other offerings with other, smaller, providers. These are the three that are commonly used, because of their size and potential for scalability.
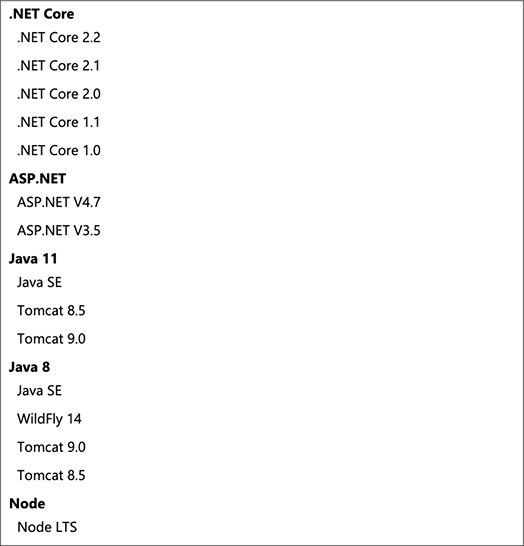
Figure 7-2 Application servers in Microsoft Azure
This is a particular factor when you are doing testing. Applications are written in languages. Those languages expect to have support on the back end. Web applications are generally not like a compiled program where you compile it, and as long as it’s the same operating system and processor architecture, it doesn’t much matter where you run the program. A web application is generally in either an interpreted language or an intermediate language. This means PHP, Python, or Ruby on the interpreted language end and Java or one of the .NET languages like VisualBasic or C# on the intermediate language side.
Storage as a Service
A very common service available from cloud providers is storage. This is likely something you are using, even if you may not be aware that you are using it. If you have a smartphone, you are almost certainly using some sort of storage as a service offering. Google has Google Drive, and Android devices will generally use that service for at least backups if not for photos or other storage needs. If you have an iPhone, you are definitely making use of iCloud, Apple’s storage as a service offering. The idea here is that you don’t have to buy a lot of expensive storage on the phone itself, which is priced to make it seem more attractive to spend a handful of dollars a month on cloud storage than physical storage on the device. Instead, you store all of your digital stuff with the cloud provider and, as long as you have Internet access, you have access to your stuff. After all, you have a device that is meant to always have Internet access by way of the cellular network.
You aren’t limited, of course, to just what your smartphone or other mobile device makes use of natively, without you being aware. You can consciously make use of their storage. In Figure 7-3, you can see Google Drive. Using Google Drive, with a web interface, makes your files available to any device that has a web browser and Internet access. These storage services are also convenient ways of sharing your files with other people. In the list of functions on the left-hand side, you can see Shared With Me. This is a list of documents that other people have shared with you. Depending on the document, you can even edit directly from your web browser, for a full collaborative experience.

Figure 7-3 Google Drive
This is not to say you are limited to using your web browser to access files. For instance, this book is being written with all of the files associated with it—Word documents, images, etc.—stored in Microsoft’s OneDrive. Figure 7-4 shows a number of files and folders for this book in the OneDrive interface. This is the web interface, though I use the OneDrive agent installed on my system to sync a folder. Showing you the folder would only show you that there are files stored on my system. This is valuable because it means I can edit these documents from any system where I have OneDrive installed. Additionally, because it’s OneDrive, it’s connected to Microsoft’s software as a service offering, so I can not only edit on my computer using Word natively, I can also edit from a web browser.
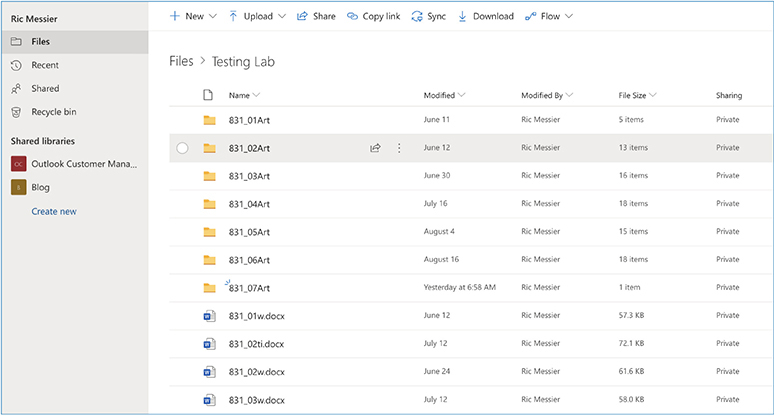
Figure 7-4 OneDrive folder
Software as a Service
The world has gone networked. Often, the assumption is that everyone has all the time access to the Internet. This has been Apple’s assumption for years, driving consumers to store all their photos with Apple’s iCloud as well as all their music. While not everyone has Internet all the time, there are some advantages to cloud-based offerings. In the case of the documents for this book, for instance, I could do all my editing on a tablet without ever worrying about storage space on the device. I could pick up any device at any time and get access to the documents, reviewing, editing, etc. Additionally, when I’m done with a document, I can just share it with my editor who can pick it up, download it, review it, edit it right in place. It saves e-mailing a lot of documents back and forth and also helps with versioning because you don’t have multiple copies floating around, never being sure if one copy has all the changes that were made because a couple of documents passed in e-mail.
This is all software as a service. I am (or could be) making use of Microsoft Word in the cloud, doing all the computing in their data centers. All I need is a web browser. Any tablet, ChromeBook, or similar device would do. Of course, in some cases software is just meant to be collaborative. A very common software as a service offering is the customer relationship management (CRM) solution Salesforce. If you’re old enough, you remember older CRM software like Act! This was a CRM offering that required a server that all of your sales team had to sync with periodically. When your team members didn’t connect regularly (this was in the days of dial-up access to home base because Internet access was not as ubiquitous and no company wanted to expose their customer database to the Internet anyway), you ended up with syncing problems because their database was badly out of date and sometimes records had to be merged by hand.
Today, all of that has changed. Sales teams just access a web interface to check on and update customer records. If they aren’t using the web interface, they are using an app on a smartphone or tablet that uses application programming interface (API) calls through the web interface to gain access to the database and the underlying data that make the CRM solution work. Everything is stored with the provider, Salesforce. Rather than buying a lot of native applications, as previous software sales models provided, companies pay for continued access to the data and the interface on a monthly or yearly basis. Generally, the software is maintained with the provider rather than with the client directly, which means the provider can keep updating the software on a regular basis to add new features or fix bugs in the software. All of this can be done in a controlled fashion without having to worry about whether customers update their own software installations. Since the software is installed at the provider, any exposure to vulnerabilities can be minimized.
There are so many advantages to software as a service that lots of companies are moving to it as a delivery model. In addition to controlling the entire software deployment stream, which means not having to support older versions, there is the constant revenue stream. Previously, a software company had to rely on customers to keep paying to upgrade the software. Now, companies or subscribers pay a small monthly fee to maintain access to the software and the data that may be what the customer really wants. In the CRM case, for instance, no one cares about maintaining access to the software per se. The software is just the means for gaining access to the underlying data. The software provides access to the data.
So, why would you, as someone looking to develop a testing lab care about software as a service? Let’s take a look at one instance of software as a service. In various places in this book have been diagrams. Diagramming software, like Visio or OmniGraffle, can be very expensive. Additionally, it often runs only on one platform. In the case of Visio, it only runs on Windows at the moment, if you use the native application. If you are using Linux or macOS, you are out of luck for a native application. Instead, you could use Visio Online, and pay a small amount per month to get access to the software so you could draw network diagrams and flowcharts as you need. Having a visual representation of your own network designs can be handy, especially if you are using cloud or other virtual infrastructure since you can’t as easily see how it all connects.
Another option is to use a site like draw.io. This is software as a service that allows you to create network diagrams, flowcharts, or logical data flows. Anything you can do with a program like OmniGraffle or Visio. Many of the diagrams in this book were created using draw.io. You can see the start of a network diagram in Figure 7-5. There are a number of stencils available for you and, of course, a wide variety of shapes available as well. Using a tool like draw.io, you can either save your diagrams on your computer or you can save them in a storage solution like Google Drive. You can also export your drawings as one of many graphics file types if you need them as pictures rather than as diagram files.

Figure 7-5 Diagramming in draw.io
There are a large number of solutions you can make use of in the cloud as software today. Many are available for use without cost, but some do have a small monthly or yearly cost. Anyone who needs to run a small business, as you may be doing if you want a testing lab, can make use of these cloud services. You can use draw.io for diagrams, Microsoft Office online or Google Docs for any documentation, and a solution like SmartSheets for project management if you have larger projects you are engaged in. No matter what the solution, there are some elements that they have in common.
Elements of Cloud
When we talk about cloud-based solutions, there are some elements they have in common. One of the first, and most important, is multitenancy. Multitenancy means there are multiple people or organizations that make use of your solution. Think about all of the cloud-based solutions we have been talking about so far. Every single one of them has thousands if not hundreds of thousands of customers or maybe even millions in the case of some of the larger providers. The importance of multitenancy is not only that multiple people can use the offering, which is important for the offering company because that’s what makes these services profitable, but that none of the customers knows any other customer exists. From the standpoint of every customer, the service offering stands on its own. All customer data is segregated, and any interface considerations should always make it look as though the customer is alone on the platform.
Multitenancy is a big part of what makes cloud-based platforms so cost-effective. You get the advantages of sharing costs for infrastructure across multiple customers rather than a single entity having to bear the entire cost of all the infrastructure by itself. It’s this multitenancy and a shared cost model that provides so many other benefits that cloud-based offerings provide. A single company may not have nearly as much to put into resiliency and dependability as a cloud-provider can develop. It’s the hallmark of a solution provider that they have some service level agreement with their customers to provide a minimum availability number. This means the service is available almost all the time. It used to be we talked about five 9s in the service provider space. That meant you were 99.999 percent up. Over the course of the year, that translates to a little over 5 minutes. That’s not much in the way of downtime over the course of a year. Keep in mind that downtime takes into account not only service failures but also any maintenance. Better architecture, which is resilient and designed to be highly available, will help with some of the downtime that would result from maintenance.
Another element of cloud computing is the delivery. Commonly, cloud offerings use web-based technologies for delivery. You may have noticed that much of the discussion when it came to delivery or access to cloud-based services was through a web browser. This is because using web technologies like HTTP is simple. Additionally, since everyone has a browser today, there is no need to develop a native application, which would miss the point anyway. Web-based access already has a number of solutions in place, such as authentication protocols. We also have a lot of technology for developing rich interfaces where the visual representation of those interfaces is taken care of by the browser.
Because so much is done inside of a web browser, self-service becomes a common feature of cloud-based services. Figure 7-6 shows the portal page to the Google Computing Cloud. From this page, the user who is logged in can create their own network and compute instances, as well as many other services. There are no tickets, no phone calls. Everything can be stood up about as fast as someone can select the computing resources they want and type information like names, as that information may be asked for.

Figure 7-6 Google Computing Cloud admin page
This self-service makes cloud computing extremely agile. This is another hallmark of cloud services. When you need additional resources, you go create instances of those resources. This means when you have an application you want to test, you go create instances of the resources you need when you need them and they are almost immediately available. If you want to test availability, you can stand up additional resources and load balancers when you need them. Everything is on-demand. This can allow for rapid application development as well. If you have an idea for an application, you can quickly and easily stand up resources you may need and start developing your application almost immediately. You don’t have to go buy hardware, install it, put the operating systems on, and everything else that’s needed. You just go to your cloud provider.
Cloud computing can also make scalability a lot easier. With so many resources available, cloud providers may offer compute solutions that automatically scale based on demand. The cloud solutions have been created to very quickly create new instances of services. If you are developing or testing a web application and suddenly your Super Bowl ad is seen and there is an immediate spike, prolonged for a couple of hours, in traffic to your system, you need something that is going to be able to handle that inbound traffic. In an on-premise model, you either spend a lot of money on hardware to have the excess capacity in case you need it, then you have it all sitting idle when you don’t need it, or you turn away customers who want to see what you are offering.
With cloud offerings, it’s reasonably easy to create a service that will scale as you need it to. Keep in mind that in order for cloud services to work the way they do, they have to be built so they can receive programmatic instructions. When you create a new compute instance with, say Microsoft Azure, there isn’t a person somewhere that goes off and does the work once they get the notice that a service is desired. Instead, there is a programmatic interface that listens for triggers that tell services to start up. We can sit in the middle of all of this. For instance, Figure 7-7 shows a sample of code provided by Microsoft in their Azure help pages. It enables your application to automatically scale. You create instrumentation in your code allowing your application to be monitored. When thresholds are reached, such as the number of requests per second or the number of concurrent users, your application can just stand up a new compute resource to handle more load.

Figure 7-7 Worker code for scaling
Maintenance is another place where cloud computing has an advantage. This is especially true if you have developed a fully scalable installation. Rather than having to patch hundreds of systems and keep them up-to-date, all you need to do is make sure the base image is up-to-date. When a new instance is created of the resource, it will automatically pick up the fixes because the fixes have been applied in the base image. Every instance of that resource gets generated from that base image. This is similar to having a gold disk image of your operating systems in your on-premise environments. Rather than having to reinstall from the gold disk each time a new set of fixes has been applied in the environment, though, you just make a change to the base image and everything will automatically pick it up. This centralized approach also improves security in a cloud environment, if administration is handled correctly.
Security isn’t guaranteed as part of any cloud computing resource. However, there are a lot of advantages to cloud providers when it comes to security. First, the larger providers will generally have virtual appliances of all of the major vendor’s security solutions. All the newest next-generation firewalls, for instance, likely have cloud instances. You can introduce security policies that apply across all of your infrastructure instances. There are dashboards that can show you the overall health of your environment, which can also be useful if you have compliance concerns with regulations like those from the Payment Card Industry (PCI).
This is not to say, though, that you have to use cloud providers. We can take all of the service models discussed earlier, as well as all the properties that you would expect from a cloud provider and you can implement all of those properties in a premise-based solution. This is something called a private cloud, which means you have everything you’d normally get from a cloud provider. You just need the hardware and some software to enable the cloud offerings.
OpenStack
OpenStack is a software project that was developed by RackSpace Hosting in conjunction with the National Aeronautics and Space Administration (NASA). It wasn’t intended to be a private cloud software solution, but as it’s open source, it works for private cloud implementations. OpenStack is really several collected services that come together to provide the functionality of a cloud solution. Figure 7-8 shows all of the different services that are used to create a working OpenStack installation. What this diagram doesn’t show is the additional services that make use of or are ancillary to these services. Horizon, for instance, is the service that provides the web interface. The Horizon interface interacts with other services like the Nova service and the Heat orchestration service. This service could be swapped out entirely, and the rest of OpenStack would continue to work.
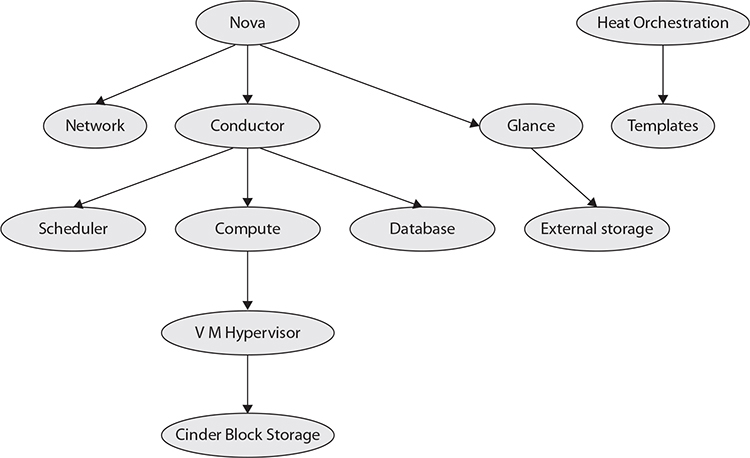
Figure 7-8 OpenStack services
Another service that isn’t shown here is Keystone, which is the authentication service. The services shown in the diagram are the ones that are essential to a working instance of any image. All server images, the inert on-disk files that are used to create an instance, are managed by the Glance service. Nova is the service that manages the instantiation of the images. This includes managing the underlying hypervisor, which provides the virtual machine capability. On a Linux system, this hypervisor may be Kernel-based Virtual Machine (KVM), which is the virtualization capability built into the Linux kernel. Nova also takes care of scheduling the instance and you can provide hints for scheduling, since there may be many compute nodes to select from in a complete OpenStack installation.
One advantage to using a platform like OpenStack over a hypervisor server like VMware ESXi is OpenStack uses a set of base images and a collection of system sizes to create instances from. The base images are often quite small, which makes deployment faster than trying to copy an entire disk and all of the configuration in a hypervisor server. The resulting system is still running in a hypervisor, but if you have simple base images you create a new instance from rather than cloning systems with configurations and disks in a hypervisor server. The purpose of OpenStack is to have simple, fast instances that you can create in many different implementations. You’re starting with a building block rather than starting with a completed Lego construction.
OpenStack would traditionally use multiple physical servers in a full implementation. You would have a compute node, a storage node, a separate node for your interface with Horizon. All of these would typically be separate systems. In fact, you may have a number of physical compute nodes in a large installation. This is not to say that you have to go that route, though. If you are just using this for quick spin up and destruction of virtual machines, you can use a single machine implementation of OpenStack. There are a couple of routes you can go here. There may be more if you go digging, but these would be the two most common.
The first approach is to use Ubuntu as your base server. From there, you can use Canonical’s workstation implementation of OpenStack. This relies on you installing the Linux container manager, lxd. When you install OpenStack on a workstation using Canonical’s approach, you are going to have all of the different elements in OpenStack installed in separate containers. This keeps all of them isolated from one another, just as if you had installed each service on separate systems. It is a very straightforward installation, however. Canonical has implemented the installation into a conjure-up spell. Conjure-up is a way of installing a large software implementation with multiple elements in a single set of instructions, called a spell. In order to install all the elements of OpenStack, there is a single conjure-up spell that takes care of all the different services. The spell makes sure all the prerequisites are installed then installs the services and does the initial configuration on them so they will run.
![]()
NOTE Canonical is the company that owns, maintains, and supports Ubuntu Linux. Along with that, they have a cloud-based service offering, running OpenStack on top of Ubuntu.
The other approach is the developer’s path. This means using a piece of software called DevStack. It’s all of the services you would get from OpenStack installed on a single piece of hardware rather than multiple pieces of hardware. For testing purposes, especially if all you want to do is get a feel for how OpenStack works, it’s a good way to go.
Using DevStack
DevStack is maintained by the same people who maintain OpenStack. The intention for DevStack is to have an OpenStack that is capable of running on a single system so developers have a way to install the software without needing a lot of physical devices just to do some simple development or testing work. DevStack, similar to Canonical’s workstation installation of OpenStack, is simple. A significant difference, though, is that with DevStack, all of the component services are running bare on the system rather than in isolation using containers. Below, you can see the output from starting off the installation of DevStack on an Ubuntu system.
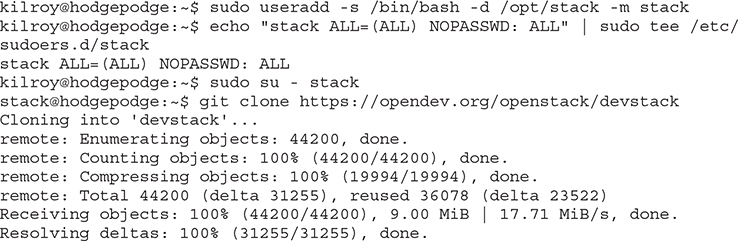
The first thing that is done is creating a user that OpenStack can run as. This would normally be an unprivileged user. It’s best to run services, wherever possible, as unprivileged users. If there happen to be any software vulnerabilities that could be exploited, it’s best that the attacker get access to the system as an unprivileged user rather than a root or privileged user. In the process of creating a user, we give the user a home directory. The useradd program will create the directory structure when we provide the -m switch. This is going to be the location of the OpenStack files, so before we install the files, we should probably switch into that directory as that user. This way, when we grab the files, they will be in the right place. All of the DevStack files you need are stored in a git repository so we are going to grab those files using git.

VIDEO To see the process of installing DevStack, watch the “Installing DevStack” video that accompanies the book.
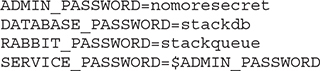
Once we have all the files we need to install DevStack, we need to do a little configuration. In the root of the devstack folder that we grabbed with git, you will need to create a file named local.conf. You can use the local.conf in the samples directory under devstack. This will be a good starting point. The important parts that you need to look at are the passwords, which you can see below. Create your own passwords here. They will be used later on.
Once you have created the configuration file, it’s really as simple as ./stack.sh. That runs a shell script that will take care of installing all of the needed services and any prerequisites. The installation will take several minutes; of course the time will vary depending on the processor and disk speed, as well as the network speed you have where anything needs to be downloaded. Once the script has finished, you have a working installation of DevStack. All you need to do is go to the IP address or hostname in your web browser. You can see the login page you will get in Figure 7-9.
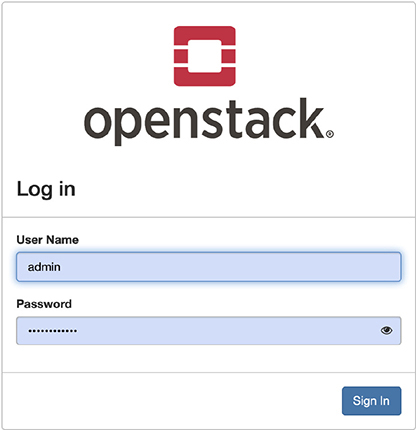
Figure 7-9 OpenStack login
When you login, you will have all the functionality anyone else running OpenStack will have. Down the left-hand side, you will see the different sections of the interface. You will also see the dashboard providing you an insight into what your system is doing. You can see the dashboard in Figure 7-10. This is an unloaded system, with no instances running, and that’s reflected in the graphs you can see. Four of the 20 virtual CPUs are in use. There is a single instance being used. It’s worth noting here that the instance you see in the graph isn’t running. It’s just an allocated instance. The same is true for the disk space, memory, and processors. They have been allocated, and if the instance were to become operational, they would actually be used. Keeping track of these things helps to prevent oversubscription.
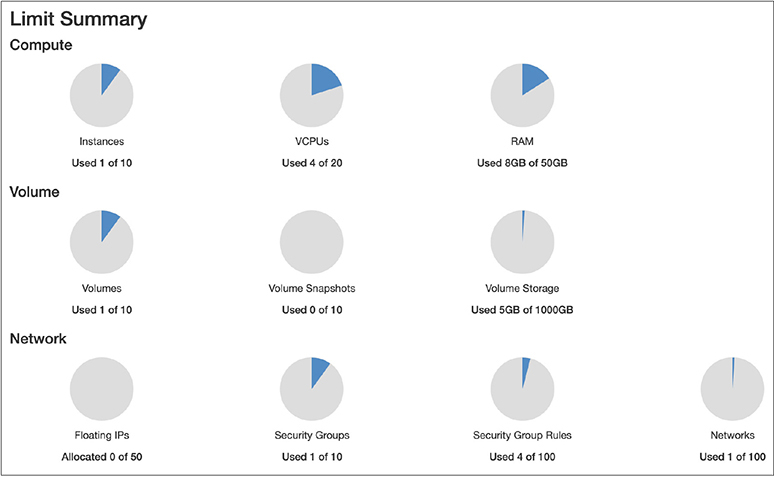
Figure 7-10 OpenStack dashboard
What you will notice if you look at the top of the dashboard is that it says Limits. This means the OpenStack installation is capped, based on the capabilities of the hardware. If you need more capability, you need either more or better hardware. As this is a lab system, I don’t have a lot of needs. I’m not looking to create large or persistent instances of any image. Even in cases where I may have a Windows Server, I can control when I might spin it up and ensure that I don’t have a lot of other instances running at the same time so I am not bumping up against limitations.
Admin
OpenStack is designed, in part, around projects. When you get a DevStack instance up and running, you have three projects that are in place. Each project is essentially a separate instance in that images and other aspects of one project aren’t visible from one project to another. When you start up, you will be in the demo project. You will also have an admin project and an alt_demo project. Along the right-hand side of the Horizon interface, you will find all the different elements of the OpenStack. Under the Admin heading, not to be confused with the admin project, you will find Compute, Volume, Network, and System. Under Compute, you will find information about the hypervisor you are using. You can see the hypervisor used in my installation in Figure 7-11. This is a bare OpenStack installation with nothing running in it. If you want to use a feature like an availability zone, meaning you are creating a collection of resources that can be allocated from, you could create those from the Host Aggregates page. This would require multiple server nodes that you could aggregate, and we only have one at this point.
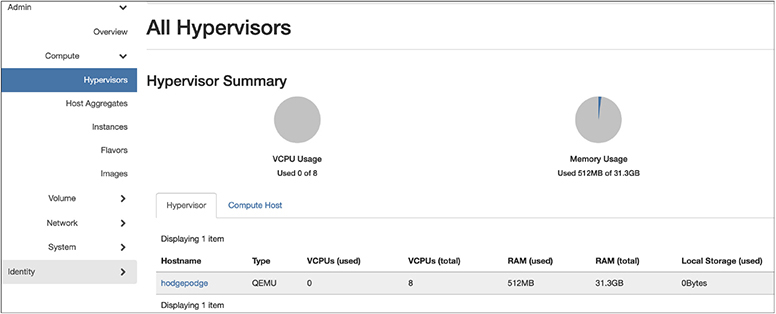
Figure 7-11 Hypervisors in OpenStack
There are two pages we do need to be a little aware of. The first is flavors. This is what OpenStack calls the different configurations, or sizes if you prefer since that’s how they are generally named. Figure 7-12 shows a list of the flavors that are installed in a clean OpenStack implementation. You can see names like m1.large, m1.medium, and m1.micro. These indicate the resources that have been configured and would be applied to any instance that selected that particular flavor. You’ll see each flavor configures a number of VCPUs, memory (RAM) size, root disk size, which will contain the image, and ephemeral disk. The ephemeral disk will go away when the instance is removed, but it could be used for temporary storage while the instance is running. Depending on what your needs are, this may not be valuable.

Figure 7-12 Flavors in OpenStack
Finally, since we are talking about images, we should look at those. The images will be the foundation of our instances. The image is essentially an installed implementation of an operating system. It’s the image of a disk where the operating system is installed. When you start up OpenStack, what you will have is a single image. CirrOS is a minimal implementation of Linux designed for cloud-based installations (get the joke? cirrus is a type of cloud). That’s the only image you will have off the bat, though you can add more. We will go into adding more later on in the section on Finding Images. Figure 7-13 shows the Images page, with more than just the CirrOS image in place. I’ve jumped ahead and added some images already.

Figure 7-13 Images in OpenStack
You may notice the > symbol to the left of each entry. This allows you to open up details about the image. It provides specifics that may be useful to know, including the minimum disk space and the minimum amount of memory. These are the details that can be configured when the image is installed into the server, meaning Glance, the image database, is told about the image, including the type of disk image it is as well as the hypervisor type that is used. All of these are considered to be QEMU images. QEMU, short for quick emulator, is a piece of software that provides hardware virtualization and processor emulation. This is the software that is used to implement and monitor the virtual machines.
Once we have the images in place, and you don’t have to go get additional imaged since CirrOS is a perfectly serviceable Linux distribution, we can talk about getting an instance running. This can be done from the page that we are on. You will notice on the far right side there is a button that says Launch. That is what we use to get an image to an instance.
Instantiation
If you are familiar with Amazon Web Services (AWS), OpenStack may seem very familiar to you. There is a lot about OpenStack that is reminiscent of AWS. Getting an image to an instance means selecting an image and clicking Launch. That is only the starting point, though. From there, we have a lot of decisions to make. You will have the dialog box shown in Figure 7-14. The first thing you need to do is to give it a name. You can name it whatever you like. The name I chose was essentially descriptive. I am creating an instance of CirrOS, so I have called it cirrosInstance. You don’t have to provide a description, though if you have given it a colorful name, like Milo for instance, maybe a description will be helpful, so you know what the instance actually is.
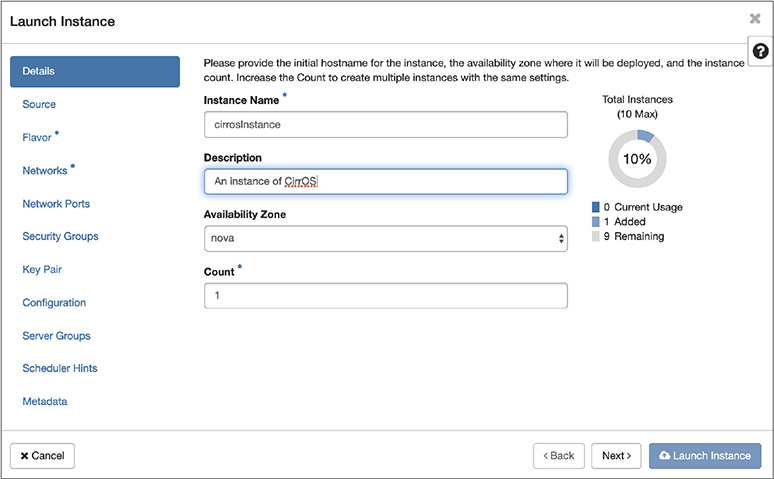
Figure 7-14 Creating an instance in OpenStack
You’ll see all of the option pages on the left-hand side of Figure 7-14. You’ve just filled in Details. You can click your way through each page by selecting the page on the left-hand side, or you can just click Next on the bottom. There are only a few pages where you absolutely have to enter information. Those are flagged with a * next to the name of the page. You’ll see the next page is called Source. Because we started with an image, that’s already been taken care of. The Source is just the image we are using to create the Instance from. The next page we have to go to is Flavor. You can see that page in Figure 7-15. It’s fairly straightforward. You will need to select the size of your instance. This is mostly based on what you intend to do with the instance. You may not need much in the way of resources, so you can select a smaller Flavor. If you are going to be running a lot of processes, you may need more memory. Personally, I always err on the side of more memory, if I can support it. What may not be immediately obvious on this page is you select the up arrow at the end of the line that has the flavor you want. It will populate the Allocated table at the top once you make that selection.

Figure 7-15 Flavor selection
The next page we have to fill out is the Networks page. This works the same as the Flavor selection. You find which network you want to put your instance on and click the up arrow. You can see in Figure 7-16 that shared network has been selected because it is up in the Allocated table. You may also notice a subtle change at the bottom of the dialog box. The Launch Instance has now been enabled. We have filled in all the information that is necessary.
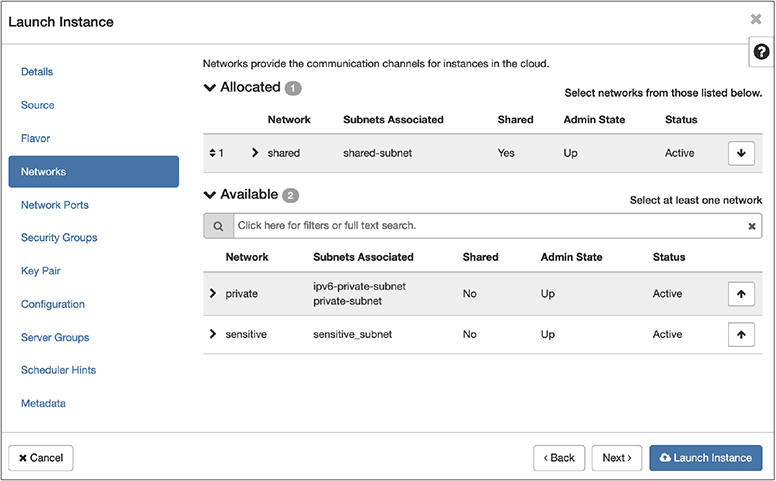
Figure 7-16 Network selection
This doesn’t mean that other information isn’t important, just that it’s not necessary. One of the other screens is important when it comes to authentication. You may want to generate session keys. The session key will allow you to authenticate to the running instance using a form of remote login like Secure Shell (SSH). This is useful because you don’t have an installation and configuration like you would when you are installing in a traditional virtual machine. You aren’t adding users, like you’d be prompted to do during a normal operating system installation. This key will take care of authentication using SSH. You can also choose to create an X.509 certificate using the session page. You can see in Figure 7-17 that I’ve generated an SSH key. What you are looking at is the private key that I need to store on my local system.
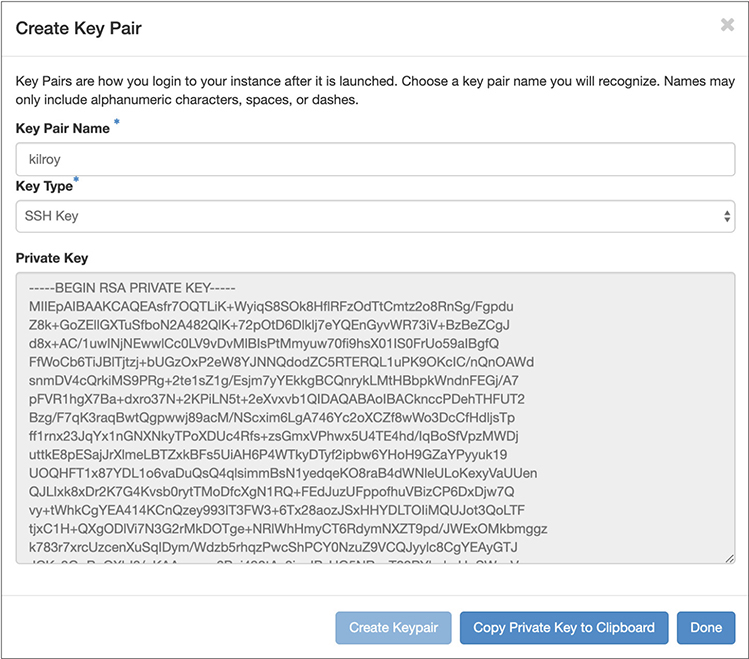
Figure 7-17 Session key generation
You don’t have to login remotely if you don’t want to. Once you have an instance running, you can open that instance and you will be given a console. You can see in Figure 7-18 the tabs for a running cirrOS instance. One of the tabs, the one that has been selected, is Console. This is a console for a Linux installation, so it’s an 80 × 25 character virtual screen inside a large browser window, making it more difficult to capture the console as well as the web interface parts that show you where we are. What you aren’t seeing in the console is the prompt indicating what the username and password are to log into the image. It may be different when the image changes over time, but the login presented on this instance is cirros for the username and gocubsgo for the password.
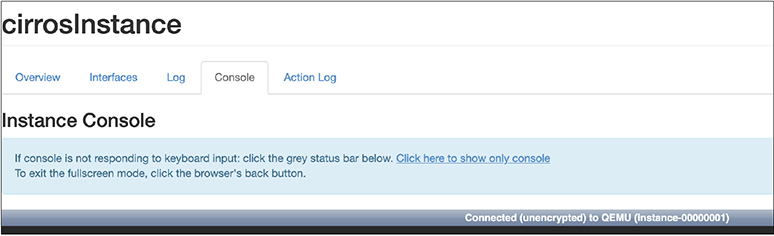
Figure 7-18 cirrOS instance console
In order to connect remotely to a running instance, you do need to have your networking setup. By default, you just have an instance. You may be familiar with this if you’ve ever setup an AWS EC2 instance. In order to get remote access, you have to do some additional work to get it an IP address that you can connect to.
VIDEO To see the use of the OpenStack web interface to start an instance, watch the “Starting an Instance in DevStack” video that accompanies the book.
Networking
When you have your DevStack installation up and running, you will have the bare essentials for networking. You could stand up some instances and have them communicate with one another but not with the outside world. Figure 7-19 shows the network topology you have when you first start up DevStack without any additional configuration. You will see that you have three networks. The first is the public network, with a subnet of 172.24.4.0/24. The second is private, with an address of 10.0.0.0/26. Finally, the shared network has an address block of 192.168.233.0/24. If you are familiar with classful addressing, you may notice we have an address block from Class B, Class A, and Class C, in that order.
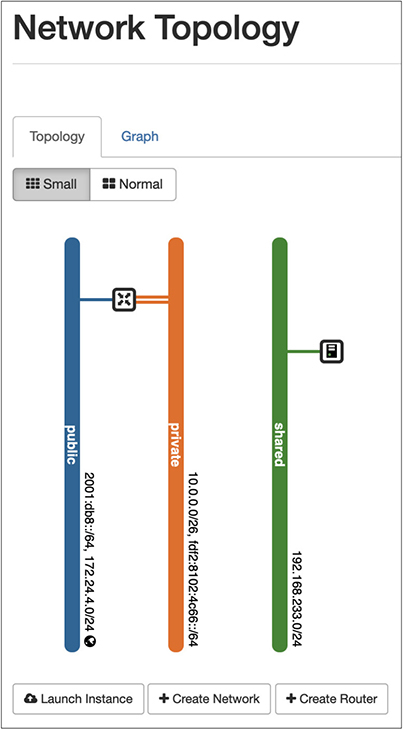
Figure 7-19 Network topology
None of these addresses have anything to do with the physical network the underlying system is connected to. We’ll get to how to address that later on. First, let’s create our own network. You may have noticed in Figure 7-19 that there was a little button that read +Create Network, and if you couldn’t see it, you’ll have to take my word. Clicking on that button brings up the dialog box you can see in Figure 7-20. This is where we create our own network. You need to give the network a name. In this case, the name of the network is sensitive_net. This is done in the first page of the dialog box. The second page is where we provide the details of the subnet. This includes the CIDR notation for the network, which is 172.20.42.0/24. The gateway address is 172.20.42.1. This subnet also needs a name, since the subnet isn’t necessarily paired directly with the network, meaning you can switch subnets around if you want or need. The network is the network and you can give it different subnets at different times. While this may seem confusing, you should think about the network as the “physical cabling.” The physical cabling doesn’t care what IP addresses it carries. You don’t swap out all of the physical components when you change out the network address.
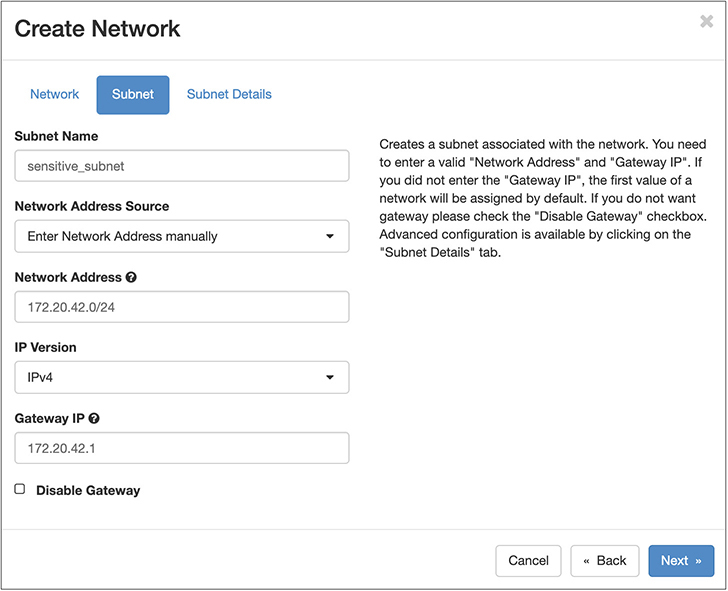
Figure 7-20 Creating a network
If you want to be able to get from one of your networks to another, you need to create a router. Remember that moving from one subnet to another requires a layer 3 gateway, otherwise known as a router. We can create a virtual router from the same page that showed us the topology. You just click on the +Create Router button on the Network Topology page, and you will get a dialog box like the one seen in Figure 7-21. The router requires a name so we can refer to it later. Additionally, in order to route, it needs two networks to route between. You can select a public network from the pulldown. There is only one public network, so that’s what we have to select here. Otherwise, there is nothing else to configure for the moment.
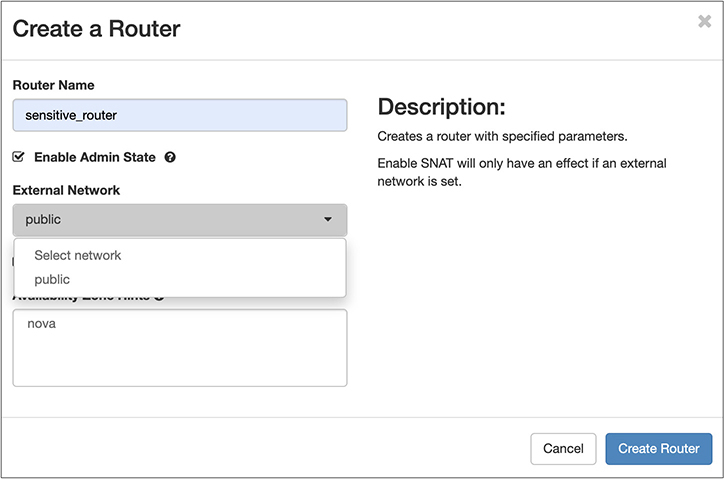
Figure 7-21 Creating a router
We need a second network to route from/to. We can connect our router to a second network from the Network Topology page. If you hover over the router just created, which is attached to the public network and only has a single connection, you will get some options. The one that we really care about is Add Interface. When you click that button, you’ll get a simple dialog box with a pulldown that provides you with the list of all subnets. Once you have selected the subnet you want to connect the router to, you have the option to assign that new interface an IP address. If you don’t assign it, OpenStack will assign it for you. The interface has to have an IP address; otherwise, no device on that subnet can send traffic to it to get to another network.
One last aspect of networking we need to talk about is how to get off the OpenStack system. For this, we need not only to have our public network, we also need an IP address on that network. We can assign an IP address from our public network, the one our system sits on if we configured it correctly. Speaking of configuring it correctly, remember the local.conf file we used to add some passwords and other configuration settings? If you want to have IP addresses that are available on the public network, you need to tell your installation about it so your Neutron networking system can know what network it is on and what addresses you are going to provide that can float from one instance to another, which is why they are called floating IPs. The configuration settings necessary are shown here:

So, we have a set of floating IPs that we can assign to any instance. We could have done it when we created the instance from the image. Even if we have an instance already up, we can assign the floating IP to the instance. Under Network in the menu on the left-hand side, there is an item called Floating IPs. From there, we can take an IP address and Associate it. In the list of addresses available, you’ll see Associate on the right-hand side. Once you click that, you will get a dialog box like the one shown in Figure 7-22. In the pulldown list, you will see all the instances that are running that you can associate the address with.
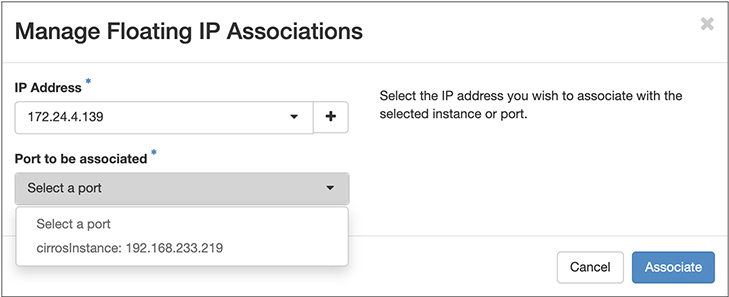
Figure 7-22 Associate floating IP
What is happening once you assign the floating IP address is that OpenStack is performing network address translation. All of this that we’ve working with tonight is done in software. In fact, this is an example of software-defined networking. Yes, software-defined networking is a bit of a buzzword, but it also provides a lot of flexibility. We can quickly make changes using software-defined networking and in OpenStack and have them take effect.
Security Groups
Security groups are a means to quickly apply a set of firewall rules. The security groups are accessed through the Network submenu on the left-hand side of the Horizon interface. There is a default security group already in place when you install DevStack. To view the rules, you’d click on Manage Rules on line that has the default group listed. Figure 7-23 shows the rules that are in the default security group. In short, the default security group allows everything into any instance that applied this group over both IPv4 and IPv6. In addition, everything going out from the instance that uses this group will be allowed. It’s like there are no rules at all. Fortunately, there are ways to fix this.
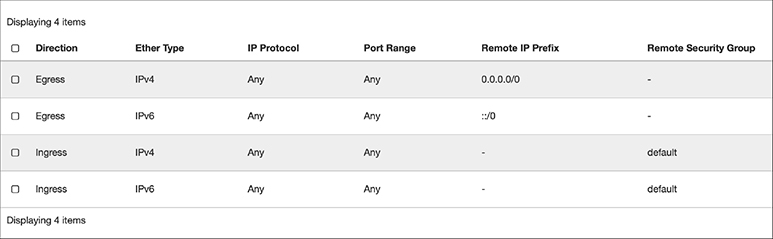
Figure 7-23 Default security group
First, create a new security group from the Security Groups page. All you will need to do is give your group a name. Once you have a new group, you can start adding rules. Click on Manage Rules and you will have a list with two entries in it. These are the default rules allowing any outbound traffic. This is where you need to be thinking about what kind of instance you are going to be applying these rules to. Is it a web server? Is it a mail server? Is it doing some other network service? You will need to tailor your rules to whatever services you are offering in your instance that someone from outside of the instance may want to get to. If you have no network services, you don’t need to be worrying about security groups. The default security group should be fine. If you have a network service, you should probably be thinking about these security groups. So, let’s add a rule. Figure 7-24 shows the dialog box you will be presented with when you add a rule to your security group.
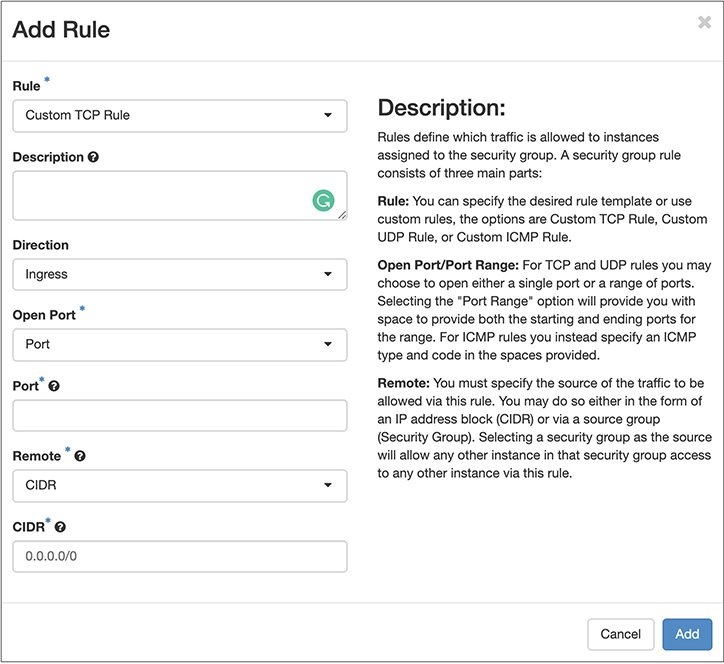
Figure 7-24 Adding rules
This is a fairly standard, albeit basic, way of adding a firewall rule. You select the type of rule, which means you are selecting either one of several well-known protocols, or you select custom. What you see in Figure 7-24 is a custom rule creation. This assumes nothing about the protocol or about any open ports. You can specify a single port or a range of ports. You can also determine what protocol you want the rule to apply to. Let’s say, though, that we are just going with a standard protocol that’s well known. Figure 7-25 shows what the dialog box looks like when we select Hypertext Transfer Protocol Secure (HTTPS) rather than letting it stay at custom Transmission Control Protocol (TCP) rule. All the port information goes away. Additionally, you will notice that the selection about whether the traffic is inbound (Ingress) or outbound (Egress) has disappeared. If it’s HTTPS, the assumption is there is an HTTPS server running on the instance you are applying the security group to. The rule automatically becomes an Ingress rule. If you wanted to apply this as an Egress rule, you could do it as a custom rule instead of one of the canned rules.
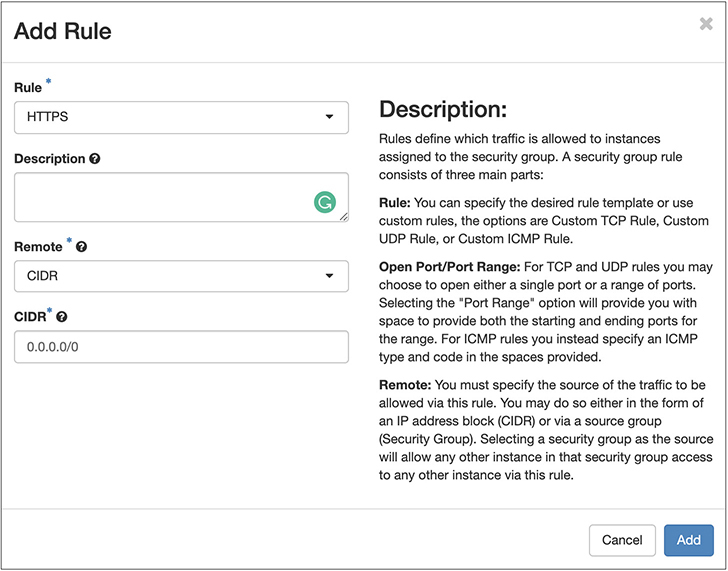
Figure 7-25 HTTPS rule in security group
We have a new security group now. This could be applied to an instance when you create it from an image, or you can always apply the rule on the fly. If we go back to the instances that are running, there is a pulldown menu associated with the instance. Using that menu, we can perform many tasks, as seen in Figure 7-26. This includes editing the security groups. Selecting that will bring up a dialog box showing you what has been applied to the instance for security groups and also a list of all the available security groups.
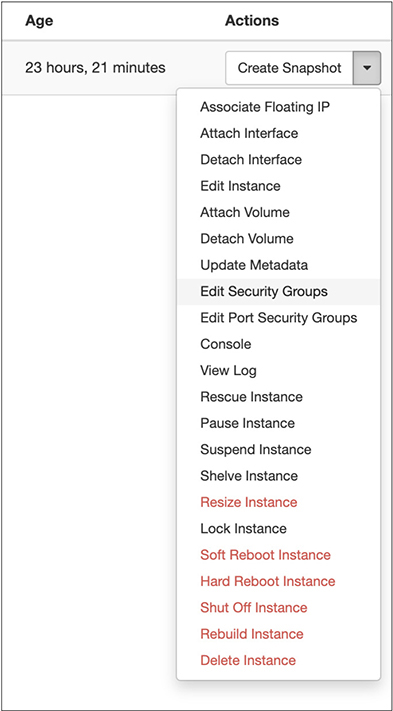
Figure 7-26 Instance menu
One nice thing about these rules is you can stack them, which means you can apply multiple security groups. In this case, for instance, the default security group was applied, but the new security group could be added. This means you can modularize your security groups so you have a set of rules, perhaps, that apply to web servers and another that apply to mail servers. If you happen to have an instance that has both, you can apply both security groups to your instance and you will have both sets of rules. Having these security groups handy to apply for whenever you have a new instance you are creating is helpful. It speeds up the process of creating the instance.
One note about security groups, though. If you have multiple network interfaces in your instance, you would need to edit port security groups. This means each network interface has security groups associated with it. If you want to have a different set of rules applied to one interface as compared with another interface, you would need to go to the instance properties then look at each interface. You can apply security groups from the interface. This makes more sense on an instance with multiple network interfaces. This is also something you will be warned about when you start editing the security group on the instance. There will be a notice about multiple interfaces and using port security groups instead.
Finding Images
You’re probably not going to be overly satisfied with using cirrOS and nothing but cirrOS. You want some flavor, some variety in your life. We can address that. While cirrOS is the default image that is installed, in part because it’s lightweight and versatile, it is not the only image that is available. You can download images for some common Linux distributions like CentOS, Fedora, Ubuntu, and OpenSUSE. Additionally, there is a Windows Server image you can download. The best place to start is the online documentation for OpenStack. In the documentation is a page for obtaining images. This page has links to download the other images, since the images are generally maintained by the organization that develops them. If you want Windows, you download it from Microsoft. If you want Ubuntu, you download it from Canonical.
Once you have the image, you will need to tell OpenStack about it, meaning you need to get the image in the right place for OpenStack to use it as well as letting OpenStack know it’s available for use. This can be done from the command line. Let’s say, for instance, that you have the Windows Server image and you want to install it. Starting from the directory where the image file is located, you could use this command to tell OpenStack about it. This is a single line, though it encompasses two commands, with the output of the first being sent into the input of the second.

The image file downloaded from Microsoft is a gzipped file, which is just a compressed file. The output of gunzip is fed into the input of the glance command, which is being used to create an image in glance. Remember Glance is the image database in OpenStack. We need to tell Glance about the image we are adding, including the type of hypervisor, the name of the image, the container format, and the disk format. A container in this context is a file format that includes metadata about the image. This particular file contains no additional information, as might be the case if you were trying to import an Amazon image (ami) or a VMware appliance (ova). The file format is qcow2. This is a disk image file format supported by QEMU and is a set of initials meaning QEMU Copy on Write. As soon as this set of commands completes, you will have the image available to you in the Horizon interface. If you have an uncompressed file, you can use essentially the same command for creating the image as shown earlier. There is no need to run gunzip before, so to provide the image to glance, you would add < imagename onto the end of the line. The < symbol redirects the contents of the file in imagename into the input of glance.
You could also create your own images to populate into OpenStack. OpenStack supports a wide variety of disk formats as well as container formats. If you have a virtual machine that you want to use in OpenStack, you could take the disk image you have in a format like qcow2 or vmdk, and use the glance image-create command to add it into Glance for use in OpenStack.
Summary
Cloud services come in many styles and models to choose from. While they are often packaged in different ways using different marketing and buzzwords, there are commonly four cloud computing services you can get. The first, starting at the bottom from the standpoint of how much the provider is doing for you, is infrastructure as a service. This is really just a virtual machine instance. You are buying hardware, without the hardware. You have an operating system instance, disk, and computing power. Go forth and do what you will with it. As long as it’s not illegal and it doesn’t violate any terms of agreement you may have had to sign (or click through) on your way to acquiring these virtual services. Use the system as a remote, hovering in the ethereal, desktop system if you like. You can also install whatever software you like. It’s yours. You’re paying for it, after all.
Next is platform as a service. You are being provided with a platform to develop your applications on. This may be a Java application server or it may be a .NET or PHP application server. In truth, the serverless computing being offered by many cloud providers is really just platform as a service. Just that the underlying details are being further obscured for you. You don’t have to worry about the operating system or the application platform. Just write code. Be a code monkey. Code monkey like Fritos. And Tab. And Mountain Dew. Don’t worry about all the other things. Just your code.
Storage as a service is also abstracted. You don’t worry about anything other than the files. Access them through a web browser, a mobile app, or even from your desktop. It doesn’t matter to the service provider. You’re really just renting disk space from them. Storage as a service may also underpin another cloud offering—software as a service. This is true when it comes to software like Microsoft Office Online or Google Docs. You access the application through your web browser and then store your documents in either OneDrive for Microsoft or Google Drive for Google. There are many other types of software as a service when you may not be using storage in the traditional sense of a collection of files. You may be using storage in a database, as in the case of Salesforce, a customer relationship manager (CRM) solution.
When it comes to cloud computing offerings, there are some key elements that make them cloud. The first is you access them over a network, commonly the Internet, though it could be over a local network as well. The second is the services commonly used web-based technologies like HTTP, XML, HTML, AJAX, and others. Another essential element of cloud-based services is multitenancy. This means many customers are using the same service at the same time, without any of them impacting any of the others. Agility is another hallmark of cloud computing services. You can very quickly create an instance of an OS image and also make a lot of changes on the fly.
All of which brings us to the idea of whether you can do a private cloud or if you have to have the Internet. You can do a private cloud, actually. You can get OpenStack software, for a start. This is a set of complementary services that provide the same functionality as you would get from most cloud providers, all accessed through a web interface. You can create multiple projects, giving the multitenancy. Images can be turned into instances very quickly, with a few configuration options. Networking is all software-defined, meaning you can create complete network architectures using OpenStack. You can use the preinstalled image or find other images to install. You can also create your own images to use in OpenStack. While OpenStack is commonly installed on multiple systems, separating out the different services, you can install it on a single system using something like DevStack, which is an OpenStack implementation designed for developers.
In the next chapter, we’re going to take the ideas that we’ve learned in this chapter and apply them to a public cloud. We’ll actually take the next three chapters to cover the three major cloud computing providers—Amazon, Google, and Microsoft.