CHAPTER 10
Google Cloud Engine
In this chapter, we will cover:
• Creating instances of systems
• Developing network designs
• Implementing security controls
We’re back to the cloud once more. This time, we’re going to take a look at the youngest of the providers we have looked at. While the cloud providers have been in alphabetical order (AWS, Azure, Google Compute), Google also happens to have been the last to the party when it comes to a cloud computing offering. Google does have a long history, though, of developing highly resilient, low-cost solutions for themselves. When Google started, they needed a lot of computing power to handle search requests. However, buying a small number of high power, top-end hardware was (and still is) expensive as compared with a lot of low-end devices that could be used in a highly available, fault tolerant setup. If one of the devices failed, it wasn’t anything to live with the other devices that were handling all the load. It was also easy to replace with another cheap piece of hardware. It’s this focus on resiliency and availability that serves them well in the cloud computing realm. Just as with the other vendors we’ve discussed, you can take advantage of the expertise and capability that Google offers for your own purposes.
Just as with Microsoft’s Azure, Google’s cloud offerings run the breadth from infrastructure as a service through storage as a service and into software as a service. You may well have used their software as a service offerings, whether it’s their office productivity software including Google Docs and Google Sheets or even if you have a Gmail e-mail address, you might consider their web interface for e-mail to be software as a service since you aren’t having to download and install a native application to manage your e-mail if you are using Google’s Gmail. The one thing Google doesn’t offer in its cloud offerings that Microsoft has is its own operating system. While it does have Android and ChromeOS, neither of these operating systems are available through their cloud computing offerings.
However, there certainly are plenty of other ways to make use of all the features Google has available in their cloud computing platform. Just as we did with the other vendors, we’re going to take a look at building a traditional web architecture using the offerings from Google’s cloud. Once we’re finished looking at a traditional architecture, we’ll take a look at implementing some capabilities in more of a cloud-native architecture. As noted previously, we’re going to look at an older web architecture, but the same elements are essentially used no matter whether you are going to go cloud-native or use a traditional approach. And in the process of looking at these, you’ll start to see how you could build your own environment that suits your lab needs.
Traditional Architecture
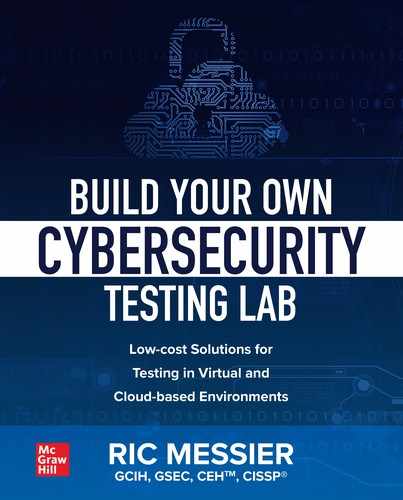
Just in case you skipped over the previous two chapters because you were mostly interested in Google’s cloud offering, a traditional web application architecture looks like what you see in Figure 10-1. This follows a classic n-tier application model where you have multiple layers that come together to serve a single application. In an ideal world, each of these layers is separated not only by network connectivity, meaning the different layers are not all on the same system or even multiple tiers are not on the same system, but also some sort of security control between each of the layers. If you have done any sort of programming, this is not all that far removed from a model-view-controller (MVC) approach to application design. In MVC, you have a model, which is the data representation, you have the view, which is the user interface and finally, you have the controller, which is the application or business logic that takes the model and represents it to the screen.
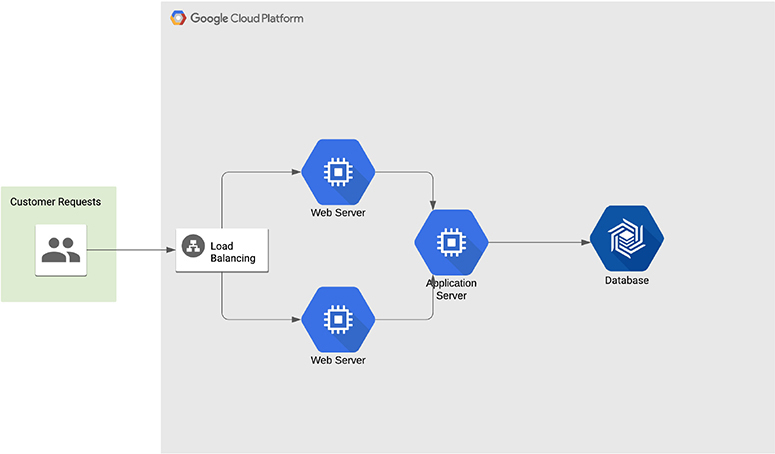
Figure 10-1 Traditional web architecture with Google
When it comes to n-tier, you can implement it in a three-tier design similar to the MVC approach. In our case, we’re going to use a four-tier or four-layer implementation, with a couple of other elements thrown into the middle, though they are not strictly necessary for the implementation. Starting at the innermost component is the model, commonly implemented with a database. Databases come in many flavors, with more being available today than probably ever before. Because we are going traditional on the first go-around, we’re going to use a relational database, though any database is fine for this purpose. You’ll want to use whatever makes sense for your application needs. When it comes to taking a look at how we do it within the Google cloud environment, the configuration and implementation is going to look much the same so it doesn’t matter if we are going traditional.
![]()
NOTE Where you can often make use of many different relational databases, you can’t replace a relational database with, say, a graph database or even a document database. The programmatic interface is different as is the representation within the database and, of course, what you get out is going to be very different from one of these database types to another.
The second tier out toward the user, noting that we move from more trusted to least trusted, is the application server. This is where the business logic is implemented. If you think about the MVC paradigm, this is part of the controller. The application server is responsible for interfacing with the data model, implemented here as a database. It performs programmatic actions on the data both before storage and after retrieval, depending on the direction the data is flowing. It is also the interface with the user that may be responsible for making sure what is provided as input makes sense in the context of the application. The application server should be responsible for sanitizing the input from the user to make sure nothing malicious makes its way to the database server for sure, but also to the underlying operating system where the application server resides.
Another part of the controller could be the web server. The web server is responsible, at least in part, for constructing replies for the user, formatting data in a way that can be consumed by the user’s browser. In the case of the web server, it’s commonly static content that just needs to be sent to the browser for display, though there could still be some programmatic elements that are separate and distinct from the application server. This is the third tier of our n-tier application. The final tier is the user’s web browser, which is the view of MVC. It is responsible for taking formatting instructions along with data, in the form of HTML, and presenting it all in a way that makes sense for the user.
Finally, we’ll take a look at implementing a load balancer, which is a very common system to be implemented in a web application. This is not strictly necessary from the perspective of a web application, but it allows us to talk about some network devices that can support the web application.
Database
Before we get going with the database server, it’s probably useful to spend a moment talking about what a relational database is. If you just know database, you won’t understand the difference between the types of databases available to you and won’t be able to make informed decisions when you need one. Relational databases are based on the relational model of data, as first described in 1969. In the relational model, you take a data tuple, which is an ordered list of elements and make relationships with that tuple to another data set or tuple. In our case, a tuple is a row in a database. Figure 10-2 shows an example of a lightly populated database. Each row in the database is a tuple. The different pieces of information are all connected to each other, which means they are related. They are also ordered in the sense that every row has information in the same order as all the others. When you extract the data, you know what each piece of data is going to represent because you know the order of the columns, based on the database schema.

Figure 10-2 Database rows (tuples)
That’s just one table in a database. You may have multiple tables and you want to connect them. There are different ways to do this but to make it very concrete and not have to try to figure it out in the midst of a query, you can create a table that maps one row of one table to another row of another table. Each set of data that follows the schema outlined by the columns you see in a common tabular representation is called a table. This may be a term familiar to you and even if you have never done any database design, it seems likely you’ve probably seen a spreadsheet at some point. Spreadsheets are also formatted into tables with rows and columns. The columns generally define the data type or variable that is going to change from one row to the next. Figure 10-3 shows a graphical representation of three tables. One table is the human table with a name and an age, one table is a pet table with a name and an age as the columns. The final table takes the keys, which are unique identifiers for each row in a table, and maps them together. Using an approach like this, every human can have multiple pets and every pet can have multiple humans. You would call this a many-many mapping.
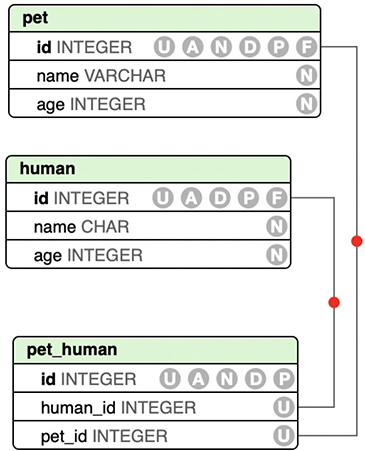
Figure 10-3 Relational database
So, great. Now we know what a database looks like visually. The question now is how to actually interact with it. Relational databases use the Structured Query Language (SQL). SQL fits the relational model because of the predictability of the data. Once a table has been designed, you don’t suddenly find yourself getting entirely different results from a query of that table. Any change to the structure of the table requires that the database be told. A database server, or any piece of software managing the database, allocates space in the database based on known quantities, meaning it knows exactly what a row looks like. Any SQL statement issued to a database is commonly called a query. This suggests we are asking the database a question, but that’s not always the case if you think a question leads to a quantity of information as an answer. In the following case, the query is asking the database to create a table with the defined structure. The answer we get back from the database is whether or not the query succeeded, meaning did the table get created.

While SQL is a standard language, there are many implementations of SQL. What you see in this code is the query for creating a table in SQLite, an embedded database, which means the application manages the database using a library rather than connecting to a database server, which manes the database. Each implementation manages the underlying storage differently, depending on what it expects the scale of the data will be—how large with the database get. It may organize keys in a different way. What connects the different databases together is the way the data is organized—in tables—as well as the language used to communicate with the database. This is not to say that this is the language used to communicate with the database server. Different implementations of relational databases will use different command languages to interact with the fundamental management of the database. As an example, communicating with the database server, rather than the database itself (meaning the data inside the database), using PostgreSQL, all commands start with a . If you want to quit the program used to interact with the database server, you would use q. This is not the only way to quit, but it is indicative of the types of commands you would use to interact with the database server using a command line program.

VIDEO For a look at how you would use Google Cloud to enable a database instance, view the “Creating Google Compute Instance” video that accompanies this book.
When it comes to structure and organization, we’re going to creating a database server instance. This does not mean we are going to be creating a database. The server is just the software that you would interface with. It manages connections, whether they are network connections or named pipes, which are local interprocess communication (IPC) mechanisms. It also manages storage within the operating system. This not only includes managing the files in the filesystem but also manages the structure and organization of the database files. Once we have the database server, we can create a database. This is a logical container, essentially, though in practice on a database server, it is a set of files where the data is going to be stored. Once we have a database, we can start to create tables. A database can contain a single table or multiple tables. It is the logical container for all of the tables and provides a way to refer specifically to tables. This means that if you want to get to a table, you would indicate the database the table belongs to then the table. As an example, let’s say the pet-human tables from Figure 10-3 were in a database called db, I could refer to the pet table using db.pet and the human table using db.human.
![]()
NOTE In order to get started with Google Cloud Platform, you need to create a billing account so they can charge you for your usage. There is a free tier, which you can enroll in, but you will still need to supply a credit card, mostly because they want to make sure you are a real person. It’s possible in creating an account that you will be given credits to use over the first year. In creating a new account for this, though I had an existing account to use, I was offered up to $300 in credits.
Now that we have a sense of the way databases are put together, we can start to look at how you would create a database environment in the Google Cloud Platform (GCP). Just as with AWS and Azure, there are a lot of offerings across a range of categories to select from. When you go to the GCP console, you will be presented with a dashboard, much the same as you get with the other providers. You can see a selection of some of those in Figure 10-4. You’ll notice the Cloud SQL database offering falls under storage, as you’d expect, alongside file storage options. After all, not all storage needs to be a database when you are developing cloud-based offerings and applications.
Figure 10-4 Google storage offerings
The first thing we need to do after selecting Cloud SQL is determine which flavor of SQL database you want to use. Earlier, we talked about how you would manage PostgreSQL using the traditional command line tool that is developed for that platform. PostgreSQL is one of the options for the server type we can select from. MySQL is the other selection available here, shown in Figure 10-5. While both are open source SQL server projects, MySQL is owned and maintained by Oracle these days. This may be a factor in influencing your decision as to which way to go. Of course, often, when you are simply implementing an application for testing, you are going to be bound by whatever platform the developer has chosen to go with. The libraries used to interact with the database servers programmatically are different between PostgreSQL and MySQL so you can’t just implement either and point the application at it. The application has to be developed with the right libraries for each database server.
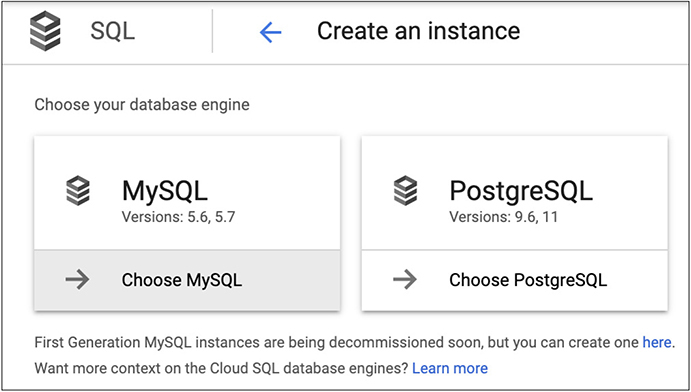
Figure 10-5 Cloud SQL choices
Just to be a little different, and in keeping with mentioning PostgreSQL, that’s what we’re going to select. Once you select the instance type, the GCP application programming interface (API) starts up to help create the instance. Creating the database includes some of the configuration settings you’d expect as well as some additional ones. First, give it an instance identifier that starts with a letter and includes letters and numbers, as you like. You can make this a random value or you can give it a name that makes some sense to you. Ultimately, this is how you are going to refer to this, especially if you are going to use the command line utilities to interface with GCP. From there, you need to provide a password for the postgres user. In this case, I had GCP generate a random password for me. Obviously, if you are going to generate a random password, you’ll need to store it somehow so you can authenticate against the instance when you are ready to start creating databases (remember, we are going to be creating a server instance, not an actual database which would happen after we created the server instance). Select your geographic region and the zone within the region, then the version if PostgreSQL you want to use, if it matters to you. Figure 10-6 shows all of these configuration settings.

Figure 10-6 Cloud SQL basic configuration
This is not the extent of the configuration capabilities we have for our SQL instance, though. In order to get to the rest of the configuration settings, you have to select “Show configuration options.” This is where you would make selections about the machine size as well as network connectivity. By default, you will get a public IP address and a machine with a single processor core, 3.75G of memory and a 10G disk to store your databases in. Additionally, you will get backups turned on by default but your database won’t be highly available. If there is an issue, your database will be unavailable until the issue, such as an application failure or network failure, is resolved. Figure 10-7 shows the additional configuration settings you can make changes to as you wish.
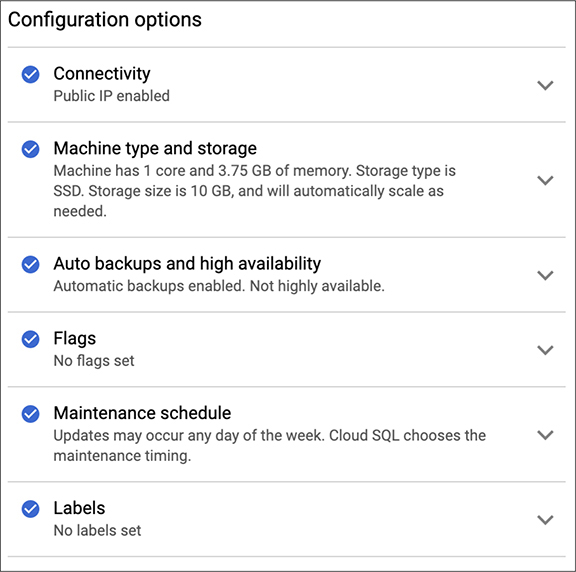
Figure 10-7 Additional Cloud SQL configuration
One advantage, as noted several times, of using a cloud platform and focusing on what you really care about rather than the care and feeding of an operating system or an application is not having to handle maintenance—that care and feeding. This is highlighted here in the additional settings. Rather than having any updates deemed necessary happen whenever GCP decides to update, you can schedule your updates. This is effectively defining your maintenance window so you can plan around it. In a testing situation, you should be aware when the database may be unavailable so you aren’t sitting down at your computer to start up your testing only to find out the database is down for an update. It’s not a great way to start your day. In the case of a single database instance, downtime could be minimal. Shutting down a database server, installing a fresh package update then starting the database up shouldn’t be a very long process. This will vary, to some degree, on the size of your databases. Larger databases will take a database server longer to start up because it may load up some parts of the database, like the indices which speed up data retrieval, into memory.
One note about the Cloud SQL instance here is that in order to create a Cloud SQL instance, I had to enable billing on my account. While it’s not clear, because no pricing is mentioned anywhere in the configuration, but it would seem that Cloud SQL is not a free tier offering since they want to be able to bill before setting up an instance. This is before even starting the configuration process, not before doing the creation. This is something to keep in mind as you are creating instances. It may also be a factor in deciding which cloud platform to use.
Application Server
As we’ve done before, we’re going to create a Tomcat instance, just to keep things a little consistent for comparison purposes. For this, in GCP, we are going to use the Marketplace. Searching for Tomcat in the Marketplace yields the results shown in Figure 10-8. There are three choices. What you see in the lower left is that two of the three are free while the third is paid. This does not mean that you can just create an instance and not pay anything for it. What it means is there are no licensing costs associated with two of them, while the third you are paying a license fee for. You will still pay the charges for compute time used, based on the size of the instance you are selecting.

Figure 10-8 Tomcat selections in GCP
Speaking of selecting the size of the instance, you can see the selections for instance in Figure 10-9. What is selected for size from a processor and memory selection is not the default for this image. What is selected is a random system size. You’ll also see the boot disk size is the default size for the image. This is the boot disk, meaning it’s the disk where the operating system is going to be stored. With this image, there is no ability to add additional storage directly to the instance, though you can always get storage solutions for your application to use if that’s what you need. As this is an application server with a database for a backend, it’s unlikely we have a lot of need for extra storage on this instance. The one consideration when you are factoring in your disk space is logging. When you are testing, logging can be essential. This isn’t always true, but if your purpose is to determine when your application has failed and how it has failed, you need those logs. If you are going to be sending a lot of requests, make sure you have adequate disk space for the logs you are going to be writing out.
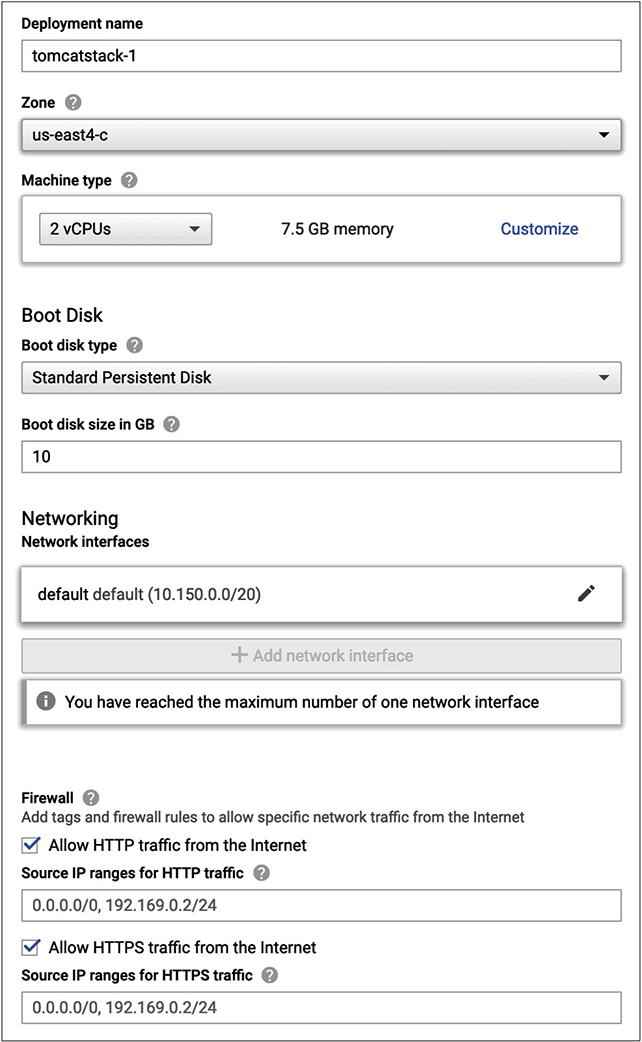
Figure 10-9 Instance details
![]()
NOTE This is especially true when you are using Java, from my experience. Java application servers can be very chatty, especially if the logging level is set high to get granular details about what the application is doing.
What you may also notice in the details here is the ability to add additional network interfaces. This can give you the ability to perform better isolation on your instances. What we’ve seen in the network diagrams appears like there may be multiple networks involved. Each tier may have its own network, though we haven’t spent any time talking about the network designs. One thing to do is have multiple network interfaces on different systems rather than having to have a router and/or firewall between the different networks. Each device has two network interfaces with a foot in two separate networks. In the case of the application server, for instance, it would have one leg on its own network, which you can think of as the front end, and a second leg on the network the database server is located on. This allows you to restrict access on the database to the IP address of that back-end leg. Using this approach doesn’t lose you anything over having a firewall and a router between the two networks. Figure 10-10 shows what that might look like logically.

Figure 10-10 Logical diagram of multiple networks
This provides us with a couple of advantages. The first is you can have an isolated network where your database server sits. There is no need to have a router on that network. The only device that needs to communicate with your database server is the application server, and using this approach, you would have both devices on the same network. Using this approach, you lose nothing over having a firewall or router between your two devices. If your database server instance only has the database listening, as is the case for these cloud-based instances, the firewall would have to allow access to that port from the IP address of the application server anyway. In order to get to the database server, an attacker would have to compromise the application server to have a launch point to go after the database server. If you did the same between the web server and the application server, the attacker would have to go through the web server to the application server to the database server. This assumes the attacker is going after the operating system and not just making use of a failure within the application, which may give it direct access to the data in the database without worrying about compromising the operating system.
Speaking of firewalls, GCP allows you to configure a firewall on your instance. What you see in Figure 10-11, which is a blow-up of a portion of Figure 10-9, is the configuration for the firewall, allowing ports 80 and 443 (though it uses the protocols HTTP and HTTPS rather than the port numbers). This is where you can also limit the access to your instances. Before adding in a specific range, what was in there was 0.0.0.0/0, meaning allow access to the entire Internet. If you don’t need to open access from the Internet, don’t. In our case, we are not putting the application server on the open Internet. Instead, we are going to use a web server on the front end. Because of that, we only need to allow access to that server. What you see in the configuration here is an entire network block, but that’s not necessary. If you want to be really detailed, just provide access to the web server.
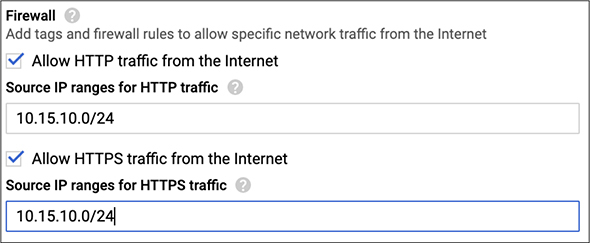
Figure 10-11 Firewall configuration
We were talking about logging earlier. The last configuration setting to consider is the use of Stackdriver. Stackdriver is GCP’s platform for monitoring. Monitoring relies on logging, at least in part. This means you can turn on Stackdriver for logging and monitoring to support your testing efforts. Both of these (logging and monitoring) selections are optional, but if you really want help with your testing efforts, they are worth considering.
Web Server
The web server is going to let us talk about another feature of GCP. This is reminiscent of what we had in Azure. We’re going to start by looking at creating a template. This gives us a way of defining an instance in a way that we can reuse that definition later. What we had with Azure was a place to download the instance definition so we could reuse later on. In this case, we are going to define a template that will be stored in our GCP environment. Figure 10-12 shows the page where we are going to define the instance. It may look familiar. We’re going to use the same approach to defining the instance as we have before. We need to give the template a name, of course, so we can identify it later. We also need to define the size of the instance from a computing perspective. One thing you may notice is the selection of the processor architecture. This is new, meaning we haven’t seen it in AWS or Azure. In fact, Azure made a point of using a generic way of referring to the capabilities of the processor. Selecting second-generation means using a Cascade Lake processor, which is a processor family released in the first half of 2019.
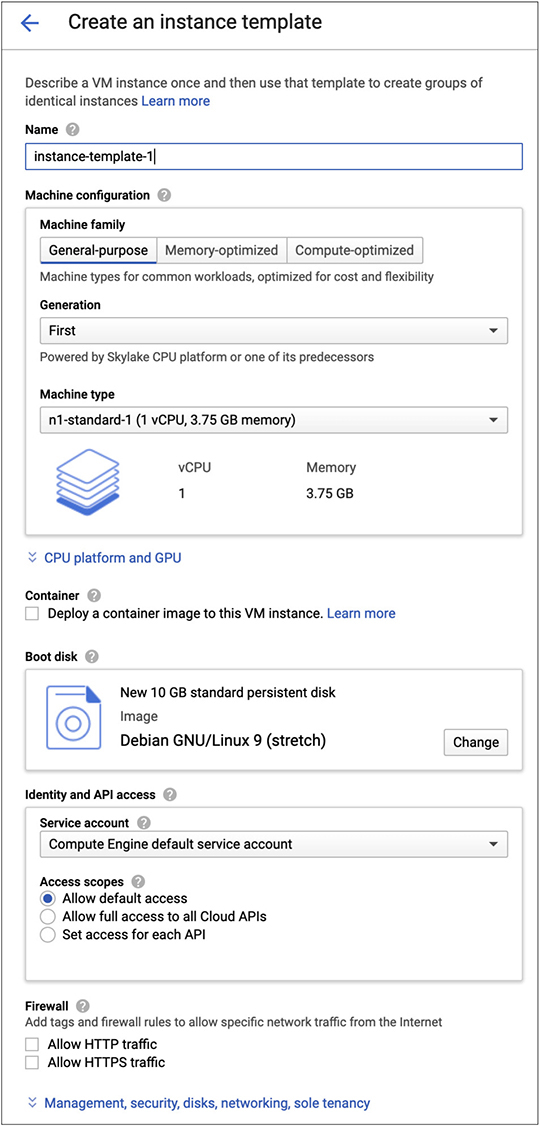
Figure 10-12 Creating a template
From a web server perspective, we are helped with the option to deploy a container to the image. What this gives us is a virtual machine instance that is running a container. With the virtual machine instance, we have a bare operating system. In order to make it a web server, we’d have to go add software to it. Adding in the container gives us the ability to add that software. Not only add the software but add it automatically. You don’t have to install the software in any way. GCP will handle adding the software for you. Everything else is fairly standard. The one thing that may be worth talking about here is GCP’s identity and access management (IAM) function. All of the cloud providers have their own version of IAM because you have to be able to create users and assign roles and permissions. What you’ll see in Figure 10-13 is the default users and roles attached to this project. This is before any additional configuration, where we may add more users and roles.
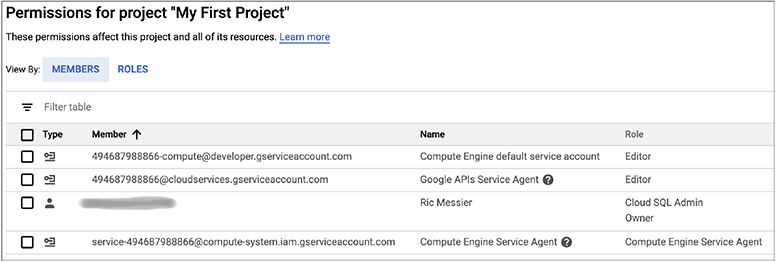
Figure 10-13 Identity and access management
Figure 10-14 shows the process of adding a new user, ignoring the error about selecting a user. The error suggests that you need to already have created a user or at least know of a user who has a Google account. Commonly, if you have Gsuite for your domain, you would have multiple users already configured with e-mail addresses and you can add one of those users. Once you have selected an appropriate user, you can add roles to that user. A viewer has read-only access to the project. A browser can look at the different GCP resources, meaning they can see what is in place but not do anything about it, including looking at configurations. An editor can edit resources, but can’t create new resources. An owner has complete access to the project, meaning they can create and modify any resources they want.
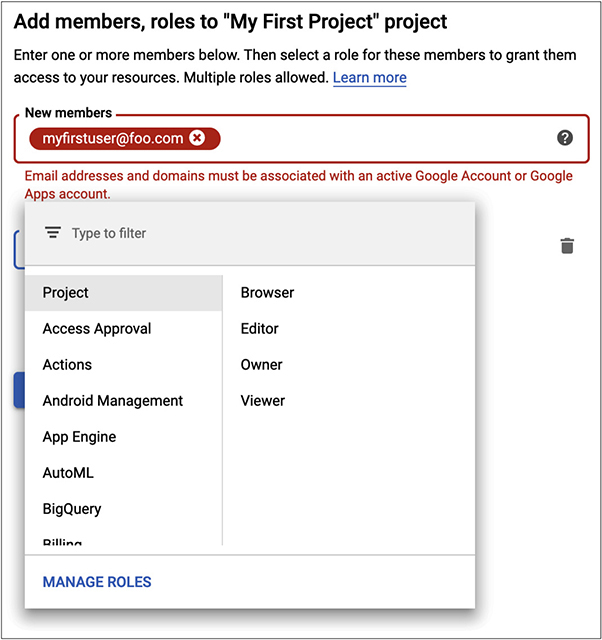
Figure 10-14 Adding a user to GCP IAM
Since the rest of the template creation and configuration is the same as what we have looked at before, we’re going to go back to creating our web server. Figure 10-15 shows the options we have available to us once we have determined that we are going to create a new Compute Engine instance. You’ll see we can just create a new instance, deploy an instance from a template, which we’ve already looked at creating, or we can go to the marketplace. The marketplace will give us access to a lot of pre-configured images. This is where you would go if you want anything other than straight infrastructure as a service. Without the marketplace, you will have a bare virtual machine that you can do anything you want with, but there won’t be any services or applications installed on it for you. The marketplace is really what we want, so we aren’t concerned with installation and configuration of the web server.
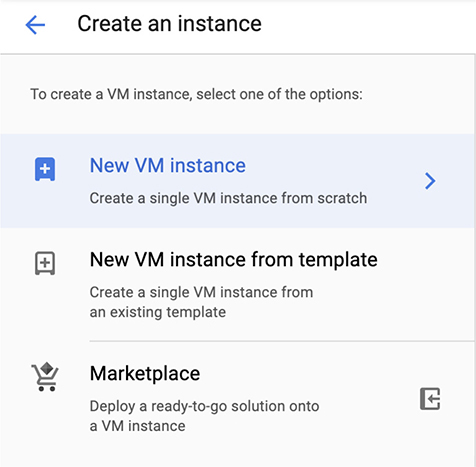
Figure 10-15 Selecting the Compute Engine type
We want a web server and since we’ve already looked at Nginx, let’s look at deploying another type of web server. A common web server is Apache’s httpd, which is the HTTP daemon. We’re going to search the marketplace for the Apache web server. You can see the results in Figure 10-16. You’ll see some of the results say LAMP stack. LAMP is an acronym meaning Linux, Apache, MySQL, PHP. Using the LAMP stack, you can have a complete web application setup on a single box. You have your web server, your application server (PHP), and your database server (MySQL). We don’t need all of that, though, since we already have a database server and an application server. The less we have installed on any given box, the better off it’s going to be. What you’ll also notice is we have the ability to select a LAMP stack on top of multiple Linux distributions. Sadly, what we can’t do here is just get an Apache web server on an instance by itself. This means we either go to a base image and add a container or we use Nginx again, which does have an image available.
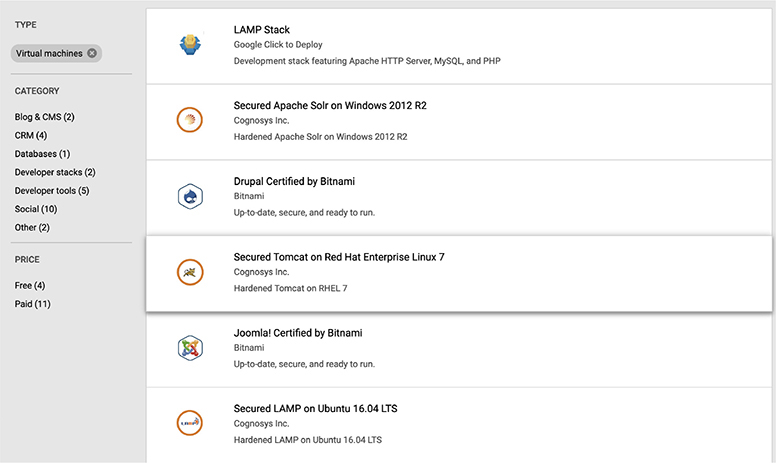
Figure 10-16 Search for Apache web server
The configuration of the instance looks the same as any other instance. The one thing to make note of, shown in Figure 10-17, is the IP address selection. You get an ephemeral address by default. Unless you go create an address, you have a choice between ephemeral and none. The ephemeral address is assigned when you turn on the instance, but when the instance is turned off, the address goes away. The address only exists for the life of the instance. You can think of this as a dynamically allocated IP address. Every time you deploy the instance, it will pick up an IP address, and as soon as the instance is turned off, the address goes away.

Figure 10-17 Instance configuration
We don’t need an external address in this case because the web server isn’t going to be externally available. Instead, remember, the load balancer is going to be the external point of connection to the user. What the web server is going to give us is the ability to serve up static content, meaning pages with no programmatic access or interaction. No code is necessary on the server side to generate the content being displayed to the user. Beyond the static content, the web server is going to act as a reverse proxy. A reverse proxy is where you have a system that takes in requests from a user that sits in front of one server (or set of servers). A common use of a proxy server is to set on the edge of a network taking requests from the inside and feeding them to systems on the outside of the network. In our case, the reverse proxy is taking requests from the outside, feeding those requests to a server, the application server, that sits on the inside of the network. It’s reverse because rather than going from inside to out, we are going from outside to in. This is from the perspective of our server infrastructure, of course.
Speaking of reverse proxy, it’s probably worth taking a look at another element of a web application infrastructure that we haven’t looked at before. It may be common for a web application to have a security element called a web application firewall (WAF). This is a layer 7 firewall, meaning it looks at the application layer traffic and makes determinations as to what to allow into the application. Application layer attacks against web applications are very common. This means the WAF looks at all of the HTTP headers, including the request uniform resource identifier (URI), but also all parameters. Somewhere between the URI and the parameters is where attacks happen. Any parameter that is provided as part of the uniform resource locator URL (the thing that shows up in the address bar) will be in the URI. The URI is provided as part of the request, as in GET /foo.php?param1=xyz. The URI is foo.php, since that’s the resource being requested. The parameter passed into the PHP script is param1. It has the value xyz in this case.
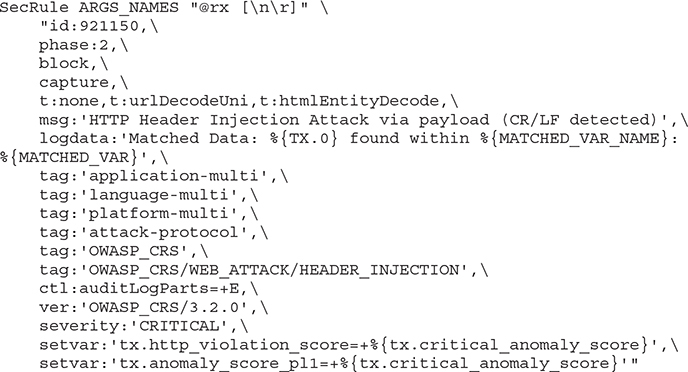
We can implement a WAF within our network design. One way to do this is to implement a module within the web server itself. An open source application that can be used for this is modsecurity. This is a module that runs inside the web server itself. When the web server is loaded, it loads the modsecurity module. Since it’s open source, the software itself is free. Additionally, there are community rules that can be implemented. These rules are complex, but text based, which means you can edit them if you would like. One example is shown next. This is a rule that detects HTTP header injection attacks. An HTTP header injection attack could be used for HTTP response splitting, cross site scripting, or other attacks. What this rule is doing is looking for a carriage return and line feed combination, which shouldn’t be seen in a set of HTTP headers.
If you wanted, you could install modsecurity into your web server instance. You could also use one of the commercial products that are available in the marketplace. A common WAF you might see is one from the company Fortinet. Figure 10-18 shows the configuration necessary to create the Fortinet firewall. One thing you may note in the firewall section is it allows for Secure Shell (SSH), which is on port 22. This is how you would manage this system, by connecting to a virtual console interface using an SSH client. Selecting the Fortinet WAF instance brings up another facet of cloud computing offerings we haven’t talked about yet. This is Bring Your Own License (BYOL). The Fortinet WAF is BYOL, which means you buy the software license directly from Fortinet and you are expected to use that license when you create the instance inside GCP. You can deploy the WAF instance, but you will only get functionality if you are able to apply a license to your instance.

Figure 10-18 Fortinet WAF
We now have a web server, including a WAF if we want. You could implement the WAF almost anywhere you wanted to, especially if it’s an external box. This is not just for Google, of course. You could implement a load balancer on any of the cloud platforms, or inside a lab on your premises. You could implement it outside the load balancer if you wanted to, though that probably doesn’t make a lot of sense unless it’s got a lot of processing power, since the purpose of a load balancer is to spread the load across multiple servers since there isn’t much of any processing going on within the load balancer. A WAF tends to require a lot of processing power simply because it is looking at a lot of text-based data, rather than numeric information. Additionally, the rules are often text based. Text processing is computationally expensive because processors are designed for primarily arithmetic and logical operations. Text-based operations can be made arithmetic and logical, but there are lots of comparisons that need to happen. Imagine comparing a 16-character pattern you are looking for against a 32-character string. You have to do a character-by-character comparison. That’s 16 comparisons just to find the first character and then if you happen to find the pattern at the tail end of the string, you need to compare all the way to the end. Comparisons in and of themselves are not hard. It’s the repetition that is time consuming.
Load Balancer
We move out another layer at this point to the load balancer. GCP has a load balancer option under their network services. As we did before, we have to decide what kind of load balancer we are going to implement. You need to select either HTTP/HTTPS, TCP, or UDP, as you can see in Figure 10-19. Actually, in Figure 10-19, UDP is left off because it made the image too wide and since we’re talking about a web application, it wasn’t as relevant anyway. So, select the HTTP load balancer. You will then need to determine whether you are going to load balance between the Internet and your virtual machine instances or between your virtual machine instances. If you are only going to load balance between your virtual machine instances, the load balancer can get an internal address and not need a public address.

Figure 10-19 Load balancer selection
Once you have identified which type of load balancer you are going to create, you have a list of tasks you have to accomplish, shown in Figure 10-20. First, you need to create a backend service. This means you have to have systems behind the load balancer to balance between. If you haven’t already created instances to balance between, you can do that here. Otherwise, you will have instances to select from in a pulldown list. In addition, you have to create a set of rules to determine how to redirect traffic. You may have certain resources that should go to particular instances, for example. You can configure that in the Host and Path Rules, shown in Figure 10-19. Finally, you need a front-end configuration. This creates not only the IP address you are going to have on your load balancer but also the protocols it will accept. By default, you get an HTTP listener. You can add an HTTPS listener, with a configuration shown in Figure 10-20. Because this is Google, you will be using Quick UDP Internet Connections (QUIC) for the encryption.
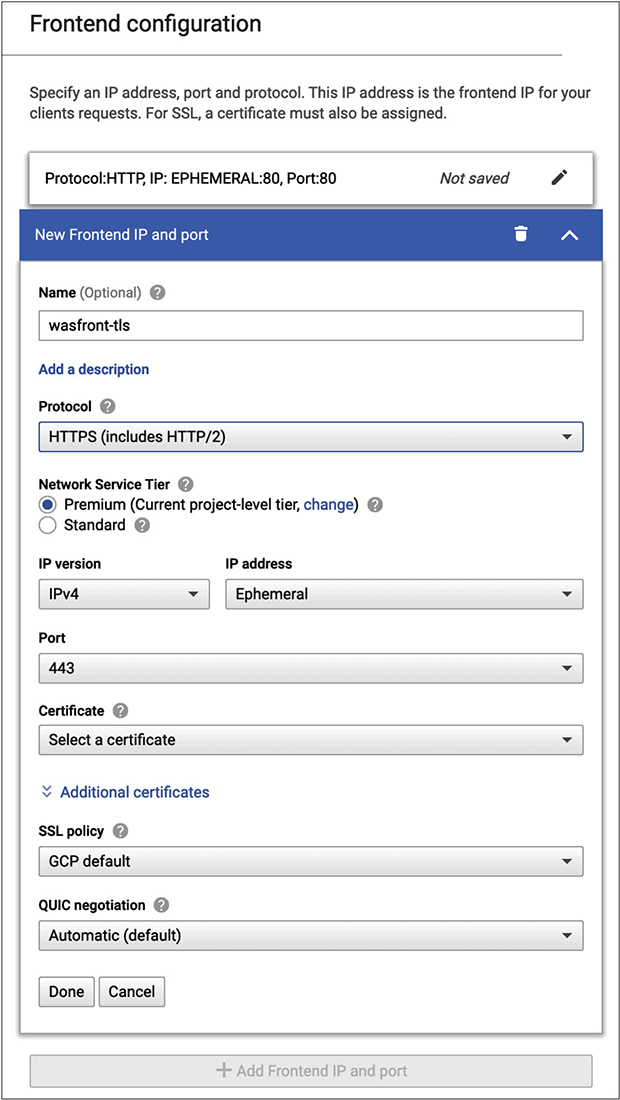
Figure 10-20 Front-end configuration
If you are doing encryption, you will need a certificate that identifies your load balancer. When a client (browser) tries to connect, there will be a handshake during which your load balancer will offer its certificate. The client will expect that the hostname it went to will match the name in the certificate. Additionally, you can create your own encryption policy. This is a configuration where you set the minimum level of encryption to be used. The default is TLS 1.0, though you can select higher versions of TLS, if you are particularly concerned with the limitations of the older versions of TLS, as well as certain that the clients who will be connecting to your service will support those newer versions of TLS.
Once we have the load balancer in place, we have our complete web application architecture. As before, this gives us a traditional web application architecture. What you’ve seen is the configuration from one GCP service to the next looks very much the same. You have to give it a name and then there are some more specific choices you need to make. This may include the size of your computing platform, including processors and memory. It may also include the disk space you want allocated to your boot disk, where the operating system will also reside. This means you can pretty much move on to any type of network architecture that you’d like and you’ll have a good idea how to create your instances and put them together.
Cloud-Native
As you’d expect, GCP has cloud-native offerings. How could it not, after all. Remember that when we are talking about cloud-native, we are talking about modern ways of developing applications. This includes a microservice architecture to the application, rather than a monolithic, single application that runs on a single virtual machine running an application server like Apache’s Tomcat Java application server. When you implement a microservices architecture, you have a lot of smaller services that interact with each other. It would be costly to implement a complete virtual machine for each of the services. A better approach is to use something called containers. This is a way of isolating an application in a virtual space without creating a complete virtual machine with its own operating system. Instead, the service lives inside a small space and you can have multiple containers, each with its own service, all using the same operating system.
Another way of going cloud-native is to get away from using the older relational database model, since there are so many types of data that modern applications use that don’t fit nicely into a traditional tabular format. Also, we don’t worry as much about relations. Often, data is entirely self-contained. You may also have variable-length data. Rather than allocating space for data that may exist, you simply use the space you need when you need it by self-describing data you are storing so the retrieval process knows what it’s getting and it can respond accordingly. So, we’re going to take a look at creating something other than a standard, relational database and we’re also going to take a look at creating containers.
Containers
A microservice is a small application that is designed to perform a specific function. Ideally, this is a function that is performed regularly and can be reused. Reuse in software development is a big thing. Why keep reinventing the wheel when you can just take something that’s already been created that you can reuse? What we need is a lightweight environment to deploy these services into. If we are using an auto-scaling environment, it’s helpful to use a mechanism that starts up quickly. Virtual machines have to go through a full boot process. This means loading the operating system (kernel) into memory and initiating the system initialization process, including starting up a lot of services that are necessary for the operating environment to function.
A container uses the existing operating system (kernel), meaning there is no time it takes to load the kernel into memory. Additionally, there are no system services that are needed to start up. All that’s necessary is for the container service to initialize the application, which means creating a namespace in memory and then loading the contained application into that namespace. A namespace just means the memory is tagged, so the only memory segments an application in a container can get to are those that are tagged the same. This is a much faster process than starting up an entire operating system and its associated operating environment.
GCP uses Kubernetes for containers. Kubernetes is a management application used for containers. It is used for deploying containers as well as managing the containers and automating the deployment of the containers. When we create a container using Kubernetes in GCP, there are two paths we can follow. We can deploy an existing image from the Marketplace or we can use it to deploy our own application. Figure 10-21 shows the configuration necessary to deploy an existing application. This means Kubernetes will reach out to a repository like Github or Bitbucket and pull a container image from one of those repositories. You can see the selected Github repository, available after authentication to Github. All of this requires that you enable some application programming interfaces (APIs) in GCP. GCP will prompt you to do that if you haven’t already.

Figure 10-21 Deploy new container
Once you have told GCP where to find the application you want to deploy, you need to do some configuration. After you click Continue on the first stage of configuration, you will be presented with what you see in Figure 10-22. This is where you give the application its name and also provide the namespace identifier. If you have multiple users across multiple projects, you may want to make sure you have provided an identifier that is unique for your application. Otherwise, you may end up with multiple applications running in the same cluster that all have the same namespace. If you haven’t configured this and have many applications all trying to use the same default namespace, you aren’t getting the isolation benefits of containers.
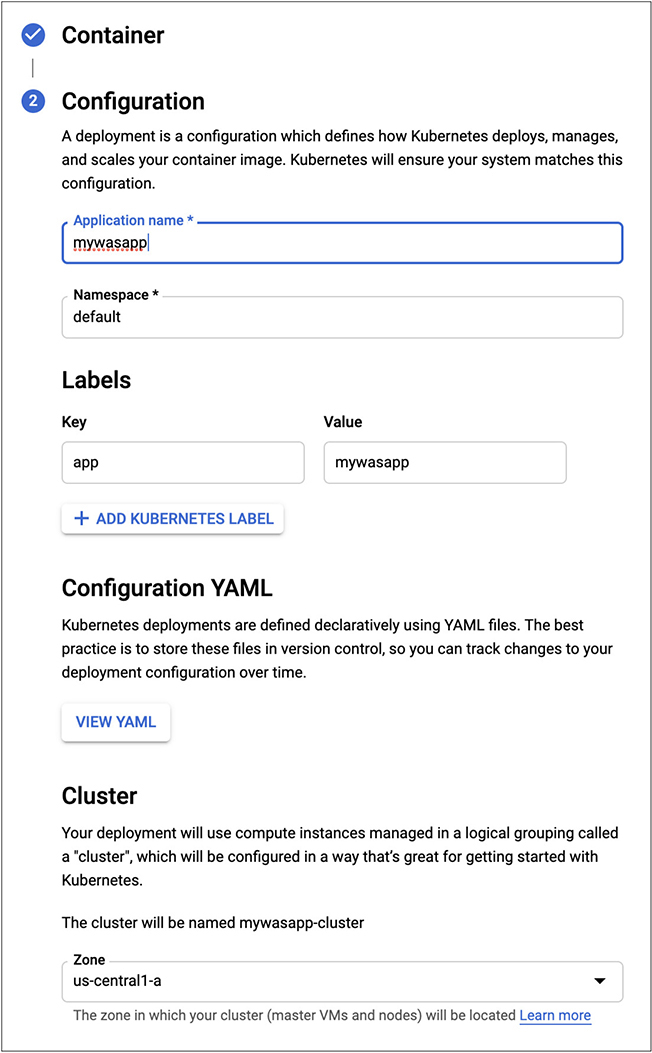
Figure 10-22 Additional container configuration
What we have at the end of this is a container that will be deployed from the application stored at your configuration at whichever Internet-facing repository you select. You will also notice that on the configuration page, you will have the ability to get a Yet Another Markup Language (YAML) configuration for your container. This YAML can then be used to redeploy the same container over and over again without having to go back to the GCP interface to create an application deployment in Kubernetes. The YAML can be used to automate your deployment and we’ll get more into automation of your environments in the next chapter. In the following code, you can see the YAML that defined the creation of this once container instance.

As this is a text-based configuration, you can make changes to it using any text editor prior to additional deployments. What may be useful is to put your configurations into some sort of version control system. This will allow you to maintain multiple versions of the configuration so you have a historical record of the changes to the configuration. If you happen to make a change you didn’t mean to make or that doesn’t work, you can also revert to a stored change.
Databases
As seen earlier, you can select an SQL implementation. GCP itself is primarily oriented around relational databases since there are multiple offerings in that space. This does not mean, though, that we can’t deploy our own NoSQL database. NoSQL is a term used to talk about non-relational databases that do not use SQL to interface with them. In order to deploy a document database like MongoDB, we need to go back to the Compute Engine and deploy an instance for MongoDB. GCP does have an offering from Google Click to Deploy. Click to Deploy is meant to be essentially a one-click deployment of an instance. Figure 10-23 shows the configuration page for the MongoDB instance.
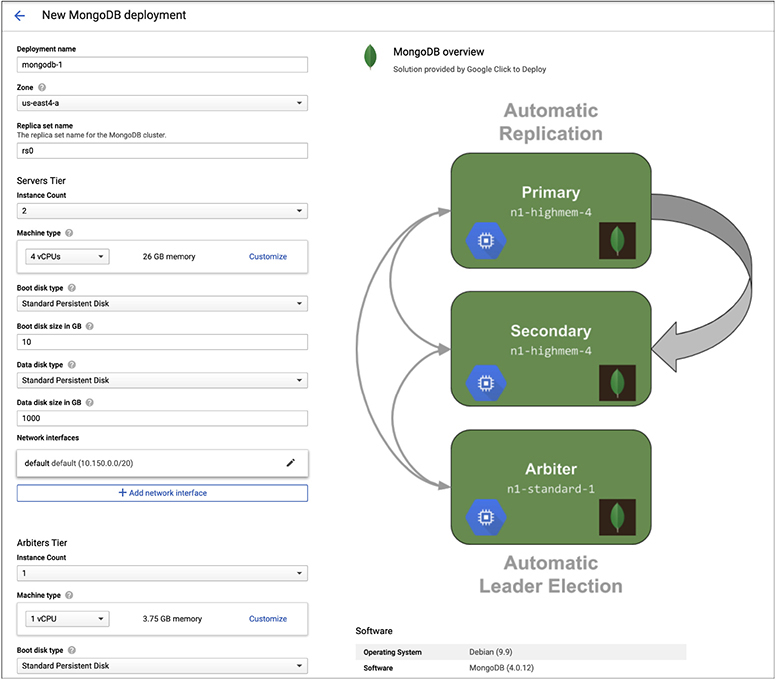
Figure 10-23 MongoDB instance configuration
You will see that with the MongoDB instance configuration you get the standard machine configuration where you select the number of processors and the amount of memory. You also have to select a network configuration. The configuration that is going to make the most difference to you is the disk size. This is not to say that memory and processor have no weight but the purpose of a database is to store and retrieve data so you will really need to make sure you have enough disk space for your database to live in. The default size of this disk is 1T, or 1000G as it’s displayed here. What you will also see is we are deploying two instances to manage the database. The diagram on the right shows how these instances are used. One of them is the primary, while the second is the secondary. Additionally, there is an arbiter that is another virtual machine instance that takes care of determining which system is the leader.
One thing you should take a close look at with this instance is the cost. When you search for the MongoDB instance and bring up the one we selected, you will see that the expected costs for this are over $300 per month. You can get this cost down by skipping the replication if you are not in need of high availability. You can also go with lower specifications for the systems in your cluster. As noted previously, if your goal is to keep costs down, it’s important to make sure you are looking closely at how much each instance is going to cost you so you can determine what the overall deployment will cost over the lifetime of the deployment. If you are using everything together for a couple of days and you make sure to turn things off when you aren’t using them, the costs will be less than what is quoted.
![]()
NOTE There may be features, like scheduled instances, that can help you keep costs down through minimizing the amount of time an instance is turned on. If this is of interest to you, you should research what is available at the time you are creating your instances.
Summary
Google has a cloud computing platform, just as Amazon and Microsoft do. Google’s is generally considered to be the third if you were to order them based on utilization. Google was also late to the party by comparison with the other vendors. Google was several years behind Amazon and Microsoft in terms of having Google Cloud Platform available for general use. This is not to say that it’s not as functional as the others, just that people may be more aware of the others. Amazon Web Services has a strong name in the industry and people use Microsoft because, first, it’s Microsoft, and second, they probably have some other relationship with the company that opens them up to be more likely to use Azure. This may be because they have an Office 365 subscription and want to keep everything together or it may also be because they are a Microsoft development shop and Microsoft makes it really easy to use Azure within their development environment. By comparison, Google isn’t known for its development platforms, certainly not to the extent that Microsoft is.
GCP has their Compute Engine, which can be used to create virtual machine instances as well as container images. There is a Marketplace, which can be used to get an image with applications already in place. Additionally, you can find virtual appliances in the Marketplace. A virtual appliance is a software that is commonly deployed in custom hardware. You may find virtual firewalls that would commonly come with hardware if you were to buy it in a non-cloud environment. The Fortinet WAF is sold as an appliance, for instance, while we looked at the virtualized instance of that appliance. The hardware may be used for acceleration because the software is implemented in silicon, which would be considerably faster than a general-purpose computer. Instead, the acceleration is handled by applying more compute resources within a virtual machine in a cloud environment.
Just as with the other platforms, we can find databases, web servers, application servers, and load balancers. Some of these are built into the platform, like the load balancer, while others rely on the use of images from the Marketplace. These images are provided by vendors other than Google, generally. In some cases, these images can be deployed as containers. Containers are a common deployment option for modern applications that may be designed using microservices. Alongside containers, modern application developers may choose to use NoSQL databases including a document-based database like MongoDB.
In the next chapter, we’re going to take all of these types of virtual instances and look at how we can automate the deployment. We have some of the foundations already in place, like the YAML definition of a container, as well as the template provided by Azure. We’ll look at some software we can use to automate all of the different pieces, including using the libraries and associated command line utilities for the different cloud platforms.