
C H A P T E R 6
![]()
Working with Data
By combining ASP.NET Web Pages with SQL Server Compact Edition, Microsoft WebMatrix provides a powerful framework for building data-driven, dynamic web applications.
In previous chapters, we have worked with sessions, cookies, forms, and HTTP requests, all of which allow us to maintain state for a period of time, but which are not useful for permanent data storage. In a data-driven web site, a database—SQL Server Compact in our case—provides a permanent store to allow the development of web applications that require stable data persistence as an integral part of the design.
There is a vast scope for database use within a web application; a database is particularly useful wherever content changes frequently or originates from a number of sources, or where large quantities of information must be managed and presented.
This chapter covers the creation and administration of SQL Server Compact Edition databases and looks at how users can interact with them through ASP.NET Web Pages. We will start by creating a database of employees for a fictional company and then use the functionality built into WebMatrix to develop web pages to facilitate the common Create, Read, Update, and Delete (CRUD) operations.
SQL Server Compact Edition
WebMatrix ships with version 4.0 of the SQL Server Compact Edition database, which is installed by the Web Platform Installer as an integral part of the platform. It is a file-based database, where all data is stored within our site in a single file with an .sdf file extension, which makes for easy deployment as no additional install is required on the web server. As the database file is stored within our site, it can be deployed automatically when we deploy the site to the production server using the tools provided by WebMatrix (see Chapter 13 for more information on deployment).
SQL Server Compact databases are limited to a maximum size of 4 GB, although an upgrade path is provided to allow easy migration to another member of the SQL Server family of products if scalability should become an issue. We will look at ways of upgrading the database later in the chapter.
Creating a Database
Although it is perfectly possible to create and administer an SQL Compact database using text commands, the WebMatrix IDE provides a graphical design tool to make this job easier for us. To access the database features of the IDE, first select the Databases tab in the Workspace Selector. A WebMatrix project can contain multiple databases, although in this simple example we will only need one. To create a new database, click either the New Database button in the Ribbon Control or the Add a database to our site button in the center of the Content Pane. An empty database will be created and appear in the Navigation Pane, where it can be renamed, if necessary. By default, the database will be given the same name as our project, suffixed with a .sdf file extension.
![]() Note The database file itself is stored in the App_Data folder within our project. If the App_Data folder does not already exist, WebMatrix will create it for us.
Note The database file itself is stored in the App_Data folder within our project. If the App_Data folder does not already exist, WebMatrix will create it for us.
Creating Tables
Now that we have an empty database to work with, we will need to add some tables in which to store our data. To create a table, either click the New Table button in the Ribbon Control or right-click the Tables node under our database in the Navigation Pane and choose New Table.
With the new table open in the designer, columns can be added by clicking the New Column button in the Ribbon Control. The designer is split into two halves: the top half contains an overview of the entire table, while the bottom half displays the properties of the selected column (see Figure 6-1).

Figure 6-1. The table design tool within the WebMatrix IDE
The following, Table 6-1, describes the six default properties, which can be edited for each column within the WebMatrix design tool.
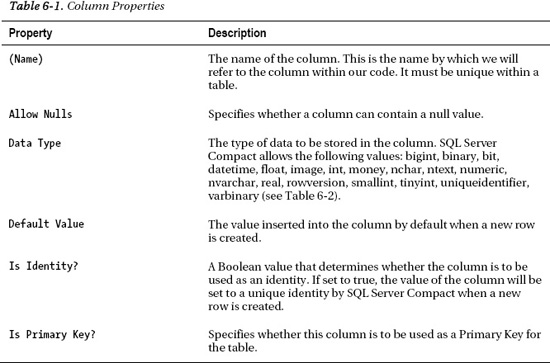
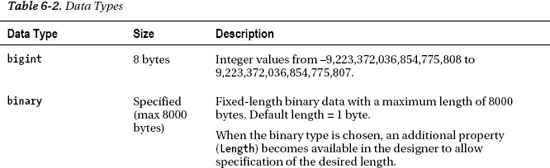
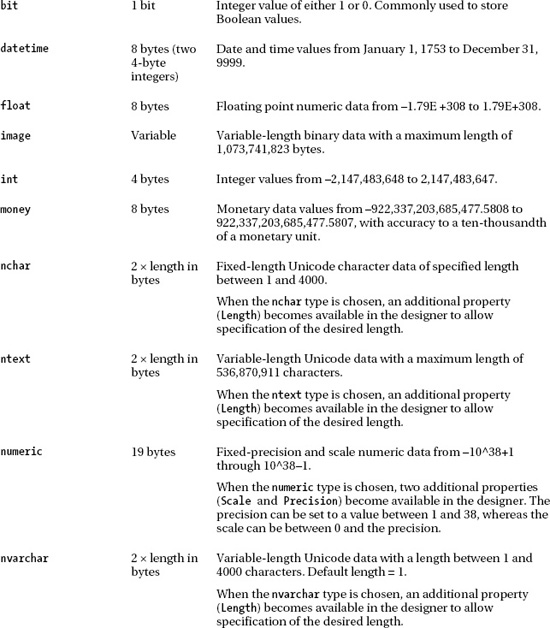
As shown in Table 6-1, the Data Type property can be set to one of eighteen different data types as defined by SQL Server Compact. The following, Table 6-2, details these types and their use.

To add the details of the first column, we simply need to type the details into the empty properties panel, as shown in Figure 6-1. Note that we can only enter values in the properties panel in the bottom half of the designer; the top half is entirely read-only (this may come as a surprise to readers who have previous experience with other SQL Server design tools). Once we have entered the details, press the New Column button on the Ribbon Control and enter the details of the next column; repeat this until all the columns have been added.
Table 6-3 shows the details of the columns to be added to our first table.
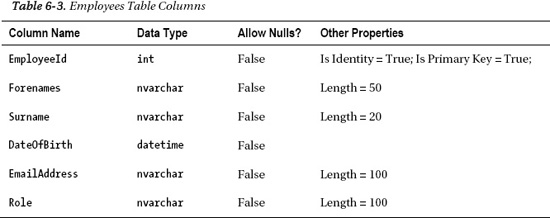
Once we have added all the columns, click the Save button in the top left-hand side of the screen, or click Ctrl+S and enter the name of the table as “Employees” in the box provided (see Figure 6-2).
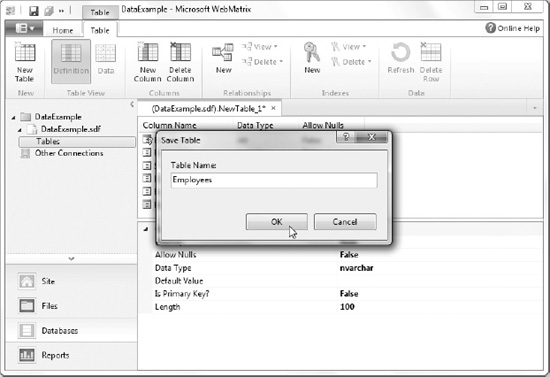
Figure 6-2. Saving the Employees table
Once we have saved the table, the Data button on the Ribbon Control will become available. Click the button and enter some test data, such as that shown here in Figure 6-3.
![]() Note Do not try to enter data into the EmployeeID column, as it is an identity field that SQL Server Compact will fill in for we with unique values, in our case integers. If we do try to enter data into the column, either here through the designer or later through code in an ASP.NET Web Page, we will encounter an error.
Note Do not try to enter data into the EmployeeID column, as it is an identity field that SQL Server Compact will fill in for we with unique values, in our case integers. If we do try to enter data into the column, either here through the designer or later through code in an ASP.NET Web Page, we will encounter an error.
If we do enter a value into this column by mistake in the designer, it can sometimes be difficult to progress, as every time we try to move to a new column we receive an ‘invalid format’ or similar error. Click OK to any error messages and press the Esc key to cancel our changes. This will return the value to null.

Figure 6-3. Sample test data entered into the Employees table
![]() Caution The date format for the DateOfBirth column will depend on the local date format settings for our development machine. In the screenshot in Figure 6-3, they are set to the date format of my machine, which is the standard United Kingdom format of dd/mm/yyyy.
Caution The date format for the DateOfBirth column will depend on the local date format settings for our development machine. In the screenshot in Figure 6-3, they are set to the date format of my machine, which is the standard United Kingdom format of dd/mm/yyyy.
Now that we know how to create databases and tables, we can look at ways of interacting with that data through code. First, we need to ensure that we have a basic understanding of Structured Query Language (SQL), the language that SQL Server uses to interact with data.
![]() Note Experienced users of SQL Server will no-doubt notice that there is no facility to create other types of database objects, such as stored procedures, triggers, views, etc. SQL Server Compact Edition is a vastly scaled-down, file-based version of SQL Server and, as such, offers only a subset of the functionality. If we do need this functionality, we can use WebMatrix with a different version of SQL Server (see the Working with Other Databases section at the end of this chapter).
Note Experienced users of SQL Server will no-doubt notice that there is no facility to create other types of database objects, such as stored procedures, triggers, views, etc. SQL Server Compact Edition is a vastly scaled-down, file-based version of SQL Server and, as such, offers only a subset of the functionality. If we do need this functionality, we can use WebMatrix with a different version of SQL Server (see the Working with Other Databases section at the end of this chapter).
Interacting with Data
Structured Query Language (SQL) is a tried and tested way of interacting with data and databases through code. It was developed at IBM in the early 1970s and is used today by most relational database systems for data retrieval and manipulation. Several versions of SQL exist, which have slightly differing functionality, although the core features of the language, including those seen in this chapter, are generally common across all versions. This means that the same SQL can be used across different databases, usually with only minor syntactical changes. SQL Server databases use a version of SQL called Transact-SQL, commonly referred to as T-SQL.
SQL can be run against our database from within the WebMatrix IDE by closing any open tables, switching to the “Home” tab in the Ribbon Control and clicking the New Query button. To run the query, use the Execute button in the Ribbon Control, located immediately to the right of the New Query button.
![]() Note This section is only intended for novices to serve as a very basic introduction to SQL, which will enable a good understanding of the code in the rest of the book. If we already have a good working knowledge of SQL, we may want to skip to the next section.
Note This section is only intended for novices to serve as a very basic introduction to SQL, which will enable a good understanding of the code in the rest of the book. If we already have a good working knowledge of SQL, we may want to skip to the next section.
For a much more detailed source of information on using T-SQL, take a look at the MSDN Transact-SQL Reference, which can be found at http://msdn.microsoft.com/en-us/library/bb510741.aspx.
Fetching Data
To read data from a database (the R in CRUD), we use the SQL select command. The select command searches for specific records, depending on a set of criteria that we specify as part of the command. When the command is executed, the database will return zero, one, or multiple matching rows.
The simplest form of the select statement is as follows:
SELECT <column names> FROM <table name>
The column names are listed, separated by commas, or can be replaced with an asterisk (*) if we wish to return all columns. The following SQL statement returns the data shown in Figure 6-4.
SELECT Forenames, Surname, Role FROM Employees
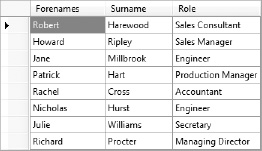
Figure 6-4. The result of a simple SQL select statement
![]() Note T-SQL is not case sensitive, yet we will note that in the preceding SQL statements I have entered the SQL keywords (SELECT and FROM) in block capitals. This is merely a convention that helps to distinguish the SQL from the names of tables, columns, etc. T-SQL also pays no attention to white space, except within literal values.
Note T-SQL is not case sensitive, yet we will note that in the preceding SQL statements I have entered the SQL keywords (SELECT and FROM) in block capitals. This is merely a convention that helps to distinguish the SQL from the names of tables, columns, etc. T-SQL also pays no attention to white space, except within literal values.
The set of rows returned by a select statement can be further distilled through the use of the where clause. The where clause is used to specify the value, or range of values, by which we wish to filter a column. For example, the following two statements return just the engineers and everyone but the Managing Director, respectively.
SELECT Forenames, Surname, Role FROM Employees WHERE Role = 'Engineer'


SELECT * FROM Employees WHERE Role != 'Managing Director'
Note that in a T-SQL string, literals are surrounded by single quotes, not double quotes as we have grown accustomed to in C#.
Several filters can be applied as part of the where clause using standard Boolean operators. For example, this SQL returns the records shown in Figure 6-5.
SELECT Forenames, Surname, Role

FROM Employees

WHERE Role = 'Engineer' OR Role = 'Production Manager'
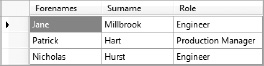
Figure 6-5. Selecting engineers and production managers
If we only want to look for a partial match against a string literal, we can use the like statement in combination with any of the four wildcard characters described in Table 6-4.
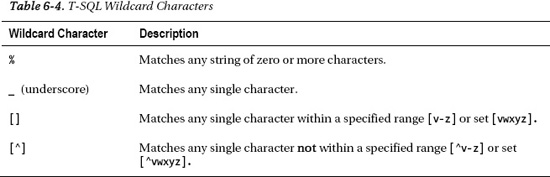
The following SQL example uses the like statement to return all managers, as shown in Figure 6-6.
SELECT Forenames, Surname, Role FROM Employees WHERE Role LIKE '%Manager'

Figure 6-6. Use of the % wildcard character to return all managers
It is perfectly acceptable to use multiple wildcard characters within the same statement. For example, if we want to include the Managing Director in the results set, we can use a multicharacter wildcard character on either side of the string literal, which returns the results shown in Figure 6-7.
SELECT Forenames, Surname, Role FROM Employees WHERE Role LIKE '%Manag%'
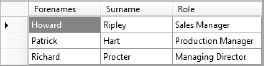
Figure 6-7. Using multiple wildcard characters to include the managing director in the result set
Finally, we can choose how the result set is ordered by specifying column names and directions using the order by statement. The statement is followed by a comma-separated list of column names, which can be sorted in either ascending (asc) or descending (desc) order. If no sort direction is given, the default setting of asc is implied.
The following statement returns the result set seen in Figure 6-8.
SELECT Surname, Forenames FROM Employees WHERE Surname LIKE 'H%' ORDER BY Surname DESC
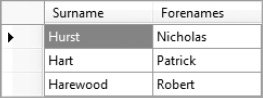
Figure 6-8. Sorting the results in reverse-alphabetical order
The results can be sorted by more than one column. For example, the following code sorts first by Role and then by Surname and returns the results seen in Figure 6-9.
SELECT Surname, Forenames, Role FROM Employees ORDER BY Role, Surname
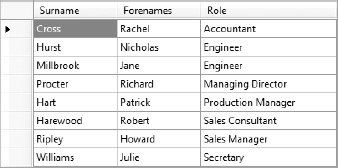
Figure 6-9. Sorting the results by multiple columns—in this case, Role followed by Surname
Here we can see that the two engineers are listed in alphabetical order by surname.
Inserting Data
To create a new row in a table (the C in CRUD), we use the SQL insert statement in conjunction with the into and values keywords. In its simplest form, the insert statement can be written using the following syntax.
INSERT INTO <table name> VALUES (<column values>)
However, it is more usual to specify the column names as well as the column values; this greatly aids readability and prevents the need to refer to the database schema to understand the code. This syntax can also be used to insert data into specific fields only, which is useful if the table has some non-nullable columns.
INSERT INTO <table name> (<column names>) VALUES (<column values>)
In this case, it is absolutely necessary to specify the column names, because our first column, EmployeeId, is an automatically generated Identity column, which will cause an error in SQL Server if we attempt to stipulate a value for it. To add a row of data to our Employees table, we could use the following SQL to add the record seen in Figure 6-10.
INSERT INTO Employees (Forenames, Surname, DateOfBirth, EmailAddress, Role)

VALUES ('Roger', 'Smith', '02/03/1975', '[email protected]', 'IT Technician')
Figure 6-10. Our new employee added to the Employees table
Note that the EmployeeId of the record we have added will probably be different from the one shown here. Each time a new row is added to the table, the value of the EmployeeId field is automatically generated by SQL Server, so the value assigned will depend on how many rows are already in the table.
Updating Data
The SQL update command is used to change existing data in a table. The update command is used with the set keyword to specify the columns to be effected and their new values.
UPDATE <table name> SET <column name> = <value>
Used in this way, the command will update every row in a table. Therefore, it is usual to specify criteria for the rows to be updated using an SQL where clause.
UPDATE <table name> SET <column name> = <value> WHERE <criteria>
For example, assuming that we know the EmployeeId, we could change the e-mail address and role of the record we added in the previous example using the following SQL.
UPDATE Employees

SET EmailAddress = '[email protected]', Role = 'Systems Engineer'

WHERE EmployeeId = 24
Deleting Data
The SQL delete command is used to remove existing row(s) from a database table. To use the delete command, we simply need to specify the table name and the row, or rows, to be deleted.
DELETE FROM <table name> WHERE <criteria>
To remove a row from the Employees table, we can use the following statement.
DELETE FROM Employees WHERE Forenames = 'Roger' AND Surname = 'Smith'
![]() Caution Be careful when writing code to delete records from a database table while using SQL. The WHERE clause is actually optional, but by omitting it, we will delete every record in the table. We should take extra care not to do this unintentionally—it has caught many an experienced developer!
Caution Be careful when writing code to delete records from a database table while using SQL. The WHERE clause is actually optional, but by omitting it, we will delete every record in the table. We should take extra care not to do this unintentionally—it has caught many an experienced developer!
Also, pay particular attention to the criteria used within our WHERE clause. If we are intending to delete only one row, ensure that our criteria are absolutely specific and could not apply to more than one record, which typically means specifying the unique primary key value of the row concerned. This is particularly easy to fall foul of if the criteria for the command are being dynamically generated within code.
Now that we have a grasp of the basic SQL required to conduct CRUD operations against an SQL Server database, we can learn how to connect ASP.NET Web Pages to a database and start to create really useful, dynamic, data-driven web pages that interact with the objects within our database.
Data Access with WebMatrix
Data access in WebMatrix has been designed from the ground up to provide a simple, quick, and effective way to perform SQL-based database operations. Following the WebMatrix ethos, ASP.NET Web Pages provides classes that facilitate database interaction in an incredibly easy way, steering clear of the Object-Relational Mapping (ORM) solutions and other colossal code constructs and abstractions that have become widespread in many other frameworks. WebMatrix is about agility and rapid development, and that is exactly what the classes within the WebMatrix.Data namespace give us.
In this section, we will create a small web site, based on the employee database created earlier in the chapter, to enable the user to carry out the most commonly required operations—creating new records, reading and displaying data, updating existing records, and deleting them. This example will give us the basis for creating our own feature-rich, data-driven, dynamic pages.
Making the Connection
Before we can perform any database operations from an ASP.NET Web Page, we need to provide the page with a database connection. The database connection lets ASP.NET know which database we are intending to operate on and is made using the Open method of the Database object.
Database.Open(filename)
![]() Note Seasoned .NET developers should note that this is not the same as creating an ADO.NET connection.
Note Seasoned .NET developers should note that this is not the same as creating an ADO.NET connection.
This method opens a connection to the database file whose filename is specified as a parameter. WebMatrix assumes that the .sdf file containing the database is held within the App_Data folder of our site—we should not specify the .sdf file extension in the filename parameter, just the name of the file. For example, to open a connection to an SQL Server Compact database called EmployeeData.sdf stored in the App_Data folder of our website, we call the Database.Open method as follows:
Database.Open("EmployeeData")
![]() Note By convention, the Database.Open method will look for an SQL Server Compact database, stored with a .sdf file extension in the default App_Data folder. However, it is perfectly possible, and often necessary, to connect to different types of databases or those stored in a location outside the App_Data folder. I will cover the methods for achieving this in the Working with Other Databases section later in the chapter.
Note By convention, the Database.Open method will look for an SQL Server Compact database, stored with a .sdf file extension in the default App_Data folder. However, it is perfectly possible, and often necessary, to connect to different types of databases or those stored in a location outside the App_Data folder. I will cover the methods for achieving this in the Working with Other Databases section later in the chapter.
Now that we have established a connection between the page and the database, we can start to retrieve data and display it to the user.
Retrieving and Displaying Data
ASP.NET Web Pages provides the WebMatrix.Data namespace that contains classes that simplify database interaction. The Database class within the WebMatrix.Data namespace exposes three methods designed for the execution of SQL select commands: Query, QuerySingle, and QueryValue. The Query method returns a collection of records, QuerySingle returns a single record, and QueryValue returns a single scalar value as the result of an SQL aggregate or scalar function (such as count, avg, min, max, len, etc.).
To fetch all the employee records from the database, we will use the Query method of the Database class. The Query method executes an SQL query against the specified database and returns a generic collection of dynamics (specifically IEnumerable<dynamic>) containing the resulting rows of data.
So let’s create a new page called default.cshtml and list the contents of the database in an HTML table. We’ll do this by first opening a connection to our database (in this example, my database is called DataExample.sdf; we should change this to whatever we called our database) and defining the necessary SQL select statement in a code block at the top of the page.
@{

    var db = Database.Open("DataExample");

    var sqlCommand = "SELECT * FROM Employees ORDER BY Surname";

}
Now we’ll take advantage of the fact that the return type of the Query() method is IEnumerable<dynamic>, by iterating through the results using a foreach loop and dynamically building a table containing the employee data at runtime.
@{

    var db = Database.Open("DataExample");

    var sqlCommand = "SELECT * FROM Employees ORDER BY Surname";

}

<!DOCTYPE html>


<html lang="en">

    <head>

        <meta charset="utf-8" />

        <title>Employees</title>

    <style>

        table { border-spacing: 0px; border-collapse: collapse; }

        th, td { border: 1px solid #CCC; padding: 10px; }

    </style>

    </head>

    <body>

        <h1>Employees</h1>

        <table>

            <thead>

                <tr>

                    <th>Employee Id</th>

                    <th>Forenames</th>

                    <th>Surname</th>

                    <th>Date Of Birth</th>

                    <th>Email Address</th>

                    <th>Role</th>

                </tr>

            </thead>

            <tbody>

                @foreach (var row in db.Query(sqlCommand))

                {

                    <tr>

                        <td>@row.EmployeeId</td>

                        <td>@row.Forenames</td>

                        <td>@row.Surname</td>

                        <td>@row.DateOfBirth</td>

                        <td>@row.EmailAddress</td>

                        <td>@row.Role</td>

                    </tr>

                }

            </tbody>

        </table>

    </body>

</html>
The foreach statement simply executes the command against the database opened at the top of the page and iterates through each row of the results. On each iteration, i.e. for each new record returned, we’ll emit a set of HTML <tr> tags and six sets of <td> tags, one for each column within the returned set of data.
It is important to remember that the Query() method returns IEnumerable<dynamic>. The advantage of this is that we can carry out any legal action with any of the dynamic properties returned. For example, ASP.NET has no idea, and frankly doesn’t care, what data type each column contains. However, we know that DateOfBirth is a DateTime, so we can do the following without any complaints from the compiler, as the statement will be resolved at runtime by the DLR.
<td>@row.DateOfBirth.ToLongDateString()</td>
When we run this code, we will see that, when the page is rendered in the browser, the DateOfBirth field is formatted as intended (see Figure 6-11).
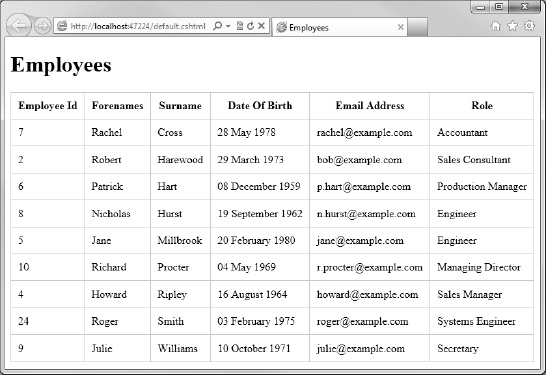
Figure 6-11. The contents of the Employees table, rendered with a formatted Date Of Birth column.
Now that we can fetch and display our existing database records, let’s see how we can go about adding some new ones.
Adding Records
Before we worry about how to use WebMatrix.Data to execute an SQL insert statement, we will need a page containing an HTML form for the user to fill in and submit. So, we will create a new page called add.cshtml and add a form for data capture.
![]() Caution As we are performing a data persistence function, we must ensure that we are using the HTTP post method in our form to help prevent the possibility of a cross-site attack by someone injecting malicious form field values or SQL into the URL.
Caution As we are performing a data persistence function, we must ensure that we are using the HTTP post method in our form to help prevent the possibility of a cross-site attack by someone injecting malicious form field values or SQL into the URL.
<!DOCTYPE html>


<html lang="en">

    <head>

        <meta charset="utf-8" />

        <title>Add an Employee</title>

        <style>

            fieldset { margin: 0.5em 0; padding: 0.4em; }

            fieldset div { clear: left; padding: 0.3em 0; }

            fieldset label { float: left; width: 7em; text-align: right;

                             padding-right: 0.4em; }

            legend { text-transform:uppercase; font-weight:bold; }

        </style>

    </head>

    <body>

        <h1>Add an Employee</h1>

        <form action="add.cshtml" method="post">

            <fieldset>

                <legend>Employee Details</legend>

                 <div>

                    @Html.Label("Forenames: ", "forenames")

                    @Html.TextBox("forenames")

                </div>

                <div>

                    @Html.Label("Surname: ", "surname")

                    @Html.TextBox("surname")

                </div>

                <div>

                    @Html.Label("Date of Birth: ", "dateOfBirth")

                    @Html.TextBox("dateOfBirth")

                </div>

                <div>

                    @Html.Label("Email Address: ", "emailAddress")

                    @Html.TextBox("emailAddress")

                </div>

                <div>

                    @Html.Label("Role: ", "role")

                    @Html.TextBox("role")

                </div>

            </fieldset>

            <div>

                <input type="submit" value="Add Employee" />

            </div>

        </form>

    </body>

</html>
This will present the user with the form shown here in Figure 6-12.

Figure 6-12. The ‘Add an Employee’ page.
Note that there is not a field here for the EmployeeId, as it is an identity field which will be generated by SQL Server when we insert a new record.
Next, we’ll add some code to the very top of the page to detect a post back from the form and insert the submitted form data into the database.
![]() Caution In order to keep the examples in this chapter clear and focused, the code examples given contain no input validation. It is absolutely essential that all user input is validated thoroughly before being committed to the database. Failure to carry out this validation correctly will, in the best case, lead to bugs and errors, but may also expose significant security flaws that could prove damaging and costly if exploited.
Caution In order to keep the examples in this chapter clear and focused, the code examples given contain no input validation. It is absolutely essential that all user input is validated thoroughly before being committed to the database. Failure to carry out this validation correctly will, in the best case, lead to bugs and errors, but may also expose significant security flaws that could prove damaging and costly if exploited.
For more information on form validation using ASP.NET Web Pages, see Chapter 5.
@{

    if (IsPost) {


        var forenames = Request["forenames"];

        var surname = Request["surname"];

        var dateOfBirth = Request["dateOfBirth"];

        var emailAddress = Request["emailAddress"];

        var role = Request["role"];


        var db = Database.Open("DataExample");

        var sqlCommand = "INSERT INTO Employees " +

                "(Forenames, Surname, DateOfBirth, EmailAddress, Role) " +

                "VALUES (@0, @1, @2, @3, @4)";

        db.Execute(sqlCommand, forenames, surname, dateOfBirth, emailAddress, role);


        Response.Redirect("~/default");

    }

}
Let’s take a closer look at exactly how this code works. If the code is being executed as the result of a page postback, we declare some variables and populate them with the values of the submitted forms. Next, we open a connection to the database and construct your SQL insert query using parameter placeholders (@0, @1, @2, @3, @4) in place of the values to be inserted.
var sqlCommand = "INSERT INTO Employees " +

                 "(Forenames, Surname, DateOfBirth, EmailAddress, Role) " +

                 "VALUES (@0, @1, @2, @3, @4)";
![]() Tip We should always use parameters to pass values to an SQL command, as seen in this example. This helps to ensure that the data is passed into the query in the correct format and takes advantage of ASP.NET’s built-in safeguards to help protect against SQL injection attacks.
Tip We should always use parameters to pass values to an SQL command, as seen in this example. This helps to ensure that the data is passed into the query in the correct format and takes advantage of ASP.NET’s built-in safeguards to help protect against SQL injection attacks.
More information on SQL injection attacks and how to guard against them can be found on the MSDN web site: http://msdn.microsoft.com/en-us/library/ms161953.aspx
Once we have constructed your SQL insert statement using parameter place holders, we call the Execute() method, passing in the variables that contain the values to substitute for the placeholders.
db.Execute(sqlCommand, forenames, surname, dateOfBirth, emailAddress, role);
![]() Note Although I chose to ignore it here, the
Note Although I chose to ignore it here, the Execute() method actually returns an integer containing the number of rows affected by the command, in a way similar to the ADO.NET ExecuteNonQuery() method.
Finally, we redirect the user to default.cshtml using the Redirect method of the Response object.
Response.Redirect("~/default");
Note that we do not need to declare the .cshtml file extension here, as the built-in routing system will deal with that for us. For more information on the ASP.NET Web Pages Routing System, see the URLs and Routing section in Chapter 4.
Your last job is to provide a link on the default page to take us to the Add New Employee page. Add the following to default.cshtml directly under the header.
Editing Existing Data
We need to provide a way for our users to be able to edit existing employee records. We will achieve this by adding a new page (edit.cshtml) containing a form populated from the database. We will also need to add a link against each row in the employee list on the default page to redirect the user to our edit form, passing the EmployeeId in the URL.
We’ll construct the link to our edit page first, by adding an extra column to the existing table in default.cshtml.
<table>
<thead>
<tr>
<th>Employee Id</th>
<th>Forenames</th>
<th>Surname</th>
<th>Date Of Birth</th>
<th>Email Address</th>
<th>Role</th>
<th> </th>
</tr>
</thead>
<tbody>
@foreach (var row in db.Query(sqlCommand))
{
<tr>
<td>@row.EmployeeId</td>
<td>@row.Forenames</td>
<td>@row.Surname</td>
<td>@row.DateOfBirth.ToLongDateString()</td>
<td>@row.EmailAddress</td>
<td>@row.Role</td>
<td><a href="edit/@row.EmployeeId">Edit</a></td>
</tr>
}
</tbody>
</table>
This code renders a link to the edit page for each employee passing the EmployeeId as part of the URL (see Figure 6-13). The actual HTML emitted to the browser by ASP.NET Web Pages will look something like this.
<a href="edit/5">Edit</a>
When a user clicks on this link, the ASP.NET Web Pages routing system will redirect the browser to edit.cshtml, as there is no such page as 5.cshtml within a folder called edit (see Chapter 4 for further explanation). We can then use Razor code in the edit page to interrogate the URL and extract the particular EmployeeId we are interested in.

Figure 6-13. The Edit links added to the employee list
Next we’ll add a new page, called edit.cshtml, and create a form for editing. We’ll get the record relating to the EmployeeId passed to the page in the UrlData and populate the form controls.
@{

    var employeeId  = UrlData[0];

    if (employeeId.IsEmpty()) {

         Response.Redirect(@Href("~/default"));

    }


    var forenames = "";

    var surname = "";

    var dateOfBirth = "";

    var emailAddress = "";

    var role = "";


    var db = Database.Open("DataExample");


    var sqlSelect = "SELECT * FROM Employees WHERE EmployeeId=@0";


    var row = db.QuerySingle(sqlSelect, employeeId);


    forenames = row.Forenames;

    surname = row.Surname;

    dateOfBirth = row.DateOfBirth.ToShortDateString();

    emailAddress = row.EmailAddress;

    role = row.Role;

}


<!DOCTYPE html>


<html lang="en">

    <head>

        <meta charset="utf-8" />

        <title>Edit Employee Record</title>

        <style>

            fieldset { margin: 0.5em 0; padding: 0.4em; }

            fieldset div { clear: left; padding: 0.3em 0; }

            fieldset label { float: left; width: 7em; text-align: right;

                             padding-right: 0.4em; }

            legend { text-transform:uppercase; font-weight:bold; }

        </style>

    </head>

    <body>

        <h1>Edit Employee Record</h1>

        <form action="" method="post">

            <fieldset>

                <legend>Employee Details</legend>

                 <div>

                    @Html.Label("Forenames: ", "forenames")

                    @Html.TextBox("forenames", forenames)

                </div>

                <div>

                    @Html.Label("Surname: ", "surname")

                    @Html.TextBox("surname", surname)

                </div>

                <div>

                    @Html.Label("Date of Birth: ", "dateOfBirth")

                    @Html.TextBox("dateOfBirth", dateOfBirth)

                </div>

                <div>

                    @Html.Label("Email Address: ", "emailAddress")

                    @Html.TextBox("emailAddress", emailAddress)

                </div>

                <div>

                    @Html.Label("Role: ", "role")

                    @Html.TextBox("role", role)

                </div>

            </fieldset>

            <div>

                <input type="submit" value="Update Employee Record" />

            </div>

        </form>

    </body>

</html>
The first part of this code gets the EmployeeId from the UrlData, passed in from the link we added to the default page. We then check the value of the EmployeeId and pass the browser back to the default page if it is blank. This handles the situation where a user may just browse directly to the edit page without specifying an EmployeeId in the URL.
var employeeId  = UrlData[0];

if (employeeId.IsEmpty()) {

     Response.Redirect(@Href("~/default"));

}
In the call to the Redirect method of the Response object, we will notice that we have used the Href helper. The Href helper builds a URL from a local file path, which means we can use the ASP.NET tilde (~) symbol to reference the default page from the root of the application. This has the advantage that wherever we move this page or site to in the future, as long as the location of the destination page remains the same, the URL will still be built correctly; this solves a common problem in web sites where pages or sites move and references to relative or absolute URLs are broken.
The next part of the code declares some variables to hold the data retrieved from the database. We then simply open the database, execute our SQL, passing in the EmployeeId as a parameter, and assign the returned values to our variables. Notice here that we are using the QuerySingle() method as we are only retrieving a single row.
The final job is to pass in the values of the variables containing the employee data to the Html helper methods used to display the form controls.
![]() Note For more information on the use of Html helper controls to render HTML form controls, see the HTML Form Helpers section in Chapter 5.
Note For more information on the use of Html helper controls to render HTML form controls, see the HTML Form Helpers section in Chapter 5.
As we can see here in Figure 6-14, if we run the default page now and click the Edit link against one of the rows, the edit page will be displayed with the form controls populated with data from the database, according to the EmployeeId passed in the URL.
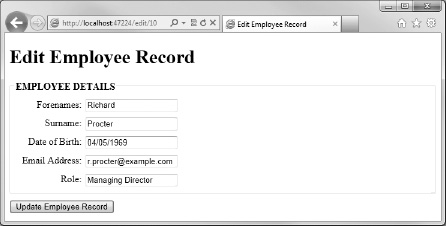
Figure 6-14. The populated edit form: Notice the URL in the address bar containing the EmployeeId.
Now we need to write some code to handle the form submission. We’ll want to update the record in the database and redirect the user back to the default page when the Update Employee Record button is clicked. Amend the code block at the top of the page to include the code highlighted in bold in this listing.
@{

    var employeeId  = UrlData[0];

    if (employeeId.IsEmpty()) {

         Response.Redirect(@Href("~/default"));

    }


    var forenames = "";

    var surname = "";

    var dateOfBirth = "";

    var emailAddress = "";

    var role = "";


    var db = Database.Open("DataExample");


    if (IsPost) {


        forenames = Request["forenames"];

        surname = Request["surname"];

        dateOfBirth = Request["dateOfBirth"];

        emailAddress = Request["emailAddress"];

        role = Request["role"];


        var sqlCommand = "UPDATE Employees SET Forenames = @0, Surname = @1, " +

                "DateOfBirth = @2, EmailAddress = @3, Role = @4 " +

                "WHERE EmployeeId = @5";

        db.Execute(sqlCommand, forenames, surname, dateOfBirth, emailAddress,

role, employeeId);


        Response.Redirect(@Href("~/default"));

    }


    var sqlSelect = "SELECT * FROM Employees WHERE EmployeeId=@0";


    var row = db.QuerySingle(sqlSelect, employeeId);


    forenames = row.Forenames;

    surname = row.Surname;

    dateOfBirth = row.DateOfBirth.ToShortDateString();

    emailAddress = row.EmailAddress;

    role = row.Role;

}
Here, inside the If(IsPost) code block, we assign the values of the submitted form fields to our variables and execute an SQL update command against the database, passing in the variables as parameters. This is done using the Execute() method of the Database object in the same way as we did when inserting records earlier. Once the record has been updated, we redirect the user back to the default page.
Now that we have implemented the Create, Read, and Update parts of CRUD, we are left with just the Delete, which we’ll deal with in the next section.
Deleting Records
To implement our delete functionality, we will add a delete link for each employee to the employee list on the default page. Clicking this link will take the user to a page requesting confirmation before the actual delete operation takes place. As an HTML hyperlink always issues an HTTP GET request, this is an important step, as it is against W3C guidelines to perform a delete operation (or any operation which affects persisted data) through an HTTP GET request.
First, let’s add a delete link to the default page for each employee in the employee list. Amend the last column in the table to include a link to delete.cshtml, passing the EmployeeId in the UrlData.
<tbody>

    @foreach (var row in db.Query(sqlCommand))

    {

        <tr>

            <td>@row.EmployeeId</td>

            <td>@row.Forenames</td>

            <td>@row.Surname</td>

            <td>@row.DateOfBirth.ToLongDateString()</td>

            <td>@row.EmailAddress</td>

            <td>@row.Role</td>

            <td>

                <a href="edit/@row.EmployeeId">Edit</a> |

                <a href="delete/@row.EmployeeId">Delete</a>

            </td>

        </tr>

    }

</tbody>
Next, we’ll create delete.cshtml and write code to get the relevant record from the database and display some confirmation text to the user.
@{

    var employeeId  = UrlData[0];

    if (employeeId.IsEmpty()) {

         Response.Redirect(@Href("~/default"));

    }


    var db = Database.Open("DataExample");


    var sqlSelect = "SELECT Forenames, Surname FROM Employees WHERE EmployeeId=@0";

    var row = db.QuerySingle(sqlSelect, employeeId);

}

<!DOCTYPE html>


<html lang="en">

    <head>

        <meta charset="utf-8" />

        <title>Delete Employee Record</title>

    </head>

    <body>

        <h1>Delete Employee Record</h1>

        <p>

            Are we sure we want to delete employee @employeeId, @row.Forenames @row.Surname?

        </p>

        <p>

            <form action="" method="post">

                <input type="button"

                onclick="document.location.href='default.cshtml';"

                value="Cancel" />

                <input type="submit" value="Delete" />

            </form>

        </p>

    </body>

</html>
The first part of this code gets the EmployeeId from the UrlData and stores it in a variable for later use. If the UrlData is empty, the user is returned to the default page. Next, we use the QuerySingle() method of the Database object to select a single row from the database, passing in the EmployeeId as a parameter.
![]() Note As is the nature of web-based applications, there is the always the possibility (albeit slim) that the employee record could be deleted by another user between the employee list being created and the delete page being displayed, or between the delete confirmation form being displayed and submitted. In the interests of clarity, this code example carries out no checks to ensure that the employee to be deleted actually exists. However, in a production environment, our code must take all these possibilities into account to avoid potential errors.
Note As is the nature of web-based applications, there is the always the possibility (albeit slim) that the employee record could be deleted by another user between the employee list being created and the delete page being displayed, or between the delete confirmation form being displayed and submitted. In the interests of clarity, this code example carries out no checks to ensure that the employee to be deleted actually exists. However, in a production environment, our code must take all these possibilities into account to avoid potential errors.
Confirmation text is then displayed to the user, showing the name and EmployeeId of the employee to be deleted. This helps to ensure that the correct record is deleted (see Figure 6-15). We supply a standard submit button to confirm the deletion as well as a second HTML button to cancel the operation. The cancel button uses JavaScript in the onclick event, which will redirect the user back to the default page without submitting the form.
<input type="button"

 onclick="document.location.href='default.cshtml';"

 value="Cancel" />

<input type="submit" value="Delete" />
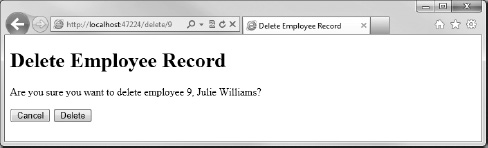
Figure 6-15. The delete confirmation page
Finally, we’ll add some code to detect an HTTP POST request and perform the SQL delete operation on the Employees table, which conforms to the W3C guidelines mentioned earlier. If the site had been set up to delete straight from the link on the default page, without requiring an HTTP POST request from the confirmation page, anyone could delete records from the database just by browsing to a correctly formed URL, like http://<servername>/delete/4.
Amend the code block at the top of the page to include the POST request handler shown in bold in the listing that follows, which deletes the row on postback and returns the user to the default page.
@{

    var employeeId  = UrlData[0];

    if (employeeId.IsEmpty()) {

         Response.Redirect(@Href("~/default"));

    }


    var db = Database.Open("DataExample");


    if (IsPost)

    {

        var sqlDelete = "DELETE FROM Employees WHERE EmployeeId=@0";

        db.Execute(sqlDelete, employeeId);

        Response.Redirect("~/default");

    }


    var sqlSelect = "SELECT Forenames, Surname FROM Employees WHERE EmployeeId=@0";

    var row = db.QuerySingle(sqlSelect, employeeId);

}
Now that we can Create, Read, Update, and Delete database records, let’s take a look at a couple of handy features that can help us to display useful data to our users; the WebGrid and Chart helpers.
Displaying Data with WebMatrix Helpers
Out of the box, WebMatrix ships with two helpers designed to facilitate the easy development of two common data display scenarios: grids (or tabular data) and graphs. In this section, We will look at both of these and discuss common examples of their use.
The WebGrid Helper
The WebGrid helper is used to render tabular data. Earlier in the chapter, in the Retrieving and Displaying Data section, we used a foreach loop to iterate through a set of database records and construct a table. This is a very common requirement in the development of web pages, which the WebGrid aims to simplify and accelerate. The helper also provides support for formatting, paging, and sorting, all of which we will see examples of in this section. The examples will all use the Employees database we constructed earlier in the chapter.
Displaying Data
Start by creating a new file in the root of our web site, called EmployeeGrid.cshtml. Next, replace the existing default markup with the following:
@{

    var db = Database.Open("DataExample");

    var sqlCommand = "SELECT * FROM Employees ORDER BY Surname";

    var result = db.Query(sqlCommand);

    var employeeGrid = new WebGrid(result);

}

<!DOCTYPE html>


<html lang="en">

    <head>

        <meta charset="utf-8" />

        <title>Employee Grid</title>

    </head>

    <body>

        <h1>Employee Grid</h1>

        <div id="grid">

            @employeeGrid.GetHtml()

        </div>

    </body>

</html>
The first three lines of the code block at the top of the page will probably look quite familiar by now. They simply open a connection to the database, define an SQL query to return all the records in the database in alphabetical order by surname, and finally execute that query against the database and store the returned records in the result variable.
The final, fourth line of the initial code block is where we start to actually use the WebGrid helper.
var employeeGrid = new WebGrid(result);
Here, we create a new WebGrid object and assign it to a variable called employeeGrid. We then just need to call the GetHtml() method of the WebGrid within the page to render it. We render the grid inside an HTML div element with its id attribute set to “grid,” which we’ll use later for styling.
<div id="grid">

    @employeeGrid.GetHtml()

</div>
Run the page, and we will see the rendered WebGrid, as seen here in Figure 6-16. We will notice that the WebGrid’s column headers are hyperlinks. Clicking these hyperlinks will sort the table by the data in those columns.
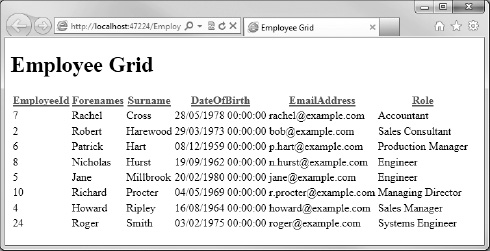
Figure 6-16. The Employee Grid, rendered by the WebGrid helper
Clearly, the WebMatrix WebGrid helper presents quite a usable UI straight out of the box, with an absolute minimum of code; it is reasonably formatted with headers and sortable columns and emits markup that complies with the HTML5 standard. However, there are several ways we can further improve the formatting and functionality, which we will look at in the next three sections.
Formatting Columns
As we have seen, by default the WebGrid helper displays all the data columns returned by the SQL query, using the column names defined in the database as the column headers in the grid. We can customize this behavior by displaying only a subset of the data columns that are returned by the query and by specifying how the data in the columns within the WebGrid should be displayed.
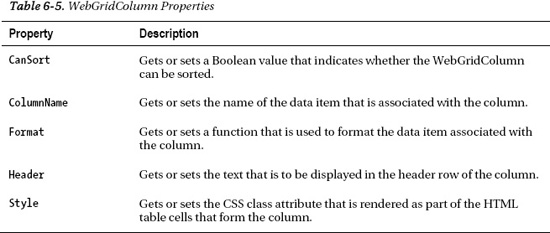
In reality, a WebGrid is actually constructed from one or more WebGridColumns. To specify the columns to be displayed and how they are formatted, we need to pass in a collection of WebGridColumns to the GetHtml() method of the WebGrid. Each WebGridColumn has five properties that can be set (see Table 6-5).
Replace the existing code and markup in EmployeeGrid.cshtml with the following, which I’ll explain in detail afterwards.
@{

    var db = Database.Open("DataExample");

    var sqlCommand = "SELECT Forenames, Surname, EmailAddress, Role FROM Employees

ORDER BY Surname";

    var result = db.Query(sqlCommand);

    var employeeGrid = new WebGrid(result);

}

<!DOCTYPE html>


<html lang="en">

    <head>

        <meta charset="utf-8" />

        <title>Employee Grid</title>

        <style type="text/css">

            .name { width: 150px; }

            .role { font-style: italic; }

        </style>

    </head>

    <body>

        <h1>Employee Grid</h1>

        <div id="grid">

            @employeeGrid.GetHtml(

                columns: employeeGrid.Columns(

                    employeeGrid.Column("Surname",

                                        style: "name",

                                        format: @<text>

                                                    @item.Surname.ToUpper()

                                                </text>),

                    employeeGrid.Column("Forenames",

                                        style: "name"),

                    employeeGrid.Column("EmailAddress",

                                        "Email Address",

                                        format: @<text>

                                                    <a href="mailto:@item.EmailAddress">

                                                        @item.EmailAddress

                                                    </a>

                                                </text>),

                    employeeGrid.Column("Role",

                                        "Job Title",

                                        style: "role")

                )

            )

        </div>

    </body>

</html>
We will notice, first of all, that the SQL query has changed. As we only want to display a subset of columns, there is no point in returning all of them, as it would waste system resources on the web server. This may not be a huge problem when we are working with the small amounts of data in this sample, but it could cause significant performance issues when working with larger production data sets.
We have also added some CSS styles into the head section of the page, which we will use to style the table cells.
The GetHtml() method call has changed significantly, both to specify columns and to format them. If we run the page, we will see the following (see Figure 6-17):
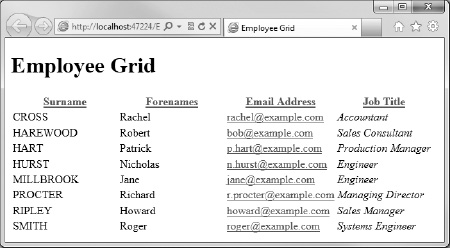
Figure 6-17. The formatted grid
The GetHtml() method call is not actually as complicated as it looks! In the call, we are simply specifying the value of the columns parameter. The columns parameter is actually an array of WebGridColumn objects, which is what we are creating in this code.
The WebGridColumn class defines objects that represent columns in a WebGrid instance. The class has five properties, which can be set as named parameters when calling the WebGridColumn constructor. Table 6-6 describes these properties, their names, types, and the name of the respective WebGridColumn constructor parameter.
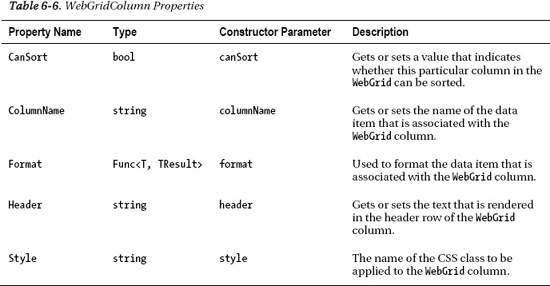
These are all fairly straightforward, except perhaps for the format property. This property is used to reformat values into an easily readable form and to add HTML markup to provide custom formatting for the WebGrid column’s data. The value of any item in the current row can be retrieved through a dynamic object called item. For example, @item.Role would retrieve the value of the Role column in the current row. If we wanted to display the Role in bold type, we could simply include some HTML within the format property for the Role column: for example, <strong>@item.Role</strong>.
The first column is populated from the Surname field. It has its CSS style set to “name,” which is declared in the head section and sets the column width to 150 pixels, by setting the property using a named parameter. The format parameter is set to return the surname in upper case, using the ToUpper() method of the String type, which we are able to do, as the Database.Query() method returns IEnumerable<dynamic>.
employeeGrid.Column("Surname",

                    style: "name",

                    format: @<text>

                                @item.Surname.ToUpper()

                            </text>),
The second column displays the Forenames field and is again styled using the “name” style specified in the document head.
employeeGrid.Column("Forenames",

                    style: "name"),
The third column contains the EmailAddress field. Here, we specify that the header should display the text “Email Address” rather than the field name, and we specify the format of the field by setting the format parameter. The format parameter is passed a template for an HTML mailto hyperlink, which will be populated with item.EmailAddress. As described earlier, the data in each individual row can be accessed using the item collection.
employeeGrid.Column("EmailAddress",

                    "Email Address",

                    format: @<text>

                                <a href="mailto:@item.EmailAddress">

                                    @item.EmailAddress

                                </a>

                            </text>),
The final column displays the contents of the Role database field, with the column header set to “Job Title.” The column is assigned the “role” CSS style, by specifying it using the style parameter.
employeeGrid.Column("Role",

                    "Job Title",

                    style: "role")
Applying Grid-Wide Styles
In addition to specifying the styles for individual table cells, the GetHtml() method of the WebGrid also allows we to set a number of CSS styles that apply to the grid as a whole. These are listed as follows in Table 6-7.
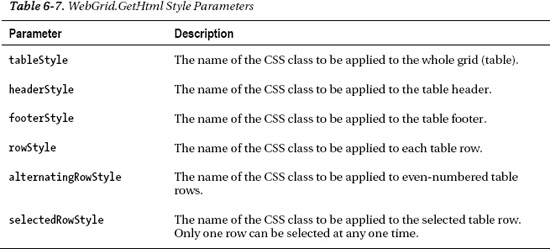
We’ll now use the GetHtml() method to apply some CSS styles across the whole grid to improve the presentation. Amend the style tag in the page header to the following:
<style type="text/css">

    .grid { margin: 4px; border-collapse: collapse; width: 600px; }

    .grid th, .grid td { border: 1px solid #CCC; padding: 5px; }

    .header { background-color: #DDD; font-weight: bold; }

    .header a { text-decoration: none; }

    .alt { background-color: #EEE; color: #000; }

    .name { width: 150px; }

    .role { width: 200px; font-style: italic; }

</style>
Next, we’ll apply those styles to the relevant elements of our table, using named parameters. Amend our call to the GetHtml() method in the body of the page to look like the following:
@employeeGrid.GetHtml(

    tableStyle: "grid",

    headerStyle: "header",

    alternatingRowStyle: "alt",

    columns: employeeGrid.Columns(

        employeeGrid.Column("Surname",

                            style: "name",

                            format: @<text>

                                        @item.Surname.ToUpper()

                                    </text>),

        employeeGrid.Column("Forenames",

                            style: "name"),

        employeeGrid.Column("EmailAddress",

                            "Email Address",

                            format: @<text>

                                        <a href="mailto:@item.EmailAddress">

                                            @item.EmailAddress

                                        </a>

                                    </text>),

        employeeGrid.Column("Role",

                            "Job Title",

                            style: "role")

    )

)
Now, when we run the EmployeeGrid.cshtml page or refresh the page in the browser, the grid will look like the example shown in Figure 6-18.
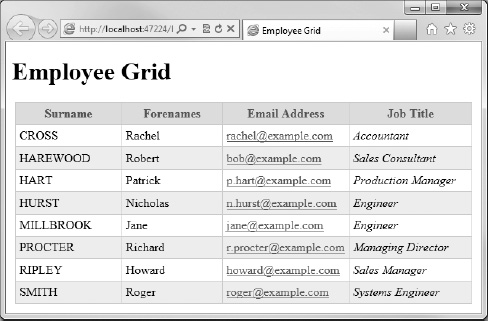
Figure 6-18. The Employee Grid with grid-wide styles applied
WebGrid Pagination
When working with large data sets, database queries can often return many more rows than can be usefully displayed on the page. To counter this problem, web developers commonly provide the user with the ability to page through the data. This can be achieved easily using the WebGrid helper by setting parameters during creation.
Amend the code used to create the WebGrid in our page to the following:
var employeeGrid = new WebGrid(source: result,

                               defaultSort: "Surname",

                               rowsPerPage: 3);
Here, we use named parameters to specify the column which will be sorted by default (defaultSort) and the number of rows we wish to display per page (rowsPerPage), in this case three.
Running or refreshing the page will show the grid displaying the first three rows, with the paging controls rendered under the table data (see Figure 6-19).
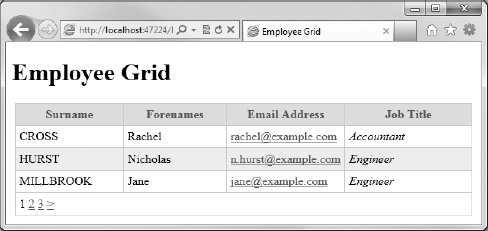
Figure 6-19. The Employee Grid set to show three records per page
The links displayed below the grid to control paging can be customized by specifying values for the firstText, previousText, nextText, lastText and mode parameters of the GetHtml() method. The firstText, previousText, nextText, and lastText properties set the text for the HTML link elements in the pager control. The mode parameter can be set to any of the WebGridPagerModes members shown here in Table 6-8.
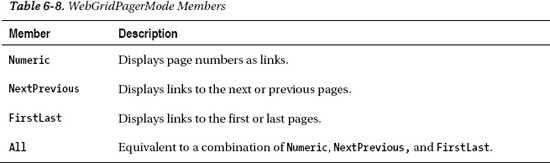
![]() Caution Note that the
Caution Note that the mode parameter must be set to a suitable value to match the values set in the firstText, previousText, nextText, and lastText properties; otherwise, an error will occur, such as, “To use this argument, pager mode “FirstLast” must be enabled.”
Changing the call to GetHtml() for the employeeGrid as shown here, the pager control links will cause the pager to be rendered as seen in Figure 6-20.
@employeeGrid.GetHtml(

                tableStyle: "grid",

                headerStyle: "header",

                alternatingRowStyle: "alt",

                mode: WebGridPagerModes.All,

                firstText: "First",

                previousText: "Prev",

                nextText: "Next",

                lastText: "Last",

                columns: employeeGrid.Columns( ....
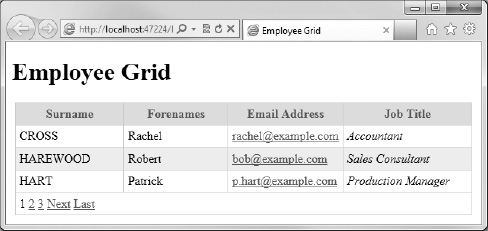
Figure 6-20. Customizing the pager control links
![]() Tip For more information on the WebGrid class and its members, visit the MDSN web site at http://msdn.microsoft.com/en-us/library/gg548335.aspx
Tip For more information on the WebGrid class and its members, visit the MDSN web site at http://msdn.microsoft.com/en-us/library/gg548335.aspx
The Chart Helper
The Chart helper is used to render data in graphical form. The helper can produce more than thirty different chart types, with a variety of options for formatting and labeling and, by default, renders a JPEG image to the browser.
The most common sources of data to be displayed in a chart are .NET collections and database queries, each of which we will look at in the next two sections. Once we have seen how to create charts from these two data sources, we will look at ways of customizing them and inserting them into an ASP.NET Web Page.
Creating a Chart Using a .NET Collection
A chart can be created using any .NET collection that implements the IEnumerable interface, including custom collections.
Create a new page in our project called CollectionChart.cshtml and overwrite the default markup with the following:
@{

    var sales = new Dictionary<string, int>()

        {

            { "Books", 10 },

            { "DVDs", 7 },

            { "Games", 12 },

            { "Music", 5 },

            { "Toys", 9 }

        };


    var myChart = new Chart(width: 600, height: 400)

        .AddTitle("Sales")

        .AddSeries(

            name: "ProductSales",

            xValue: sales.Keys,

            yValues: sales.Values)

        .Write();

}
The first thing we do in this code is define a new generic dictionary collection, called sales, which we populate with some data, in this case relating to the sales figures of each of five categories of products.
Next, we create a new chart and set the width and height by passing in named parameters to the constructor. To add a title to the chart, we call the AddTitle() method and pass in the title, “Sales.” We then use the AddSeries() method to pass in a data series to the chart. Multiple data series can be displayed on a chart, and each must have its own unique name, in our case “ProductSales.” Using the xValue and yValues parameters, we also tell the chart which set of values we wish to plot; clearly, we will be using the dictionary keys and values we have just created.
Finally, we call the Write() method to render the image to the browser which, because we didn’t explicitly specify a chart type, displays the default column chart shown here in Figure 6-21.
![]() Note We will be looking at the different types of chart and how to specify them later in the chapter.
Note We will be looking at the different types of chart and how to specify them later in the chapter.

Figure 6-21. A chart created using data from a generic dictionary collection
Creating a Chart Using a Database Query
The most common source of data for creating charts is from the result of a database query. Fortunately, the WebMatrix Chart helper makes this a relatively simple task.
To start with, we will need to create some data that is suitable for graphical representation. Create a new table in our database called Products and add the three columns described here in Table 6-9.
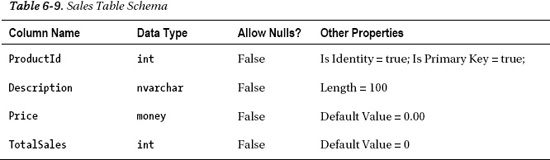
Then add some sample data, similar to that shown here, in Figure 6-22.
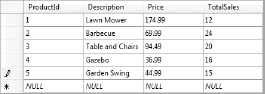
Figure 6-22. Our sample products data
Now that we have some suitable data, we can see how to display it using the Chart helper. Create a new page called DatabaseChart.cshtml in our project and replace the default markup with the following code.
@{

    var db = Database.Open("DataExample");

    var sqlCommand = "SELECT Description, TotalSales FROM Products";

    var chartData = db.Query(sqlCommand);

    var myChart = new Chart(width: 600, height: 400)

        .AddTitle("Product Sales")

        .DataBindTable(chartData, "Description")

        .Write();

}
This is all the code we needed to render the column chart seen in Figure 6-23. The first three lines establish a database connection, define an SQL query, and execute the query using the Query() method of the Database object, as we have seen many times before.
The fourth line creates a new Chart object and uses named parameters to pass the desired width and height for the chart into the constructor. We then set the title of the chart using the AddTitle() method. The data is bound to the chart using the DataBindTable() method, which requires two parameters: dataSource, which can be any IEnumerable object, and xField, which is the name of the table column to be used for the x-series axis. We pass chartData into the dataSource parameter and “Description” into the xField parameter.
Finally, we call the Write() method to output the chart to the browser.
![]() Tip Using the DataBindTable() method, we only have the option to specify the column to be used for the x-axis. The data column to be used for the y-axis is inferred from the dataSource, which in our case is easy as we are only returning two columns in our query.
Tip Using the DataBindTable() method, we only have the option to specify the column to be used for the x-axis. The data column to be used for the y-axis is inferred from the dataSource, which in our case is easy as we are only returning two columns in our query.
However, if our query contains more than two columns and we need to specify both the x and y axes, we can make use of the AddSeries() method we saw in the .NET Collection Chart in the previous section. The Database.Query() method returns an IEnumerable<dynamic> collection which is compatible with the AddSeries() method.
For example, instead of binding the result of the database query to the chart using the DataBindTable(), as we have previously, we could use the AddSeries() method shown here.
.AddSeries("ProductSales",

    xValue: chartData, xField: "Description",

    yValues: chartData, yFields: "TotalSales")
In this instance, both methods return the same results.
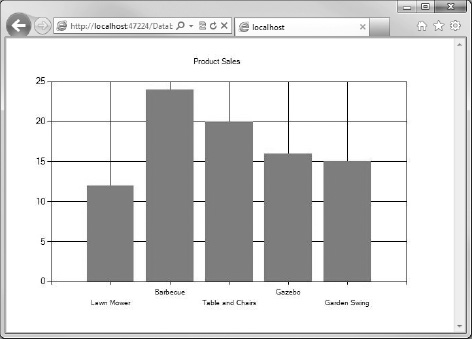
Figure 6-23. A column chart constructed from the result of a database query
Displaying a Chart in a Web Page
In both the .NET collection and database examples seen so far in the chapter, the Chart helper has rendered the chart directly to the browser as a graphic. However, we will usually want to render the chart graphic within a page containing additional markup. Placing the code we have seen so far in an existing page will result in the chart being rendered in the browser with any other markup being lost. We can prove this to our self by adding some static HTML to one of the previous Chart helper examples and running the page. None of the HTML we have added will be rendered; the browser is actually pointing to an image file created on the web server, not to a web page at all.
To solve this problem, we need to render the chart in two stages. First, we generate the Chart as we have so far, then we display the resulting image in another page using an HTML img element.
Create a new file called ChartPage.cshtml within our project and replace the default markup with the following:
<!DOCTYPE html>


<html lang="en">

    <head>

        <meta charset="utf-8" />

        <title>Chart Display Page</title>

    </head>

    <body>

        <h1>Chart Display Page</h1>

        <p>The chart shown on this page is rendered through the use of an

           HTML <code>img</code> tag with its <code>src</code> attribute

           set to the file which generates the chart: DatabaseChart.cshtml</p>

        <p>

            <img src="DatabaseChart.cshtml" />

        </p>

    </body>

</html>
The important line in this example is the one highlighted in bold, which uses the img element to display the chart we created earlier in the Creating a Chart Using a Database Query section.
When we run the ChartPage.cshtml, we will see that the graph is embedded within the rest of the markup on the page (see Figure 6-24).
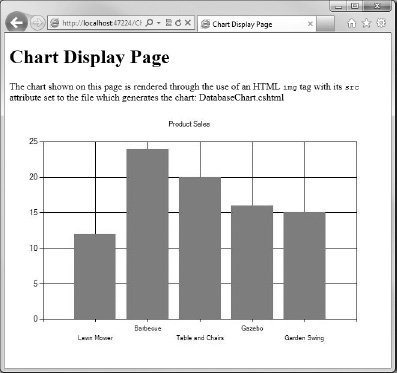
Figure 6-24. Embedding a chart within existing markup using an HTML img element
Displaying Different Chart Types
The WebMatrix Chart helper can render 35 different types of chart: Area, Bar, BoxPlot, Bubble, Candlestick, Column, Doughnut, ErrorBar, FastLine, FastPoint, Funnel, Kagi, Line, Pie, Point, PointAndFigure, Polar, Pyramid, Radar, Range, RangeBar, RangeColumn, Renko, Spline, SplineArea, SplineRange, StackedArea, StackedArea100, StackedBar, StackedBar100, StackedColumn, StackedColumn100, StepLine, Stock, and ThreeLineBreak.
To specify the type of chart to render, we set the chartType parameter of the AddSeries() method. The string passed in the chartType parameter can, and must, be any one of the chart types listed earlier.
The following code example renders the pie chart seen in Figure 6-25.
@{

    var sales = new Dictionary<string, int>()

        {

            { "Books", 10 },

            { "DVDs", 7 },

            { "Games", 12 },

            { "Music", 5 },

            { "Toys", 9 }

        };


    var myChart = new Chart(width: 600, height: 400)

        .AddTitle("Sales")

        .AddSeries(

            chartType: "Pie",

            name: "ProductSales",

            xValue: sales.Keys,

            yValues: sales.Values)

        .Write();

}
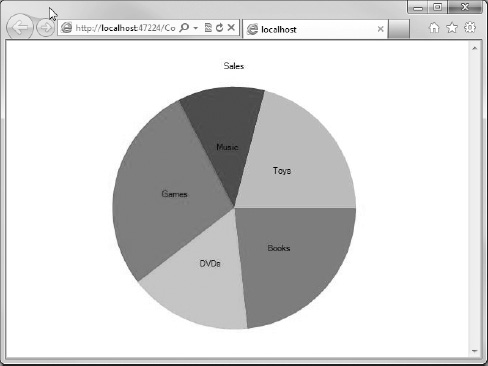
Figure 6-25. A pie chart rendered by the WebMatrix Chart helper
Styling and Formatting WebMatrix Charts
Charts rendered by the WebMatrix Chart helper can be styled in a number of ways. The easiest way to change the appearance of the whole chart is to specify one of the built-in themes. This is done by passing a ChartTheme name to the theme parameter of the Chart constructor.
The built-in themes are listed here in Table 6-10.


It is also possible to display a legend to explain the meaning of each series in the chart. To display a legend, call the AddLegend() method of the Chart class, passing in the text to be displayed as the title of the legend and a unique name for the legend. The legend displays the text value held in the name property for each series.
The following code generates the themed chart seen in Figure 6-26.
@{

    var sales = new Dictionary<string, int>()

        {

            { "Books", 10 },

            { "DVDs", 7 },

            { "Games", 12 },

            { "Music", 5 },

            { "Toys", 9 }

        };


    var myChart = new Chart(width: 600, height: 400, theme: ChartTheme.Green)

        .AddTitle("Sales")

        .AddLegend("Legend:", "SalesLegend")

        .AddSeries(

            name: "Sales Per Product",

            xValue: sales.Keys,

            yValues: sales.Values)

        .Write();

}
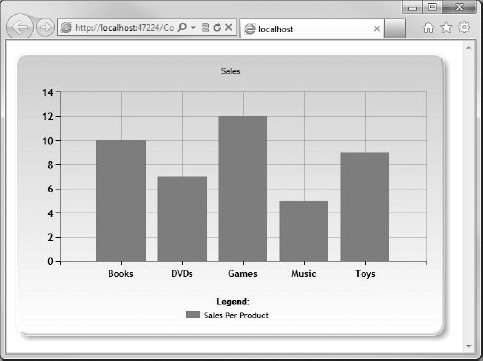
Figure 6-26. Specifying a theme and displaying a chart legend
Saving Charts
Every time we use the Chart helper in a web page, it is re-created in its entirety. That means that if the data required for any of the chart’s series comes from the result of a database query, for example, that query must be re-executed every time the chart is requested. Even for a small query, this is a waste of server resources and can have an impact on the performance of the web site.
To help improve performance in this situation, we can use a number of techniques. We will look at two such techniques in this section: caching and saving the chart as an image file for later use.
Caching Charts
Caching a chart stores it in memory for a predetermined period of time. This way, if a chart is requested again within this period, it is rendered directly from the server cache, rather than being re-created. The chart is only re-created if requested again after the cache has expired. Caching is determined on a series-by-series basis and is controlled through the AddSeries() method of the chart.
To demonstrate caching, create a new file in the root of our example website called CachedChartPage.cshtml and replace the default markup with the following:
<!DOCTYPE html>

<html>

    <head>

        <title>Cached Chart Display Page</title>

    </head>

<body>

    <h1>Cached Chart Display Page</h1>

    <img src="CachedChart.cshtml?key=cacheKey" />

</body>

</html>
Next, create another new file in the root of our web site, this time called CachedChart.cshtml, which will contain the code to create a chart. Replace the default generated markup in CachedChart.cshtml with the following:
@{

    var cacheKey = Request["key"];

    if (cacheKey != null) {

        var cachedChart = Chart.GetFromCache(key: cacheKey);

        if (cachedChart == null) {


            var sales = new Dictionary<string, int>()

            {

                { "Books", 10 },

                { "DVDs", 7 },

                { "Games", 12 },

                { "Music", 5 },

                { "Toys", 9 }

            };


            cachedChart = new Chart(600, 400);

            cachedChart.AddTitle("Cached at " + DateTime.Now);

            cachedChart.AddSeries(

                name: "Sales",

                xValue: sales.Keys,

                yValues: sales.Values);

            cachedChart.SaveToCache(key: cacheKey,

                minutesToCache: 2,

                slidingExpiration: false);

        }

        Chart.WriteFromCache(cacheKey);

    }

}
Let’s take a look at this code and how it works. First, the code attempts to get the key value from the QueryString. If a value has been passed in, the chart is retrieved from the cache.
var cacheKey = Request["key"];

    if (cacheKey != null) {

        var cachedChart = Chart.GetFromCache(key: cacheKey);
If a key value has not been passed via the QueryString, a new generic Dictionary object is created, containing the data for the chart to display (this could be replaced by code gathering data from any source). A new Chart object is then created, the series is added, and the chart title is set to the current date and time (which we will use to prove the caching later). We then call the SaveToCache() method and pass in the key, which is the ID of the chart in the cache, the minutesToCache, which is the number of minutes we wish to cache the chart for, and set the slidingExpiration to false. The slidingExpiration parameter is a Boolean value which, if set to true, indicates that the chart’s cache expiration is reset each time the cached item is accessed. By setting this to false, we ensure that the expiration time is based on an absolute interval time since the item was added to the cache.
cachedChart = new Chart(400, 300);

cachedChart.AddTitle("Cached at " + DateTime.Now);

cachedChart.AddSeries(

   name: "Sales",

   xValue: sales.Keys,

yValues: sales.Values);

cachedChart.SaveToCache(key: cacheKey,

   minutesToCache: 2,

   slidingExpiration: false);
Finally, instead of calling the Chart’s Write() method, we call the WriteFromCache() method, passing in the key. We will notice that this method call is outside the if block, as we want to call it, whether the chart was available in the cache to begin with or had to be generated and saved in the cache.
Chart.WriteFromCache(cacheKey);
Now, when we run CachedChartPage.cshtml, we will see that the chart is displayed with the current date and time displayed in the chart title (see Figure 6-27).
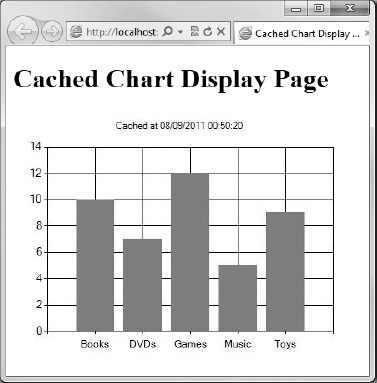
Figure 6-27. The cached chart: Note the date time displayed in the chart title.
If we close the browser and run the page again or refresh the browser, we will notice that the date and time displayed in the chart title has not changed. This proves that the chart has been cached.
To generate a new chart in the cache, click the Restart button in the WebMatrix IDE Ribbon Control (see Figure 6-28) and rerun the page (as restarting the application also resets the cache), or wait two minutes and refresh the page in the browser. This time, the date and time will change, as there is no chart currently in the cache; the chart has been re-generated using the code we supplied inside the if block, regathering any data necessary for its creation.
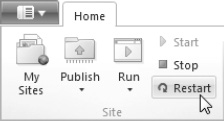
Figure 6-28. The Restart button in the Ribbon Control of the WebMatrix IDE
Saving Charts as Image Files
Another technique for saving a chart for later use is to save it as a standard image file on the web server. Once the image has been saved, it can then be accessed using an HTML img tag, as we would for any other graphic.
![]() Note In order to use this technique, our web application must have read/write access to a folder on the web server.
Note In order to use this technique, our web application must have read/write access to a folder on the web server.
At the root of our web site, create a folder called _Charts. Next, add a new page to the site root called SaveChart.cshtml. Replace the default markup in SaveChart.cshtml with the following:
@{

    var chartFileName = "_Charts/SalesChart01.jpg";

    if (!File.Exists(Server.MapPath(chartFileName))) {


        var sales = new Dictionary<string, int>()

        {

            { "Books", 10 },

            { "DVDs", 7 },

            { "Games", 12 },

            { "Music", 5 },

            { "Toys", 9 }

        };


        var chartImage = new Chart(400, 300);

        chartImage.AddTitle("Saved Chart");

        chartImage.AddSeries(

                name: "Sales",

                xValue: sales.Keys,

                yValues: sales.Values);

        chartImage.Save(path: chartFileName);

    }

}


<!DOCTYPE html>


<html lang="en">

    <head>

        <meta charset="utf-8" />

        <title>Saved Chart Example</title>

    </head>

    <body>

        <img src="@chartFileName" />

    </body>

</html>
In the code block at the top of the page we check to see if the chart already exists in the specified place on the web server. If the file does not exist, we generate some data in a generic Dictionary collection to display on the chart, then create a new chart, and add the collection as a chart series. Finally, we call the Save() method on the chart and pass in the path and filename declared on the first line to the methods path parameter.
In the body of the page, we simply use an HTML img element, pointing at the path declared in the code block, to display the chart.
The advantage of this technique is that the file is stored in the file system on the web server, rather than in a temporary cache, and so will not be lost if the web site is restarted.
Working with Other Databases
There may be occasions where we will need to connect to, and interact with, databases other than SQL Server Compact. In this section, we will see how an existing SQL Server Compact database can be migrated to a different version of SQL Server and how to connect to an SQL Server or MySQL database with ASP.NET Web Pages.
Migrating an SQL Server Database
While the SQL Server Compact database supplied with Microsoft WebMatrix is perfectly usable for small- to medium-sized web sites, it may become necessary to use one of the more powerful versions in the SQL Server family to meet performance or space requirements.
WebMatrix makes it easy to migrate an existing SQL Server Compact database from within the WebMatrix IDE.
Select the Databases workspace in the Workspace Selector and, in the Navigation Pane, highlight the database to be migrated. If the database is eligible for migration, the Migrate button will be available on the Home tab of the Ribbon Control (see Figure 6-29).
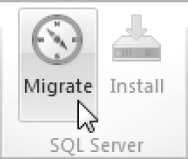
Figure 6-29. The Migrate button in the WebMatrix Ribbon Control
When we click the Migrate button, we will be presented with the Migrate Database dialog (see Figure 6-30). It is then simply a matter of entering the details of the database server we wish to migrate to and clicking the OK button.
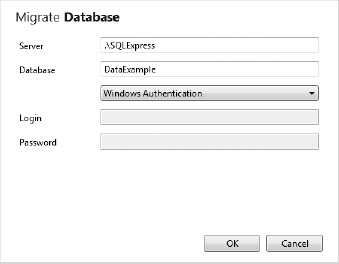
Figure 6-30. The Migrate Database dialog
When the migration has successfully completed, we will receive a success message in the notification area at the bottom of the IDE.
Connecting to an SQL Server or MySQL Database
Database interaction with WebMatrix is not solely limited to the integrated SQL Server Compact database. It may be necessary, at times, to make use of an existing database with greater capacity and performance, for example MySQL or a different version of SQL Server. In this section, we will see how WebMatrix can connect to either of these databases.
Creating a New Connection
To create a new connection to an existing database, select the Databases workspace in the Workspace Selector of the WebMatrix IDE. With the Databases workspace selected, the Ribbon Control at the top of the page will contain a New Connection icon (see Figure 6-31).
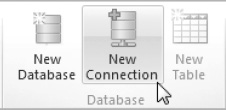
Figure 6-31. The New Connection button in the Ribbon Control
Click this icon to open the “Connect to Database” dialog box, shown here in Figure 6-32.
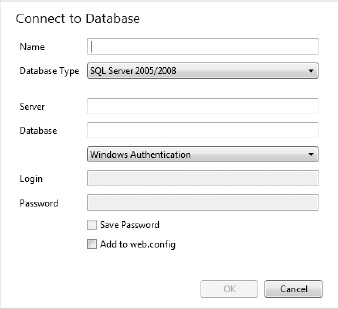
Figure 6-32. The Connect to Database dialog box
Enter a name for the connection in the “Name” textbox at the top of this dialog box. The name can be any string value but, for readability and maintenance purposes, be sure to give it a meaningful name that clearly identifies the database to which we wish to connect.
Next, select the type of database we wish to connect to, using the Database Type drop-down list. This is a choice of either SQL Server or MySQL, assuming that we have both installed on our machine.
Finally, fill in the rest of the required information, check the “Add to web.config” checkbox, and click OK.
If the connection is successful, we will see a success message in the Notification Area at the bottom of the IDE, and the database will appear in the Navigation Pane of the Database workspace. In the Navigation Pane, we will be able to browse the various objects within the database (see Figure 6-33).
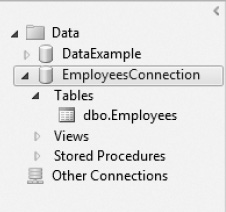
Figure 6-33. The new database connection displayed in the Navigation Pane
The database can now be accessed in code in exactly the same way that we have done previously. To connect to the external database, all we need do is pass the name of our newly created database connection to the Database.Open() method.
var db = Database.Open("EmployeesConnection");
The web.config File
Because we checked the “Add to web.config” checkbox in the “Connect to Database” dialog box, the connection details have been added to a file called web.config in the root of our site. The web.config file is an XML file that can contain various configuration information regarding our site and will be created for we by WebMatrix if it does not already exist.
If we did not already have a web.config file and have connected to an SQL Server Express database, the web.config created by WebMatrix will look something similar to the following:
<?xml version="1.0" encoding="UTF-8"?>

<configuration>

    <connectionStrings>

        <add connectionString="Trusted_Connection=True;Server=.SQLEXPRESS;Database=Employees"

    name="SqlServerConnection" providerName="System.Data.SqlClient" />

    </connectionStrings>

</configuration>
Each database connection that we create will be inserted as an add element within the connectionStrings section. It is useful to keep the connections in the web.config file, as they can be easily edited if necessary when deploying to a production server in the future.
We will use the web.config to store other site configuration information as we move through the later chapters of the book.
Summary
In this chapter, we have learned how to interact with databases using Microsoft WebMatrix. We have seen how we can use the WebMatrix IDE to create Microsoft SQL Server Compact databases and how to use Structured Query Language and C# Razor code to perform Create, Read, Update, and Delete (CRUD) operations.
Next, we saw how to use the in-built WebGrid and Chart helpers to easily present tabular and graphical information to the user and finished by learning how to connect to other types of external databases.
Using the information and techniques presented in this chapter, we can now create interactive, dynamic web sites which persist their data to a database for permanent storage.
In the next chapter, we will learn how to use the ASP.NET Web Pages membership functions to secure areas of our web site for access by registered and authenticated users.