
C H A P T E R 4
![]()
Working with Razor and ASP.NET Web Pages
In the “Hello World” application in Chapter 2, Razor, C#, and ASP.NET Web Pages were used to perform relatively complex server-side tasks with ease. Now that you have a base knowledge of C#, either from experience or from the previous chapter, it is time to take a more in-depth look at Razor and ASP.NET Web Pages.
C#, Razor, and ASP.NET Web Pages combine perfectly to create an extremely powerful framework for creating sophisticated and dynamic web pages. In this chapter, some of the features of this framework that have been designed to provide a lightweight, fast, and scalable way to build web applications will be looked at. Topics covered in this chapter include:
- Razor syntax
- Layout
- Helpers
- Functions
- Maintaining state
- Uniform Resource Locators (URLs) and Routing
Razor Syntax
Razor is a simple to use, yet extremely powerful, programming syntax for inserting server-side code into web pages. When you create a new ASP.NET Web Page (.CSHTML or .VBHTML) in WebMatrix, you are creating a file that has two totally separate types of content: client-side and server-side. The client-side content of an ASP.NET Web Page can contain any of the usual code and markup that you would expect to see in a normal HTML page, including HTML, JavaScript, and CSS. The server-side content contains instructions to the web server in C# (or VB.NET), which are used to create dynamic content and interact with other resources, such as databases and file systems.
The server-side code is inserted directly into the page amongst the client-side content; use of the Razor syntax is your way of telling the web server where the client-side content ends and where the server-side content begins, and vice-versa.
The most common use of Razor is to dynamically create HTML and other client-side content. When IIS receives a request for a .CSHTML or .VBHTML page it recognizes it as an ASP.NET Web Page, executes any server-side instructions marked with the Razor syntax, and then returns the generated page to the browser.
![]() Note The Razor syntax was actually invented for WebMatrix. However, it proved to be so popular amongst developers and such a great improvement over previous syntaxes, that it has now also been adopted as the default view engine for ASP.NET MVC.
Note The Razor syntax was actually invented for WebMatrix. However, it proved to be so popular amongst developers and such a great improvement over previous syntaxes, that it has now also been adopted as the default view engine for ASP.NET MVC.
Adding a single line of server-side code
A single line of server-side code can be added to an ASP.NET Web Page using the @ symbol. The code is added in-line with the client-side content, such as HTML, etc., and is recognised and processed automatically by the web server, substituting the Razor code with relevant dynamic content wherever this is the intention, such as
<p>The current date and time is: @DateTime.Now</p>
The parser has an intimate in-built knowledge of C# syntax, which makes it able to recognize where a C# statement ends and the HTML begins.
When a single-line expression is used in this way, the output is rendered directly to the page. If the single line of server-side code is there to perform some other function and is not intended for display, you can inform the parser by wrapping the statement in a pair or curly braces, thereby creating a statement block. This is seen in the following code
@{ var PageTitle = "My Home Page"; }


<!DOCTYPE html>


<html lang="en">

    <head>

        <meta charset="utf-8" />

        <title>@PageTitle</title>

    </head>

    <body>

        <h1>@PageTitle</h1>

        <p>The current date and time is: @DateTime.Now</p>

    </body>

</html>
This mix of code and HTML markup would output the result, as seen in Figure 4-1.
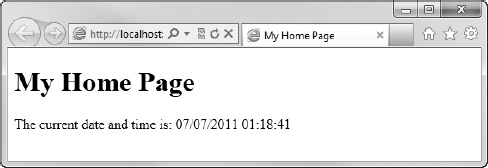
Figure 4-1. The result of the combination of Razor code and HTML.
As far as the browser is concerned, the server is returning plain old HTML and is no different from a normal static page. The following code is the HTML returned to the browser in the previous example.
<!DOCTYPE html>


<html lang="en">

    <head>

        <meta charset="utf-8" />

        <title>My Home Page</title>

    </head>

    <body>

        <h1>My Home Page</h1>

        <p>The current date and time is: 07/07/2011 01:18:41</p>

    </body>

</html>
The final type of single-line expression in Razor is known as a multi-token statement. Here, you want the output to be the result to the page, but need multiple items within the expression to be evaluated beforehand. The syntax for a multi-token expression is to enclose the expression in parentheses. In this example, the two integer variables are multiplied then output.
<p>The number is: @( 12 * 4 )</p>
The result of this code is seen in Figure 4-2.
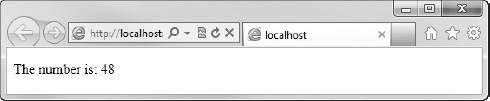
Figure 4-2. The result of a calculation performed inside a multi-token statement.
Adding more complex code
Multiple lines of C# code can be added using a multi-statement block. Unlike in-line expressions, each line of code inside a code block, whether single or multi-statement, must end with a semi-colon. The following code shows an example of a multi-statement block.
@{

    var movies = new List<string>();

    movies.Add("The Shawshank Redemption");

    movies.Add("The Godfather");

    movies.Add("The Godfather: Part II");

    movies.Add("The Good, the Bad and the Ugly");

    movies.Add("Pulp Fiction");

}
To display the data held within your movies list, you could use a foreach loop to iterate over the collection and output each item to an HTML list. This is actually a really useful pattern, as the page emitted by IIS and sent to the browser will contain just a simple HTML unordered list, meaning that it can be easily styled with CSS by a designer to achieve the desired look and feel. Figure 4-3 shows the un-styled HTML page returned to the browser.
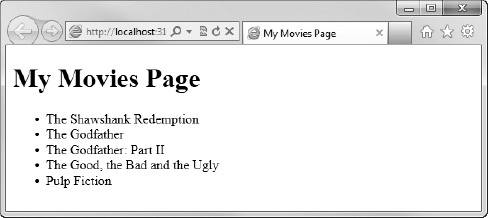
Figure 4-3. The un-styled HTML list rendered in the page.
The Razor code to achieve this is pretty interesting; let's take a look at it.
@{ var PageTitle = "My Movies Page"; }


@{

    var movies = new List<string>();

    movies.Add("The Shawshank Redemption");

    movies.Add("The Godfather");

    movies.Add("The Godfather: Part II");

    movies.Add("The Good, the Bad and the Ugly");

    movies.Add("Pulp Fiction");

}
<!DOCTYPE html>


<html lang="en">

    <head>

        <meta charset="utf-8" />

        <title>@PageTitle</title>

    </head>

    <body>


        <h1>@PageTitle</h1>


        <ul id="movies">


            @foreach (var movie in movies)

            {

                <li>@movie</li>

            }


        </ul>


    </body>

</html>
You can see here that, due to its semantic knowledge of the C# language, Razor is able to recognize that the <li> and </li> within the foreach loop are actually HTML tags and should be output to the page, along with the value of the local variable, movie.
Note also that Razor recognizes the curly braces { } as the start and end of the foreach loop, without the requirement for additional @ characters in the markup. This is a huge improvement over many other syntaxes, and helps to create code with a good standard of readability. The body of the same page that you have just created using Razor, for example, written using the traditional ASP <% ... %> Web Forms syntax would look like this
<body>


    <h1><%= PageTitle %></h1>


    <ul>


        <% foreach (var movie in movies)

        } %>

            <li><%= movie %></li>

        <% } %>


    </ul>


</body>
Even in this simple nine line example, you can see just how much of an improvement the Razor syntax offers, in terms of readability and ease of coding.
Mixing it up
There are times when an @ symbol is not intended as a token to identify the text immediately following it as server-side code. Take for instance an email address.
<p>Please contact [email protected]</p>
The Razor parser is clever enough to recognise this as an email address because it evaluates the text to the right-hand side of the @ symbol to determine if it is a valid C# code. It will also recognise where an email address ends and code begins. The following code renders the email address as plain text and the telephoneNumber variable as code.
@{ var telephoneNumber = "01632 567890"; }

<p>Please contact [email protected] or @telephoneNumber</p>
In the vast majority of cases, Razor works just exactly as you would expect. Once you have used it a few times, you will find that it becomes second nature and you use it without really thinking. However, there are bound to be a few edge cases where the Razor parser could potentially interpret the markup in a way that was not originally intended by the developer. In order to cope with this, there are a couple of ways to clarify your intent to the parser.
In cases where an @ symbol is intended for display on the page, but is also valid code, you can escape the @ symbol with @@.
@{ var stevelydford = "me"; }

<p>Follow me on twitter: @@stevelydford</p>
If you are nesting a block of client-side content within a server-side code block, it is necessary to wrap the content within an HTML element such as a <p>, <span>, or <div> to clarify the intent of the code to the Razor parser. The following example demonstrates this technique using <div> tags inside an if ... else statement.
@{ var loggedIn = false; }


<!DOCTYPE html>


<html lang="en">

    <head>

        <meta charset="utf-8" />

        <title>Example Page</title>

    </head>

    <body>

        @if (loggedIn)

        {

            <div>

                <h1>Welcome</h1>

                The time now is:

                @DateTime.Now.ToShortTimeString()<br />

                Have a nice day!

            </div>

        }

        else

        {

            <div>

                <h1>Please Log In</h1>

                You are not currently logged in<br />

                to this site. Please log in or register.

            </div>

        }

    </body>

</html>
Notice that there is also a single-line expression within the first <div>, declared using the @ symbol.
If you wish to send the content of the relevant code block in the if statement to the browser, without wrapping it within an HTML element, you can use the special tag, <text>.
<text>

    <h1>Welcome</h1>

    The time now is:

    @DateTime.Now.ToShortTimeString()<br />

    Have a nice day!

</text>
The <text> tag will not be sent to the browser, and exists purely to help the Razor parser in these circumstances. In this example, the following HTML is sent to the browser.
<h1>Welcome</h1>

The time now is:

17:45<br />

Have a nice day!
If you only need to output a single line of content within a code block, you can use the @: operator instead of wrapping it in <text> tags.
If the @: operator is omitted from the previous code example, the web server will display the following error page (see Figure 4-4).
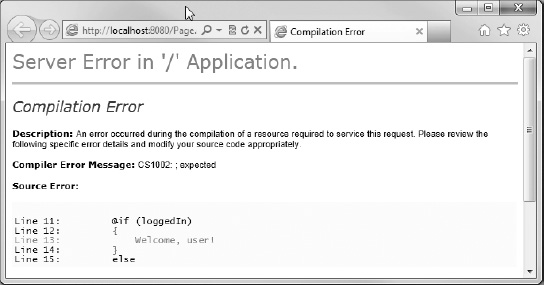
Figure 4-4. The error message displayed when the @: operators are omitted. They are required to provide clarification to the Razor parser.
![]() Tip All content output to the browser, using Razor, is HTML encoded for security purposes. This helps prevent Cross-Site Scripting (XSS) attacks. This means that reserved HTML characters are converted to their equivalent codes for display on the page (for example, a < symbol is converted to <). For example, if your page contains the following code
Tip All content output to the browser, using Razor, is HTML encoded for security purposes. This helps prevent Cross-Site Scripting (XSS) attacks. This means that reserved HTML characters are converted to their equivalent codes for display on the page (for example, a < symbol is converted to <). For example, if your page contains the following code
@{

    var message = "You must be <a href='login.cshtml'>logged in</a><br />to use this site.";

}

<p>@message</p>
the server will send the following encoded HTML to the browser
To prevent this encoding, use the Html.Raw() method.
@{

    var message = "You must be <a href='login.cshtml'>logged in</a> to use this site.";

}

<p>@Html.Raw(message)</p>
For more information on XSS attacks and HTML encoding, see Chapter 5.
Layout
The look and feel of your site is very important when you are aiming to provide a great user experience; WebMatrix has lots of great features to help you achieve this. Perhaps, one of the most important of these, is the fact that the server-side Razor code produces clean standards-compliant HTML, which can be easily styled by a competent web designer using CSS and other techniques with which they are already familiar. The importance of this cannot be over-emphasised. Over the years, many web development frameworks have been heavily criticised for producing non-standard client-side content that is extremely difficult, or even impossible, to style and make work consistently across all browsers. With Razor, you have complete control over exactly what is sent to the users' browser–there are no “server controls” or “ViewStates” that will insert unwieldy HTML, scripts, and data into your page at runtime.
In addition to rendering clean standards-compliant content in a very controllable way, Razor has the ability to create layout templates to make designated sections of markup reusable across your site.
Staying DRY
Most websites have at least some content that is displayed on every page. This helps in the consistency of the design and user experience. It may include common items such as headers, footers, and navigation, as well as other content areas specific to the user or application. When you are using WebMatrix, it is possible to define these items as templates and reuse them across all or selected pages.
RenderPage()
The first technique that you are going to look at to help reuse content in multiple places in your site is the use of the RenderPage() method. This method basically takes the content of another file in your site, often referred to as a partial page, and renders it in the exact place where the RenderPage() method is placed in the calling code. Once all calls to RenderPage() (and the other layout methods that you will look at later in this chapter) have been completed, the finished page is assembled by WebMatrix and sent to the client's browser. To the client, this process will be seamless.
The easiest way to fully understand the steps involved in using the RenderPage() method is to create a working example, so go ahead and fire up WebMatrix. Once the IDE has loaded, create a new ‘Site From Template', choose the ‘Empty Site' template, and call it ‘Layouts'.
The first thing you'll need is a page from which to call the RenderPage() method. Select the Files tab in the Workspace Selector, and from the Ribbon Control choose New New File. Select CSHTML in the ‘Choose a File Type’ dialog, name the page Default.cshtml, and click OK.
Let's add some content to your default page.
@{ var PageTitle = "Layout Example"; }

<!DOCTYPE html>


<html lang="en">

    <head>

        <meta charset="utf-8" />

        <title>@PageTitle</title>

    </head>

    <body>

        <h2>@PageTitle</h2>

        <p>This is the main page content.</p>

    </body>

</html>
Next, add your partial page. It is a common convention amongst web developers that files intended to be shared across multiple pages in a site are stored in a folder named Shared. In the Navigation Pane, right-click the root folder (i.e. Layouts), and choose ‘New Folder' from the context menu (see Figure 4-5). By default, WebMatrix will name the folder ‘New Folder', so rename it to ‘Shared' by overtyping the name or right-clicking and choosing ‘Rename'.
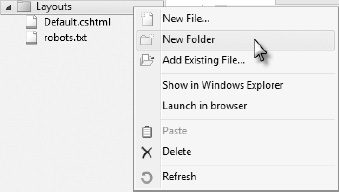
Figure 4-5. Adding a new folder to your site.
Add two new CSHTML files to this folder and call them _Header.cshtml and _Footer.cshtml.
![]() Note By default, WebMatrix will not serve pages to the client's browser that are named with a leading underscore. You can use this to your advantage here, as you don't want users to request your partial pages unintentionally or otherwise.
Note By default, WebMatrix will not serve pages to the client's browser that are named with a leading underscore. You can use this to your advantage here, as you don't want users to request your partial pages unintentionally or otherwise.
Remove all the default HTML from _Header.cshtml and replace it with the following
<div id="header">

    <h1>.: Company Logo :.</h1>

    <hr />

</div>
Similarly, remove the HTML that was automatically created by WebMatrix in _Footer.cshtml and substitute it with the following content.
<div id="footer">

    <hr />

    <p>

        For all support enquiries, please contact

        <a href="mailto:[email protected]">[email protected]</a>

    </p>

</div>
Finally, you need to add calls to the RenderPage() method in Default.cshtml to insert the header and footer exactly where you want them to appear. You need to pass the RenderPage() method the exact location and filename of the shared file that you wish to render.
@{ var PageTitle = "Layout Example"; }

<!DOCTYPE html>


<html lang="en">
    <head>

        <meta charset="utf-8" />

        <title>@PageTitle</title>

    </head>

    <body>


        @RenderPage("/Shared/_Header.cshtml")


        <h2>@PageTitle</h2>

        <p>This is the main page content.</p>


        @RenderPage("/Shared/_Footer.cshtml")


    </body>

</html>
When you run the page, you will see that the header and footer have been inserted (see Figure 4-6).
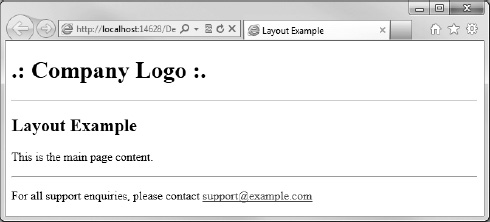
Figure 4-6. The default page, with the shared header and footer inserted, using the RenderPage() method.
As far as the browser is concerned, it has just been served a single page by WebMatrix, as described in Figure 4-7.
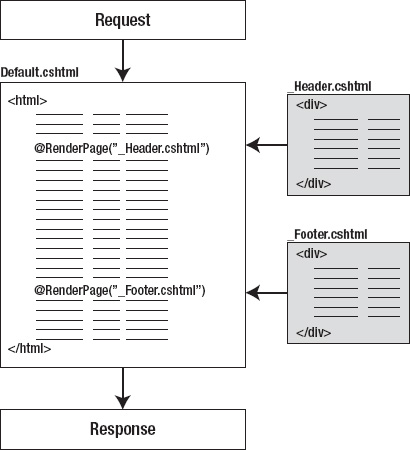
Figure 4-7. The RenderPage() process.
This is the code that you will see if you right-click the browser and choose ‘View Source’.
<!DOCTYPE html>


<html lang="en">

    <head>

        <meta charset="utf-8" />

        <title>Layout Example</title>

    </head>

    <body>

        <div id="header">

            <h1>.: Company Logo :.</h1>

            <hr />

        </div>

        <h2>Layout Example</h2>

        <p>This is the main page content.</p>

        <div id="footer">

            <hr />

            <p>
                For all support enquiries, please contact

                <a href="mailto:[email protected]">[email protected]</a>

            </p>

        </div>

    </body>

</html>
![]() Tip When running the site from the WebMatrix IDE, it will always attempt to run the page that was currently (or most recently) selected in the Navigation Pane. Unfortunately, there is no way to set the page you wish to run by default, so you will need to remember to select the page you wish to view before clicking run, particularly if you have been editing a file that will not render, such as a partial page with an underscore prefix or a CSS file.
Tip When running the site from the WebMatrix IDE, it will always attempt to run the page that was currently (or most recently) selected in the Navigation Pane. Unfortunately, there is no way to set the page you wish to run by default, so you will need to remember to select the page you wish to view before clicking run, particularly if you have been editing a file that will not render, such as a partial page with an underscore prefix or a CSS file.
Alternatively, you can keep the browser open after the first run, and instead of running the site every time from within the WebMatrix IDE, just save all pages in WebMatrix (Ctrl + Shift + S) and refresh the browser (by pressing F5 in most browsers) to see any changes.
Layout Pages
The RenderPage() method is great for inserting a piece of common user interface (UI) into multiple pages, but what if you want to create a common whole-page design to be used throughout your site? In this situation, a good solution is the use of layout pages.
A layout page contains the template for a web page. Once a layout page has been defined, you can create content pages that specify that their layout is inherited from your layout page. Each layout page has a single call to the RenderBody() method that fetches the content and merges it with the layout page. If you have any previous experience with ASP.NET Web Forms, you will recognise this as being a similar concept to ContentPlaceHolders in Master Pages.
Layout pages can still include Razor code, and calls to the RenderPage() method as you did in the previous section. In fact, let's modify your existing Default.cshtml to use a layout page.
Create a new file in the Shared folder called _Layout.cshtml, and modify the generated HTML, as shown here
<!DOCTYPE html>


<html lang="en">

    <head>

        <meta charset="utf-8" />

        <title>Layout Page Example</title>

    </head>

    <body>
        @RenderPage("/Shared/_Header.cshtml")


        <div id="content">

            @RenderBody()

        </div>


        @RenderPage("/Shared/_Footer.cshtml")

    </body>

</html>
Now, open Default.cshtml and amend it to look like the following
@{

    Layout = "/Shared/_Layout.cshtml";

    var PageTitle = "Layout Example";

}


<h2>@PageTitle</h2>

<p>This is the main page content.</p>
Notice that in Default.cshtml, you have removed all the page level HTMLs (head tags, body tags, etc.), as this is now being provided by the layout page. All you need to do is to specify which layout page you wish to use by setting the Layout property at the top of the page before any markup is defined. In this case, you have set the Layout property equal to "/Shared/_Layout.cshtml", the location of your layout page. The layout page then generates further calls to the RenderPage() method to pull in the header and footer and the finished page, is sent to the browser. Figure 4-8 shows how this process works.
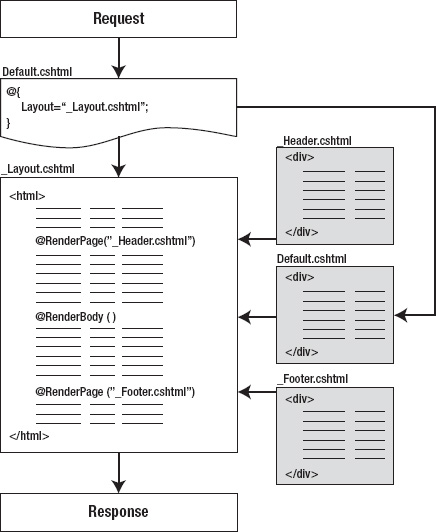
Figure 4-8. The Layout Page process.
The final result in this case will be identical to that seen previously in Figure 4-5. However, now you could go on to create any number of content pages, all by using your layout page to create a consistent look and feel to your site. Additionally, if you wanted to change the design at any point, you could do that once in the layout page and have that instantly reflected across your whole site.
RenderSection()
You can identify multiple content sections within a layout page, which is useful if you want to design layouts that have more than one area of replaceable content. This technique involves naming sections within your layout page, using the RenderSection() method, and providing content sections with a matching name in your content pages, as shown in Figure 4-9. Each named section within the content page is contained within a @section block.
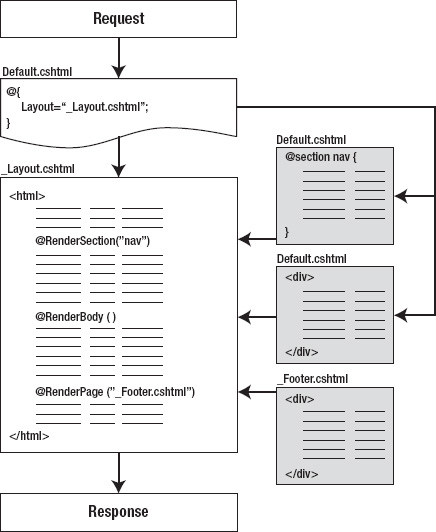
Figure 4-9. The RenderSection() process.
Let's demonstrate this process with an example. To begin, modify your layout page to include some calls to RenderSection(). These are the changes that you will make to /Shared/_Layout.cshtml
<!DOCTYPE html>


<html lang="en">

    <head>

        <meta charset="utf-8" />

        <title>@RenderSection("title")</title>

    </head>

    <body>

        @RenderPage("/Shared/_Header.cshtml")


        <div content="links">
            @RenderSection("links")

        </div>


        <div id="content">

            @RenderBody()

        </div>


        @RenderPage("/Shared/_Footer.cshtml")

    </body>

</html>
Two new sections called title and links have been defined. You'll need to define these sections in your content page (Default.cshtml) now, as running the site in its current state will produce the error page shown in Figure 4-10.
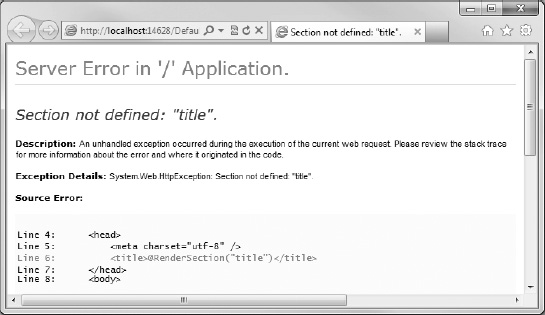
Figure 4-10. Content sections are mandatory by default, if defined by using the RenderSection() method in the layout page.
![]() Caution WebMatrix will generate an error if the layout page contains a section that is not matched in the content page, and vice versa. It will also throw an exception if the layout page contains method calls that try to render the same section multiple times.
Caution WebMatrix will generate an error if the layout page contains a section that is not matched in the content page, and vice versa. It will also throw an exception if the layout page contains method calls that try to render the same section multiple times.
How to prevent this error will be discussed later in this section. For now, let's just add the required sections to your Default.cshtml page.
@{

    Layout = "/Shared/_Layout.cshtml";

    var PageTitle = "RenderSection Example";

}


@section title {

    @PageTitle

}


@section links {

    <ul>

        <li><a href="#">Home</a></li>

        <li><a href="#">Products</a></li>

        <li><a href="#">Clients</a></li>

        <li><a href="#">Contact Us</a></li>

    </ul>

}


<h2>@PageTitle</h2>

<p>This is the main page content.</p>
Now when you run the page, the content is correctly rendered (see Figure 4-11). The content within the named section blocks are rendered in place of the related RenderSection() method calls, and the RenderBody() call fetches the remaining content not held within the named sections.
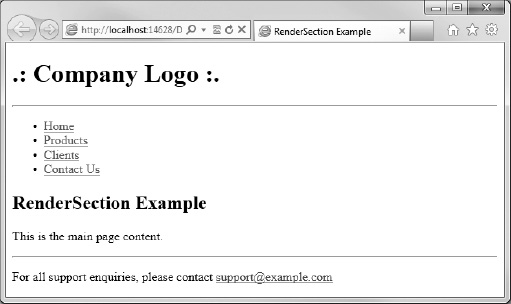
Figure 4-11. Content correctly rendered within the named sections.
Making a section optional
In Layout.cshtml, notice how the <title> tag has a call to RenderSection(). This is a particularly useful technique, because without it, the title of the page would be set within the layout page and become essentially immutable. In a similar way, it is also useful to render a section within the document <head> tags to allow the content page to access to them, perhaps to register some CSS or JavaScript that is individual to that page. However, you do not want sections such as this to be mandatory, as you may not wish to use them on every occasion. To make the section optional, you can set the required parameter of the RenderSection() method equal to false, using C# named parameters, like so
@RenderSection("head", required: false)
Passing Data to Layout and Partial Pages
Often, you will require the actual rendered content of a layout or partial page to be based on some contextual data from the calling page. Examples of this include displaying a list of products depending on which category is chosen in an online store, or displaying a different piece of UI depending on whether a user is currently logged into the site or not.
In order to achieve this, you will need some way of passing data from the content page (i.e. the page requested by the user) to the relevant layout or partial pages. ASP.NET Web Pages delivers this functionality through the provision of the PageData property of the content page. The PageData property is a dictionary object that is shared between pages, layout pages, and partial pages, and can be used to pass data as required. To pass data from the content page, it is simply a matter of adding a key/value pair to the PageData property in the content page, which can then be accessed from any layout or partial pages that are called. This process is shown in Figure 4-12.
Figure 4-12. Passing data to a partial page.
Create a new page called Default2.cshtml. At the top of this page, add a value to the PageData dictionary. The following code shows this technique in practice.
@{

    PageData["user"] = false;

    var PageTitle = "PageData Example";

}


<!DOCTYPE html>


<html lang="en">

    <head>

        <meta charset="utf-8" />

        <title>@PageTitle</title>

    </head>

    <body>

        <h1>@PageTitle</h1>

        @RenderPage("/Shared/_User.cshtml")

    </body>

</html>
Next, create a partial page called _User.cshtml in the Shared folder. In this partial page, check the value of PageData["user"] to decide whether to display a welcome message or a login form.
@if (PageData["user"]) {

    <div>

        <h2>Welcome!</h2>]

        <!-- More info about user here -->

    </div>

}

else {

    <div>

        <form method="post" action="login.cshtml">

            <h2>Login:</h2>

            <div>

                <label for="username">Username: </label>

                <input type="text" name="username" />

            </div>

            <div>

                <label for="password">Password: </label>

                <input type="password" name="password" />

            </div>

            <div>

                <input type="submit" value="Login" />

            </div>

        </form>

    </div>

}
The key/value pairs stored in the PageData dictionary are not restricted to just .NET primitive types. The PageData dictionary is actually declared as
So, it is quite common to see custom objects, generic collections, etc. being passed in the PageData dictionary. To see this in action, create a new page called Catalog.cshtml and amend the default markup to match the code example below, which adds a notional list of categories to the PageData dictionary.
@{

    var categories = new List<string>() { "Books", "Films", "Music", "Games", "Toys" };

    PageData["categories"] = categories;

}


<!DOCTYPE html>


<html lang="en">

    <head>

        <meta charset="utf-8" />

        <title>PageData Example</title>

    </head>

    <body>

        <h1>PageData Example</h1>

        @RenderPage("/Shared/_Categories.cshtml")

    </body>

</html>
The following example code shows how a partial page named Categories.cshtml can access the categories page data passed in from the calling page.
<div>

    <h2>Categories</h2>

    <ul>

        @{

            foreach (var category in PageData["categories"])

            {

                <li>@category</li>

            }

        }

    </ul>

</div>
This renders the output to the browser, as seen in Figure 4-13.
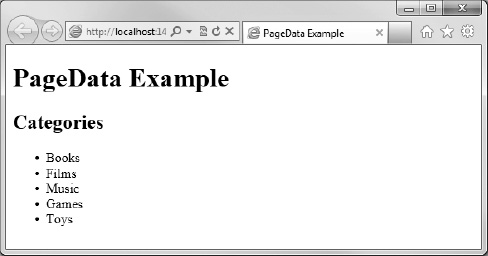
Figure 4-13. Passing a generic list to a partial page using PageData.
Helpers
Helpers are another way to help you achieve DRYness in your site design. A helper is a custom component that can receive a list of parameters in a way similar to a method call, and return HTML (or any kind of client-content) to be rendered on the page.
Helpers have an enormous number of potential uses. In the example in this section, you will use a helper to display a common piece of UI that presents information about a product. This is a very simple example, but in reality, helpers can contain any markup and client-side or server-side code that you need. You will make extensive use of helpers of varying complexity throughout the examples in this book.
Helpers (and functions that will be covered in the next section) must be created within a folder in the root of your website called App_Code. This folder name is an ASP.NET convention that automatically makes all code within it available for use in the rest of your application. The App_Code folder can contain sub-folders, the contents of which will also be accessible to the code in the rest of your site.
![]() Tip There are many pre-written helpers available for download that you can use to add functionality to your site. Some of these, including Twitter, Facebook, and other helpers, will be discussed in more detail in Chapter 8.
Tip There are many pre-written helpers available for download that you can use to add functionality to your site. Some of these, including Twitter, Facebook, and other helpers, will be discussed in more detail in Chapter 8.
In order to see an example of helpers in action, you will create a new site called HelperExample, using the Empty Site template. You will need to add an App_Code folder to the root of your web site, which you can do by right-clicking the root folder in the Navigation Pane and choosing the New Folder option. Once the folder has been created and named, right-click it and choose New File. Add a CSHTML file called ProductHelpers.cshtml. The site structure in your Navigation Pane should look like the one shown in Figure 4-14.
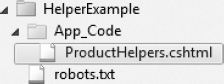
Figure 4-14. The App_Code folder.
![]() Note By default, WebMatrix will not serve any pages in the App_Code folder directly to the user's browser, so you do not need to prefix the filename with an underscore.
Note By default, WebMatrix will not serve any pages in the App_Code folder directly to the user's browser, so you do not need to prefix the filename with an underscore.
Replace the default content that WebMatrix has automatically generated inside the new file with the following
@helper ProductInfo(string title, string description, decimal price)

{

    <div style="border:2px solid #666; background-color:#ffffcc; padding:10px; width:10em;">

        <strong>@title</strong><br />

        @description<br />

        <em>£@price</em>

    </div>

}
A call to this helper method can be made within any page by using an @ symbol followed by the filename and helper name, separated by a dot. Add a file named Product.cshtml to the root folder in your application. In the body of the page, add the following code.
@ProductHelpers.ProductInfo("Widget", "This is the product description", 2.99m)
If you had created folders within App_Code, you would be able to call the helper using the following syntax.
@FolderName.FileName.HelperName
When called, your example product helper renders, as seen in Figure 4-15.
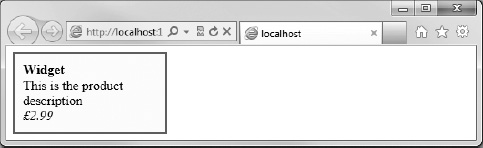
Figure 4-15. An example ProductInfo helper.
Functions
WebMatrix functions are static methods that can be called from anywhere in your WebMatrix application. Unlike helpers, which can return only a block of HTML for rendering in the browser, a function can return any valid C# type.
Let's create a function that accepts a date of birth as a parameter and returns the person's current age as an integer.
If your site doesn't already have an App_Code folder, create one, and inside it create a file called DateFunctions.cshtml. Add the following code to DateFunctions.cshtml.
@functions {


    public static int CurrentAge (DateTime dateOfBirth)

    {

        DateTime today = DateTime.Today;

        int years = today.Year - dateOfBirth.Year;

        // Subtract a year if this year's birthday hasn't happened yet

        if (today.Month < dateOfBirth.Month || (today.Month == dateOfBirth.Month &&

            today.Day < dateOfBirth.Day))

        {

            years--;

        }

        return years;

    }

}
As you can see from this code snippet, functions are simply standard C# static methods enclosed within a @functions {...} code block. In this example, you have declared a function called CurrentAge, which accepts a DateTime and returns an int. The function simply subtracts the year of the date of birth passed to the function from the current year and then decrements this by a further year, if this year's birthday hasn't yet happened.
You can add any number of functions to your DateFunctions.cshtml file, as long as they all appear within the @functions {...} code block.
@functions {


    public static int CurrentAge (DateTime dateOfBirth)

    {

        DateTime today = DateTime.Today;

        int years = today.Year - dateOfBirth.Year;

        // Subtract a year if this year's birthday hasn't happened yet

        if (today.Month < dateOfBirth.Month || (today.Month == dateOfBirth.Month &&

            today.Day < dateOfBirth.Day))

        {

            years--;

        }

        return years;

    }


    public static int DaysToNextBirthday (DateTime dateOfBirth)

    {
        DateTime today = DateTime.Today;

        DateTime next = new DateTime(today.Year, dateOfBirth.Month, dateOfBirth.Day);


        // Add a year if this years birthday has already happened

        if (next < today)

        {

            next = next.AddYears(1);

        }


        int days = (next - today).Days;


        return days;

    }

}
To call your functions from within any Razor page in your project, simply give the filename followed by the function name in the standard .NET dot-separated format.
@{

    DateTime birthday = new DateTime(1981, 12, 8);

    int age = @DateFunctions.CurrentAge(birthday);

    int daysToBirthday = @DateFunctions.DaysToNextBirthday(birthday);

}


<p>Your current age is @age</p>

<p>@daysToBirthday days until you are @(age + 1)</p>
![]() Tip As you build more and more WebMatrix web applications, you will gather a whole library of common functions and helpers that can help to vastly reduce the development time of future projects.
Tip As you build more and more WebMatrix web applications, you will gather a whole library of common functions and helpers that can help to vastly reduce the development time of future projects.
Maintaining State
The HyperText Transfer Protocol (HTTP), which is the networking protocol used as the foundation of data communication on the World Wide Web, is a stateless protocol. When using HTTP, a request is made to the web server by the client, and a response is constructed and then returned. After the response has been returned, the web server has no further links to the client browser. In other words, each individual HTTP request has no knowledge of previous requests, and future requests will have no knowledge of the requests made today.
This concept works well for the disconnected and distributed nature of the World Wide Web, but it does cause some problems for web developers when trying to perform tasks that require data to be maintained across requests. Even relatively simple and common tasks, such as tracking the status of a user's authentication or keeping track of the items in a shopping cart, require some sort of state to be maintained.
HTTP and ASP.NET Web Pages provide several ways for us to maintain state in web applications. In this chapter, you will look at sessions and cookies.
Session State
The ASP.NET session state enables you to store and retrieve data per user, as they browse your application. A session is started when the user first lands on a page in your web site and ends either when they close their browser, or when the session “times out” due to inactivity after a predetermined period of time (set in IIS as twenty minutes, by default).
Session Variables
The most common use of the session for maintaining state is for storing user specific data in session variables. Session variables are stored in a dictionary on the server, and are unique to each visitor per session.
The session variable collection is indexed by a string or an integer index. Session variables do not have to be explicitly added to the collection, they can simply be added or retrieved by referring to their name or index.
@{

    Session["username"] = "Bond007";

    Session["membershipLevel"] = 3;

}


<h1>Welcome @Session["username"]!</h1>
By default, session variables can hold any valid .NET data type, including generic collections and custom objects.
Session Identifiers
All sessions created and maintained by the server are given a unique identifier, which is stored in the SessionID property of the page. Each new request for a page is examined to see if it already has a valid SessionID–if one is not present; the server starts a new session and assigns a new SessionID.
A session is considered to be active if the user has requested a page within the session “time out” period. If the time between requests exceeds the time out period, the session is dropped and a new SessionID is assigned, and by default, stored in a cookie. The SessionID can be accessed directly in code, and returns a randomly generated sequence of numbers and letters, an example of which is shown here
@Session.SessionID // wxjzybjnnkur0qrgf5wjs2ko
The SessionID is generated in memory, on the server, and is not persisted to disk. Therefore, while a SessionID is unique at the time it is created, it cannot be guaranteed to be unique over an extended period. A server reset, for example, may cause duplicate SessionID's to be produced.
If your application design requires that you determine whether the session was created during the current request, you can interrogate the Session.IsNewSession property, which returns a Boolean true or false.
Cookies
A cookie is a small text file kept on the user's machine that can be used to store data specific to that user. The advantage of using cookies is that they are not necessarily deleted when a session closes, so they can persist on the users machine and be retrieved or amended the next time they visit the site. The disadvantages are that they have a very limited size, are text-only, are browser-specific, and might be disabled in the users' browser settings.
Cookies are written using the page's Response property, and can contain only strings. When writing a cookie, you can also set some other properties, the most common being the expiration date.
@{

    Response.Cookies["username"].Value = "Bond007";

    Response.Cookies["username"].Expires = DateTime.Now.AddDays(7);

}
If you do not set the expiration date, the cookie will expire at the end of the current session. Cookies can also contain subkeys, which help the developer to keep the site's cookies organised and treat groups of them as a single object when convenient. For example
@{

    Response.Cookies["user"]["username"] = "Bond007";

    Response.Cookies["user"]["membershipLevel"] = "3";

    Response.Cookies["user"].Expires = DateTime.Now.AddDays(7);

}
To retrieve the value of a cookie, you use the Request property of the page. You need to check that the cookie exists before you retrieve its value, because if it does not, ASP.NET will throw a NullReferenceException.
@{

    string username = "";


    if(Request.Cookies["username"] != null)

    {

        username = Request.Cookies["username"].Value;

    }

}
Cookies containing subkeys are also interrogated using the Request property, and must be checked for existence before accessing.
@{

    string username = "";

    int userLevel = 0;


    if(Request.Cookies["user"] != null)

    {

        username = Request.Cookies["user"]["username"];

        userLevel = int.Parse(Request.Cookies["user"]["membershipLevel"]);

    }

}
Limitations of Cookies
When designing a web application that uses cookies, it is important to bear in mind that individual users can delete, or altogether refuse, cookies on their machine–in fact, a user may not even be on the same machine when they re-visit the site, whether they accept cookies or not. Therefore, although cookies are very useful, you should never rely on them, and should use them only for non-essential features. The same rule applies to session variables, as they too rely on cookies by default.
If you attempt to write a cookie to a browser that will not accept them, no exception will be thrown. Checking to see if a browser can accept cookies is actually a fairly straightforward task. You just need to attempt to write a cookie and read it back on another page. If you cannot read the value of the cookie you have just set, you can assume that cookies are unavailable to you.
![]() Caution In order to ensure the security of your application, it is important that you validate any data that you receive from a user. This includes cookies, which are stored on a user's machine and could potentially be open to tampering, and thereby inject malicious data into your site.
Caution In order to ensure the security of your application, it is important that you validate any data that you receive from a user. This includes cookies, which are stored on a user's machine and could potentially be open to tampering, and thereby inject malicious data into your site.
Startup Code
ASP.NET Web Pages provide ways to run code before a page loads. There are various scenarios in which this pattern can be advantageous– error handling and the setting of global site wide variables are to name but two.
You can run code the first time the web site is accessed and before and after any page in a particular folder is loaded. This section will describe the methods of doing this.
Application Level Code
When a site is first accessed, WebMatrix checks to see if the _AppStart.cshtml page has been run. If this check returns false, then the _AppStart.cshtml page is executed before the actual page requested is dealt with.
The _AppStart.cshtml file must be created in the root of the website, which is an excellent place to set global variables–in fact ASP.NET Web Pages provides the AppState dictionary specifically for this task.
In this example, you will add an item to the AppState dictionary to store the application's name. Create a new site, add an _AppStart.cshtml file to the site root, and replace the contents of the file with the following
@{

    AppState["appName"] = "My Custom Web Site";

}
You now have access to the AppState dictionary from everywhere within your site. To see this in action, create a new file called Default.cshtml, and enter the following code
<!DOCTYPE html>

<html>

    <head>
        <title>@AppState["appName"]</title>

    </head>

    <body>

        <h1>@AppState["appName"]</h1>

    </body>

</html>
This code interrogates the AppState dictionary, in order to display the name of the application inside the <title> and <h1> tags.
A common use for the _AppStart.cshtml file is to initialize values for helpers that you use in your site–many of the available third-party helpers require initialization with API keys, usernames, etc.
![]() Caution You should take extra care to ensure that the code inside your _AppStart file is bug free, because if it fails to run the website won't start.
Caution You should take extra care to ensure that the code inside your _AppStart file is bug free, because if it fails to run the website won't start.
Folder Level Code
ASP.NET Web Pages checks for the presence of a _PageStart.cshtml in the folder containing the requested file, or any of the folders above it, and if found, runs them all, starting at the root folder, before the requested page is executed. If the _AppStart.cshtml file has not been run when a page is requested, it is run first; this is then followed by the execution of the relevant _PageStart.cshtml files, if they exist. Finally, the requested page is executed.
If a hierarchy of folders exists, each can contain a _PageStart.cshtml file. WebMatrix will start at the root folder level and run every _PageStart.cshtml file it encounters as it navigates its way down the folder hierarchy to the requested page.
Within the _PageStart.cshtml file, you make a call to the RunPage() method, which tells the server where in the _PageStart.cshtml file you want the requested page to run, as shown in Figure 4-16.

Figure 4-16. The _AppStart and _PageStart process.
As you can see in this diagram, _PageStart.cshtml can include code that is run before and after every page in a folder. The diagram also shows that if the _AppStart.cshtml file needs to be run, this will always happen first.
The most common use for the _PageStart.cshtml file is to set the layout page for every file in a particular folder. By declaring the location of the layout page in the _PageStart.cshtml file, it will be inherited by all other pages in that folder and those below. Other common uses include error handling and folder-level access restriction; you will look at all these techniques during the course of the book.
URLs and Routing
The URLs of the pages in your site can have a huge impact on the usability of your site and how it is indexed by the major search engines.
WebMatrix provides several tools for working with URLs, both in terms of making them human readable and search engine friendly, and for passing data between pages within the URL itself. This section will identify the most common of these methods, and how they can benefit your site.
Routing
ASP.NET Web Pages have built-in support for working with friendly URLS. Consider the following two URLs.
http://www.example.com/store/showProducts.cshtml?catID=12

http://www.example.com/store/categories/books
Clearly, the second one is easier for a human user to read, making it more likely to be hacked (i.e. it visualizes the site structure and allows users to move to higher levels of the information architecture by hacking off the end of the URL), but it is also much friendlier to search engine spiders, and can help improve your site's ranking on search engines such as Google. So how can you achieve this with WebMatrix?
If you have used ASP.NET MVC in the past (or possibly ASP.NET Web Forms), you will have used System.Web.Routing to provide a detailed routing table matching URL elements to controllers or files. In ASP.NET Web Pages, the built-in routing requires that URLs ultimately map to a physical file on the server. This sounds complicated, but in reality it is actually a simple concept. Take the second URL in the previous example– WebMatrix will take the URL and attempt to match the individual elements of the URL, from left to right, to physical files and folders on disk. If a match is found, the remaining elements are passed to the page as URLData (which will be discussed in more detail at the end of this section).
The search for a matching file in this case would adhere to the following steps:
- Is there a file at
/store/categories/books.cshtmlor/store/categories/books.vbhtml? If so, run this page. - Is there a file at
/store/categories.cshtmlor/store/categories.vbhtml? If so, run this page, and pass “books” in the URLData. - Is there a file at
/store.cshtmlor/store.vbhtml? If so, run this page, and pass “categories” and “books” in the URLData. - Is there a file at
/store/categories/books/default.cshtmlor/store/categories/books/default.vbhtml? If so, run this page. - Is there a file at
/store/categories/books/index.cshtmlor/store/categories/books/index.cshtml? If so, run this page.
If no match is found during this search, an HTTP 404– File Not Found error page is returned.
Passing Data in the URL
There are two types of data that can be passed in a URL. If WebMatrix performs the routing search described in the last section and has data to be passed to the page, it will pass it in the URLData collection.
Data can be retrieved from the URLData collection using an integral, zero-based index. For example, imagine you had a file at /store/categories.cshtml and a user browsed to
Web Pages would execute /store/categories.cshtml and pass the value “music” in the URLData, which you could retrieve in the categories.cshtml page with the following code
<!DOCTYPE html>

<html>

    <head>

        <title>URLData Example</title>

    </head>

    <body>

        <h1>Category: @UrlData[0].ToString()</h1>

    </body>

</html>
Data can also be passed in the URL in the form of a QueryString. A QueryString is a standard web format where name/value pairs are passed at the end of the URL following a question mark (?) character. Multiple name/value pairs can be passed, separated by an ampersand (&). For example
This data can then be retrieved using the pages' Request property, like so
@{

    string categoryID = "";

    string productID = "";


    if (Request.QueryString["catID"] != null)

    {

        categoryID = Request.QueryString["catID"].ToString();

    }


    if (Request.QueryString["productID"] != null)

    {

        productID = Request.QueryString["productID"].ToString();

    }

}
Notice that you are performing a check to see if the QueryString parameter exists before you try to access its value, to avoid a potential NullReferenceException.
![]() Caution It is important that you never trust the data being sent to you as part of a URL. It can easily be changed by the user, which can cause serious security issues. This type of vulnerability is known as an “Insecure Direct Object Reference,” and was exploited famously in 2011, to unlawfully gain access to accounts on a major banking web site by hackers who altered the account number passed in the URL, having previously logged in to a valid account.
Caution It is important that you never trust the data being sent to you as part of a URL. It can easily be changed by the user, which can cause serious security issues. This type of vulnerability is known as an “Insecure Direct Object Reference,” and was exploited famously in 2011, to unlawfully gain access to accounts on a major banking web site by hackers who altered the account number passed in the URL, having previously logged in to a valid account.
Summary
In this chapter, you have expanded your knowledge of WebMatrix by learning about ASP.NET Web Pages and the Razor syntax. You have learned how the Razor syntax is used to insert C# server-side code into ASP.NET Web Pages and how to use helpers and functions to maximize code reuse in your project. You have also seen how easy it is to achieve a consistent look and feel throughout your site using layout pages and partial pages. Finally, you learned different ways to maintain state in your application, run code before your pages execute, and made use of the ASP.NET Web Pages built-in routing system.
In the next chapter, you are going to look at ways to build some user interaction into your site through the use of HTML forms, and learn how to validate that interaction.