
C H A P T E R 5
![]()
Forms and Validation
Until now, our server-side code has provided dynamic content but it also has been a one-way operation—we have only been concerned with presenting content to the user. In this chapter we will learn how to make our sites much more interactive by taking user input and performing operations based on it.
User input is commonly gathered through the use of HTML forms; we can interrogate the form contents using Razor code once the form has been submitted. When we have learned how to retrieve the data from the submitted form, we will look at ways of validating the data submitted by users, both to ensure that they have submitted the required data and that any data they have supplied is in the format we are expecting.
The first section in this chapter deals with the mechanics and semantics of HTML forms. If you have little or no previous experience with creating dynamic interactive web pages, and consequently have not have spent much time working with HTML forms, this section is for you. If you are already an experienced web developer, perhaps currently using a different server-side technology such as Rails or PHP, you may wish to simply skim over this section.
![]() Note A good understanding of HTML forms is fundamental to the content in the rest of the book. Although prior knowledge of HTML is assumed, I have included the brief revision section on HTML forms at the beginning of this chapter as it is very possible for even an experienced web designer to have very little actual working knowledge of forms if they have no previous server-side coding experience.
Note A good understanding of HTML forms is fundamental to the content in the rest of the book. Although prior knowledge of HTML is assumed, I have included the brief revision section on HTML forms at the beginning of this chapter as it is very possible for even an experienced web designer to have very little actual working knowledge of forms if they have no previous server-side coding experience.
HTML Forms
HTML forms use a <form> tag to act as a container for an assortment of input controls to gather data from the user. The <form> tag has attributes that determine where the data captured by the controls in the form will be sent for processing (the action attribute) and how those data are sent (the method attribute).
The action attribute contains the URL of the page which will handle the submitted form data; in the majority of cases this will be the same page that contains the form. By default, if the action attribute contains an empty string, WebMatrix will pass the data back to the sending page. Nevertheless, it is good to be explicit to help keep your code readable.
The method attribute specifies the HTTP method that is to be used to send the form to the processing page. The attribute can contain one of two values: get or post. The get method appends the form data to the URI as a QueryString, whereas the post method includes the form data in the HTTP request and is not visible to the user. The get method has the advantage that the resulting URI (including the form data in the QueryString) can be bookmarked by the user—this is useful for bookmarking search results, for example. However, if the server-side code uses the submitted form data to make changes to persisted data (in a database for example), then the post method should be used to ensure security as the QueryString can be easily changed by the user in the browser's address bar.
<form action="page.cshtml" method="post">

    ...

</form>
Form Controls
Any HTML tag, except that defining another form, can be nested within a <form> start tag and a </form> end tag. The tags we are interested in here are the group of HTML elements known as controls—input, button, select, textarea, label, and fieldset.
The input tag
The <input> tag can display a number of different UI elements that are designed to gather data from the user in different ways; it is the most commonly used element by far. The exact characteristics of the control to be rendered by the input element are determined by the values of its various attributes. The most important attributes when working with <input> tags in WebMatrix are listed in Table 5-1:
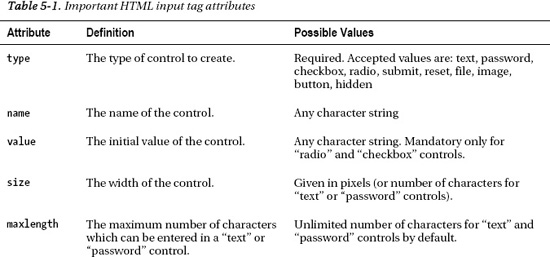
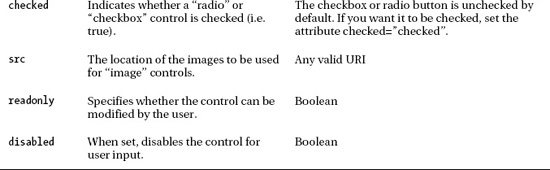
As you can see, the value of the type attribute actually determines which control is rendered to the page. The text and password input controls render a single-line textbox to the page designed to capture keyboard input. The two controls are essentially the same, except that the password control masks the user's input (see Figure 5-1).
<form action="page.cshtml" method="post">

    Username: <input type="text" name="username" maxlength="20" /><br />

    Password: <input type="password" name="password"  />

</form>
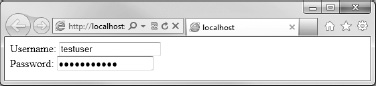
Figure 5-1. The text and password input controls showing user input
As you would expect, Razor code can be used to set the initial value of a control. Here, we set the initial value of a text control called startdate to the current date:
<form action="page.cshtml" method="post">

    Start Date:

    <input type="text" name="startdate" value="@DateTime.Now.ToShortDateString()" />

</form>
![]() Note If you have previous experience with ASP.NET Web Forms, you will know that, due to the architecture of the ASP.NET Web Forms model, it is restricted to a single form per page. The same is not true of ASP.NET Web Pages. With ASP.NET Web Pages, multiple, non-nested forms are perfectly acceptable within the same CSHTML page.
Note If you have previous experience with ASP.NET Web Forms, you will know that, due to the architecture of the ASP.NET Web Forms model, it is restricted to a single form per page. The same is not true of ASP.NET Web Pages. With ASP.NET Web Pages, multiple, non-nested forms are perfectly acceptable within the same CSHTML page.
Checkbox controls are designed to collect Boolean data. The string specified in the value attribute is the literal that will be sent as part of the forms data if the checkbox is checked when the form is submitted. If the checked attribute is set to a value of "checked", the checkbox will be checked on the initial rendering of the form (see Figure 5-2).
<form action="page.cshtml" method="post">

    Correct? <input type="checkbox" name="correct" value="true" checked="checked" /><br />

    Opt in? <input type="checkbox" name="opt_in" value="true" />

</form>
Figure 5-2. The checkbox control
Unlike checkbox controls, which work independently of each other, radio buttons are intended to be used in situations where a user ideally selects only one of a number of options. All options are given the same name and the string in the value attribute of the chosen option is passed to the form handler on submission. Because the radio button group might possibly be submitted with no value selected, prevent this behavior by ensuring that one of the options has the checked attribute set in the initial markup (see Figure 5-3).
<form action="page.cshtml" method="post">

    Color: <br/>

    <input type="radio" name="color" value="red" checked="checked" /> Red<br />

    <input type="radio" name="color" value="green" /> Green<br />

    <input type="radio" name="color" value="blue" /> Blue<br />

    <input type="radio" name="color" value="yellow" /> Yellow

</form>
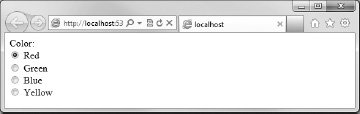
Figure 5-3. A group of radio button controls
The next code sample and screenshot (see Figure 5-4) show the various types of button control, listed here:
- The
filecontrol displays a file selection dialog box that allows the user to choose a file on their machine; this control is commonly used as part of a file upload process. - The
buttoncontrol simply renders a push button on the page. The push button has no default behavior and is designed to be used in conjunction with client-side scripting to react to events (when clicked, released, etc.). - The
resetbutton control simply resets all of the controls in the form to their initial values. - The
submitandimagebuttons fulfill the same purpose; they both send the form data to the server. Every form must have at least one submit or image button that, when clicked, will send the form data to the server using the method and action specified in the form tags attributes. The submit control renders a standard button with the text specified in thevalueattribute as the button's label. The image button uses an image, whose URI is specified in thesrcattribute, to decorate the button. For accessibility reasons, providing an alternate text, using the alt attribute, is important for image buttons.
<form action="page.cshtml" method="post">

    File control: <input type="file" name="userfile" /><br />

    Button control: <input type="button" value="Click Here" /><br />

    Reset control: <input type="reset" value="Reset Form" /><br />

    Submit control: <input type="submit" value="Submit Form" /><br />

    Image control: <input type="image" src="images/button.png" alt="click me" />

</form>
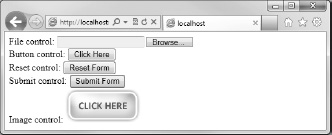
Figure 5-4. HTML button controls
The final type of input control is the hidden control. The hidden control is not rendered but its value is submitted with the form. This is generally used to store data that are meaningless to the user but are necessary for the server-side functionality of the form handler, such as an individual record's unique identifier. It is important to note that the hidden control is not secure and the value can be easily read by the user viewing the source of the page.
<form action="page.cshtml" method="post">

    <input type="hidden" name="id" value="abcd1234" />

</form>
The select tag
The <select> element is used to render a drop-down list. Each choice within the drop-down list is represented by an <option> element, whose content is rendered in the drop-down section of the drop-down list. The <option> element also contains an attribute called value, which is the actual data to be posted back to the web server as part of the form. The following code example and screenshot (see Figure 5-5) demonstrates the use of a <select> tag, where the name of each airport is displayed to the user, but the unique three-letter international code is sent to the server for processing:
<form action="page.cshtml" method="post">

    Choose an airport:

    <select name="airport">

        <option value="LHR">London Heathrow</option>

        <option value="LAX">Los Angeles International</option>

        <option value="SIN">Changi International</option>

        <option value="JFK">John F. Kennedy International</option>

        <option value="HND">Tokyo International</option>

        <option value="MIA">Miami International</option>

        <option value="FRA">Frankfurt International</option>

        <option value="CDG">Charles De Gaulle International</option>

        <option value="HKG">Hong Kong International</option>

        <option value="PEK">Beijing Capital International</option>

    </select>

</form>
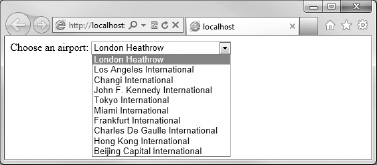
Figure 5-5. The select element
To set an initial value, the selected attribute can be applied to any one of the options with a value of selected (i.e. selected="selected"). Groups of options can also be brought together into logical clusters using the <optgroup> tag. The following code sample and screenshot, Figure 5-6, shows our airport drop-down list grouped by continent:
<form action="page.cshtml" method="post">

    Choose an airport:

    <select name="airport">

        <optgroup label="Europe">

            <option value="LHR" selected="selected">London Heathrow</option>

            <option value="FRA">Frankfurt International</option>

            <option value="CDG">Charles De Gaulle International</option>

        </optgroup>

        <optgroup label="North America">

            <option value="LAX">Los Angeles International</option>

            <option value="JFK">John F. Kennedy International</option>

            <option value="MIA">Miami International</option>

        </optgroup>

        <optgroup label="Asia">

            <option value="SIN">Changi International</option>

            <option value="HND">Tokyo International</option>

            <option value="HKG">Hong Kong International</option>

            <option value="PEK">Beijing Capital International</option>

        </optgroup>

    </select>

</form>
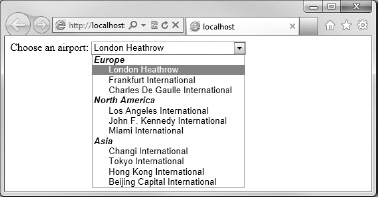
Figure 5-6. Clustering menu options using the optgroup tag
As you can see, the use of the <optgroup> tag makes the list much easier for the user to navigate; only the options, not the option groups, can be selected.
A common programming requirement is to want to populate the contents of a <select> tag with a list of values held in a collection, whether that collection has itself been populated as the result of a database query or by other means. Assuming that the collection you are iterating implements either IEnumerable or IEnumerable<T>, the easiest way to add the contents of a collection to a drop-down list is to use a foreach loop. In the following example we declare and initialize a generic list of months and add them as options to a select control:
@using System.Globalization;

@{

    Dictionary<int, string> months = new Dictionary<int, string>();


    // Populate the months dictionary with the month number and name

    for (int i = 1; i <= 12; i++)

    {

        months.Add(i, DateTimeFormatInfo.CurrentInfo.GetMonthName(i));

    }

}


<!DOCTYPE html>

<html lang="en">

<head>

    <meta charset="utf-8" />

    <title></title>

</head>

<body>

    <form action="page.cshtml" method="post">

    Month:

    <select name="month">

        @foreach (var month in months)

        {

            <option value="@month.Key">@month.Value</option>

        }

    </select>

    </form>

</body>

</html>
Although not often used, the <select> tag has a size attribute, which indicates the number of items to be shown in your list. When set, the browser will render a fixed list, or list box, instead of a drop-down menu. The list box works in every other way identically to the drop-down list.
The button tag
The <button> element creates a push button that operates in exactly the same way as the <input> element button control type; the only difference between the two control types is the <button> element's ability to contain HTML content—most usually, but not restricted to, styled text or images. The button's type attribute determines whether it is a submit, reset, or push button type.
The following markup renders the button shown in Figure 5-7:
<form action="page.cshtml" method="post">

    <button name="submit" type="submit">

        Submit

        <img src="images/tick.png" alt="Submit the form" />

    </button>

</form>

Figure 5-7. The button control has richer rendering possibilities than the input button types.
The textarea tag
The <textarea> element renders a multi-line text input control. The control is sized by specifying the number of rows and columns of text, using the rows and cols attributes. Unlike the <input> text controls, the initial value of the <textarea> element is contained between the <textarea> start tag and the </textarea> end tag, rather than in a value attribute.
The following code example and screenshot (see Figure 5-8) renders a textarea 40 columns by 10 rows in size, with some initial sample content. The actual textual content of the textarea has been shortened in the code example for clarity:
<form action="page.cshtml" method="post">

    Notes:<br/>

    <textarea name="notes" cols="40" rows="10">Lorem ipsum... </textarea></form>
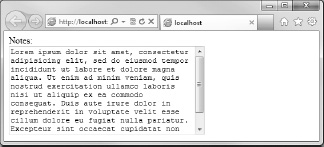
Figure 5-8. The textarea element renders a multi-line text box.
As with the <input> control types, the <textarea> has Boolean flags, readonly and disabled, which can be used to stop users from making changes to the content of the textarea, or to disable it completely.
The label and fieldset tags
The final two types of HTML form control that we are going to look at here are the <label> and <fieldset>. These controls are purely read-only controls that are designed to convey information to our users and organize our UI.
The <fieldset> tag is used to visually group controls on the page to aid users' understanding and navigation of the form. A <legend> tag can be added as the first child element of the <fieldset> tag to assign a caption to the fieldset.
The <label> tag is explicitly related to an individual form control (such as a textbox) via its for attribute, which must match exactly the value contained in the id attribute of the associated control. It is used to attach information to a control to present a visually improved user experience and to aid navigation and accessibility.
The following code sample and screenshot (see Figure 5-9) demonstrate the correct use of the <fieldset>, <legend>, and <label> elements to provide visual cues to the users of our forms:
<form action="page.cshtml" method="post">

    <fieldset>

        <legend>Personal Details</legend>

        <div>

            <label for="surname">Surname: </label>

            <input type="text" name="surname" id="surname" />

        </div>

        <div>

            <label for="forenames">Forenames: </label>

            <input type="text" name="forenames" id="forenames" />

        </div>

        <div>

            <label for="license">Current Driving License: </label>

            <input type="checkbox" name="license" id="license" />

        </div>

    </fieldset>

    <fieldset>

        <legend>Vehicle Details</legend>

        <div>

            <label for="make">Make: </label>

            <input type="text" name="make" id="make" />

        </div>

        <div>

            <label for="model">Model: </label>

            <input type="text" name="model" id="model" />

        </div>

    </fieldset>

    <div>

        <input type="reset" value="Reset Form" />

        <input type="submit" value="Save Details" />

    </div>

</form>
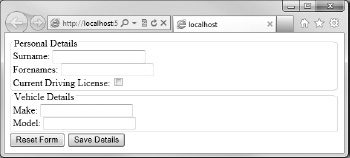
Figure 5-9. Improving the user interface using fieldset, legend, and label elements
You will notice that all of the <input> tags have id and name attributes. The id attribute is used to identify all HTML elements for style and scripting purposes, whereas the name attribute is used to access the value of form controls (see the Accessing Submitted Form Data section later in the chapter).
![]() Tip The World Wide Web Consortium (W3C) is the organization responsible for the development of web standards and they have excellent information on all aspects of HTML available on their web site. The section containing information specific to HTML forms can be found at:
Tip The World Wide Web Consortium (W3C) is the organization responsible for the development of web standards and they have excellent information on all aspects of HTML available on their web site. The section containing information specific to HTML forms can be found at: www.w3.org/TR/html5/forms.html
HTML Form Helpers
As you can imagine, creating forms in HTML can soon become a tedious and repetitive process. Fortunately, ASP.NET Web Pages provides us with some useful HTML helper methods for displaying form fields. The methods are all part of the HtmlHelper class and can save a considerable amount of development time when creating forms, as they offer a much terser, neater syntax.
For example, to create an input text control, instead of writing the following HTML:
<input id="description" name="description" type="text" value="" />
you can simply call the Html.Textbox() helper method and pass in the name, like so:
@Html.TextBox("description")
In this section, we'll take a quick tour of the form helpers and see some examples of use. They each share some common parameters, some obvious such as name and value and others that are not so obvious, such as htmlAttributes that defines the names and values of any other custom HTML attribute we wish to assign to the control we are creating. In the course of going over the following examples, I will explain any method parameters that may be less than apparent.
Html.TextBox(), Html.Password() and Html.Hidden()
The Textbox() helper renders a text input element with the specified name, value, and HTML attributes. It has the following four signatures:
public IHtmlString TextBox(string name)


public IHtmlString TextBox(string name,

                           Object value)


public IHtmlString TextBox(string name,

                           Object value,

                           Object htmlAttributes)


public IHtmlString TextBox(string name,

                           Object value,

                           IDictionary<string, Object> htmlAttributes)
The following code sample demonstrates the use of the Textbox() helper method and shows the actual HTML generated by the helper and emitted to the page:
@Html.TextBox("description")

@Html.TextBox("description", "Description goes here")

@Html.TextBox("description", "Description goes here", new { maxlength = "50",

                                                            @class = "valid-style" } )


@* Actual HTML sent to client... *@


<input id="description" name="description" type="text" value="" />

<input id="description" name="description" type="text" value="Description goes here" />

<input class="valid-style" id="description" maxlength="50" name="description"

       type="text" value="Description goes here" />
Note that in the last example, when creating the htmlAttributes object, we used the @ operator to indicate a verbatim string because class is a reserved word in C#.
The Html.Password and Html.Hidden helpers have the same set of overloads and work in exactly the same way, but they render either a password input control or a hidden input control, respectively.
Html.CheckBox()
The CheckBox() helper renders an HTML checkbox input control to the page and has the following six signatures:
public IHtmlString CheckBox(string name)


public IHtmlString CheckBox(string name, bool isChecked)


public IHtmlString CheckBox(string name, IDictionary<string, Object> htmlAttrributes)


public IHtmlString CheckBox(string name, Object htmlAttributes)


public IHtmlString CheckBox(string name, bool isChecked, Object htmlAttributes)


public IHtmlString CheckBox(string name, bool isChecked,

                            IDictionary<string, Object> htmlAttrributes)
The code sample below shows typical usage of the helper, followed by the actual HTML rendered:
@Html.CheckBox("approved")

@Html.CheckBox("approved", true)


@* Actual HTML sent to client... *@

<input id="approved" name="approved" type="checkbox" />

<input checked="checked" id="approved" name="approved" type="checkbox" />
Unfortunately, the HTML rendered by the CheckBox helper does not include a value attribute, which means that when the box is checked and the form is submitted the CheckBox returns the default value of “on”. In order to use the AsBool() extension method, which we will discuss later in this chapter, we need the CheckBox's value attribute to be set to “true”. We can accomplish this using the htmlAttributes parameter:
@Html.CheckBox("approved", true, new { value = "true" })which renders the HTML that we require:
<input checked="checked" id="approved" name="approved" type="checkbox" value="true" />
Html.RadioButton()
The RadioButton helper returns an HTML radio input control with the specified name, value, and other attributes. It has six overloads:
public IHtmlString RadioButton(string name, Object value)


public IHtmlString RadioButton(string name, Object value, bool isChecked)


public IHtmlString RadioButton(string name, Object value,

                               IDictionary<string, Object> htmlAttributes)


public IHtmlString RadioButton(string name, Object value, Object htmlAttributes)


public IHtmlString RadioButton(string name, Object value, bool isChecked,

                               IDictionary<string, Object> htmlAttributes)


public IHtmlString RadioButton(string name, Object value, bool isChecked,

                               Object htmlAttributes)
The following code sample demonstrates use of the helper and the resulting HTML output:
@Html.RadioButton("vehicleType", "car", true)

@Html.RadioButton("vehicleType", "truck")

@Html.RadioButton("vehicleType", "motorcycle")


@* Actual HTML sent to client... *@

<input id="vehicleType" name="vehicleType" type="radio" value="car" checked="checked" />

<input id="vehicleType" name="vehicleType" type="radio" value="truck" />

<input id="vehicleType" name="vehicleType" type="radio" value="motorcycle" />
Html.TextArea()
The TextArea() helper is very similar to the TextBox() helper, but it includes additional overloads to allow the developer to specify the row and col attributes:
public IHtmlString TextArea(string name)


public IHtmlString TextArea(string name,
Object htmlAttributes)
public IHtmlString TextArea(string name,
IDictionary<string, Object> htmlAttributes)
public IHtmlString TextArea(string name,
string value)
public IHtmlString TextArea(string name,
string value,
Object htmlAttributes)
public IHtmlString TextArea(string name,
string value,
IDictionary<string, Object> htmlAttributes)
public IHtmlString TextArea(string name,
string value,
int rows,
int columns,
Object htmlAttributes)
public IHtmlString TextArea(string name,
string value,
int rows,
int columns,
IDictionary<string, Object> htmlAttributes)
The following code shows the TextArea() helper method in use and the resulting HTML sent to the client:
@Html.TextArea("description", "", 10, 40, null)

@Html.TextArea("comment", "Please enter your comments")


@* Actual HTML sent to client... *@

<textarea cols="40" id="description" name="description" rows="10"></textarea>

<textarea cols="20" id="comment" name="comment" rows="2">Please enter your comments</textarea>
Html.DropDownList()
The DropDownList() helper method renders an HTML select control to the page. It has the following signatures:
public IHtmlString DropDownList(string name,

                                IEnumerable<SelectListItem> selectList)


public IHtmlString DropDownList(string name,

                                IEnumerable<SelectListItem> selectList,

                                IDictionary<string, Object> htmlAttributes)


public IHtmlString DropDownList(string name,
IEnumerable<SelectListItem> selectList,
Object htmlAttributes)
public IHtmlString DropDownList(string name,
string defaultOption,
IEnumerable<SelectListItem> selectList)
public IHtmlString DropDownList(string name,
string defaultOption,
IEnumerable<SelectListItem> selectList,
IDictionary<string, Object> htmlAttributes)
public IHtmlString DropDownList(string name,
string defaultOption,
IEnumerable<SelectListItem> selectList,
Object htmlAttributes)
public IHtmlString DropDownList(string name,
string defaultOption,
IEnumerable<SelectListItem> selectList,
Object selectedValue,
IDictionary<string, Object> htmlAttributes)
public IHtmlString DropDownList(string name,
string defaultOption,
IEnumerable<SelectListItem> selectList,
Object selectedValue,
Object htmlAttributes)
The selectList parameter accepts an IEnumerable collection of SelectListItem objects. The SelectListItem object is used to create an HTML option element and as such, it represents an item in an HTML select list (a drop-down list or list box). The SelectListItem class has three properties; Selected—which indicates whether the SelectListItem is currently selected; Text—which is the text to be displayed to the user; and Value—which is the content of the HTML value attribute of the HTML option element to be rendered.
The selectedValue parameter of the DropDownList() helper specifies the item in the list that is selected by default. The helper will select the first item in the list with a matching value, or if the item has no value, matching text.
The defaultOption parameter inserts an option tag with no value as the first item in the list and is used to communicate that no option has been chosen, either for optional fields or to facilitate the development of required field validation.
The following code sample shows typical use of the DropDownList() helper method and the resulting HTML:
@{

    var optionList = new List<SelectListItem>()

    {

        new SelectListItem { Value = "C", Text = "Cyan" },

        new SelectListItem { Value = "M", Text = "Magenta" },

        new SelectListItem { Value = "Y", Text = "Yellow" },

        new SelectListItem { Value = "K", Text = "Black" }
};
}
@Html.DropDownList("color", "Not selected", optionList, "M", null)
@* Actual HTML sent to client... *@
<select id="color" name="color">
<option value="">Not selected</option>
<option value="C">Cyan</option>
<option selected="selected" value="M">Magenta</option>
<option value="Y">Yellow</option>
<option value="K">Black</option>
</select>
This may seem a little long-winded at this stage for populating a list with static values, but in a later chapter you will see how this helper can be used to easily populate drop-down lists from a database.
Html.ListBox()
The ListBox() helper works in essentially the same way as the DropDownList() helper, but includes additional overloaded methods to give access to the size and multiple attributes of the rendered HTML select control:
@Html.ListBox("color", "Not selected", optionList, "M", 5, true)
These attributes can, of course, also be set using the htmlAttributes parameter:
@Html.DropDownList("color", "Not selected", optionList, "M",

                   new { size = 5, multiple = "multiple" })
Html.Label()
The final HTML helper method that we are going to look at in this section is Html.Label(), which simply renders an HTML label control to the page output. It has five signatures:
public IHtmlString Label(string labelText)


public IHtmlString Label(string labelText,

                         Object attributes)


public IHtmlString Label(string labelText,

                         string labelFor)


public IHtmlString Label(string labelText,

                         string labelFor

                         IDictionary<string, Object> attributes)

public IHtmlString Label(string labelText,

                         string labelFor

                         Object attributes)
The use of the Label() helper method and the resulting HTML output are shown here:
@Html.Label("Username: ", "username")

@Html.TextBox("username")


@* Actual HTML sent to client... *@

<label for="username">Username: </label>

<input id="username" name="username" type="text" value="" />
![]() Note The HTML helper methods we have seen in this section are all extension methods of the HtmlHelper class. Extension methods are a special kind of static method used to “add” methods to existing types, without the need to modify the existing type or derive a new one. Further information on extension methods can be found on the MSDN web site at:
Note The HTML helper methods we have seen in this section are all extension methods of the HtmlHelper class. Extension methods are a special kind of static method used to “add” methods to existing types, without the need to modify the existing type or derive a new one. Further information on extension methods can be found on the MSDN web site at: http://msdn.microsoft.com/en-us/library/bb383977.aspx
The MSDN web site also has further information on the HtmlHelper class at:
http://msdn.microsoft.com/en-us/library/system.web.webpages.html.htmlhelper.aspx
Handling Forms with WebMatrix
Now that we have a good understanding of HTML forms, we can look at ways of processing the form data submitted to the web server using WebMatrix. The first part of this process is identifying when a form has been submitted and displaying dynamic UI accordingly. This is accomplished in ASP.NET Web Pages through the use of the IsPost property.
In order to fully understand this process, it is important that we understand the entire form lifecycle; from initial request, through user submission to form data processing:
- Initially a browser requests a .cshtml web page
- The server executes the requested .cshtml web page. This generates a form with empty input controls, which is returned to the browser and displayed to the user.
- At the browser, the user fills in the form, and clicks a button to submit the form data to the server.
- At the server, the web page is executed again. Here we can use the
IsPostproperty to detect that the page has been posted back, and can therefore process the form data posted from the user.
The diagram in Figure 5-10 demonstrates this process:
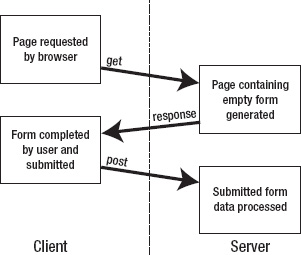
Figure 5-10. The form lifecycle
Identifying Form Submissions
The Boolean IsPost property of a WebMatrix page provides us with a simple and effective way to determine whether a form has been submitted by the user. Up to this point, clicking the submit button on a form has done nothing except post the page back to itself and restore the default values of any form controls. By interrogating the IsPost property, we can now ascertain whether the page has been requested as part of a form action and perform server-side processing as necessary. Typically, this server-side code would perform some calculation or data access function, but in the following code we will simply display a message to the user to inform them that the form has been processed.
![]() Note We will be looking at ways to implement data access code in the next chapter: Chapter 6 - Working with Data.
Note We will be looking at ways to implement data access code in the next chapter: Chapter 6 - Working with Data.
@{

    if (IsPost){

        <div>

            <em>Product details added.</em>

        </div>

    }

}


<!DOCTYPE html>
<html lang="en">
<head>
<meta charset="utf-8" />
<title>Add Product</title>
</head>
<body>
<form action="" method="post">
<fieldset>
<legend>Add New Product</legend>
<div>
@Html.Label("Name: ", "name")
@Html.TextBox("name")
</div>
<div>
@Html.Label("Description: ", "description")
@Html.TextArea("description", "", 5, 40, null)
</div>
<div>
@Html.Label("Price: ", "price")
@Html.TextBox("price")
</div>
<div>
@Html.Label("Discount Available? ", "discount")
@Html.CheckBox("discount", new { value = "true" })
</div>
</fieldset>
<div>
<input type="submit" value="Submit Form" />
</div>
</form>
</body>
</html>
If you take a look at the code block at the very top of this example, you can see that when the page is run for the first time the if(IsPost) conditional returns false (as the page is not being executed as the result of an HTTP POST request). Therefore, the code inside the if block, in this case the code displaying the success message, is not executed.
However, when the submit button is clicked and the form is posted back to the same server, the page will run again (due the value in the action attribute of the form), the IsPost property will evaluate to true, and the message will be displayed, as in Figure 5-11:
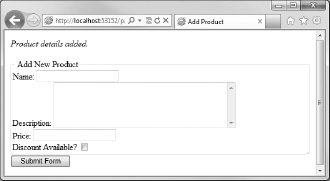
Figure 5-11. The message returned to the user when the IsPost property is true.
We can now determine when a form has been submitted and execute specific code accordingly. Our next task is to read the data sent to the server by the form as part of the HTTP POST request.
Accessing Submitted Form Data
The values of submitted form fields can be accessed via the Request object. Each item within the Request object is identified by a key that corresponds to the value of the name attribute of each of the fields within the form. For example, to access the value of the following input text control after a postback:
<input type="text" name="username" />
You would access the value stored in the Request object with a key of username:
Request["username"]
Let's make some changes to the code at the top of our page to provide some confirmation to the user when they click the Submit Form button, by pulling the data back out of the Request object. We'll do this by assigning the relevant values of the Request object to four string variables and then displaying the content of those variables:
@{

    if (IsPost){

        string name = Request["name"];

        string description = Request["description"];

        string price = Request["price"];

        string discount = Request["discount"];


        <div>

            <em>Product details added.</em><br />

            Product Name: @name<br />

            Description: @description<br />

            Price: @price<br />

            Discount Available? @discount<br />

        </div>

    }

}
Now, when the user fills in the form and clicks the submit button, they will see the confirmation text just above the form, as shown in Figure 5-12:
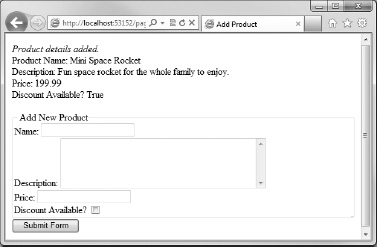
Figure 5-12. The confirmation seen by the user on postback.
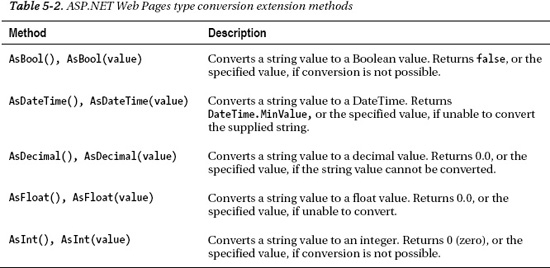
Form values are stored within the Request object as strings. Therefore, if we need to work with the value of the field as a DateTime, Boolean, or some other type we will need to convert it first. Web Pages provides five type conversion extension methods (defined in the StringExtensions class), as detailed in Table 5-2:
As an example, we can use these methods to determine whether a discount is available on our product and display to the user the discounted price, which in our case will be a 50% reduction.
We will accomplish this by using the AsBool() and AsDecimal() methods to convert the string value returned from the discount checkbox (which will return the string "true" if checked) and the price textbox. Once we have converted these values we can use them to test if a discount is available and, if so, display the discounted price (see Figure 5-13):
@{

    if (IsPost){

        string name = Request["name"];

        string description = Request["description"];

        decimal price = Request["price"].AsDecimal();

        bool discount = Request["discount"].AsBool();


        <div>

            <em>Product details added.</em><br />

            Product Name: @name<br />

            Description: @description<br />

            Price: @price<br />

            Discount Available? @discount<br />

           @if(discount)

            {

                <text>

                    Discounted Price: @(price / 2)

                </text>

            }

        </div>

    }

}
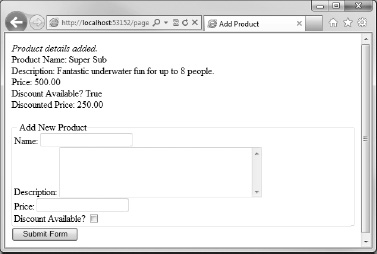
Figure 5-13. Showing the discounted price
![]() Note By interrogating the Request object in the way we have ( e.g. the Request[“key”]), we are actually interrogating the posted form for values as well as the URL for
Note By interrogating the Request object in the way we have ( e.g. the Request[“key”]), we are actually interrogating the posted form for values as well as the URL for QueryString values. Therefore it is important that you do not introduce any ambiguity by having form fields and QueryString values of the same name. If this is unavoidable, or you wish to be more explicit in your code, you can call the Request.Form or Request.QueryString methods separately. For example:
Request.Form["productName"]

Request.QueryString["productName"]
Validating User Input
In an ideal world, we would present the user with a form and they would fill it in correctly, in its entirety, before pressing the submit button. However, in reality, this often does not happen. People make mistakes, misunderstand what is being asked for, bypass fields, or in the worst case deliberately try to damage your site or its data by submitting potentially harmful values (see the section in this chapter on Form Security). To counter this, we can check the submitted form field values before we use them in our application and prompt the user to enter correct values and re-submit the form. This process is known as form validation.
Note the important difference between correct data and valid data. Just because data have passed our checks, and are therefore seen as valid, the data are not necessarily correct. In the majority of cases, we can only reasonably expect to check that data are within permitted ranges and are properly formatted. For instance, if a user is entering a Date of Birth, we can check that the date is within a reasonable date range, say between DateTime.Today and DateTime.Today.AddYears(-120), but we do not know if the date they have entered is factually correct. It is your job, when writing your validation logic, to ensure that data are valid and reasonable, and usable for successful completion of any subsequent operations. It is virtually impossible in most cases to check for absolute accuracy. After all, if we know what the value should be, why would we need to ask the user to supply it?
When to validate?
Form validation code can be written to take place either on the client browser or on the web server. Both techniques have advantages and disadvantages, which we will look at here before we discuss the ideal solution.
Server-side validation
Server-side validation is accomplished in ASP.NET Web Pages by writing Razor code, which is executed after the page is submitted by the user. If the validation passes, the data are processed as necessary and the program flow continues. However, if the validation fails the data are not processed; instead a response is sent back to the client, the page containing the form is refreshed and information is displayed to the user asking them to correct the relevant data and re-submit the form.
Server-side validation has two significant benefits to us as programmers. Firstly, we can write the validation logic in C#, which we know and love, and as such we can take full advantage of the classes and methods available to us in the .NET Framework as part of ASP.NET. Secondly, and more importantly, server-side validation is secure—it will always be executed, unlike client-side validation, which can be bypassed by the user.
The only real disadvantage to the server-side approach lies in the fact that the data must be submitted to the server before any validation occurs. This means that the user must fill in and submit the whole form before they get a response, which can in some cases provide a less than ideal user experience, particularly over a slow connection.
The diagram in Figure 5-14 describes the process flow involved in server-side validation. In the diagram, every time the process crosses the dashed line between client and server-side, an HTTP request is sent and a page refresh occurs.
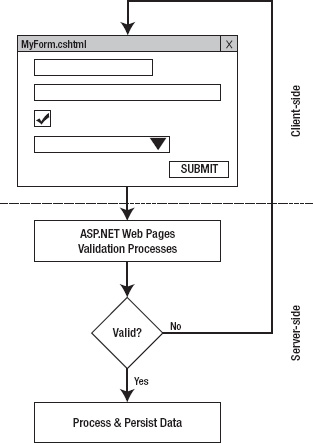
Figure 5-14. The server-side validation process
Client-side validation
Client-side validation is carried out in the browser before the data are submitted to the client. This is achieved using a client-side scripting language, such as JavaScript, or by the use of a combination of client-side technologies, commonly referred to as AJAX (Asynchronous JavaScript and XML). Taking this approach allows validation of a user's input as they type, rather than requiring a page refresh, which means a richer and more responsive user experience.
The big disadvantage to client-side scripting is that it can be easily bypassed by the user, who, by disabling JavaScript in their browser settings, also disables our client-side validation. For this reason, most developers choose to only use client-side scripts to provide guidance and feedback to the user, through features such as input masking, dynamic help, and tooltips, rather than relying on it for full input validation.
Figure 5-15 outlines the process flow involved in client-side validation. We can see that building the validation into the page results in only one trip to the server and instant feedback for the user.
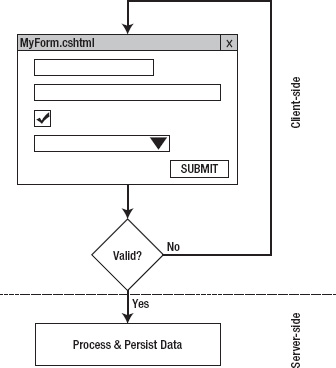
Figure 5-15. The client-side validation process
The best of both worlds
The best approach is clearly to use a ‘belt and braces' combination of the two. Ideally, you would use JavaScript to provide rich, responsive validation and feedback and back that up with server-side code to carry out a final comprehensive check before any data processing takes place. Using this design pattern means that, in the vast majority of cases, when JavaScript is enabled, the user gets the very best user experience. At the same time, when JavaScript is disabled on the client, validation and security are not compromised.
As this book is about ASP.NET Web Pages, a server-side technology, we will be concentrating on server-side validation. In any case, server-side validation cannot be ‘turned off', so it is the only choice if one must be made. Client-side is for vanity; server-side for sanity.
Figure 5-16 shows the process involved in this ideal method. The page is validated using JavaScript and, when deemed valid, passed to ASP.NET Web Pages for final validation before any data processing takes place. As I say, this is the ideal method, but it does require a lot of work. You should always ensure that your server-side validation routines are ‘watertight' before adding the JavaScript client-side functionality, as the server-side code that is your ultimate security checkpoint.
Client-Side Validation Frameworks
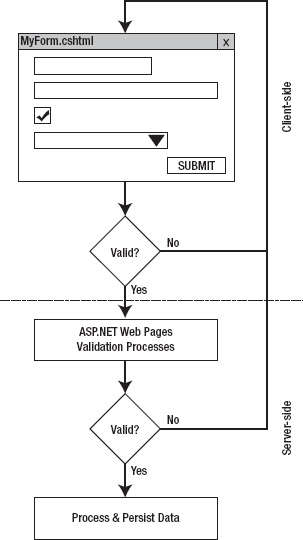
Figure 5-16. The ideal solution—a combination of client and server-side validation
Form Security
A malicious user could try to attack your web site in a number of ways, usually in an attempt to gain information or to submit falsified data. Two common types of attack targeted at HTML forms are Cross-site Scripting (XSS) and Cross-site Request Forgery (XSRF). In this section, we'll look at the ways that ASP.NET Web Pages can help you to secure your site against these types of attacks.
Cross-site Scripting (XSS))
Cross-site scripting (XSS) attacks exploit vulnerabilities in web page validation by injecting client-side code into form fields on web pages viewed by other users.
Whenever you accept some input from the user and redisplay it (as we have in this chapter with our ‘Add New Product' form), you are opening your site to potential XSS attacks. By default, ASP.NET prevents people from posting potentially dangerous values via a get or post request. Imagine that a user was to enter the following text into our forms product name field:
<script>alert(‘All your base are belong to us!')</script>
When they click the submit button they would, by default, be presented with an error similar to the one shown in Figure 5-17:
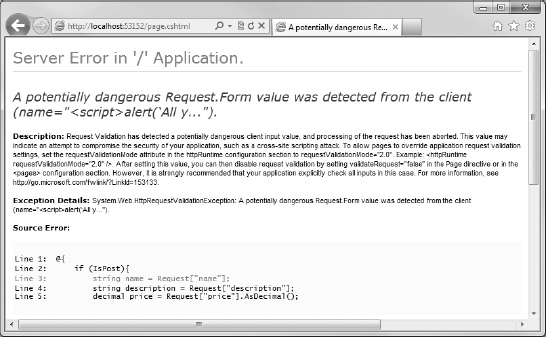
Figure 5-17. The error page seen on submission of potentially unsafe data
This may seem a little excessive for the example we have just seen that, if allowed to pass, would simply display a browser message box on the client. However, client-side scripts can be used in much more malicious ways; for example, to gain access to cookies storing important, sensitive information about the user, to steal an authenticated session, to manipulate files on the client computer, or even to record the keystrokes that a user makes while using a web site.
In some cases, you may want to allow your users to enter HTML into a form field; this is a common requirement in content management systems, for example. We can use the Request.Unvalidated() method to switch off the ASP.NET validation for individual form fields. For example, if we wanted to allow the user to enter HTML into our description field, we could do the following:
@{

    if (IsPost){

        string name = Request["name"];

        string description = Request.Unvalidated("description");

        decimal price = Request["price"].AsDecimal();

        bool discount = Request["discount"].AsBool();
<div>
<em>Product details added.</em><br />
Product Name: @name<br />
Description: @description<br />
Price: @price<br />
Discount Available?: @discount<br />
@if(discount)
{
<text>
Discounted Price: @(price / 2)
</text>
}
</div>
}
}
This would be fine if we wanted simply to validate the HTML for potentially harmful values and then store it away in a database, for example, but if we were to display it back to the user, as in the code sample above, they would see the encoded HTML returned, as shown in Figure 5-18:
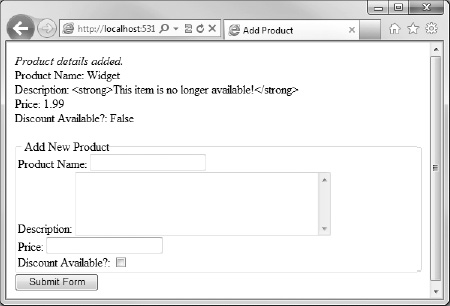
Figure 5-18. The result of calling the Request.Unvalidated() method
If we were happy that the submitted HTML was suitable, we could display it as intended in the browser by using the Html.Raw() helper method:
Description: @Html.Raw(description)<br />
This method prevents ASP.NET encoding the HTML and outputs it directly to the browser, as seen in Figure 5-19:
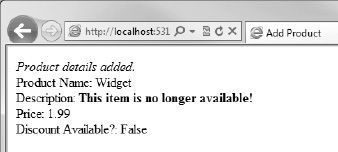
Figure 5-19. HTML encoding is prevented by using the HTML.Raw helper method.
Cross-site Request Forgery (XSRF)
Cross-site Request Forgery (XSRF) attacks occur when a user visits a malicious web site, often via an email or instant message. The web site covertly submits a harmful request on a site where the user is already authenticated. The malicious site carries out its attack by sending a forged request, which appears to come from a legitimately authenticated user, to the form handling code of a page. Real world examples of attacks carried out by this method range from gaining access to account information to submitting false orders and stealing money.
The most effective way to prevent an XSRF attack is to check that the HTTP POST request originates from the expected form within your site and does not come from an unknown source. ASP.NET Web Pages provides the AntiForgery class to help accomplish this.
The AntiForgery helper class has two public methods; GetHtml() and Validate(). The GetHtml() method creates an encrypted token, stores it in a cookie, and also adds it to the form within a hidden field. The Validate() method is called within the form handler and checks that the value within the hidden field matches the value stored within the cookie. If they do not match the form, processing stops and an exception is generated. This simple measure ensures that the request has come from the correct, legitimate form and has therefore not been forged.
The following code sample demonstrates the use of the AntiForgery class:
@{

    var username = "";


    if(IsPost) {

        AntiForgery.Validate();

        username = Request["username"];

    }

}

<!DOCTYPE html>

<html lang="en">

<head>

    <meta charset="utf-8" />

    <title>AntiForgery Example</title>

</head>

<body>
@if (IsPost)
{
<text>
<h1>Welcome, @username</h1>
</text>
}
<form method="post" action="">
@Html.Label("Username: ", "username")
@Html.TextBox("username")
@AntiForgery.GetHtml()
<input type="submit" value="Submit" />
</form>
</body>
</html>
Performing Form Validation
In this section, we will see how we can use ASP.NET Web Pages to perform server-side form validation. First off, let's create a form to validate. Our form will gather information about an employee:
<!DOCTYPE html>

<html lang="en">

<head>

    <meta charset="utf-8" />

    <title>Add Employee</title>

</head>

<body>

    <h1>Add Employee</h1>

    <form action="" method="post">

        <fieldset>

            <legend>Personal Details</legend>

            <div>

                @Html.Label("Forenames: ", "forenames")

                @Html.TextBox("forenames")

            </div>

            <div>

                @Html.Label("Surname: ", "surname")

                @Html.TextBox("surname")

            </div>

            <div>

                @Html.Label("Date of Birth: ", "dateOfBirth")

                @Html.TextBox("dateOfBirth")

            </div>

        </fieldset>

        <fieldset>

            <legend>Company Details</legend>

                <div>

                    @Html.Label("Department: ", "department")

                    @{

                        var departmentList = new List<SelectListItem>()
{
new SelectListItem { Value = "admin", Text = "Administration" },
new SelectListItem { Value = "hr", Text = "Human Resources" },
new SelectListItem { Value = "catering", Text = "Catering" },
new SelectListItem { Value = "dev",
Text = "Product Development" },
new SelectListItem { Value = "sales",
Text = "Sales and Marketing" },
};
}
@Html.DropDownList("department", "Not selected", departmentList)
</div>
<div>
<div>
@Html.Label("Employee ID: ", "employeeID")
@Html.TextBox("employeeID", "", new { maxlength = 4 })
</div>
</div>
</fieldset>
<div>
<input type="submit" value="Add Employee" />
</div>
</form>
</body>
</html>
Next, we'll add a code block to the top of our page to test the IsPost property and, if true, perform our data processing. For the purposes of this demonstration, we'll send the user to a “success” page using the Response.Redirect() method:
@{

    if (IsPost)

    {

        Response.Redirect("Success.cshtml");

    }

}
If we run the page in the browser, we can see that an empty form is displayed and if we click on the ‘Add Employee' button we will be redirected to Success.cshtml. However, we do not want an empty form to be submitted for processing, which at the moment is perfectly possible. In this example, we'll assume that the minimum information that we require about a new employee is their surname and employee ID, so our first piece of validation code will make these fields mandatory.
At the very top of the page, we will add some variables to store the values of our form fields. As we have seen in previous examples, when the submit button is pushed, the page is refreshed and the form fields are cleared. Clearly, we need to show the submitted data back to the user in the form to allow them to make corrections, so we will pass these variables to the value parameters of the various HTML form helpers we have used.
@{

    var forenames = "";

    var surname = "";

    var dateOfBirth = DateTime.MinValue;
var department = "";
var employeeId = "";
if (IsPost)

{

    forenames = Request["forenames"];

    surname = Request["surname"];

    dateOfBirth = Request["dateOfBirth"].AsDateTime();

    department = Request["department"];

    employeeId = Request["employeeId"];
@*Response.Redirect("Success.cshtml");*@
}
}
<!DOCTYPE html>
<html lang="en">
<head>
<meta charset="utf-8" />
<title>Add Employee</title>
</head>
<body>
<h1>Add Employee</h1>
<form action="" method="post">
<fieldset>
<legend>Personal Details</legend>
<div>
@Html.Label("Forenames: ", "forenames")
@Html.TextBox("forenames", forenames)
</div>
<div>
@Html.Label("Surname: ", "surname")
@Html.TextBox("surname", surname)
</div>
<div>
@Html.Label("Date of Birth: ", "dateOfBirth")
@Html.TextBox("dateOfBirth", dateOfBirth.ToShortDateString())
</div>
</fieldset>
<fieldset>
<legend>Company Details</legend>
<div>
@Html.Label("Department: ", "department")
@{
var departmentList = new List<SelectListItem>()
{
new SelectListItem { Value = "admin", Text = "Administration" },
new SelectListItem { Value = "hr", Text = "Human Resources" },
new SelectListItem { Value = "catering", Text = "Catering" },
new SelectListItem { Value = "dev",
Text = "Product Development" }, new SelectListItem { Value = "sales",
Text = "Sales and Marketing" },
};
}
@Html.DropDownList("department", "Not selected", departmentList,
department, null)
</div>
<div>
<div>
@Html.Label("Employee ID: ", "employeeID")
@Html.TextBox("employeeID", employeeId, new { maxlength = 4 })
</div>
</div>
</fieldset>
<div>
<input type="submit" value="Add Employee" />
</div>
</form>
</body>
</html>
Note that we have set the initial value of the Date of Birth field to DateTime.MinValue. By doing this, we help indicate to the user the format of the input we are expecting in this field. Also note that we have temporarily commented out the call to the Response.Redirect() method to allow us to test the functionality so far.
ModelState
Now we are in a position to carry out our first piece of validation, which will be to check that the surname and employee ID fields are not empty. If a field is empty, we simply want to record that fact and move on to the next part of the validation process; it would be a terrible user experience if we only told the user about validation errors one at a time and expected a fresh form submission for each. Once all the validations checks have been processed, we will then report back all of our findings to the user.
In order to achieve this, we will use the page's ModelState object to store a dictionary of errors (in the ModelStateDictionary). In ASP.NET the model refers to the entity represented in your form, which in our case is an employee; the ModelState object stores the state (i.e. the validity) of the data stored in our model. Once all the validations are complete we can interrogate the ModelState.IsValid property to determine whether the form contains entirely valid data—ModelState.IsValid will be set to false if any errors have been added to the ModelStateDictionary. We add validation errors to the ModelStateDictionary using the ModelState.AddError method, passing in a key (usually corresponding to the name of the control) and the relevant error message.
if (IsPost)
{
forenames = Request["forenames"];
surname = Request["surname"];
dateOfBirth = Request["dateOfBirth"].AsDateTime();
department = Request["department"];
employeeId = Request["employeeId"]; if (surname.IsEmpty())
{
ModelState.AddError("surname", "The Surname field is required");
}
if (employeeId.IsEmpty())
{
ModelState.AddError("employeeID", "The Employee ID field is required");
}
if (ModelState.IsValid)
{
Response.Redirect("Success.cshtml");
}
}
Displaying Validation Results
ASP.NET Web Pages provides us with a couple of helper methods designed to display validation feedback to users. The first of these methods, Html.ValidationSummary(), displays an HTML unordered list of all validation error messages held within the ModelStateDictionary. The second method, ValidationMessage(), displays the first error message found in the ModelStateDictionary which corresponds to the specified key.
We'll insert a ValidationSummary at the top of our page and a ValidationMessage next to the relevant form fields.
The validation helpers also assign a CSS class to the HTML regions they render. The CSS styles defined in the <head> of this code sample will help the users to identify the feedback by highlighting the relevant fields and validation error messages. As well as the ValidationSummary and ValidationMessage helpers, any form fields identified as keys within the ModelStateDictionary also get assigned a CSS class which can be used to alter the appearance of the relevant HTML tags.
![]() Tip The ValidationSummary gets rendered as an HTML
Tip The ValidationSummary gets rendered as an HTML <div> element with a class attribute of “validation-summary-errors”. The ValidationMessage helper renders a <span> element with a class attribute of “field-validation-error”, which is also assigned to the corresponding form control if the name of the control matches the key in the ModelStateDictionary.
While we are adding some CSS styles for our validation helpers, we'll take the opportunity to add some very basic styles to make our form a bit neater:
@{

   ... validation code, as before ...

}


<!DOCTYPE html>
<html lang="en">
<head>
<meta charset="utf-8" />
<title>Add Employee</title>
<style>
/* Form styles */
fieldset { margin: 0.5em 0; padding: 0.4em; }
fieldset div { clear: left; padding: 0.3em 0; }
fieldset label { float: left; width: 7em; text-align: right; padding-right: 0.4em;}
legend { text-transform:uppercase; font-weight:bold; }
/* Validation styles */
.validation-summary-errors { font-weight: bold; color: #FF0000; }
span.field-validation-error { color: #FF0000; }
input.field-validation-error { border: 1px solid #FF0000; background-color: #FFCCCC; }
</style>
</head>
<body>
<h1>Add Employee</h1>
@Html.ValidationSummary("Please correct the following errors:")
<form action="" method="post">
<fieldset>
<legend>Personal Details</legend>
<div>
@Html.Label("Forenames: ", "forenames")
@Html.TextBox("forenames", forenames)
</div>
<div>
@Html.Label("Surname: ", "surname")
@Html.TextBox("surname", surname)
@Html.ValidationMessage("surname")
</div>
<div>
@Html.Label("Date of Birth: ", "dateOfBirth")
@Html.TextBox("dateOfBirth", dateOfBirth.ToShortDateString())
</div>
</fieldset>
<fieldset>
<legend>Company Details</legend>
<div>
@Html.Label("Department: ", "department")
@{
var departmentList = new List<SelectListItem>()
{
new SelectListItem { Value = "admin", Text = "Administration" },
new SelectListItem { Value = "hr", Text = "Human Resources" },
new SelectListItem { Value = "catering", Text = "Catering" },
new SelectListItem { Value = "dev",
Text = "Product Development" },
new SelectListItem { Value = "sales", Text = "Sales and Marketing" },
};
}
@Html.DropDownList("department", "Not selected", departmentList,
department, null)
</div>
<div>
<div>
@Html.Label("Employee ID: ", "employeeID")
@Html.TextBox("employeeID", employeeId, new { maxlength = 4 })
@Html.ValidationMessage("employeeID")
</div>
</div>
</fieldset>
<div>
<input type="submit" value="Add Employee" />
</div>
</form>
</body>
</html>
The form and validation feedback now look like this (see Figure 5-20):
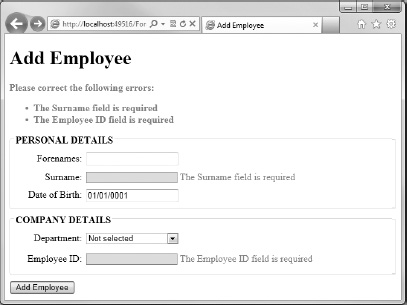
Figure 5-20. The ValidationSummary and ValidationMessage helpers
Building a validation library
Most validation routines fall into one of four categories; required field, comparison to a value, range checking, and pattern matching. Due to their capacity for reuse, form validations are ideally suited for implementation using functions. By using functions instead of re-writing the same, or similar, validation code in every page within our site, we can write a set of universal methods and call them whenever we need them, passing parameters to suit the situation.
The first category of validation routine—the required field—is implemented through the ASP.NET Web Pages IsEmpty() method, as demonstrated previously. So let's move straight to the second category: comparison.
In validation terms, comparisons are concerned with relating the value of a form field to another specified value. Our functions must allow us to apply the equality and relational operators (see Chapter 3) to submitted form field values. In order to do this, we'll create a series of public, static methods that take two parameters—the field value and the comparator—and return the result of the comparison as a Boolean.
We'll add a file called Validation.cshtml to the App_Code folder of the project and create a series of methods with generic parameters that will allow us to compare any data types that implement the IComparable interface:
![]() Note Any type that implements the IComparable interface can be compared with any other instance. The interface requires that any implementing types define a single method: CompareTo(Object). The use of the
Note Any type that implements the IComparable interface can be compared with any other instance. The interface requires that any implementing types define a single method: CompareTo(Object). The use of the where keyword in the following code sample simply ensures that any type passed into the method implements the IComparable interface.
This is a relatively advanced concept. If you are new to C#, do not be overly concerned with the syntax below; you should just understand that all native numeric types, Strings, Chars and DateTimes all implement IComparable, which means that we can compare them using the CompareTo() method.
Much more detailed information about the IComparable interface can be found on the MSDN web site at:
http://msdn.microsoft.com/en-us/library/ey2t2ys5.aspx
@* Validation Functions *@

@functions {


    @* Comparisons *@

    public static bool IsEqualTo<T>(T value, T comparator) where T : IComparable
{
return value.Equals(comparator);
}
public static bool IsGreaterThan<T>(T value, T comparator) where T : IComparable
{
return value.CompareTo(comparator) > 0;
}
public static bool IsLessThan<T>(T value, T comparator) where T : IComparable
{
return value.CompareTo(comparator) < 0;
}
public static bool IsGreaterThanOrEqualTo<T>(T value, T comparator) where T : IComparable
{
return value.CompareTo(comparator) >= 0;
}
public static bool IsLessThanOrEqualTo<T>(T value, T comparator) where T : IComparable
{
return value.CompareTo(comparator) <= 0;
}
}
Next we'll add some range validation. This method will require three generic parameters; the form field value, the minimum acceptable value (i.e. the bottom of the range) and the maximum acceptable value (i.e. the top of the range). The method will return a Boolean indicating whether the value is greater than or equal to (>=) the minimum value and (&&) less than or equal to (<=) the maximum.
@* Range Validation *@

public static bool IsBetween<T>(T value, T minValue, T maxValue) where T : IComparable

{

    return (value.CompareTo(minValue) >= 0 && value.CompareTo(maxValue) <= 0);

}
The final addition to our validation library, for the time being, will be involved with pattern matching. Our pattern matching functions will use regular expressions to match strings to common patterns, such as email addresses and URLs. These methods will simply accept a single string parameter and return a Boolean indicating the success of the match. Here we will implement four pattern matching functions; IsNumbersOnly(), IsLettersOnly(), IsAlphaNumeric() and IsValidEmail(). You may wish to add additional functions here in the future by replacing the regular expressions with your own.
![]() Tip Regular expressions are incredibly useful, but can be very long and laborious to design and test. A single expression can be hundreds of characters long (a popular one for checking URLs is over 500 characters for example). Fortunately a simple web search will provide you with an example regular expression for just about any common scenario, which you can then test and use within your validation library.
Tip Regular expressions are incredibly useful, but can be very long and laborious to design and test. A single expression can be hundreds of characters long (a popular one for checking URLs is over 500 characters for example). Fortunately a simple web search will provide you with an example regular expression for just about any common scenario, which you can then test and use within your validation library.
More information on Regular Expressions can be found on the MSDN web site at:
http://msdn.microsoft.com/en-us/library/hs600312.aspx
Here are our pattern matching methods:
@* Pattern Matching *@public static bool IsNumbersOnly(string value)
{
string expression = @"^[0-9]+$";
return System.Text.RegularExpressions.Regex.IsMatch(value, expression);
}
public static bool IsLettersOnly(string value)
{
string expression = @"^[A-Za-z]+$";
return System.Text.RegularExpressions.Regex.IsMatch(value, expression);
}
public static bool IsAlphaNumeric(string value)
{
string expression = @"^[A-Za-z0-9]+$";
return System.Text.RegularExpressions.Regex.IsMatch(value, expression);
}
public static bool IsValidEmail(string value)
{
string expression = @"^([a-zA-Z0-9_-.]+)@(([[0-9]{1,3}" +
@".[0-9]{1,3}.[0-9]{1,3}.)|(([a-zA-Z0-9-]+" +
@".)+))([a-zA-Z]{2,4}|[0-9]{1,3})(]?)$";
return System.Text.RegularExpressions.Regex.IsMatch(value, expression);
}
Using our validation functions
Your validation library will grow over time, but this first iteration will cope with the vast majority of validation requirements. To use the library, we can call the functions from directly from any page, as Validation.cshtml resides in the App_Code folder. The following example checks that the Employee ID submitted in our form falls within a range of 100 to 9999 and adds an error into the ModelStateDictionary if it does not:
if (!Validation.IsBetween(employeeId.AsInt(), 100, 9999))

{

    ModelState.AddError("employeeID",

        "The Employee ID must be between 100 and 9999 inclusive");

}
Because our comparison methods have generic parameters, we can call the same function to check that the date of birth falls between today and 100 years ago:
if (!Validation.IsBetween(dateOfBirth, DateTime.Now.AddYears(-100), DateTime.Now))

{

    ModelState.AddError("dateOfBirth", "Invalid Date of Birth");

}
If we use the AsDateTime() method to convert the string input from the textbox to a DateTime before we call our validation, any non-date formatted input, including a blank field, will be converted to DateTime.MinValue. Therefore, by using our validation function in this way, we can deal with an empty field and check that a date is valid and between ranges; three validations in one and no redundant checks.
It pays to plan your validation carefully to ensure that all bases are covered, not only for expected values, but also for the expected data types. There will always be someone who types “yesterday” into a date field or “three” into a numeric field; you must ensure that you can cope with all of these scenarios gracefully.
Summary
This chapter demonstrated how to create forms using both standard HTML and the helper functions supplied by ASP.NET Web Pages. We also learned how to detect form submission and interrogate HTTP POST requests to gain access to submitted form field values. Finally, we looked at ways of validating user input and created a universal validation library, using Razor functions, which we can use in future projects.
The next chapter deals with persistence—making use of the SQL Server Compact database provided as part of WebMatrix. This will combine with the lessons learned in this chapter to enable the building of interactive, data-driven web applications where users can create, edit, and store data for later use.