
Chapter Objectives
Recommend general principles for cluster infrastructure implementation
Identify common Linux infrastructure components used in a cluster
Detail configuration options for frequently used infrastructure services
Linux, the operating system, provides a number of infrastructure services that are essential to the proper operation of a cluster. These are the services that are necessary as you begin to install the cluster from a raw hardware state, and are essential to its continued operation. This chapter covers some of the infrastructure services, their relationship to the cluster, and their basic configuration. The configuration examples focus on Red Hat or Red Hat–derived Linux distributions.
The next several chapters cover a number of infrastructure services that support the operation of the other systems in the cluster. In many cases these services are located on dedicated systems in the cluster for both security and protection from compute-intensive interference. Which infrastructures services are necessary for your cluster is a design decision, driven by your system administration environment, the cluster's applications, and the functionality that they require.
The infrastructure services are not completely independent of one another. For example, the name resolution service is used by practically every subsystem and application that runs in the cluster—everything depends on it. Other services are used during specialized operations like cluster installation and system booting. The flow of the next several chapters is roughly in order that the services would need to be installed or activated in the cluster. A partial list of the possible infrastructure services is
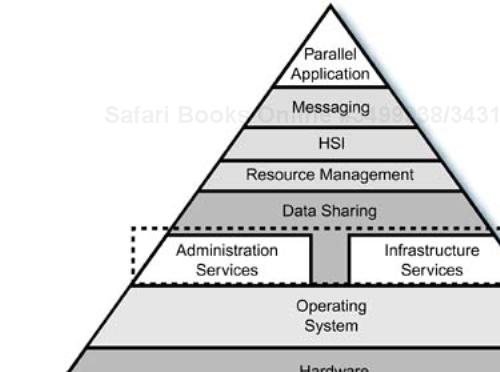
The functional location of these services in relationship to the rest of the cluster architecture is shown in Figure 10-1. The services “ride on top of” the Linux operating system and are usually included as a standard part of the distribution, unless server-specific packages have been omitted for marketing purposes. Whether a particular distribution's packaging of Linux contains the services you want is an important fact to verify. This is when selecting the proper version of the commercial distributions is important for your cluster's infrastructure.
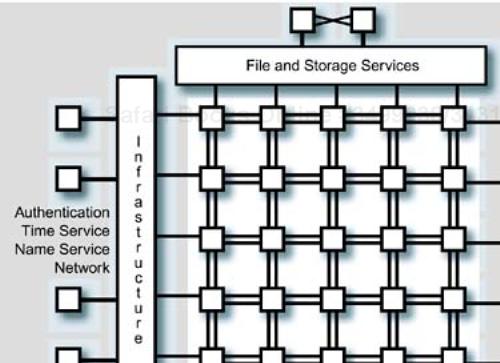
Your cluster hardware is completely assembled, racked, and cabled. Your racks are placed in the computer room, connected to power, and powered on. What is the next step? Where do you start? Some of the potential physical locations in the cluster architecture for the infrastructure and administrative services we will examine are shown in Figure 10-2.
There are administrative systems, master or head nodes, file servers, compute slices, and spares, all waiting to be configured. How do you install the services to bootstrap the cluster and allow the remaining installation tasks to continue? You do have a project plan and a design for the cluster's software stack, don't you? (See “Preliminary Solution Design” on page 32 for elements of the project plan and design).
Although the goal of configuring a cluster's software may be considered “creating a single system” activity, the details are similar to installing a “compressed” network environment, existing within one or more racks. Multiple networks, client–server-based services, management, routing, remote access, and other infrastructure are familiar to systems administrators working in distributed environments. The cluster requires the same sort of services that a “normal” network would require, and many of these services must be in place before the remainder of the “software stack” can be installed. They are direct dependencies for that software.
In this chapter, much of the software we configure will “live” on one or more administrative nodes, head nodes, and the systems providing local storage for administrative data. These systems run the services and provide the storage necessary for supporting the compute activities that take place on the compute slices. Let's roll up the sleeves of our Linux T-shirt and begin.
There are some general principles that we should outline before we start deploying the infrastructure services for a cluster. Some basic principles that hold true in any large, complex networked environment, are
Keep essential services separated from high-load (compute-bound or heavy user traffic) interference.
Choose services that support multiple copies for redundancy
Use services that have fall-back capabilities, possibly to another service for the same information.
Use single-point administration techniques whenever it is possible and consistent with the other suggested approaches (for example, a single version data source, but not SPOF).
Segregate services onto separate networks if they are high traffic or performance sensitive.
Provide services that are efficient and that do not interfere with performance.
Use version control and backups to protect configuration information.
Now is a good time to discuss these recommendations, before we start making software location and configuration choices for the infrastructure services.
It is obviously a bad idea to run infrastructure services on the cluster's compute slices, because the compute-intensive nature of the parallel activities will interfere with the performance of the service. The service software may also “get in the way of” the compute slice application activities. I discuss configuration of the compute slice environment separately, but it should be considered off limits to clusterwide, essential services that would interfere with their primary function.
In some cases, it is best to run a service on an isolated system, where the software is beyond user interference, and the hardware and operating system may be tuned for maximum performance. The file server or servers are a primary example of this type of situation. Let's discuss a file server as an example of an isolated service, for just a paragraph or two.
Most file server technologies, such as NFS, rely on caching mechanisms to reduce the number of physical reads or writes required for storage media. Although disk arrays have internal caches, the operating system on the file server also caches file system blocks in the system page cache, which resides in main memory. Any activities on the file server that disturb the contents of the page cache (backups or other file system activity) cause the cache contents to be overwritten and force extra physical I/O.
In addition to the caching interference, any process on the file server that takes CPU cycles away from its file-serving activities will interfere with those activities. There is no faster way to impact every file server client in the cluster than to slow down the file server system with nonessential activities. The general lesson is: Dedicate the necessary resources to an essential service, and do not succumb to temptation to use the system for other purposes (including development work or compute jobs), unless you are sure that there will be no “destructive interference” between activities.
Any service that is essential to the operation of the cluster should be protected by some level of redundancy or high availability. If the service becomes unavailable, you do not want the operation of the cluster impacted. There are several hardware areas, including the file server and head nodes, that are single points of failure.
Services that allow multiple copies of their server portion, coupled with client fail-over, should be configured to use that ability. Two examples of such services with built-in redundancy and fail-over are NIS and DHCP. The location of the primary and secondary copies of the services in the cluster is an important design decision.
NIS provides the ability to configure one master and multiple slave servers. Clients may be configured to bind to a specific server or to select the first server located by broadcast. If a server ever becomes unavailable, the client's binding will fail over to another master or slave server after a timeout.
The DHCP service may be configured with two servers sharing the responsibilities of managing the address pools associated with groups of clients or separate LAN segments. The two servers communicate together with a proprietary protocol, sharing the responsibility for assigning IP addresses in response to client requests. In the event of a failure, the DHCP peer protocol allows the surviving server to take over responsibilities for managing the pool, which is no longer shared with its (dead) peer.
In these two (and other) cases, implementation of redundancy requires specific planning and configuration actions. In the case of both DHCP and NIS, two servers must be configured and placed on separate systems. In both cases, the fail-over mechanism can hide any server failure from the client systems using the services.
An example of fall-back, at multiple levels, is the client system's name resolution service. The name resolution may be configured, via the /etc/nsswitch.conf name service switch file, to use multiple sources for host name information, including NIS, NIS+, DNS, and the local /etc/hosts file. The services may be accessed in a specified order and with a specified fall-back pattern should any of the sources of the service become unavailable.
For example, the name service switch may be configured to use DNS first, followed by the local hosts file. The DNS resolver file, /etc/resolv.conf, may be configured to use multiple DNS servers (up to three). When a host name needs to be resolved, the client system will attempt to use the DNS service first.
If neither of the DNS servers are available, then after the appropriate time-out, the client name resolution library will fall back to using the local hosts file. This type of arrangement allows us considerable flexibility in dealing with potential failures. The more immune a client (compute slice) system is to infrastructure failures, the more reliable it will be for its users and their applications.
Previously, we examined an example of configuring a name resolution service with multiple sources of information—namely, DNS and the local hosts file. But what is the correct (or best) order to specify the configuration of the services? Let's use this example to illustrate “single-point administration” as a design choice in a cluster.
The possible ordering of the two services in the name service switch are (1) first use the file /etc/hosts, followed by DNS, and (2) first use DNS, followed by the /etc/hosts file. The DNS service distributes its information from a single set of configuration files on the server system, with DNS replicas using identical copies of the same configuration files. The host information in the /etc/hosts file needs to be replicated on every system.
Comparing the two possibilities, we see that making changes or additions to the host names in the cluster would require updating all /etc/hosts files on every system, whereas a DNS change involves updating the DNS configuration information and one or two replicas. The number of systems “touched” in the process is lower with the DNS approach, and the potential impact to the cluster is lower in terms of interfering with jobs that are executing.
The design choice we make depends on the type of service we are choosing and our implementation options (in other words, what are the administration characteristics of the services from which we have to choose). Some possible considerations for making this type of single-point administration design decision are
Minimizing the number of systems touched as a result of a change
Minimizing the amount of impact to running jobs from a change
Minimizing the potential for configurations to get “out of sync” across the cluster
Minimizing system administration effort required to effect the change
Careful thought and single-point administration approaches can minimize impact to the cluster and the amount of system administration effort needed to keep infrastructure services operational and their configurations up-to-date.
Your choice of infrastructure services, if not carefully considered, can have unexpected performance consequences in your cluster. There are some service choices that are best avoided, if possible. One of these services, at least with regard to providing host name lookup, is NIS.
Although NIS is a very useful single-point method of distributing user login information, group information, automounter maps, and host name information, it also may have unexpected performance impacts. For example, if you are using NFS, every mount by a remote client requires a host name lookup to validate the IP address in the request. NIS can be a very slow name resolution service, sometimes taking on the order of seconds to look up and return the IP address to name mapping.
The NFS mount daemon on some UNIX implementations is single threaded, meaning that it processes a single request before moving on to the next one. Part of this processing is a name resolution request for the IP address of the mounting host, which may cause the daemon to block while waiting for the reply from the name resolution service. This is a performance bottleneck that is only made worse by slow name resolution service response for each mount request.
Although this situation may or may not be present in a given implementation of Linux (and tests in my network did not detect a problem), it serves as a good lesson for those of us designing infrastructure services: Choose services that make efficient use of resources and do not slow down the systems that depend on them. Name resolution is central to the operation of the networked services in a cluster and we better make sure it works quickly and efficiently. We should also be on the lookout for other services that are direct dependencies of other essential system services.
When making changes to system configuration information, particularly configuration files, it is a very good idea to be able to back out changes if they don't work. The ability to revert to a previous version of a configuration file set implies some form of what is called revision control or configuration management in the software development world. Fortunately, we can use Linux tools that are targeted at software development to perform this function for us.
In a large and complex environment, with multiple system administrators, version control, which usually incorporates a “checkin” and “checkout” process for files under its control, can help prevent stepping on each other's work. Check out a file, make changes to it, test it, then check it back in—and while the file is checked out, you have exclusive access to it. The check-in step creates a new version of the file within the version control software, preserving the old versions and their lineage.
TIP
Using some form of software configuration management technique to manage versions of configuration information is essential to the professional operation of a cluster. View configuration changes as software updates, and apply the same change, test, release process that software developers use.
There are two easy choices for version control tools on many Linux distributions: the revision control system (RCS) and the concurrent version system (CVS). Both tools come with the standard distributions of Linux, mainly because they are used in one form or another by the software development community. The formality of your configuration management approach depends on the requirements of your environment.
For a minimal amount of impact to your “normal” procedure, yet to add the benefits of revision control to your environment, you should consider
Having a central repository for configuration files
Adding revision information to a header in the files, using, at a minimum, functionality similar to
$Id$provided by RCSBacking up the configuration information on a regular basis
As a simple example, adding lines to a file that consist of
#!/bin/sh
# $Id$
#
will expand to
#!/bin/sh
# $Id: config.sh,v 1.1 2004/02/28 17:04:34 rlucke Exp rlucke $
#
when the file is checked in to, and then out of, the RCS facility. Just the addition of a simple version header like this can help track down issues with configuration problems. (If you are not familiar with the operation of RCS, you can get an introductory command tutorial by issuing the man rcsintro command.) The larger your administration team and the more complex your cluster, the more necessary version control becomes.
In addition to saving the version history of your configuration files, there are tools, such as tripwire, that can save a database of checksum information for the “active” copies of important system configuration files and programs. The database for a given system is created, and at regular intervals the tool compares the saved checksum information with that of the current system configuration files. Any changes to protected files are flagged for attention by system administrators.
Tools of this type are intended to detect intrusions and the activities of hackers that modify system files and configurations to gain control of the system. This type of protection is especially important if a system is to be connected directly to the Internet, where it is visible and potentially accessible by hackers. Tools like tripwire should be installed, and careful attention should be paid whenever there is the potential for a system's configuration to be modified by unwanted visitors or untrustworthy users.
To prepare for loading the infrastructure services on your cluster, you need to think about the following items:
Access to the console of the systems being loaded
The order of installation of the administrative/infrastructure servers
Dependencies (in other words, the need for stable storage) for loading activities, which can determine the order of installation
Checking your activities against the plan for the cluster's infrastructure
There are a certain number of “chicken-and-egg” issues to overcome: You will likely not have all the console access facilities in place, the networks will not be “live” and configured, and the file server won't be available. You are, after all, in the process of bootstrapping the cluster's software infrastructure from “scratch.”
You have to start somewhere. I usually like to start with the file server, because that enables stable storage for the other infrastructure configuration information (Linux packages, configuration files, system images, scripts, and so on). In small clusters, this may mean starting with the master nodes, because the local storage on these systems may substitute for a file server (this is not the best choice of configuration).
If there is a need for downloading software to the cluster environment from the Internet, this can be a strong argument for starting with the master nodes and enabling the external connection early during the installation process. This may work in trusted network environments, but for security-conscious installations, an external connection at any time prior to having all security facilities in place may not be advisable. You will be able to make the proper choice based on your experience level and the local environment.
A representation of a cluster's administration and infrastructure components is shown in Figure 10-2. Although the “Job Scheduling and Access,” “Infrastructure,” and “Administration” functions are shown located on separate systems in the figure, in reality the separate components may be placed on shared system resources in the cluster. How these services are located is part of the overall design of the cluster's software stack. The “File Services and Storage” functionality should be located on separate resources. A recommended installation order is
The compute slices depend on most of the other services for their operation, which is why they are late in the installation process. Administrative services are important to the operation of the cluster and troubleshooting its operation, but the monitoring features require some compute slices to be installed with which to test. Do not make the mistake of partially installing the cluster software and then giving your users free run of the system while you are trying to complete the installation!
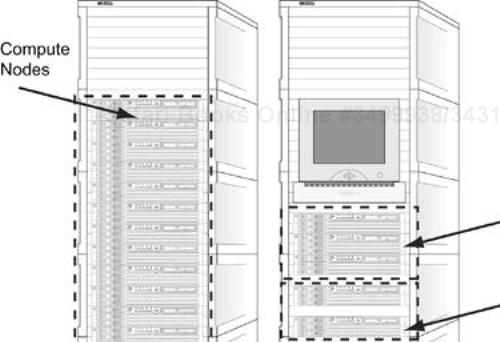
An example cluster hardware configuration with two master nodes, two infrastructure nodes, one file server, one spare node, and 16 compute slices is shown in Figure 10-3. We will use this configuration as an example of how to approach installing the software infrastructure for the cluster. We will examine a general outline, in terms of high-level steps, and future sections will outline some of the specific configuration actions for the subsystems involved. If you haven't seen the subsystems mentioned in the outline, don't worry; they are covered in upcoming sections.
For this configuration, let's assume that the file server will provide NFS; the name services will be provided by a combination of DNS, NIS, and the /etc/hosts files; NTP will be used for time synchronization; user account information is provided by NIS; Kerberos is configured along with SSH for remote access and authentication; and SystemImager will be used for network installation of the Linux operating system.
Configure any networking equipment and console management equipment with their default gateway and IP address information.
Install and update the Linux operating system on the two infrastructure nodes, using RAID 1 to mirror the system disks.
Initialize SSH access for the root account between the two infrastructure nodes.
Install the PDSH on the two infrastructure nodes to use for executing parallel commands between the two infrastructure systems.
Create minimal
/etc/hostsfiles containing the host information for the infrastructure nodes, master nodes, NFS server, switches, and default network gateways.Configure DNS on the two infrastructure nodes with the expected cluster information, including the network addresses and names for all compute slices, infrastructure nodes, spare nodes, master nodes, switches, and console management devices on all networks present in the cluster.
Configure a master and a slave NIS server on the two infrastructure nodes.
Build and push the minimal NIS
passwdandgroupmaps between the master and slave servers.Configure the infrastructure nodes'
/etc/nsswitch.conffile to use the NIS and DNS services, along with fall-back to/etc/hosts.Verify proper name service operation and fall-back.
Configure the DHCP server and a fail-over copy on the two infrastructure nodes, and populate the configuration files with MAC address and host information.
Verify proper DHCP operation and fall-back.
Configure a master and a slave Kerberos key distribution center (KDC) and administrative server on the two infrastructure nodes.
Install and update the Linux operating system on the NFS server, using RAID 1 to mirror the system disks.
Configure channel bonding between the NFS server and the core Ethernet switch.
Add the NFS server's root account to the SSH information for remote access.
Install PDSH on the NFS server to allow parallel command execution.
Configure and export the NFS server's storage.
Perform initial tuning of the NFS server subsystem.
Install and configure TFTP and
pxelinuxon the infrastructure server targeted for the system installation service.Replicate the TFTP and
pxelinuxinstallation to the second infrastructure server as a future backup.Install and configure the
SystemImagerserver and configuration files on both the two infrastructure servers, using the NFS server as storage for images.Test the
pxelinuxnetwork booting procedure from both infrastructure servers, one at a time.Install the
SystemImagerclient on both infrastructure servers and the NFS server.Use
SystemImagerto capture images of both infrastructure servers and the NFS server.Install and update the Linux operating system on one of the master nodes, using RAID 1 to mirror the system disks.
Configure channel bonding between the first master node and the external network.
Configure network connections between the master node, the internal cluster networks, and the external network.
Enable name service client (
/etc/resolv.confand/etc/nsswitch.conf) on the master node.Configure the Linux firewall, if desired, on the first master node, allowing only minimal protocol access (SSH and NTP).
Create NFS automounter maps for user home directories, administration information, project storage, and any other required NFS data mappings.
Enable the NFS client and automount file system (
autofs) on the first master node and the infrastructure nodes, if desired.Install the
SystemImagerclient on the master node.Capture an image of the first master node with
SystemImagerand replicate it to the second master node.Install and verify the second master node.
Create a user account and push the NIS map information.
Test the new user account's access to the NFS file server and other cluster resources.
Install and update the Linux operating system on the spare node (the image from this system will become the
SystemImager“golden client”), using RAID 1 to mirror the system disks.Configure the spare node to use the client services for Kerberos, NFS, NTP, NIS,
autofs, and the name services.Configure the spare node's network access to cluster resources.
Capture an image of the spare node to install on the other compute slices in the cluster.
Test a network installation of one of the “blank” compute slices in the second rack (remember that?).
Troubleshoot the network installation of the blank compute slice until it works properly (network configurations are correct, disk mirroring works, and so on).
Boot and install the remaining compute slices.
Verify all IP, host name, MAC, and other configuration information on all the clients.
Capture all SSH keys necessary for remote access, generate the
rootuser'sauthorized_keys2andknown_hostsfiles.Place the two SSH files in the proper location in the
SystemImagerimage for the compute slices and execute anupdate-clientcommand on each of the clients.Test remote access to all the compute slices.
Verify that all
SystemImagerimages are up-to-date with respect to what is installed in the cluster.
These steps should put you in the position of having a cluster with a functional infrastructure and an operational starting point for loading the next layer of software, which includes monitoring tools, load balancing, HSI libraries, and applications. It is important to verify that both “normal” users and root have the proper access to the correct resources. Users should be prevented from accessing resources on the management network without proper authorization, but should be able to access their home directories and other permitted information on the NFS file server.
The steps outlined here are detailed in the sections on the individual services and the associated configuration steps. How long it takes you to reach a point where you have a stable infrastructure will depend on a number of factors, including
The size of the cluster
The stability of the operating system and hardware combination
The number of required infrastructure services
Your level of experience with the required administration steps
How much preparation was done prior to the start of the installation process (in terms of design, planning, investigation, and downloading of required software)
The readiness of the environment (power, network connections, and so on)
Ideally, an experienced cluster builder can get a hardware configuration similar in size to the example cluster to the stable infrastructure state in approximately two (long) days.
Because of the real world and the “pi Principle” (the length of time actually needed for any project is roughly 3.1415 times the predicted time), this ideal situation is almost never realized. As you dig into the upcoming sections, you will see that the amount of latitude in configuration of the subsystems leaves a lot of room for mistakes and oversights.
Once you have chosen the starting point for the administrative node configuration, loading an operating system goes much faster if you have a graphical point-and-click interface. Because the systems may have a minimal graphics capability built in, temporarily connecting a graphics monitor, keyboard, and mouse will get you started. The presence of a KVM switch connected to the systems being loaded will also give you a flexible way to work on several systems in parallel by sharing a graphics monitor, keyboard, and mouse.
As part of loading the Linux operating system on to the administrative nodes, you need to decide which packages to include. The server portion of services like NFS, NIS, NTP, DHCP, and TFTP are necessary to provide services to client systems. There also will be required packages for services like measurement and monitoring that will be loaded later—for example, the Apache Web server may be required for Web-based tools. Packages from outside the Linux distribution will have dependencies that you must consider.
One reason to trim unnecessary packages is to make the system footprint or image smaller. If you are going to capture a snapshot or image of the system later (I describe the methods for doing this in a later chapter), the time required for saving and restoring a system image is smaller if the system footprint is smaller. Trim unwanted packages, but be sure not to trim too far—understand the package dependencies.
Part of loading the operating system is configuring the local disks. Information and recommendations for this step are covered in Chapter 9, “Linux Local Disk Storage” on page 188. Once the disks are configured and the operating system is loaded, you can start performing the basic configuration of the administrative nodes. In the following sections, we look at some of the essential configuration steps that may be needed in your cluster.
Linux has been used for years in ISPs to create the infrastructure needed for access to the World Wide Web. Not only are the networking capabilities of Linux feature rich, but they have been thoroughly “wrung out” by demanding users. In addition to the general network availability for network services, there are several specialized capabilities of which we can make good use in our cluster.
The exact configuration needs of your Ethernet switches will depend on the manufacturer of the switch and the model you are using. Most managed switches will come from the factory with a default configuration for their IP address and console passwords. You may not need to perform any configuration steps to get the switch to connect the systems in your cluster, but there will be work needed to integrate the switches into the management scheme that you will use.
Making connections from the cluster to external networks, internally configuring the file server links, and verifying management access to the switch equipment via their serial console switch (if present) connections may be necessary to prepare for infrastructure loading. After all, testing the infrastructure will require a network, at least in the management rack and with the involvement of the cores switch. Steps for configuring the switching equipment may include
Connecting to the switch via a serial port with either the serial console switch or a laptop computer[1]
Setting the access password for the switch's management console
Setting the switch's management IP address
Configuring routing
Configuring any port trunking that is required
Whether you install the infrastructure systems or configure the network switches first is a matter of preference (and scheduling of resources). Once the installation of the administrative nodes is started, you can attend to the switches while the operating system is loading. The network interfaces on the systems being loaded may not be configured properly if a connection to network equipment is not detected.
As we discussed in Chapter 6, an Ethernet switch will flood all frames to all ports unless VLANs or some other filtering technique is employed. This means that all traffic within the switch is presented to a system attached to one of the switch's ports, and the Ethernet interface will receive all traffic, discarding the frames that are not applicable to its MAC address.
Although the compute slices in the cluster have up to three physical interfaces—tied to the management, data, and control Ethernet networks—other systems, such as the administrative nodes, may have only one physical Ethernet interface, yet need access to all three of the networks. The particular networks and their traffic may be there, “within the switch,” but we need a way to convince Linux to allow us to access the networks and their attached devices from systems that may have only a single Ethernet interface.
We can do this by creating network “aliases” to the existing Ethernet connection—for example, eth0. Remember that UNIX Ethernet interfaces are configured with the ifconfig command, which specifies details like the IP address associated with the interface, the net mask, and the broadcast address.
Example output from the ifconfig command is
# ifconfig eth0

eth0 Link encap:Ethernet HWaddr 00:06:25:04:DE:4E
inet addr:192.168.0.110 Bcast:192.168.0.255 Mask:255.255.255.0
UP BROADCAST RUNNING MULTICAST MTU:1500 Metric:1
RX packets:20115040 errors:0 dropped:0 overruns:0 frame:0
TX packets:26310592 errors:4 dropped:0 overruns:0 carrier:0
          collisions:0 txqueuelen:100
RX bytes:3210027801 (3061.3 Mb) TX bytes:2223080970(2120.0 Mb)
 Interrupt:9 Base address:0x1400
To create a network alias for the eth0 interface, we would issue the following command:
# ifconfig eth0:0 10.0.1.1 netmask 255.255.248.0
      broadcast 10.0.7.255
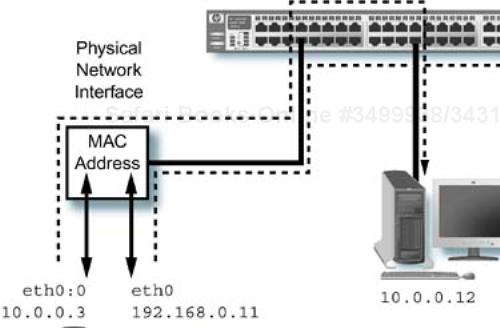
What we have just done is “attached” a new IP address for a completely different network to the physical interface eth0 and called it eth0:0. The alias is added after the Linux device name by affixing a “:” character followed by a string (usually numerical, but not required to be such). (Documentation is located in /usr/src/Linux-2.4/Documentation/networking/alias.txt if you have the kernel source RPM package installed. The possible length of the string for an alias is not specified in any documentation that I could find, and it appears that assumptions are made about the length of this field. It is best to stick with numerical alias strings for safety's sake.) We could just have easily attached another (unique) IP address in the same network as an alias—for example, 192.168.0.231.
We can now “ping” this address from other systems and use it in the alternate network as if it were a separate physical interface with its own IP address. It is indeed, an “alias” for the existing physical interface and is handled like any other IP address by the system. The output of the ifconfig command shows, however, that the network alias has the same MAC address as the physical interface card that previously handled only the configuration for eth0:
# ifconfig eth0:0

eth0:0    Link encap:Ethernet HWaddr 00:06:25:04:DE:4E
inet addr:10.0.0.1 Bcast:10.0.7.255 Mask:255.255.248.0
          UP BROADCAST RUNNING MULTICAST MTU:1500 Metric:1
          Interrupt:9 Base address:0x1400
In addition to sharing the MAC address, which is a hardware quantity, the network alias does not have any of its own interface-level statistics (receive or transmit byte counts, and so forth) reported; these are associated with the physical interface. An example of an Ethernet alias is shown in Figure 10-4.
Another way of examining the relationship between a network alias and the physical interface is to use the Linux ip command. This command is frequently listed as the preferred method of viewing and manipulating Linux network configuration information, like ARP cache behavior, route table entries, interface configuration, and other operations that UNIX system administrators are used to performing with ifconfig.
It also allows access to some of the more esoteric features, like TCP/IP traffic shaping and output queue processing, but you have to work a little to find the information in the system documentation for this command. (This is not really fair. The man page for the ip command points to the actual documentation for the command, which is located in /usr/share/doc/iproute-2.4.7/ip-cref.ps. You can use the gv or the ghostscript commands to view the file. It would be nice to have a man page for it, however.) An example output from the ip command for our network alias is
# ip addr show

1: lo: <LOOPBACK,UP> mtu 16436 qdisc noqueue
    link/loopback 00:00:00:00:00:00 brd 00:00:00:00:00:00
    inet 127.0.0.1/8 brd 127.255.255.255 scope host lo
2: eth0: <BROADCAST,MULTICAST,UP> mtu 1500 qdisc pfifo_fast qlen 100
    link/ether 00:06:25:04:de:4e brd ff:ff:ff:ff:ff:ff
    inet 192.168.0.110/24 brd 192.168.0.255 scope global eth0
    inet 10.0.0.1/21 brd 10.0.7.255 scope global eth0:0
Another, more abbreviated, form for the same command that yields the same output is
# ip addr
Notice that the output from the command shows the link index (N:), which uniquely identifies the interface, the physical interface name (eth0) used by the system, followed by the physical link information (link flags, MTU size, the queuing disciplines qdisc, and then by the associated IP addresses, including the alias). This is, perhaps, a more useful and complete arrangement of the information than that provided by the ifconfig command.
We could have used the ip command to add the alias with the following format:
# ip addr add 10.0.0.1/21 brd + dev eth0 label eth0:0
or with a nonnumerical alias
# ip addr add 10.0.0.1/21 brd + dev eth0 label eth0:Alias0
The ip command will create the same alias, with the added benefit of automatically calculating the proper broadcast address by using the brd + option. This is certainly a very flexible and logical way to perform the configuration of a network alias, along with most other desired operations. I happen to like the ip command for this very reason. It is possible to learn a lot about the underlying functionality and capabilities of Linux networking, just by reading the documentation for the command.
A reasonable question might be: How and where would we use this feature in our cluster's implementation? This functionality may be used anywhere you need to access network traffic that may be available “on the wire,” but it has different network addresses than the configured interface. An example is the administrative nodes which need to connect to the management LAN, but also need to access the file server resources which are handled by the data LAN.
Once you have decided that a particular system needs access to more than one network's traffic via one or more aliases on a single physical interface, you need to consider how to reestablish the alias at the next system boot—in other words, how to make the connection permanent. The network alias will disappear after a reboot or if you manually issue the command
# ifconfig eth0:0 down
or use the ip command
# ip addr del 10.0.0.1 dev eth0
The normal boot process for a Red Hat or most Red Hat–derived operating systems uses scripts and data files located in and underneath the /etc/sysconfig directory. Underneath this directory is the network-scripts directory, which contains initialization files for each network interface, such as ifcfg-eth0. To reinstall the alias at boot time, we only need to create /etc/sysconfig/network-scripts/ifcfg-eth0:0 and have it contain
ONBOOT=yes
BOOTPROTO=static
DEVICE=eth0:0
IPADDR=10.0.0.1
NETMASK=255.255.248.0
The normal boot process will create the alias and attach it to the appropriate device: eth0. This also allows us to issue ifup eth0:0 and ifdown eth0:0 commands to manipulate the state of the network alias manually. Because the use of BOOTPROTO=dhcp appears to confuse the DHCP client, dhclient, it is best to assign configuration values statically to links that are network aliases.
There are several places within our cluster where we might wish to use port trunking for high availability and to increase network bandwidth. One of these places is between the file server equipment and the LAN that distributes the data to client systems. We discussed the theoretical concepts involved in port trunking or aggregation in Chapter 5, “Link Aggregation” on page 111. It's time to discuss how Linux handles trunking.
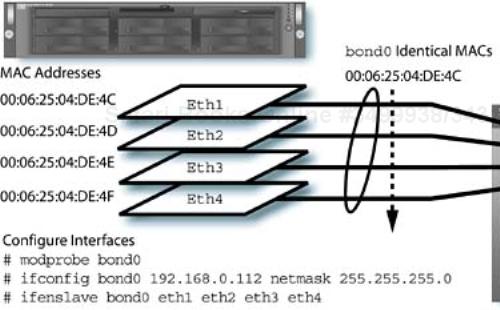
The Linux networking stack allows the configuration of multiple network links into a single trunked link called a bond. To allow bonding multiple links together, the functionality must either be compiled into the kernel or provided as a dynamically loadable module called bonding. In addition, there is a command, ifenslave, which is similar to the ifconfig command, that is used to assign physical devices to the bond. You can think of this as creating a virtual device, like a container with its own attributes, then assigning physical links to the container.
The process of creating a bond involves the following manual steps:
Creating an alias in
/etc/modules.conffor the bonding module, with the desired device name, such asbond0Loading the
bondingmodule, with appropriate optionsLoading the physical network “slave” interface modules
Configuring the bond device with
ifconfigEnslaving the slave links to the bond device
Verifying the bond operation
(Documentation for the process is located in the file /usr/src/linux-2.4/Documentation/networking/bonding.txt and is a detailed initiation into the bonding process and interfacing with Ethernet switching equipment.) Red Hat Linux and derivative distributions provide the loadable module and the ifenslave command to support bonding. There is no man page for the ifenslave command that I have been able to locate.
The source code for the ifenslave command is located in /usr/src/linux-2.4/Documentation/networking/ifenslave.c and it details the use of the parameters listed in the brief usage output presented here. This is a good example of using the presence of Linux source code to best advantage.
# ifenslave -?
Usage: ifenslave [-adfrvVh] <master-interface> < <slave-if>
[metric <N>] > ...
       ifenslave -c master-interface slave-if
The options listed in the source are shown in Table 10-1.
Table 10-1. Options for the Linux ifenslave command
Option | Description |
|---|---|
| Show all interfaces |
| Change active slave interface |
| Detach a slave interface |
| Force the operation |
| How-to message |
| Make receive-only slave interface |
| Verbose output |
| Output command version |
| Usage message |
Let's take an example, using four GbE links provided by Intel Pro/1000 GbE interfaces. The system[2] will probably already have detected the interfaces if the hardware is supported, and called them eth1, eth2, eth3, and eth4 (assuming there is also a built-in link that is named eth0).
First, configure the /etc/modules.conf entries:
alias eth0 3c59x
alias bond0 bonding
alias eth1 e1000
alias eth2 e1000
alias eth3 e1000
alias eth4 e1000
The possible module options for the bonding module may be listed:
# modinfo bonding
filename:    /lib/modules/2.4.22-1.2149.nptl/kernel/drivers/
net/bonding/bonding.o
description: "Ethernet Channel Bonding Driver, v2.4.1"
author:      <none>
license:     "GPL"
...
The output from the modinfo bonding command lists all the possible parameters that may be specified to the bonding module when it is loaded. These options may be specified in an “options” specification in the /etc/modules.conf file, or may be specified on the command line when manually loading the module. In this case, to load the module manually we would execute modprobe bond0, which would load the module (and any module dependencies) as specified in the /etc/modules.conf file, including the options.
Which options you specify for the bonding module will depend on the modes that your network interfaces support and the capabilities of the switching equipment to which the bond is connected. An example options specification in /etc/modules.conf to enable a four-link trunk to a compatible switch is
alias bond0 bonding
options bond0 max_bonds=4,mode=0
alias eth1 e1000
alias eth2 e1000
alias eth3 e1000
alias eth4 e1000
Here we specify the options for the aliased name bond0, as opposed to the bonding module itself, to allow more than one bond on the system. Once the module is loaded, the kernel will create the bond0 network device. The next step is to configure the device with the ifconfig command:
ifconfig bond0 192.168.0.103 netmask 255.255.255.0 broadcast
       192.168.0.255 up
and then finally to add the slave interfaces to the bond:
ifenslave bond0 eth1 eth2 eth3 eth4
At this point, you should be able to see the link listed in the output for the ifconfig or ip commands, and perform simple operations across the link to test it.
Now that we have manually created the bond, we can configure the Red Hat Linux networking start-up scripts to recreate the bond for us at system boot or when we issue an ifup bond0 command, just as if it were for a “normal” network link. The contents of the configuration file /etc/sysconfig/network-scripts/ifcfg-bond0 might be similar to the contents listed here:
DEVICE=bond0
IPADDR=192.168.0.103
NETMASK=255.255.255.0
NETWORK=192.168.0.0
BROADCAST=192.168.0.255
ONBOOT=yes
BOOTPROTO=none
For each of the slave network interfaces (eth1, eth2, eth3, and eth4) in the example bond, the interface configuration file in /etc/sysconfig/network-scripts should contain configuration statements similar to the example for eth1:
DEVICE=eth1
ONBOOT=yes
MASTER=bond0
SLAVE=yes
BOOTPROTO=none
This will automatically recreate the bond at system boot time or in response to an ifup bond0 command. Note, once again, that using DHCP for this link is likely to cause the dhclient program fits, so use of DHCP on the bond is disabled.
Creating trunked links, or bonds, on Linux is not too difficult. A major step in the right direction is locating the proper documentation for the process and identifying the correct commands and sequences. This overview may need to be modified, based on the network interfaces and switch equipment that you use in your cluster. Figure 10-5 shows the basic components and commands to activate a bond.
The default MTU size for an Ethernet frame is 1,500 bytes. If you have the proper network interfaces and Ethernet switches to support it, you may use jumbo frames, which increase the size of the MTU to 9 KB. This functionality has to be explicitly enabled with either the ifconfig or ip commands. Examples of manually configuring this parameter for both possible commands are
# ifconfig eth0 192.168.0.110 netmask 255.255.255.0
       broadcast 192.68.0.244 mtu 9216

# ip link set eth0 mtu 9216
The MTU size may also be set in the /etc/sysconfig/network-scripts configuration file for the interface device by specifying the MTU=<value> option. An example is
DEVICE=eth0
MTU=9216
This will set the MTU value as part of the device initialization at boot time or if an ifup command is issued.
Ensuring that a network link is operating in the proper mode (full duplex) is sometimes difficult. If the autonegotiation process runs into difficulty, it is possible that there is a mismatch in settings between the switch and the client system. Linux provides a useful tool, the MII tool, or mii-tool command, that can determine the current state of the local interface and the switch port. This has saved me a tremendous amount of time and frustration.
An example command and the associated output are shown here for a 100base-TX interface:
# mii-tool -v eth0

eth0: negotiated 100baseTx-FD flow-control, link ok

  product info: vendor 00:10:18, model 23 rev 7

  basic mode:   autonegotiation enabled

  basic status: autonegotiation complete, link ok

  capabilities: 100baseTx-FD 100baseTx-HD 10baseT-FD
      10baseT-HD

  advertising:  100baseTx-FD 100baseTx-HD 10baseT-FD
      10baseT-HD flow-control
  link partner: 100baseTx-FD 100baseTx-HD 10baseT-FD

      10baseT-HD flow-control
This output shows that the local interface is indeed running in 100base-TX full-duplex mode, along with the current state of the link. The command lists both the capabilities being advertised for the local interface and the switch port (link partner). This is highly valuable if you suspect autonegotiation problems.
In addition to displaying the current state of the link, it is possible to control the behavior of the link with the tool. It is not recommended to reset the link or change the duplex behavior on an active link, but sometimes errors in autonegotiation leave you no alternative. Make sure that there is no activity before doing any operations that might affect the link. Examples of restarting autonegotiation, resetting the link, and changing the duplex behavior are
# mii-tool -v --restart eth0
# mii-tool -v --reset eth0
# mii-tool -v --force=100baseTx-FD eth0
The proper operation of the network link is essential to the operation of the administrative nodes and their services. Once the operating system is installed on the administrative nodes, the mii-tool command may be used to verify link operation and to troubleshoot switch port settings.
Services in a Red Hat Linux or derivative distribution are controlled by a set of scripts that are located in /etc/init.d and are activated in the appropriate run level by the /etc/rc script, which is run by the init process at system boot time. Each run level has an associated directory, /etc/rc*.d, which has links to the service scripts that are to be run with the “start” or “stop” parameter when the system transitions to that run level.
Examining the scripts in /etc/init.d, you will see comments like the one found toward the top of the /etc/init.d/syslog script:
...
# chkconfig: 2345 12 88
...
This comment tells the chkconfig command where (within run level directories) to install links to the start-up script. It also specifies the priority for start-up and shutdown links. The string 2345 specifies the single-digit run levels within which to create start-up links. Shutdown links are created in the remaining run levels.
The third and fourth fields are the link “priorities” to use for the start-up and shutdown links respectively. When chkconfig --add syslog is run, the links are created, whereas chkconfig --del syslog removes the links for the service. The start-up link created is S12syslog, using the first link priority, and the shutdown or “kill” link created is K88syslog, with the second link priority.
The appropriate links are created for services at system installation time by their package installation scripts. To remove services and shorten the system boot time, links for unnecessary services may be removed. If an add-on service is not targeted for the Red Hat environment, you may have to configure the start-up script information for chkconfig manually.
Executing the command chkconfig --list will list the status of all services, including those handled by xinetd, which are configured with separate configuration files in the /etc/xinetd.d directory. Issuing chkconfig --list <service> will list the current status of the specified service's start-up and shutdown links. The chkconfig command will create and remove links and list their status, but will not actually start or shut down the service.
The service command will start, restart, or stop a service. Executing service <service> restart will first stop, then restart the associated service. Some services also support returning status with service <service> status, and saving state by executing service <service> save.
Both the chkconfig and service commands are frequently used when configuring services. We need to make sure that we activate the service's run-level links to ensure that they will be started at system boot time, and start the service once it is configured. Some of the services that we add later may require manual configuration.
The importance of time synchronization between networked systems is often overlooked. Accuracy and a minimum “skew” is important to some services, like Kerberos, that require all client and server systems to be synchronized within a certain time differential. There are other situations, notably software development environments, for which synchronization is also important (think about the system time as associated with software module versions and whether they are “out of date” with respect to their source).
The time service on Linux systems is handled by the NTP daemon, ntpd. Unfortunately, there may be no man pages on some of the Red Hat distributions and very little documentation on the usage of this service. The Fedora distribution seems to have remedied this situation.
The easiest way to configure the client behavior of this service is to use the redhat-config-date tool, which is available as part of the system installation or can be run independently after the system is installed. This is a graphical tool that requires the presence of an X Windows server to run.
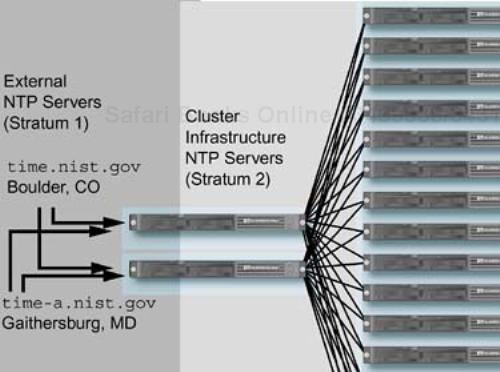
You can enable the service and point it to an external server that provides the NTP service. A list of external servers is available at http://www.boulder.nist.gov/timefreq/service/time-servers.html. The daemon may run in multiple layers, or strata, with a client to one daemon providing server functionality to higher numbered strata. One or more NTP servers in your cluster, pointing at a highly accurate source, can service the remaining systems in the cluster.
If you wish to use an external time source, such as time.nist.gov, there must be a route to the external server from the chosen infrastructure node. You may need to run the daemon on a system (like a head node) that has external network routing access, and open up port 123 for UDP and TCP traffic in any firewall between the target server and the cluster's clients. A system, inside your cluster, with an accurate time source, removes the need to communicate with external NTP servers and may be necessary in high-security installations.
The majority of the data produced by NTP and its current operation is kept in /etc/ntp, including the keys file, which you should modify to contain values for your cluster's configuration. The keys provide a level of authentication that can keep malicious users from resetting your system's time. There are several cautions about using the default values for the key and password in the documentation, and you should heed the advice.
The configuration information for ntpd is kept in /etc/ntp.conf, and an example configuration file (with comments removed) created by the installation process is
server time.nist.gov
fudge 127.127.1.0 stratum 10
driftfile /var/lib/ntp/drift
multicastclient
broadcastdelay 0.008
authenticate no
#keys /etc/ntp/keys
This file points an “internal” NTP server at an external source of reliable time information. Notice that, by default, authentication is turned off between this server and all “lower level” clients. The use of multicast client capability means that all systems will listen to a multicast address, which defaults to 224.0.0.1 for time information, provided that behavior is enabled on the clients. This keeps the communications traffic between the server and the clients to a minimum.
TIP
Pay close attention to service “fan-out” and expected traffic patterns for cluster services. Multiple servers, special communication methods like multicasting, or traffic reduction may be necessary to keep performance adequate in a large cluster.
The client may also be configured to calculate the clock drift and to set the time at system boot, then exit by using the -q option. (Most modern systems have a hardware clock that keeps track of the time, even when the operating system is not running. This hardware clock is read at boot time by the /etc/rc.sysinit file and updated at shutdown by the /etc/inittab file.) If having the ntpd process continually running on client systems (compute slices) is a concern, then you can manually enable this feature in the configuration file /etc/sysconfig/ntpd, which contains the daemon's start-up options. Remember to enable and start the service on the appropriate systems with
# chkconfig ntpd on
# service ntpd start
The number of NTP servers you need for your cluster will depend on the number of clients to be serviced, and the mode in which the clients are operating. If you examine Figure 10-6, you can begin to see some of the “fan-out” issues for services that can occur in a cluster. For redundancy, each client will specify both NTP servers in their /etc/ntp.conf configuration file, resulting in 32 update messages for the whole cluster. In a larger cluster, the number of NTP servers might have to be increased, or the amount of traffic reduced or spread out in time to provide adequate performance.
A very useful tool for debugging NTP, by talking to the ntpd daemon, is the ntpq command. This allows examining various parameters, including the parameters associated with peer servers. An example output from the tool is
# ntpq
ntpq> peers
remote       refid   st t when poll reach delay offset jitter
==============================================================
time.nist.gov 0.0.0.0 16 u -  64  0     0.000 0.000  4000.000
Name resolution services are fundamental to the operation of any networked environment, and a cluster is no exception. If we adhere to the general policy of making systems internal to the cluster be “invisible” to the outside world, then there will be no direct connection between those systems and any external naming services. The required name resolution services need to be provided inside the cluster's networks, and in an efficient manner, to avoid impacting system performance.
Because the name service is so basic, it is central to the operation of every other networked service in the cluster. There are a number of ways to implement the service in a Linux environment, but the other services that you run in the cluster will have some requirements for the name service behavior. You should be aware that other services like Kerberos require an IP-to-host mapping and the reverse mapping, host to IP, to be available and valid.
Before I discuss the possible name resolution service configurations, we should examine the need for consistency in the format of the names supplied by the service—more for the system administrators of the cluster than anyone else. We have, after all, a networked environment, with tens to thousands of hosts, for which each host may have as many as three separate network connections, and each connection requires an IP address and a separate, unique host name. Having a convention to follow for host naming with this many systems is important for consistency, sanity, and automation of administration tasks.
Whatever your final choice of format for host names in your cluster, it is important to have alignment between the names and IP addresses for all network connections. You are free to choose whatever conventions you can dream up, and you have the opportunity to make your life easier or more difficult than necessary based on your choices. Let's talk about some ways to make your naming convention usable.
In Chapter 6 on page 123, we discussed aligning the IP addresses in the various cluster networks and allocating IP addresses in blocks of addresses for different purposes, including expansion. We associate human-readable names with the IP addresses to help make sense of a numerical IP address format that was intended more for internal use by hardware and software—even the dots in an IP address are “by convention” (including the conventions specified in the various RFC documents that originally created the notation). How names are applied to your cluster's IP addresses will determine how easy it is to locate a given system connection, sort information with host names in it, and apply automated techniques to your system administration processes. It also will affect the amount of typing you will do.
The first thing to consider is the length of the host name. Long is more descriptive, but lots of characters take more effort to type. Fewer characters are easier to type, but are less descriptive. There will be a numerical component (usually) to the host name, so the overall addition to the number of characters in the host name has to be considered.
Lexical ordering of characters needs to be considered because host1 and host10 will be sorted ahead of host2. When you use numbers in a host name, to get sorting algorithms to work properly, you need to include leading zeros. So the previous list of host names would be host01, host10, and host02 to get the proper sorting order. This may seem trivial, but having to change host names in a large cluster installation project is a nightmare.
As an example, let's assume we have a cluster with 128 compute slices, two head nodes, a file server, and four administrative nodes. Additionally, there are management LAN, data LAN, and HSI connections that require IP addresses and host names. There is a single management rack with a core switch, and four compute racks with 32 compute slices, one serial console switch capable of NFS, and one management switch each. A possible scheme is presented in Table 10-2.
Table 10-2. Host Naming Convention Example
Host Description | Management LAN | Data LAN | HSI |
|---|---|---|---|
Compute slices | mcs001-mcs128 | dcs001-dcs128 | hcs001-hcs128 |
Administrative/infrastructure node | mad001-mad004 | dad001-dad004 | had001-had004 |
Head nodes | mhn001-mhn002 | dhn001-dhn002 | hhn001-hhn002 |
File server | mfs001 | dfs001 | N/A |
Ethernet management switches | mem001-mem004 | N/A | N/A |
Serial console switches | mss001-mss004 | N/A | N/A |
Ethernet core switch | mec001 | N/A | N/A |
I think the chosen host names represent a good compromise between brevity and mnemonic content. They also will sort in the proper order. Other conventions, like including the rack number are also possible. Make sure you experiment with whatever choices you make, because you will likely be stuck with them once implemented.
Linux, and indeed many UNIX systems, provides for the use of multiple name resolution services, with a search order and fall-back capability. The name resolution provided by the gethostbyname routine in the system library may search NIS, NIS+, DNS, or the local /etc/hosts file for host name information. All systems in the cluster, including head nodes, compute slices, file servers, and administrative/infrastructure nodes will need name service resolution configured.
The ordering of the search, the sources used for the search, and the fall-back behavior are all determined by the name service switch configuration file: /etc/nsswitch.conf. This file also controls the sources of information for other services and many of the system “database” files that are provided by NIS: password, group, shadow, ethers, netmasks, networks, protocols, rpc, services, netgroup, publickey, (e-mail) aliases, and the NFS automounter maps, such as auto.master. This file is a relatively new addition to UNIX systems.
In the simplest form, the configuration for the name services is a specification of a database followed by a list, in order of search, containing the sources of name resolution information. A line such as
hosts: files dns nis
would cause a host name lookup to look in the local /etc/hosts file, traverse DNS, and then finally the NIS service for an answer to the query. Besides rearranging the order or contents of the list, it is possible to exercise more control over the behavior by applying two actions— return or continue—to four possible results of the lookup: success, notfound, unavail, and tryagain.
The defaults for each action (in the format used in the file) are [SUCCESS=return], [NOTFOUND=continue], [UNAVAIL=continue], and [TRYAGAIN=continue]. The last service in the list has an implied [NOTFOUND=return] associated with it. The success result occurs if the name is located in the associated service, notfound occurs if the service cannot find the name, unavail indicates that the service is permanently unavailable or not active, and tryagain indicates a temporary service condition that may be recoverable.
It is more important for us to determine which services we are going to use for name resolution, because the default behavior of the switch suits our needs just fine. The default (implied) configuration for each name service is the same as shown for DNS in the following example:
hosts: files[SUCCESS=return,NOTFOUND=return,UNAVAIL=continue,
TRYAGAIN=return] dns[...] nis[...]
Remember that in this example the default behavior for all services is specified. You do not have to configure the actions explicitly. For more information on the configuration of this file, see man nsswitch.conf. We can now move on to the configuration of the individual name resolution services.
The /etc/hosts file was the original network host name lookup database on a UNIX system. As networked environments become larger and more complex, keeping the host files synchronized between multiple systems becomes a real chore—the more systems, the larger the chore. The networked, single-point administration tools (DNS and NIS) that are discussed later make the job easier, but they rely on network availability to operate and add complexity to the configuration process. The hosts file, however low-tech it seems, still works just fine. (It is, however, sheer lunacy to attempt to build a hosts file for large clusters by hand. By having naming conventions and host IP ranges, it is possible to script the building of the hosts files. Some of the cluster creation tools generate this type of configuration file from information stored in a cluster configuration database. There are also automated tools available to generate the DNS configuration files for you.)
If you are going to use DNS in your cluster, then you will want to provide a fully qualified host name as an alias in the /etc/hosts file. In this way, whatever form is entered for the host name, the name resolution service can return a matching format to the user or application—fully qualified or not. It can be disconcerting to enter a fully qualified host name and find just the host being used in the response.
Falling back (no pun intended) to our IP address example shown in Table 10-2, we might produce the following fragment of an /etc/hosts file:
# IP address        Host        Aliases
127.0.0.1           localhost   loopback
#
10.0.1.1            mcs001      mcs001.cluster.local
10.0.2.1            dcs001      dcs001.cluster.local
10.0.3.1            hcs001      hcs001.cluster.local
#
10.0.2.150          dfs001      dfs001.cluster.local
#
10.0.1.254          mgw001      mgw.cluster.local
10.0.2.254          dgw001      dgw.cluster.local
10.0.3.254          hgw001      hgw.cluster.local
#
10.0.1.200          mns001      mns001.cluster.local
10.0.1.201          mns002      mns002.cluster.local
10.0.1.202          mns003      mns003.cluster.local
10.0.1.203          mns004      mns004.cluster.local
Configuration of the DNS can be a complicated endeavor. There are whole books written on just this topic.[3] The main configuration file for the Berkeley Internet name daemon (BIND) is kept in /etc/named.conf,[4] as in this example that I use (somewhat modified) in my network at home:
options {
       directory       "/var/named";
       query-source    address * port 53;
       allow-query     {
                        127/8;
                        192.168.0/24;
                      };
};

logging  {
       category "unmatched" { null; };
       category "default"   { "default_syslog";
                            "default_debug";
                          };
       channel "default_debug" {
                             file "/var/log/named.debug";
                             severity dynamic;
       };
};

controls {
       inet 127.0.0.1 allow { localhost; } keys { rndckey; };
};
include "/etc/rndc.key";
zone    "0.0.127.in-addr.arpa" IN       {
       type master;
       file "127.0.0";
       allow-update { none; };
};
zone "cluster.local" IN                    {
       type master;
       file "cluster.local";
       allow-update { none; };
};
zone    "localhost" IN                  {
       type master;
       file "localhost.zone";
       allow-update { none; };
};
zone "0.168.192.in-addr.arpa" IN        {
       type master;
       file "0.168.192";
       allow-update { none; };
};
zone    "."         IN                  {
       type forward;
       forward first;
       forwarders{
                    X.X.X.Y;      External DNS server 1
                    X.X.X.Z;      External DNS server 2
                    192.168.0.254; Local firewall router
       };
};
This is a very basic DNS configuration that I use as a starting point for more complex configurations. And, before we go any further, let me tell all the BIND experts out there that I am well aware that this example has holes in it. The primary reason for presenting this example is to show that without too much typing you can get a functioning DNS configuration file that resolves addresses for local “zones” and forwards everything else to external DNS servers. (If there is a DNS and BIND expert on your staff, have her create a better configuration for you.) Because of space constraints, I have to leave more complicated configuration options as an exercise for you.
The “options” and “logging” stanzas in the file set the basic behavior for the daemon in terms of the networks handled and the amount of logging output that goes to the specified files. The “controls” definition allows direct communication with the daemon by the rndc command running on the allowed hosts—in this case, the local host on which the named daemon is executing. This command allows reloading the database, turning query logging on and off, and other maintenance functions. The rndc keys file contains the value that is also specified in the /etc/rndc.conf file, so that the named daemon and the rndc command share the same key when they communicate.
The zone definitions in this example, except for the “.” or root zone, have configuration files located in the /var/named directory. I may have used outdated naming conventions for these file names, so consult a DNS book or expert before casting yours in concrete. An example of the content in the cluster.local zone file is
$TTL    3D
@               IN      SOA     ns2.cluster.local.  root.ns2.cluster.local. (
                        20040225        ; serial, todays date
                        8H              ; refresh, seconds
                        2H              ; retry, seconds
                        4W              ; expire, seconds
                        1D )            ; minimum, seconds
                        NS      ns1.cluster.local. ;
                        NS      ns2.cluster.local. ;
localhost               A       127.0.0.1
ns1.cluster.local.      A       192.168.0.151
                        TXT     "Primary Name Server"
ns2.cluster.local.      A       192.168.0.152
                        TXT     "Secondary Name Server"
cs01                    A       192.168.0.1
cs02                    A       192.168.0.2
cs03                    A       192.168.0.3
cs04                    A       192.168.0.4
cs05                    A       192.168.0.5
This file contains definitions for two name servers and five other systems in the zone that it handles. The database for DNS consists of records, and the A designator is an address record that specifies a host name-to-address association. The reverse mapping of host name to IP address is handled by the 0.168.192 file, which you will notice is named after the first three octets of the network address in reverse order:
$TTL 3D
@       IN  SOA  ns2.cluster.local. root.ns2.cluster.local. (
                   20040225 ; Serial
                   8H       ; Refresh
                   2H       ; Retry
                   4W       ; Expire
                   3D)      ; Minimum Time To Live (TTL)

             NS    ns1.cluster.local.
             NS    ns2.cluster.local.
1            PTR   cs01.cluster.local.
2            PTR   cs02.cluster.local.
3            PTR   cs03.cluster.local.
4            PTR   cs04.cluster.local.
5            PTR   cs05.cluster.local.
The addresses in this file are all relative to the 192.168.0 network. The PTR records are pointers back to the original records for the host names. The NS records represent systems that are name servers for the domain. The DNS database has many other record types to learn, in addition to the basic ones shown here.
As you can see, the BIND configuration files are a lot of repetitive information, and once you get the framework constructed, it can be relatively easy to fill in additional systems. The remaining configuration file contents are “standard” and I leave them as an exercise for you. Although the example configuration is fairly simple, BIND and DNS are moving targets, with constant security improvements and changes to the configuration syntax being made.
DNS is a hierarchical, distributed network database system. As such, it is necessarily more complex than either the hosts file or the NIS. This does not mean that minimal DNS configurations are impossible to craft. The example in this section may serve as a starting point.
Finding a good book on the subject, using a GUI-based configuration tool like redhat-config-bind, or having a pretrained expert, are ways to tackle a more complex DNS installation for your cluster. Do not attempt to create a secure Internet-connected DNS configuration or an intranet (internal corporate) slave configuration without consulting the proper DNS maintainers. You will save yourself potential security breaches and clashes with local (or remote) DNS administrators.
With DNS configured, do not forget to issue the required commands to create the boot-time links and start the service:
# chkconfig named on
# service named start
# tail /var/log/messages

Mar  1 10:55:49 ns2 named[31627]: starting BIND 9.2.1 -u  named
Mar  1 10:55:49 ns2 named[31627]: using 1 CPU
Mar  1 10:55:49 ns2 named[31630]: loading configuration from '/etc/named.conf'
Mar  1 10:55:50 ns2 named[31630]: no IPv6 interfaces found
Mar  1 10:55:50 ns2 named[31630]: listening on IPv4  interface lo, 127.0.0.1#53
Mar  1 10:55:50 ns2 named[31630]: listening on IPv4  interface eth0, 192.168.0.152#53
Mar  1 10:55:50 ns2 named[31630]: command channel listening  on 127.0.0.1#953
Mar  1 10:55:50 ns2 named[31630]: zone 0.0.127.in-addr.arpa/ IN: loaded serial 20040225
Mar  1 10:55:50 ns2 named: named startup succeeded
Mar  1 10:55:50 ns2 named[31630]: dns_master_load: 0.168.192:12: TTL set to prior TTL (1)
Mar  1 10:55:50 ns2 named[31630]: zone 0.168.192.in- addr.arpa/IN: loaded serial 20040225
Mar  1 10:55:50 ns2 named[31630]: zone cluster.local/IN:  loaded serial 20040225
Mar  1 10:55:50 ns2 named[31630]: zone localhost/IN: loaded  serial 20040225
Mar  1 10:55:50 ns2 named[31630]: running
Once you have DNS installed on at least one server, you can begin testing. I tend to “cross resolve” two DNS servers, which means that I set the /etc/resolv.conf file on one system to use the other server first, followed by itself. As an example, here is a /etc/resolv.conf file that does this:
domain          cluster.local #Local domain name
server          192.168.0.151 #The other server first
server          192.168.0.152 #This server last
You may specify up to three servers in the resolv.conf file. Client systems can use the same version of the /etc/resolv.conf file to specify the domain and DNS servers for resolution.
Testing your DNS configuration consists of verifying that all host names on all networks are resolved properly. I use the rndc command to enable query logging, which will show all DNS queries in the /var/log/messages file managed by the system logging daemon, syslogd.
# rndc
Usage: rndc [-c config] [-s server] [-p port]
        [-k key-file ] [-y key] [-V] command

command is one of the following:

  reload        Reload configuration file and zones.
  reload zone [class [view]]
                Reload a single zone.
  refresh zone [class [view]]
                Schedule immediate maintenance for a zone.
  reconfig      Reload configuration file and new zones only.
  stats         Write server stats to the statistics file.
  querylog      Toggle query logging.
  dumpdb        Dump cache(s) to the file (named_dump.db).
  stop          Save pending updates and stop the server.
  halt          Stop the server without saving updates.
  trace         Increment debugging level by one.
  trace level   Change the debugging level.
  notrace       Set debugging level to 0.
  flush         Flushes all of the server's caches.
  flush [view]  Flushes the server's cache for a view.
  status        Display status of the server.
  *restart      Restart the server.

* == not yet implemented
Version: 9.2.1
So merely issuing the rndc querylog command will toggle the logging of client requests on and off. Also, dumping the database to a file can help with syntax issues by showing you what the daemon read and how it was interpreted. The command rndc dumpdb does this.
For testing purposes, you can use the Linux host or dig commands to create DNS queries against your DNS servers. The following output was from the host command:
# host 192.168.0.152
152.0.168.192.in-addr.arpa domain name pointer ns2.cluster.local.
# host ns2
ns2.cluster.local has address 192.168.0.152
# host ns1
ns1.cluster.local has address 192.168.0.151
The dig command produces a more verbose output. Once you have “internal” cluster name resolution working, you will have to ensure that the cluster itself is visible in the “external” DNS database so that users or applications (if it is a database cluster) can access it. There are a number of issues to notice:
Spreading login or access activities equally between head nodes with round-robin DNS resolution
Resolving external names on the master nodes, in addition to the cluster-specific names
Testing that “internal” names don't “leak” outside the cluster
These activities will likely take coordination with the local DNS administrator, and are beyond the scope of what we can cover here.
Despite its potential issues, the NIS is a useful single-point administration tool. Although system administrators tend to think of NIS in terms of its ability to share password and group information, NIS can be used to distribute other system information from a central location, and even custom “maps” that drive system behavior.
In conjunction with the name service switch, /etc/nsswitch.conf, NIS can share NFS automounter maps and other system configuration information from a central copy of files located in the /etc directory on the master server: passwd, group, shadow, services, rpc, networks, netgroups, and several others. The information from NIS can either replace or augment the information in the local files. An NIS master server distributes central information to NIS slave servers, and both are capable of supporting client systems.
The NIS maps are databases that consist of gdbm (GNU dbm) files. These are simple, single-key “hashed” databases produced from a text file that is fed into the makedbm command. The first field in the text file line, up to the first whitespace delimiter, becomes the database key, and the remainder of the line becomes the database “record” associated with the key.
NIS “maps” are individual gdbm databases that are accessible via RPC requests from client systems. The client system passes the key in a request, and the NIS master or slave server looks up the key in the requested database and returns the record associated with the key. A lookup in the database takes at most two disk accesses.
The ypinit command[5] is used to create either an NIS master or slave server. As part of the process of creating the master server, you will specify a list of slave servers:
# domainname cluster.nis # ypinit -m -bash: ypinit: command not found # /usr/lib/yp/ypinit -m At this point, we have to construct a list of the hosts which will run NIS servers. ns1.cluster.local is in the list of NIS server hosts. Please continue to add the names for
This is a relatively easy process, and it has created an NIS domain with the name cluster.local in the /var/yp directory. The NIS domain looks like a DNS domain, but is not the same thing—the two are separate concepts with similar formats.
The following are notes about the NIS master server creation output listed earlier.
The domain database is kept under
/var/yp.There is a
Makefileunder/var/ypthat is responsible for creating the NIS maps from the original files.We set the NIS domain name, using the
domainnamecommand from the command line prior to creating the domain database, and the directory/var/yp/<domainname>contains the NIS database files.You will notice the prefix
ypused a lot, because the original name for the service was “yellow pages,” which is a registered trademark of a British phone company.A special map file,
ypservers, contains the list of master and slave NIS servers that was created from the input during configuration.
We have built a default set of NIS maps from the system files on the master server. Before we create any slave servers, we need to make sure that the NIS services are properly enabled and started. Note that NIS master and slave servers also are usually NIS clients. Both sets of services need to be configured and enabled.
We need to get the system set up to start the NIS server software at system boot time. One necessary task is to add the NISDOMAIN variable definition to the /etc/sysconfig/network file. This will restore the proper NIS domain information globally at boot time. The settings in the file for our example would be
...
NISDOMAIN=cluster.nis
...
Once the NIS domain setting is established, and can be reestablished, we can start the NIS server (ypserv) software:
# chkconfig ypserv on
# service ypserv start
You should see the NIS server software start-up message. The server is now ready to respond to external requests. Any time you modify one of the files that is exported via NFS (/etc/passwd, /etc/group, or similar), you should perform the following commands:
# cd /var/yp
# make
This will recreate any maps that may be “out of date” with respect to the files you modified, and will “push” them to the slave servers. You need to realize that the files on the NIS master server are the ones being exported to the slaves and are the ones being used by the client systems. The files on the NIS master should contain the information that you want used by the other systems participating in the NIS domain. Our next step is to set up the slave servers.
The /var/yp/<domain>/ypservers map contains a list of NIS servers that was created when the master was initialized. There are occasions when we might want to modify that list. How can we do this?
In theory, we could add a name to the ypservers file that gets created in the /var/yp directory, then use the local Makefile to recreate the ypservers map with make ypservers. On the Red Hat distributions I have examined, this does not appear to work. But there is another, more manual approach.
It is possible to reverse the ypservers map creation process using the makedbm command to dump the contents of the map file. For our example, the output is
# /usr/lib/yp/makedbm -u /var/yp/cluster.nis/ypservers
ns1.cluster.local ns1.cluster.local
YP_MASTER_NAME ns1.cluster.local
YP_LAST_MODIFIED 1078184516
ns2.cluster.local ns2.cluster.local
Part of the master installation process is the creation of a /var/yp/ypservers file. We can edit this file and use it to recreate the new ypservers database:
# /usr/lib/yp/makedbm -i /var/yp/ypservers
   -o /var/yp/cluster.local/ypservers ./ypservers ypservers
The first system in the file is assumed to be the master server. For more information on the creation of this file and the initialization process, you can actually examine the commands used in the /var/yp/ypinit command, because in Linux it is a script.
With a master NIS server in place and operational, we now can configure the slave servers. The slave server will need to connect to the master server to download the map database, so the master must be running and available. On the slave server, we initialize NIS with the following commands:
# domainname cluster.nis # /usr/lib/yp/ypinit -s ns1.cluster.local We will need a few minutes to copy the data from ns1 Transferring shadow.byname... Trying ypxfrd ... success [ ... output omitted ... ] ns2.cluster.local's NIS data base has been set up. If there were warnings, please figure out what went wrong, and fix it. At this point, make sure that /etc/passwd and /etc/group have been edited so that when the NIS is activated, the data bases you have just created will
Note that even though the command output suggests that we need to edit the passwd and group files, this is no longer necessary. The /etc/nsswitch.conf must be properly configured to utilize NIS for the information, but we do not have to add the infamous +::: lines to the files. (If you don't know about this antique requirement, never mind. Just rejoice that there is no more need to edit the files directly to use NIS. Unless of course you want to, then you can specify compat as the source of the data in place of nis.)
As with the master, we need to add the NISDOMAIN definition to the /etc/sysconfig/network file. When finished, we also need to enable and start the ypserv service, just as we did on the master server.
Configuring NIS client systems, and which may include the NIS master and slave servers, is relatively easy. Adding the NISDOMAIN definition to /etc/sysconfig/network is necessary, just like with the master and slave servers. This restores the NIS domain information at boot time. There is one more file to configure for clients, /etc/yp.conf, which is used by the client portion of NIS, ypbind.
The /etc/yp.conf file contains information about the method to use in contacting the NIS server. This file may be created automatically by the dhclient program, based on information from DHCP, if it is active and distributing NIS server information. I cover using DHCP as a single-point administration tool in the next chapter. An example of the /etc/yp.conf file is
domain cluster.nis server ns1.cluster.local
domain cluster.nis server ns2.cluster.local
This file will be used by ypbind to attempt a direct connection to the first server in the list, for NIS information, and will not use broadcasting. It is possible to add a line domain cluster.nis broadcast to enable server location for the desired domain via a broadcast. Broadcasting is inherently unsafe because of the ability for systems to replace, or “spoof,” the real NIS server. In the event that the first server does not answer, ypbind will try the second server.
To ensure that the NIS client, ypbind, is enabled and operational, you should execute
# chkconfig ypbind on
# service ypbind start
The ypbind process running on an NIS client will send “keep alive” messages to the master server every 20 seconds. In the event that the master does not respond, ypbind will attempt to locate and connect to an alternate server. The exact fail-over behavior is documented in the man page for ypbind.
The /var/yp/Makefile file contains make commands that will create the NIS maps from the standard set of system files. There are some configuration options that affect the NIS map contents. A section of the /var/yp/Makefile is listed here:
# The lowest gid that will be included in the group maps.
MINUID=500
MINGID=500

# Don't export this uid/guid (nfsnobody).
# Set to 0 if you want to
NFSNOBODYUID=65534
NFSNOBODYGID=65534

# Should we merge the passwd file with the shadow file ?
# MERGE_PASSWD=true|false
MERGE_PASSWD=false

# Should we merge the group file with the gshadow file ?
# MERGE_GROUP=true|false
MERGE_GROUP=false
The low-order GIDs and UIDs in the /etc/password and /etc/group files are usually reserved for system entities. It is not desirable to export these values to all systems, so it is possible to set a threshold below which the NIS map will not contain the UIDs or GIDs. Remember that the exported values could override the local values, depending on the settings in the name service switch file. A similar situation occurs with the NFSNOBODY UID and GID values, which are defined to prevent unauthenticated users from accessing files on the local system via NFS.
Linux has the ability to use shadow password and group files to address the security issues caused by the permitted access to /etc/passwd and /etc/group. Because the user and group passwords are visible in these files, Linux can utilize separate files, with more restricted access, that “shadow” the information in the publicly readable files. The options to merge the password and group shadow information into the NIS maps allows sharing the information across the NIS domain, but also subverts the additional security provided by the shadow files.
The /var/yp/Makefile for NIS that creates the map database will create some default maps for the NFS automounter. The auto.master, auto.home, and auto.local maps are created from the associated files in the /etc directory. If you want to add maps, then you must modify the Makefile to add the processing necessary.
Modifications are necessary in four places in the file to add a map. Let's look at an example, adding the auto.indirect map, which will be created from the /etc/auto.indirect file. First, we need to add a definition for the new map to the list of files that are built:
AUTO_MASTER = $(YPSRCDIR)/auto.master
AUTO_HOME   = $(YPSRCDIR)/auto.home
AUTO_LOCAL  = $(YPSRCDIR)/auto.local
AUTO_INDIRECT= $(YPSRCDIR)/auto.indirect
If you examine the file, you will find that the YPSRCDIR variable is defined as /etc, so the definition $(YPSRCDIR) will be replaced by that string. Next, we add the target to the list of targets to be created:
# If you don't want some of these maps built, feel free to
# comment them out from this list.

all:  passwd group hosts rpc services netid protocols mail
      auto.indirect
        # netgrp shadow publickey networks ethers bootparams
        # printcap
        # amd.home auto.master auto.home auto.local
        # passwd.adjunct
        # timezone locale netmasks
Lines ending with the “” character are continued on the next line, in true UNIX format. Now we can locate a section of rules that create the auto.local map, clone it, and modify it for our auto.indirect map:
auto.indirect: $(AUTO_INDIRECT) $(YPDIR)/Makefile
        @echo "Updating $@..."
        -@sed -e "/^#/d" -e s/#.*$$// $(AUTO_INDIRECT) |
           $(DBLOAD) -i $(AUTO_INDIRECT)
           -o $(YPMAPDIR)/$@ - $@
        -@$(NOPUSH) || $(YPPUSH) -d $(DOMAIN) $@
This rule says: If ever the auto.indirect target is out of date with respect to the file specified by the variable AUTO_INDIRECT or the /var/yp/Makefile, then execute the commands below. This will read the /etc/auto.indirect file, remove leading and trailing comments using the sed command, and feed the results to the makedbm command, which will create a new map file in /var/yp/<domain>/auto.indirect.
These changes to /var/yp/Makefile are prototypical for adding any new map to the NIS domain's database, provided no specialized processing is required for the text in the source file. You may notice that the awk command is used in some of the rules to alter the order of tokens on the text lines (recall that the first token on the line becomes the database key for gdbm).
We can now add map information to the cluster's NIS domain, but why would we want to? Certainly, if we are going to use the NFS automounter facility, we may need to add more maps to the default set. But we can apply the general NIS map distribution and lookup mechanism to other goals, such as using NIS as a general-purpose database for our own system administration purposes.
Once NIS is started, we can access any map that it distributes, using the information there to affect system configuration and behavior. Say, for example, that we create an NIS map that contains host name-to-time server assignments. By accessing the NIS map, finding its host name, and extracting the associated time server IP addresses, a system could configure its own NTP server associations at boot time.
The system administrator could manage this information in a single place—the NIS map—and have the individual client system alter its behavior as part of the normal start-up. This assumes, of course, that NIS is operational at the time the configuration file needs to be generated. Although this particular example may not be earthshaking, I have seen this approach put to very good use in large environments.
Testing for proper operation of NIS is fairly straightforward, and uses several commands that are available. Some of the useful commands are
domainname—. to list the current NIS domainypwhich—. to list the current NIS server we are usingypmatch<key> <mapname>—. to find data that matches a given key in the mapypcat -k<mapname>—. to list the data from an NIS map, including the key
The first step in debugging a suspected NIS problem is to verify the operation with the tools listed here. Verify that the domain name is properly set, that the client is bound to an NIS server, and that information may be extracted from the map in question. If things don't work at this level, you may need to troubleshoot network configuration as well.
If the underlying NIS and network interactions appear to be correct, it is a good idea to take a look at the contents of the /etc/nsswitch.conf file to verify that it contains the proper configuration. NIS may be functioning properly, but if the hostname, automount, passwd, or other services are not configured to get their information from NIS, it could be the culprit.
The use of NIS is certainly optional in your cluster. I rarely find anyone who is neutral on the subject of whether to use NIS. I believe NIS can be extremely useful if your environment is not strictly focused on absolute security. There are security features available in the form of access control, but they do not address the inherently unencrypted design of the software's data transfer.
Even if you do not choose to use the NFS automounter, NFS, or /etc/passwd style authentication, NIS can provide useful facilities for name resolution and general data distribution. NIS certainly deserves consideration as part of your system administration suite if it can save you time and effort. For a more complete treatise on NIS, see Stern [1992].
Linux provides you with the choice of (at least) three sources for name resolution: the local /etc/hosts file, DNS, and the NIS hosts map. All three of these services may be tied together with the name service switch configuration file, /etc/nsswitch.conf, to provide access to multiple sources of host name information. As a system architect, you can choose the ordering of the services and their fall-back behavior.
The name service switch is implemented in the main system library, A schematic representation of the name service switch is shown in Figure 10-7. The routines in the main system C library are dynamically linked to applications that make lookup requests. The routines, like gethostbyname, in turn cause the /etc/nsswitch.conf file to be read, and a set of dynamic libraries to be loaded that handle the communications with the name services according to the configuration information in /etc/nsswitch.conf. (The dynamically loaded libraries in Linux have the .so suffix, which indicates a “shared object.” These libraries are loaded when referenced [explicitly or implicitly], and may be shared by multiple applications on the system. These libraries may also be called shared libraries on other operating systems.)
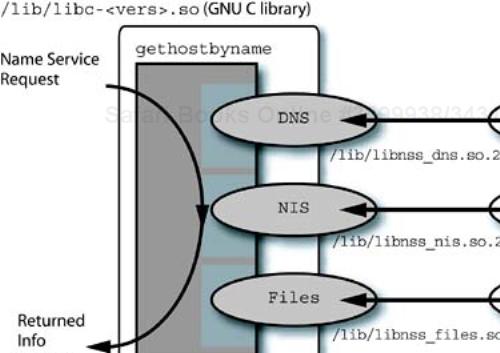
In addition to the flexibility of the name service switch, you have the ability to configure the behavior of the individual services. NIS may be configured to use DNS if a host query is not in its databases, and DNS may be configured to use multiple local servers and to forward unknown requests to external DNS servers. This is a lot of flexibility, and making the proper choices for flexibility, reliability, and ease of administration can be challenging.
In a small cluster it may be easier to manage just the /etc/hosts file, and the lack of dependency on the network can be a plus. In the long run, however, it is less error prone and more efficient with respect to updates to use one or both of the network-based services, once you invest in the work of setting up the service. The local hosts file may then contain only the absolutely essential IP addresses and names, like the file server and default gateways. Striking a balance between maintaining and distributing the data is the issue: If the network is not there, how much real work will you be getting done, anyway?
NIS is an optional service for name resolution, particularly if you are performance and security conscious. However, the ability to distribute automounter maps and other information from a single point is very useful. Using it as a fall-back service to DNS provides some additional redundancy. My tendency is to implement local DNS servers for the cluster “domain,” with fall-back to NIS via the name service switch, and a minimal amount of information in a local system's /etc/hosts file for each system in the cluster. This provides a local file as a final backstop for failures.
For the “fixed” resources in the cluster, like the administrative and infrastructure servers, static network configurations may be reasonable. In this case, the systems are not making DHCP requests and so will need their own host name and IP addresses in the local /etc/hosts file and network configuration files in /etc/sysconfig. Also, the NIS master, if you choose to use NIS, will by default distribute the /etc/hosts file from the system that on which it resides, so we are back to maintaining at least one complete copy of the /etc/hosts file if you choose to enable NIS.
A minimal hosts file, with default gateways and server system definitions, provides sufficient information to handle the system boot process in conjunction with DHCP. With a minimal configuration of /etc/nsswitch.conf, and the DNS, NIS, and “files” order of search, we can have reasonable flexibility and immunity to failure. Another strategy is to specify the host file first in the list, with a fall-back to DNS and finally NIS. Your selection depends on need and your level of comfort with the available name service options.
The choices are not always easy, and sometimes you have to pick an initial path and adjust it later. This is all the more reason to consider implementing several of the name resolution methods during the initial cluster installation. You can enable, disable, or reorder them with the name service switch configuration file to make changes. The rules of the system administration game are the following: You can't win, you can't break even, and you have to play. Anyone who tells you differently is probably selling something.
In this chapter we examined a number of general recommendations for the design and implementation of infrastructure services. How big your cluster is will determine how many systems you need to dedicate to infrastructure service, but for availability's sake you should dedicate two systems to this purpose. Your software requirements will determine which of the services are needed, and your design choices determine how the services are installed.
The discussion of common infrastructure services and configuration techniques, like network aliases, channel bonding, starting and stopping Linux services, time synchronization with NTP, and several name resolution services are intended to point to individual areas where you can do further research, if needed. Infrastructure services, such as time synchronization, are often overlooked in favor of more glamorous, software-like parallel applications. The services we are deploying, however, are required for the operation of the higher level software packages.
We will continue to build a strong foundation for our cluster's software environment in the upcoming chapters.
[1] Today's laptops are omitting serial ports from the standard connections that are available. There are a number of USB-to-serial port converters that are quite useful if your laptop does not have a serial port. The Linux minicom application is a terminal emulator that allows you to make the connection between your laptop's serial connection and the device to which you are talking.
[2] Actually, the hardware configurator is called kudzu, after the pervasive vine in the South that has tendrils reaching into everything.
[3] See Albitz and Lui [2001].
[4] Yes, having the service called one name (DNS) and the actual implementation, in the form of the named daemon and configuration file (BIND), called another name drives me crazy, too. I promise to try to keep it straight.
[5] Neither this command, nor the makedbm command are located in root's path. The commands are in the /usr/lib/yp directory.