
Although we've decided to go with a flat-six airframe, the exact airframe is yet to be decided. The materials, brand, and price can vary incredibly. Let's take a quick look at some specifications you should consider.
Carbon fiber looks cool, sounds even cooler, but what is it? It's exactly what it sounds like. It's basically a woven fabric of carbon strands encased in an epoxy resin. It's extremely easy to form, very strong, and very light. Carbon fiber is the material they make super cars, racing motorcycles, and yes, aircraft from. However, it's very expensive and can be brittle if it's compromised. It can also be welded using nothing more than a superglue-like substance known as C.A. glue (cyanoacrylate or Superglue).
Aluminum is also light and strong. However, it's bendable and more flexible. It's less expensive, readily available, and can make an effective airframe. It is also used in cars, racing motorcycles, and aircraft. It cannot be welded easily and requires very special equipment to form it and machine it. Also, aluminum can be easier to drill, while drilling carbon fiber can cause cracks and compromise the strength of the airframe.
What we care about in a DIY multicopter is strength, weight, and yes … expense. There is nothing wrong with carbon fiber (in fact, in many ways, it is superior to aluminum), but we're going with an aluminum frame as our starting point.
We'll need a fairly large frame (to keep the large rotors, which we'll probably need, from hitting each other while rotating).
What we really want to look at is all the stress points on the airframe. If you really think about it, the motor mounts, and where each arm attaches to the hub of the airframe are the areas we need to examine carefully. A metal plate is a must for the motor mounts. If a carbon fiber motor mount is used, a metal backplate is a must. Many a multicopter has been lost because of screws popping right through the motor mounts. The following image shows a motor mount (left) where just such a thing happened. The fix (right) is to use a backplate when encountering carbon fiber motor mounts. This distributes the stress to the whole plate (rather than a small point the size of a screwhead). Washers are usually not enough.

Similarly, because we've decided to use an airframe with long arms, leverage must be taken into account on the points where the arms attach to the hub. It's very important to have a sturdy hub that cradles the spars in a way that distributes the stress as much as possible. If a spar is merely sandwiched between two plates with a couple of bolts holding it … that may not be enough to hold the spars firmly. The following image shows a properly cradled spar:

In the preceding image, you'll notice that the spars are cradled so that stress in any direction is distributed across a lot of surface area. Furthermore, you'll notice 45 degree angles in the cradles. As the cradle is tightened down, it cinches the aluminum spar and deforms it along these angles. This also prevents the spars from rolling.
Between this cradling and the aluminum motor mounts (predrilled for many motor types), we're going to use the Turnigy H.A.L. (Heavy Aerial Lift) hexacopter frame. It carries a 775 mm motor span (plenty of room for up to 14-inch rotors) and has a protective cover for our electronics. Best of all, this frame retails for under 70 USD at http://www.hobbyking.com/hobbyking/store/uh_viewitem.asp?idproduct=25698&aff=492101.
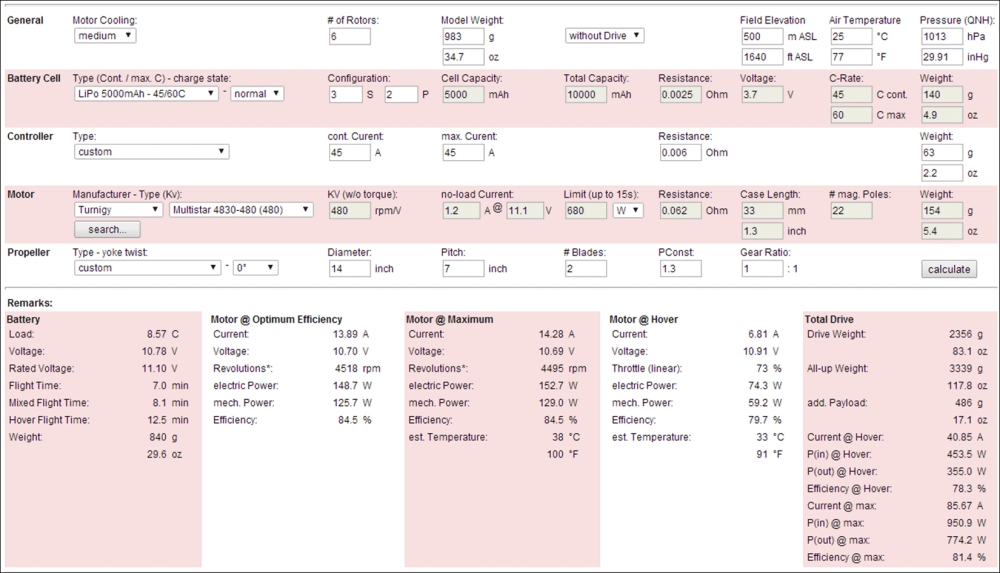
Now that we've chosen our airframe, we know it weighs 983 grams (based on the specifications mentioned on the previous link). Let's plug this information into our calculator (refer to the following screenshot). You can see that we've set our copter to 6 rotors, our weight to 983 grams, and specified that this weight is a without Drive system (not including our motors, props, ESCs, or batteries).

You can leave all of the other entries alone. These specify the environment you'd be flying in. Air density can affect the efficiency of your rotors, and temperature can affect your motors. These default settings are at your typical temperature and elevation. Unless you're flying in the desert, high elevations, or in the cold, you can leave these alone. We're after what your typical performance will be.
Let's skip down to the propellers. These will usually dictate what motors you choose, and the motors dictate the ESCs, and the ESCs and motors combined will determine your battery. So, let's take a look at the drive system in that order.
This is another huge point of stress. If you consider it, every bit of weight is supported by the props in the air. So, here it's very important to have strong props that cut the air well, with as little flex as possible, and are very light. Flex can produce bounce, which can actually produce harmonic vibration between the guidance system and the flexing of the props (sending your drone into uncontrolled tumbles).
Does one of the materials that we've already discussed sound strong, light, and very stiff? If you're thinking carbon fiber, you're right on the money. We're going to have a lot of weight here, so we'll go with pretty large props because they'll move a whole lot more air and carbon fiber because they're strong.
The larger the props, the stronger they need to be, and consequently the more powerful the motor, ESC, and battery. Before we start shopping around for parts, let's plug in stats and see what we come up with.
When we look at props, there are two stats we need to look at. These are diameter and pitch. The diameter is simple enough. It's just how big the props are. The pitch is another story. The pitch is how much of pitch the blade has. The tips of a propeller are more flat in relation to the rotation. In other words, they twist. Your typical blade would have something more like a 4.7-inch pitch at 10 inches. Why?
Believe it or not, these motors encounter a ton of resistance. The resistance comes from the wind, and a fully-pitched blade may sound nice, but believe it or not, propulsion is really more of a game of efficiency than raw power. It's all about the balance.
There's no doubt that we'll have to adjust our power system later, so for now let's start big. We'll go with a 14-inch propeller (because it's the biggest that can possibly fit on that frame without the props touching), with a typical (for that size) 8-inch pitch. The following screenshot shows these entries in our calculator:

You can see we've entered 14 for Diameter and 8 for Pitch. Our propellers will be typical two-blade props. Three- and four-blade props can provide more lift, but also have more resistance and consequently will kill our batteries faster. The PConst (or power constraint) indicates how much power is absorbed by the props. The value of 1.3 is a typical value. Each brand and size of prop may be slightly different, and unless the specific prop you choose has those statistics available … leave this alone. A value of 1.0 is a perfectly efficient propeller. This is an unattainable value. The gear ratio is 1:1 because we're using a prop directly attached to a motor. If we were using a gear box, we'd change this value accordingly. Don't hit calculate yet. We don't have enough fields filled out.
It should be said that most likely these propellers will be too large. We'll probably have to go down to a 12- or even 11-inch propeller (or change our pitch) for maximum efficiency. However … this is a good place to start. For now, let's move on to the motors.
Remembering that the props, motors, and ESCs must all be tuned to each other for optimum efficiency (and to minimize the risk of failures); now is the time to experiment. Before we get something in the air, experience a motor failure, start a forest fire, or worse yet, hurt an observer … we can now play around with calculations and see what we get.
With motors and propellers, there is a universal truth: smaller propellers turn faster and larger ones turn slower. This is because of the risk of something similar to cavitation at the tips. With this in mind, we want the motors to turn as fast as possible without causing cavitation around our props. The term cavitation is usually used in terms of propellers in liquid. However, a similar principle applies in air. By spinning a prop, you create high-and low-pressure zones. If a prop spins too rapidly, the trailing blade may move through an area of low pressure and decrease its efficiency. Basically, this means moving through its own prop wash. This can be a huge problem for stability and lift. Furthermore, a cavitating prop can encounter shock waves and even shatter because of them. The tips could also break the sound barrier and cause a shockwave that shatters the blade.
We also need to consider leverage. As the blades are longer, the tips of the blades will be moving faster. This is both the reason for a twist in a propeller (to provide consistent lift across the whole blade) and the reason for rotating it slower (taking torque as a higher priority to speed and reduction of cavitation or sound barrier risk).
An electric motor's speed rating is in what's known as KV. Basically, this is RPM (or revolutions per minute) per volt of electricity supplied to the motor. A good motor for a larger blade would be between 350 and 600 KV. With a 14-inch prop, it's probably somewhere around 500 KV. In case you haven't noticed, this is where we do some guessing and see what happens in the calculations.
Another thing to take into account when choosing a motor is whether it should be brushed or brushless. Without getting too deep into the intricacies of motors, a brushed motor wears out (as there is friction involved in the use of brushes to time the polarity of the electromagnets driving the motor); whereas a brushless motor will last much longer and be far more efficient. It would be completely senseless to choose a brushed motor for a large multicopter, so we're going brushless no matter what.
We'll also need to consider the number of magnetic poles in the motor. A motor is a series of electromagnets and a series of traditional magnets. The electromagnets switch polarity between positive and negative to attract the traditional magnets and push them away in sequence. This is what makes the motor spin. If you followed the same principle on a line instead of a cylinder, you'd have a rail gun, or maglev train.
Between each magnetic pole is a dead zone. This zone is where the influence of the electromagnets isn't quite as strong as it is when it's close to the electromagnet. This is also where (during rotation) the influence of the previous pole is lost and the next pole is picked up. This can cause vibration, make the rotation of the motor slow, and speed up ever so slightly. We're using these to run a camera, so platform, stability, and vibration reduction is key.
The more magnetic poles we have, the smoother the rotation of the rotors. The following diagram shows a 4-pole versus 8-pole example of a brushless outrunner motor. This is where the outer can of the motor rotates while the inner electromagnets remain stationary.

You can see how the overlapping fields of repulsion and attraction to the outer traditional magnets would produce a more steady thrust, less oscillation of the velocity of the motor, and less vibration overall. Basically, you can attain consistent power because of overlapping fields. The 8-pole motor is far superior to the 4-pole motor. Now imagine 20 or more poles. It would be like a surfer riding waves of electromagnetic fields. Huge, smooth waves. We'll be using 20-pole (or better) motors.
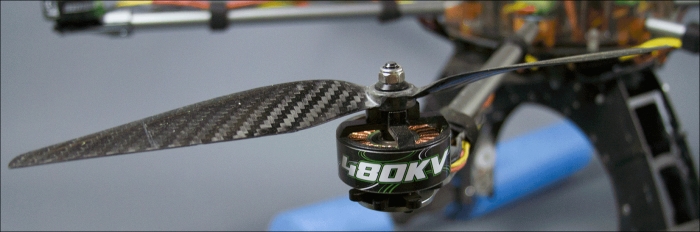
The final bit of consideration with a motor is the form factor. As we'll be using pretty powerful motors to turn our large propellers, they'll be big. We don't want a motor as tall as a beer can. Luckily, there is a solution for just such a problem. The Turnigy Multistar series of motors is among many that have more of a pancake form factor (wide, but short). Pancake motors are purpose-built for multicopters.
Multistars have a good reputation for reliability, stability, and are cost-effective. Let's use these motors for this example (as the entire line is already built into the calculator). The following screenshot shows our selection of the Turnigy Multistar 4830 (480KV) motor:

We chose this motor because the KV rating is 480 (close to our estimated 500), can handle a large battery, and has 22 poles. You can see that once we selected the motor, all the other fields were filled in for us and grayed out (the option to change the values taken away). All of the specifications of this motor are already in the calculator, so we can move on. To learn more about this motor, you can check it out at http://www.hobbyking.com/hobbyking/store/uh_viewitem.asp?idproduct=26961&aff=492101.
The following image shows the motor we'll be using:
Now that we know what kind of motors we're using, we can choose the ESCs.
Your ESC choice is a crucial decision. These are really where most electronic failures happen. An improperly balanced ESC can not only figuratively burn up, but quite literally can catch on fire. I still remember when I first started using fixed-wing aircraft on weekends to keep my flying skills up (a great way of practicing line-of-sight flying without destroying your multicopter … but we'll get into that in a later chapter).
I had an E-flite Spitfire Mk IV. It was a great plane, but I wanted it to go faster. So, I put a power 10 motor in it (a very powerful motor), and the spitfire caught fire in midair. It looked amazing … like it had been shot down by the other warbird following it. But then it occurred to me, "Wait, it's heading for that field of dry grass, and I have no control!" Nothing bad happened … fortunately. However, this is not always the case. Fire is never good in the air. It can be expensive, heartbreaking, and downright dangerous. Needless to say … balancing your ESC against your motor and power supply is extremely important.
We want our amp rating on our ESCs to be slightly over the amp rating of the motor (22 amps constant and 31 amp burst by its specifications on the vendor website). We can also see that the Multistar 45 amp 2-6S (the S rating is the battery that we'll get into next) is what's recommended by the manufacturer.
Unfortunately, the Multistar ESCs are not in the calculator, and not every specification is on the manufacturer website. So, we'll have to do some estimating here. The following image shows the Multistar 45 amp 2-6S ESCs we'll be using. They're available at http://www.hobbyking.com/hobbyking/store/uh_viewitem.asp?idproduct=27777&aff=492101.
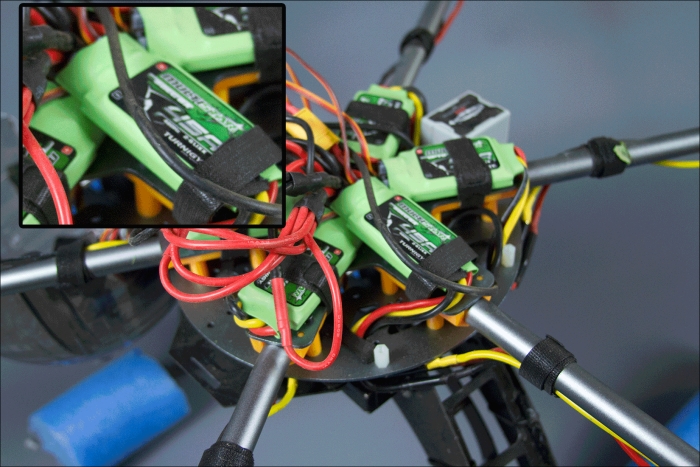
First, let's get close. In the ESC section of the calculator, let's select max 40A (which means a 40-amp ESC). This fills in a lot of the fields for us. Then, switch back to custom. Note that you have to have the full version (0.99 USD) to customize this setting. Now, we can set our cont. Current and max. Current to 45 amps and our Weight to 63 grams. The following screenshot shows our filled-in ESC (controller) fields of our calculator:

Another thing to consider is the Battery Eliminator Circuit (BEC). Usually, an ESC has a BEC built in to power your radio receiver. However, the guidance system we're using in this example (we'll get to it later) will supply power to the radio, so the ESCs don't have a BEC. If the guidance system you choose has no power supplied to the radio receiver, you'll need a BEC for this. We'll be skipping BECs because most multicopter guidance systems worth their salt supply power to the receiver.
Now, there's one more item before we can calculate and adjust … the battery.
Again … here is where you'll want to find the balance. Just because you have more voltage doesn't make your multicopter fly better. More voltage can also mean more weight.
When choosing a battery, there are a lot of chemical formulations available, from NiCd to LiPo. Without getting into all the ins and outs of battery chemicals, let me tell you this: the only choice for an aircraft is LiPo (Lithium Polymer). This is because it gives you the best power and the lightest weight. LiPo batteries require special balancing chargers (that provide equal power to each cell of the battery), so make sure that you also get a LiPo-specific charger.
Also when choosing a battery, there are two numbers you should concern yourself with first: the S rating; and mAh rating.
The S rating of a battery simply means how many cells the battery has. Remember, a battery is not a single chunk of chemicals providing power. When you call that AA cell a battery, that's actually incorrect. The battery is the series of cells you have when you put two of those in your television remote. A battery is a collection of cells. Each LiPo cell is of 3.7 volts. So, a 2S battery is 7.4 volts, a 3S battery is 11.1 volts, and so on.
The mAh (milliamp hour) rating is really how long the battery will last. Each mAh represents 1 hour of battery power for each .001 amp (milliamp) of power drawn from it. So, as you can see, volts may not be the best use of weight. To get more time in the air, you'll want more mAh (or capacity) on your battery.
In all of my flying, I've used a lot of different brands of batteries. The best batteries I've found for the money are the Turnigy nano-tech batteries. They seem to be lighter and lasts me far more charges than other batteries I've tried with less puffing.
Puffing brings me to the final statistic (important, but the final consideration), that is, the C rating. Simply put, the C rating is how many times the mAh rating the battery can have drawn off of it safely. Overdrawing a LiPo battery can lead it to puff up … literally, it expands. Overexpanding the battery can lead to an explosion of the battery and an extremely hot fire. If you ever have a battery puff on you, dispose of it properly and don't ever use or charge the battery again. A video of LiPo batteries puffing and burning can be found at https://www.youtube.com/watch?v=zQheOtdCTjs.
An example of a C rating is this: if a battery has 5000 mAh and a 1C rating, it can withstand 5 amps drawn from it. At 5000 mAh and a 30C rating, it can withstand 150 amps drawn from it safely. As we're using 6 x 45-amp ESCs, we should look at a battery that can withstand at least 270 amps of draw from it.
Let's start with two batteries, each at a 6S, 5000 mAh, and 45-90C.
These batteries (run in parallel) will give us 10,000 mAh of life and can discharge 450 amps (very comfortable for our 270 amp requirement). We'll probably need to respecify these later, but let's go for the gusto right now.
The following screenshot shows that we've picked the 5000mAh LiPo option with 6S, and 2P (parallel) in our calculator:

Ok, now let's hit calculate and move on to tweaking our specifications.
If you've hit calculate already, you're probably thinking, "What went wrong?". In the following screenshot, we can see that our results show only 2.2 minutes of flight time and a whole lot of warnings!

We've obviously overpowered our motors … greatly. This is proof that bigger is not always better. We probably also have too much pitch on our props. The motor shows far too much draw in amps, and we're going to overheat and kill our motors and ESCs if we max out the throttle.
So, let's tinker. We still want our batteries to have as much life as possible because this means we stay in the air as long as possible. However, we may not need that many cells (S) in our batteries. Let's cut it in half (go down to 3S) and hit calculate. The following screenshot shows the results:

Ok, we're on the right track. We've gotten rid of the warnings, but our flight time is still only at 6.4 minutes. We still haven't added the weight of our camera, gimbal, or guidance system. Let's get that flight time up to at least 7 minutes by playing with the propellers.
Let's shift the pitch of the props down from 8 inches to 7 inches and see what this gets us. The following screenshot shows us the results:
Cool! We've met our minimum of 7 minutes of flight time. The propellers are available at http://www.hobbyking.com/hobbyking/store/uh_viewitem.asp?idproduct=25696&aff=492101. For now, let's leave our stats alone and move on to the other components and see how that affects the results.