This section will describe how to configure a blueprint, add it to a service catalog, and make it orderable for users in a given business group. It will cover the following points in greater detail:
- Creating and preparing a template in vCenter to be used for a blueprint
- Creating a network pool to be used with a pre-existing VLAN
- Creating a set of properties to be used with the blueprint
- Creating an IaaS blueprint for a VM
- Publishing the service for a given business group (entitlements)
Before the blueprint can rely on the template, a few things have to be checked in vCenter in order to make it a successful and straightforward deployment. Here is a list of things which should be considered for the template:
- The most recent VMware tools should be installed in the template
- The vRA Guest Agent should be installed successfully in the template
- If it is a Windows template, it should NOT be part of a domain (only a workgroup)
- For Windows or Linux VMs, there should be a valid customization specification available in vSphere.
- The template should have a limited size, for example, 40 GB for Windows Server 2012 - with one disk. Of course, this depends also on processes, standards, and policies from the organization.
- All necessary software which can and should be pre-fitted is already installed (for example, AV scanner, backup client, and so on)
The part with the customization specification is possibly one of the most important. Especially for Windows VM Clones, it is important to have this ready for vRA. This will be used with every deployment and ensure that all Windows VMs are correctly activated and added to the domain if necessary.
However, also for Linux, those specification settings are important, since they take care of resetting the interface configuration (ifcfg) files to ensure the network comes up correctly. A detailed instruction on how to set up a specification setting can be found in the VMware vSphere documentation.
Network pools are required to attach the deployed VM to a pre-existing LAN environment. Typically, they describe a port group on vSphere. However, it is recommended to either name them identically to the port group they attach to, or at least easily identifiable.
Network pools can additionally contain reserved IP addresses. In a sense, vRA delivers a poor man's IPAM where a block of IPs can be reserved for vRA and every time a VM is deployed it will get an IP out of this list. This is typically used in legacy environments without NSX possibilities.
Also, the use of an external DHCP is supported; in this case, no IPs are reserved and the VMs are just deployed relying on the external DHCP to deliver an IP address. Also, it is possible to integrate an IPAM service using vRO workflows.
In vRA 7.2, the Infoblox integration works out of the box:
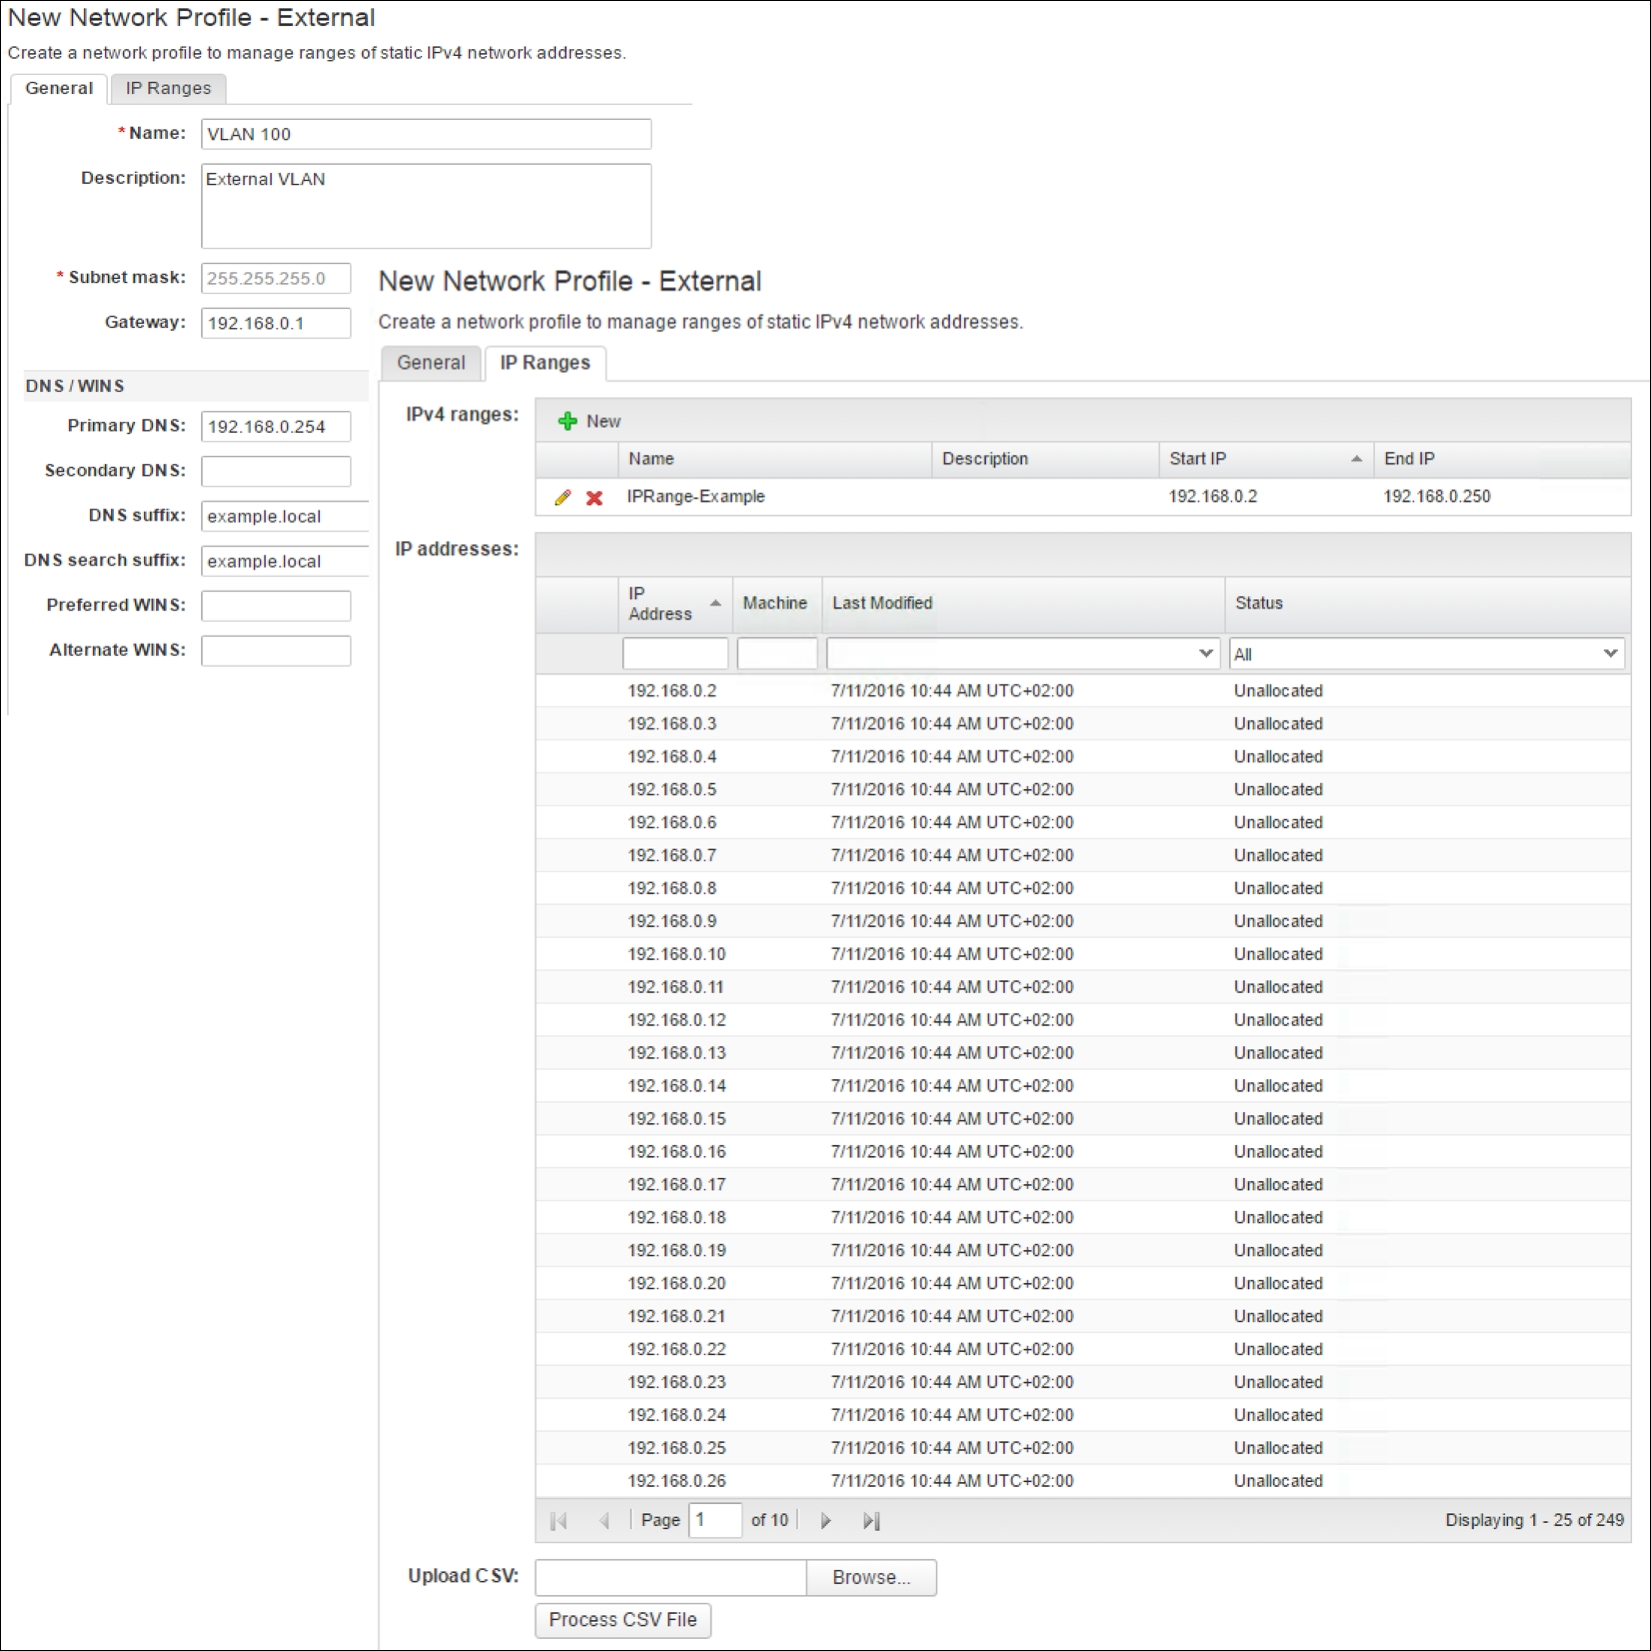
To create a network, please follow these steps:
- Open vRA and log on with a privileged user (at least tenant admin).
- Click on Infrastructure and then on Network Profiles.
- Click the New button and select External.
- Provide a descriptive name - best practice is to include the VLAN ID if any.
- Provide the VLAN as well as subnet information for the pool.
- Click on IP Range and enter a valid IP range for your network, for example,
192.168.0.2 - 192.168.0.250. - Save the configuration.
Before continuing, ensure that the newly created network pool is associated with a vSphere port group under the Infrastructure | Reservations tab:

- Click on the Infrastructure tab.
- Click on Reservations in the left-hand menu.
- Choose the reservation regarding your tenant.
- Click on the Network tab.
- Check the network path (VDS port group) which relates to the created network profile.
- Choose the Network Profile in the drop-down list.
- Click OK to save the configuration.
As described, properties will be useful to integrate third-party solutions such as backup. Let's create a retention policy property, where the user could choose how long the machine will be kept:
- Open vRA and log on with a privileged user.
- Click on the Administration tab.
- Click on Property Dictionary.
- Click on the Property Definitions menu on the left-hand side.
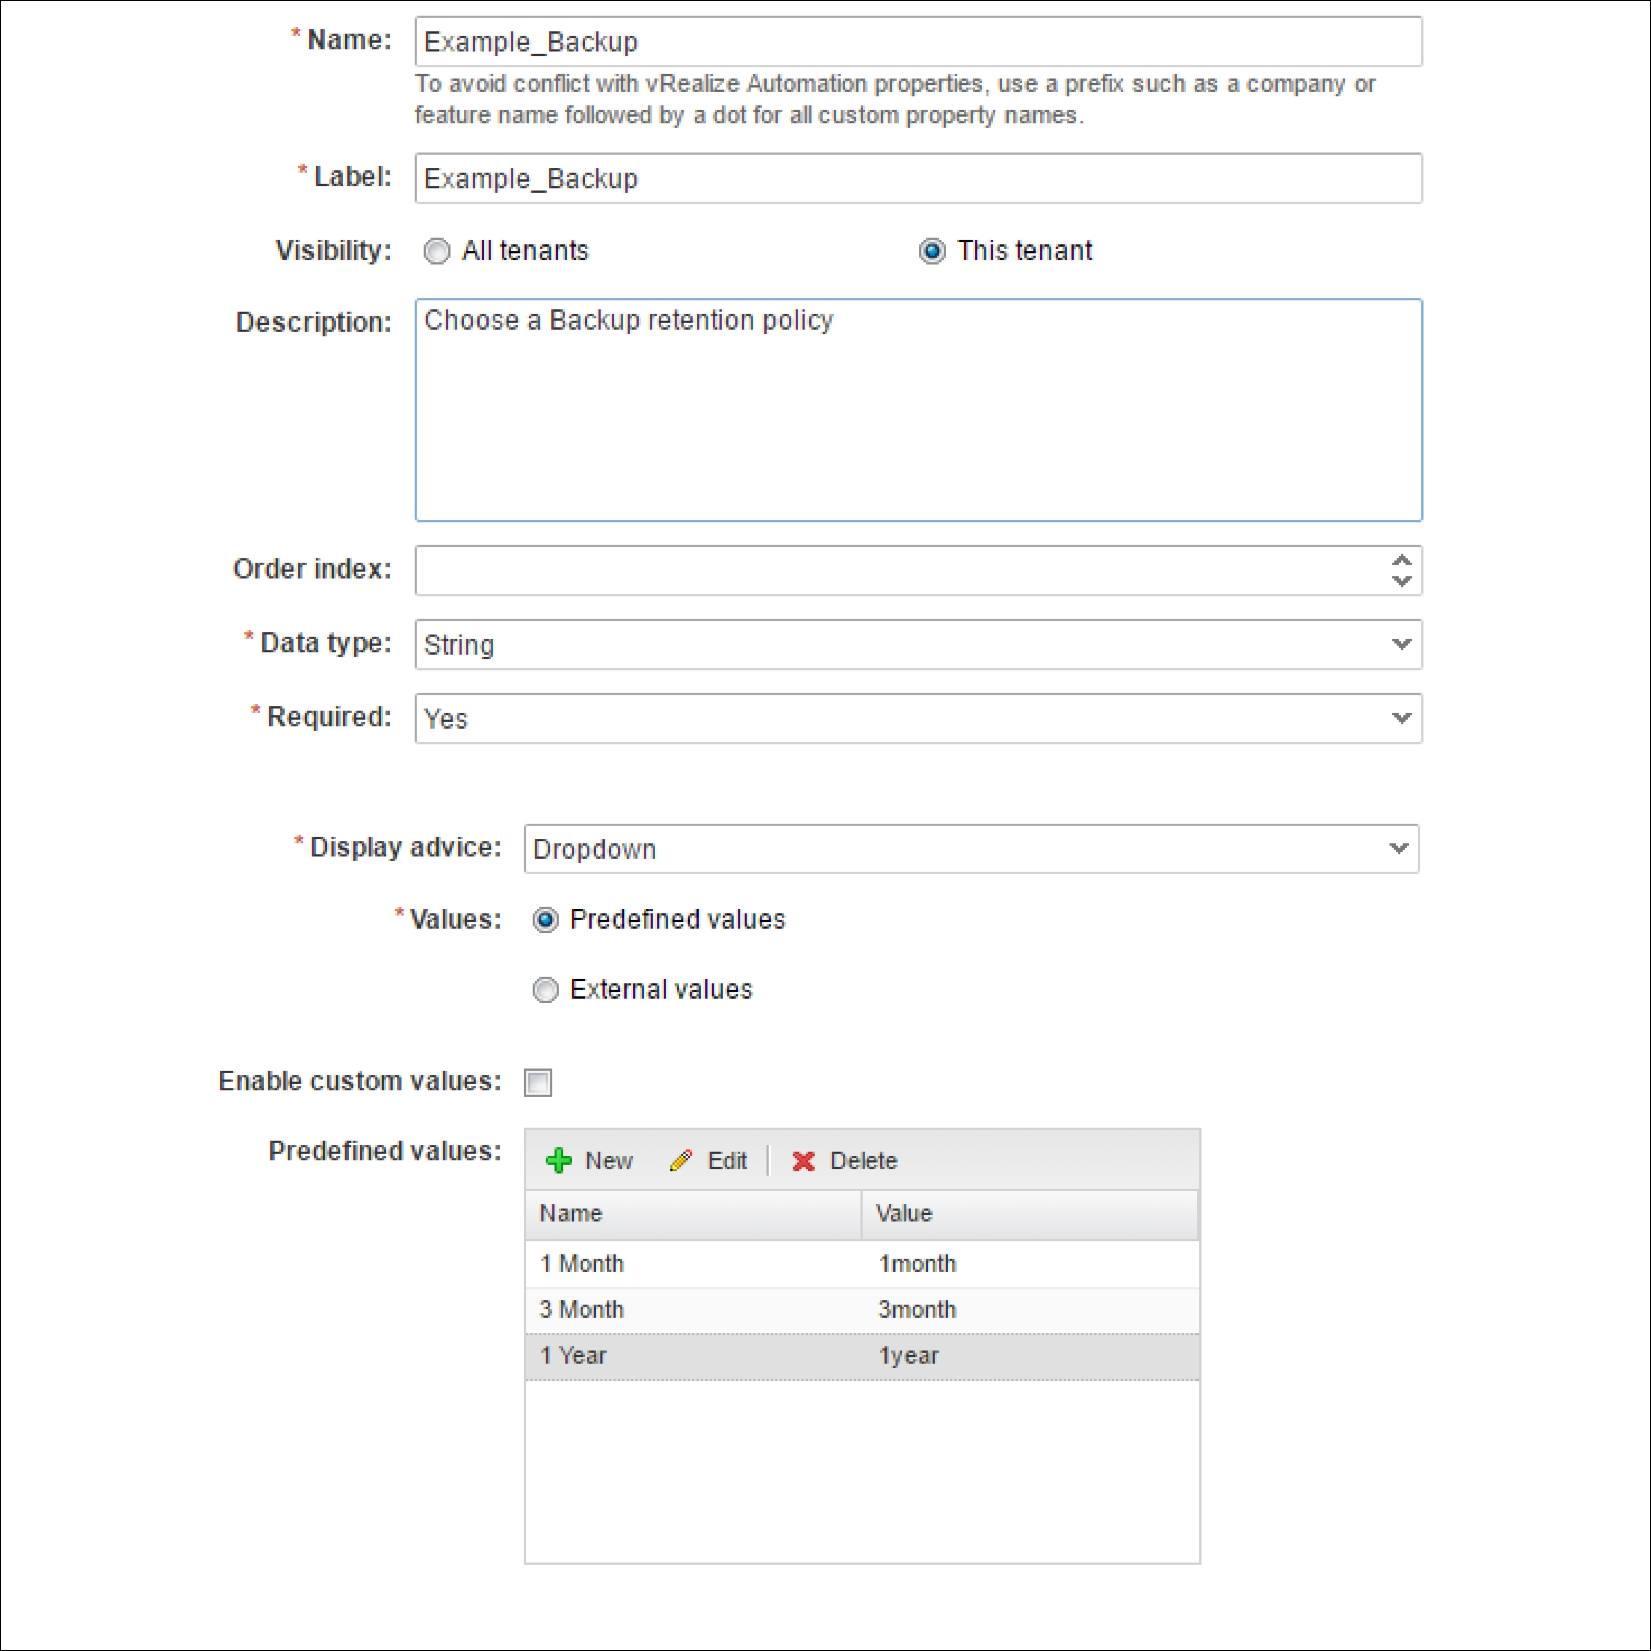
- Click on the New button to add the properties.
- Enter a descriptive property name, remember to use custom prefixes such as Example - note that the label can be different than the name!
- Choose a data type, for example,
String. - Define the display advice, for example,
Drop down. - Choose Pre-Defined Values.
- Enter the desired backup retention values, for example,
1 month,3 months,1 year.
Create a properties group if not already present. This will enable the properties to be used also in blueprints by adding simply the properties group. To add a group, follow these steps:
- Click on Properties Group in the left-hand menu.
- Click on the New button.
- Provide a descriptive name (maybe with the same prefix as the property). The ID gets generated automatically out of the name (needs to be unique!).
- In the Properties field, click on New and use the selector to choose the previously created property.
- Click on Show in Request so the user is able to choose from the property values.
- Click OK to save the property.
- Click Save to save the property group.
Now, since we have completed all the pre-work, the design of the blueprint itself can be done using the preconfigured assets. In this case, it will be a Windows 2012 blueprint which will be added to a distinct network in a preset VLAN. For backup options, there will be a selectable amount of retention period for the user in the steps of 1 month, 3 months or 1 year:
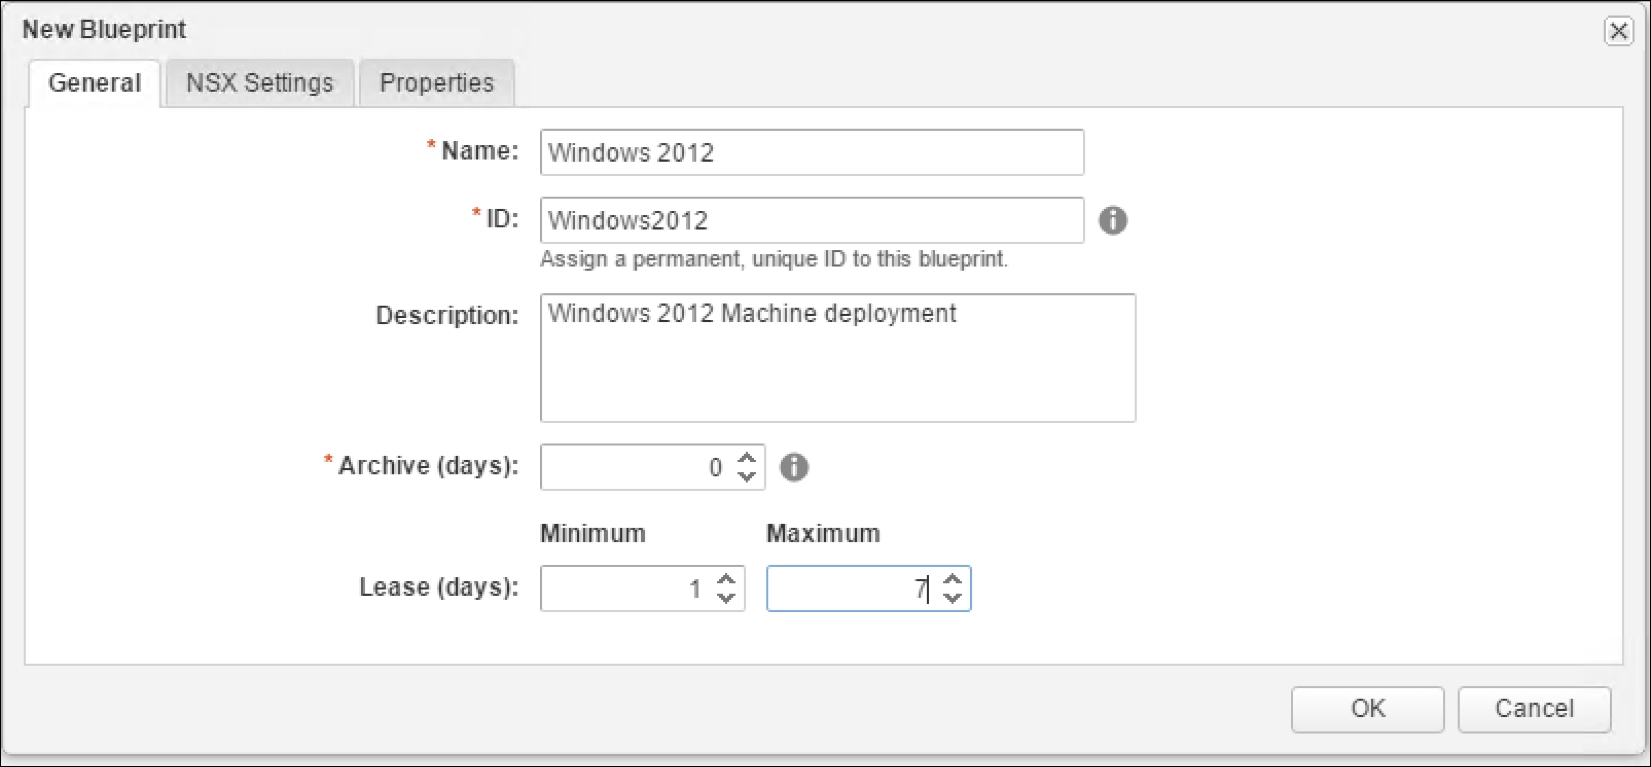
- Open vRA and log in with a privileged user holding at least the designer role.
- Click on Blueprints in the left-hand side menu.
- Click on the New button.
- Provide a descriptive name, such as
Windows 2012. - Give it a description; this will be seen by the user requesting the service.
- Set Archive days.
- Set the minimum and maximum lease time:
- Under the Properties tab, click the Add button on the Property groups tab and select the previously set up Properties group.
- Click OK to get to the graphical designer.
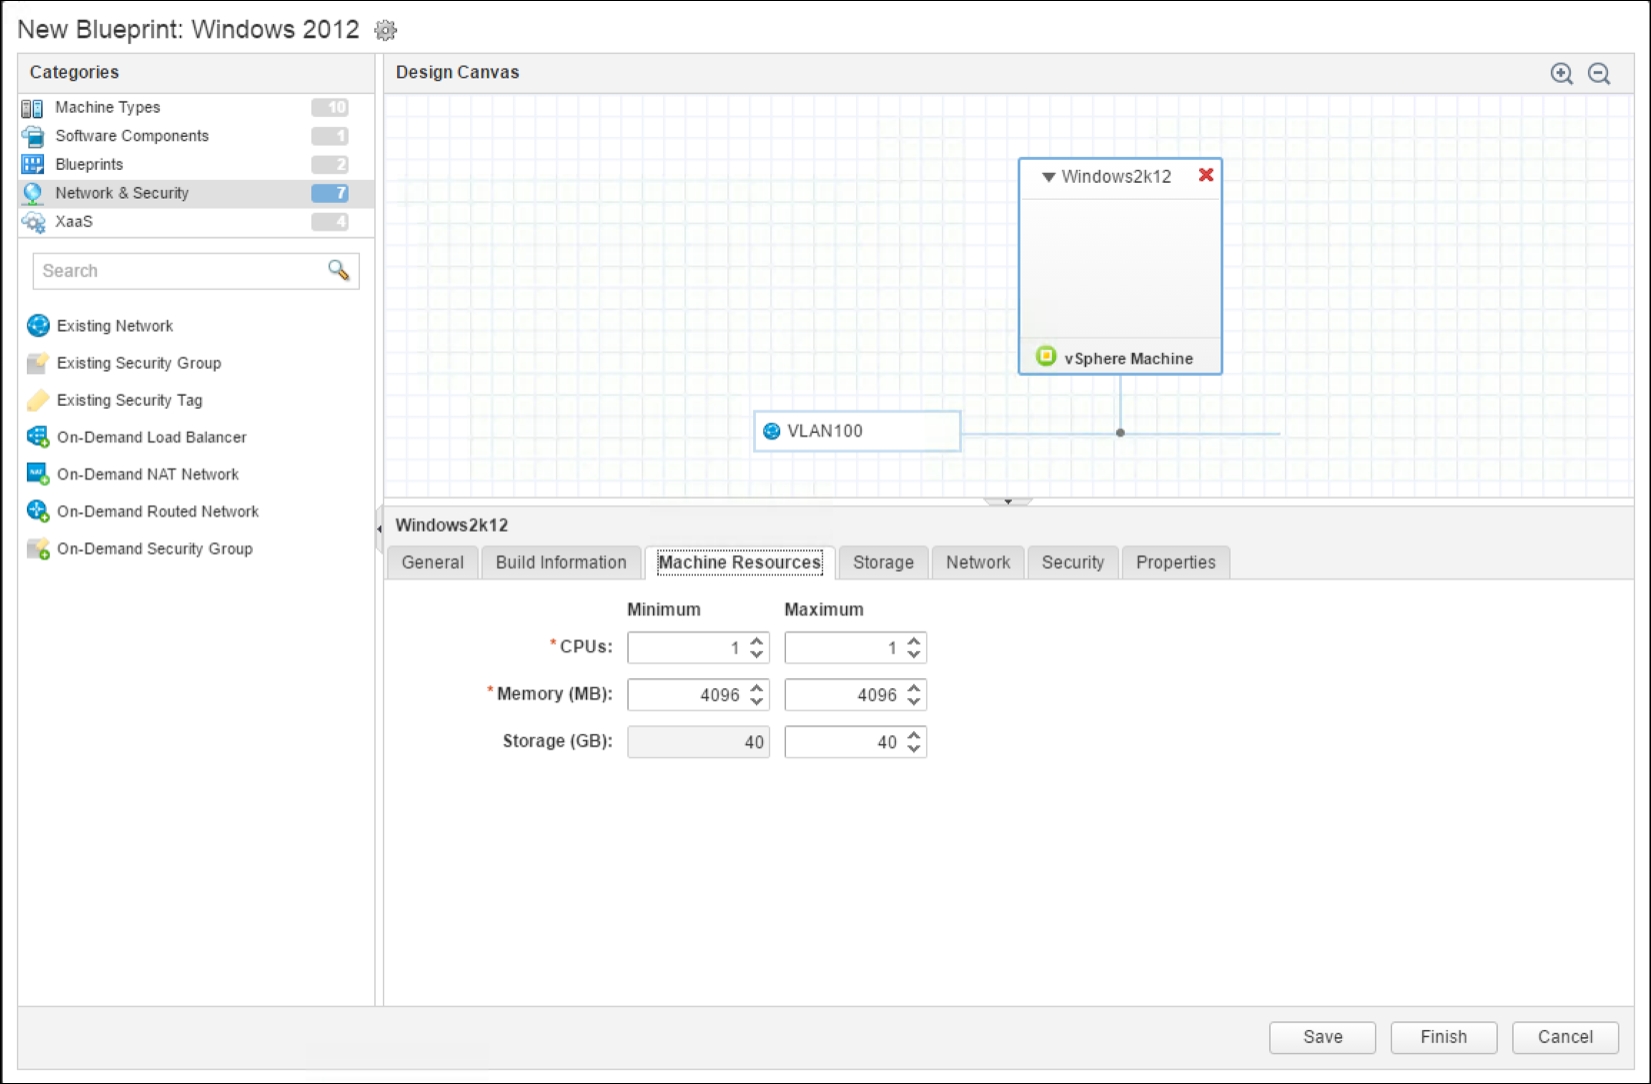
- In the designer UI, drag a vSphere Machine from the left-hand side into the canvas.
- In the top-left corner, at the Categories area, click on the Network and Security option.
- Drag and drop an Existing Network into the blueprint.
- Click on the newly added network icon to open its preferences at the bottom of the canvas.
- Under General, click on the button and choose the previously created network.
- Click on the vSphere Machine on the canvas to open its preferences at the bottom of the canvas.
- In the General tab, provide an ID (no spaces) as well as a description.
- Select either Group Default or a preset machine name prefix from the drop-down field.
- Set the minimum and maximum count of instances allowed in the blueprint. Leaving that blank is equivalent to no limit.
After you have added all this, it is time to configure the installation method for the blueprint. There should be a template in the environment to use; this is how to configure the blueprint installation leveraging vSphere templates:
- Click on the Build Information tab.
- Select Clone in the Action drop-down menu.
- Under Clone from, click on the button with the three dots to the Windows 2012 template from the vCenter endpoint.
- Under Customization Spec, write exactly the name of the vCenter customization spec, including upper- and lowercase letters and possible spaces. Tip: Go to policies in vCenter, select it, and copy and paste the name to prevent typos!
- Under the Machine Resources tab, the minimum and maximum vCPU, memory, and storage configuration can be set.
- Under the Storage tab, the template disk should show up as a given. The machine cannot be smaller than the template disk size. Additional disks to add can be configured here.
- Click on the Network tab and then on the New button.
- Select the added network
your VLAN- as assignment type, select DHCP and click OK. This will ensure the VM gets a VLAN from the previously created pool. - Click Save and then Finish.
- The blueprint is successfully configured:
Now, since the blueprint is configured and using all the other services, it is time to publish it. This last step will add it to the catalog and therefore it can be requested by users on demand:
- While still logged on to vRA, in the Design tab, select the newly created blueprint.
- Click on Publish in the heading row.
- The blueprint status will change to Published.
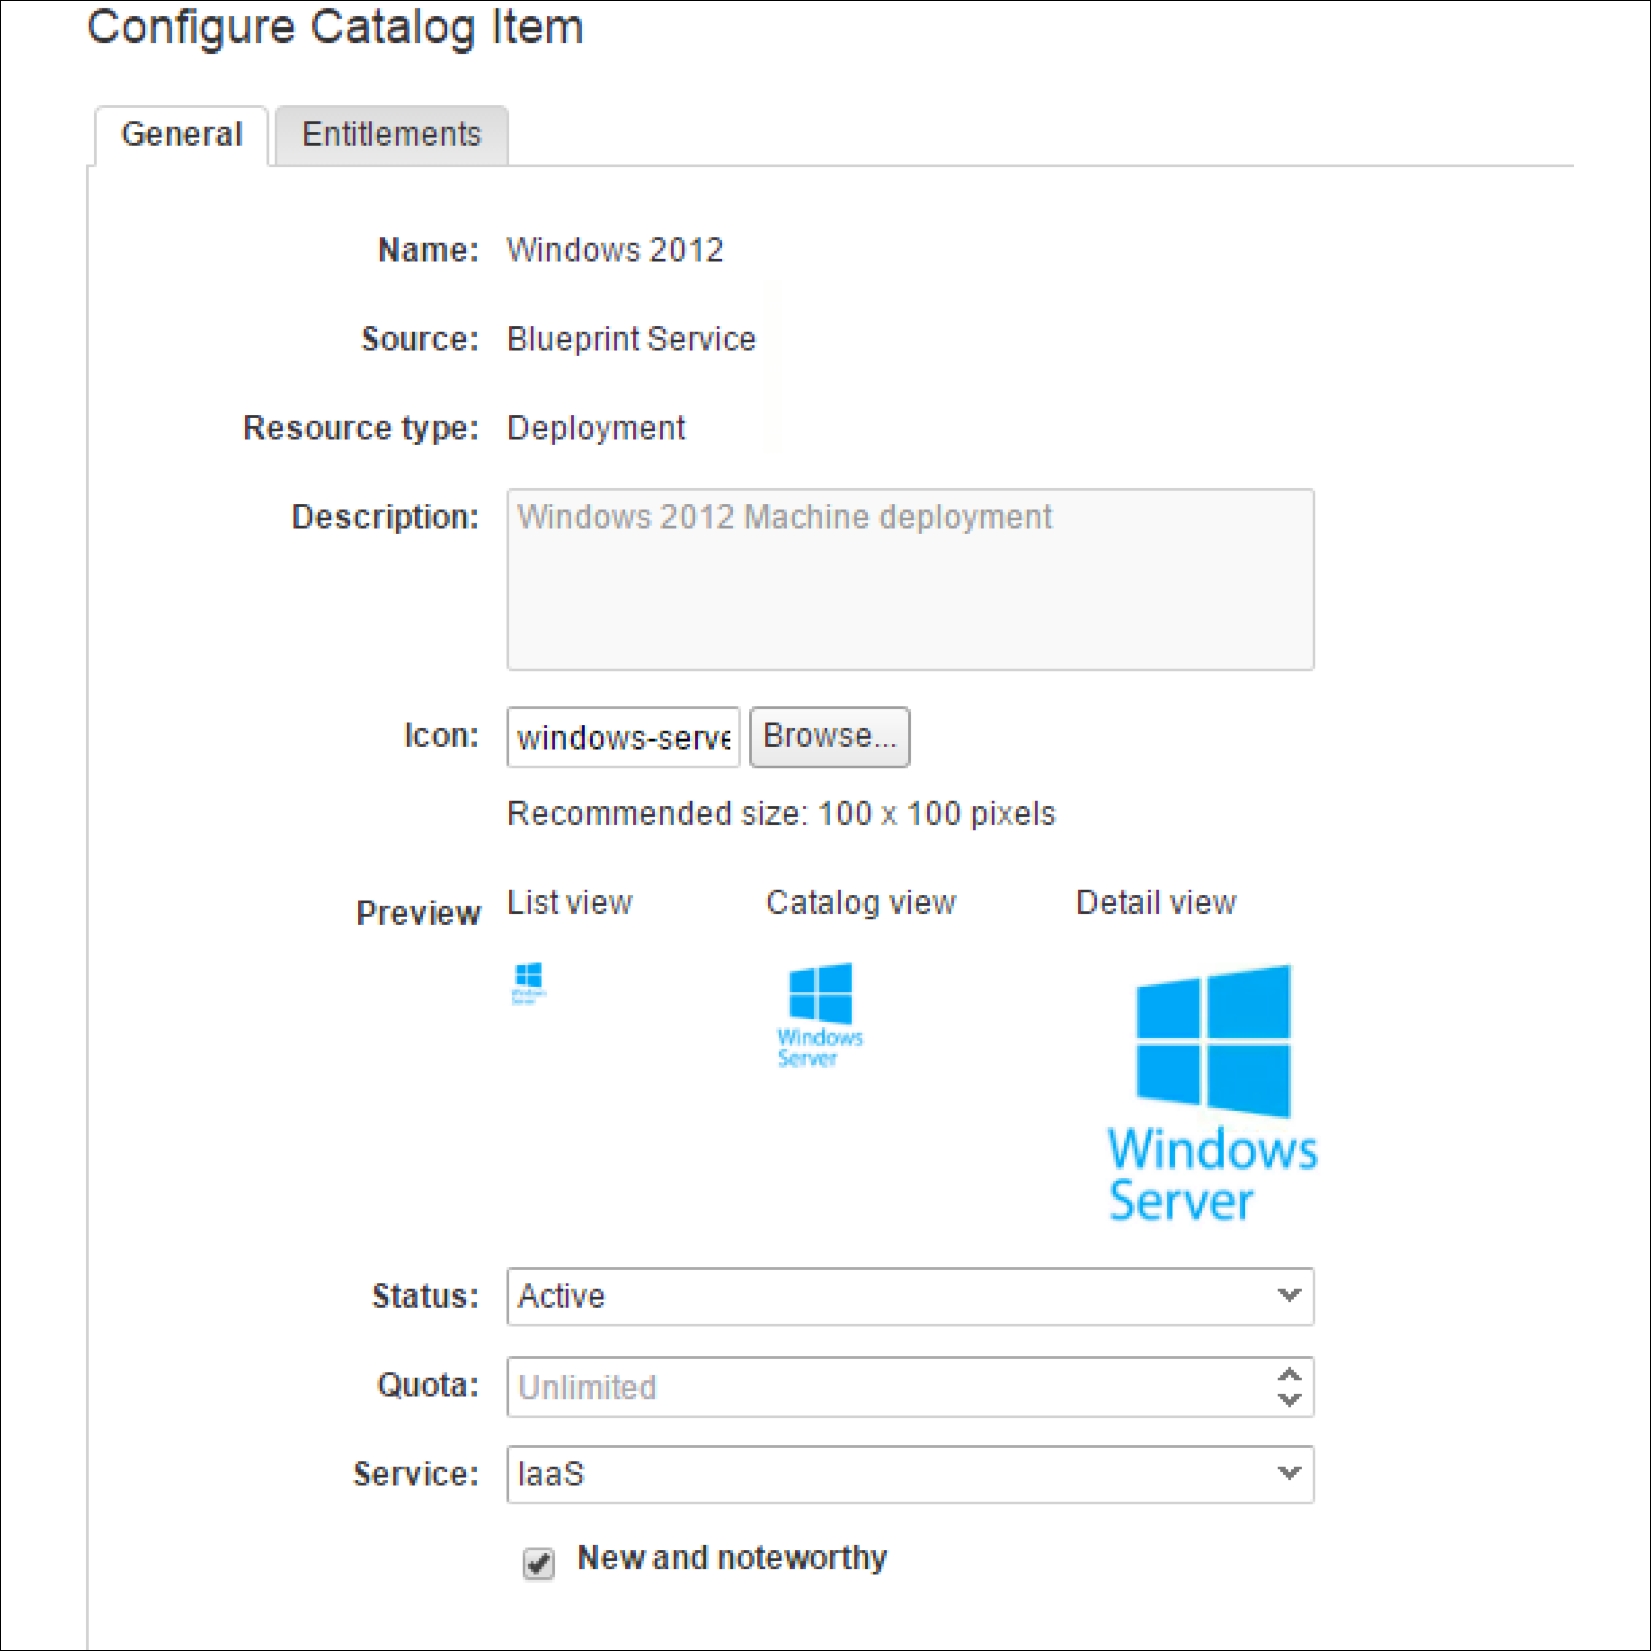
Now, since the blueprint is published, it can be seen under Catalog Items. To add it to a catalog, do the following:
- Click on the Administration tab.
- Select Catalog Items in the left-hand menu.
- Click on the newly added
Windows 2012blueprint. - In the settings screen, pick a service (probably IaaS) and select an icon for your blueprint if applicable.
- Click New and noteworthy to make the newly added service stand out: