In previous chapters, we have started the Django project and React project, representing back-end and front-end parts of our mobile application. In this chapter, I will explain how to attach a user interface to our engine and structure our MVC model. React will help us to gather all pieces together and make our CRUD more versatile and user-friendly. The purpose of this chapter is not to build a desktop version of our app but rather to show you React in action and prepare you for React Native. We are not going to spend a lot of time on styling bells and whistles because our ultimate goal is a mobile app. Nonetheless, if you decide to continue with a desktop version, this chapter would provide you with a solid foundation for many additional React features.
Cross-origin resource sharing
After we have launched the React project and run it on localhost:3000 and the Django project runs on the 8000 server, you are probably asking yourself a question of how we would connect these two together. The general idea is to call APIs and to render data from the back-end with React. However, Django would not accept an outside request from an unknown source. Usually, when you deploy your projects to a production server, you would replace temporary developer server URLs with domain names. Any website by default restricts access to its resources from other domains. To allow our React application to fetch URLs from the Django project, we would need to install and enable CORS (cross-origin resource sharing). There is a Django extension, django-cors-headers, that adds CORS headers to responses1 with very flexible settings. We will go through the whole process right now. If you would like to learn more about this package and see other available options, go right to the source: https://pypi.org/project/django-cors-headers/.
Anytime you would want to add a library to your Django project, make sure your virtual environment is engaged. Also, do not forget to append the package name and version to the requirements.txt file. In your pizzavspizza directory, if you use Mac, run the source command to engage the virtual environment.
source venv/bin/activate
For Windows, activate virtualenv in the Scripts directory, like this:
pizzavspizzavenvScriptsactivate
If your virtual environment is on, you can move to the installation of django-cors-headers with the pip command.
pip install django-cors-headers
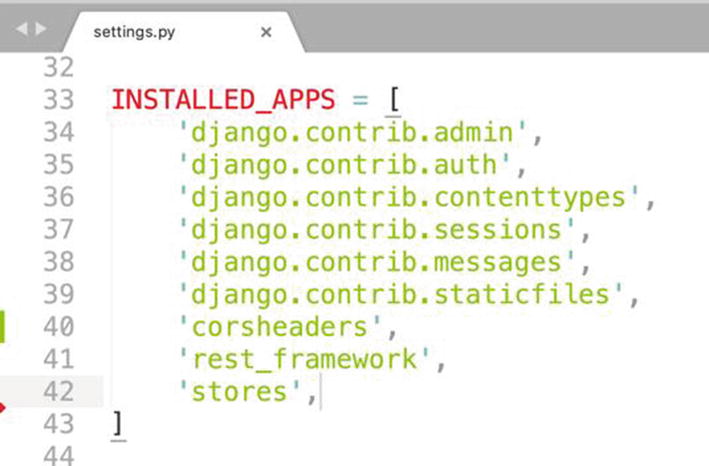
django-cors-headers is an app, and we need to add ‘corsheaders’ to INSTALLED_APPS in the Django settings.py file (Figure 4-1).
Figure 4-1
Add ‘corsheaders’ to the INSTALLED_APPS list in the settings.py file
Also, we need to add ‘corsheaders.middleware.CorsMiddleware’ and ‘django.middleware.common.CommonMiddleware’ to the MIDDLEWARE list in the same settings.py file. Try to place them at the beginning of the list (Figure 4-2).
Figure 4-2
Put corsheaders.middleware.CorsMiddleware on top of the MIDDLEWARE list in the settings.py file
The last step in the process of setting up and configuring CORS for our Django project would be to add the CORS_ORIGIN_ALLOW_ALL or CORS_ORIGIN_WHITELIST option. CORS_ORIGIN_ALLOW_ALL when set to True would allow all sites to access our APIs. This is totally normal when you are in the development mode. If you want to be specific and indicate all domains that would have the permission to grab data from your site, then you would need to assign them as a list to CORS_ORIGIN_WHITELIST. The latter option would be preferable for the production mode. For simplicity, we will set CORS_ORIGIN_ALLOW_ALL = True (Figure 4-3).
Figure 4-3
CORS configurations in settings.py
Fetch API with Axios
As you remember in the previous chapter, we went over a React component structure and coded a PizzaList component that would read dummy JSON. It is time to replace dummy data with actual records from our database.
Make sure both of your projects are running on local servers. Just to remind you, start Django with the command runserver, and you should see it in the browser at http://127.0.0.1:8000. Sometimes, for simplicity’s sake, developers would replace the 127.0.0.1 part with a localhost, and the final IP would look like localhost:8000.
python manage.py runserver
React starts with the command npm start, and it will be running in another browser window if you navigate to localhost:3000.
npm start
At the moment, our PizzaList component has just one method render() and loops through DummyData imported from a file. We need to replace DummyData with the actual data. The best place to call an API in the React component would be the componentDidMount() method. Before we add this method to our component, let me briefly explain how it works.
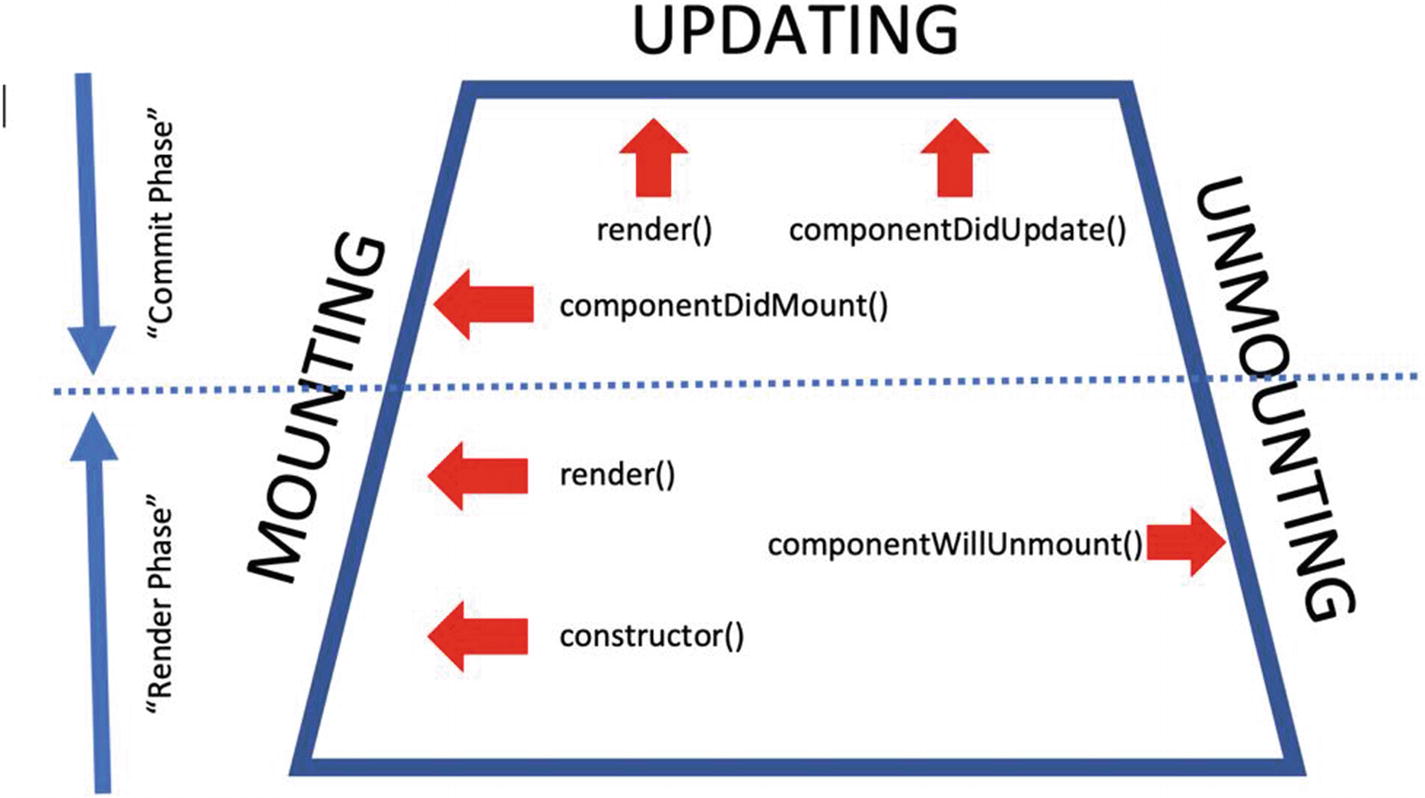
Lifecycle of a component
At the moment, our PizzaList component has just one method render(). As I have mentioned before, render() is essential to a component. When you are rendering a component, React is inserting, or the right word would be mounting, this element into the DOM. Later, this component might be updated with new data or completely unmounted from the DOM, or simply saying, deleted. This process is called the lifecycle of a component (Figure 4-4). You can draw an analogy with an actor on the stage. An actor comes on the stage and performs, like a component becomes a part of the DOM and renders something. If the audience liked the performance, an actor could present another gig, pretty much like the same component being updated with new data. Finally, when the show is over, an actor leaves the stage, and we unmount a component for the time being.
Figure 4-4
Lifecycle of a component
If we split the mounting process into steps, we would see that first the constructor() method comes into play, then render(), and lastly componentDidMount(). So far, we have mostly used the render() method. In the next chapter, we will see a practical application of constructor() and componentDidMount() methods. The constructor method is used for two things, initializing an object and handling events. All attributes of an object should be in place before the render() method adds a component to the DOM. Consequently, componentDidMount() fired after a component was added to the DOM. The main idea behind componentDidMount() is to add supplementary statements to a component. This method would be ideal to make an API call within a component.
Although technically the componentDidMount() method is called after the component has been rendered, it would be a good idea to place it above the render method. That is exactly where we will define it in the PizzaList component. Inside componentDidMount(), we will call our API with the help of the JavaScript library Axios. There are two options on how you can call an API in React: Axios or method fetch. Both of them do the same thing – send a request to a server. I encourage you to try both options and see what would work for you. Fetch is a JavaScript method, and you do not have to install it. I have an example of the fetch method in footnotes in case you would want to give it a try.2 Here, I will use Axios. The Axios syntax is simpler, besides we would need it for the React Native part.
To start with Axios, we would need to install it with the npm command.
npm install axios
After Axios is installed, we can import it in our pizzeriaslist.js file.
import axios from 'axios'
The next step is to implement our first API call in componentDidMount. To send a GET request and fetch data from our database, we would use the axios.get method. The syntax is pretty simple, and you can find all available options for all HTTP requests here: www.npmjs.com/package/axios. The method axios.get would return a response, and for now we just print this data with console.log().
componentDidMount(){
axios.get("http://127.0.0.1:8000/")
.then((response) => {
console.log(response)
})
.catch(function (error) {
console.log(error);
})
}
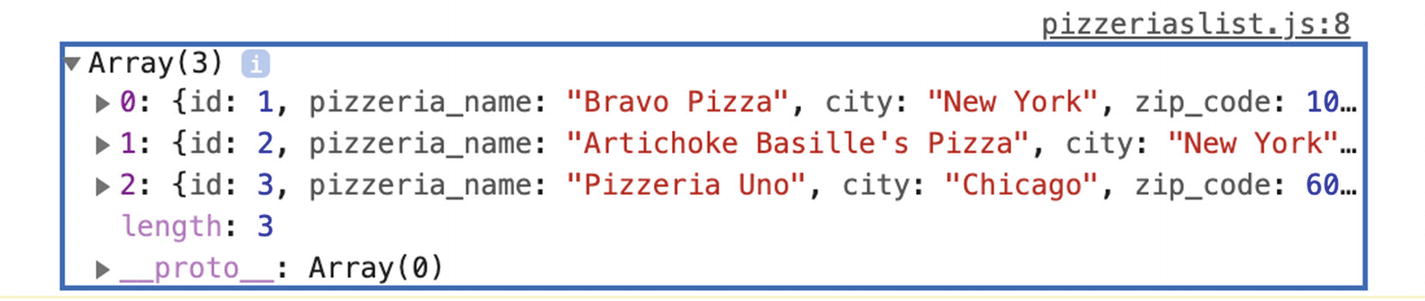
You can find incoming data from the API in the browser. Make sure your local server is running on the localhost:3000 port. Right click of your mouse should get the developer tools menu with the inspect option (I am using Chrome browser). Choose inspect option and make sure the Console menu is chosen to see the JavaScript code in action. There might be a few warnings. Disregard them for now, and look for Array (3). You’ll find Array (3) next to the pizzeriaslist.js:8 line of code. Click this little arrow to expand the Array. The Array holds all data that came from our Django project (Figure 4-5) and structurally looks like JSON.
Figure 4-5
Data printed by console.log()
OK, the API call went through just fine, and we can set up incoming data as property value of the PizzaList component by adding it to State.
In the PizzaList component, initialize State and define pizzeriasData as an empty array like this:
state = {
pizzeriasData:[]
}
After State is defined, we need to pass our data into it. Replace console.log command with the setState method.
this.setState({pizzeriasData: response.data})
The attribute data will get us JSON from the response. The last but not least change should be done to the render method in the PizzaList component. We need to replace DummyData in our render method with the actual data.
this.state.pizzeriasData
Replace the dummy data with pizzeriasData from state:
render(){
return(
<div>
{this.state.pizzeriasData.map( item => {
return <h3>{item.pizzeria_name},{item.city}</h3>
})
}
</div>
)}
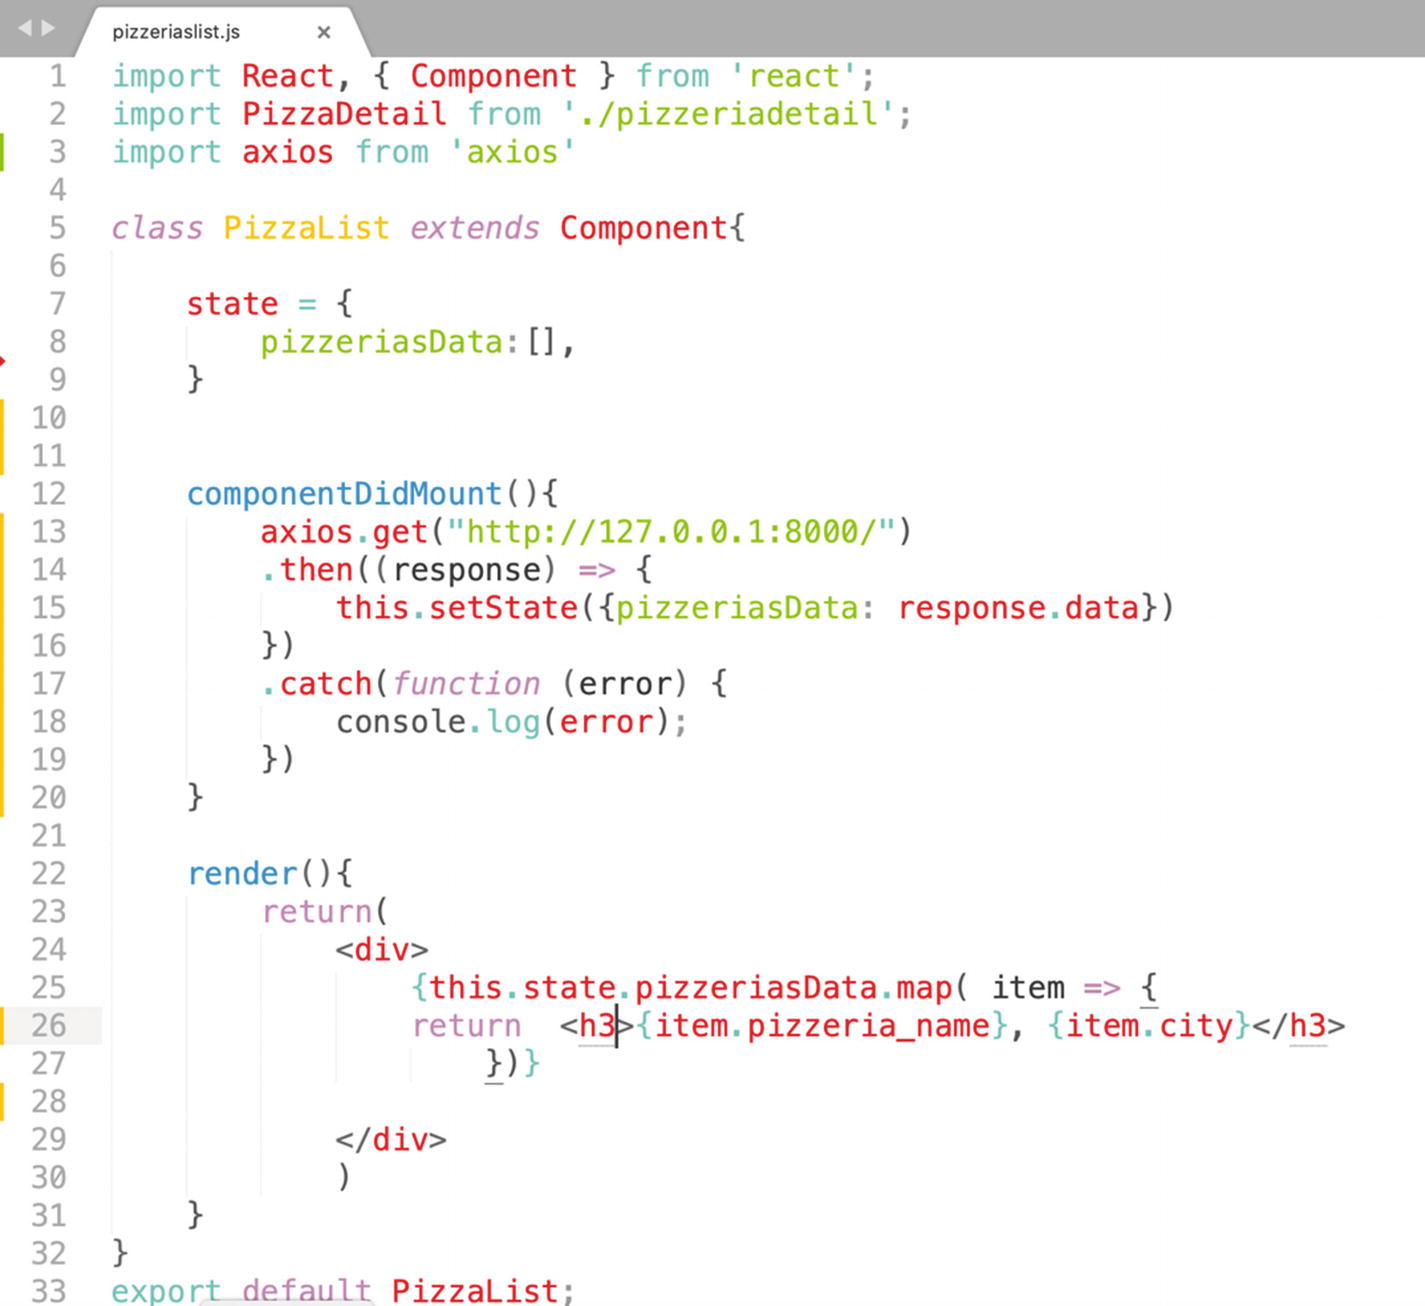
Item in this case is a variable name. pizzeria_name and city are field names from our database. Do not forget to remove DummyData import from your file. Ultimately, your pizzeriaslist.js file should look like the one in Figure 4-6.
Figure 4-6
PizzaList component in pizzeriaslist.js after we have replaced dummy data with the API
Before we get to our PizzaDetail component, let’s briefly take a look at warnings we got while inspecting our data in the browser. Yellow ones are just warnings that could be easily fixed. The warning “ ‘logo’ is defined but never used” could be fixed if you remove the line
import logo from './logo.svg';
from the App.js file. We are not using the default image anyway. Red warnings are more weighty than yellow ones. The error message “Download error or resource isn’t a valid image” means that the old React image can’t be found anymore. We can delete this link, since we are not using it anymore.
The warning “Each child in a list should have a unique “key” prop.” is worth mentioning here because keys are very important in React (Figure 4-7).
Figure 4-7
Warning messages from the browser console
React compares virtual DOM with “actual” HTML DOM and updates changes. It would be faster to update one small element if information has changed than the whole div container holding the whole set of data. In our case, React would update each pizzeria separately, based on the key, rather than all of them. Helping React with the right object to update, we would need to add a unique and static id from our database directly to the <h3> tag. If you take a closer look at each object we are receiving from the API in Figure 4-5, every pizzeria starts with “id”. If you can’t find one, make sure you have added the “id” field to serializers in the Django project. This “id” could be used as a key in the React app. Precisely, we should add the key to line 26 (Figure 4-6) in the pizerriaslist.js file as the warning message is suggesting.
Afterward, the key warning should be gone, and each pizzeria record should be assigned a key with an original id. You still might see a yellow warning that PizzaDetail is defined but never used. That is OK for now.
Detail view
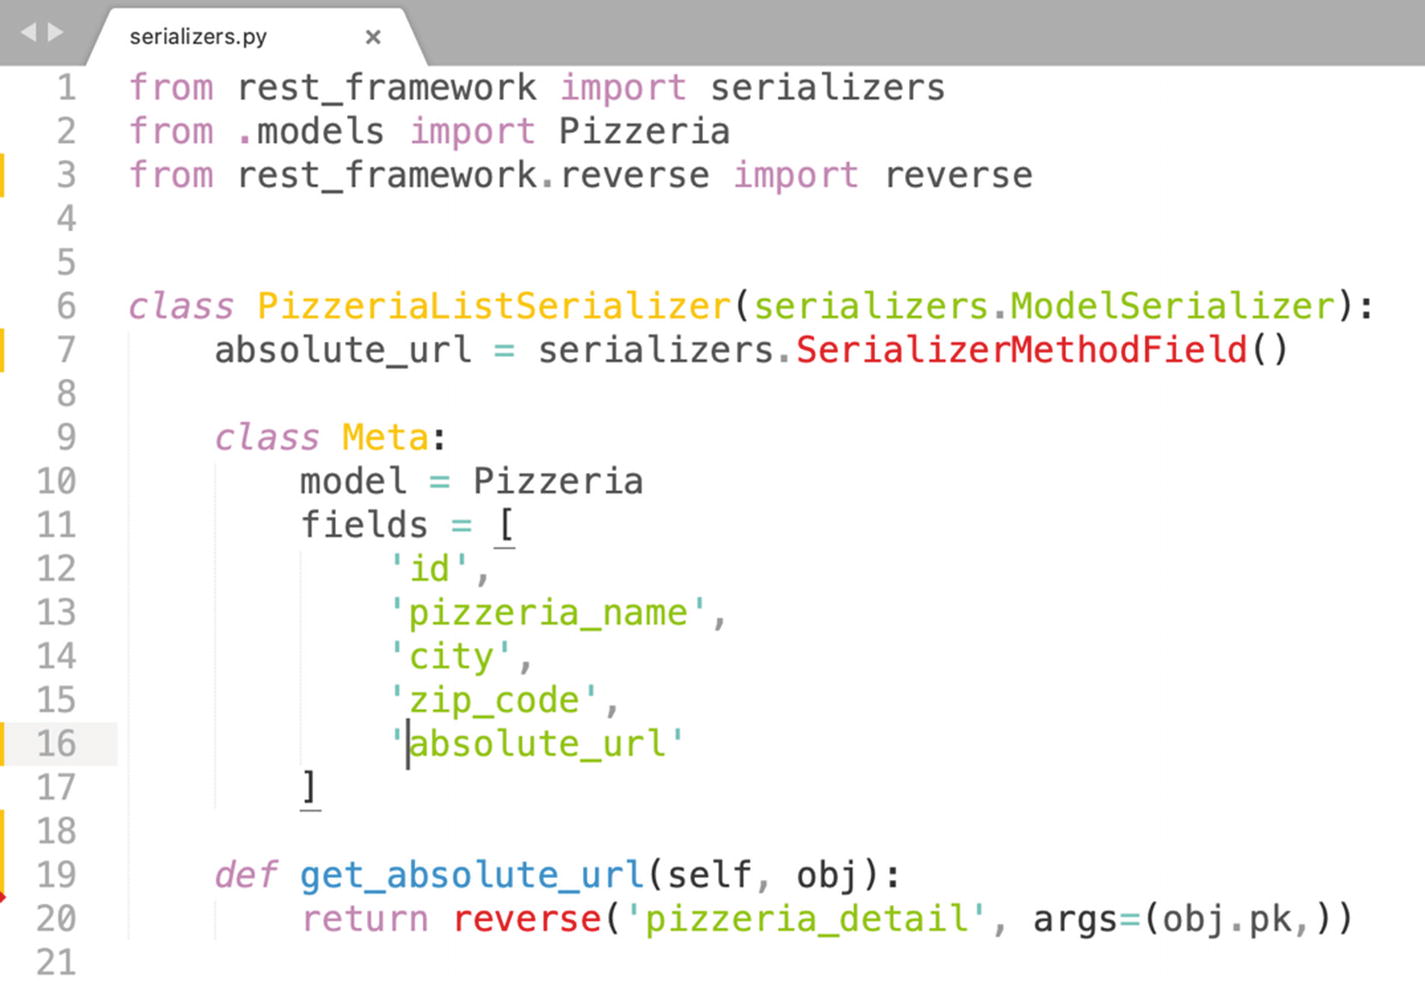
Now is the time to call the detail API and set the detail view of our app. Before we get to the front-end part, we need to review PizzeriaListSerializer in the serializers.py file in our Django project.
Django REST offers a neat solution to build custom methods and bind them to API data as an extra field in a serializer. This mechanism allows you to perform any manipulation on an object and return the result as an attribute of the object. We will start with a simple example and create a method to return an absolute URL of the detail view for our Pizzeria model. The URL for a PizzeriaRetrieveAPIView has two parts, a root URL and an id of an object. Despite the fact that you can just concatenate the object’s id to a root URL, an absolute URL would be a preferred solution. An absolute URL comes as an attribute from the object itself; there would never be any mismatch.
The composition of the SerializerMethodField requires two things: you need to declare the name of the field and define a method with a prefix get_ to the field name.
In the present case, we need to declare an absolute URL field within PizzeriaListSerializer like this:
Do not forget to include absolute_url in the serializer itself as a field, line 16 (Figure 4-8). Then define and compose a get_absolute_url method:
def get_absolute_url(self, obj):
return reverse('pizzeria_detail', args=(obj.pk,))
Our custom method would take the obj argument referring to the Pizzeria instance itself and return the PizzeriaRetrieveAPIView URL pattern. This would be possible with the help of reverse calling URL with a 'pizzeria_detail' label defined in the URL dispatcher urls.py file.
Lastly, we would need to import reverse from the Django REST framework.
from rest_framework.reverse import reverse
The updated PizzeriaListSerializer would look like the one in Figure 4-8.
Figure 4-8
Method get_absolute_url in PizzeriaListSerializer
After we have added a custom field to our PizzeriaListSerializer, we would be able to see absolute_url in our JSON data. Our ultimate goal here is to call the absolute_url API by clicking the Pizzeria name from our list view. Then we will pass Pizzeria details to the PizzaDetail component. To render PizzaDetail on a click and call the absolute_url, we would need to compose two new methods in the pizzeriaslist.js file. You might ask why we would need two separate methods for a simple job. By all means, you can squeeze everything into one method, but it would be a better practice to make each method responsible for one single task, like fetching an API.
Our API call method would be named getPizzaDetail and would accept a Pizzeria instance as an argument. Using the Axios get method, we would fetch information and set that data as a PizzaList component attribute.
I hope everything in the getPizzaDetail method makes sense to you by now. We pass the Pizzeria instance into the getPizzaDetail method. Item represents the instance, and we can access its attribute absolute_url. To fetch all the details of pizerria, we call the axios.get method. If the API call is successful, then we can store the received response as “pizzeria” in State.
The next method, showPizzeriaDetails, would invoke the getPizzaDetail method and change the special attribute showComponent to true at the moment a user clicks a particular Pizzeria. In our State, we would initially define it as false. That would ensure the PizzaDetail component would not be revealed ahead of time.
showPizzeriaDetails(item){
this.getPizzaDetail(item);
this.setState({ showComponent: true });
}
As our State is getting more laborious, we need to use the constructor method. The constructor method initializes State and binds methods. The constructor method would be called before the component is mounted.
Finally, we would need to invoke the showPizzeriaDetails method with the event handler onClick in the render() method and pass the clicked object as an argument. We place the PizzaDetail component into the render() method and pass pizzeria details as props. The conditional operator “?” would make sure that PizzaDetail is called only if the showComponent value was changed to true.
Ahead of moving to the PizzaDetail component, you could compare your code to the PizzaList component (Figure 4-9).
Figure 4-9
PizzaList component with an option to invoke the showPizzeriaDetails method on click
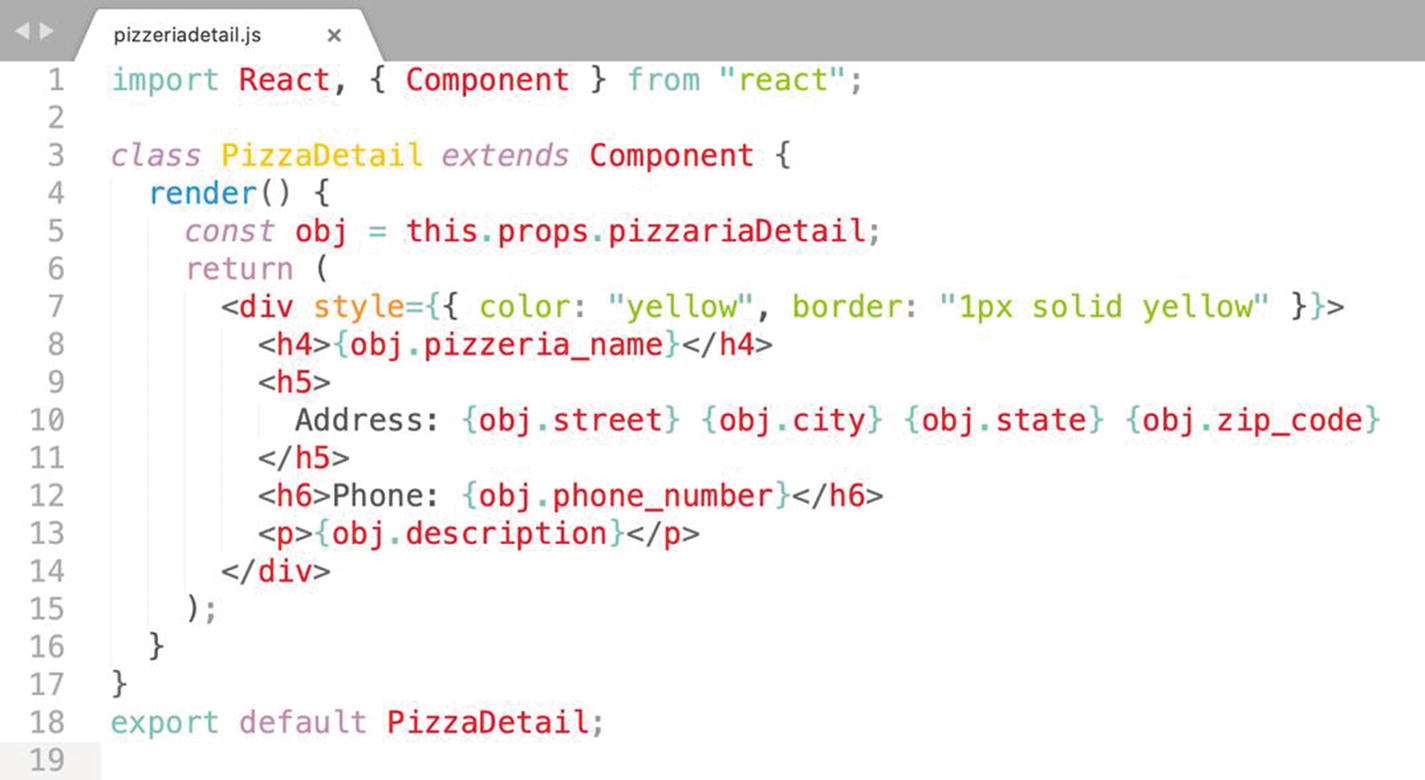
Earlier, in the previous chapter, we have created the pizzeriadetail.js file. It is the time to alter the PizzaDetail component and render all attributes of a pizzeria coming through the fields of PizzeriaDetailSerializer.
Keep in mind that at the moment, I will not be styling the appearance of our app. Again, in this chapter we are learning the React principles. We will take care of the appearance when we start building our mobile app. Now I want to concentrate on barebones of CRUD. The only style I’ll add would be to differentiate PizzaDetail from the PizzaList component.
At the beginning we need to assign our props coming from PizzaList component to a variable obj in the render() method. As a matter of fact, we will be replacing old dummy props with the actual data.
const obj = this.props.pizzariaDetail;
Using a minimum of style, I will add yellow border and change the color of the text to yellow in our <div> container.
With the help of a few <h4>, <h5>, and <h6> tags, I will arrange detail information from obj in the following order as you can see in Figure 4-10. The old variable p would be replaced with obj. Also, replace the old names with the actual attributes coming from our model (Figure 4-10).
Figure 4-10
PizzaDetail component, data from PizzeriaDetailSerializer comes from obj and structured with JSX
If all your local servers are running, you can open our front-end part in the browser and test the detail component by clicking the pizzeria name from the list. As a result, you should see a box with yellow text rendering detail information (Figure 4-11).
Figure 4-11
Front-end view of our app rendering detail information
Create view
The create part of CRUD in my opinion is the most exciting one. We can implement it with the JSX React form and Axios post method.
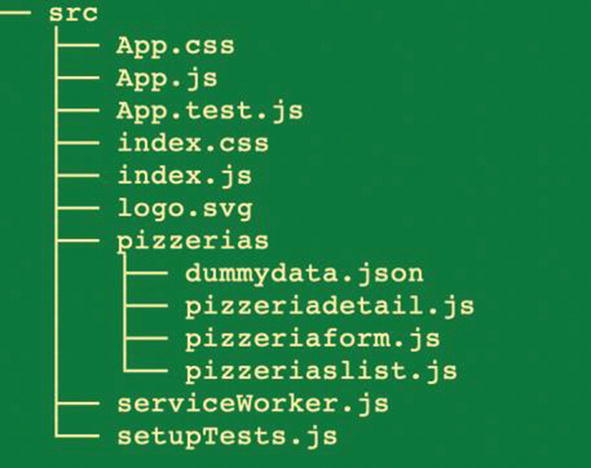
We will define the component PizzaForm in a new file pizzeriaform.js in our folder pizzerias. The same directory where all our components are kept. Create the pizzeriaform.js file (Figure 4-12). The steps to compose the form component would be the following: in the render method of the form component, define inputs for all fields we want the user to fill in, bundle incoming data with handle method, and set State. Then call PizzeriaCreateAPIView with axios.get method and send data.
Figure 4-12
Newly created pizzeriaform.js for the PizzaForm component
In pizzeriaform.js, import React and Axios.
import React, { Component } from "react";
import axios from "axios";
We need to define the PizzaForm component.
class PizzaForm extends React.Component {
//Code
}
export default PizzaForm;
Before we get to the coding part, I would like to go over the structure we need to put in place in the PizzaForm component. As you remember, any component would require a render() method; this is where we would place the JSX <Form> with all input fields. Most of the web forms use a submit button. Our case would not be an exception, and we would bind one to our form.
Besides the submit button and input fields, we would need to set up two event handler methods. The handleSubmit method would be triggered on submit and the handleChange method on input. I’ll start with handleChange() that would be triggered on incoming data and take event as an argument. Moreover, handleChange method would set entered data as State. The second method, handleSubmit(), would call axios.post() and send the data. This method would be triggered by the built-in onSubmit handler in the form. Adding “handle” designation to a method name is conventional in React.
handleChange(event) {
//Code
}
handleSubmit(event) {
event.preventDefault();
}
render() {
const { pizzeria_name } = this.state;
return (
<form onSubmit={this.handleSubmit}>
<div>
<input
type="text"
name="pizzeria_name"
value={pizzeria_name}
onChange={this.handleChange}
/>
</div>
<input type="submit" value="Submit" />
</form>
);
}
We need to define pizzeria_name in the render() method and would use it as “name” key and value equivalent. The built-in onChange event handler would be bind to the handleChange method. Best practice would be to include event.preventDefault() into handleSubmit method to prevent accidental clicks.
Inside the constructor method, we would define the attributes. Make sure the name of an attribute in State would match the value of the “name” key in the input. Also, we would need to bind our custom methods to the component in the constructor.
constructor(props) {
super(props);
this.state = {
pizzeria_name: " ",
};
this.handleChange = this.handleChange.bind(this);
this.handleSubmit = this.handleSubmit.bind(this);
}
Immediately upon rendering form in the browser, pizzeria_name is an empty string. That’s what we have set as a default value in the constructor. As soon as we receive a value from the user, we would command setState to reassign pizzeria_name to incoming text in the handleChange method.
This setup would help us to grab values and assign them to the right attributes with the help of “name” and value keys from input form.3 event.target.name gives us the option to bundle multiple inputs from our form. The PizzaForm component should be imported into pizzeriaslist.js and added to the PizzaList component. Make sure <PizzaForm/> would go into the main <div> container the render() method returns.
<div>
<PizzaForm/>
</div>
To test our solution, place console.log(this.state.pizzeria_name) in handleSubmit method and enter any text into the prompt and hit submit button. With the help of inspect tool, you could see the same text in the browser console (Figure 4-13).
Figure 4-13
In the browser console, you can see the same text you entered into the prompt on the web page
The final step is to call axios.post() method and send our inputted pizzeria name. I will replace console.log() with an API call like this:
handleSubmit(event) {
event.preventDefault();
console.log(this.state.pizzeria_name);
axios
.post("http://127.0.0.1:8000/create/", {
pizzeria_name: this.state.pizzeria_name
})
.then((response) =>{
console.log(response);
})
.catch(function (error) {
console.log(error);
});
}
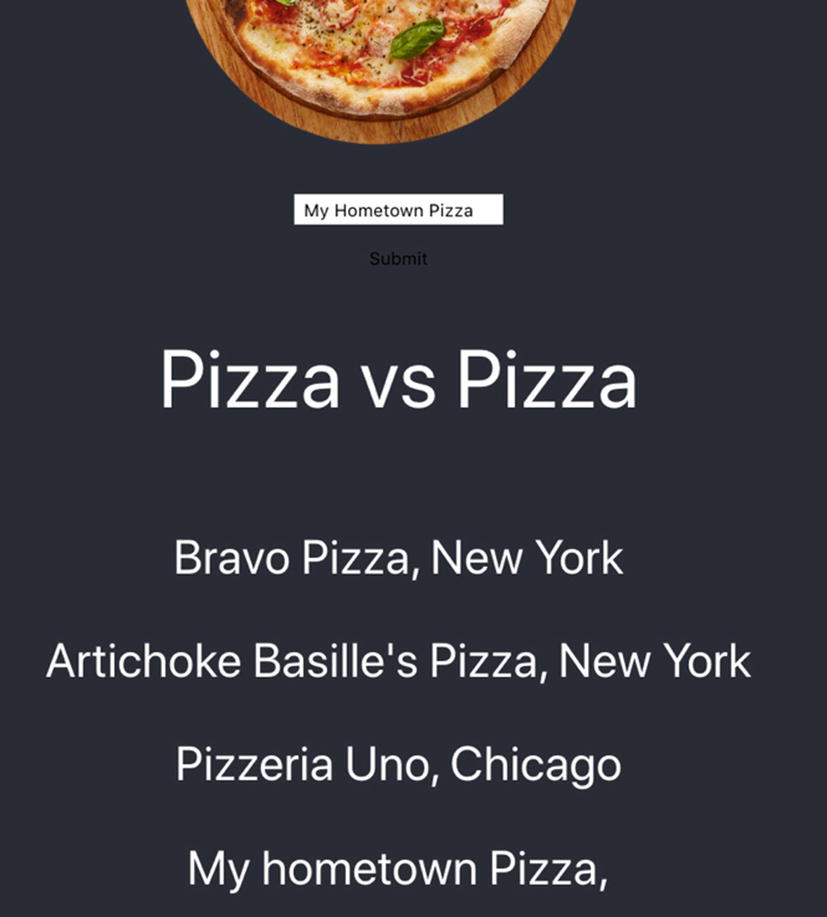
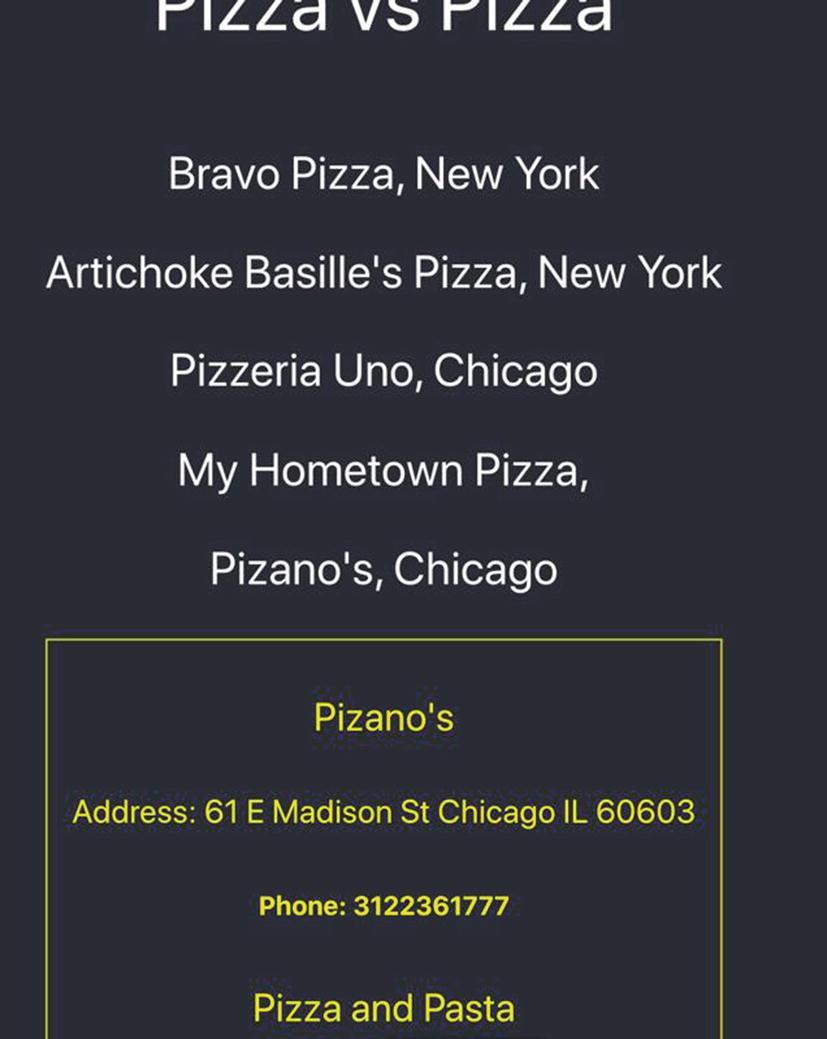
Please remember that the pizzeria_name key in the method .post() has to match the field name in PizzeriaDetailSerializer. Make sure your Django project is up and running. I will enter “My Hometown Pizza” into the prompt and click submit button. If you do the same and reload the web page in the browser, you should see “My Hometown Pizza” in our list of Pizzerias (Figure 4-14).
Figure 4-14
“My Hometown Pizza” has been successfully written into our database and then rendered in List View
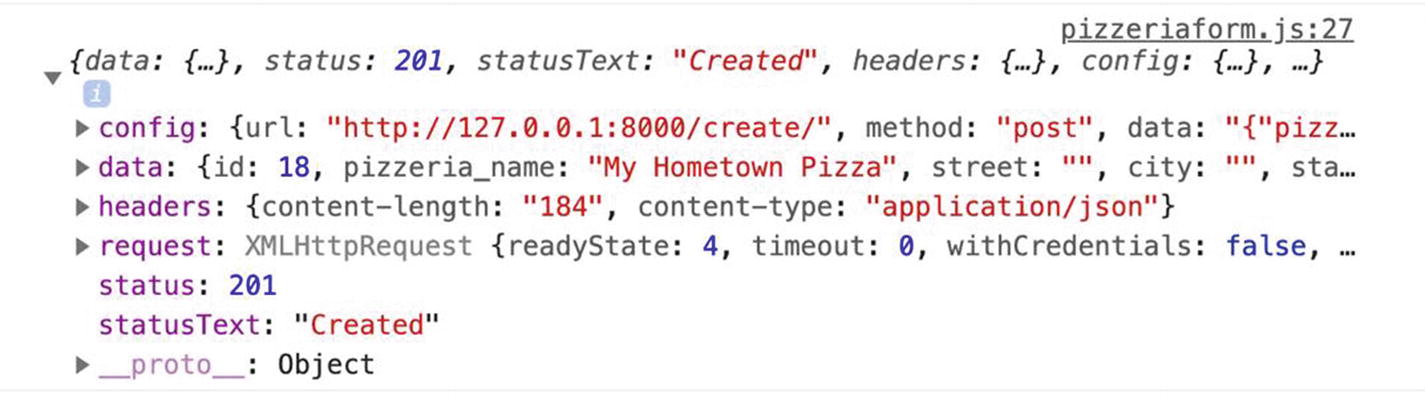
Additionally, you can inspect the response we received and printed in the console. Status is 201 and the “Created” message proves that we have successfully entered a new pizzeria brand into our database (Figure 4-15).
Figure 4-15
Status 201 proves the successful execution of the post method and the creation of new object
I hope you got the idea behind React forms. With the same logic we could add the rest of the PizzeriaDetailSerializer fields to our render method. We will not accept the id field, since it would be assigned automatically. Also, active field would be set as True by default. We will not attach any images to the form in this example. Sending images requires more explanation. We will cover the process of attaching and sending photos in detail in Chapter 7. For now, we just omit this field.
Aside from input “name” and value keys, I have wrapped each <input> into <div></div> tags to give our form a little bit of structure. Define all input “name” keys as consts above the form. For style, I added white color to submit button for visibility. I know that styling is far from perfect at the moment, and we will add styling later when we start building a mobile front-end. After the render() method, we need to add the same “name” key inputs to the constructor and define them as empty strings.
constructor(props) {
super(props);
this.state = {
pizzeria_name: " ",
street: " ",
city: " ",
state: " ",
zip_code: " ",
website: " ",
phone_number: " ",
description: " ",
email: " ",
};
this.handleChange = this.handleChange.bind(this);
this.handleSubmit = this.handleSubmit.bind(this);
}
Finally, we would need to pass all values into axios.post() method as a dictionary.
handleSubmit(event) {
event.preventDefault();
axios
.post("http://127.0.0.1:8000/create/", {
pizzeria_name: this.state.pizzeria_name,
street: this.state.street,
city: this.state.city,
state: this.state.state,
zip_code: this.state.zip_code,
website: this.state.website,
phone_number: this.state.phone_number,
description: this.state.description,
email: this.state.email,
})
.then((response) => {
console.log(response);
})
.catch(function (error) {
console.log(error);
});
}
Note
Before you enter values into form fields, make sure they are entered in the correct format and would match our validation fields in Django Model. For example, a website value should start with “http://” and a phone number would be exactly ten digits. We will add validation to input fields in Chapter 7.
Make sure both of your local servers are up and running. As a test, I will enter my favorite pizzeria place name near our office in Chicago, Pizano’s (Figure 4-16).
Figure 4-16
Entering information in the form
If all information was entered correctly and you had no errors in pizzeriaform.js, you would need to refresh the browser and click the newly created Pizano’s record, and the web app would render all details for that joint (Figure 4-17).
Figure 4-17
Component PizzaDetail renders details for clicked record
Update view
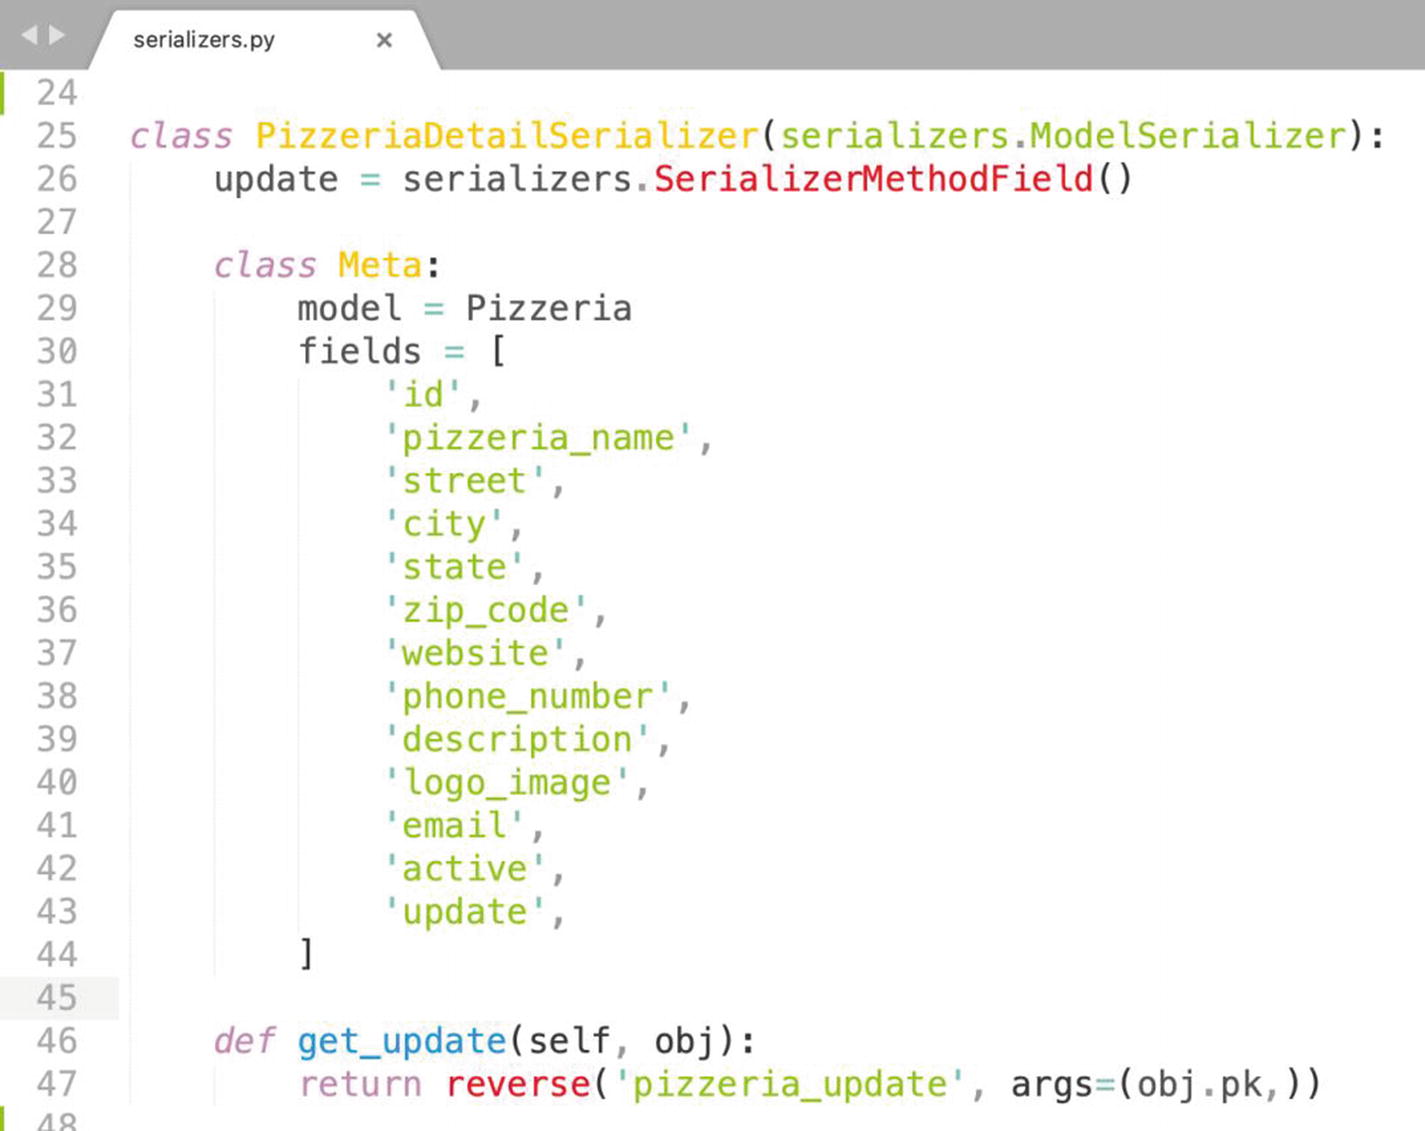
In general, update is quite similar to create method and done with PATCH request. You might ask, why won’t we use the method PUT? The answer is PUT replaces the whole object, and the PATCH applies partial changes. Following the REST architectural style, we will add a custom serializer field update to PizzeriaDetailSerializer in serializers.py in our Django project and define it as SerializerMethodField(). The logic is very simple; we will use SerializerMethodField() every time we need to add a method to our pizzeria instance. We went through the steps of creating a method field in the detail view previously in this chapter. This time, I’ll just show you PizzeriaDetailSerializer with update field in it (Figure 4-18).
Figure 4-18
PizzeriaDetailSerializer with a SerializerMethodField update
As you can see in Figure 4-18, the logic is straightforward; we define the field, include the field “update” into fields list, and create the method with an unchangeable prefix get before the name of the field. Only this time, we include “pizza_update” label from urls.py file. Reverse method would get us the URL pattern for update view by this label.
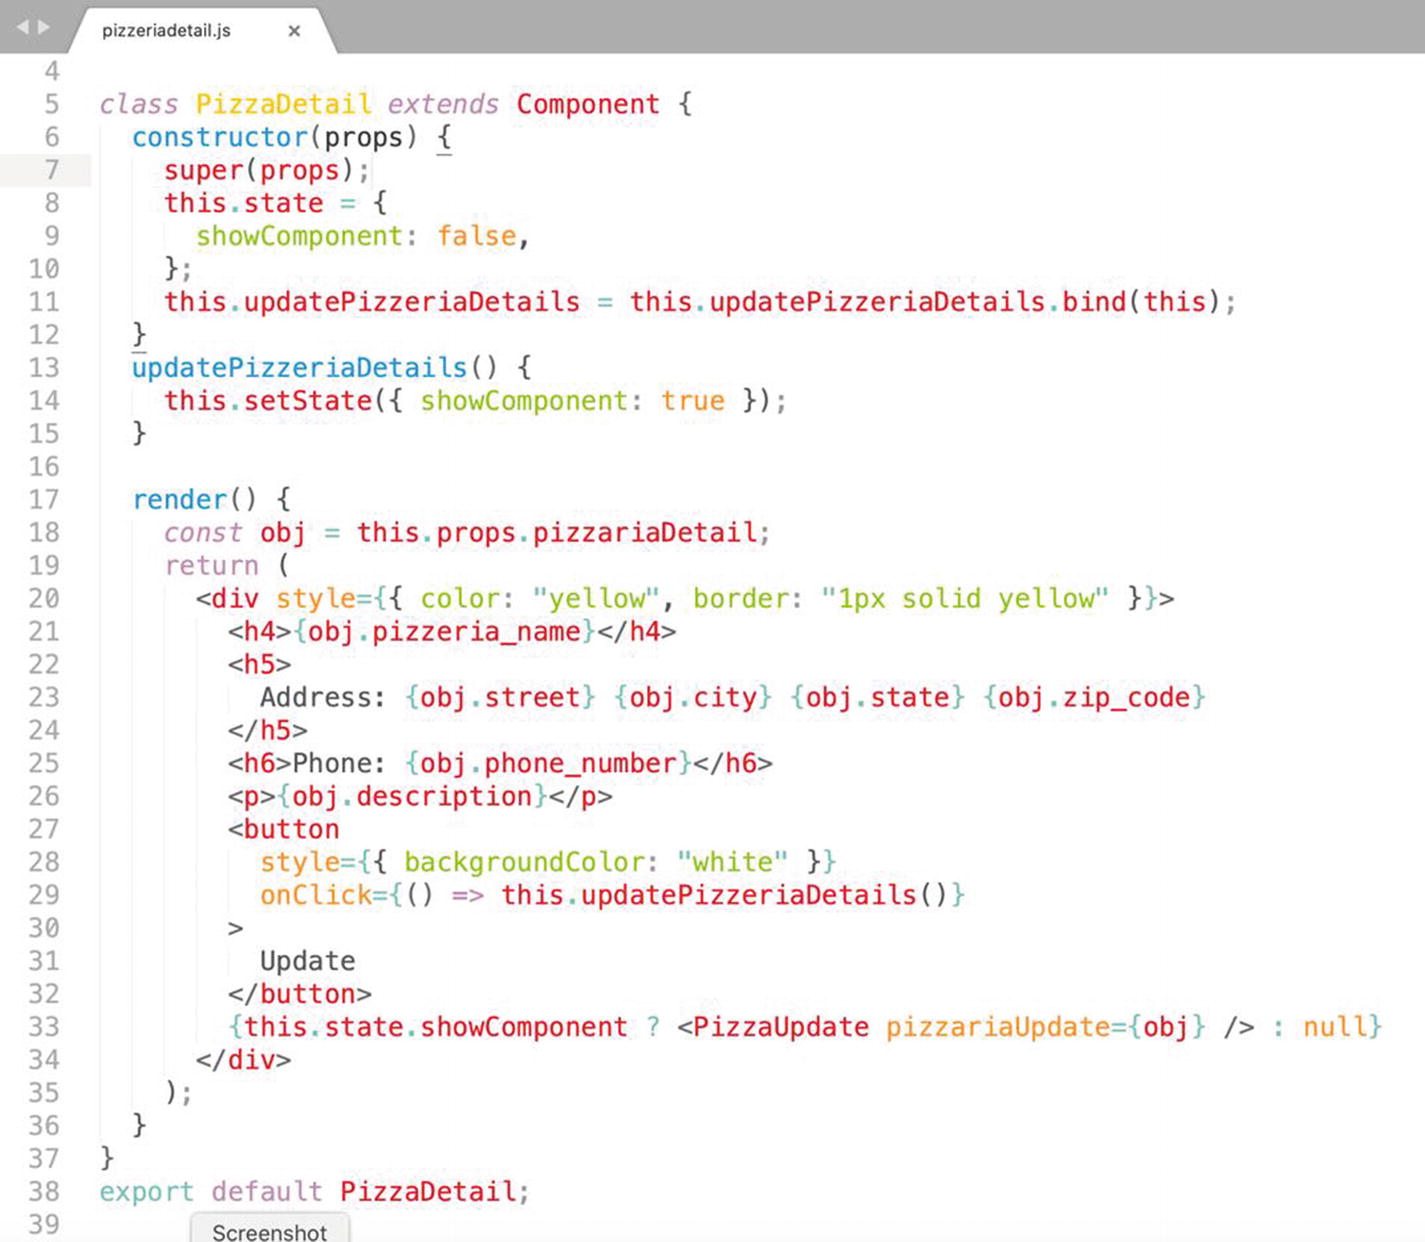
In the front-end portion, we need to add “update” button to PizzaDetail component in the pizzeriadetail.js file. Clicking that button would reveal another component PizzaUpdate, which we have not created yet.
<button
style={{ backgroundColor: "white" }}
onClick={()=> this.updatePizzeriaDetails()}>
Update
</button>
To render PizzaUpdate component, we will add the event handler “onClick” and create “updatePizzeriaDetails” method.
updatePizzeriaDetails() {
this.setState({ showComponent: true });
}
“updatePizzeriaDetails” is a simple method that would toggle showComponent from False to True on a click. Also, we would need to add PizzaUpdate component to the render method in PizzaDetail.
Please note that we are passing an object as props to PizzaUpdate component. Our PizzaUpdate component would take the pizzeria instance that has to be updated.
The last part in PizzaDetail component is the constructor method. We will define showComponent in State and bind the updatePizzeriaDetails method.
Finally, our PizzaDetail component should look like the one in Figure 4-19.
Figure 4-19
Component PizzaDetail will show the PizzaUpdate component on click
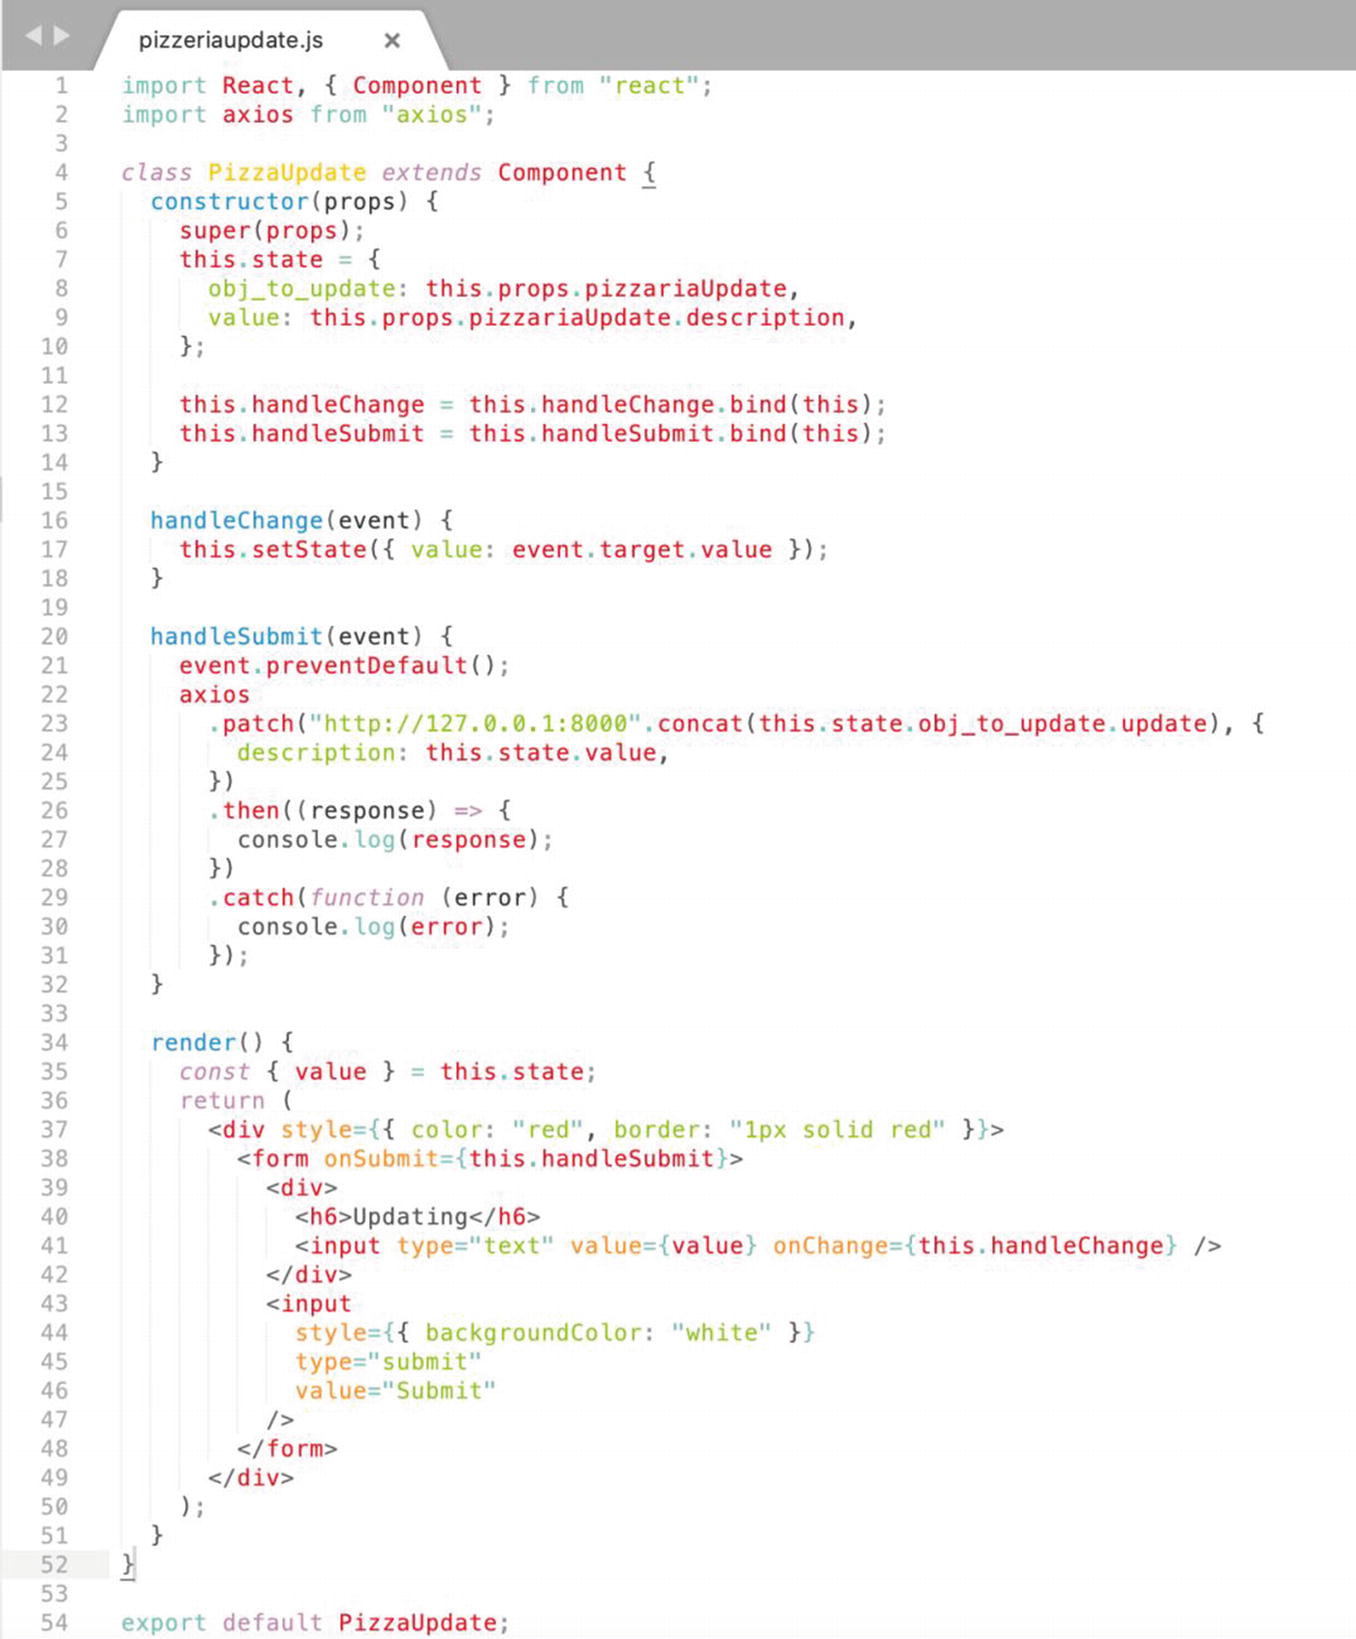
Finally, it is time to create pizzeriaupdate.js file and construct PizzaUpdate component. After you create pizzeriaupdate.js and declare the PizzaUpdate component, import them to the pizzeriadetail.js file on top. PizzaUpdate for the most part would look like PizzaForm component. Since the logic would be the same and I do not want to waste your time, we will go over the “description” field only. The description field would be used to be an updatable field as an example here. If you want to make all fields of your serializer updatable, just follow the same steps we are about to do for “description” field. In general, the process would be to have an input for each field and send the incoming data with axios.patch() method – exactly what we will do right now with “description” field.
I will copy PizzaForm component to my pizzaupdate.js and modify it a bit. For starters, I will set obj to be changed in State as obj_to_update and will assign props that were passed from PizzaDetail as a value. Keep in mind that React State is immutable and would not be changed if props were changed. Initializing State from props in the constructor is tricky. If you are planning to change your props later, you should not initialize them in state. However, there are exceptions. We are not planning to change our props at any time in PizzaUpdate component; thus, we could set them in State. Also, I’ll initialize “value” as a key for the actual data we are about to update. At first, it would render the old data in the description field, and the user could amend it with new information.
constructor(props) {
super(props);
this.state = {
obj_to_update: this.props.pizzariaUpdate,
value: this.props.pizzariaUpdate.description,
};
this.handleChange = this.handleChange.bind(this);
this.handleSubmit = this.handleSubmit.bind(this);
}
As you can see in constructor, we are binding the same handleChange and handleSubmit methods we used to submit the form in PizzaForm component. I’ll slightly adjust the handleChange method to one value being extracted from <input> tag, since in this example, we use the description field only.
handleChange(event) {
this.setState({ value: event.target.value });
}
Our handleSubmit will call the axios.patch() method. PATCH method is similar to POST and requires a URL and data we are sending. We would concatenate our URL for updating to the domain name or IP and send the data as value from State. In the following example, the “description” is a Model field we are trying to update, and this.state.value represents the information we captured from a user.
The render() method is quite similar to what we did in PizzaForm component; we have removed all fields except “description”. Also, we do not need “name” key since there is only “description” value. I have added a minimum of style, red color for text and border, to make this element visible on the page.
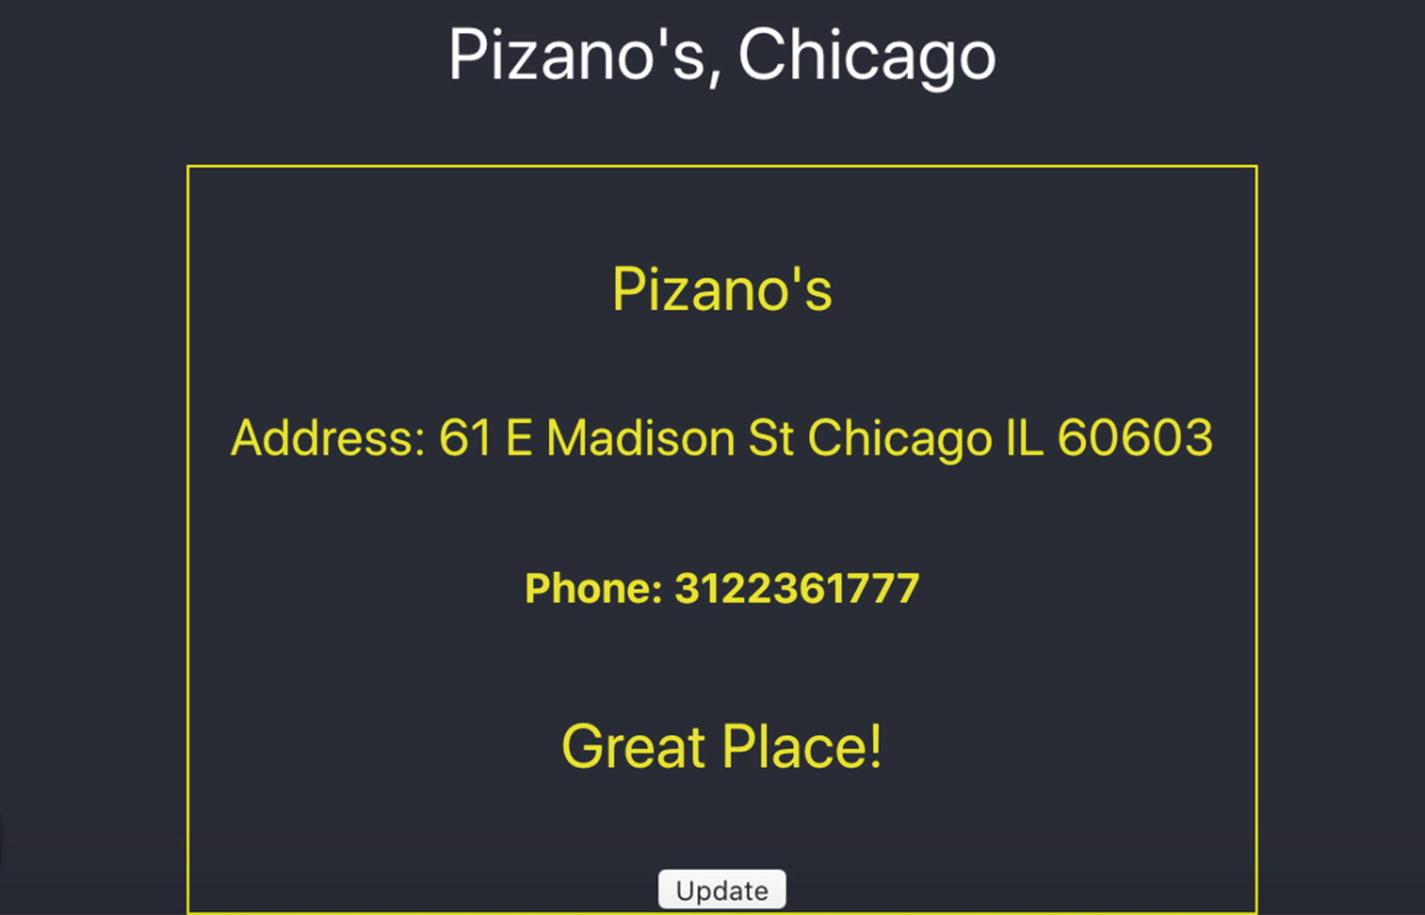
The finished puzzle of PizzaUpdate component should look like the one in Figure 4-22. We can test it and see PATCH request in action. Make sure both of your servers are up and running. I am going to choose Pizano’s, and in detail view, I’ll click update button. After that, we should be able to see update component and form field with the description information we are planning to update (Figure 4-20). In the description field, I’ll change “Pizza and Pasta” to “Great Place!”
Figure 4-20
Updating pizzeria’s description field with a new record
After we click submit button and refresh the page, our Pizano’s detail view should have a new description (Figure 4-21). Keep in mind we are learning the basics of React and practicing API calls here; later, in a mobile version, we will spend more time on styling.
Figure 4-21
Updated record
Figure 4-22
Component PizzaUpdate
Delete view
Delete is the simplest of all methods, and if you got this far, you should have an understanding of how to do it. We need to add “Delete” button and on click call a method that would send DELETE request to our server.
We will start with a custom method field in Serializers. PizzeriaDetailSerializer in serializers.py would be the right place for the delete field. We will define it as SerializerMethodField(). Right after this, we should add “delete” field to a list of fields and construct a method named after that field with a mandatory suffix get. The reverse() function would generate a URL by looking for the right API pointed by the label ‘pizzeria_delete’ (Figure 4-23).
Figure 4-23
A delete field was added to PizzeriaDetailSerializer in the serializers.py file
Let’s flip back to our front-end project front_pizzavspizza. Let’s place the delete function into the PizzaDetail component. We will follow the same steps as we did with Create and Update components. I’ll copy my “update” button element and rename it to “delete”. Also, onClick handler would invoke deletePizzeria method and pass an object with the attribute “delete”.
<button
style={{ backgroundColor: "white" }}
onClick={() => this.deletePizzeria(obj.delete)}>
Delete
</button>
Maybe it looks a little bit strange that we are using a method that has not been defined yet, but we have walked that road before and have a clear understanding of how it should be designed.
Do not forget to bind the deletePizzeria method to the PizzaDetail component in the constructor method.
Our deletePizzeria method will contain the Axios delete() method. Make sure you import the Axios library in pizzeriadetail.js on the top of the page. Like this, import axios from “axios”. The syntax is very similar to what we have done so far.
deletePizzeria(obj){
console.log(obj);
axios.delete("http://127.0.0.1:8000".concat(obj))
.then((response) => {
console.log(response);
})
.catch(function (error) {
console.log(error);
});
}
We are ready to test our delete feature. My victim is the “My Hometown Pizza” record. By clicking delete button in the detail view, I’ll delete that record. Permanently. In the console, you should be able to see the response message fired with status 204, a proof that axios.delete() ran successfully (Figure 4-24). After refreshing our browser, you no longer could find the “My Hometown Pizza” record.
Figure 4-24
Response message with status 204 after a successful delete request went through
Please do not pay too much attention to the sequence of my records. I have added and removed a few records as I was testing my code. My advice to you is always run your code and use console.log() to test every step of your program. Do not wait till you finish the whole project.
There’s one more thing we could do to make our code cleaner and versatile. In all API calls, we used the http://127.0.0.1:8000 prefix. When you deploy your project on a server, your IP would change. Also, you might want to use a domain name. The beginning of our URL could be set as an environment variable. Environment variables are very convenient. Define variables and they would be available through a global process anywhere within your application. Based on your production circle, you can have a couple of environment files where you would define separate sets of global variables and use them for different development stages. Please do not confuse the React environment variables file with virtual environment in the Django project. In React, .env file plays more like a setting role where you can define APIs, keys, and other project-related variables.
We will create .env file in our main React project folder front_pizzavspizza. In .env file, we would define REACT_APP_URL.
REACT_APP_URL = “http://127.0.0.1:8000”
After we have moved the first part of our URL to .env file, we could access it anywhere in the front-end web app. To put REACT_APP_URL into action, we would need to replace http://127.0.0.1:8000 in all Axios methods with
process.env.REACT_APP_URL
Our PizzaList component in the pizzeriaslist.js file contains two Axios get methods in componentDidMount() and getPizzaDetail(). In the first instance, we need to pass the process.env.REACT_APP_URL variable to get a method like this:
componentDidMount() {
axios
.get(process.env.REACT_APP_URL)
.then((response) => {
this.setState({ pizzeriasData: response.data });
})
.catch(function (error) {
console.log(error);
});
}
The detail URL in getPizzaDetail() comes with an object id and uses concat() method. The environment variable, process.env.REACT_APP_URL, can be appended with the right pizzeria instance using absolute_url attribute.
Following the same logic, you could replace the local server IP http://127.0.0.1:8000 with process.env.REACT_APP_URL environment variable in PizzaDetail, PizzaForm, and PizzaUpdate components. After you are done, restart your server and refresh your browser. Your web app should be running as before.
A couple of thoughts as we are wrapping this chapter. The main intention of this chapter was to show you how to do CRUD with React and practice composing components. As I have mentioned before, React Native is a mobile flavor of React, and it would be a good idea to get a general understanding of its roots and some practical knowledge. By all means, we could have continued with React and add other cool features if our goal was to build a desktop version. I hope now you have a good understanding about components, state, and props. In the next chapters, we would move our application to mobile platforms with the help of React Native. Using native elements of iPhone and Android, we would construct all features of a modern mobile application powered by Python Django.