In the previous chapter, we have implemented the retrieve part of the mobile application. Here, we will learn how to send POST requests and attach images to our records. We will go in baby steps and discuss the whole process from capturing incoming data to forms and other third-party solutions to help us handle and validate information. Creating new records is an essential part of any web app. Along with that, an Image is a vital part of any new record, especially for mobile users. We will break down to the smallest element handling an Image in mobile platforms. Finally, we will take a look at authentication options in Django REST.
Inputting data
Before we use POST request to send the data to the database, I would like to explain to you how to grab a user input on a mobile device. For this task, we would use TextInput, a React Native component. TextInput comes with numerous props. Here, we will discuss the essential ones. If you are planning to build mobile apps for a living, it would be a good idea to get familiar with all of them and read the documentation at https://reactnative.dev/docs/textinput.
As you might recall from Chapter 5, we have the drawer component ScreenA. It is not doing anything at the moment, and we can use it to practice TextInput.
Navigate to screenA.js file and import basic React Native components. Be prepared to update the import list with new components as we move along.
import { StyleSheet, Image, SafeAreaView, TextInput, Text } from "react-native";
We rewrite ScreenA class component as a functional expression. Later, we will change the name of this component to reflect the purpose of the code, but for now ScreenA name would work. Inside ScreenA component, we will use SafeAreaView, to make sure all our elements would stay under the iPhone notch. Inside <SafeAreaView> tags, we place the TextInput element like this:
const ScreenA = () => {
return (
<SafeAreaView>
<TextInput />
</SafeAreaView>
);
};
For TextInput component, we will use the simplest styling, just to make it visible on the screen at the moment.
Right under the ScreenA component, we define a styles object and set the following props for the textBox attribute:
const styles = StyleSheet.create({
textBox: {
marginTop: 200,
height: 40,
borderColor: "gray",
borderWidth: 1,
marginRight: 20,
marginLeft: 20,
},
});
Make sure you bind the style to TextInput in order for styles to apply:
<TextInput style={styles.textBox} />
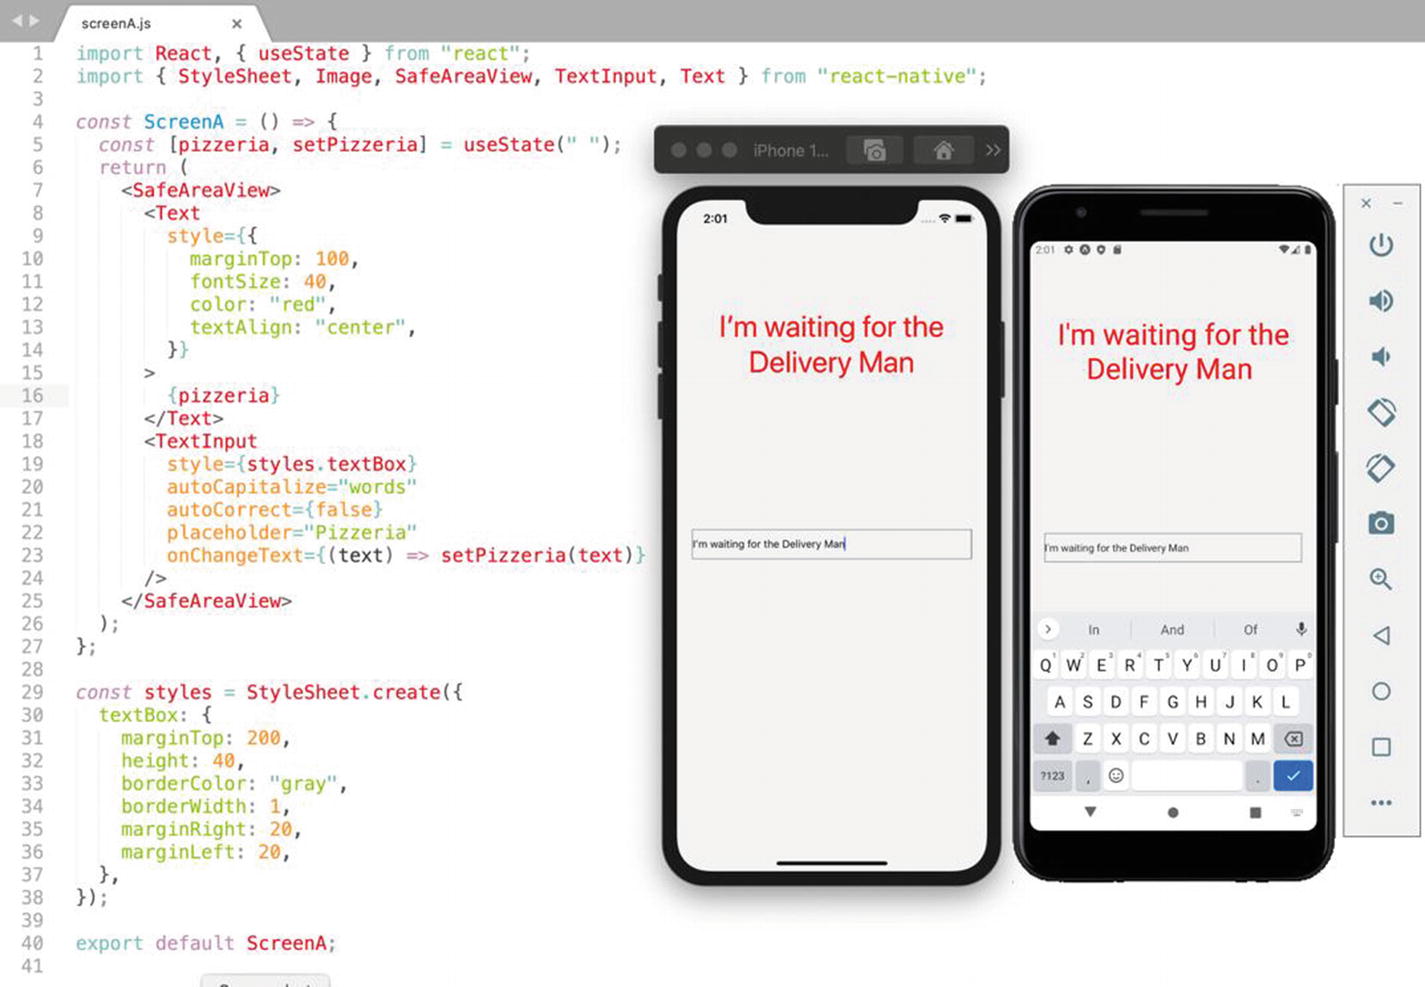
If you ran this drawer component on the simulator now, you would see just an empty bordered box in the center of the screen. We need to add a couple of essential props to start with. Our final goal here is to give a user the technical ability to record information on a new pizza place. Prior to building a form with all fields, let’s see how the one field input would work. For starters we learn how to grab the name of a place. TextInput comes with built-in features. Let’s put these features to use. In TextInput component, we pass placeholder props set to “Pizzeria.” autoCapitalize comes with default settings “none,” “sentences,” “words,” and “characters.” I think we should capitalize all words in the name. Set autoCapitalize to “words.” We will set the autoCorrect feature to false. autoCorrect’s job is to check the spelling of an input. You have probably noticed that with names the autocorrect feature acts goofy. Chances are that the pizza place name is not in the dictionary. Not to drive our users nuts over an extraordinary name or brand, we would switch autocorrect off.
<TextInput
style={styles.textBox}
autoCapitalize="words"
autoCorrect={false}
placeholder="Pizzeria"
/>
Finally, the iPhone simulator and Android emulator render an empty prompt with the placeholder “Pizzeria” (Figure 7-1).
Figure 7-1
iPhone and Android render TextInput element
You can try it and type something in that TextInput element. The question is how we would grab that text so we can use it later. Well, if you want to set some value and use it later, that sounds like State, right? In a functional component, we have to use the useState hook. Go ahead and import it from “react”:
import React, { useState } from "react";
In order for us to use this hook, we need to define an array with two values. First is a variable name we are trying to assign with the value, and the second value should start with “set” to set up the value to the variable. I’ll use “pizzeria” as a variable.
const [pizzeria, setPizzeria] = useState(" ");
The useState hook would have an empty string as a default value. As we start typing something, the text would be set as the value and stored with the “pizzeria” variable. The useState hook would be triggered by onChangeText handler. Add this handler inside <TextInput> tags onChangeText={(text) => setPizzeria(text)}.
If we want to see this in action, we can insert a <Text> element above the input.
<Text
style={{
marginTop: 100,
fontSize: 40,
color: "red",
textAlign: "center",
}}
>
{pizzeria}
</Text>
I have added a little bit of style to make this output visible. Try it, type something in the prompt box, and you immediately will see this text in red on the screen (Figure 7-2).
Figure 7-2
Text entered into TextInput component being rendered on the screen with the help of a useState hook
This would be the idea behind each field in our form. Use TextInput and define a useState hook. Then we need to validate fields and raise errors if a user inputs data in a wrong format. You might say, this is too much work, there has to be a better way. Yes, there is another way. There are third-party libraries for React forms and field validation. I am talking about Formik and Yup.
Forms with Formik and Yup
Formik is a popular choice of React developers to handle forms. I would definitely recommend you to visit their website: https://formik.org. They have tons of useful information. In the following example we will see how Formic can grab a user’s input and then will validate incoming data with Yup. Using the npm command, install Formik and Yup.
npm install formik -- save
npm install yup -- save
For our form, we would need a submit button. Let’s update our imports and add a Button component. Now, we need to import Formik and Yup.
import { StyleSheet, SafeAreaView, TextInput, Button, Text } from "react-native";
import { Formik } from "formik";
import * as Yup from "yup";
In ScreenA component, remove the useState hook. Also, remove the useState hook from import. We would no longer need it. Spoiler alert, Formik comes with its own hooks. The text element we have used to see if our TextInput box was working can be removed too. Instead, place the opening and closing <Formik> </Formik> tags into return() right after <SafeAreaView>. For now, I’ll use two inputs, pizzeria and city. Not to overwhelm you with many lines of code. You have to understand that in order for Formik to perform its task, it would require at least three ingredients:
1.
initialValues (where we initiate input values)
2.
onSubmit (what do we want to do with these values)
3.
TextInputs with submit button
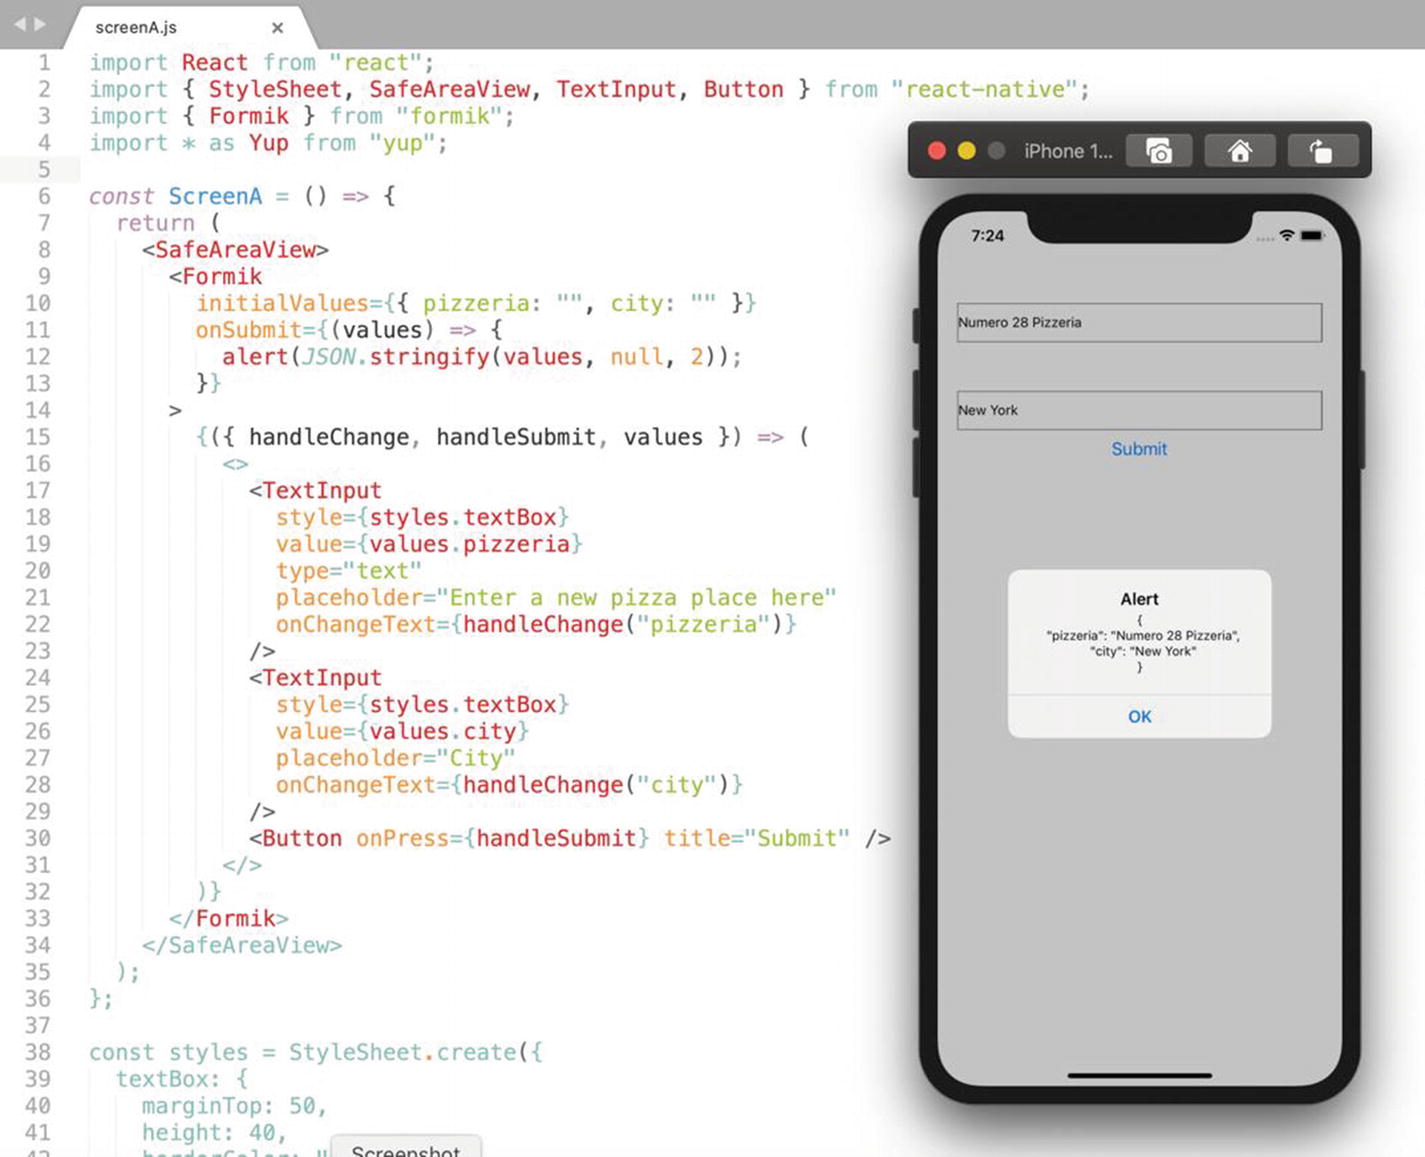
We are starting with initialValues. This is easy; just list all field values and define them as empty strings and pass as an object.
Next, we will define onSubmit as a function that would take values and show them in an alert message.
<Formik
initialValues={{ pizzeria: "", city: "" }}
onSubmit={(values) => {
alert(JSON.stringify(values, null, 2));
}}
></Formik>
Last but not least, between <Formik> opening and closing tags, we create a function that on submit will handle our incoming values. This function would need JSX with input fields, and they all would have to be wrapped as one element. We might use <View> component, or sometimes people use empty div tags. In this function, we define Formik’s handleChange, handleSubmit, and values. Along with event handlers, they would grab and submit values. The TextInput element we already have could be used again. We just need to duplicate it and move them into empty <> tags. I’ll leave the necessary props only. Set one for a pizzeria and the other one for city. Logically, we would need to have a submit button under them. As a last touch, I would change the value of marginTop to 50 in styles.
{({ handleChange, handleSubmit, values }) => (
<>
<TextInput
style={styles.textBox}
value={values.pizzeria}
type="text"
placeholder="Enter a new pizza place here"
onChangeText={handleChange("pizzeria")}
/>
<TextInput
style={styles.textBox}
value={values.city}
placeholder="City"
onChangeText={handleChange("city")}
/>
<Button onPress={handleSubmit} title="Submit" />
</>
)}
After you enter the pizzeria name and city and then click submit button, the iPhone simulator will render the values as an alert message (Figure 7-3).
Figure 7-3
Alert message displaying the values we have entered in form fields
As you remember in the second chapter of this book, we defined the Pizzeria model. We were very specific about the fields. We have set the fields to a specific number of characters we can accept and determined pizzeria_name as a required field. In real life, people always make mistakes and might skip a field accidently. Or, and this happens a lot, enter a value in incorrect format. The bottom line is we need to validate the inputs before we send data to our database. You do not want the POST request to be rejected simply because someone unintentionally missed a field. As I always say, a good developer would guide the user. It is very easy to validate data with Yup library. Yup would be the best option for Formik.
You can use the models.py file in Django project as a reference to implement the same data validation format using Yup methods for the Pizzeria model.
Inside our <Formik> element, we can define validationSchema with the help of Yup.object() function. You can reference all Yup options here: www.npmjs.com/package/yup.
In order for the pizzeria name to be successfully sent to a server, it would have to be a string with a max of 200 characters. Otherwise, we would have to raise an error message: “Must be less than 200 characters.” The minimum we can set is three characters with a validation message: “Must be at least 3 characters.” According to our Django model, a pizzeria name is a must have. Based on that, we will add the Yup required method to make sure a user has entered the value for a pizzeria name.
const validationSchema = Yup.object().shape({
pizzeria: Yup.string().max(200, 'Must be less than 200 characters').min(3, 'Must be at least 3 characters').required('Required')
})
The city input format would be very close to pizzeria. But according to our Model, it could be left blank and may contain 400 characters. I probably should’ve checked the world atlas first to see if there was a city with such a long name.
city: Yup.string().max(400, 'Must be less than 400 characters').min(3, 'Must be at least 3 characters')
Finally, we need to pass this object to <Formik> component.
validationSchema={validationSchema}
And include <Text> tags with error messages. The errors variable should be added to the list of arguments we use for our TextInput fields. One last thing, let’s add color: "red" to styles and pass it as an error attribute.
const ScreenA = () => {
const validationSchema = Yup.object({
pizzeria: Yup.string().max(200, 'Must be less than 200 characters').min(3, 'Must be at least 3 characters').required('Required'),
city: Yup.string().max(400, 'Must be less than 400 characters').min(3, 'Must be at least 3 characters'),
Now, if the user intentionally or by mistake leaves pizzeria field blank, our app would raise a red error message, like the one you can see in Figure 7-4.
Figure 7-4
Yup raises error messages
The example we just did perfectly illustrates how Formik and Yup could help us with the form and data validation. Before we get to the POST request, I would like to refactor this code. I will split this file into three modules to make the component cleaner. There will be an actual component, and I think it is about time we rename ScreenA to AddPizzeria. Then there should be a separate file for validationSchema. We need to validate many fields, and it could become messy and confusing. Also, we would need to add a lot of code for styling.
According to our new naming convention, we would need to rename ScreenA to AddPizzeria everywhere, including the name of the file itself. I’ll call the file addPizzeria.js.1 Do not forget to change all instances of ScreenA in App.js to AddPizzeria and replace the import with addPizzeria from “./src/screens/drawer/addPizzeria.js”;. Right next to the newly renamed addPizzeria.js, create two files for our style, addPizzeria_styles.js (Figure 7-5) and addPizzeria_valid.js.
Figure 7-5
We have renamed the screenA.js file to addPizzeria.js and added addPizzeria_styles.js and addPizzeria_valid.js in the drawer directory
Next, import these addPizzeria_styles.js and addPizzeria_valid.js files right above the addPizzeria component.
import styles from "./addPizzeria_styles"; import validationSchema from "./addPizzeria_valid";
In addPizzeria_styles.js, import
import { StyleSheet } from "react-native";
import validationSchema from "./addPizzeria_valid";
and define a structure for the styles object; do not forget to export it on the bottom of the addPizzeria_styles.js file.
const styles = StyleSheet.create({
//code
});
export default styles;
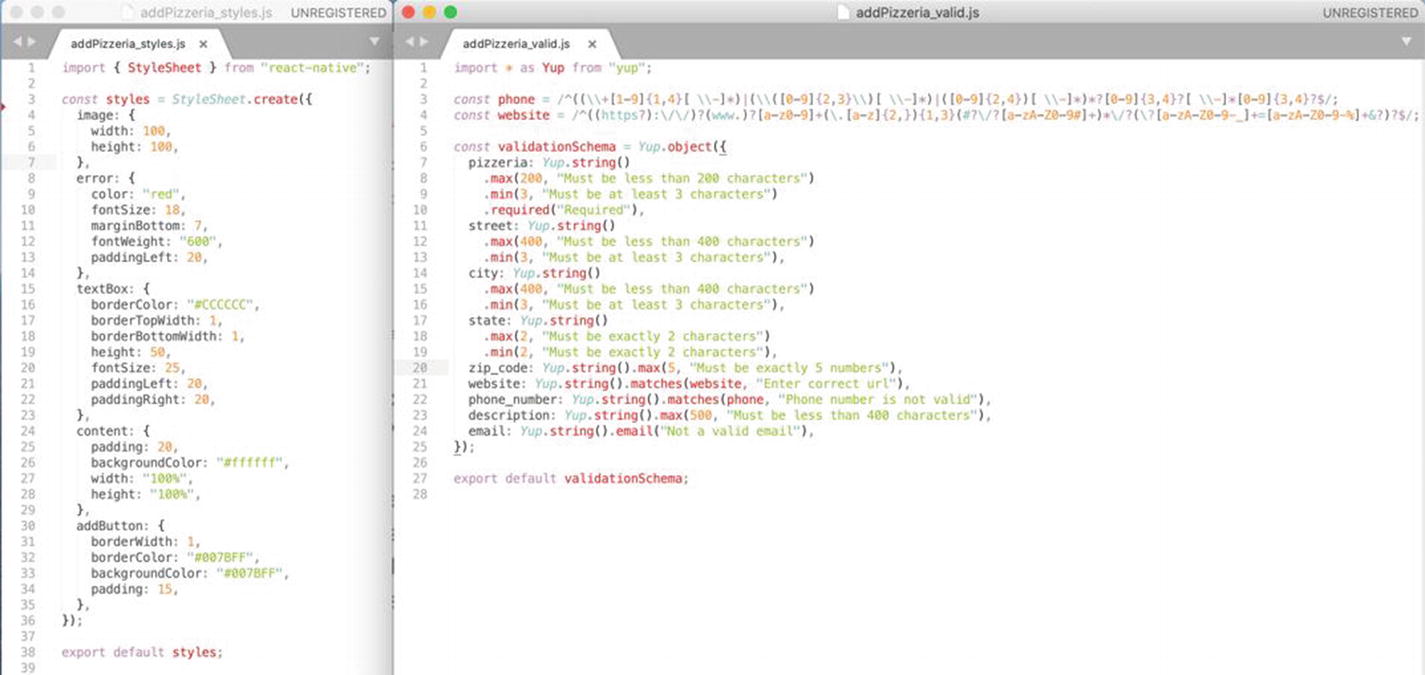
Here, we would need to define style props for the following attributes: container, image, title, textBox, error, and addButton. By now, you have probably guessed that design is not my strong point, so I invite you to explore fonts, sizes, and colors.
By now, dealing with the Image component should be simple as we have discussed it many times during the course of this book. The Image component requires height and width props.
image: {
width: 200,
height: 200,
},
The error text and input prompt would look like this:
error: {
color: "red",
fontSize: 18,
marginBottom: 7,
fontWeight: "600",
paddingLeft: 20,
},
textBox: {
borderColor: "#CCCCCC",
borderTopWidth: 1,
borderBottomWidth: 1,
height: 50,
fontSize: 25,
paddingLeft: 20,
paddingRight: 20,
},
Let me remind you that the Button component would be rendered as a button on Android only, so this style would work for Android platforms.
addButton: {
borderWidth: 1,
borderColor: "#007BFF",
backgroundColor: "#007BFF",
padding: 15,
},
Finally, we will wrap all our elements with a container View. We will set the color to white, and with the help of width and height, we will make sure that 100% of the screen would be covered.
container: {
justifyContent: "center",
backgroundColor: "#ffffff",
width: "100%",
height: "100%",
},
You can see the styles object in Figure 7-6. Make sure you remove the old styles object on the bottom of addPizzeria.js. Otherwise, it would clash with imported styles from addPizzeria_styles.js.
All right, let’s move to addPizzeria_valid.js file. On top, we would need to import Yup:
import * as Yup from "yup";
Move our validationSchema from addPizzeria.js to addPizzeria_valid.js and add all other fields based on our Pizzeria model in models.py. For now, we will skip the logo_image field because for image we will create a special component. Also, we do not need to include an active field; it would be set to True value by default.
Based on what we have done for pizzeria and city fields, you understand the principle behind Yup validation. But how would you validate a phone number or a website address? We could use regex as we did in the Django model. For that, we need to define regex patterns for phone and website.
For all fields, we would use string() method, even for zip_code. We would need a string data type to send a POST request. Email is an essential piece of information in any form. Fortunately for us, Yup comes with a special email() validator method, and we will use that for our email field.
phone_number: Yup.string().matches(phone, "Phone number is not valid"),
description: Yup.string().max(500, "Must be less than 400 characters"),
email: Yup.string().email("Not a valid email"),
});
Following React guidelines, we need to export validationSchema on the bottom of addPizzeria_valid.js file. You can see the final version of addPizzeria_valid.js in Figure 7-6.
Figure 7-6
addPizzeria_styles.js and addPizzeria_valid.js in the drawer directory
After we cleaned the addPizzeria.js file of style and validationSchema, it would be easier for us to concentrate on TextInput fields. We have nine TextInput fields, and down the road we would need to attach an image. To make sure all these fields would fit nicely on the screen of any iPhone or Android model, we will use the React Native component ScrollView. It is kind of similar to FlatList. A user would be able to scroll through elements. Usually, ScrollView would be applied to a much smaller list, fewer than 100 items. We have less than 100 elements, and ScrollView would be a perfect choice for us. Import the ScrollView component.
import {TextInput,
Button,
Text,
Image,
ScrollView,
SafeAreaView,
} from "react-native";
The barebones of our AddPizzeria component would look like this:
<SafeAreaView> will use style={styles.content} from our addPizzeria_styles.js file. Inside the <Formik opening tag, we will define all initial values and set them all to strings. In JSON.stringify, replace 2 with 9, the number of values we are passing.
<Formik
initialValues={{
pizzeria: "",
street: "",
city: "",
state: "",
zip_code: "",
website: "",
phone_number: "",
description: "",
email: "",
}}
onSubmit={(values) => {
alert(JSON.stringify(values, null, 9));
}}
validationSchema={validationSchema}
>
As a placeholder, we will use our old image of pizza pie and place it as a first element inside <ScrollView> tags. It is OK that it is not centered. We need the default image for now, and later it would be replaced with an image picker component.
<Image
style={styles.image}
source={{ uri: "https://bit.ly/book-pizza" }}
/>
Each TextInput component would have the same props with different values from our initialValues list. We have defined initialValues at the beginning of the <Formik>. All TextInputs share the same style={styles.textBox}, and under each input, we will place a <Text> element with an error message. You can take this example and use it as a template for all TextInput fields. The final file would look like the ones in Figures 7-7 and 7-8.
<TextInput
style={styles.textBox}
value={values.street}
placeholder="Street address"
onChangeText={handleChange("street")}
/>
<Text style={styles.error}>{errors.street}</Text>
Before we implement the POST request with Axios, we need to test our form with an alert message (Figures 7-7 and 7-8). Enter your favorite pizza place name and address to check if your form works correctly. The AddPizzeria component is very concentrated, and the following is the code from addPizzeria.js:
import {
SafeAreaView,
ScrollView,
TextInput,
Button,
Image,
Text
} from "react-native";
import { Formik } from "formik";
import styles from "./addPizzeria_styles";
import validationSchema from "./addPizzeria_valid";
First half of the addPizzeria.js file and iPhone simulator rendering an alert message with information I just entered
Figure 7-8
Second half of the addPizzeria.js file and Android emulator rendering an alert message with information I just entered
Sending data to the API
We have successfully extracted data from the form, and now we can package it and send it to a database. What exactly do I mean by package? I propose to use the FormData object and set the values of inputs to model fields. We will use model fields as keys and compile an object to be sent with a POST request. FormData is commonly used to send forms with attached files. With a FormData object, the Axios post() method would set headers as “content-type”:”multipart/form”. “Multipart/form” is one of the methods to encode the data that structures the POST request itself. We would need to use “multipart/form” because later we would attach an image to our form.
To make our POST API call, we will define a new function handleSubmit right above the return method in AddPizzeria component. Inside the handleSubmit function, we will use the Axios instance through client and compile the FormData object. The structure of handleSubmit function would look like this:
const handleSubmit = (values) =>{
const data = new FormData();
client.post(//API call)
}
Some developers prefer to create a special file for a layer between the API client and onSubmit handler. We are not going to multiplicate files here, simply to make the process as clear and understandable as it can be.
To compile the FormData object, we would need to define a variable and assign a FormatData() function.
const data = new FormData();
The FormData function will initialize a new object, and we could append our keys and values to the object.
const data = new FormData();
data.append("pizzeria_name", values.pizzeria);
data.append("street", values.street);
data.append("city", values.city);
data.append("state", values.state);
data.append("zip_code", values.zip_code);
data.append("website", values.website);
data.append("phone_number", values.phone_number);
data.append("pizzeria_name", values.pizzeria);
data.append("description", values.description);
data.append("email", values.email);
We will skip an image field for now. If there is no incoming image, we have a default one in our Django Model.
To make a post() request, we need to pass a URL for the Create View and data. Django URL requires “/create/” extension to set up a new Pizzeria object.
client
.post("/create/", data)
.then(function (response) {
console.log(response);
})
.catch(function (response) {
console.log(response);
});
When you finish the handleSubmit function, you need to pass it to onSubmit handler. Replace the alert message and all other code we used before; here is the updated AddPizzeria component:
We are almost done. However, to successfully acquire our data, the Django REST framework would need to parse it. Django REST comes with four different parsers: JSONParser, FormParser, MultiPartParser, and FileUploadParser.2 Encoding “multipart/form-data” method we are using in our mobile app would require a MultiPartParser.
To use MultiPartParser in views.py file in the Django project, we would need to import it from rest_framework.parsers.
from rest_framework.parsers import MultiPartParser
And add it to our PizzeriaCreateAPIView as parser_classes.
class PizzeriaCreateAPIView(generics.CreateAPIView):
parser_classes = [MultiPartParser]
queryset = Pizzeria.objects.all()
serializer_class = PizzeriaDetailSerializer
Make certain that the views.py file was saved and the back-end developer server is running. Enter new information in our AddPizzeria screen and click submit button (Figure 7-9).
Figure 7-9
POST request with a FormData object
To be sure that the object was posted, reload iPhone or Android emulator and retrieve the record in your browser running on 127.0.01:8000 server (Figure 7-10).
Figure 7-10
New record was created with the API POST request
Using images
We can grab an input text and send it over to a server, but what about images? The process of uploading an image to a server would require three steps. First, we need to acquire a permission to get access to photos on a mobile device. Second, we need to select an image from the camera roll where photos are saved. Third, transmit the photo’s URI with a POST API call.
The first part sounds like a lot of coding; however, the Expo framework comes with a bunch of useful features like FaceDetector, GoogleSignIn, ImagePicker, and others. In our case, ImagePicker would come in handy to solve the first two steps. ImagePicker is probably one of the most popular Expo features. You should definitely check the documentation (https://docs.expo.io/versions/v38.0.0/sdk/imagepicker/). There, you will find a very informative video on how to use ImagePicker.
ImagePicker comes as a separate component, and we need to install it.
expo install expo-image-picker
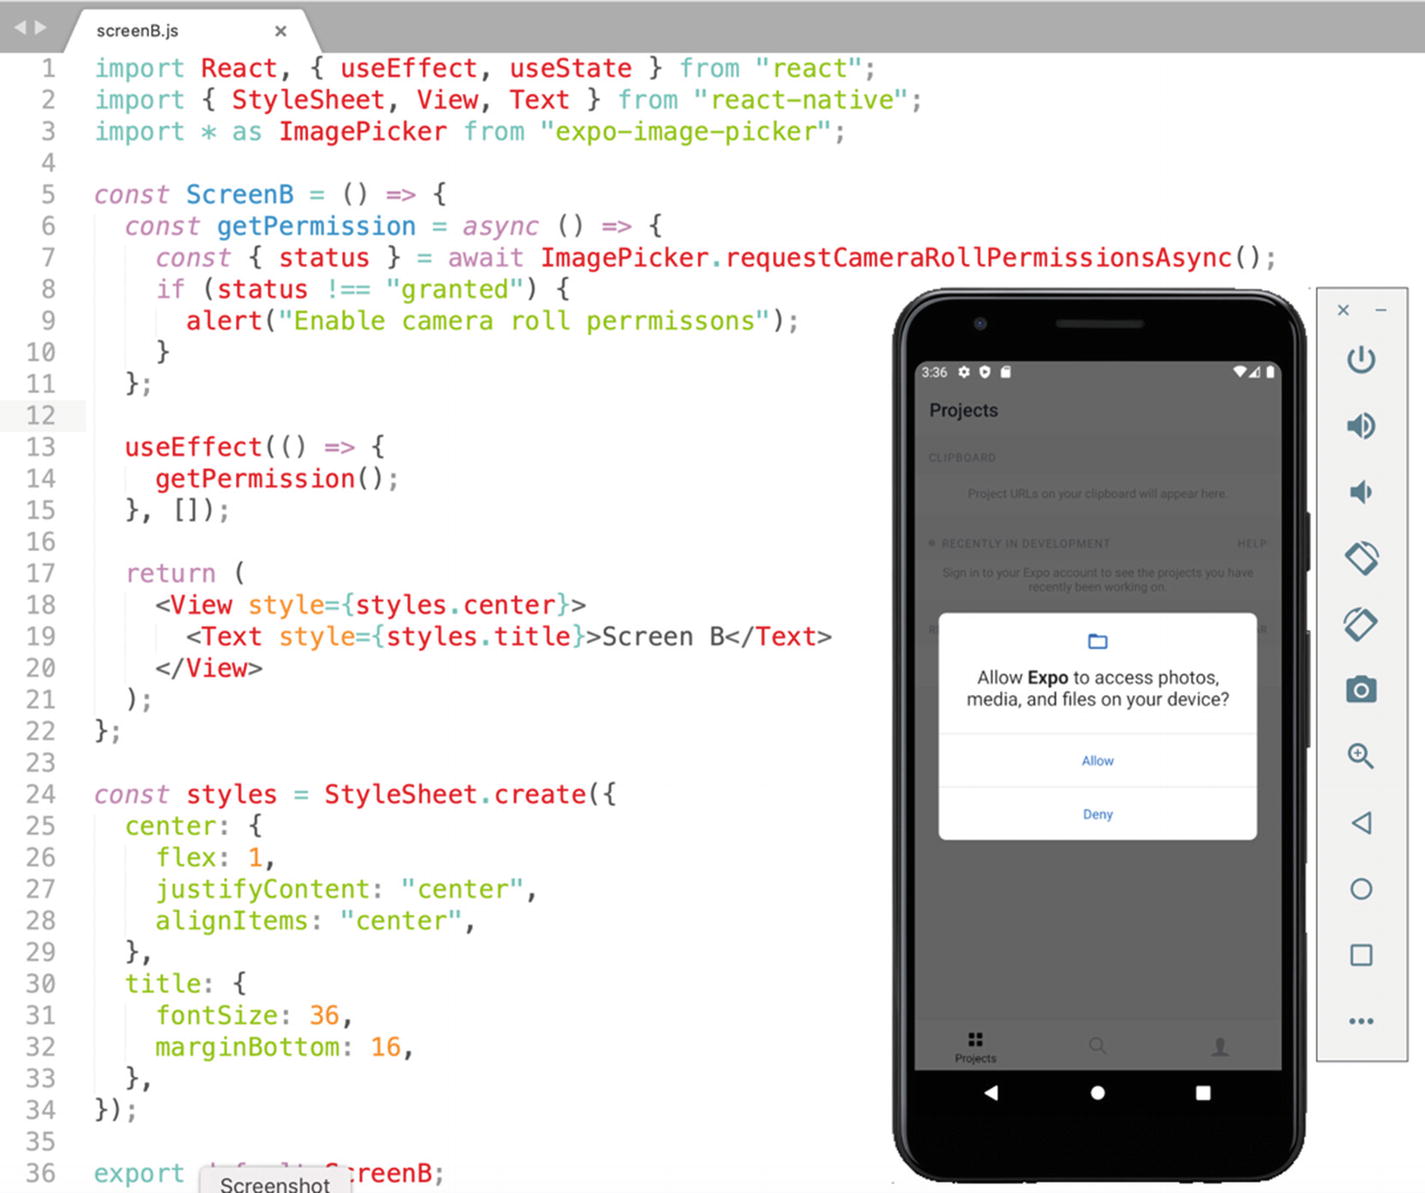
In our React Native pizzavspizza_app, we have the component ScreenB that does nothing at the moment. We can use it to practice image picking. Above ScreenB component, import everything from the expo-image-picker package.
import * as ImagePicker from "expo-image-picker";
ImagePicker comes with methods that would help us to obtain a permission to access camera roll on a phone. To solve this, we would need to use requestCameraRollPermissionAsync() method. This method would return Boolean. If true, then we could have access to a phone’s photos folder.3 Obtaining permission is similar to calling API. We would create a function and invoke it in the useEffect hook. Later, to save a photo’s URI, we would need the useState hook. Make sure you have hooks imported.
import React, { useEffect, useState } from "react";
We can rewrite the ScreenB component as a function expression, to be consistent with other components. Right above return, declare getPermission function. Since requestCameraRollPermissionAsync() is an asynchronous method, our getPermission function should have async/await keywords.
const ScreenB = () => {
const getPermission = async () => {};
return (
<View style={styles.center}>
<Text style={styles.title}>Screen B</Text>
</View>
);
};
Inside getPermission function, we will invoke requestCameraRollPermissionAsync() that would ask a user to grant the permissions. If the user chooses not to grant our app this privilege, then we would raise a fair alert asking for permission.
const getPermission = async () => {
const { status } = await ImagePicker.requestCameraRollPermissionsAsync();
if (status !== "granted") {
alert("Enable camera roll permissions");
}
};
The right place to invoke getPermission function would be in the useEffect hook.
useEffect(() => {
getPermission();
}, []);
I might sound like a broken record here, but do not forget to use an empty array as a second argument in the useEffect hook. If you navigate to ScreenB in the drawer, it should raise a permission request to access your photos (Figure 7-11).
Figure 7-11
The mobile application is asking for a permission to get access to the camera roll
Expo would be replaced with the app name in production. Also, this permission was saved, and if later you want to change it, you could do so in settings. If for some reason you decline this request, it would raise “Enable camera roll permissions” alert, and you would need to grant the permission by changing access in the phone’s settings.
The next step is to grab an image with ImagePicker. This task could be done with launchImageLibraryAsync() method. launchImageLibraryAsync() returns either {cancelled : true} or {cancelled : false}. {cancelled : true} would be returned if the user did not pick anything. However, if the user picked a photo, then we would receive the image, uri, width, height, exif, and base64. Then we can save the URI with useState hook. Let’s start with the hook and use the variable photo to save our object.
const [photo, setPhoto] = useState();
Now we can define the function to select a photo. Using our previous experience, it would be smart to use a try statement. If the user selects a photo and everything goes smoothly, then we would set the image URI as the photo variable; otherwise, raise an alert message.
const selectPhoto = async () => {
try {
const result = await ImagePicker.launchImageLibraryAsync();
if (!result.cancelled) setPhoto(result.uri);
} catch (error) {
alert("Error, try again");
}
};
We will invoke this function on a press of the button. To see this function in action, we would render the image that was picked. For this, we would need to add Button and Image components to our imports.
import { StyleSheet, View, Text, Button } from "react-native";
Put these new components to use. I’ll replace the old <Text> component with <Button> one. The OnPress handler would call the selectPhoto function.
If we grab the image, then URI would be set as a photo with setPhoto, and we could render it with <Image> component. Make sure the Image component is imported.
Remember the Image component requires width and height attributes. We would need to add them to the styles object.
photo: {
width: 400,
height: 400,
}
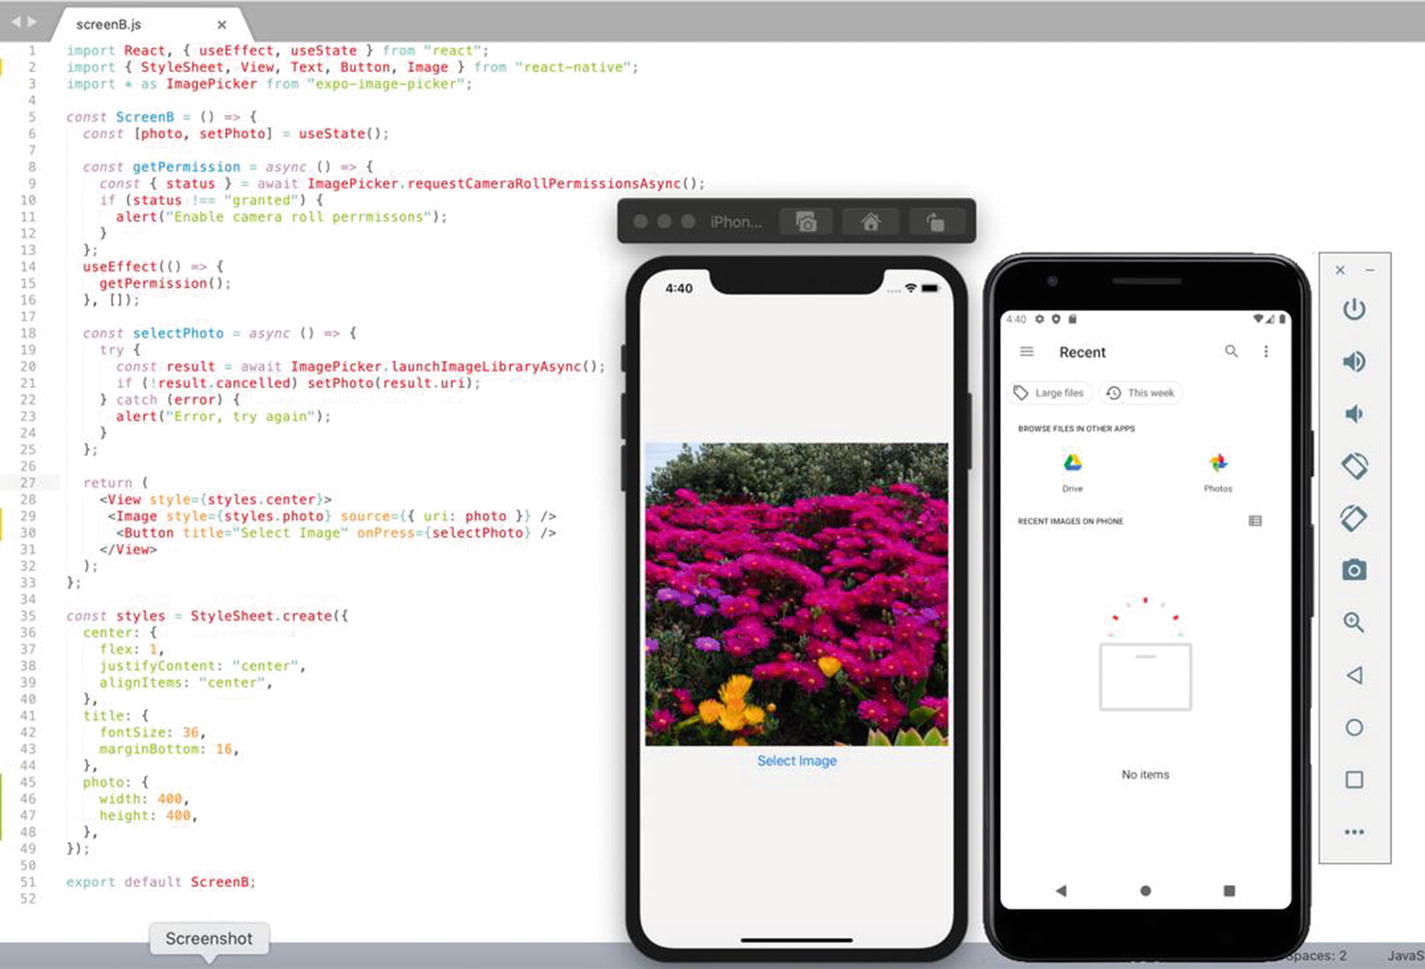
Try this “Select Image” button. The iPhone simulator comes with preset images, and you can pick one. The Android emulator has no images. We can see that the ImagePicker component works fine on both of them (Figure 7-12). Here, you can see all changes we have made to the ScreenB component and the full solution for ImagePicker.
import React, { useEffect, useState } from "react";
import { StyleSheet, View, Image, Button } from "react-native";
import * as ImagePicker from "expo-image-picker";
const ScreenB = () => {
const [photo, setPhoto] = useState();
const getPermission = async () => {
const { status } = await ImagePicker.requestCameraRollPermissionsAsync();
if (status !== "granted") {
alert("Enable camera roll permissions");
}
};
useEffect(() => {
getPermission();
}, []);
const selectPhoto = async () => {
try {
const result = await ImagePicker.launchImageLibraryAsync();
The ImagePicker component picks an image from the camera roll
The first two steps of our initial plan to get permissions and grab an image are completed. The final step, uploading an image to a server, could be split into two parts: build a reusable component and use that component in the AddPizzeria form or any other place in the app.
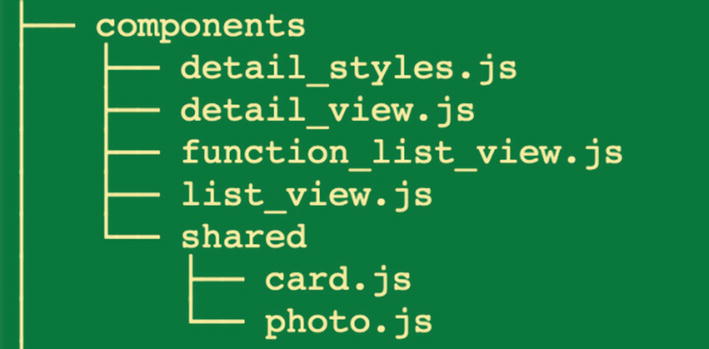
We can refactor our existing code in screenB.js file and save it as a reusable component. In the shared folder where we keep reusable and shareable components, create a new file photo.js (Figure 7-13).
Figure 7-13
New photo.js file in the shared directory to store a reusable PhotoPicker component
In photo.js file, I’ll declare a new component PhotoPicker. The name PhotoPicker suggests that this is a wrapper for Expo ImagePicker component. On the top of the file, we need to import the essential stuff. It’s very similar to what we used in screenB.js file, except for the useState hook. We will need this hook in AddPizzeria component.
import React, { useEffect } from "react";
import { View, StyleSheet, Image } from "react-native";
import * as ImagePicker from "expo-image-picker";
const PhotoPicker = () => {
return;
};
export default PhotoPicker;
Following the logic in the previous example, we would need to obtain a permission to get access to camera roll and select a photo. I’ll just copy getPermission function from screenB.js file and call it in the useEffect hook.
const getPermission = async () => {
const { status } = await ImagePicker.requestCameraRollPermissionsAsync();
if (status !== "granted") {
alert("Enable camera roll permissions");
}
};
useEffect(() => {
getPermission();
}, []);
Right after this, we can copy and paste selectPhoto function to photo.js from screenB.js file.
const selectPhoto = async () => {
try {
const result = await ImagePicker.launchImageLibraryAsync();
if (!result.cancelled) setPhoto(result.uri);
} catch (error) {
alert("Error, try again");
}
};
For this component, we would need to set up a simple style object. Using StyleSheet component, we will create this object with two attributes, container and img. Container will provide the color and position the element in the center. The img attribute will provide dimensions and round the corners of an incoming photo.
So far, everything is similar to what we have done before. PhotoPicker is a reusable component and will take an image URL as props. We can define it as a photo. This photo would be returned or rendered by our component. But what if there is no image selected yet? How would we mark that field? We can place a temporary placeholder as before. This time, we could use an icon from Expo. Font Awesome icons are available through @expo/vector-icons library, and it is included in Expo. Here, you can find the list of all icons: https://icons.expo.fyi.
Here, I’ll use a simple picture icon. We need to import the icon family on top of the file, and then we can use an icon component.
import { SimpleLineIcons } from "@expo/vector-icons";
Using conditional rendering, we can return the following statements wrapped in <View> tags, because a React component can return only one container.
With the help of React conditional rendering, we can create if and else scenarios and show a component based on some conditions. If you want to learn the rules and syntax, visit the React documentation: https://reactjs.org/docs/conditional-rendering.html. There, you can find and practice numerous examples.
If there is no photo, URI comes as an empty string and then returns a picture icon with size and color props. Otherwise, it renders the selected image, and the variable photo would pass the URI. This is my code for the PhotoPicker component:
import React, { useEffect } from "react";
import { View, StyleSheet, Image } from "react-native";
import * as ImagePicker from "expo-image-picker";
import { SimpleLineIcons } from "@expo/vector-icons";
const PhotoPicker = ({photo}) => {
const getPermission = async () => {
const { status } = await ImagePicker.requestCameraRollPermissionsAsync();
if (status !== "granted") {
alert("Enable camera roll permissions");
}
};
useEffect(() => {
getPermission();
}, []);
const selectPhoto = async () => {
try {
const result = await ImagePicker.launchImageLibraryAsync();
If you want to test it, we would need to import PhotoPicker component into addPizzeria.js file.
import PhotoPicker from "../components/shared/photo.js";
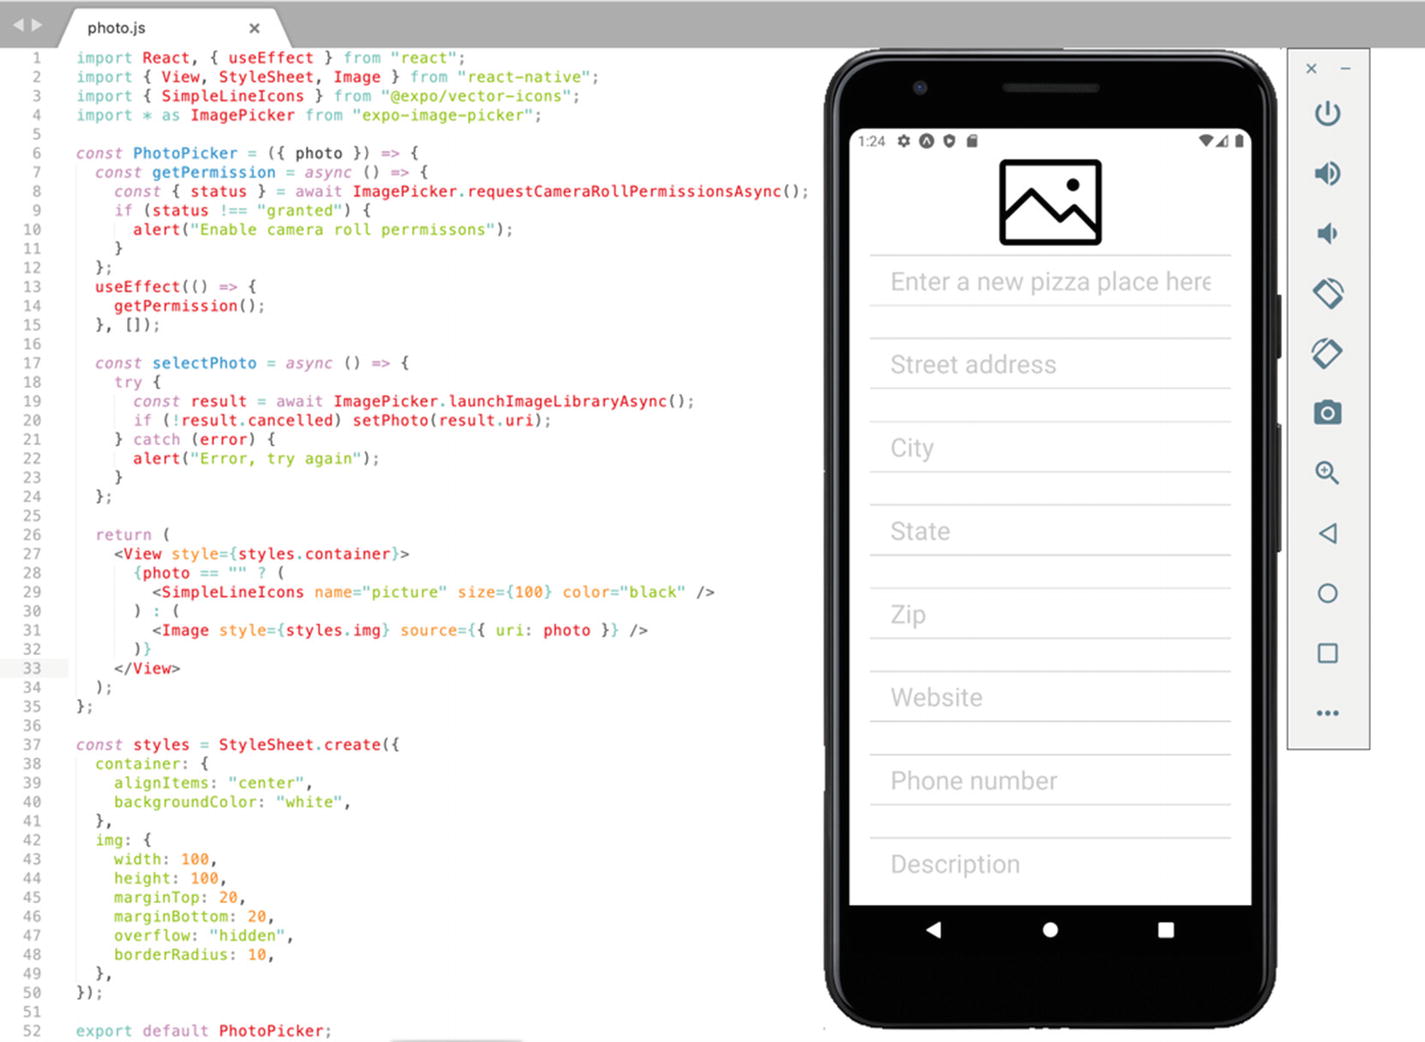
And replace <Image> element with the <PhotoPicker photo={“ ”}/> component with an empty string passed as props. You can see our default icon right above the form fields, replacing the old pizza image (Figure 7-14).
Figure 7-14
PhotoPicker component rendering the default picture icon
Our job is to click that picture icon and select a photo from camera roll. When we pick the right photo, we would save it in useState hook and append URI to the data object.
To make our icon clickable, we would use React Native TouchableWithoutFeedback component. The documentation assures that it is an “extensive and future-proof way to handle touch-based input”4 – exactly what we need here.
Import it in photo.js file.
import { View, StyleSheet, Image, TouchableWithoutFeedback } from "react-native";
We will wrap <View> container with <TouchableWithoutFeedback> tags and use event handler onPress. The OnPress handler will invoke onPress function that we would need yet to define.
What about the function onPress? What should happen on a press? As a part of our plan, we would need to invoke a selectPhoto function. However, the user might change his or her mind; then we would need to give the user another chance to pick a photo again.
Before, we have used a simple JavaScript alert function to see how inputs worked. This time, we would need to use a React Native Alert Core Component. How is that different from the alert function? Well, for starters, it comes with buttons and you could make a choice. Also, since it is a native component, it would be the most efficient choice for a React project.
Add Alert to the list of our imports.
import {
View,
StyleSheet,
Image,
TouchableWithoutFeedback,
Alert,
} from "react-native";
Our onPress function would have two options: if there is no photo selected yet, you could choose one with the help of selectPhoto(), or if there was a photo, Alert would ask you if you want to replace it with another photo. A positive answer would trigger the selectPhoto function again.
const onPress = () => {
if (photo == "") selectPhoto();
else
Alert.alert("Photo", "Would you like to use another photo? ", [
{ text: "Yes", onPress: () => selectPhoto() },
{ text: "No, keep it!" },
]);
};
Before we put it to test, we need to replace setPhoto in the selectPhoto function. We used setPhoto as a part of the useState hook, and we do not use it here. We will replace setPhoto with a function onPressPhoto.
const selectPhoto = async () => {
try {
const result = await ImagePicker.launchImageLibraryAsync();
if (!result.cancelled) onPressPhoto(result.uri);
} catch (error) {
alert("Error, try again");
}
};
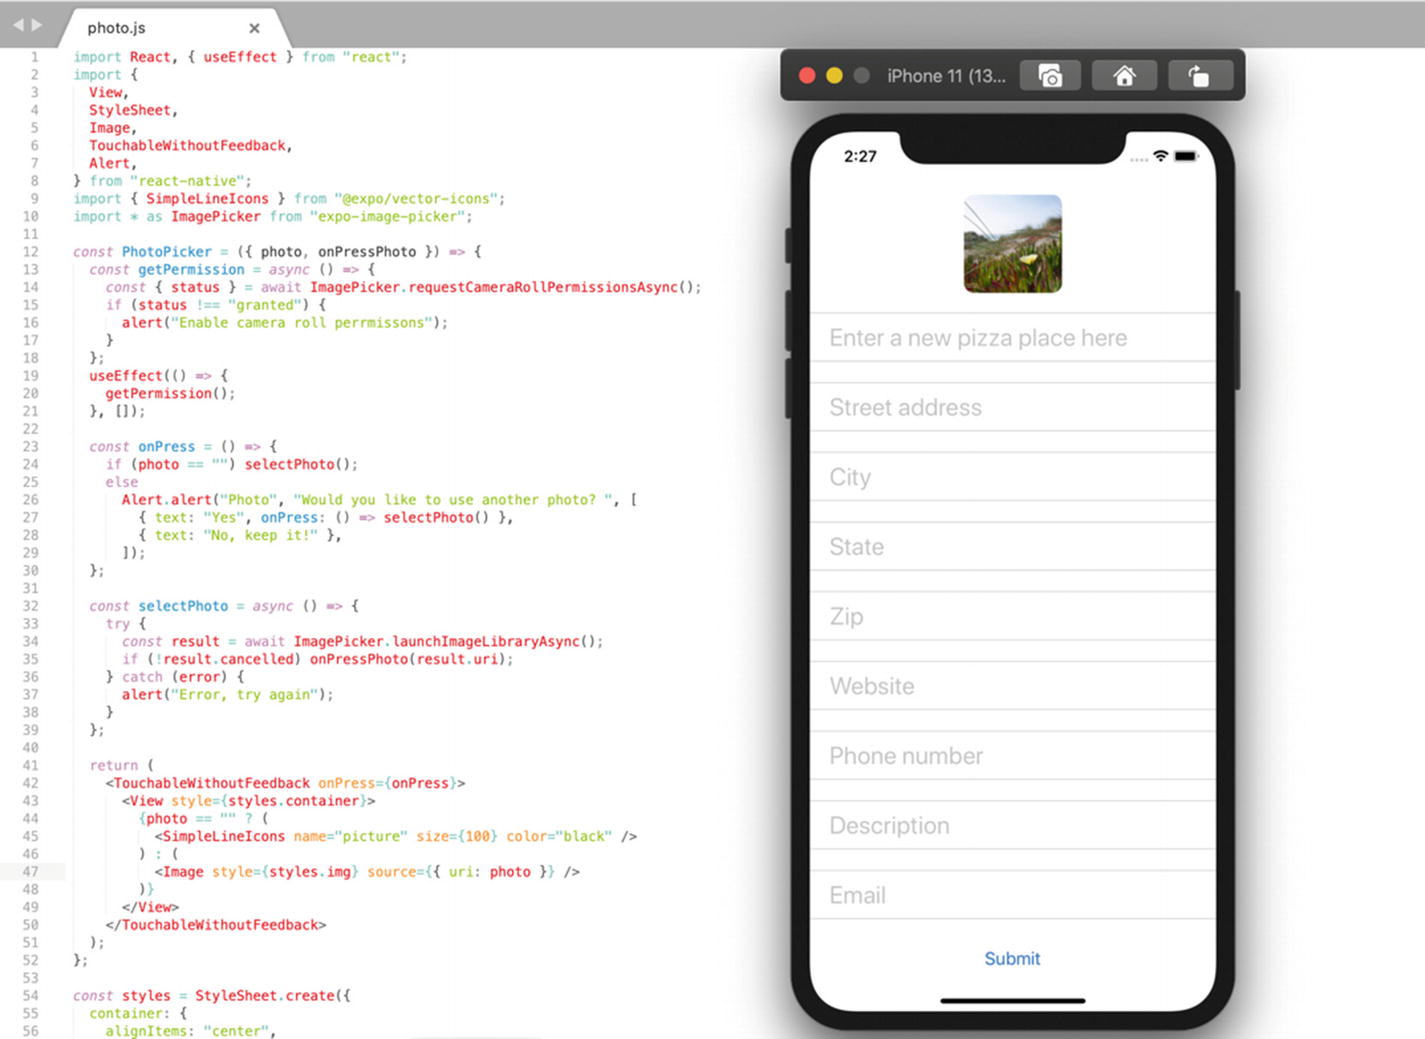
OnPressPhoto would help us to set URI as a useState hook in the AddPizzeria component, and we would use it as props in the PhotoPicker component.
The iPhone simulator picks a photo if you press that picture icon on the AddPizzeria screen (Figure 7-15). If you press it again, you can replace the image with another photo from camera roll.
Figure 7-15
You can choose a photo from the camera roll in AddPizzeria form
The final step of our plan is to send the photo’s URI with the data object to a server. The handleSubmit function in AddPizzeria component calls http://127.0.0.1:800/create/ URL, and that invokes PizzeriaCreateAPIView in the Django project views.py file. Accordingly, PizzeriaCreateAPIView serves PizzeriaDetailSerializer from serializers.py. Apparently, PizzeriaDetailSerializer lacks logo_image field which we would like to use to upload our photo as a logo for the new pizza place. Let’s fix that and insert logo_image into PizzeriaDetailSerializer fields.
class PizzeriaDetailSerializer(serializers.ModelSerializer):
Now, flip back to AddPizzeria.js file, and in handleSubmit function, append this field with values to the data object.
data.append("logo_image", {
uri: photo,
name: "filename.jpg",
type: "image/jpg",
});
Besides the URI itself, I have provided the name and type of the file. Also, I’ll wrap our API call in try and except statements. Using the photo with nice flowers from camera roll, I’ll try to add my favorite Giordano’s place to our list (Figure 7-16).
Figure 7-16
Uploading a photo with the AddPizzeria form
It looks like we’ve done it! But how would the user know that the record was created successfully? To inform the user, we will use an Alert component.
To reload the app from inside, we need to use the NativeModule. Update the list of imported components in addPizzeria.js.
With the Alert component, we will inform the user that the record has been successfully created and on press will reload the app and redirect to the home screen. We will store this code as a separate function, because if we decide to alter the message down the road, we would not want to mess with handleSubmit function. I’ll call this function postedAlert.
And we will invoke the function postedAlert in a try statement if the record was successfully sent (Figure 7-17). Here, you can see the final version of the addPizzeria.js file:
import React, { useState } from "react";
import {
SafeAreaView,
ScrollView,
TextInput,
Button,
NativeModules,
Text,
View,
Image,
Alert,
} from "react-native";
import { Formik } from "formik";
import client from "./../../api/client";
import styles from "./addPizzeria_styles";
import validationSchema from "./addPizzeria_valid";
import PhotoPicker from "../components/shared/photo.js";
You have to understand that the possibilities of what to do after the user has created a record are endless, and reload is the simplest one. Another obvious option would be to redirect to the “home” screen and update the useEffect hook to return the updated list of pizzerias. Or maybe redirect with no alert message. I’ll leave it up to you. On press, the alert message will reload our app, and we will see our newly created records (Figure 7-18).
Figure 7-18
Django renders the list of Pizzerias, and we see the same record on the “Home” screen of our app
Authentication
One of the reasons why we use Django and not anything else is that Django comes with a modern authentication tool. You do not have to use third-party solutions or pay for authentication services. The Django REST framework comes with token-based HTTP authentication.5 Using this tool, you can set permissions for Views and actions. For example, only authorized users could have access to PizzeriaCreateAPIView or see information like a personal account.
Authtoken is very easy to install and use. First, we would need to add “rest_framework.authtoken” to the installed apps list in settings.py in the Django project.
INSTALLED_APPS = [
'django.contrib.admin',
'django.contrib.auth',
'django.contrib.contenttypes',
'django.contrib.sessions',
'django.contrib.messages',
'django.contrib.staticfiles',
'corsheaders',
'rest_framework',
'rest_framework.authtoken',
'stores',
]
The Authtoken app comes with Models, and we need to run migrate command.
python manage.py migrate
After Models were migrated, you can restart your developer server. As a last step of the installation process, we need to add the URL pattern to the main URL dispatcher in pizzaproject/urls.py.
Import views from the Authtoken app and provide the URL pattern (Figure 7-19).
from rest_framework.authtoken import views
path('api-token-auth/', views.obtain_auth_token)
Figure 7-19
URL dispatcher pizzaproject/urls.py
It is time to generate a token! Navigate to 127.0.01:8000/admin/. It might ask you to log in. On the administration page, you should see the Auth Token App and Tokens model. Click Tokens, and in the upper-right corner, press the Add Token button. Then choose a user you would like to generate a token and click save. My database currently has just one superuser, me, so I’ll add myself a token. In Figure 7-20, you can see the generated token in the Tokens model.
Figure 7-20
Django Administration Authtoken has generated a token
The only way to see the token and the Authtoken app in action is to send a POST request. Before we build a front-end solution for that, we can use the Postman app (www.postman.com). Postman is a very popular platform for testing APIs. It is free and I have it running on my computer. If you do not want to install this app, that is OK; just take a look at Figure 7-21. On a second thought, I would recommend you to install this free app on your computer for your future RESTful projects.
Figure 7-21
Postman app returns a token if you send a POST request with a username and password
In the Postman app, we would need to provide a URL we would like to hit. In our case, it is http://127.0.0.1:8000. I will change the settings in Postman to a raw JSON input.
Our auth API requires two arguments, username and password. In raw format, I’ll pass them as a JSON dictionary {“username”: “art”, “password”:”programwithus123”. You should use your credentials to obtain a token. After Authtoken receives correct credentials, it would return the token, as you can see at the bottom of Figure 7-21.
This token would work as a key. If you decide to lock some views and allow authenticated users only to call that API, then a token should be added to the headers of an HTTP request.
Let’s build a logging form in our React Native app and obtain a token based on a username and password. ScreenC component is vacant, and we can use it for the login form. Technically, this api-token-auth API call would be no different than any other POST request.
Since we just went through the whole process of creating a record, I’ll go a little bit faster and copy our AddPizzeria form to screenC file.
We will name this component LoginForm. Copy the Formik form we have used before or create one from scratch. We need two fields, username and password. For our login screen, we need a title. Using Text tags, I’ll create a title like this:
<Text>Login to your account</Text>
and place <Text> and the form in <View></View> tags.
To stay consistent with the name of the component, we can rename the file itself to loginForm.js. Do not forget to replace old ScreenC imports everywhere in App.js with LoginForm component.
import LoginForm from "./src/screens/drawer/loginForm.js";
Also, validationSchema and styles would be very similar to what we used before, yet we need to change something. To speed up the process you can copy and rename addPizzeria_styles.js and addPizzeria_valid.js to loginForm_styles.js and loginForm_valid.js (Figure 7-22).
Figure 7-22
loginForm.js (former screenC) loginForm_styles.js and loginForm_valid.js in the drawer directory
loginForm_valid.js would have a validationSchema but much shorter than we used to have. We need to validate the username and password only. I’ll add required() method to the password field.
import * as Yup from "yup";
const validationSchema = Yup.object({
username: Yup.string()
.max(200, "Must be less than 200 characters")
.min(3, "Must be at least 3 characters")
.required("Required"),
password: Yup.string()
.max(400, "Must be less than 400 characters")
.min(3, "Must be at least 3 characters")
.required("Required"),
});
export default validationSchema;
loginForm_styles.js file succeeds the majority of style attributes, except image. I will add two more attributes: container and title. The title would be used for the <Text> element and the container for <View>. Again, do not be afraid to experiment with style on your own.
import { StyleSheet } from "react-native";
const styles = StyleSheet.create({
error: {
color: "red",
fontSize: 18,
marginBottom: 7,
fontWeight: "600",
paddingLeft: 20,
},
textBox: {
borderColor: "#CCCCCC",
borderTopWidth: 1,
borderBottomWidth: 1,
height: 50,
fontSize: 25,
paddingLeft: 20,
paddingRight: 20,
},
content: {
padding: 20,
backgroundColor: "#ffffff",
width: "100%",
height: "100%",
},
addButton: {
borderWidth: 1,
borderColor: "#007BFF",
backgroundColor: "#007BFF",
padding: 15,
},
container: {
paddingTop: 200,
},
title: {
fontSize: 30,
color: "black",
textAlign: "center",
paddingBottom: 50,
},
});
export default styles;
Based on the changes we just made, we would need to adjust our imports in loginForm.js file.
import React from "react";
import { TextInput, Button, Text, View, SafeAreaView } from "react-native";
import { Formik } from "formik";
import client from "./../../api/client";
import styles from "./loginForm_styles";
import validationSchema from "./loginForm_valid";
We need to alter the handleSubmit function accordingly to a new form and call “/api-token-auth/” API. To see if we get back any token from the POST request, we will use a simple JavaScript alert() function.
Django returns an authentication token based on the username and password
Let’s test our LoginForm component. If I enter my username and password on the login screen, Django returns my token. This is the same token we have seen before in the Postman app (Figure 7-23). Login information is very sensitive; make sure you get it right.
If you are wondering how a user could get registered in the first place, the answer would be to follow all the steps we implemented for PizzeriaCreateAPIView. Step one, in the Django project, create a View and Serializer as a form. In the URL dispatcher, add a new API end to invoke the View. Step two, in the React Native app, write a new component with a form and use Axios to handle a POST request.
Let’s start with a new View in views.py. We can name this view UserCreateView. For UserCreateView, we would need access to Django’s default User model. We can get that access through get_user_model method. To show you how to use permissions in Django REST, we would import permissions from rest_framework and allow anyone to use UserCreateView View.
from django.contrib.auth import get_user_model
from rest_framework import permissions
UserCreateView would require a Serializer. We do not have one yet. Later, we would need to create UserSerializer. Add UserSerializer to the Serializers import.
from .serializers import (
PizzeriaListSerializer,
PizzeriaDetailSerializer,
UserSerializer
)
Now define UserCreateView. First of all, it will inherit from generics.CreateAPIView. We have talked about generic Views earlier in this book.
For Model, we would use the default User model. Django comes with a simple built-in User model. If you need to add more attributes to the User model, you could extend it with a one-to-one relation later. We need to specify the type of data parser as MultiPartParser. This time, we add permission_classes and set it as AllowAny. Finally, we would use UserSerializer to accept and validate incoming data.
class UserCreateView(generics.CreateAPIView):
model = get_user_model()
parser_classes = [MultiPartParser]
permission_classes = [permissions.AllowAny]
serializer_class = UserSerializer
Following our steps, now would be the time to define UserSerializer in serializers.py.
In serializers, we would also need to get access to the User model; import get_user_model.
from django.contrib.auth import get_user_model
The get_user_model method would smooth the communication with the User model. We would need to use it twice so we can save it with the variable UserModel.
UserModel = get_user_model()
UserSerializer will inherit from ModelSerializer. As a safety measure, we will make the password as a write_only field. To validate data and create an instance of User, Django REST recommends using create() and save() methods. In UserSerializer, we will make sure that username and password fields are validated and saved. The create method would return a User instance if it was created successfully. The ModelSerializer serializer requires a Model, and we will provide UserModel.
class UserSerializer(serializers.ModelSerializer):
password = serializers.CharField(write_only=True)
def create(self, validated_data):
user = UserModel.objects.create(
username=validated_data['username']
)
user.set_password(validated_data['password'])
user.save()
return user
class Meta:
model = get_user_model()
fields = [ "username", "password"]
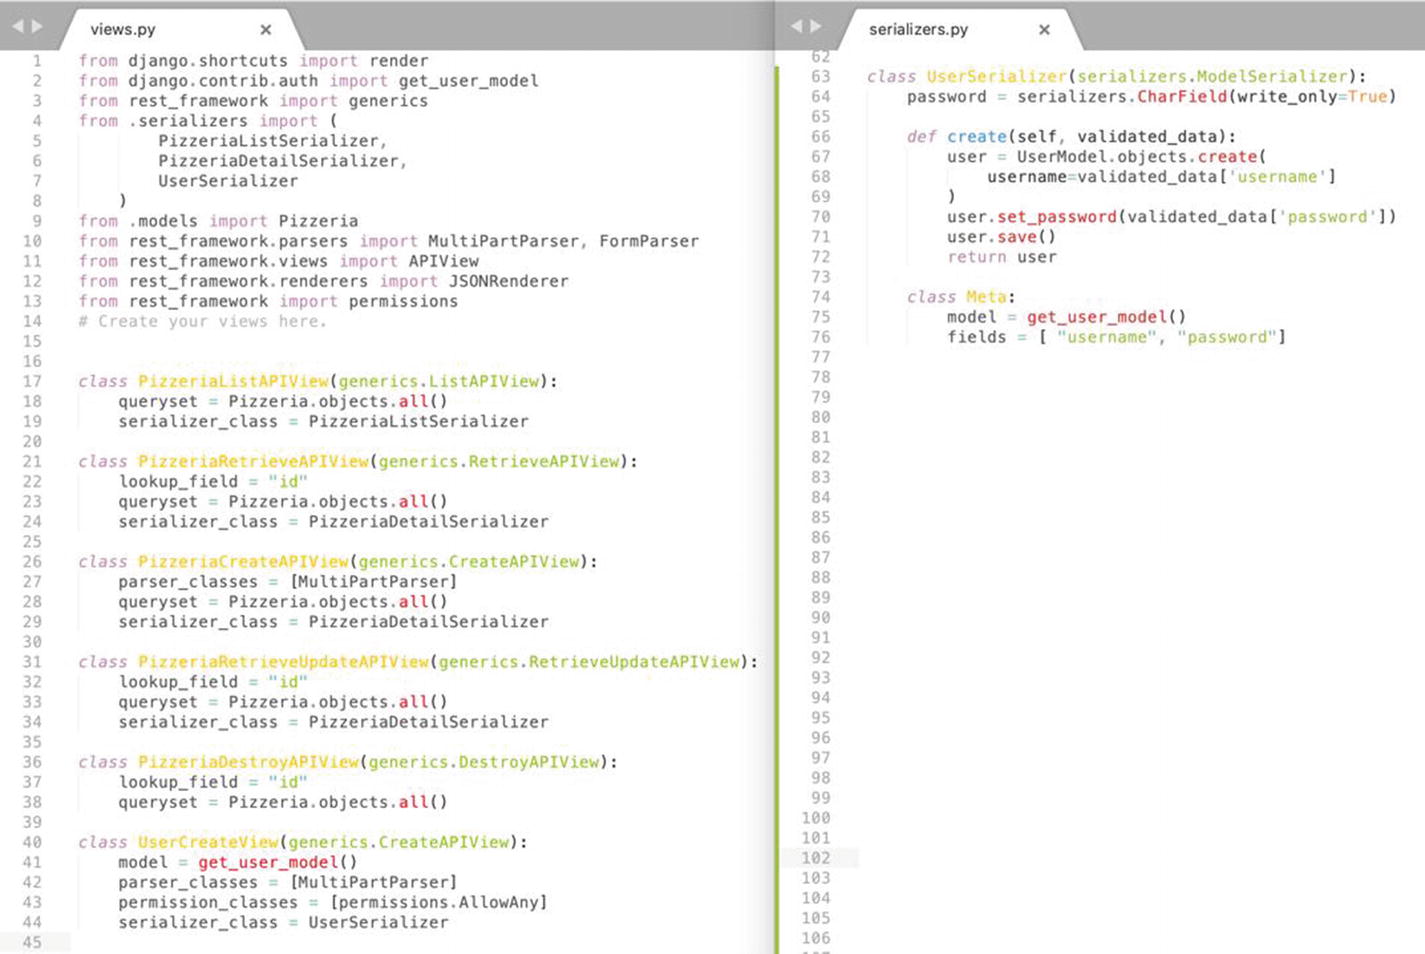
You can see UserCreateView and UserSerializer in Figure 7-24.
Figure 7-24
UserCreateView in views.py and UserSerializer in serializers.py
The final step, as you know by now, is to add a URL pattern to the URL dispatcher. The process is pretty logical. Define a View; create the URL to invoke that View. The API endpoint for UserCreateView would be in the same global pizzaproject/urls.py file where we defined the URL for Authtoken. UserCreateView is defined in stores/views.py, and we would need to import it in urls.py.
from stores.views import UserCreateView
You can use any pattern for your views. I think patterns should be simple and Search Engine Optimization–friendly. For UserCreateView, we will use “/register/”.
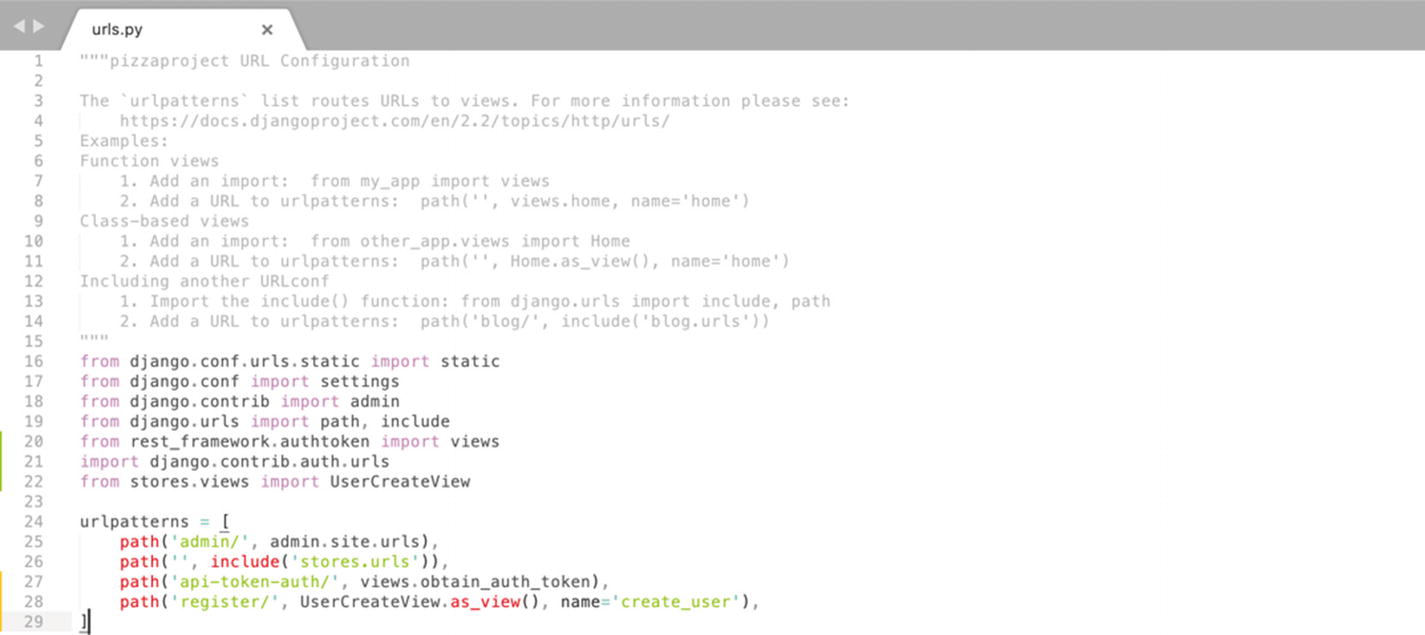
The final version of pizzaproject/urls.py should look like the one in Figure 7-25.
Figure 7-25
URL pattern to create a new user in the urls.py file
Our back-end part is ready, and we can start with a front-end part. We still have screenB.js file with ScreenB component that we do not need any more. We can rename screenB.js to regForm.js (Figure 7-26).
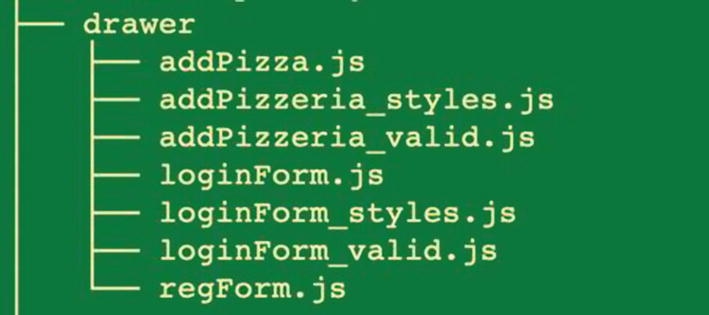
Figure 7-26
regForm.js (former screenB.js) in the drawer directory
RegForm component would be very similar to LoginForm component. We will copy everything from loginForm.js and paste the code in regForm.js.
Let’s replace LoginForm with RegForm component. Do not forget to import regForm.js and replace ScreenB component with RegForm in App.js file. We can use the same style and validation schema for the RegForm component. I’ll just change the text in <Text> tags to “Registration”.
Only one major thing would be different, a URL pattern in post() method. Later, you can refactor this code and create a shareable component for the login and registration forms. Let’s replace the URL in handleSubmit function.
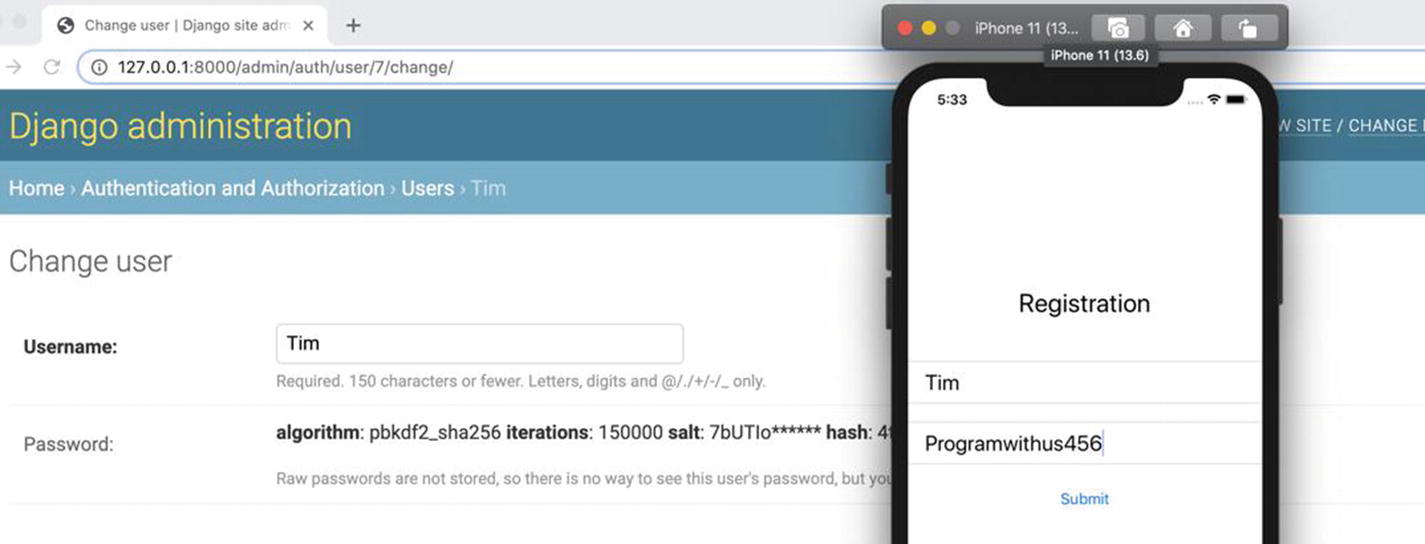
We can try our RegForm component and enter a username and password on the Registration screen. I have used the name Tim, my good friend, as a username. Programwithus456 is the password. If we open Django admin in the browser and navigate to the Users model, we could see that a new user was created (Figure 7-27).
Figure 7-27
A new user has been added through the RegForm component
To close the circle and automate generating token process in Django REST, we can assign a token to any user upon registration. In the create method of UserSerializer, we will add another create method for the Token model.
Python runs in sequence, and we have to generate a token after a User instance was created.
class UserSerializer(serializers.ModelSerializer):
password = serializers.CharField(write_only=True)
def create(self, validated_data):
user = UserModel.objects.create(
username=validated_data['username']
)
user.set_password(validated_data['password'])
user.save()
new_token = Token.objects.create(user=user)
return user
class Meta:
model = get_user_model()
fields = [ "username", "password"]
We use the Token model in UserSerializer, and we need to import it into serializers.py.
from rest_framework.authtoken.models import Token
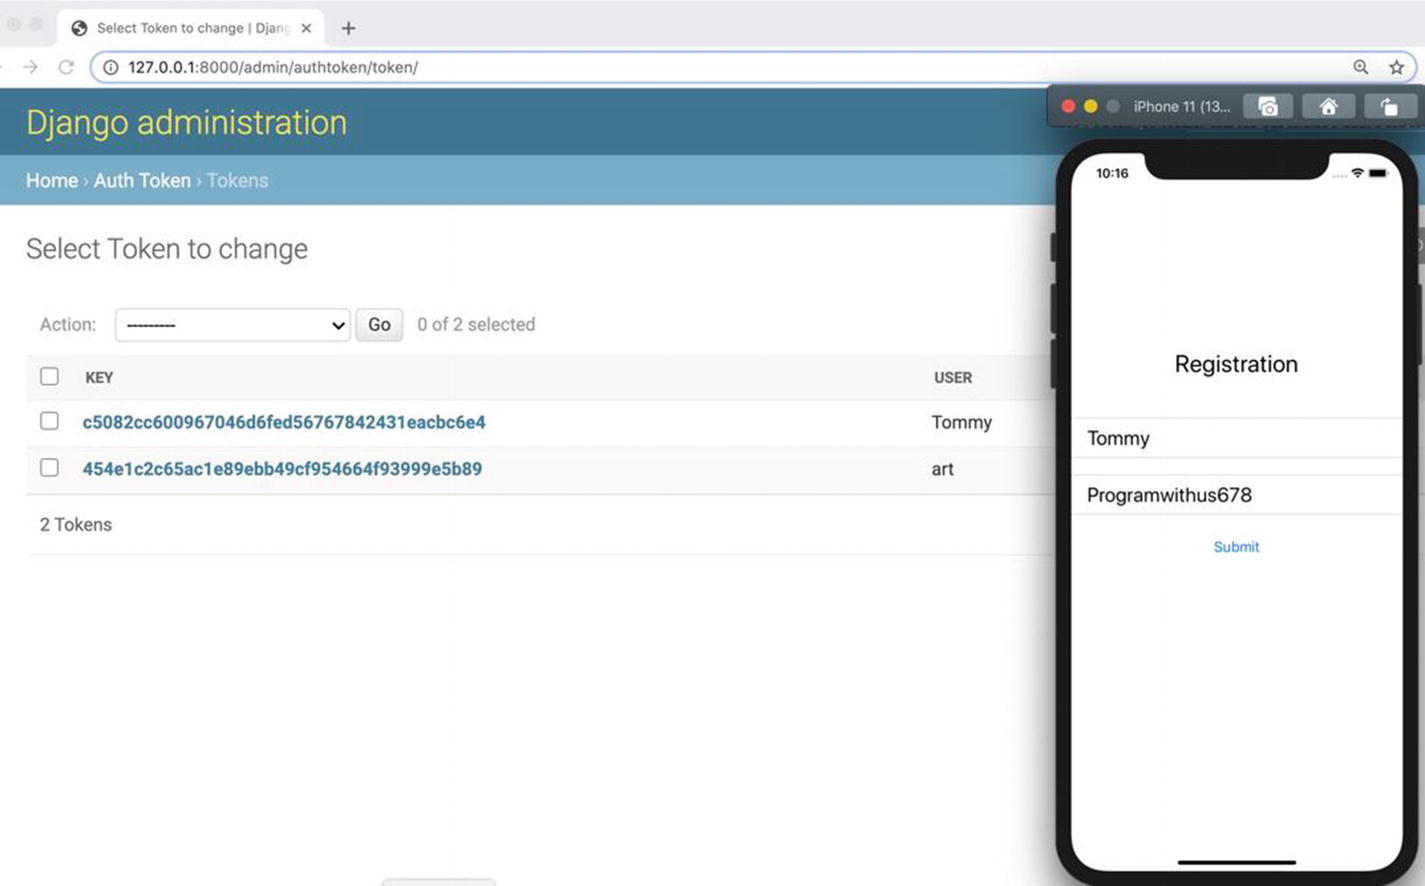
To test my code, I’ll register my friend Tommy, and you can see the system has automatically generated the token (Figure 7-28).
Figure 7-28
A new token was generated for a new user
We have implemented all the major web app operations in this book. Everything else would be a variation of what we have covered here. To get fluent with these technologies, you should keep working on this project or maybe start a new project to implement new features and style it to perfection.
In the next chapter, I will show you how you can deploy our code on a live server and make it accessible to everyone. Also, we will create two stand-alone mobile apps – one for Apple App store and the other one for Google Play store.