In this chapter, we will assemble our mobile app using all the knowledge we have gained so far. I will try to be logical and extrapolate methods we have used in React, in Chapter 4, to our principal project powered by React Native and applicable to iOS and Android platforms. We will create React Native components and screens correlating to our back-end Django APIs. As we move along, we will take a closer look at styling elements. Also, we will spend a great deal of time working with images. To store more pictures of each pizzeria, we will create a new model and connect it to our Model.
Networking
Our ListView component should be able to fetch all records from our database and serve them using pizzeria_list API. If you do not quite remember the pattern of this API, go to the URL dispatcher in our Django project and look it up by the name. Our APIs should be up and running. Make sure Django’s built-in web server is running.
Note
Every time before launching Django with the command python manage.py runserver, make sure the virtual environment is engaged.
Following the same logic we used in Chapter 4, we would need to call the API with a JavaScript library Axios. Install Axios to our latest project pizzavspizza_app. Using npm command, we will install Axios in React Native project.
npm install axios --save
Due to the fact that accessing the Web is a completely different task than rendering records, it would be a good idea to keep the API’s calls isolated from our components in another file and maybe even in a separate directory.
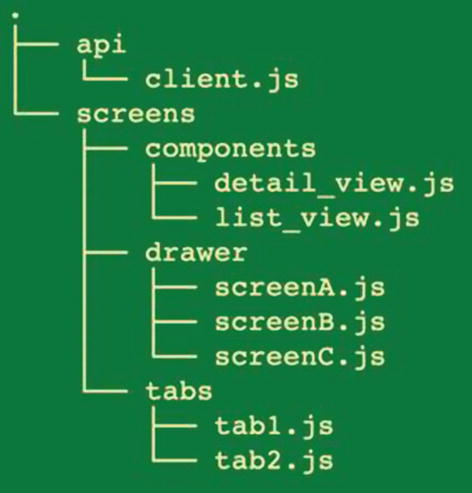
In our React Native project, we need to create a new folder api in src directory right next to screens. Inside api folder, create client.js file (Figure 6-1).
Figure 6-1
New directory api with client.js file
client.js will be responsible for all networking communications with the outside world. In this file, we will import Axios and, in create() method, define a baseURL for our back-end server. The create() method would initialize a new Axios instance and set custom defaults for our application. This would be an appropriate place to add headers if you need to call the API with an authentication key or any other arguments.
Note
To establish an instance, create() method must have baseURL with uppercase URL at the end. All other spellings would not work. The URL address has no closing “/”.
import axios from "axios";
export default axios.create({
baseURL: "http://127.0.0.1:8000",
});
Note
In some cases, the Android emulator may not render information coming from a local server. Although we will discuss in detail how to deploy your project to a real server later in Chapter 8, I have our back-end project running on pizzavspizza.com. If your code is correct and the Android emulator still cannot fetch data from your local http://127.0.01:800 server, replace the local URL with the http://pizzavspizza.com/api domain in client.js. The Android emulator should reach the Web then. After refreshing the app, you should see the results.
To use the Axios instance in our ListView component, we need to import it to list_view.js file.
import client from "./../../api/client";
When I was writing this book, I had a dilemma; should I do all components as classes or functions? I know many React Native developers prefer to compile their components as simple JavaScript functions. For starters, it is simpler. Besides, recently, React Native added Hooks to simplify the function compiling process. This new cool feature allows to use componentDidMount features and other lifecycle methods without declaring a class. Since the main idea behind this book is to introduce and explain the logic of Django and React Native, I decided to show you both the class component example and the function component solution. We will start with the class, only because our ListView is already done as a class and we got an idea of how React classes work based on our experience with them from Chapter 4.
Class Component API call
To render a list of items, React Native provides a scrollable built-in solution FlatList. FlatList is specifically designed for list views – logically similar to function map() we have used before. FlatList is scrollable and easy to use. To get started with FlatList basic component, we would need to import it to list_view.js file and append it to the list of elements coming from “react-native”.
import { StyleSheet, SafeAreaView, Text, Image, Button, FlatList} from "react-native";
Calling an API process would be similar to what we did in Chapter 4. We will go through the same steps. First, fetch an array of records; second, set it as State; and third, render all items in FlatList component as text.
Using Axios instance imported through client.js, we will access our list of records in componentDidMount method. As we discussed before, componentDidMount method would be the best place for an API call. We will request our pizzerias list information through Axios instance in componentDidMount, like this:
componentDidMount() {
client.get("/").then((response) => {
this.setState({ data: response.data });
});
}
Next, we need to initialize the constructor and define data as an empty array. Our data would be coming as an array, and we would need to store it in the appropriate structure. To access data in render(), we would need to pass it into the method, const { data } = this.state;.
constructor(props) {
super(props);
this.state = {
data: [],
};
}
Finally, we will insert <FlatList/> element between <Text> and <Button/> elements.
Let’s go over the FlatList component for a second. FlatList takes data as an array and iterates through it, rendering each item. Each item must have a unique key passed as a string. Be careful with all attributes and make sure you use correct captions for keyExtractor and renderItem.1
<FlatList
data={data}
keyExtractor={(item) => item.id.toString()}
renderItem={({ item }) => (
<Text style={styles.itemText}>
{item.pizzeria_name}, {item.city}
</Text>
)}
/>
Every item is wrapped in <Text> tags. Through an item, we can access our pizzeria attributes – item.pizzeria_name and item.city. As I have mentioned before, an id must be a string. Using the JavaScript toString() method, we can convert an integer to an acceptable format. In our case, I have added a style just to distinguish pizzerias from everything else on the screen. No worries, this is just a temporary solution. We will add the appropriate style to components later in this chapter. Insert the new attribute itemText into the styles object on the bottom of the file.
itemText: {
color: "green",
fontSize: 20,
}
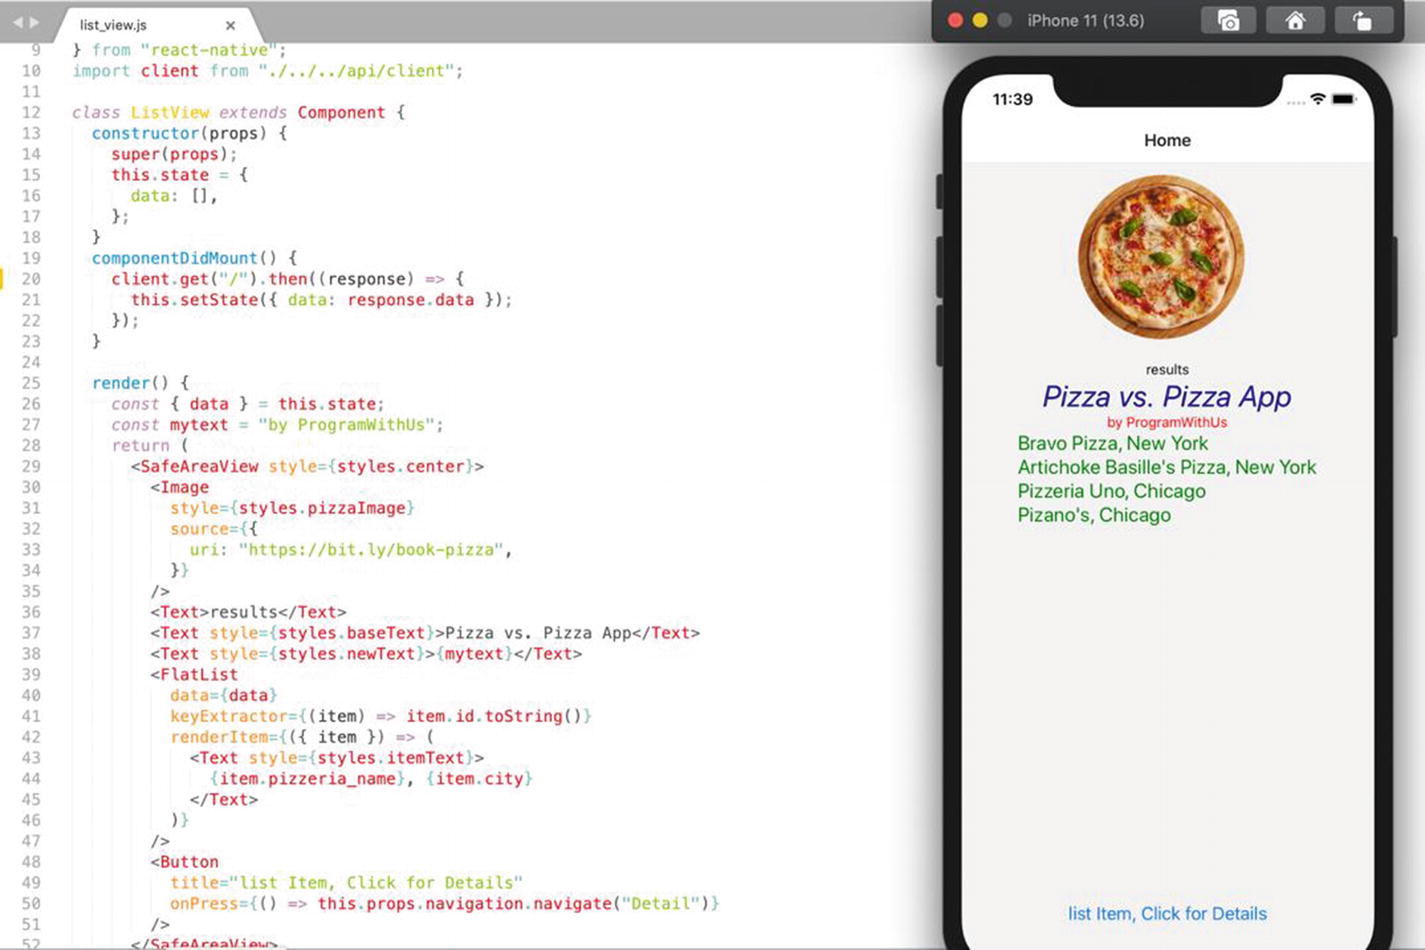
If both of your servers, http://127.0.01:800/ and http://localhost:19002/, are running, then you should see the list of our pizzerias rendering on the main “results” screen as you can see in Figure 6-2.
Figure 6-2
FlatList rendering elements from the Django project
A very common practice is to use async/await with componentDidMount() method in React Native. The word “async” before the method assures that a promise would be returned by the method. Promises are a built-in solution in JavaScript to support asynchronous programming. The word “await” makes code wait until the promise yields a result. Async/await is just a wrapper around promises. You can learn more about promises at https://developer.mozilla.org.2 Using async/await with API calls is a good practice, and we can implement it with componentDidMount() method in our example.
Since the outcome of the API call might be a failure, it is a good idea to capture an error message. Also, to enhance user experience, professional developers would add some default information or images in case the API call fails. This option would not leave a user with a blank screen and spoil the first impression about the app. In real life, many things could go wrong, not necessarily related to your code – a weak Wi-Fi signal or unreliable third-party API, just to name a few.
Using the “async” keyword before the function name, we can convert componentDidMount() into an asynchronous method.
async componentDidMount() {
try {
const response = await client.get("/");
if (!response.ok) {
this.setState({ data: response.data });
}
}catch (error) {
console.log(error);
}
}
The try statement will make an attempt to fetch the information, and if it was successful, it would set the response as data. Otherwise, it would catch an error message. For quicker debugging, many developers would place inside the catch statement a helper function to email them a message with the bug to fix the problem ASAP. We are not going to implement that here.
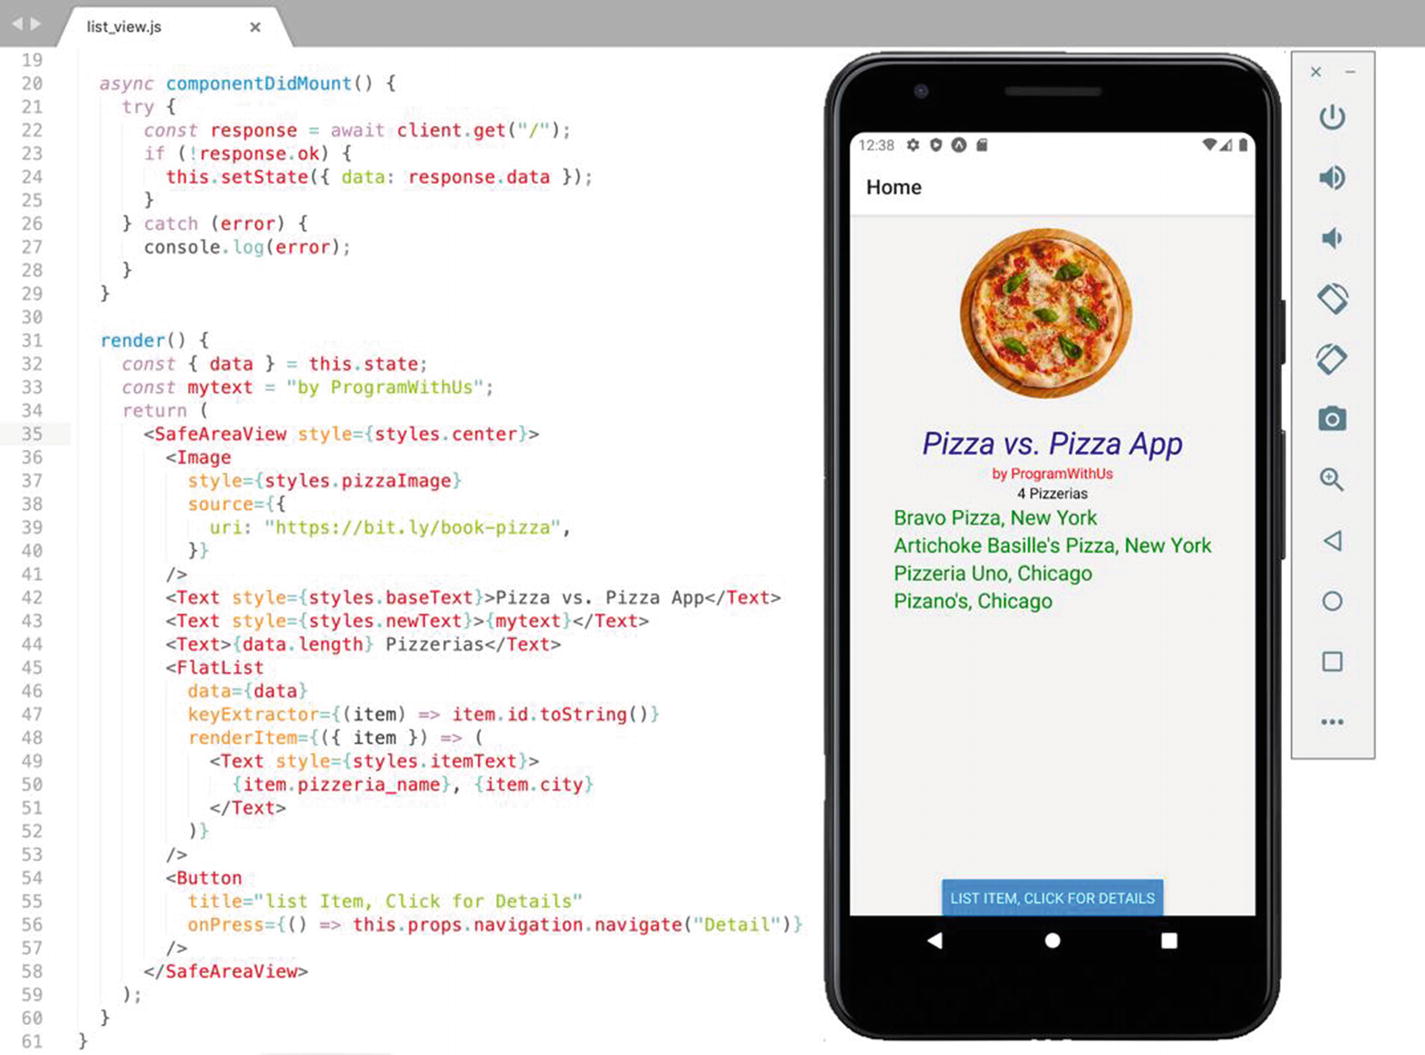
One last thing we could do here is to get the number of items we have in an array. Data in the constructor holds our incoming information as an array. Using the array attribute length, we can see how long the incoming list is.
Simple message results wrapped in <Text> tags could be released with
<Text>{data.length} Pizzerias</Text>
I’ll place this statement right above the <FlatList> element. You could see the final version of the <ListView> component with the asynchronous componentDidMount method in Figure 6-3.
Figure 6-3
Final version of ListView defined as a class component in list_view.js
Note
If your iPhone simulator or Android emulator is acting up, just reboot them. Rebooting should wipe out the memory.
Function Component API call
To illustrate how we can make the same API call with hooks and define a component as a function, I will create a new file function_list_view.js in the components folder (Figure 6-4).
Figure 6-4
function_list_view.js for Function Component in the components directory
On top of the function_list_view.js file, we import useState and useEffect hooks. Please note that we are not importing the Component as in the previous example, simply because we will compile everything as a function component.
import React, { useState, useEffect } from "react";
The first question you would probably ask is “What is a hook?” The formal definition you can find in the React documentation says, “A Hook is a special function that lets you ‘hook into’ React features.”3 In a nutshell, a useState hook is a substitution of the State attribute in React class. You can achieve the same functionality with hooks in a function component as you would get in the class component with built-in attributes, like State and others. The useEffect hook is a function equivalent to componentDidMount, componentDidUpdate, and componentWillUnmount methods. You might recall them from React class lifecycle we discussed in Chapter 4, Figure 4-4.
First things first, we need to redirect the ListView component to function_list_view.js file in App.js. Replace ListView import with the following:
import ListView from "./src/screens/components/function_list_view";
Many elements of the ListView function in function_list_view.js would be the same as in the previous example. We can just copy the code from the list_view.js file to the new function_list_view.js.
In function_list_view.js file, replace class ListView and constructor with
const ListView = () => {
const [data, setData] = useState([]);}
Make sure to check if opening brackets match corresponding closing brackets. Now the ListView component is a functional expression, and the useState hook succeeds the constructor. At the moment, data is defined as an empty array waiting for incoming results. Conceptually, it’s similar to what we implemented before with a class constructor.
Inside our ListView component, we will define getList function, very similar to what we did in componentDidMount method. We will use the “async” keyword to make our function asynchronous.
const getList = async () => {
const response = await client.get("/");
setData(response.data);
};
setData will assign results to the data referred before as a useState hook. If we were writing a class component, we would call an API in componentDidMount method. Since the useEffect hook covers the functionality of componentDidMount, we will invoke our getList function in useEffect. I do not want to place the asynchronous function itself in useEffect Hook, for a simple reason. An asynchronous function always returns a promise. Please note that the useEffect hook uses a second argument, an empty array. This array is used to pass dependencies to useEffect. We do not have any dependencies for this call and leave it empty. If for some reason or by mistake you forget or remove this empty array brackets, the useEffect hook would call the getList function over and over again, consequently hitting an API. In other words, without the second argument, we would end up in an infinite loop. By passing the empty array into useEffect, we execute getList function only once when the component is rendered the first time.
useEffect(() => {
getList();
}, []);
Keep in mind that we no longer need the render() method because it is not a part of a function. A function returns the result, and this is where we keep FlatList component. Also, const { data } = this.state; should be removed. We no longer use State. Everything else following this point would be the same as in the ListView class component before, except props for navigation in <Button> element. We remove <Button> element for now. We will implement it again later in a different manner. Also, we would need to use a return for our item attributes rendered as Text.
<FlatList
data={data}
keyExtractor={(item) => item.id.toString()}
renderItem={({ item }) => {
return (
<Text style={styles.itemText}>
{item.pizzeria_name}, {item.city}
</Text>
);
}}
/>
Make sure your syntax is correct and you have the same number of closing brackets as the opening ones (Figure 6-5).
Figure 6-5
ListView component implemented as a function in function_list_view.js
Note
If you miss console.log() on the debugging console in React Native, you can press ⌘ + D in the iPhone simulator and choose the Remote JS Debugging option. This will open a new page running in the browser on localhost:19001/debugger-ui/. Using Developer Tools, you could inspect messages printed with the console.log() function. Also, console.log() stuff would be printed in the terminal.
Passing data between screens
Now that we have a list of our pizzeria places, it would be a good idea to fetch all details for a particular place on a click. All we have to do is to call a detail URL and render it on another screen. In Chapter 4, we solved this problem by passing absolute_url attribute of an object as props. In React Native, this operation would be simpler, considering we have a navigation in place.
React Navigation’s stack navigator helps us to go from one screen to another by passing props on click. While we are swiping between screens, we might as well pass values.
So far, we have been using button element, but it is bulky and displayed variously on different platforms.
To produce details of a restaurant by a touch, we will need to use TouchableOpacity component. On a press, an element wrapped in TouchableOpacity would fade out and act as a button. We can bind our absolute_url to the navigator and pass it as props.
As always, we would need to import TouchableOpacity into function_list_view.js file.
import {
StyleSheet,
SafeAreaView,
Text,
Image,
FlatList,
TouchableOpacity,
} from "react-native";
In the previous example, we got rid of the button element with a navigation. Logically, we would need a navigation at some point, and the best way to define it would be to pass it as an argument in ListView function.
const ListView = ({ navigation }) => {
//code
}
We can use TouchableOpacity in our FlatList component in return. Each item you want to be clickable should be wrapped in <TouchableOpacity> tags, like this:
TouchableOpacity comes with the event handler onPress. When pressed, it would navigate to a screen name – in this case, it would be “Detail” – and pass additional props to that screen. Props should be passed in the navigate function as a second argument in the form of a dictionary. Just as an example that you can pass anything as props, I would add one more argument – the message “Best Pizza” (Figure 6-6).
Figure 6-6
ListView component passing props through navigation to DetailView component in function_list_view.js
To stay consistent, I’ll implement DetailView component in detail_view.js file as a function. As in the previous example, we would need to pass the navigation as an argument and add the route. The route will help us to handle parameters passed through the navigation.
const DetailView = ({ navigation, route }) => {
//code
}
Let’s see if we can grab these params in DetailView component.
To extract params from the navigation, add this code right after the DetailView function header:
const { objurl } = route.params;
const { hey } = route.params;
Remove the render method(). Inside the return, replace the <Button> element with
<View style={styles.center}>
<Text style={styles.title}>{ hey }</Text>
<Text style={styles.title}>{ objurl }</Text>
</View>
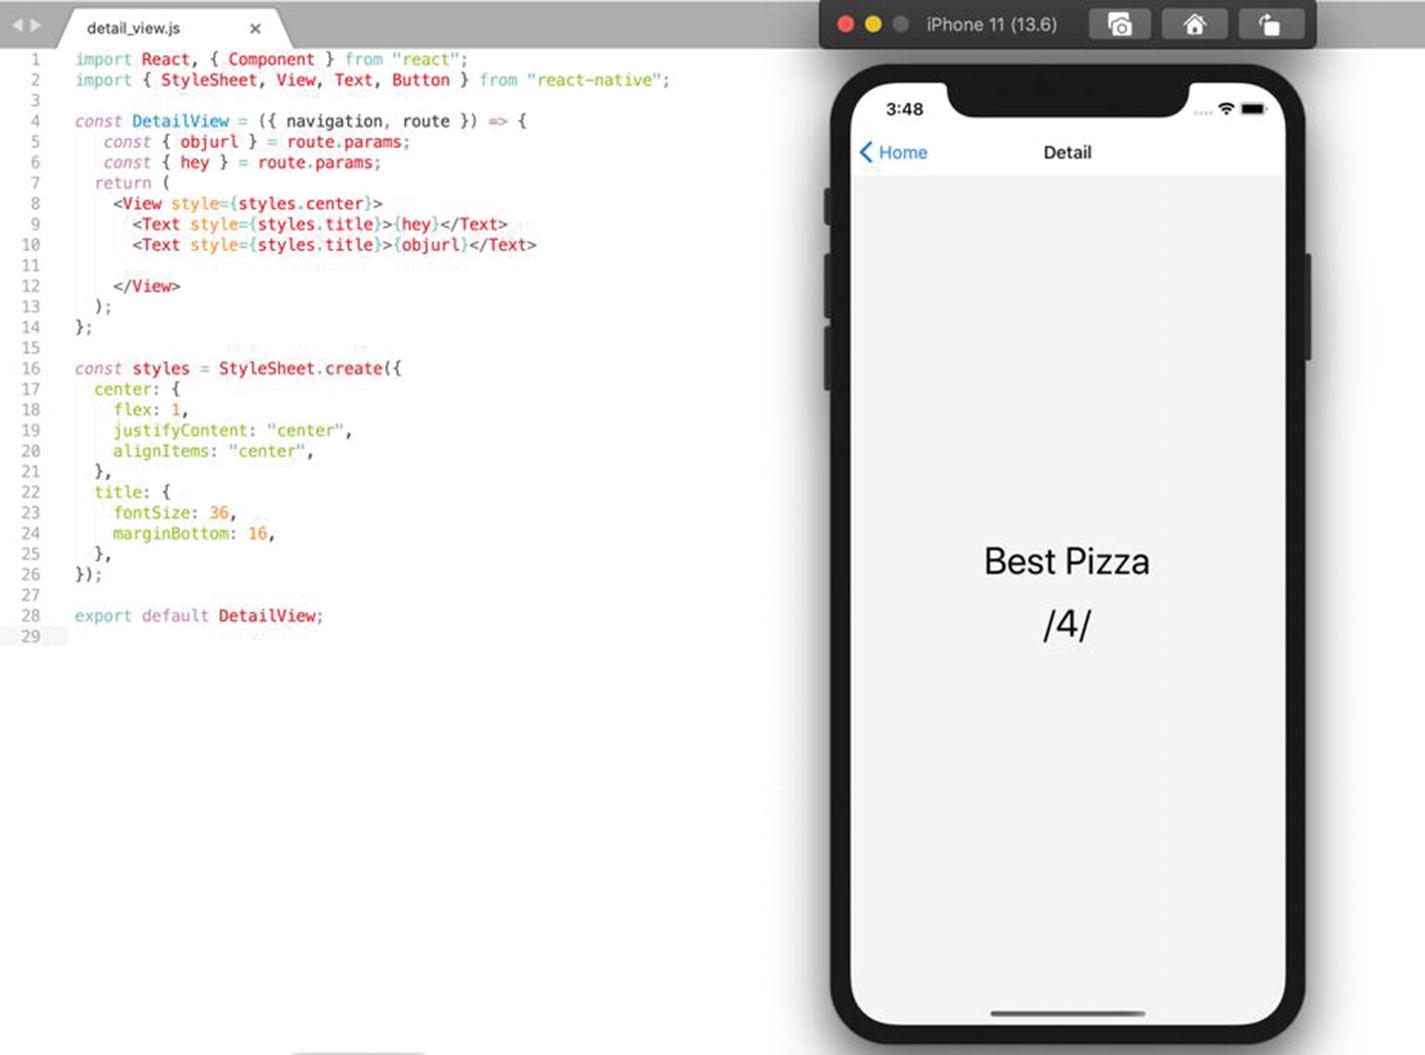
After you have done that, you can press any pizzeria name on the main screen, and it should redirect you to the Detail screen with the item id and “Best Pizza” message (Figure 6-7).
Figure 6-7
DetailView component passing props through the navigation
Detail view screen
With the URL we have received from the ListView component, we can fetch all details our back-end has to offer about each pizzeria. The process would be similar to what we just did with ListView. We would need useState and useEffect hooks. Let’s import them right away.
import React, { useState, useEffect } from "react";
Speaking of imports, do not forget to import client.js file with an instance of Axios.
import client from "./../../api/client";
Again, the useState hook would substitute the constructor because ListView is a function component at the present. In the useState hook, we define the detail variable to hold our incoming data and setDetail. The only difference between the current setup and what we did in the previous example would be an empty string as a default value for Detail.
const [detail, setDetail] = useState("");
We would need a function to make the API call. Create one and name it getDetail. This would be an asynchronous function with an async keyword. Moreover, this function will take an argument, the object URL we passed as props.
const getDetail = async (url) => {
const response = await client.get(url);
setDetail(response.data);
};
It would be a good idea to use try and catch statements again. Maybe the object we are trying to fetch no longer exists. In this case, we would need to catch a 404 error message.
const getDetail = async (url) => {
try {
const response = await client.get(url);
if (!response.ok) {
setDetail(response.data);
}
} catch (error) {
console.log(error);
}
};
The useEffect hook will invoke getDetail function upon rendering DetailView component. Make sure the second argument, an empty array, is in place.
useEffect(()=>{ getDetail(objurl); }, [])
The moment we get data from our back-end server, we would be able to access all attributes of our object. I will remove the hey props we used for testing purposes and in <View> tags list the main attributes coming from the detail URL. In order to fit all this text on a screen, I’ll adjust the font size to 15, like this: title: { fontSize: 15}.
You might ask, “What about the image? A picture is worth a thousand words.” Sure thing, we will deal with an image next. Before we get to that part, make sure your ListView component renders details when you press a pizzeria from the list on the main screen (Figure 6-8).
Figure 6-8
DetailView component, the detail screen rendering information if you press a pizzeria from the list
Images from HTTP URL
Our DetailView component is working fine, and we can render the image. A picture would require an Image component; we can add it to our imports.
import { StyleSheet, View, Text, Image } from "react-native";
The Image component must have a source and dimensions for pics coming from the Web. JSX is different from HTML, and we would need to use the “source” verbatim not “src”. The source must have an object with a URI key. For dimensions, I’ll use width: 200 and height: 200. Our code should be clean and neat, so I will update the StyleSheet with
pizzaImage: {
width: 200,
height: 200,
marginBottom: 16,
}
The URI in the source would point to the detail.logo_image URL serving an image. Make sure you have uploaded pictures to your database, or you could use mine, just replace the baseURL: “http://pizzavspizza.com/api” in client.js. Insert <Image> component into <View> tags in the DetailView component.
<Image
style={styles.pizzaImage}
source={{
uri: detail.logo_image,
}}
/>
Before you try the image feature, we need to make some adjustments to the global urls.py file in pizzaproject directory in the Django project. We need to add static and media paths for all image files. I will go more into the details about how Django serves static and image files in Chapter 8. We need to import static function and settings into pizzaproject/urls.py like this from django.conf.urls.static import static from django.conf import settings. Also, append the urlpatterns list with the MEDIA_URL and STATIC_URL paths like this: + static (settings.MEDIA_URL, document_root=settings.MEDIA_ROOT)+ static (settings.STATIC_URL, document_root=settings.STATIC_ROOT). At the end of the day, the detail screen should render the image for a restaurant we have in our database (Figure 6-10).
Figure 6-9
Media and Static paths are needed to serve uploaded and static files
Figure 6-10
DetailView component, the detail screen rendering an image from db.sqlite3
Our goal is to have many images of each pizzeria. Users could submit their own images and attach them to a particular restaurant. Sounds like we need a separate table in our database to hold all these images.
If each pizzeria object needs to have a multiple number of images, then we need to define another Model in the Django project models.py file. This Model would be connected to the Pizzeria Model through a foreign key. Also, this approach could be applied any time you need to bind one Model to another. For example, if later we would want to add comments, or a menu from the restaurant, we could define a new Model for that object and get models connected with a foreign key. This would establish one-to-many relationships. One pizzeria could have many images or many comments or many variations of pizza.
In the Django project models.py, we will add an Image Model with a couple of fields. The Image field would provide a path to the image itself, and we define it as an ImageField instance. Image_title, in case we want to provide a name for an image, would be a string. The most important field would be a ForeignKey instance. We would need it to establish a many-to-one relationship. This field would require the name of the Model it is bound to and an on_delete argument. An on_delete argument is usually set to a CASCADE option, meaning the record would be deleted if the object it was bound to was gone. Also, add a blank argument as True to the ForeignKey field. We would need it in case we want to create a new pizza place and have no photos yet to attach. We might want to add DateTimeField to keep track of most recent uploads. The actual model looks like this:
The inner class Meta in Django is responsible for how the object and its attributes are rendered. It might specify permissions and default ordering. We want to see the recent upload first, and we will set it as metadata under the Image Model.
class Meta:
ordering = ['-uploded_at']
The minus before the field name means that we want to reverse the order and sort it in a descending manner.
Additionally, in our Pizzeria model logo_image field, we would place a default value for an image. If a user wants to create a new pizza place but does not have an image yet, we could provide a default image. You can take any image file and copy it into the /media/pizzariaImages/ folder. If you would like to use my file, you can download it here: https://bit.ly/book-pizzalogo.
Updated logo_image field in Pizzeria would look like this:
Every time you make changes to models.py, you need to run makemigrations and then migrate. In your pizzaproject directory where the manage.py file is, run the makemigrations command (make sure the virtual environment is activated).
python manage.py makemigrations
If you got error messages, make sure your fields are correct and the indentation is OK like in Figure 6-11.
Figure 6-11
Image model in the Django project models.py file
The first command, makemigrations, would create a blueprint, and the next command, migrate, would create that table in db.sqlite3 file.
python manage.py migrate
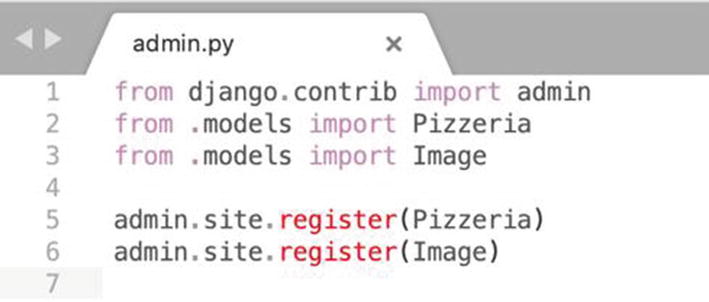
We need to import the Image model into the admin.py file in the Django project pizzavspizza and register.
from .models import Image
admin.site.register(Image)
This would give us an option to upload and manage images through the admin menu (Figure 6-12).
Figure 6-12
Register the Image model in the admin.py file
Django will be serving pizzeria images URLs. We need to include the Image Model in serializers. Import a new Model Image to serializers.py.
from .models import Image
Using HyperlinkedModelSerializer class to bind one model to another, we define ImageSerializer in serializers.py in the Django project.
class ImageSerializer(serializers.HyperlinkedModelSerializer):
We list all fields from the Image Model except the pizzeria field. To nest ImageSerializer in PizzeriaDetailSerializer, we need to define it using related_name we have used in our Image Model “pizzeria_images” (Figure 6-13). We have to use this name as a keyword to connect models together. The argument “many” in ImageSerializer field means that we expect many images, as our relation implies, one to many.
Now we can include pizzeria_images field in PizzeriaDetailSerializer fields.
class Meta:
model = Pizzeria
fields = [
'id',
'pizzeria_name',
'street',
'city',
'state',
'zip_code',
'website',
'phone_number',
'description',
'email',
'active',
'update',
'delete',
'pizzeria_images',
]
Also, I think we should move logo_image field out of PizzeriaDetailSerializer and include it in PizzeriaListSerializer. After all, a logo image should be on the list view. We would need it to make a nice first impression. Finally, our serializers.py should look like the one in Figure 6-13.
Figure 6-13
PizzeriaDetailSerializer includes ImageSerializer
Launch a server and add images through the admin menu in your browser.
python manage.py runserver
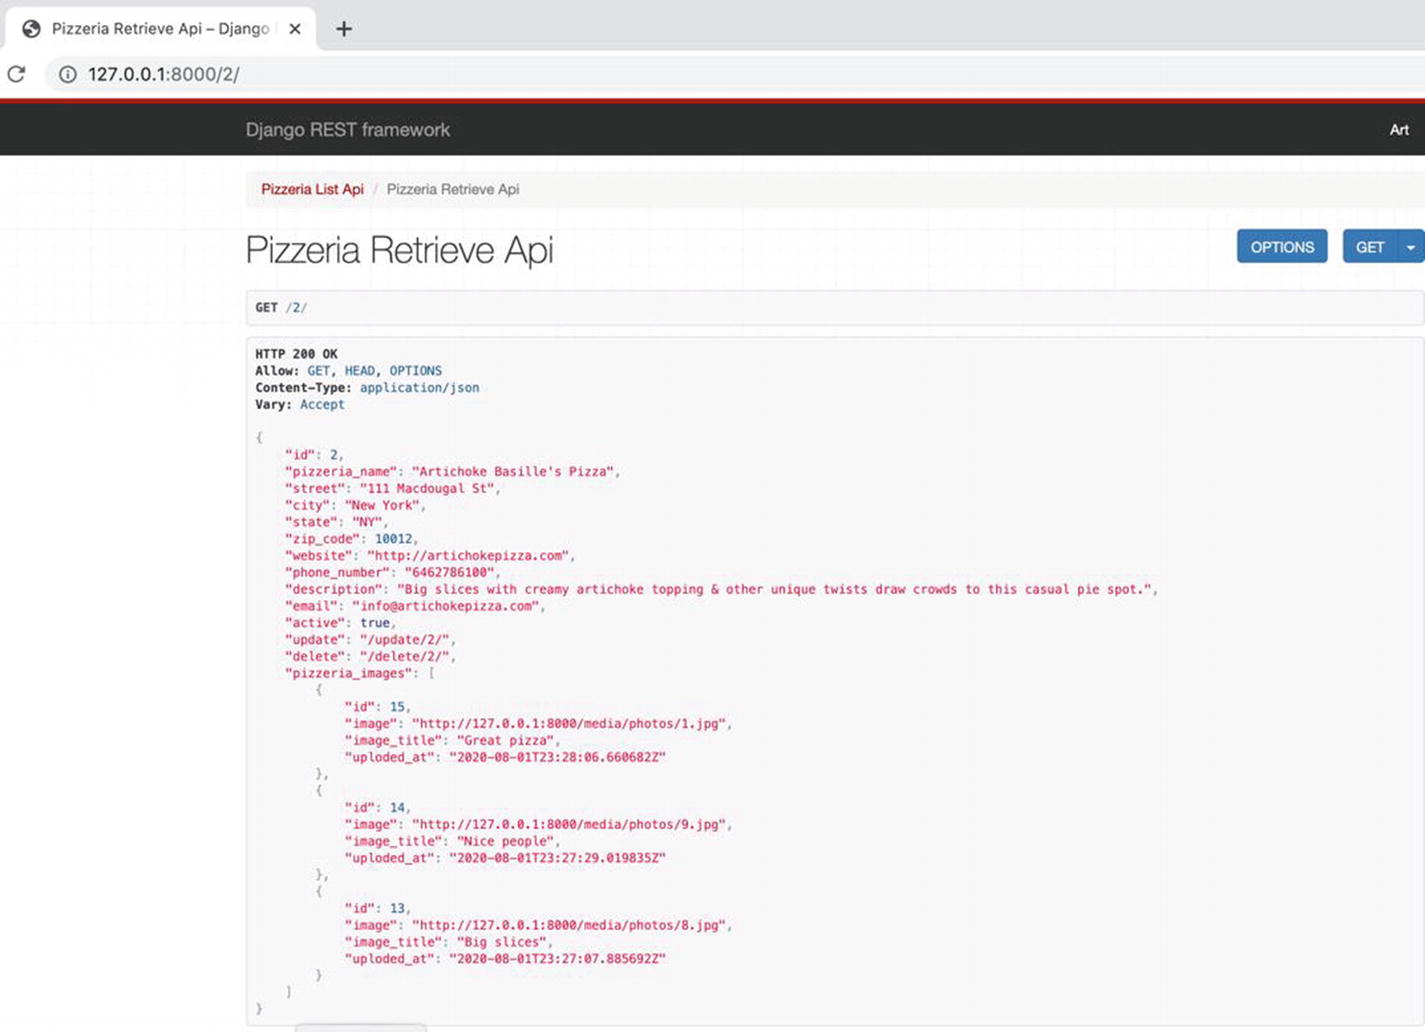
I have uploaded my photos, and when I call the Detail View, the Pizzeria object includes fields from a related Image Model under the name “pizzeria_images” (Figure 6-14). Coming up, we will render all these images in the detail screen in React Native app.
Figure 6-14
Django REST serving Detail view with a related model Image
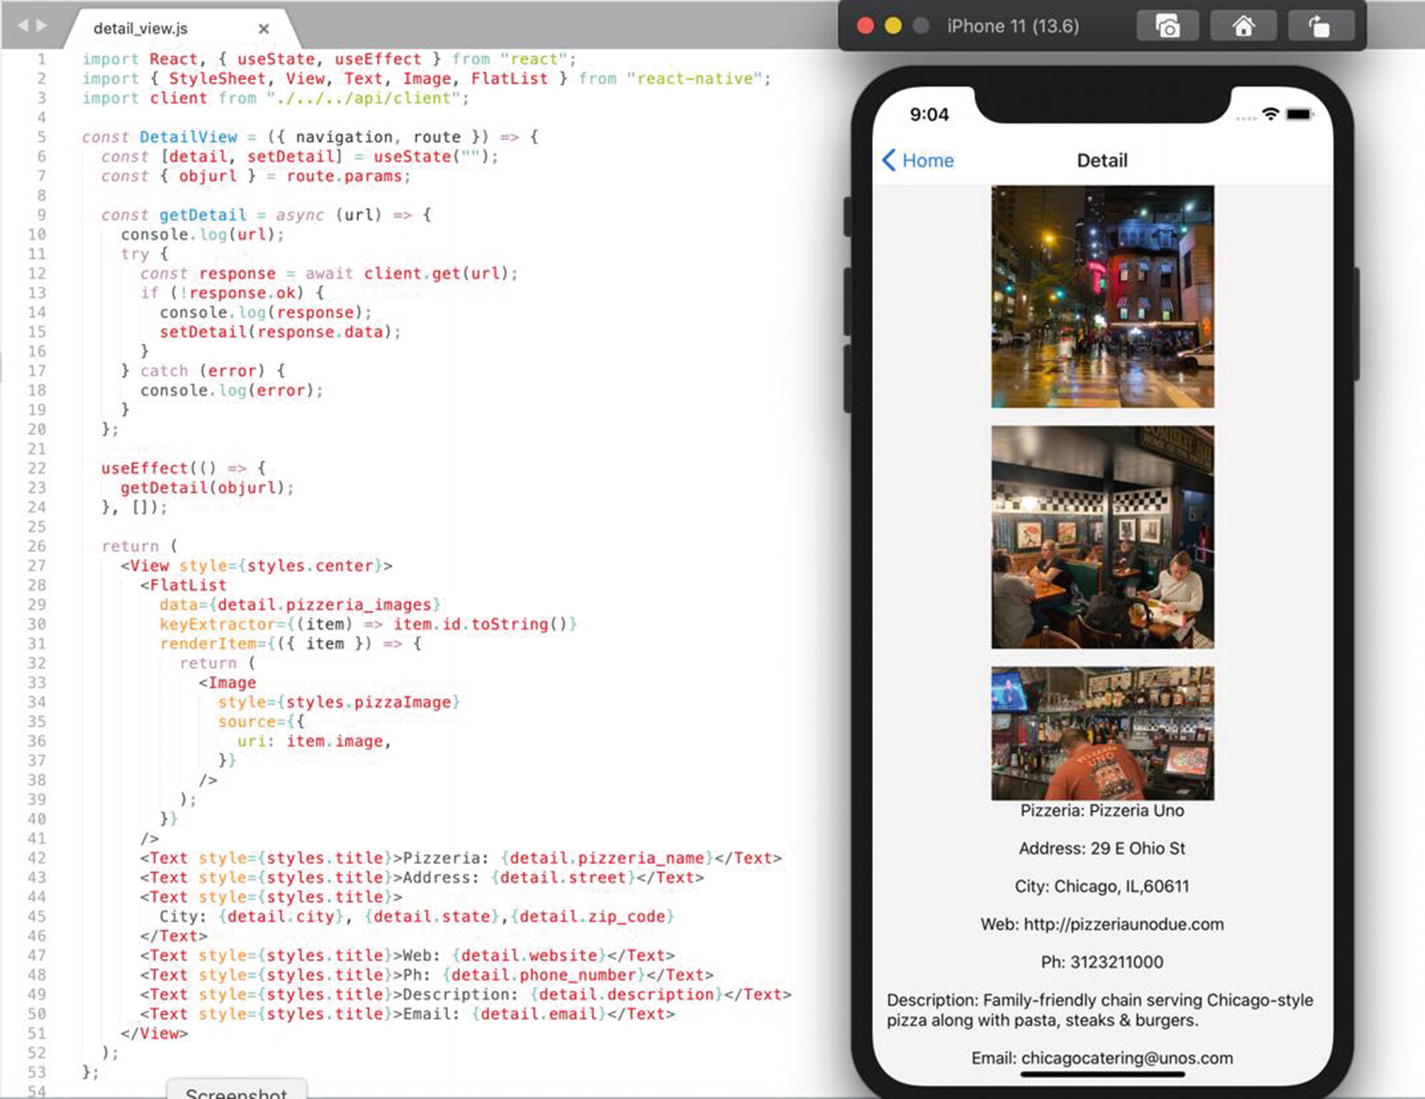
Let’s flip back to our React Native project. In Figure 6-14, we can see that images come in an array assigned to the pizzeria_images keyword. If we want to render images one by one, we would need to iterate. Logically, this sounds like a job for a FlatList component.
In detail_view.js file, we append our import list with FlatList component.
import { StyleSheet, View, Text, Image, FlatList } from "react-native";
From the previous example with FlatList, we know that it requires an array, id, and some kind of item. To grab each image from pizzeria_images list, we can pass it as a keyword argument data={detail.pizzeria_images} into FlatList. A single image is stored as an object in the Image Model and comes with a primary key or id we can obtain with keyExtractor argument keyExtractor={(item) => item.id.toString()}. The item we want to render would be the image URL. We can simply replace the URI in the Image component source with item.image. Ultimately, FlatList would return the Image component with source={{uri: item.image}}.
<FlatList
data={detail.pizzeria_images}
keyExtractor={(item) => item.id.toString()}
renderItem={({ item }) => {
return (
<Image
style={styles.pizzaImage}
source={{
uri: item.image,
}}
/>
);
}}
/>
The outer curly braces evaluate an expression in JSX, and the inner ones indicate an object. The whole FlatList structure in the DetailView component will replace logo <Image> tags and should look like the one in Figure 6-15.
Figure 6-15
FlatList element rendering images in the DetailView component
By default, the FlatList component presents items as a scrollable vertical list. In DetailView, we should probably render images horizontally. In my opinion, that would be more convenient and familiar to users. This is easy to achieve; all we have to do is to add the keyword argument horizontal and set it to true inside the <FlatList/> element, like this:
<FlatList
horizontal={true}
data={detail.pizzeria_images}
keyExtractor={(item) => item.id.toString()}
renderItem={({ item }) => {
return (
<Image
style={styles.photo}
source={{
uri: item.image,
}}
/>
);
}}
/>
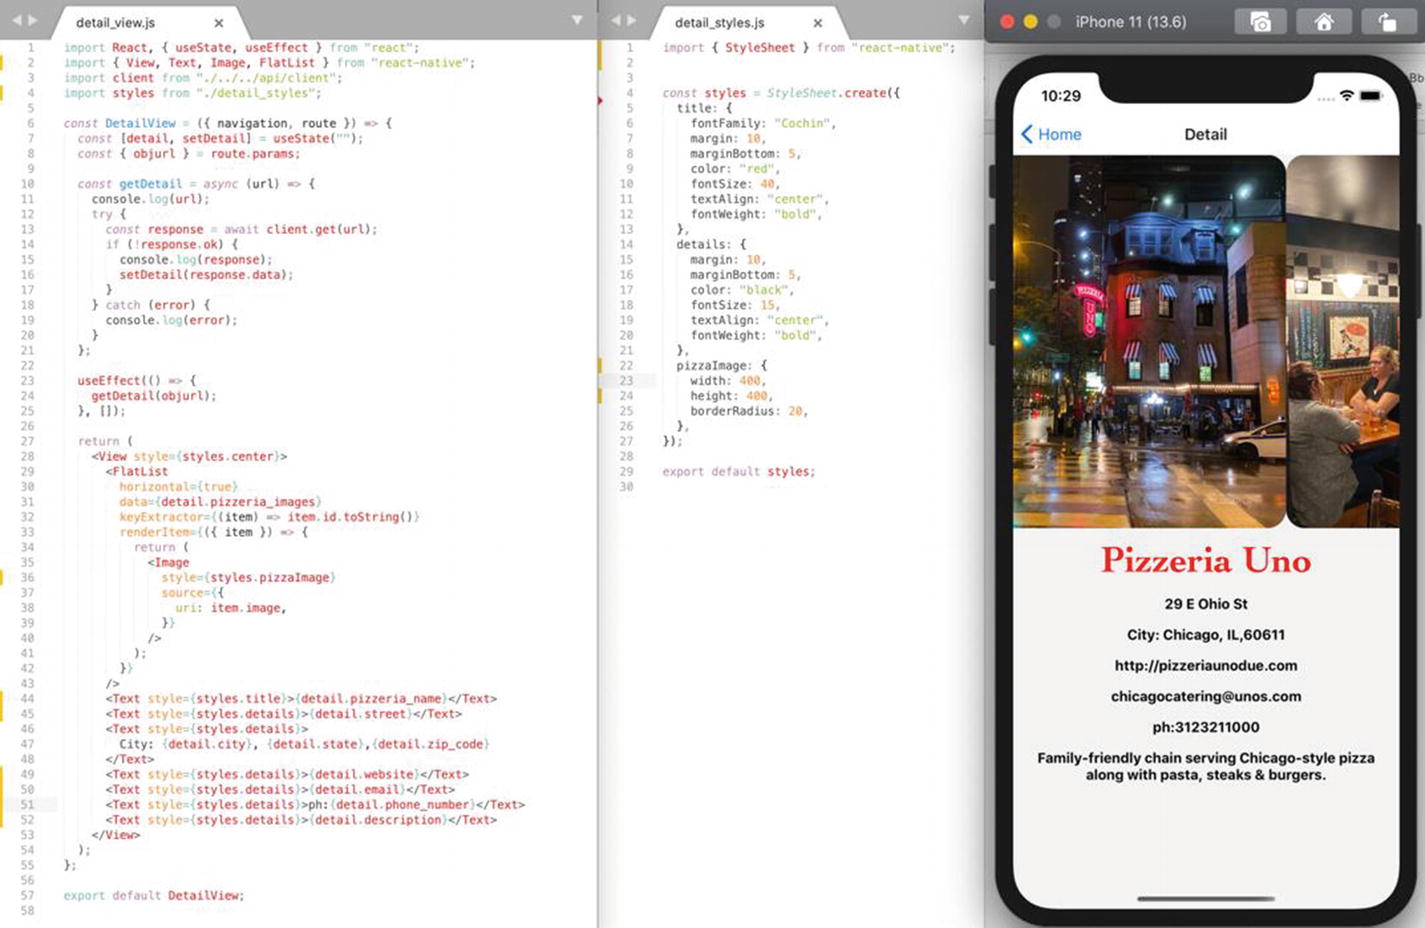
Moreover, we can make the detail screen a little bit eye-catching. This would require a lot of code in the StyleSheet, and to make our DetailView cleaner, we should move Styles to another file. Create detail_styles.js file in the components directory. Then copy and paste the Styles object from detail_view.js into new detail_styles.js file. Now that StyleSheet is no longer needed in detail_view.js, let’s remove it and import on the top of detail_styles.js.
import { StyleSheet } from "react-native";
At the same time, we need to bind styles to DetailView component and import it in detail_view.js.
import styles from "./detail_styles";
After we have bound styles together we can concentrate on styling itself in detail_styles.js. In the Styles object, I want to start with pizzaImage attribute and round up the corners of our squared images. You can find all style props here: https://reactnative.dev/docs/view-style-props. I’ll use a couple of essential elements in this book just to give you an idea of how to use them.
For our images, we will use the borderRadius prop and set it to 20 points.pizzaImage: { width: 400, height: 400, borderRadius: 20 }
The bigger the value, the rounder your photo would get. I’ll increase the width and height of an image to 400 points. The Pizzeria name should be bright and bold. I’ll replace the text attribute with a title for a restaurant name and details for everything else. My title would have the fancy font Cochin set to fontFamily prop. I do not think that Android supports Cochin font. If you are designing an app specifically for Android, use any other font of your choice. Font size 40 and bold red color would distinguish it from other text on the screen.
title: {
fontFamily: "Cochin",
margin: 10,
marginBottom: 5,
color: "red",
fontSize: 40,
textAlign: "center",
fontWeight: "bold",
}
The Details text would be much simpler like this:
details: {
margin: 10,
marginBottom: 5,
color: "black",
fontSize: 15,
textAlign: "center",
fontWeight: "bold",
}
All old and no longer needed attributes in StyleSheet should be removed. Do not forget to import the styles object after you are done with it and to export default styles, on the bottom of the detail_styles.js file. Also, I’ll clean up DetailView component. First, I’ll replace style.text with style.title and style.details. Second, I’ll remove Pizzeria, Address, and other labels we had on the screen for testing purposes. Probably, leave ph: label; without it, a phone number looks like some sort of a serial number. On your iPhone simulator, you should see pizzeria details like in Figure 6-16 and be able to swipe images from right to left.
Figure 6-16
Final view of detail screen with detail_view.js and detail_style.js files
Card list view screen
A card element is a staple of mobile apps. Card is a content container. You can make corners round, title bold, and price and details bright to make your element stand out. The flashier the card style is, the more chances a user would click it. We leave these marketing options to professional designers and implement a simple card element. We will list all our pizzerias as cards on the main screen.
One option would be to add style to FlatList items. This solution would limit the use of our card style in other screens. The main idea of React is to reuse components over and over again; that is why we will implement card as a functional component in a separate file. Moreover, we will place this file into a new folder. I’ll name the folder “shared”. As the name implies, this would be a folder for all components we might want to use again and share them with among different screens. In the components directory, we will make the new folder “shared” with file card.js (Figure 6-17).
Figure 6-17
New file card.js in the shared folder inside the components directory
Our goal is to render each list element in a card container. A React component is like a function; we can pass the main attributes of every pizzeria into a small Card component as props.
In the newly created card.js file, we need to import React and basic components of React Native. The Card component should have an image, title, and some details. Sounds like we need Image and Text. To wrap it all up nicely, we would need the StyleSheet and View components.
import React from "react";
import { View, Image, Text, StyleSheet } from "react-native";
In the card.js file, we define Card as a functional component and export it on the bottom of the file page.
const Card = () => {
return (
);
};
export default Card;
The barebones of our Card component would be View, Image, and Text elements. We would need an outer <View> container for the logo image and an inner <View> container to hold <Text> items. This structure would be returned by our Card component.
<View>
<Image source={ logo } />
<View>
<Text>{ title }</Text>
<Text>{ details }</Text>
</View>
</View>
Each container, Image, and Text would require some sort of styling, and we define the Styles object under the Card component. Let’s start with the outer container and set layout styling props as the following:
container: {
marginTop: 20,
backgroundColor: "white",
overflow: "hidden",
flex: 1,
borderRadius: 15,
}
Every card in our list view would have a padding defined with marginTop props. I set it to 20, but you are welcome to play with it and see how it works and what look you would like better. The background would be white to make the pizzeria name and city more visible. Overflow props by default have two options, “visible” and “hidden.” Hidden would guarantee that the image would not overshadow our round corners which we set to 15 as borderRadius. Finally, flex would control how our card elements would be placed along the axis.4
Image is an important part of the card element, and we want to have 100% width of our container and we set the height to 250 points.
logo: {
width: "100%",
height: 250,
}
Text elements should be centered with a bit of padding like this:
inner: {
padding: 20,
flex: 1,
justifyContent: "center",
width: "100%",
height: 100,
}
Title and details attributes of the card element conceptually would be the same as we had them in the ListView component. However, we can try other colors and fontSize props. Feel free to experiment with colors, sizes, and fonts too.
title: {
fontSize: 28,
margin: 10,
fontWeight: "bold",
color: "black",
textAlign: "center",
},
details: {
fontSize: 15,
margin: 10,
fontWeight: "bold",
color: "blue",
textAlign: "center",
}
We would pass {logo}, {title}, and {details} as props to the Card component.
const Card = ({ logo, title, details }) => {
//code
}
The Image component is very sensitive to dimensions and source, as you may recall from previous examples. The Pizzeria logo would be coming as a URI, and we need to include “uri” into our image source keyword.
<Image style={styles.logo} source={{ uri: logo }} />
You can see the whole Card component in the cards.js file in Figure 6-18.
Figure 6-18
Card component in the card.js file
We import the Card component to function_list_view.js and place it inside our <FlatList> element.
import Card from "./shared/card";
All pizzeria attributes would be passed as props to the Card component. This Card component will replace <Text> tags in <FlatList> we have used before.
<Card
logo={item.logo_image}
title={item.pizzeria_name}
details={item.city}
/>
I’ll wrap <FlatList> component with <View> tags inside of <SafeAreaView> element. Make sure the View component is imported into the function_list_view.js file. For a new <View> container, we will set the style with padding and gray color like this:
container: {
backgroundColor: "#eeeeee",
padding: 20,
}
Finally, to clear some space for our cards in the list screen, I’ll remove all elements like <Image> for pizza pie and <Text> tags with “Pizza vs. Pizza App”. Same goes for style props we no longer use; feel free to remove them. <FlatList> will be the main element of our ListView component as you can see in Figure 6-19.
Figure 6-19
FlatList element rendering Card component
In this chapter, we have answered the question “how to retrieve data from the Django project and render it on a mobile platform.” This chapter is another example that using Django and building a RESTful API structure would give a developer the ability to use any front-end technology. I hope by now you have got the feel of the power and versatility of Django as a back-end. Besides CRUD operations, Django would be a great platform to perform any data analysis, data manipulations, machine learning, and automation utilizing the power of Python.
In the next chapter, we will explore Create operations and see how we can receive data from a user and send it to the back-end.