
One of the most important features of web applications is the ability to allow users to authenticate. The application should keep track of the authenticated users; however, web requests are stateless. Each request is treated as an unrelated transaction to any previous request. There are multiple workarounds to keep track of logged users such as sessions, cookies, and tokens. Once we solve the authentication needs, another important feature is authorization. It dictates what the users can see and do inside the app. Authorization assigns roles to the users. For instance, a seller should be able to edit his/her own products but not anyone else's. However, administrators should be able to edit/delete any product that they find inappropriate.
Modern applications allow logins not only through usernames and passwords, but also through social networks. This latter strategy of authentication usually uses OAuth, which is an open protocol that enables secure authentication through third-party applications.
In this context, we are going to cover the following topics in this chapter:
- Getting started with authentication strategies
- Understanding client-side authentication
- Understanding server-side authentication
- Authenticating with Facebook, Google, and Twitter
Generally, the task of implementing user authentication can be time-consuming and repetitive. Thankfully, the Yeoman generator gets us started with all the boilerplate code. We will start with the most common authentication strategies. Later, we will make them functional using the Facebook, Google, and Twitter API keys. Then, we will go through the backend authentication and routes. And finally, we are going to create end-to-end tests to make sure the users can log in using their username/password and social authentications.
Let's first take a necessary detour, and explain how the different authentication mechanisms work.
Session-based authentication is one of the most common methods for providing authentication. It uses cookies to save a session ID that is usually related to the user ID. Once the user is logged in, the session ID is passed on each request:
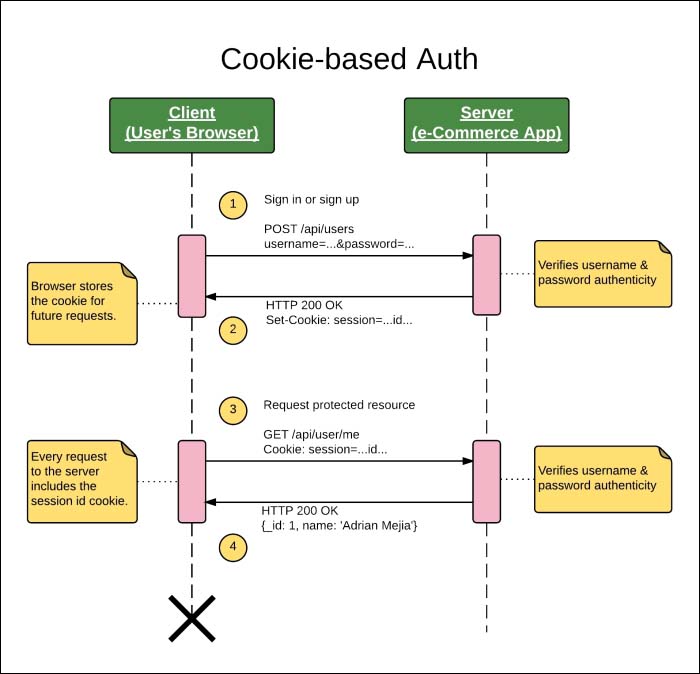
Figure 1: Session-based authentication sequence diagram
- The browser sends a
POSTrequest to the server with the username and password. - If the username/password combination matches the records, the server responds with a cookie containing the session ID, and it is stored locally in the browser's cookie, session, or local storage.
- From that time onwards, the browser will include the cookie session at each request.
- The server verifies the authenticity of the cookie's session ID and replies accordingly.
Token-based authentication uses JSON web tokens instead of cookies. Once the user is logged in, a token is added to the HTTP header of each request to validate the user.
The JSON Web Token authentication diagram might look similar to the session-based authentication, but it brings some advantages that we are going to discuss later.

Figure 2: Token-based authentication sequence diagram
The main difference is that instead of relying on cookies, it uses an HTTP header to send the authentication token.
- The browser sends a POST request to the server with the username and password.
- If the username/password combination matches the records, the server responds with a JSON Web Token (JWT) containing the user data, and it is stored locally in the browser's cookie, session, or local storage.
- From that time onwards, the client needs to add the HTTP header,
Authentication: Bearer TOKEN. - The server verifies the authenticity of the authentication token in the HTTP header and replies accordingly. Note that the cookie is not used for authentication purposes in this strategy.
There seems to be only one subtle difference between these two kinds of authentication, but there are great advantages of using JWT over session-based authentication such as the following:
- Cross-Origin Resource Sharing (CORS): Cookie-based authentication and AJAX don't play very well across multiple domains. On the other hand, token-based authentication works seamlessly.
- Scalability: Session IDs need to be stored in the server which implies some challenges when using distributed applications, and it also adds some lookup latency. JWTs are self-signed, and any instance of the server can validate its authenticity. The servers just need to share the private key.
- Mobile: Cookies are not ideal for working with mobile devices and secured APIs. The token approach simplifies this a lot.
- Security: There is no need to worry about CSRF (Cross-site request forgery), since no cookies are used.
- Others advantages: JWT is performance and standard-based.
Tip
For a deeper understanding about how JWT works, take a look at http://jwt.io/.
OAuth-based authentication is popular on social networks for allowing third-party applications to provide a single sign-on. For instance, you might want to login to an app using your Twitter account information without compromising your Twitter account credentials (username/password). That's what OAuth enables us to do, and it is useful for both registering and signing in as a user with just one click.
The following diagram shows the interactions between the client (the customer's browser), server (the e-commerce application), and the OAuth provider (for example, Twitter). This is called a three-legged OAuth:

Figure 3: Three-legged OAuth authentication sequence diagram
- Ahead of time, the application needs to gets registered with the OAuth Provider (in this case, Twitter) to get its API credentials: consumer key and secret. Moreover, it needs to set a callback URL to redirect the users back to the application.
- The user has to log in/register by clicking the Connect with Twitter button.
- The app asks for a Request Token from the OAuth provider. Along with the request, the app sends its consumer key and secret to get properly identified.
- The provider (Twitter) verifies the consumer key, secret and request URL; if everything matches with the registered records, it grants a Request Token.
- The app saves the Request Token, and redirects the user to the provider website.
- The provider website prompts the user to provide authorization.
- Once the user has authorized the OAuth provider to share data with the app, the provider redirects the user back to the application using the callback URL along with the
oauth_verifier. - The app uses the
oauth_verifierto exchange the Request Token for an Access Token. The provider grants the Access Token along with the user's profile data. - At this point, the user is registered/logged in the app with the profile data fetched from the OAuth Provider, and a session ID is created.
- From that time on, all the requests from the user to the app will use the session ID.
This is one of the most common scenarios for OAuth, and the one that we are going to use in this project.