
Some of the node modules (npm) that we are using in this chapter are as follows:
Passport: Authentication module for NodeJSPassport-local: Username and password authentication strategy for Passport and Node.jsPassport-facebook: Facebook authentication strategyPassport-twitter: Twitter authentication strategyPassport-google-oauth: Google (OAuth) authentication strategiesJsonwebtoken: Implementation of the JSON Web Token (JWT) standard. It is used to send encrypted JSON with sensitive dataExpress-jwt: Express middleware to authenticate HTTP requests using JWT (JSON Web Token) and setsreq.user
PassportJS is an npm module that can be added to the ExpressJS middlewares. It uses sessions to provide the user login functionality, and supports more than 300 authentication strategies. It also supports single sign-on through OAuth, SAML, and JWT to mention a few. The use of authentication strategies extends from the most popular social networks to sports and health portals such as Fitbit and Human API to art galleries like deviantArt and federated authentication using OpenID. In case you do not find a strategy, PassportJS gives you the option to create your own.
Tip
It's recommended to check out Passport to get a deeper understanding of the module at http://passportjs.org/docs.
If you run grunt serve again, you will see that we already have the sign up and login links. We can sign up, sign in, and log out with an e-mail/password. However, social logins won't work. Let's get through the functionality and fix the single sign-on strategies.
When we run grunt serve or npm start, it executes node server/app.js. As we have seen before, this script is the one that bootstraps the rest of the application. The most significant portions are where the ExpressJS app is set up and the routes are defined:
/* server/app.js *excerpt */

var app = express();
var server = require('http').createServer(app);
// ...
require('./config/express')(app);
require('./routes')(app);
The express.js file initializes the PassportJS, and sets up the session:
/* server/config/express.js *excerpt */

var session = require('express-session');
var mongoStore = require('connect-mongo')(session);
var mongoose = require('mongoose');
var passport = require('passport');

app.use(passport.initialize());

  // Persist sessions with mongoStore / sequelizeStore
  // We need to enable sessions for passport twitter because its an oauth 1.0 strategy

  app.use(session({
    secret: config.secrets.session,
    resave: true,
    saveUninitialized: true,
    store: new mongoStore({
      mongooseConnection: mongoose.connection,
      db: 'meanshop'
    })
  }));
The first step for enabling Passport is to add it to the middleware chain using passport.initialize().
Next, we use the express-session middleware to set up our sessions. Only the session ID is stored in a cookie and not the session data. The ID is used to retrieve the data stored on the server side. Let us take a look at the meaning of the parameters passed:
Secret: This is a string that is used to generate the session ID cookie.Resave: This forces the session to always save back to the server even if it has not been modified.SaveUninitialized: This is a session which is uninitialized when it is new. This option forces the session to be saved even when it is new and unmodified.Store: This is where the session data is saved. By default, it is stored in the memory (MemoryStore). However, we are using MongoDB instead withconnect-mongo. Another popular storage option is (connect-redis) Redis.
Tip
MemoryStore and MongoStore are two different strategies for saving sessions. In the first one, the sessions data is stored in the memory of the server. That can cause scaling across multiple servers, since memory is separate on each server. Furthermore, it can consume a significant amount of memory if there are many concurrent users. On the other hand, MongoStore, is a better solution. Sessions can scale as we scale the database, and it is shared across multiple servers.
Now that we have properly initialized PassportJS, we need to map it to the routes, and add strategies to make it functional. Let's now explore how we use the User model to provide authentication.
The following is an excerpt of the user model. It comes preloaded with all the methods that we need for authentication and validations:
/* server/api/user/user.model.js *excerpt */

var mongoose = require('mongoose');
var Schema = mongoose.Schema;
var crypto = require('crypto');
var authTypes = ['github', 'twitter', 'facebook', 'google'];

var UserSchema = new Schema({
  name: String,
  email: { type: String, lowercase: true },
  role: {
    type: String,
    default: 'user'
  },
  hashedPassword: String,
  provider: String,
  salt: String,
  facebook: {},
  twitter: {},
  google: {},
  github: {}
});

UserSchema
  .virtual('password')
  .set(function(password) {
    this._password = password;
    this.salt = this.makeSalt();
    this.hashedPassword = this.encryptPassword(password);
  })
  .get(function() {
    return this._password;
  });

UserSchema.methods = {
  authenticate: function(plainText) {
    return this.encryptPassword(plainText) === this.hashedPassword;
  },

  makeSalt: function() {
    return crypto.randomBytes(16).toString('base64');
  },

  encryptPassword: function(password) {
    if (!password || !this.salt) return '';
    var salt = new Buffer(this.salt, 'base64');
    return crypto.pbkdf2Sync(password, salt, 10000, 64).toString('base64');
  }
};
A plain text password should never be saved to the database. Thus, we are always saving the encrypted version of the password. Furthermore, a salt parameter is added to the password encryption mechanism for extra security.
Tip
Password salt
The purpose of adding a salt is to protect the users with a simple password (dictionary words). Salt is random data generated to be used along with the password in the one-way hashing function. The end result is an encrypted password, which is the one that is stored in the database.
We are going to use four strategies for our application: local (e-mail/password), Facebook, Twitter, and Google. The following screenshot displays the file structure organization:
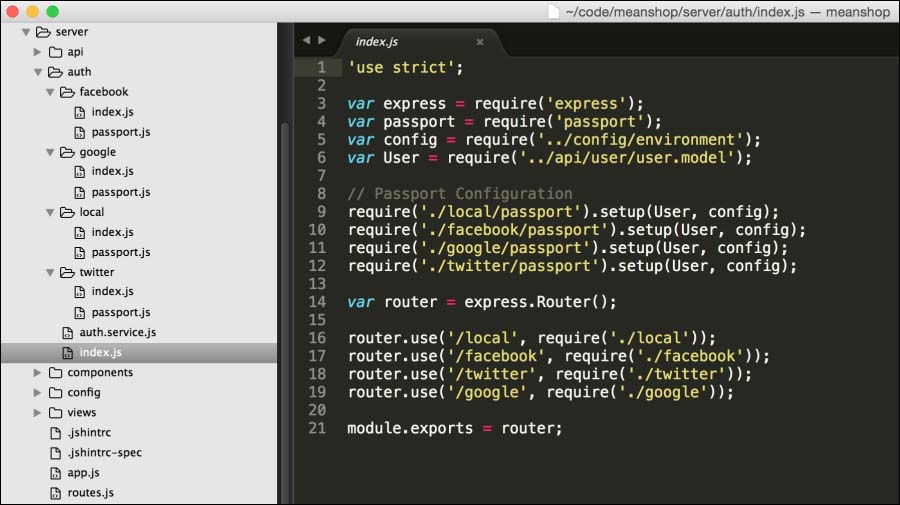
Figure 4: File structure to organize authentication strategies
They are all contained inside the auth folder, and have two files inside:
index.js: This file defines the routespassport.js: This file defines the strategies
To begin with the routes, open routes.js. All the authentication strategies will be mapped under the /auth path:
/* server/routes.js *excerpt */

app.use('/api/products', require('./api/product'));
app.use('/api/users', require('./api/user'));
app.use('/auth', require('./auth'));
When we expand ./auth routes, we see that we have one for any strategy that we want to support: local, Facebook, Twitter, and Google:
/* server/auth/index.js  *excerpt */

router.use('/local', require('./local'));
router.use('/facebook', require('./facebook'));
router.use('/twitter', require('./twitter'));
router.use('/google', require('./google'));
To sum up, the preceding code will yield the following routes:
- Local authentication:
/auth/local - Facebook authentication:
/auth/facebook - General path:
/auth/:provider
We are going to focus only on the local strategy first to drive the concepts home, and then explain the social strategies.
Setting up local authentication or any other kind of authentication involves two steps:
- Defining the strategy with
passport.use:/* server/auth/local/passport.js *excerpt */ exports.setup = function(User, config) { passport.use(new LocalStrategy({ usernameField: 'email', passwordField: 'password' // this is the virtual field on the model }, function(email, password, done) { return localAuthenticate(User, email, password, done); })); };; - Adding the strategy to the route with
passport.authenticate:/* server/auth/local/index.js *excerpt */ router.post('/', function(req, res, next) { passport.authenticate('local', function (err, user, info) { var error = err || info; if (error) return res.json(401, error); if (!user) return res.json(404, {message: 'Something went wrong, please try again.'}); var token = auth.signToken(user._id, user.role); res.json({token: token}); })(req, res, next) });
Passport.use defines the method to validate that the e-mail/password combination is correct. This is done by finding the user by e-mail, and then encrypting the plain text password and verifying if it matches with the one in the database. If the e-mail is found and there's a match in the password, then the user is authenticated; otherwise, it throws an error.
Passport.authenticate is used to associate an authentication strategy with a route. In this particular case, we pull out the local strategy that we defined previously in the previous step.
To make sure that users can sign in and out at all times, we are going to add automated testing. Our Yeoman generator gets us started quickly. Review the following directories: e2e/account/signup/signup.spec.js, e2e/account/login/login.spec.js, and e2e/account/logout/logout.spec.js. In this set of tests, we are also testing that we can sign up, log in, and log out.