
Deploying an application is the process of moving the current code base to a production server. There are many options depending on our needs. There are cloud application platforms such as Heroku and Openshift that abstract all the complexity of setting up all the servers, and allow us to scale on-demand with just a few clicks. On the other hand, there are also Virtual Private Servers (VPS), which grant you access to cloud resources, and you have to set up all the servers yourself. In the first one (Platform as a Service or PaaS), we only need to worry about the application, while the platform manages the servers in the background. VPS, on the other hand, give us full access to cloud servers where we need to do everything ourselves.
Platform as a service (PaaS) is a convenient type of cloud computing. It allows us to quickly deploy applications without having to spend time setting up servers. The platform is configured to support a number of different types of applications. There are a couple of PaaS that are free to try such as Heroku and Openshift. Let's try to get our app deployed!
Heroku requires installing a command-line program called heroku-toolbelt. Follow the instructions on https://toolbelt.heroku.com to install it. We also need to create an account in Heroku. Then, we will be able to log in through the command-line by typing: heroku login.
Our yo generator already supports deploying to Heroku. So, we just need to build the project and deploy it:
$ grunt build
$ yo angular-fullstack:heroku
The last command is going to ask you a few questions like application name, and so on. After this is done, you need to set up the MongoDB database:
$ cd dist && heroku addons:create mongolab:sandbox
We also need to set the environment variables. Set NODE_ENV and all variables that you have on local.env.js to heroku:
$ heroku config:set NODE_ENV=production

# add all the social networks IDs and secrets.e.g.:
$ heroku config:set FACEBOOK_ID=appId FACEBOOK_SECRET=secret

# visualize all the set variables with
$ heroku config
Finally, you can open the application by running it with the following command:
$ heroku open
Any other update can be refreshed on Heroku by typing the following command:
$ grunt buildcontrol:heroku
PaaS offers the ability to scale easily on demand. However, you will never have full control of the server's configurations. In case you want to do that, you need to go with Virtual Private Servers (VPS) or your own servers. In the next section, we are going to explain how to set it up.
There are a number of Virtual Private Server (VPS) providers, such as Amazon AWS, Digital Ocean, Rackspace, and many more. We will go through the process of deploying our app in Digital Ocean, but the same applies to any other provider or even our own (bare metal) servers.
Again, the steps that follow are more or less the same for any server using Ubuntu 14.04 x64. You can go to https://www.digitalocean.com/?refcode=dd388adf295f to get a $10 credit and follow along with this section, or use any other similar provider that you are familiar with.
After you sign up, go ahead and create a 512 MB/1 CPU droplet (server instance) using Ubuntu 14.04 x64:
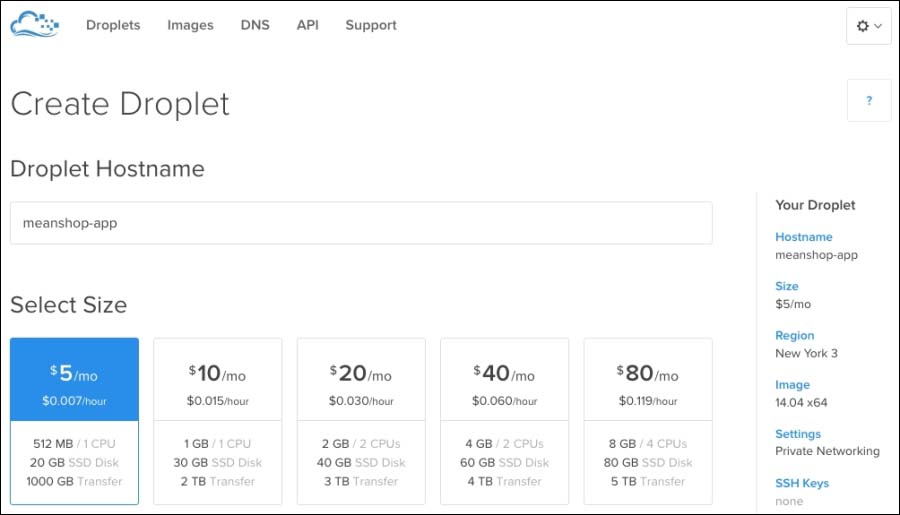
Figure 4: Creating a server instance in Digital Ocean
Choose the region that is closest to you, in my case, New York. In the settings, select enable private network. Once you click, you create a droplet. After a minute or so, you will receive an e-mail with the password for the root username.
Create another droplet, this time called meanshop-web, with exactly the same settings. Next, go to the droplet menu, and get the Public and Private IP addresses for each one under settings.
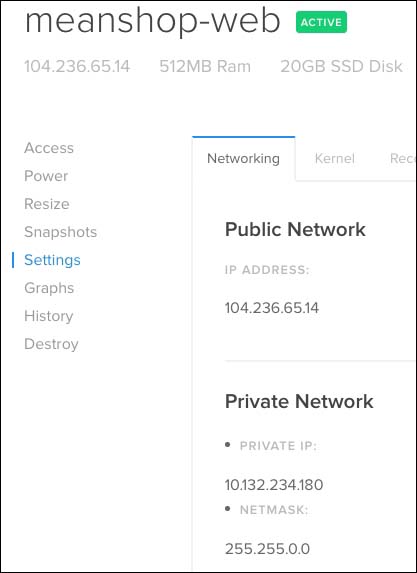
Figure 5: Public and Private networks on Digital Ocean settings
Once you log in as the root user, you can create a new user with sudo privileges as follows:
adduser YOUR_USERNAME
gpasswd –a YOUR_USERNAME sudo
sudo - YOUR_USERNAME
Now, we are ready to deploy our app! Again, the steps that follow are the same regardless of the provider you choose, or even with your own personal servers with Ubuntu 14.04.