
10. iAd, Airplay, and In-app Purchases
Your game may benefit from the addition of a couple features that aren’t specifically game related, but could add value to your game and possibly increase its earning potential.
In this chapter, you’ll see how to add iAd and in-app purchases to your game to create additional revenue streams, and learn how to display your game on a big-screen TV.
Using iAd
iAd is the Apple-supplied advertising framework that allows your app to display ads. The one requirement of iAd is that the ads are shown on a ViewController, so when the user taps on the ad, iAd can load it fullscreen in a modal ViewController.
iAd generates revenue through a combination of tap-throughs and successful presentation of the ad. The revenue is split 60/40 in your favor.
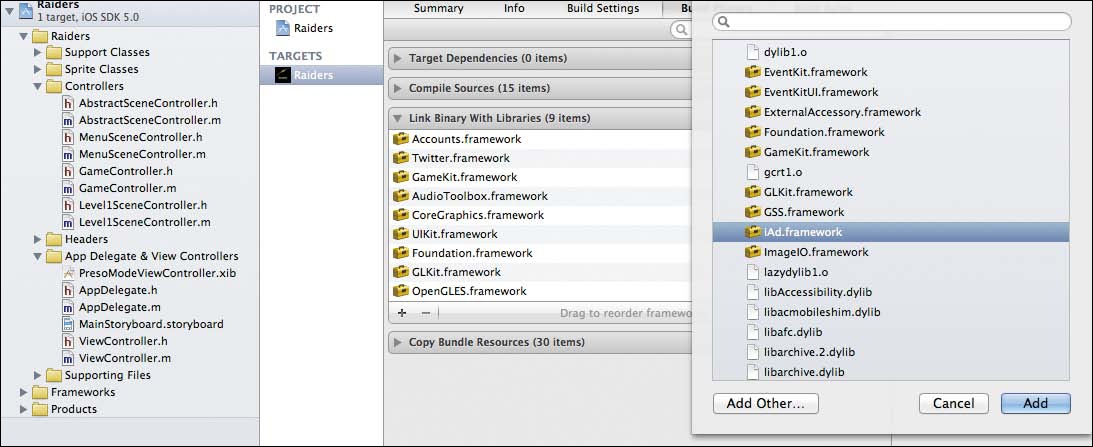
Like so many iOS features, iAd is fairly easy to setup. First, you add the iAd framework into your project (Figure 10.1).
Figure 10.1 Adding the iAd framework to your game
Then, add an ADBannerView to your project in one of two ways. Either add the view programmatically, or drop the ADBannerView onto your ViewControllers view in your ViewControllers nib. In Raiders, this is in MainStoryboard.storyboard (Figure 10.2).
Figure 10.2 ViewController with an AdBannerView

Now set the delegate of ADBannerView to the ViewController object, and set an outlet to the ADBannerView in the ViewController class. The easiest way to do this is to click the Assistant Editor button in XCode 4.2 (which looks like a butler), and Control-drag from the ADBannerView to the header file of your ViewController. Choose Outlet and give it a name.
This will set up the IBOutlet automatically, creating the backing property and @synthesize in the .m file.
When that is done, you have four methods in the ADBannerView protocol to implement:
-(void)bannerViewDidLoadAd:(ADBannerView *)banner {
[banner setHidden:NO];
}
-(void)bannerView:(ADBannerView *)banner didFailToReceiveAdWithError:(NSError *)error {
[banner setHidden:YES];
}
-(BOOL)bannerViewActionShouldBegin:(ADBannerView *)banner willLeaveApplication:(BOOL)willLeave {
return YES;
}
-(void)bannerViewActionDidFinish:(ADBannerView *)banner {
}
This procedure is not strictly necessary, but it pays to hide the ADBannerView in the viewDidLoad, and make it visible again when an ad is returned successfully.
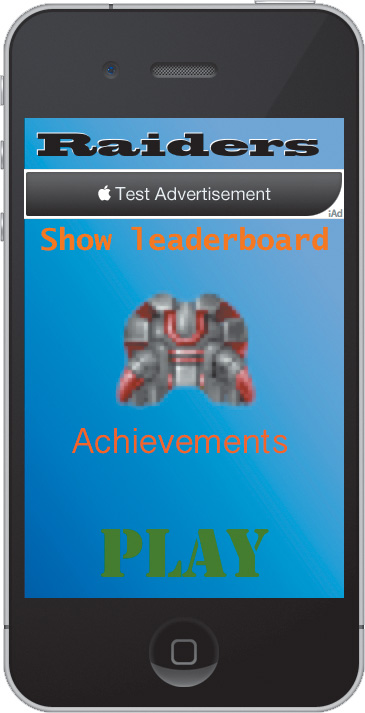
In Raiders, the iAd will display in the MenuScene only. It can be very distracting (and bad for game performance) to display an ad on the main play screen. If you do this, you won’t win any friends, so it’s best to find supplementary screens on which to place your ads. Menu screens or settings screens are obvious places for ads (Figure 10.3).
Figure 10.3 Raiders showing test iAd
In the Raiders game engine, one ViewController is used and the scenes are rendered on top of it. When a scene is replaced, it is still rendering inside the same ViewController. However, having a single ViewController that renders all the scenes can cause a problem as shown in Figure 10.4.
Figure 10.4 The iAd is still showing.
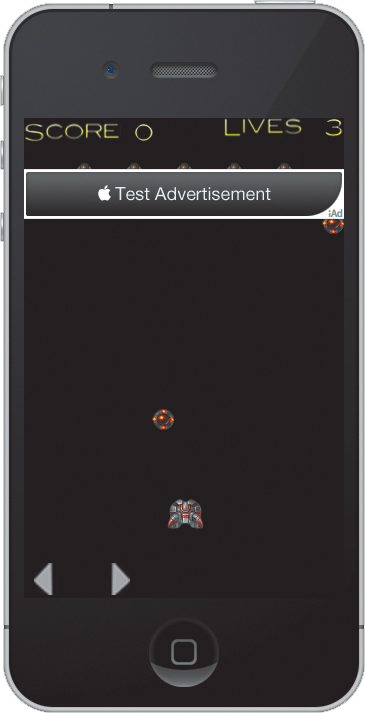
As you can see, the iAd is still displayed while the game is playing, which is far from ideal. The solution is to set a method on ViewController called setHidden: that is called from the scene change in GameController.
- (void)changeScene:(NSString *)scene {
if (![scene isEqualToString:MENU_SCENE])
[(ViewController *)[GameController sharedGameController]. mainView setHideAd:YES];
In ViewController have a BOOL variable that tests for YES or NO when the iAd is to be displayed.
- (void)setHideAd:(BOOL)hideiAd {
hideAd = hideiAd;
[bannerView setHidden:hideiAd];
}
-(void)bannerViewDidLoadAd:(ADBannerView *)banner {
if (!hideAd)
[banner setHidden:NO];
}
Note that hideAd should return NO for the initial MenuScene, as changeScene isn’t called until the scene is changed from Level1Scene.
Getting AirPlay
AirPlay comprises several frameworks that allow apps to stream audio and video content to an AirPlay-compatible device such as an Apple TV.
AirPlay can mirror your app to a connected TV either through an HDMI adapter plugged into the dock port of your device, or using Apple TV.
AirPlay can also implement what Apple calls second display. This feature can be seen in games such as Real Racing 2, where the main game is displayed on your HDTV, and your iPad shows additional information such as lap times, vehicle speed, and a map of the course.
Using AirPlay is a very complex topic, so it won’t be discussed in detail here. However, many games could benefit from a second display. If yours is among them, AirPlay is well worth the time and effort.
Supporting In-App Purchases
In-app purchases (IAP) are a way to generate revenue by selling additional items inside your game.
For example, a racing game might offer extra vehicles or tracks. Angry Birds sells the Mighty Eagle that can clear a level. The options are limited only by your imagination.
To set up IAP, you must add the items you want to sell to iTunes Connect, and also set up test users. The test user(s) need to be set up to test the IAP before releasing your app to the public. You can do this by logging into iTunes Connect, clicking Manage Users > Test Account, and filling in the fields.
After the user has bought a feature in IAP, you then have to deliver it to her iOS device using one of two methods. You can either bundle the feature in your original app and then unlock it at the time of purchase, or you can push the feature to the iOS device from your own server.
Creating and Processing an IAP
To create and test an IAP, you must be running your game on an actual iOS device. Store Kit (the IAP framework) doesn’t support the simulator.
To add IAP to your app:
1. Add the StoreKit framework to your app.
2. Retrieve information about your products.
3. Use this code to acquire product information and display that information in a control on a new UIViewController:
- (void)requestProductData {
SKProductsRequest *request= [[SKProductsRequest alloc] initWithProductIdentifiers:[NSSet setWithObject: @"your identifier"]];
request.delegate = self;
[request start];
}
- (void)productsRequest:(SKProductsRequest *)request didReceiveResponse:(SKProductsResponse *)response {
if (response.products != nil)
products = response.products;
// populate UI
[productsPicker reloadAllComponents];
}
4. Register a transaction payment queue:
MyStoreObserver *observer = [[MyStoreObserver alloc] init];
[[SKPaymentQueue defaultQueue] addTransactionObserver:observer];
where MyStoreObserver is a NSObject subclass that implements the SKPaymentTransactionObserver protocol.
5. Implement the paymentQueue:updatedTransactions: method on MyStoreObserver. That method is called every time a transaction is created or updated:
- (void)paymentQueue:(SKPaymentQueue *)queue updatedTransactions:(NSArray *)transactions
{
for (SKPaymentTransaction *transaction in transactions)
{
switch (transaction.transactionState)
{
case SKPaymentTransactionStatePurchased:
[self completeTransaction:transaction];
break;
case SKPaymentTransactionStateFailed:
[self failedTransaction:transaction];
break;
case SKPaymentTransactionStateRestored:
[self restoreTransaction:transaction];
default:
break;
}
}
}
6. The observer provides a product following a successful purchase:
- (void) completeTransaction: (SKPaymentTransaction *) transaction {
// Your application should implement these two methods.
[self recordTransaction: transaction];
[self provideContent: transaction.payment.productIdentifier];
// Remove the transaction from the payment queue.
[[SKPaymentQueue defaultQueue] finishTransaction: transaction];
}
7. Finish the transactions for restored and failed purchases:
- (void) restoreTransaction: (SKPaymentTransaction *) transaction {
[self recordTransaction: transaction];
[self provideContent: transaction.originalTransaction.payment.productIdentifier];
[[SKPaymentQueue defaultQueue] finishTransaction: transaction];
}
- (void) failedTransaction: (SKPaymentTransaction *) transaction {
if (transaction.error.code != SKErrorPaymentCancelled)
{
// Optionally, display an error here.
}
[[SKPaymentQueue defaultQueue] finishTransaction: transaction];
}
8. With all the infrastructure in place, you can finish the user interface. When the user selects an item in the store, create a payment object and add it to the payment queue:
SKPayment *payment = [SKPayment paymentWithProductIdentifier: @"your identifier"];
[[SKPaymentQueue defaultQueue] addPayment:payment];
Note

Too many elements of this method are locked to the app to allow posting a demo project without giving away some of the author’s personal identifier code.
Wrapping Up
In this chapter you learned how to implement iAd and in-app purchases in your app, and were briefly introduced to Airplay.
These are technologies that aren’t specifically linked to games, but are useful frameworks to help generate income.