
9. Being Social
The world has become increasingly social, and a lot smaller. Using social networks, you have many ways to find and connect friends, no matter where they are in the world. Adding social features to your game can spread the buzz and also make it a lot more “sticky” as players strive to beat their friends’ scores or get their names onto a leaderboard.
Game Center Integration
Apple describes Game Center as “a new social gaming network that is available on supported iOS-based devices running iOS 4.1 and later. A social gaming network allows players to share information about the games they are playing as well as to join other players in multiplayer games. Game Center provides these services over both wireless and cellular networks.”
To enable game center you need to do the following things:
• Configure iTunes Connect—Configure the game in iTunes Connect and enable Game Center integration. Usually you can do so just before releasing the game, but any app that uses Game Center must first be set up in iTunes Connect. The Setup guide can be found at https://itunesconnect.apple.com/docs/iTunesConnect_DeveloperGuide.pdf.
• Configure the Bundle Identifier—Game Center apps require that the identifier be set to the final version during testing. The bundle identifier is found under the project settings for the target, as shown in Figure 9.1.
Figure 9.1 Identifier Settings

• Apply the Game Kit Framework—If your game requires Game Kit, as in the case of a multiuser game that finds players via Game Kit, then Game Kit must be added to the list of device requirements. You can locate more information at http://developer.apple.com/library/ios/#documentation/iPhone/Conceptual/iPhoneOSProgrammingGuide/BuildTimeConfiguration/BuildTimeConfiguration.html#//apple_ref/doc/uid/TP40007072-CH7-SW9.
If you decide to add the reference to the Game Kit framework, a check must be performed to ensure that the gaming device in use supports Game Kit. The checking code is:
BOOL isGameCenterAPIAvailable()
{
// Check for presence of GKLocalPlayer class.
BOOL localPlayerClassAvailable = (NSClassFromString(@"GKLocalPlayer")) != nil;
// The device must be running iOS 4.1 or later.
NSString *reqSysVer = @"4.1";
NSString *currSysVer = [[UIDevice currentDevice] systemVersion];
BOOL osVersionSupported = ([currSysVer compare:reqSysVer options:NSNumericSearch] != NSOrderedAscending);
return (localPlayerClassAvailable && osVersionSupported);
}
This function can then be called in the application:didFinishLaunchingWithOptions method of the AppDelegate. If Game Center is available, then the local player needs to authenticated. If the user can’t be authenticated, Game Center features must be disabled. In Raiders, a BOOL property is set to YES if authentication succeeds, otherwise NO is set:
- (BOOL)application:(UIApplication *)application didFinishLaunchingWithOptions:(NSDictionary *)launchOptions {
if ([self isGameCenterAvailable]) {
GKLocalPlayer *localPlayer = [GKLocalPlayer localPlayer];
[localPlayer authenticateWithCompletionHandler: ^(NSError *error) {
useGameKit = localPlayer.isAuthenticated;
}];
}
return YES;
}
Using Leaderboards, Achievements, and Scoring
Game Center brings many features to iOS gaming such as peer-to-peer connectivity, multiplayer matchmaking, and voice chat. The features that Raiders will implement are leaderboards, achievements, and adding scores to the Game Center servers.
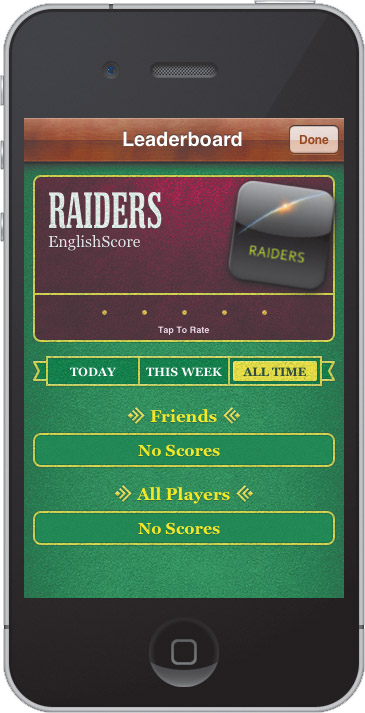
Building Leaderboards
A leaderboard is analogous to a high score table, but centralizes all the scores for people who play your game. Individual players can filter the leaderboard scores by current week, previous week, all-time, and in comparison to friends’ scores. Your game can have many leaderboards featuring different scores and rankings.
A leaderboard is set up in iTunes Connect and can have many parameters, as explained in the Game Kit programmer’s guide in the leaderboard section.
Once your leaderboards are configured, you can display them quite easily. In Raiders, the leaderboards can be accessed from the MenuSceneController. A link to the main GLKViewController needs to be setup in GameController because the leaderboard is shown using a UIKit ViewController (Figure 9.2). To show the leaderboard from the showLeaderBoard ActionItem, use the following code:
- (void)showLeaderBoard {
GKLeaderboardViewController *leaderboardController = [[GKLeaderboardViewController alloc] init];
if (leaderboardController != nil)
{
leaderboardController.leaderboardDelegate = self;
[[GameController sharedGameController].mainView presentViewController:leaderboardController animated:YES completion:nil];
}
}
Figure 9.2 Leaderboard in action
The GLKLeaderboardViewController has a delegate that is called when the user has tapped the Close button so that your code can dismiss the Leaderboard view:
- (void)leaderboardViewControllerDidFinish: (GKLeaderboardViewController *)viewController {
[[GameController sharedGameController].mainView dismissModalViewControllerAnimated:YES];
}
Sending Scores
To get the leaderboards to work, you have to send scores to Game Center. This is a simple task achieved with a simple method:
- (void)sendScoreToGameCenter:(int64_t)score forCategory: (NSString *)category {
GKScore *scoreReporter = [[GKScore alloc] initWithCategory:category];
scoreReporter.value = score;
[scoreReporter reportScoreWithCompletionHandler: ^(NSError *error) {
if (error != nil) {
// handle the reporting error
}
}];
}
The Apple documentation for Game Center suggests that if an error occurs while sending a score, then the score should be saved and sent at a later time. GKScore uses the NSCoding protocol, so could easily be stored using something like NSDefaults, and sent again at the next game launch, or the next time that a score is sent.
In Raiders, a score is sent to Game Center at the end of each game. In the current Raiders code, if a score fails to upload, it is lost; but for your games it is recommended that you save the GKScore and try to send it at a later date.
Something like the following code could be used to store the GKScore:
NSData *scoreData = [NSKeyedArchiver archivedDataWithRootObject:scoreReporter];
NSUserDefaults *defaults = [NSUserDefaults standardUserDefaults];
[defaults setObject:scoreData forKey:@"lastFailedScore"];
[defaults synchronize];
Creating Achievements
Achievements provide goals that game players can strive for, increasing the “beat your friends” factor. A game can issue a total of 1000 achievement points.
Sending an achievement is similar to sending a score. You should save any failed achievement as you save a score:
- (void)reportAchievementIdentifier:(NSString*)identifier percentComplete:(float)percent {
GKAchievement *achievement = [[GKAchievement alloc] initWithIdentifier:identifier];
if (achievement) {
achievement.percentComplete = percent;
[achievement reportAchievementWithCompletionHandler: ^(NSError *error) {
if (error != nil) {
// Retain the achievement object and try again later (not shown).
}
}];
}
}
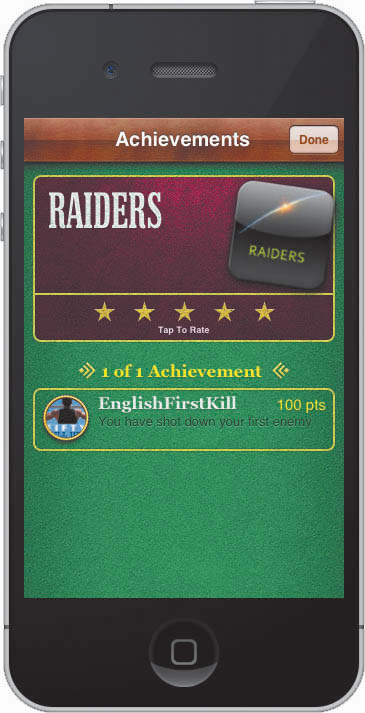
Raiders will have one example achievement. It is awarded when the player makes the first kill (Figure 9.3). To view the player’s achievements, a UIViewController is supplied by the Game Kit framework called GKAchievementViewController. It is shown in a similar fashion to GKLeaderBoardViewController. Classes using GKAchievementViewController are required to implement the GKAchievementViewControllerDelegate which includes a single method, achievementViewControllerDidFinish, that dismisses the view controller, similar to closing the leaderboard.
Figure 9.3 Raiders’ single achievement
The code is in MenuSceneController along with the delegate method:
- (void)showAchievements {
GKAchievementViewController *achievements = [[GKAchievementViewController alloc] init];
if (achievements != nil) {
achievements.achievementDelegate = self;
[[GameController sharedGameController].mainView presentModal ViewController:achievements animated:YES];
}
}
- (void)achievementViewControllerDidFinish: (GKAchievementViewController *)viewController {
[[GameController sharedGameController].mainView dismissModalViewControllerAnimated:YES];
}
Completing Game Center Integration
This code just scratches the surface of what Game Center and Game Kit offer. You should read the documentation at http://developer.apple.com to more fully understand these features.
Sending a Tweet
Apple includes a framework in iOS 5 that allows users to post to Twitter. In typical Apple fashion, this framework is very easy to implement compared to some other third-party Twitter libraries.
First, you must add the Twitter framework and the Account framework to your project.
A tweet can be sent in two ways. A TWTweetComposeViewController shows a view controller that allows the user to enter his own text, but can be prepopulated by the app. The second method is to programmatically send the tweet.
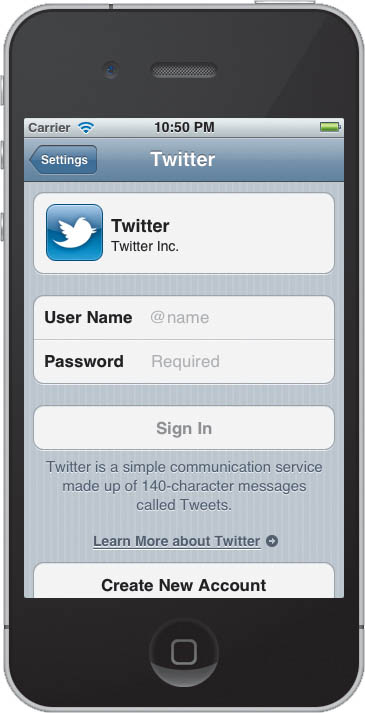
Neither option can work unless the user has his Twitter account settings configured on the device (Figure 9.4).
Figure 9.4 Twitter account setup
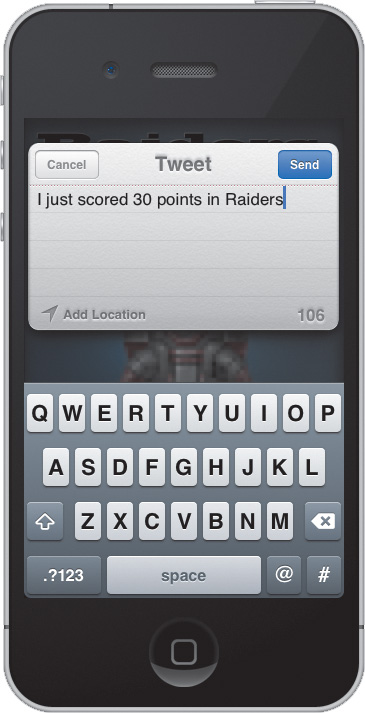
Using TWTweetComposeViewController
The easiest way to send a tweet is to use the TWTweetComposeViewController (Figure 9.5) which can be set up with a few lines of code:
- (void)sendTweet {
TWTweetComposeViewController *tweetViewController = [[TWTweetComposeViewController alloc] init];
// Set the initial tweet text. See the framework for additional properties that can be set.
[tweetViewController setInitialText: [NSString stringWithFormat:@"I just scored %d points in Raiders", currentScore]];
// Create the completion handler block.
[tweetViewController setCompletionHandler: ^(TWTweetComposeViewControllerResult result) {
NSString *output;
switch (result) {
case TWTweetComposeViewControllerResultCancelled:
// The cancel button was tapped.
output = @"Tweet cancelled.";
break;
case TWTweetComposeViewControllerResultDone:
// The tweet was sent.
output = @"Tweet done.";
break;
default:
break;
}
// Dismiss the tweet composition view controller.
[mainView dismissModalViewControllerAnimated:YES];
}];
// Present the tweet composition view controller modally.
[mainView presentModalViewController:tweetViewController animated:YES];
}
Figure 9.5 TWTweetComposeViewController in action
Sending a Tweet Without a ViewController
The second way to send a tweet is to use the Twitter API to send a status update in the background without using a ViewController. The user has to allow this before the tweet can be sent. This method involves slightly more code than the previous method, but is a good choice if you want to send a standard status update message that requires no user input, or to interrupt the user and require him to send the tweet manually.
Raiders doesn’t implement this method, but the code to achieve it would look like this:
- (void)sendCustomTweet {
// Create an account store object.
ACAccountStore *accountStore = [[ACAccountStore alloc] init];
// Create an account type that ensures Twitter accounts are retrieved.
ACAccountType *accountType = [accountStore accountTypeWithAccountTypeIdentifier: ACAccountTypeIdentifierTwitter];
// Request access from the user to use their Twitter accounts.
[accountStore requestAccessToAccountsWithType:accountType withCompletionHandler:^(BOOL granted, NSError *error) {
if(granted) {
// Get the list of Twitter accounts.
NSArray *accountsArray = [accountStore accountsWithAccountType:accountType];
// For the sake of brevity, we'll assume there is only one Twitter account present.
// You would ideally ask the user which account they want to tweet from, if there is more than one Twitter account present.
if ([accountsArray count] > 0) {
// Grab the initial Twitter account to tweet from.
ACAccount *twitterAccount = [accountsArray objectAtIndex:0];
// Create a request, which in this example, posts a tweet to the user's timeline.
// This example uses version 1 of the Twitter API.
// This may need to be changed to whichever version is currently appropriate.
TWRequest *postRequest = [[TWRequest alloc] initWithURL:[NSURL URLWithString: @"http://api.twitter.com/1/statuses/update.json"] parameters:[NSDictionary dictionaryWithObject: @"Hello. This is a tweet." forKey:@"status"] requestMethod:TWRequestMethodPOST];
// Set the account used to post the tweet.
[postRequest setAccount:twitterAccount];
// Perform the request created above and create a handler block to handle the response.
[postRequest performRequestWithHandler:^(NSData *responseData, NSHTTPURLResponse *urlResponse, NSError *error) {
NSString *output = [NSString stringWithFormat: @"HTTP response status: %i", [urlResponse statusCode]];
[self performSelectorOnMainThread: @selector(displayText:) withObject:output waitUntilDone:NO];
}];
}
}
}];
}
The code checks for Twitter accounts, chooses the first account using the standard Twitter API URLs, and then sends the update using TWRequest.
Wrapping Up
In this chapter, you learned how simple it can be to integrate social features into your game, or into any iOS 5 app. You’ve also seen how to integrate Twitter updates using just a few lines of code. But this chapter only touched briefly on what you can do with Game Center.
The next chapter will feature additional code that might be useful in your apps, but isn’t necessarily implemented in Raiders.