Chapter 5. Client-Side Data Storage
Most software applications need to store data in some sort of persistent fashion in order to be useful. When it comes to web apps, this task has traditionally been handled either with a server-side database or cookies set in the browser. With the advent of HTML5, web developers now have a few more options: localStorage, sessionStorage, and client-side databases.
localStorage and sessionStorage
localStorage and sessionStorage (collectively referred to as key/value storage) are very similar to cookies in that they allow you to use JavaScript to set name/value pairs that you can then retrieve across multiple page reloads.
Unlike cookies, however, localStorage and sessionStorage data is not sent across the wire with the browser request—it lives entirely in the client. Therefore, it’s feasible to store much more data than you would want to with cookies.
Note
At the time of this writing, browser size limits for localStorage and sessionStorage are still in flux.
Functionally, localStorage and sessionStorage are the same. They differ only in terms of persistence and scope:
localStorageData is saved even after the window is closed and is available to all windows (or tabs) that are loaded from the same source (must be the same domain name, protocol, and port). This is useful for things like application preferences.
sessionStorageData is stored with the window object. Other windows/tabs are not aware of the values, and the data is discarded when the window/tab is closed. Useful for window-specific state like active tab highlight, or the sort order of a table.
Note
In any of the following examples, you can
substitute sessionStorage anywhere you see
localStorage.
Setting a value is as simple as:
localStorage.setItem('age', 40);Accessing a stored value is equally simple:
var age = localStorage.getItem('age'),You can delete a specific key/value pair from storage with:
localStorage.removeItem('age'),Or, you can delete all key/value pairs like so:
localStorage.clear();
Assuming that your keys are valid JavaScript tokens (no spaces, no punctuation other than underscores, etc.), you can use this alternate syntax:
localStorage.age = 40 // Set the value of age
var age = localStorage.age; // Get the value of age
delete localStorage.age; // Remove age from storage
Note
The localStorage and sessionStorage keys are stored separately. If you use the same key name in each, they will not conflict with each other.
Saving User Settings to localStorage
On to a practical example. Let’s update the Settings panel of the example app we started working on in Chapter 4 to store the form values in localStorage.
We are going to be writing a fair amount of JavaScript in this chapter, and I don’t want to jam it all in the head section of our HTML document. To keep our code organized, I’m going to create a file called kilo.js and update the head of my HTML document with a reference to it:
<head>
    <title>Kilo</title>
    <link type="text/css" rel="stylesheet" media="screen" href="jqtouch/jqtouch.css">
    <link type="text/css" rel="stylesheet" media="screen"
        href="themes/jqt/theme.css">
    <script type="text/javascript" src="jqtouch/jquery.js"></script>
    <script type="text/javascript" src="jqtouch/jqtouch.js"></script>
    <script type="text/javascript" src="kilo.js"></script>
</head>
Alert readers will notice that I’ve also removed the jQTouch constructor from the head of the HTML document. It’s not gone, though; I just moved it into kilo.js. So be sure you’ve removed that from your main HTML file, create the kilo.js file in the same directory with the following contents, and then reload the main HTML document in your browser to make sure it’s still working:
var jQT = $.jQTouch({
    icon: 'kilo.png',
    statusBar: 'black'
});
I need to override the submit action of the
Settings form and replace it with a custom function called
saveSettings(). Thanks to jQuery, I can accomplish this
with a single line of code, which I’ll place in the document ready
function. Add the following to kilo.js:
$(document).ready(function(){
    $('#settings form').submit(saveSettings);
});
The net result of this is that when the
user submits the Settings form, the saveSettings() function will run instead
of the form actually getting submitted.
When the saveSettings()
function is called, it grabs the values from the three form inputs
using jQuery’s val() function and saves each in a
localStorage variable of the same name. Add this function
to kilo.js:
function saveSettings() {
    localStorage.age = $('#age').val();
    localStorage.budget = $('#budget').val();
    localStorage.weight = $('#weight').val();
    jQT.goBack();
    return false;
}
Once the values are stored, I use the
jQuery goBack() function (on the second to last line) to
dismiss the panel and return to the previous page. I then return
false to prevent the default action of the submit event
that triggers this function. Had I omitted this line, the current page
would reload, which is not what we want.
At this point, a user can launch the app, navigate to the Settings panel, enter her settings, and submit the form to save her settings to localStorage.
Since we are not clearing the fields when the form is submitted, the values that the user enters will still be there when she navigates back to the Settings panel. However, this is not because the values have been saved to localStorage; it’s just because they are still just sitting there after having been typed in. Therefore, the next time the user launches that app and navigates to the Settings panel, the fields will be empty even though they have been saved.
To remedy this, we need to load the
settings using the loadSettings() function, so add the
following function to kilo.js:
function loadSettings() {
    $('#age').val(localStorage.age);
    $('#budget').val(localStorage.budget);
    $('#weight').val(localStorage.weight);
}
The loadSettings() function is
the opposite of the saveSettings() function; i.e., it
uses jQuery’s val() function to set the three fields of
the Settings form to the corresponding values saved in
localStorage.
Now that we have a
loadSettings() function, we need to trigger it. The most
obvious time is probably when the app launches. To make this happen, I
simply add a line to the document ready function in kilo.js:
$(document).ready(function(){
    $('#settings form').submit(saveSettings);
    loadSettings();
});
Unfortunately, loading the settings only at startup leaves a loophole that occurs if the user navigates to the Settings panel, changes some values, and taps the cancel button without submitting the form.
In this case, the newly changed values will
still be sitting there the next time the user visits the Settings
panel, even though the values were not saved. If the user closed and
reopened the app, the displayed values would revert to the saved
values because the loadSettings() function would refresh
them at startup.
There are several ways that we could rectify this situation, but I think the most appropriate is to refresh the displayed values whenever the Settings panel begins to move, either into or out of view.
Thanks to jQTouch, this is a simple matter
of binding the loadSettings() function to the
pageAnimationStart event of the Settings panel. Replace
the line you just added with the code shown in bold instead:
$(document).ready(function(){
    $('#settings form').submit(saveSettings);
    $('#settings').bind('pageAnimationStart', loadSettings);
});
The JavaScript contained in the kilo.js file now provides persistent data support for the Settings panel. When you view the code we’ve written to make this happen, there’s really not much to it. Here is everything in kilo.js so far:
var jQT = $.jQTouch({
    icon: 'kilo.png',
    statusBar: 'black'
});
$(document).ready(function(){
    $('#settings form').submit(saveSettings);
    $('#settings').bind('pageAnimationStart', loadSettings);
});
function loadSettings() {
    $('#age').val(localStorage.age);
    $('#budget').val(localStorage.budget);
    $('#weight').val(localStorage.weight);
}
function saveSettings() {
    localStorage.age = $('#age').val();
    localStorage.budget = $('#budget').val();
    localStorage.weight = $('#weight').val();
    jQT.goBack();
    return false;
}
Saving the Selected Date to sessionStorage
Ultimately, what I want to do is set up the Date panel such that when it’s displayed, it will check the database for any records entered for that date, and display them as an edge-to-edge list. This requires that the Date panel know what date was tapped on the Dates panel.
I also want to allow the user to add and delete entries from the database, so I’ll have to add support for the + button that already exists on the Date panel, and the Delete button in the Date panel entry template (more on this later).
The first step is to let the Date panel know what item was clicked in order to navigate to it from the Dates panel. With this piece of information, I can calculate the appropriate date context. To do this, I add some lines to the document ready function in kilo.js:
$(document).ready(function(){
$('#settings form').submit(saveSettings);
$('#settings').bind('pageAnimationStart', loadSettings);
$('#dates li a').click(function(){ var dayOffset = this.id;
 var date = new Date();
 date.setDate(date.getDate() - dayOffset);
sessionStorage.currentDate = date.getMonth() + 1 + '/' +
date.getDate() + '/' +
date.getFullYear();
date.setDate(date.getDate() - dayOffset);
sessionStorage.currentDate = date.getMonth() + 1 + '/' +
date.getDate() + '/' +
date.getFullYear(); refreshEntries();
 });
});
});
});-
On this line, I’m using jQuery’s
click()function to bind my own code to the click event of the links on the Dates panel.-
Here, I’m grabbing the
idof the clicked object and storing it in thedayOffsetvariable. If you recall, the links on the Dates panel haveids ranging from 0 to 5, so theidof the clicked link will correspond to the number of days needed to calculate the clicked date (0 days in the past equals today, 1 day in the past equals yesterday, 2 days in the past equals the day before yesterday, etc.).
Note
In this context, the this keyword will contain a reference to the object that was the
target of the click event.
-
On this line, I create a new JavaScript date object and store it in a variable named
date. Initially, this date will be pointed at the particular moment in time that it was created, so on the next line, I subtract thedayOffsetfrom the result of thegetDate()function, and then usesetDate()to repoint the date.-
Here, I build a MM/DD/YYYY-formatted date string and save it to
sessionStorageascurrentDate.
Note
The getMonth() method of the
date object returns values from 0–11, January being 0. Therefore, I
have to add 1 to it to generate the correct value for the formatted
string.
-
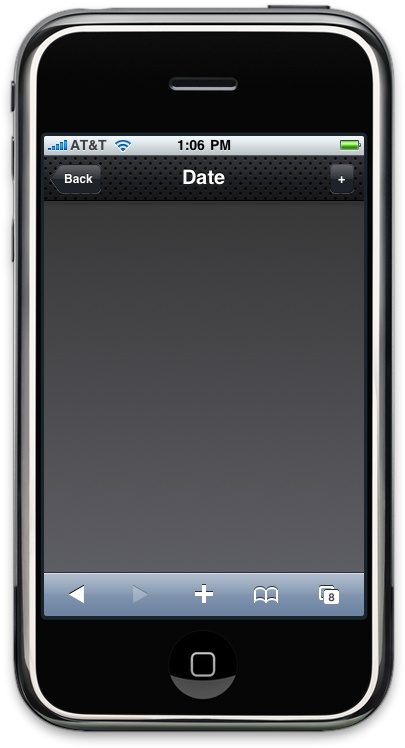
Finally, I call the
refreshEntries()function. The job of therefreshEntries()function is to update the incoming Date panel appropriately based on the date that was tapped on the Dates panel. For now, I’ll just set it up to update the toolbar title of the Dates panel with the selected date, so you can see it’s working. Without it, you’d just see the word “Date” as shown in Figure 5-1. Figure 5-2 shows therefreshEntries()function in action.
Here’s the code for the
refreshEntries() function:
function refreshEntries() {
    var currentDate = sessionStorage.currentDate;
    $('#date h1').text(currentDate);
}

Next, we’ll move on to a more powerful and complex client-side data storage method that we’ll use to store the user’s food entries on the Date panel.
Client-Side Database
Of all the exciting features of HTML5, the one that rocks my world the most is client-side database support. It allows developers to use a simple but powerful JavaScript database API to store persistent data in a relational format.
Developers can use standard SQL statements to create tables; to insert, update, select, and delete rows; and so on. The JavaScript database API even supports transactions. We’re talking about SQL here, so there is an inherent complexity. Regardless, this is a game-changing feature, so time spent getting your head around it will be well rewarded.
Creating a Database
Now that our Date panel knows what date the
user has selected, we have all the info we need to allow users to
create entries. Before we can write the createEntry function, we need to set up a
database table to store the submitted data. I’ll add some lines to
kilo.js to do so:
var db;'CREATE TABLE IF NOT EXISTS entries ' + ' (id INTEGER NOT NULL PRIMARY KEY AUTOINCREMENT, ' + ' date DATE NOT NULL, food TEXT NOT NULL, ' + ' calories INTEGER NOT NULL );' ); } ); });
-
The first thing to note is that I’ve added a variable named
dbto the global scope of the application. This variable will be used to hold a reference to the database connection once we’ve established it. I defined it in the global scope because we’re going to have to refer to it all over the place.-
On these four lines, I’m defining some
vars for theopenDatabasecall:shortNameA string that will be used to refer to the database file on disk.
versionA number that you can use to manage upgrades and backward compatibility when you need to change your database schema.
displayNameA string that will be presented to the user in the interface. For example, the display name appears in the Settings application on the iPhone in the Settings→Safari→Databases panel.
maxSizeThe maximum number of kilobytes to which you think your database will grow.
Note
Database size limits are still being implemented by browser vendors at this
time, so some trial and error while testing your application is in
order. The current default on the iPhone is 5 MB. If your database
grows beyond this limit, the user will automatically be asked to
allow or deny the size increase. If he allows the increase, the
database size limit will be upped to 10 MB. If he denies the
increase, a QUOTA_ERR error will be returned. See Table 5-1 for a list of database error
codes.
-
With my parameters set, I call
openDatabaseon this line and store the connection in thedbvariable. If the database doesn’t already exist, it will be created.Now that we have a database connection, we need to create an
entriestable if one doesn’t already exist.-
All database queries must take place in the context of a transaction, so I begin one here by calling the
transactionmethod of thedbobject. The remaining lines comprise a function that is sent to the transaction as the sole parameter.-
Here, I begin an anonymous function and pass the transaction into it. To be perfectly honest, passing the transaction into its own callback function makes no sense to me, but that’s what you have to do.
-
Once inside the function, I call the
executeSqlmethod of the transaction object to execute a standard CREATE TABLE query.
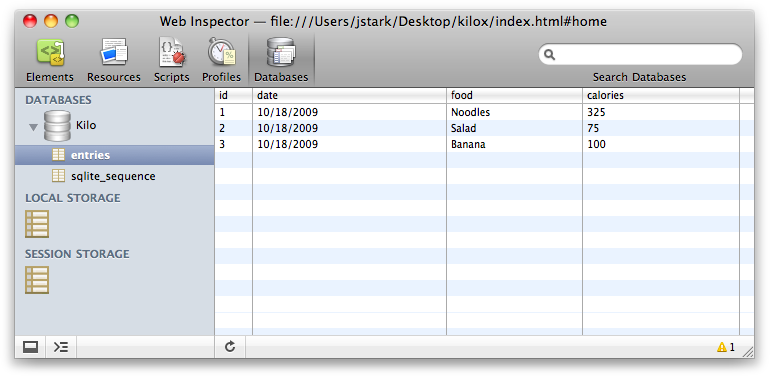
If you were to launch the app as is, it would create a database named Kilo on your iPhone. You can see this by navigating to Settings→Safari→Databases→Kilo on the iPhone. Figure 5-3 shows the database settings.

In the desktop version of Safari, you can actually view and interact with your client-side databases by navigating to Develop→Show Web Inspector, then clicking the Databases tab. (If the Develop menu is not available, go into Safari’s Preferences and enable the Develop menu on the Advanced preferences page.)
Note
The Databases tab is named Storage in WebKit. I think Storage is a more accurate name, so I wouldn’t be surprised if this change eventually shows up in Safari.
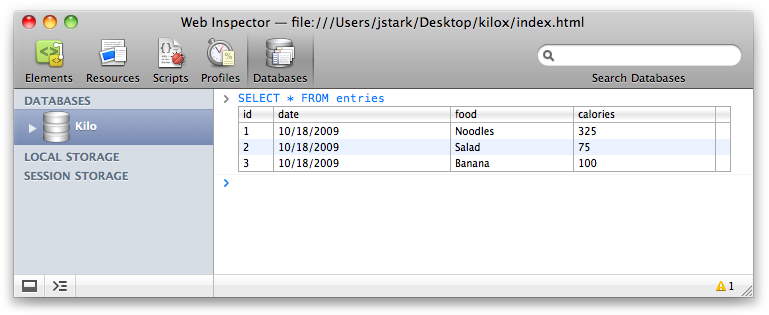
The Web Inspector included in desktop Safari is extremely helpful when debugging. By default, it appears as a pane of your current browser window. If you click the undock icon (hover over the icons at the bottom left to see what they do), Web Inspector will appear in a separate window as shown in Figure 5-4. The interface even allows you to send arbitrary SQL queries to the database by clicking on the database name (see Figure 5-5).
Inserting Rows
Now that we have a database set up to receive some
entries, we can start building the createEntry()
function. First, you have to override the submit event of the #createEntry form. You can do so by
binding the createEntry() function to the submit event in
the document ready function in kilo.js (here I just show the first few
lines, with the added line of code in bold):
$(document).ready(function(){
    $('#createEntry form').submit(createEntry);
    $('#settings form').submit(saveSettings);
    $('#settings').bind('pageAnimationStart', loadSettings);
    ...
Now when a user submits the
#createEntry form, the createEntry()
function will be called. Next, add the following to kilo.js to create the record in the
database:
function createEntry() {
    var date = sessionStorage.currentDate;
    var calories = $('#calories').val();
    var food = $('#food').val();
    db.transaction(
        function(transaction) {
            transaction.executeSql(
                'INSERT INTO entries (date, calories, food) VALUES (?, ?, ?);',
                [date, calories, food],
                function(){
                    refreshEntries();
                    jQT.goBack();
                },
                errorHandler
            );
        }
    );
    return false;
}-
I’m setting some variables that I’m going to use in the SQL query. If you recall, the date that the user tapped on the Dates panel will be stored in
sessionStorage.currentDate. The other two values (caloriesandfood) are pulled out of the data entry form using the same approach that we saw earlier with the Settings form.-
Then, I open a database transaction and run an
executeSql()call. Here I am passing four parameters to theexecuteSql()method:'INSERT INTO entries (date, calories, food) VALUES (?, ?, ?);'This is the statement that will be executed. The question marks are data placeholders.
[date, calories, food]This is an array of the values being sent to the database. They correspond by position with the data placeholder question marks in the SQL statement.
function(){refreshEntries();jQT.goBack();}This anonymous function will execute if the SQL query is successful.
errorHandlerThis is the name of the function that will execute if the SQL query fails.
Error handling
Assuming the insert is successful, the anonymous
function passed as the third parameter will be executed. It calls
the refreshEntries() function (which at the moment only
updates the title of the Date panel, but will soon cause the entries
you create to appear in the list there), and it calls jQTouch’s
goBack() function to dismiss the
New Entry panel and return to the Date panel.
If the insert is not successful, the
errorHandler() function will run. Add the following to
the kilo.js file:
function errorHandler(transaction, error) {
alert('Oops. Error was '+error.message+' (Code '+error.code+')'),
return true;
}The error handler is passed two parameters: the transaction object and the error object. Here, I’m using the error object to alert the user to the message and error code that were thrown.
Error handlers must return true or false. When an error handler returns true (i.e., “Yes, this is a fatal error”), execution is halted and the entire transaction is rolled back. When an error handler returns false (i.e., “No, this is not a fatal error”), execution will continue.
In some cases, you might want to branch based on the type of error to decide whether you should return true or false. Table 5-1 shows the current possible error codes according to the W3C Web Database working draft specification.
You may have noticed that the error
handler function accepts a transaction object in addition to the
error object. It’s conceivable that in some cases you might want to
execute a SQL statement inside of the error handler, perhaps to log
the error or record some metadata for debugging or crash reporting
purposes. The transaction object parameter allows you to make more
executeSql() calls from inside the error handler, like
so:
function errorHandler(transaction, error) {
alert('Oops. Error was '+error.message+' (Code '+error.code+')'),
transaction.executeSql('INSERT INTO errors (code, message) VALUES (?, ?);',
[error.code, error.message]);
return false;
}Please take special note of the fact that
I have to return false from the error handler if I want
my executeSql() statement to run. If I return
true (or nothing at all), the entire
transaction—including this SQL statement—will be rolled back, thereby preventing the
desired result.
Selecting Rows and Handling Result Sets
The next step is to expand the
refreshEntries() function to do more than just set the
title bar to the selected date. Specifically, I’m going to query the
database for entries on the selected date, and then append them to the
#date ul element using the hidden
entryTemplate HTML for structure. It’s been a while since
we looked at that code, so here’s the Date panel again:
<div id="date">
<div class="toolbar">
<h1>Date</h1>
<a class="button back" href="#">Back</a>
<a class="button slideup" href="#createEntry">+</a>
</div>
<ul class="edgetoedge">
<li id="entryTemplate" class="entry" style="display:none">
<span class="label">Label</span>
<span class="calories">000</span>
<span class="delete">Delete</span>
</li>
</ul>
</div>Here’s the complete
refreshEntries() function, which you must use to replace
the existing refreshEntries() function:
function refreshEntries() {
var currentDate = sessionStorage.currentDate;
$('#date h1').text(currentDate);
$('#date ul li:gt(0)').remove();
db.transaction(
function(transaction) {
transaction.executeSql(
'SELECT * FROM entries WHERE date = ? ORDER BY food;',
[currentDate],
function (transaction, result) {
for (var i=0; i < result.rows.length; i++) {
var row = result.rows.item(i); var newEntryRow = $('#entryTemplate').clone();
 newEntryRow.removeAttr('id'),
newEntryRow.removeAttr('style'),
newEntryRow.data('entryId', row.id);
newEntryRow.removeAttr('id'),
newEntryRow.removeAttr('style'),
newEntryRow.data('entryId', row.id); newEntryRow.appendTo('#date ul'),
 newEntryRow.find('.label').text(row.food);
newEntryRow.find('.calories').text(row.calories);
}
},
errorHandler
);
}
);
}
newEntryRow.find('.label').text(row.food);
newEntryRow.find('.calories').text(row.calories);
}
},
errorHandler
);
}
);
}-
These two lines set the toolbar title of the Date panel to the contents of the
currentDatevalue saved insessionStorage.-
On this line I’m using jQuery’s
gt()function (gtstands for “greater than”) to select and remove anylielements with an index greater than 0. The first time through, this will do nothing because the onlyliwill be the one with theidofentryTemplate, which has an index of 0. However, on subsequent visits to the page we need to remove any additionallis before appending rows from the database again. Otherwise, items would end up appearing multiple times in the list.-
On these three lines, I’m setting up a database transaction and the
executeSqlstatement.-
This line contains the first parameter for the
executeSqlstatement. It’s a simpleSELECTstatement with a question mark acting as a data placeholder.-
This is a single-element array that contains the currently selected date. This will replace the question mark in the SQL query. Note that quotes around the
?are not necessary—escaping and quoting of data is handled automatically.-
This anonymous function will be called in the event of a successful query. It accepts two parameters:
transactionandresult.The
transactionobject can be used within the success handler to send new queries to the database, as we saw with the error handler previously. However, there is no need to do that in this case, so we won’t be using it.The
resultobject is what we are most interested in here. It has three read-only properties:rowsAffected, which you can use to determine the number of rows affected by an insert, update, or delete query;insertId, which returns the primary key of the last row created in an insert operation; androws, which has the found records.The
rowsobject will contain 0 or morerowobjects, and also has alengthproperty that I use in theforloop on the next line.-
On this line, I use the
item()method of therowsobject to set therowvariable to the contents of the current row.-
On this line, I
clone()the templateliand remove itsidandstyleattributes on the next two lines. Removing the style will make the row visible, and removing theidis important because otherwise we would end up with multiple items on the page with the sameid.-
On this line, I store the value of the
row’sidproperty as data on theliitself (we’ll need that later if the user decides to delete the entry).-
This is where I append the
lielement to the parentul. On the next two lines, I update thelabelandcaloriesspan child elements of theliwith the corresponding data from therowobject.
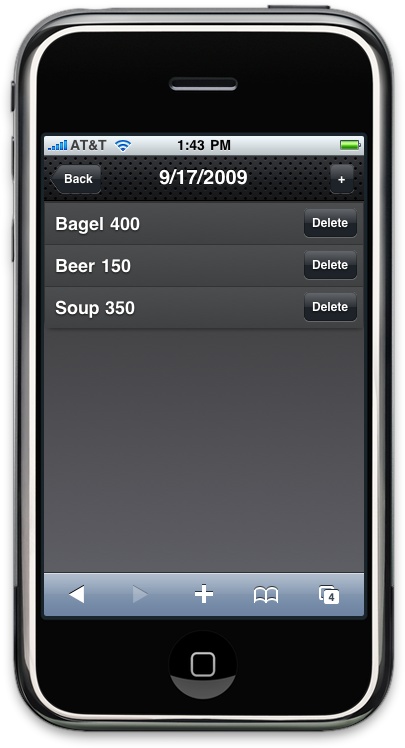
With all this out of the way, our Date
panel will display an li for each row in the database
that corresponds to the selected date. Each row will have a label,
calories, and a Delete button. Once we create a few rows, you can see
that we need to add a bit of CSS to style things up nicely (Figure 5-6).
Save the following CSS into a file named kilo.css:
#date ul li {
position: relative;
}
#date ul li span {
color: #FFFFFF;
text-shadow: rgba(0,0,0,.7) 0 1px 2px;
}
#date ul li .delete {
position: absolute;
top: 5px;
right: 6px;
font-size: 12px;
line-height: 30px;
padding: 0 3px;
border-width: 0 5px;
-webkit-border-image: url(themes/jqt/img/button.png) 0 5 0 5;
}Now, link to kilo.css by adding the following line to the head section of index.html:
<link type="text/css" rel="stylesheet" media="screen" href="kilo.css">
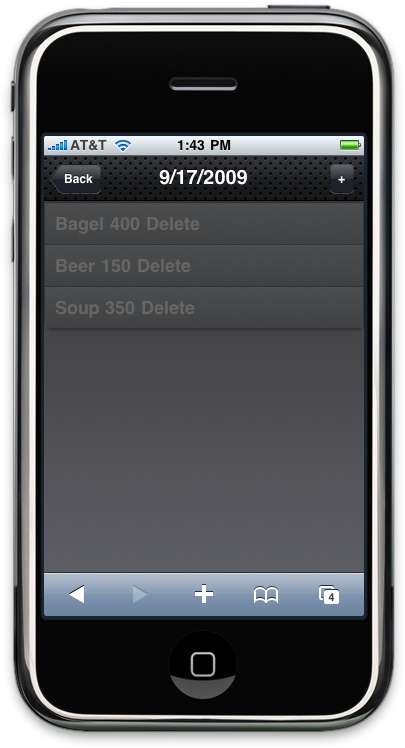
Although the Delete buttons now look like
buttons, they won’t do anything when tapped at this point (see Figure 5-7). This is because I set them up
using the span tag, which is not an interactive element
in an HTML page.
Deleting Rows
To make my Delete buttons do something when clicked, I
need to bind a click event handler to them with jQuery. I did the same
sort of thing earlier with the items on the Dates panel using jQuery’s
click() method.
Unfortunately, that approach won’t work in this case. Unlike the items on the Dates panel, the entries on the Date panel are not static—they are added and removed throughout the course of the user’s session. In fact, when the application launches, there are no entries visible on the Date panel at all. Therefore, we have nothing to bind the click to at launch.
The solution is to bind click events to the
Delete buttons as they are created by the
refreshEntries() function. To do so, add the following to
the end of the for loop:
newEntryRow.find('.delete').click(function(){
var clickedEntry = $(this).parent();
var clickedEntryId = clickedEntry.data('entryId'),
deleteEntryById(clickedEntryId);
clickedEntry.slideUp();
});-
The function begins by specifying that we are looking for any elements that match the
#date .deleteselector, and calling theclick()method on those elements. Theclick()method accepts the anonymous function that will be used to handle the event as its only parameter.-
When the click handler is triggered, the parent of the Delete button (i.e., the
li) is located and stored in theclickedEntryvariable.-
On this line, I’m setting the
clickedEntryIdvariable to the value of theentryIdI stored on thelielement when it was created by therefreshEntries()function.-
On this line, I pass the clicked
idinto thedeleteEntryById()function, and then on the next line, I use jQuery’sslideUp()method to gracefully remove thelifrom the page.
Note
JavaScript gurus in the crowd might
wonder why I didn’t use jQuery’s live() function to
bind the delete handler to the Delete buttons. Unfortunately, the
live() function doesn’t work with click on
the iPhone because click isn’t the event that bubbles
up the DOM. For more information on jQuery’s live()
function, please visit http://docs.jquery.com/Events/live#typefn.
Add the following
deleteEntryById() function to kilo.js to remove the entry from the
database:
function deleteEntryById(id) {
db.transaction(
function(transaction) {
transaction.executeSql('DELETE FROM entries WHERE id=?;',
[id], null, errorHandler);
}
);
}As we’ve seen in previous examples, I open
a transaction, pass it a callback function with the transaction object
as the parameter, and call the executeSql() method. I’m
passing in the SQL query and the id
of the clicked record as the first two arguments. The third argument
is where the success handler would go, but I don’t need one, so I just
specify null. As the fourth
argument, I specify the same default error handler that we’ve been
using all along.
And there you have it. It may have taken a lot of description to get to this point, but in reality we haven’t had to write all that much code. In fact, the completed kilo.js file (Example 5-1) only contains 108 lines of JavaScript.
var jQT = $.jQTouch({
icon: 'kilo.png',
statusBar: 'black'
});
var db;
$(document).ready(function(){
$('#createEntry form').submit(createEntry);
$('#settings form').submit(saveSettings);
$('#settings').bind('pageAnimationStart', loadSettings);
$('#dates li a').click(function(){
var dayOffset = this.id;
var date = new Date();
date.setDate(date.getDate() - dayOffset);
sessionStorage.currentDate = date.getMonth() + 1 + '/' +
date.getDate() + '/' +
date.getFullYear();
refreshEntries();
});
var shortName = 'Kilo';
var version = '1.0';
var displayName = 'Kilo';
var maxSize = 65536;
db = openDatabase(shortName, version, displayName, maxSize);
db.transaction(
function(transaction) {
transaction.executeSql(
'CREATE TABLE IF NOT EXISTS entries ' +
' (id INTEGER NOT NULL PRIMARY KEY AUTOINCREMENT, ' +
' date DATE NOT NULL, food TEXT NOT NULL, ' +
' calories INTEGER NOT NULL);'
);
}
);
});
function loadSettings() {
$('#age').val(localStorage.age);
$('#budget').val(localStorage.budget);
$('#weight').val(localStorage.weight);
}
function saveSettings() {
localStorage.age = $('#age').val();
localStorage.budget = $('#budget').val();
localStorage.weight = $('#weight').val();
jQT.goBack();
return false;
}
function createEntry() {
var date = sessionStorage.currentDate;
var calories = $('#calories').val();
var food = $('#food').val();
db.transaction(
function(transaction) {
transaction.executeSql(
'INSERT INTO entries (date, calories, food) VALUES (?, ?, ?);',
[date, calories, food],
function(){
refreshEntries();
jQT.goBack();
},
errorHandler
);
}
);
return false;
}
function refreshEntries() {
var currentDate = sessionStorage.currentDate;
$('#date h1').text(currentDate);
$('#date ul li:gt(0)').remove();
db.transaction(
function(transaction) {
transaction.executeSql(
'SELECT * FROM entries WHERE date = ? ORDER BY food;',
[currentDate],
function (transaction, result) {
for (var i=0; i < result.rows.length; i++) {
var row = result.rows.item(i);
var newEntryRow = $('#entryTemplate').clone();
newEntryRow.removeAttr('id'),
newEntryRow.removeAttr('style'),
newEntryRow.data('entryId', row.id);
newEntryRow.appendTo('#date ul'),
newEntryRow.find('.label').text(row.food);
newEntryRow.find('.calories').text(row.calories);
newEntryRow.find('.delete').click(function(){
var clickedEntry = $(this).parent();
var clickedEntryId = clickedEntry.data('entryId'),
deleteEntryById(clickedEntryId);
clickedEntry.slideUp();
});
}
},
errorHandler
);
}
);
}
function deleteEntryById(id) {
db.transaction(
function(transaction) {
transaction.executeSql('DELETE FROM entries WHERE id=?;',
[id], null, errorHandler);
}
);
}
function errorHandler(transaction, error) {
    alert('Oops. Error was '+error.message+' (Code '+error.code+')'),
    return true;
}What You’ve Learned
In this chapter, you learned two ways to store user data on the client: key/value storage, and the client-side SQL database. The client-side database in particular opens up a world of possibilities for web-based application developers.
The only thing stopping us from running this example application in offline mode is that we have to initially connect to the web server each time the app is launched to download the HTML and related resources. Wouldn’t it be schweet if we could just cache all that stuff locally on the device?